Becom BE-ART Series User manual

BE-ART SERIES
TWIN ARM KNEADING MACHINE
INSTALLATION & OPERATION MANUAL
Customer Service
Phone: (360) 255-7467
Phone: (888) 869-5737
Website: www.becomsales.com
Corporate Headquarters
5500 Olympic Dr
STE H 105 - PMB 117
Gig Harbor, WA 98335
Phone: (360) 255-7467
Fax: (253) 276-0244
Warehouse
409 West Cooper St
Tipton, MO 65081
Phone: (360) 255-7467
Fax: (253) 276-0244

© BEcom Sales (2020-02) BE-ART Page 1
BEFORE USING THIS MACHINE, READ THE INSTRUCTION MANUAL CAREFULLY
Table of contents
1. General information
1.1. Behavior
1.2. Caution
2. General points
2.1. Machine identification
2.2. Warning labels
2.3. Safeguards
2.4. Qualified personnel
2.5. Correct use
2.6. Residual risks
2.7. Machine guarantee
3. Installation
3.1. Lifting the machine
3.2. Reception
3.3. Electrical connection
3.4. Starting for the first time
4. Technical specifications
4.1. Machine specifications
4.2. Power specifications
5. Machine description
5.1. Machine structure
5.2. Intended use
5.3. Unintended use
6. Safe and correct use
6.1. Protection system
6.2. Safety devices
6.3. Controls
7. Cleaning the machine
8. Scrapping
8.1. Disabling the machine
8.2. Disabling procedure
8.3. Scrapping the machine

© BEcom Sales (2020-02) BE-ART Page 2
1. General information
The BE-ART Series twin arm kneading machines mix dough by simulating the movement of human hands,
creating a perfectly oxygenated product without heating the dough. The kneading, lifting, stretching, and pulling
process is perfect for gluten development and provides maximum water absorption. These machines are
designed to knead soft dough (90% hydration) up to medium-firm dough (50% minimum hydration) and the
rapid leavening process produces a light and well-leavened product. A graduated knob adjusts arm strokes from
30 RPM to 70 RPM and a timer is used for consistent cycle times between speed 1 and speed 2. The BE-ART
Series machines and are great for bakery, confectionary, and pizzeria facilities.
1.1 Behavior
Having a good knowledge of the instructions in this manual is important for drawing maximum profit from
machine use and is essential for your safety. Each operator must read and understand the whole user and
maintenance manual before starting to use this machine.
If any part of this manual is not clear, immediately contact the manufacturer before starting to use the machine.
If you have any problems with machine operation, contact the manufacturer directly and quickly: a staff of
technicians is available for any problems regarding operation and production. Specify the model and serial
number in each communication that refers to this machine.
1.2 Caution
-Do not use the machine if under the influence of alcohol, drugs or medicines that can alter your physical
condition.
-Keep hair and other body parts away from the rotating pieces, belts and gears
-Keep the danger and safety information signs clean and in order.
2. General points
2.1 Machine identification
Information about the machine can be found on the serial number plate.

© BEcom Sales (2020-02) BE-ART Page 3
2.2 Warning labels
Labels that signal special operations that are dangerous or forbidden.
2.3 Safeguards
Definition: Safeguards are any safety measures which involve the application of specific technical mechanisms
(guards, safety devices) to protect people from dangers which cannot be made sufficiently harmless through
design.
2.4 Qualified personnel
The normal preparation that a baker or cake maker has is necessary for using this machine.
2.5 Correct use
The machine can only be used by qualified staff and must not be placed in areas that are open to everyone. The
machine can only be used to work bread and cake products.
2.6 Residual risks
The machine was designed in compliance with the safety regulations given in EC Directives. Using the machine in
situations and in manners that are different from those programmed by the manufacturer can create risks that
cannot be expected or quantified. In particular, the user MUST NOT tamper with the devices and mechanical
organs, modify the internal and external structure of the machine, loosen or tighten bolts and screws.
2.7 Machine guarantee
The Manufacturer guarantees that the machines are new and as such free from material and/or production
defects.
The guarantee remains valid for 12 (twelve) months from the delivery date, excluding the electrical parts.
The guarantee only covers the replacement of parts, therefore it does not cover any kind of accessory costs for
services, assistance, extra material, food and accommodation of the technicians, which must be paid fully by the
end client. Requests for part replacement must reach the company in writing.
The replaced material must be returned within and no later than 15 days, and net of transport costs. An invoice
will be issued for any replaced parts that are not returned within the indicated period.
© BEcom Sales (2020-02) BE-ART Page 4
When the faulty parts are checked, if it is found that the breakage cannot be traced back to the company but to
scarce maintenance or incorrect use by the client, a regular sales invoice will be issued for the returned parts.
The guarantee will not be applied if the client delays payment.
The guarantee does not cover any faults and/or damage caused during transport, and/or by incorrect
installation, negligence or incorrect machinery use, and/or if the parts have been tampered with, repaired or
modified without obtaining the written authorization of the manufacturer and, in any case, for causes not
related to same.
3. Installation
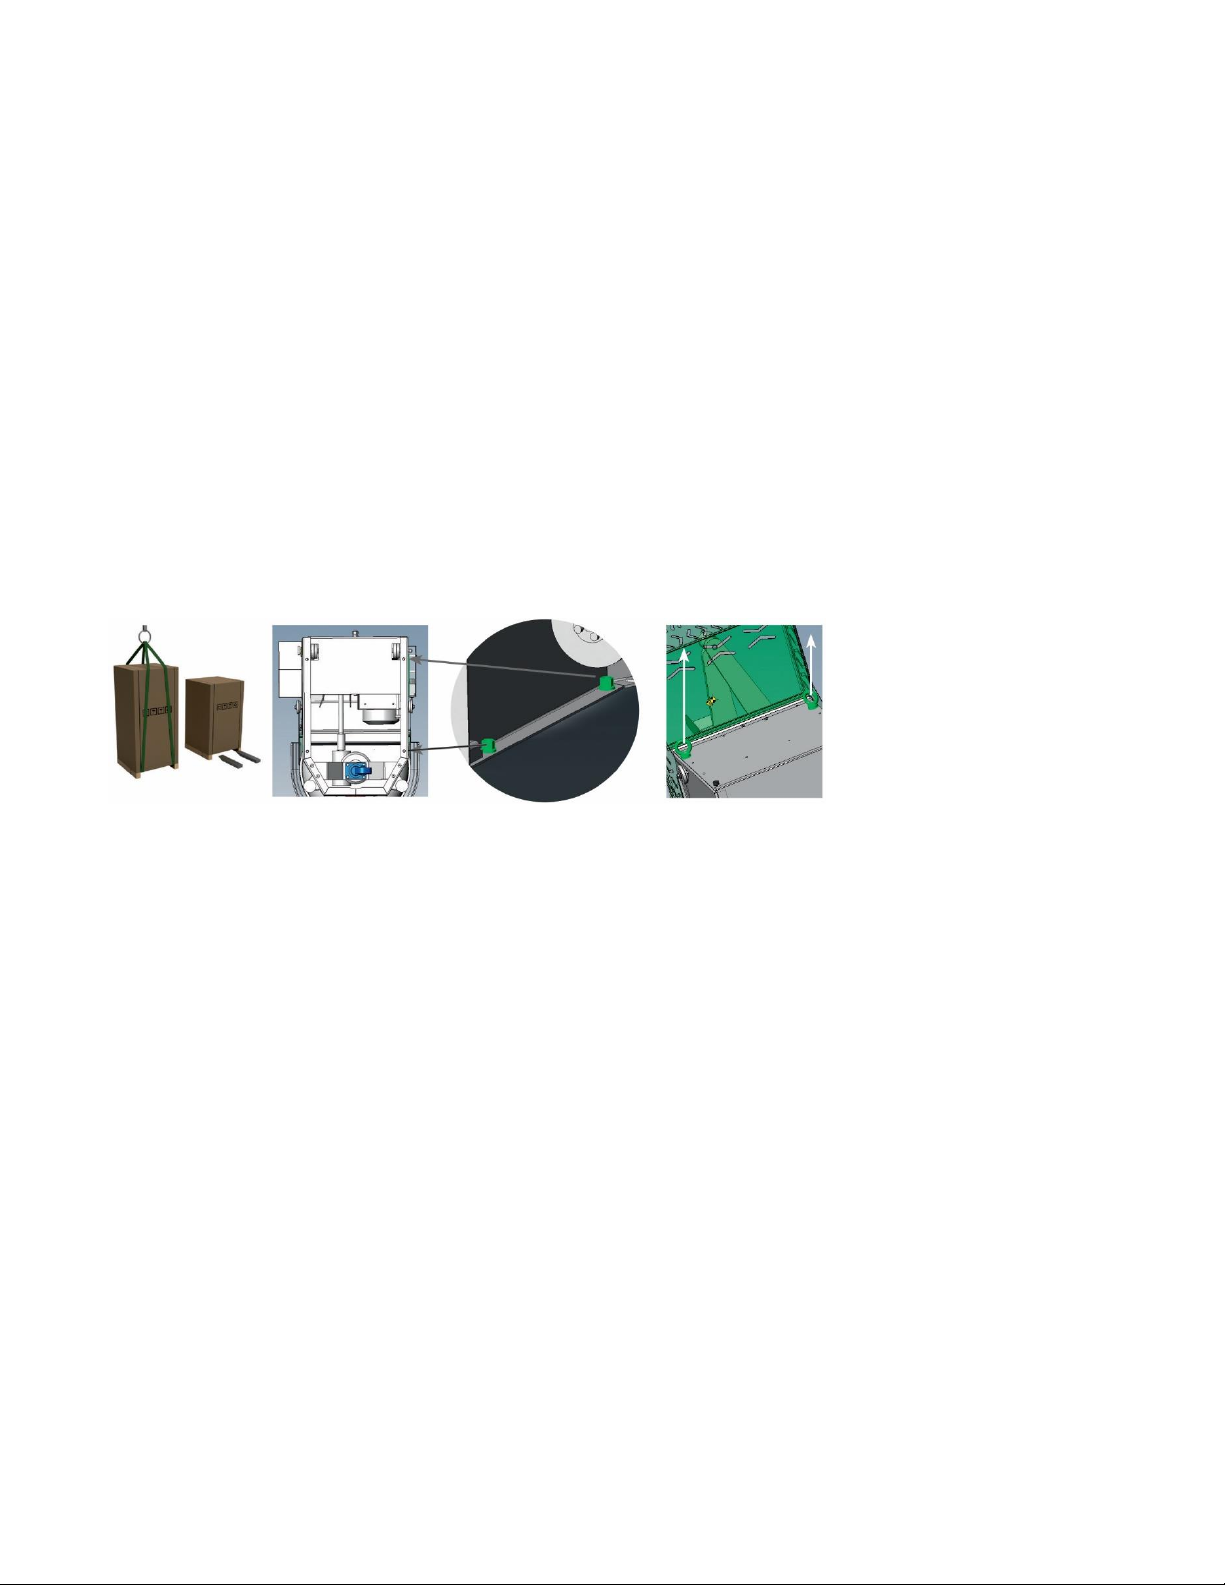
3.1 Lifting the machine
The machine can be sent packed on a pallet and wrapped in carton. The machine, if packed in this manner, can
be lifted using a forklift truck or a transpallet; thread the forks into the relative spaces below the packaging
itself. The machine can also be lifted using a crane, by passing the cables or strips under the packaging. In this
case respect the maximum tension angle of the cables, which must be 45°.
NOTE: The machine can only be lifted by qualified experts.
3.2 Reception
Remove the packaging and make sure no damage has been done. Free the machine from the blocks on the base.
If you find any damage, immediately inform the carrier.
3.3 Electrical connection
Make sure the mains have the same voltage as that indicated on the machine data plate. The power supply must
be connected using a disconnecting switch with a capacity that is suitable fore the machine power
requirements, with a three-phase (3 phases + earth) or single-phase plug. Connect to the power panel plants.
Before powering the machine, make sure the contacts were not loosened during transport. The connections
must be made in compliance with local laws in force.
3.4 Starting for the first time
Check the general conditions of the machine. Our technical assistance office must be informed immediately of
any faults or breakages caused during transport. When the machine has been prepared, make sure its voltage
corresponds with that of the supply network. When connected correctly, make sure the motor rotates in the
correct direction. If it does not, invert the polarities.
BEWARE: Any fault caused to the machine because of incorrect movements or tampering caused during the
period covered by the guarantee can compromise guarantee validity.

© BEcom Sales (2020-02) BE-ART Page 5
4. Technical specifications
4.1 Machine specifications
Standard carton pallet
BE-ART-40 - 739 lbs
BE-ART-50 - 745 lbs
BE-ART-60 - 750 lbs
31.5" x 45.25" x 65" tall
Wooden crate on request
BE-ART-40 - 838 lbs
BE-ART-50 - 842 lbs
BE-ART-60 - 849 lbs
34" x 48" x 66" tall

© BEcom Sales (2020-02) BE-ART Page 6
4.1 Power specifications
Voltage impulses
Must not last longer than 1.5 ms with an up/down time of between 500 ns and 500 μs and a peak value of no
higher than 200% of the effective value of the nominal power supply voltage.
Interruptions in the voltage
The power supply must not be interrupted or the voltage must not go to zero for more than 3 ms and no matter
what instant of the power supply wave. More than 1 s must pass between two subsequent interruptions.
Voltage dips
Voltage dips must not exceed 20% of the peak voltage of the power supply for more than one cycle. More than 1
s must pass between two subsequent dips.
Voltage
400 ±10% V three-phase
220 ±10% V single-phase
Frequency
50/60 ±1% Hz
Electric motor power
1,5 Cv.
Electric power supply tolerance
Voltage
Voltage at running speed: ±10% the nominal voltage.
Frequency
±1% the nominal frequency in continuous.
±2% the nominal frequency for a short period.

© BEcom Sales (2020-02) BE-ART Page 7
5. Machine description
5.1 Machine structure
The machine consists of the following main parts:
1. Mixing tank
2. Kneading arms
3. EC standard safety protection
4. Operation controls
5. Upper transmission guard cover
6. Machine unit
7. Main ON/OFF switch
8. Electric system guard cover
9. Lower transmission guard cover
10. Rear transmission guard cover
11. Pair of front feet used to stabilize the machine
5. 2 Intended use
-This machine is designed and produced specifically to mix oven cooked products.
-The machine is designed and produced to operate in closed environments that are protected from
atmospheric agents.
-The machine is powered by electricity, which is converted into mechanical energy for the intended uses.
5.3 Unintended use
-Using the machine in an explosive atmosphere.
-Using the machine in a flammable atmosphere.
-Using jets of water to washing the machine area where the control equipment is located.
6. Safe and correct use
6.1 Protection system
Fixed and mobile shields
All the drive units are protected by a casing
(A), fastened as indicated by the EN 953
Directive. The mixing area is protected and
cannot be accessed by the operator with the
machine running, thanks to an EC standard
protection grid (B).
6.2 Safety devices
Emergency stop
The machine is equipped with an emergency STOP button (C), located on the machine console, which allows the
operator to stop the machine in emergency cases. In addition, there is a rapid stop system (micro - D) installed
inside the protection grid rotation system, which instantly blocks the rotation of the moving parts when the grid
is raised.
© BEcom Sales (2020-02) BE-ART Page 8
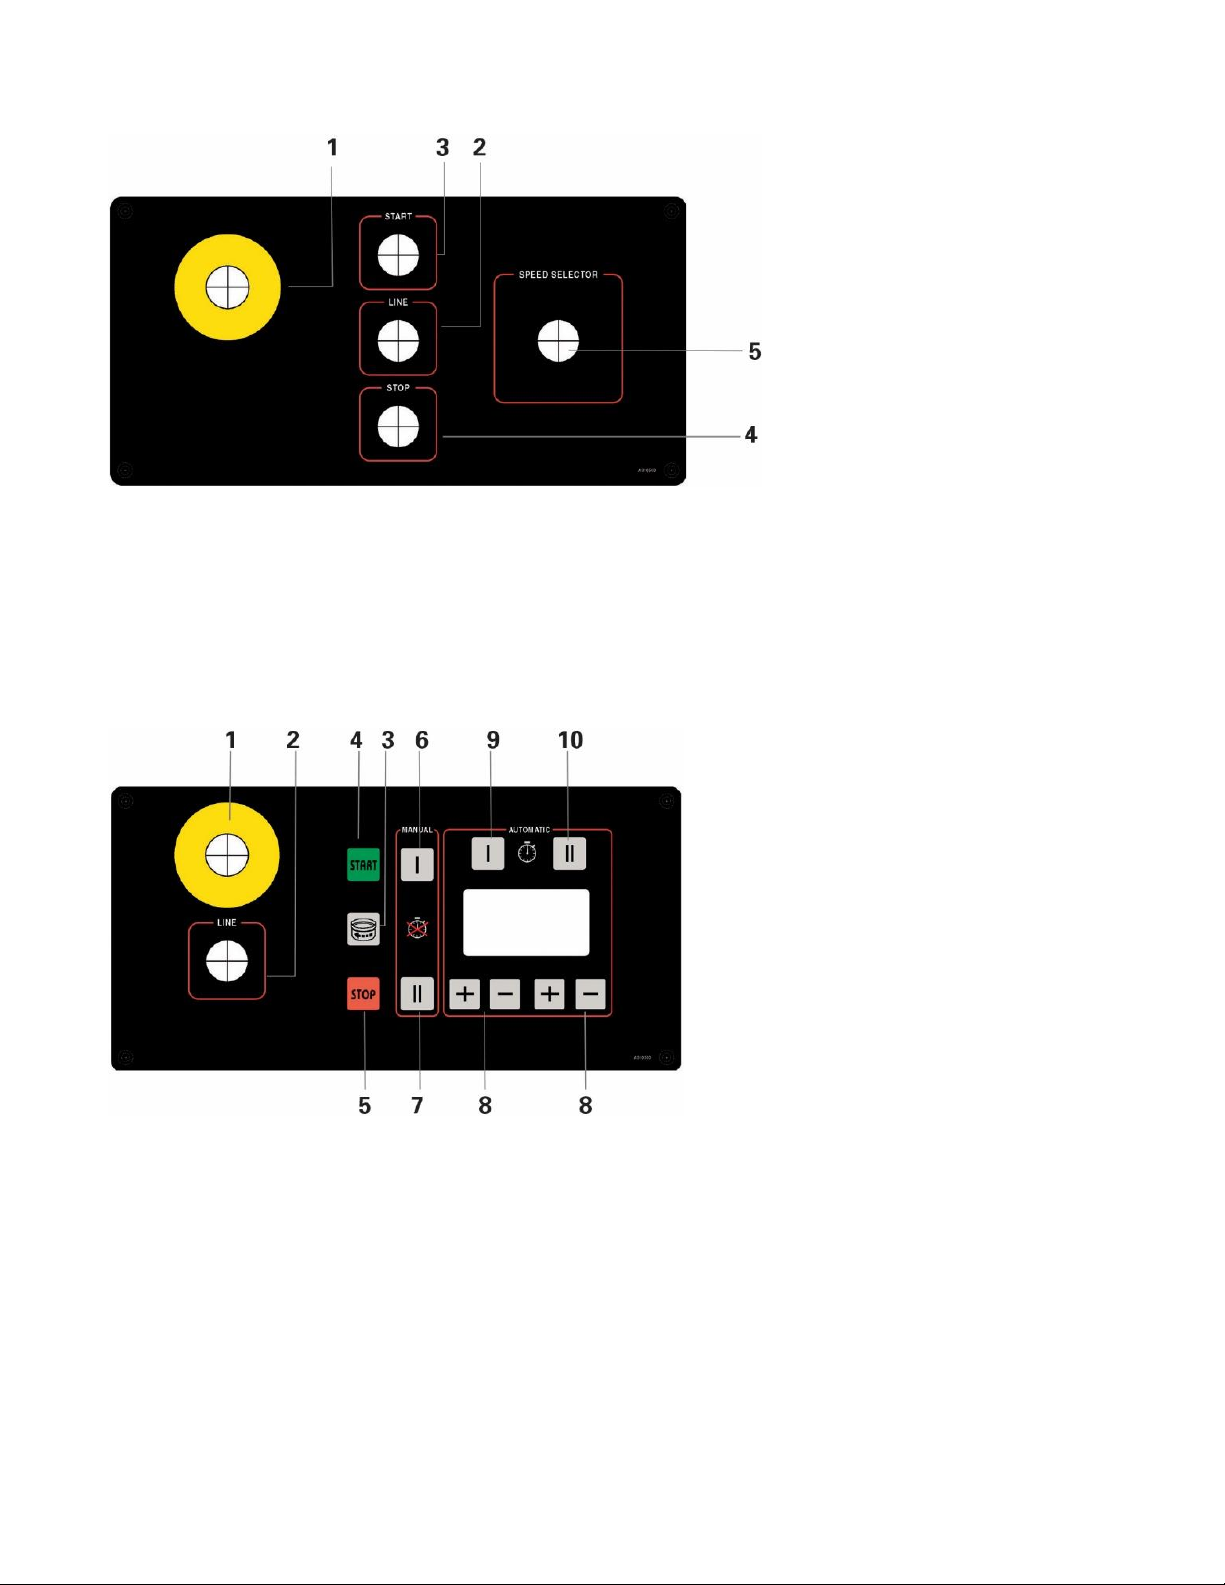
6.3 Controls
MANUAL
1. Red emergency stop button with a yellow background
2. Line LED - current presence
3. START button
4. STOP button
5. Manual speed selector
DIGITAL
1. Red emergency stop button with a yellow background
2. Line LED - electricity presence
3. Pulse tank rotation in the normal direction
4. START button
5. STOP button
6. Set speed 1 in manual mode
7. Set speed 2 in manual mode
8. Automatic cycle timers
9. Set speed 1 in automatic mode
10. Set speed 2 in automatic mode
© BEcom Sales (2020-02) BE-ART Page 9
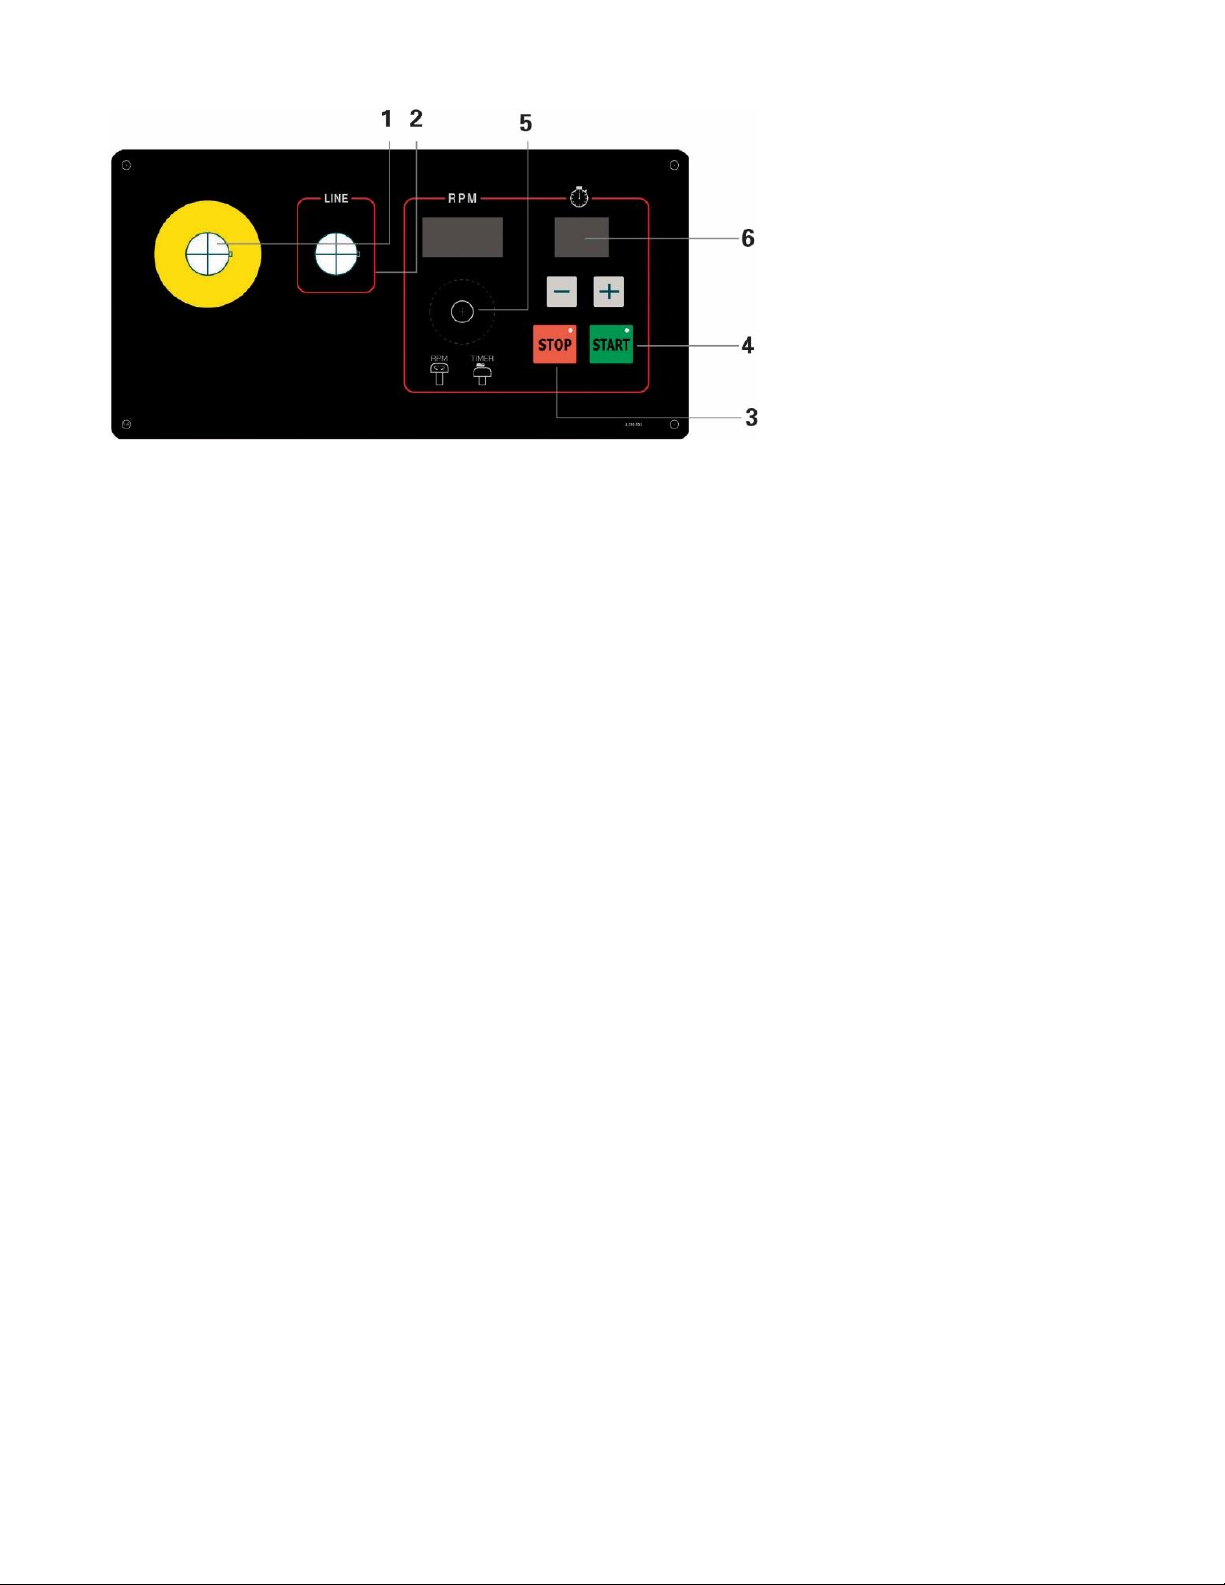
INV
1. Red emergency stop button with a yellow background
2. 2 Line LED - current presence
3. START button
4. STOP button
5. Potentiometer / inverter
6. Automatic cycle timer set (press knob 5 to access)
7. Cleaning the machine
All those operations that can be carried out by the user are classified as routine maintenance. They include
cleaning, and also periodic and preventive inspections that guarantee safe machine operation.
NOTE: The following operations can be carried out by those who use the machine during a normal working
cycle.
BEWARE: Always switch the machine off before starting to clean it.
Periodically clean the machine in a general manner in order to keep it operating well. In particular:
-The machine must be cleaned at the end of every production shift.
-If the machine is cleaned, all its more delicate parts remain efficient and it becomes easier to note
possible irregularly slack parts or irregular wear.

© BEcom Sales (2020-02) BE-ART Page 10
8. Scrapping
8.1 Disabling the machine
Once the technical and operational life of the machine has been reached, it must be disabled. Decommissioning
it and placing it in a condition where it can no longer be used for the purposes it was designed and produced for
must, however, make it possible to recycle the raw materials used to produce it.
8.2 Disabling procedure
1. Switch the machine off.
2. Disconnect the energy supplies. Disconnect the power supply cable from the terminal board of the
power panel.
3. Dismantle the following parts:
a. Electrical parts.
b. Non metallic parts and components
8.3 Scrapping the machine
In compliance with Art. 13 of Italian legislative decree no. 151 of 25 July 2005 entitled
“Application of Directives 2002/95/EC, 2002/96/EC and 2003/108/EC regarding
restriction of the use of dangerous substances in electric and electronic equipment, and
also waste disposal”. The crossed out wheelie bin symbol on the apparatus or its
packaging indicates that when it reaches the end of its useful life, the product must be
disposed of separately from other waste. When being disposed of, the machine must be
separated into its different materials and given to authorized disposal structures.
This manual suits for next models
3
Table of contents
Popular Kitchen Appliance manuals by other brands

BIRO
BIRO B300m Installation - use - maintenance

Pizzacraft
Pizzacraft PizzaQue instructions

Keimling
Keimling Soyabella SB-130 Operation manual

Josoo Electric Appliance
Josoo Electric Appliance ZS-A200X instruction manual

Princess
Princess 2929993 Instructions for use

Roller Grill
Roller Grill 901 G Instructions for use and installation


Zelmer
Zelmer Alexis Young user manual

Viking
Viking V36SO Series Installation, operation & owners guide

Caterlite
Caterlite CS939 instruction manual

Amica
Amica WCF2V60B38.1 operating instructions

Roller Grill
Roller Grill PZ 430 D Instructions for use and installation

Dick
Dick RS-75 installation instructions