Becx Machines HS131HR User manual

Hedge trimmer
Type: HS131 HR
Version: 1
July 2019
Hedge Cutter
HS131HR
User-Manual

Hedge trimmer
Type: HS131HR
Version: 1
juli 2019
Page 2 of 35
Manufacturer Becx Machines B.V.
De Sonman 35
5066 GJ Moergestel
Tel: +31 (0) 13 2070760
http://www.becxmachines.coml
© Copyright 2017
Nothing in this publication may be reproduced and/or made public in any form by print, photocopy,
microfilm, recording tape, electronically or by any other means without prior written permission
from Becx Machines B.V.
Becx Machines B.V. reserves the right to modify parts of the system, including the contents of this
manual, at any moment, without prior or direct notification to the buyer.
Although Becx Machines B.V. has taken the greatest care to make sure that individual parts have
been described correctly and in full where necessary, it accepts no liability for damage as a result of
inaccuracies or incompleteness of this manual.

Hedge trimmer
Type: HS131HR
Version: 1
juli 2019
Page 3 of 35
Preface
The Becx hedge trimmer has been specially developed to cut hedges safely and efficiently.
Each cutting head is equipped with a double row of cutter blades, enabling extra fine cutting.
Combined with the five-sided protection, this prevents danger from flailing branches. The hedge
trimmer is designed in such a way that it will continue to function in the most demanding situations
and will continue to work for a long time. Each cutter head is therefore equipped with its own
hydraulic motor. The shafts and the bearings are of an extra heavy-duty construction.
Read this manual carefully before you start to use the hedge trimmer.
Always follow the safety instructions set out in chapter 2.
One copy of this manual must be kept with hedge trimmer and must
be available to the user. All important servicing sessions and any
comments must be recorded and retained by the servicing company.
The user is responsible for selecting a suitable tool carrier for the
hedge trimmer and for ensuring that the hedge trimmer is properly
attached and connected.

Hedge trimmer
Type: HS131HR
Version: 1
juli 2019
Page 4 of 35
Table of contents
PREFACE ...................................................................................................................................... 3
TABLE OF CONTENTS .................................................................................................................... 4
CERTIFICATE OF CONFORMITY (IIA) (COPY) ................................................................................... 5
LIST OF SYMBOLS ......................................................................................................................... 6
1) TECHNICAL DATA...................................................................................................................... 7
2) SAFETY..................................................................................................................................... 8
2.1 GENERAL .............................................................................................................................. 8
2.2 IN USE ................................................................................................................................. 8
2.3 OPERATING PERSONNEL ........................................................................................................... 9
2.4 CAUTION SYMBOLS ON MACHINE ............................................................................................. 10
3) COMPONENT DESCRIPTION .................................................................................................... 11
3.1 MECHANICAL COMPONENTS.................................................................................................... 12
3.2HYDRAULIC COMPONENTS ...................................................................................................... 14
3.3 HYDRAULIC SCHEME .............................................................................................................. 15
4) OPERATION............................................................................................................................ 15
4.1 ASSEMBLY AND ADJUSTMENT OF THE HEDGE TRIMMER................................................................... 16
4.1 CARRYING OUT TRIMMING OPERATIONS ..................................................................................... 18
4.3 STORAGE............................................................................................................................ 22
5) MAINTENANCE................................................................................................................. 23
5.1 REPLACING AND/OR SHARPENING THE CUTTER BLADES. ................................................................. 24
5.2 TORQUE ............................................................................................................................. 29
6) FAILURE ANALYSIS............................................................................................................ 30
7) REMOVAL ........................................................................................................................ 31
8) LOGBOOK......................................................................................................................... 32

Hedge trimmer
Type: HS131HR
Version: 1
juli 2019
Page 5 of 35
Certificate of conformity (IIa) (copy)
We:
Becx Machines B.V.
De Sonman 35
5066 GJ Moergestel
declare entirely under our sole responsibility, that this product:
Description : Becx Hedge Trimmer.
Type : HS131HR
Serial number : .....................
to which this declaration applies, complies with the provisions of the Directives:
Machinery Directive 2006/42/EG
Complies with the following standards:
NEN-EN-12100 Safety of machinery. Basic definitions, general design principles.
NEN-EN 4413 Hysraulics –Safety requirements for hydraulic and
pneumatic systems and their components: Hydraulics
NEN-ISO 4254-1 Agricultural machinery - Safety - Part 1: General requirements
NEN-EN 982 Safety of machinery. Safety requirements for fluid power systems
and their components. Hydraulics
Director; Erwin Hommen
The Netherlands, Moergestel,
Date: .........................
Hedge trimmer
Type: HS131HR
Version: 1
juli 2019
Page 6 of 35
List of symbols
This manual uses the following symbols for all actions and situations where the safety of the operator
or technician is at stake and where it is necessary to act with caution:
Warning!
Explanation.

Hedge trimmer
Type: HS131HR
Version: 1
juli 2019
Page 7 of 35
1) Technical data
Description
Value
Unit
General
Noise pressure
See tool carrier
dB(A)
Vibration level in normal use
n.a.
Cutting capacity
30
mm
Needed power
10
Kw
Dimensions and weights
Width
1415
mm
Length
1076
mm
Height
452
m
Own weight
154
kg
attachment information
Standard attachment tube
80*80
mm
Available mounting width
325
mm
Force on attachment point (see Figure 8)
1550
N
Hanging moment (see Figure 8)
492
Nm
Connection data
Maximum operating pressure
180
bar
Maximum revolutions
2500
-/min
Maximum Oil flow (at 2500 rev/min)
45
L/min
Pressure line attachment: with rapid flat seal attachment
1/2”
Return line connection: with rapid flat seal attachment
1/2”
Drain line connection: with rapid flat seal attachment
3/8”
Maximum pressure on drain line
non-pressurized
bar
Hydraulic oil filtering requirements
10
microns
Oil for the drive
HV-46 or equivalent
Grease for greasing cutting heads
NLGI 2
Figure 1: Dimensions

Hedge trimmer
Type: HS131HR
Version: 1
juli 2019
Page 8 of 35
2) Safety
2.1 General
No modifications must be made to the hedge trimmer.
Only cutting blades that comply with the supplier's specifications must be
installed.
You are at risk of being cut by the sharp knife edges when you work on the
cutter blades.
The user is responsible for making sure that the correct tool carrier and lifting
arm are used (see chapter 0:1). The following are important points in this
regard:
The maximum pressure and number of revolutions (oil flow) must not be
exceeded. Excess pressure and excess revving can damage the machine and
cause injury.
The lifting arm and tool carrier must be strong and stable enough to absorb the
forces and moments exerted by the hedge trimmer safely and under all
circumstances.
2.2 In use
Consult the tool carrier manual for the noise rating. Because this is
considerably louder than the hedge trimmer itself, the noise load of the tool
carrier determines the rating.
The machinery must only be used for the activities for which it is designed.
The trimmer is not suitable for trimming with ground contact. The design of
the hedge trimmer means that there is too great a risk that the cutter blades
will touch the ground and/or obstacles.
The hedgecutter is built for cutting hedges and groundcover plantation and
must not be used for any other purposes such as cutting grass or road-sides.
Persons or animals who are present in or who approach the danger zone must
be stopped immediately and the hedge trimmer must be switched off (see
4.1). This also applies to situations where the hedge trimmer is switched on
after maintenance to make sure it operates correctly.
If passers-by disrupt the trimming work too much, the operator can consider
temporarily cordoning off the site.
The work-place should be secured when the operator’s sight is diminished by
a high or dense hedge.
If the hedge trimmer starts to make a different sound and/or starts to vibrate,
work must stop immediately and the hedge trimmer has to be switched off
(see 4.1). Work can only continue after the source of the noise has been
identified and resolved.

Hedge trimmer
Type: HS131HR
Version: 1
juli 2019
Page 9 of 35
If no trimming work is being done, always switch off the hedge trimmer. This
includes when you are driving to the work site. The risk of coming into contact
with passers-by is greater at these times than during trimming. There is no
hedge present to act as a protective shield in these situations and it is more
difficult for bystanders and passers-by to judge the route you are taking.
Objects that are flung out can travel a greater distance when there is no
hedge to stop them.
Always complete inspection and maintenance jobs.
The machinery must not be used for any other purposes during inspection and
maintenance.
The hydraulic feed to the hedge trimmer must be disconnected during
inspection, maintenance or cleaning to prevent accidental operation.
Always comply with local work regulations and safety rules.
If the machinery is used in the dark, use sufficient lighting (approx. 50 lux at
the work site).
Trimming operations must stop immediately if there is any possibility that
people and animals could enter the danger zone. (see 4.1)
Switch machinery on and off at a low revolution speed to prevent damage.
Depending on the tool carrier used, this means that the machine is running
stationary or at minimum flow.
2.3 Operating personnel
Operating personnel must be over 18.
Only persons who have received permission from the owner are allowed to
operate the system.
Persons must only carry out jobs for which they are trained. This applies to
both maintenance work and normal operations.
Personnel who operate equipment must be familiar with all possible
situations that could arise.
The owner or person in charge must be told if personnel operating machinery
identify faults or hazards or do not agree with safety measures.

Hedge trimmer
Type: HS131HR
Version: 1
juli 2019
Page 10 of 35
2.4 Caution Symbols on machine
1.
Cut-off danger
2.
Read manual before operation.
3.
See securing workzone (4.2)

Hedge trimmer
Type: HS131HR
Version: 1
juli 2019
Page 11 of 35
3) Component description
Figure 2: General photo
Figure
Part
Explanation
1
lifting arm
The lifting arm is not supplied. The user is responsible for
using a lifting arm that is suitable for the hedge trimmer.
2
Hedge trimmer
The hedge trimmer can be used horizontally, vertically and at
all intermediate angles.
3
tool carrier
The tool carrier is not supplied. The user is responsible for
using a tool carrier that is suitable for the hedge trimmer.
2
1
3

Hedge trimmer
Type: HS131HR
Version: 1
juli 2019
Page 12 of 35
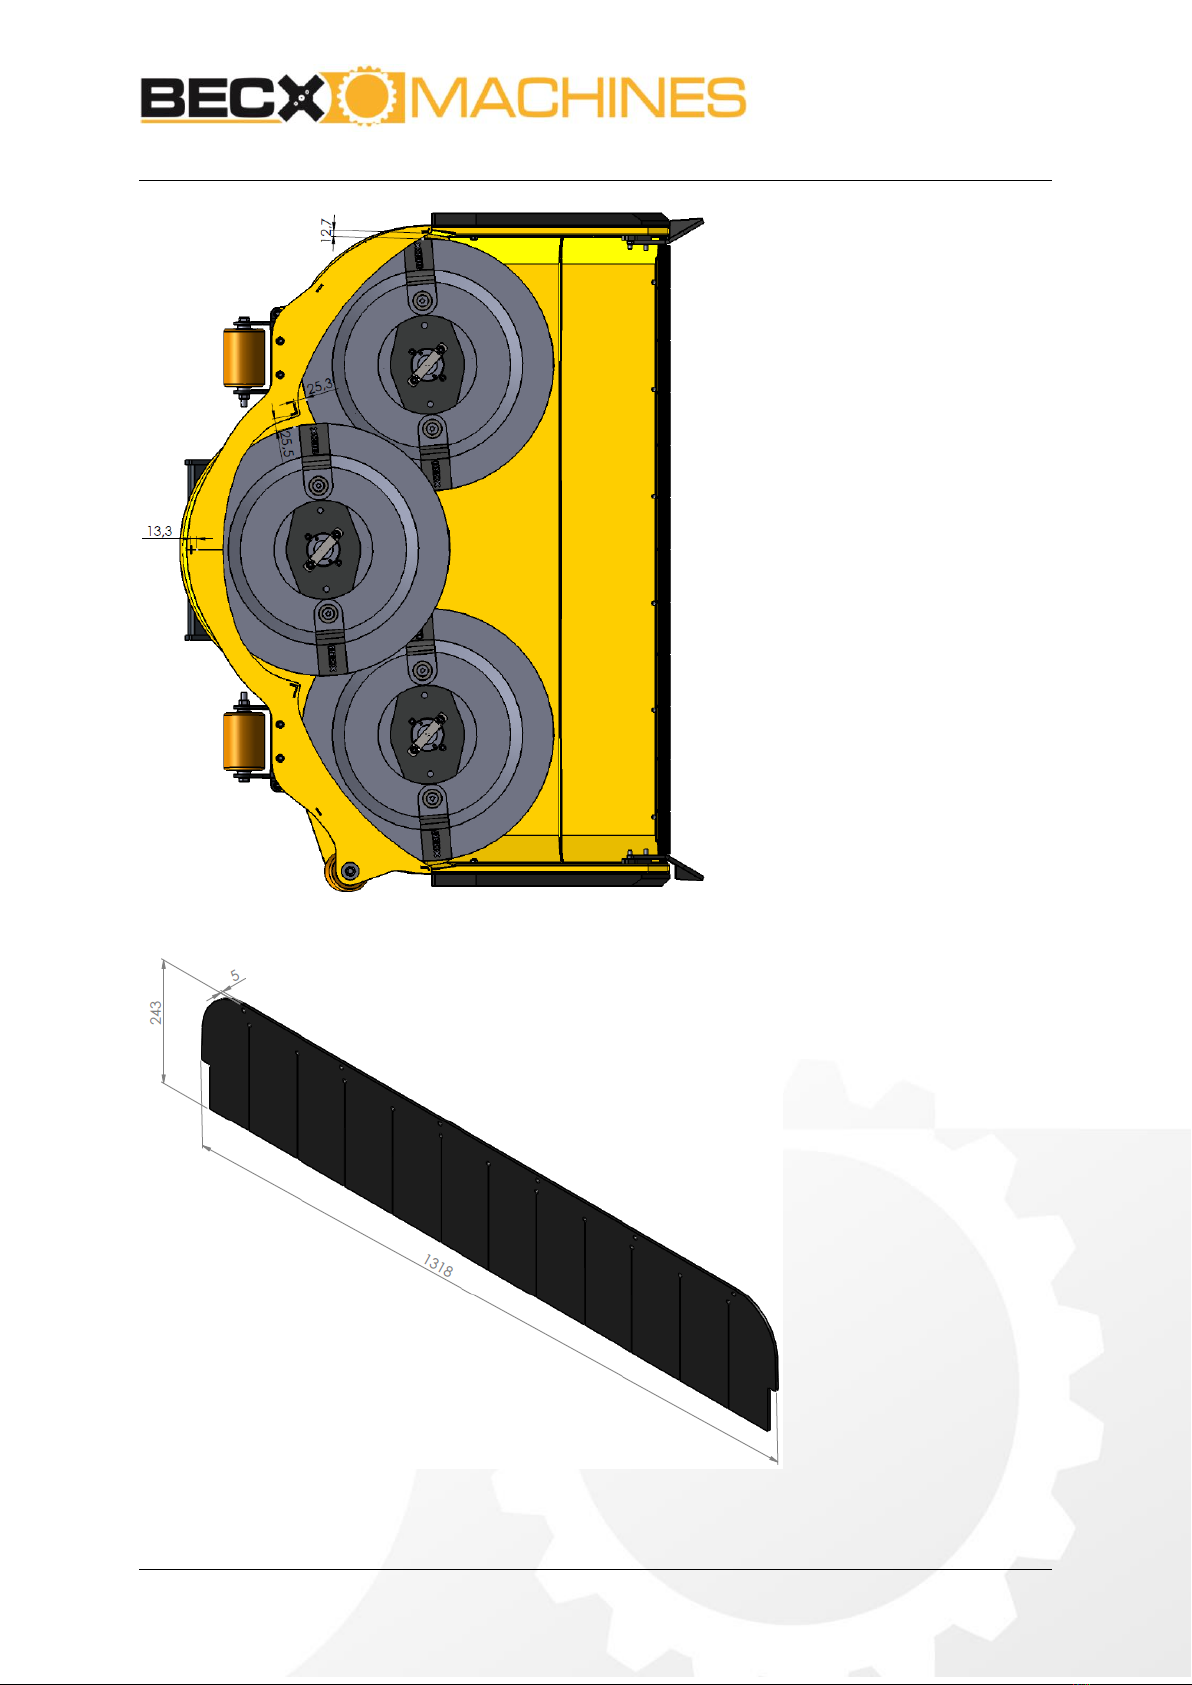
3.1 Mechanical components
Figure 3: General overview of the mechanical components
Figure
part
explanation
1
Attachment tube
The hedge trimmer must be attached to the lifting arm on the
tool carrier by means of the attachment tube.
2
angle adjustment
Once the hedge cutter has been attached to the lifting arm it
can be adjusted to the correct angle. (see paragraph 4.1)
3
Hydraulic motor
(3*)
Each cutter head is driven by its own hydraulic motor.
4
Inlet side
During trimming, the branches to be cut will enter on the
inlet side, which is protected with Polyurethane flaps next to
the cutting heads.
5
Cutting head (3*)
Each cutting head carries four cutter blades. The lower two
cutting blades cut the branches and twigs off the hedge. The
upper two cutting blades slice the cut branches into small
chips.
6
protective deck
The protective deck is made of high-quality steel and
prevents cut material from being hurled out.
4
3
1
2
6
5
Hedge trimmer
Type: HS131HR
Version: 1
juli 2019
Page 13 of 35
Figure 4: Dimensions protective body
Figure 5: Dimensions protective material front side (Material: PUR SH 90 A)

Hedge trimmer
Type: HS131HR
Version: 1
juli 2019
Page 14 of 35
3.2 Hydraulic components
Figuur 7: Overzichtsfoto hydraulische componenten
Figuur 7
part
explanation
1
Feeder line
connection with
rapid attachment
The hydraulic oil is fed in from the hydraulic aggregate.
2
Drain line
connection with
rapid attachment
The drain oil from the motors is returned to the hydraulic
aggregate on the tool carrier through a separate drain line.
3
Discharge line
connection with
rapid attachment
The hydraulic oil is returned to the hydraulic aggregate.
4
Hydraulic motor
(3*)
Each hydraulic motor has a connections for a feeder line, a
return line and a drainage line. The three motors are
arranged in series so that the hedge trimmer is connected
with one feeder line, one return line and one drain line.
The direction of rotation is protected by means of a non-
return valve.
3
4
1
2

Hedge trimmer
Type: HS131HR
Version: 1
juli 2019
Page 15 of 35
3.3 Hydraulic scheme

Hedge trimmer
Type: HS131HR
Version: 1
juli 2019
Page 16 of 35
4) Operation
4.1 assembly and adjustment of the hedge trimmer
Figure 8: horizontal setting of the hedge trimmer
No.
What to do
Action
Result
1
Select the correct tool
carrier and lifting arm
make sure that the tool carrier and lifting
arm are sufficiently strong and stable for
the hedge trimmer (see chapter 0 for its
own weight , the load when lifting (Figure
8:1 / 8:4) and the exerted moment of the
lifting (Figure 8:2).
Make sure that the maximum pressure and
number of revolutions (oil flow) are not
exceeded.
Make sure that the correct rapid
attachment connections are installed for
the feed line, return line and drain line.
Make sure that the correct clasp is used.
Ignoring the stated
values can result in
damage to
equipment and
injury to persons.
2
Adjust the hedge
trimmer in the
horizontal position.
Depending of the deflection of the lifting
arm, the bottom (see Figure 8:5) of the
hedge trimmer will not be completely
horizontal.
Adjust the angle setting (see Figure 8:3) so
that the deck is suspended horizontally
when lifted upwards.
Trimming will work
best if the base of
the protective deck
runs parallel to the
level of the cutting
plane.
3
Connect the hoses
Connect the rapid attachment connections
for the feed line, return line and drain line
(see: Figuur ).
1
2
3
4
5

Hedge trimmer
Type: HS131HR
Version: 1
juli 2019
Page 17 of 35
4
Switch on the
hydraulic system
Adjust the setting of the hydraulic
aggregate so that the maximum pressure
and number of revolutions cannot be
exceeded.
This will depend on the type of tool carrier
that is used. Please refer to the manual of
the tool carrier.
On the hydraulic system there are 3
numbered adjustment screws.
They have the following functions:
1. This screw regulates the speed of the
hedgecutter. This speed should be set
at 2500 rpm.
2. This screw secures the pressure on
the hydraulic motors. This is set at
200 bar.
4. This screw controls the time that the
knive disks use to stop. This is set to 5
seconds.
Screw 2 and 4 are set correctly at the factory.
These should not be adjusted!
Hedge trimmer
Type: HS131HR
Version: 1
juli 2019
Page 18 of 35
4.1 Carrying out trimming operations
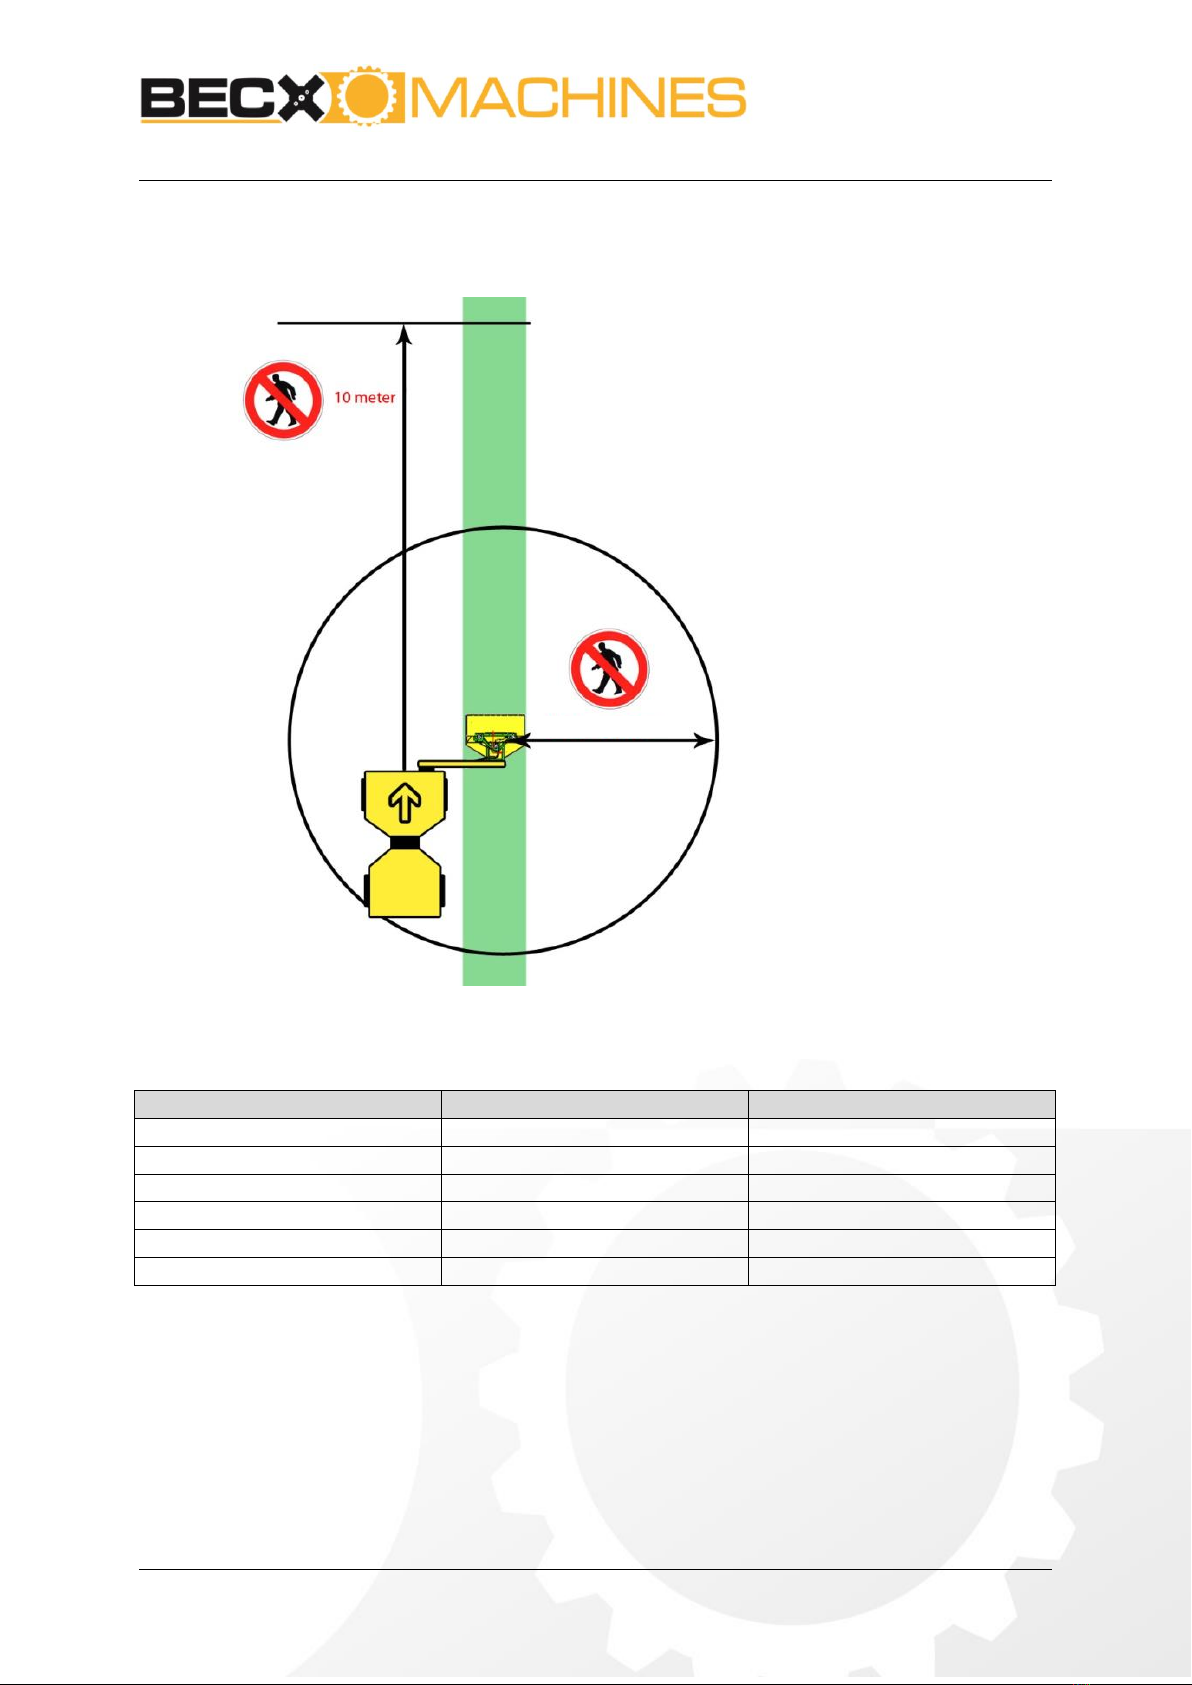
Figure 9: overview of danger zone to 1 meter trim height
Trim height
Danger radius
Safe frontal distance
0-1 m
5 m
10 m
1.1-1.2 m
6 m
11 m
1.2-1.3 m
7 m
12 m
1.3-1.4 m
8 m
13 m
1.4-1.5 m
9 m
14 m
>1.5 m
10 m
15 m
Table 1: Table trim heights - safe distance
Radius = 5 meters

Hedge trimmer
Type: HS131HR
Version: 1
juli 2019
Page 19 of 35
Figure 10: overview of danger zone to 1 meter trim height in vertical position
Trim height
Danger radius
Safe frontal distance
0-1 m
10 m
10 m
1.1-1.2 m
11 m
11 m
1.2-1.3 m
12 m
12 m
1.3-1.4 m
13 m
13 m
1.4-1.5 m
14 m
14 m
>1.5 m
15 m
15 m
Table 2: Table trim heights - safe distance vertical position
Radius = 10 meters
Hedge trimmer
Type: HS131HR
Version: 1
juli 2019
Page 20 of 35
No.
What to do
Action
Result
1
Check the machinery
check the following points:
check the cutter blades:
The cutter blades must not be ground
back too far and must be in balance (see
0)
Check the cutter blades for damage and
cracks before starting, after 4 hours of
operation or immediately if the cutter
blades have come into contact with
materials that are different from what
they are intended to cut.
Visually check at least on a daily basis
whether the locking plates and locking nuts
of the cutter blades are in place.
Check whether the direction of rotation
corresponds to the arrow on the deck.
Check the number of revolutions of the
cutter blades.
Check whether the cutter blades run free of
vibrations.
If a defect is identified in one of the above
points, this must first be remedied before it is
allowed to put the hedge trimmer back into
operation.
Carrying on with
loose locking
nuts, cracked
cutter blades or
with a poorly
running or
excessively fast
system can
result in damage
to the
machinery
and/or injury to
the operator or
passers-by.
2
Check the site where
the work will take
place.
Check the hedge to be trimmed and the
surroundings for the following points:
Are there any obstacles which can be
damaged by the hedge trimmer or which
could cause damage to the hedge trimmer?
Are there any loose items such as dirt or
loose metal wires?
Check if there is people or animals in the
danger zone are
If there are lots of people passing by the
work-place should be secured.
If the sight of the operator is severly
hindered (for instance by high or dense
hedge) the work-place should be secured.
Operator needs to always be sure there are
no people on the other side of a high dense
hedge when cutting it.
Bear this in mind
when carrying
out the trimming
operation.
Remove any
loose items in
order to prevent
damage to the
hedge trimmer.
Table of contents
Other Becx Machines Trimmer manuals


Popular Trimmer manuals by other brands

Remington
Remington G4 Graphite Series quick start guide

ATIKA
ATIKA BT 25 Original instructions

Electrolux
Electrolux Flymo Multi-Trim CT250X Important information

Craftsman
Craftsman CMEHT150 instruction manual

Ardisam
Ardisam EarthQuake 600050 Series Operator's manual

GreenWorks
GreenWorks POWERALL STE304 Operator's manual


