Beemoo ROUTE User manual
IMPORTANT!
READ CAREFULLY AND
KEEP FOR FUTURE
REFERENCE.
Model: Beemoo Route i-Size
Infant Car Seat
E8*129R03/04*13035*00
ADVARSEL!
LÆS OMHYGGELIGT
OG GEM TIL FREMTIDIG
REFERENCE.
Model: Beemoo Route i-Size
Autostol Baby
E8*129R03/04*13035*00
VIKTIGT!
LÄS NOGA OCHBEHÅLL
FÖR FRAMTIDA
REFERENS.
Modell: Beemoo Route i-Size
Babyskydd
E8*129R03/04*13035*00
TÄRKEÄÄ!
LÄS NOGA OCHBEHÅLL
FÖR FRAMTIDA
REFERENS.
Malli: Beemoo Route i-Size
Turvakaukalo
E8*129R03/04*13035*00
ADVARSEL!
LES NØYE OG BEHOLD
FOR FREMTIDIG
REFERANSE.
Modell: Beemoo Route i-Size
Babybilstol
E8*129R03/04*13035*00
WICHTIG!
LESEN SIE DIESE HINWEISE
AUFMERKSAM UND
BEWAHREN SIE SIE FÜR
ZUKÜNFTIGE FRAGEN AUF.
Modell: Beemoo Route i-Size
Babyschale
E8*129R03/04*13035*00
i-Size Infant Car Seat 40-87 cm, ≤ 13 kg
UK UK
2 3
INSTRUCTION MANUAL
IMPORTANT!
Read and follow these instructions carefully before using this child car seat.
Beemoo Route i-Size Infant Car seat is exclusively intended for the safety of your child
in the vehicle. Checked and approved according to ECE R129/03
Baby’s length Baby’s weight
40-87 cm ≤13 kg
WARNING!
To keep your child properly protected it is essential that you use the car seat as
described in this manual.
WARNING!
Keep plastic packaging material out of your child’s reach: danger of suocation!
WARNING!
The i-Size infant car seat should not be combined and used with other systems.
NOTE!
The included newborn inlay protects your child. It must be used until the
child’s height is 60 cm.
NOTE!
Please always have the instruction manual at hand and store it in the
dedicated slot under the car seat.
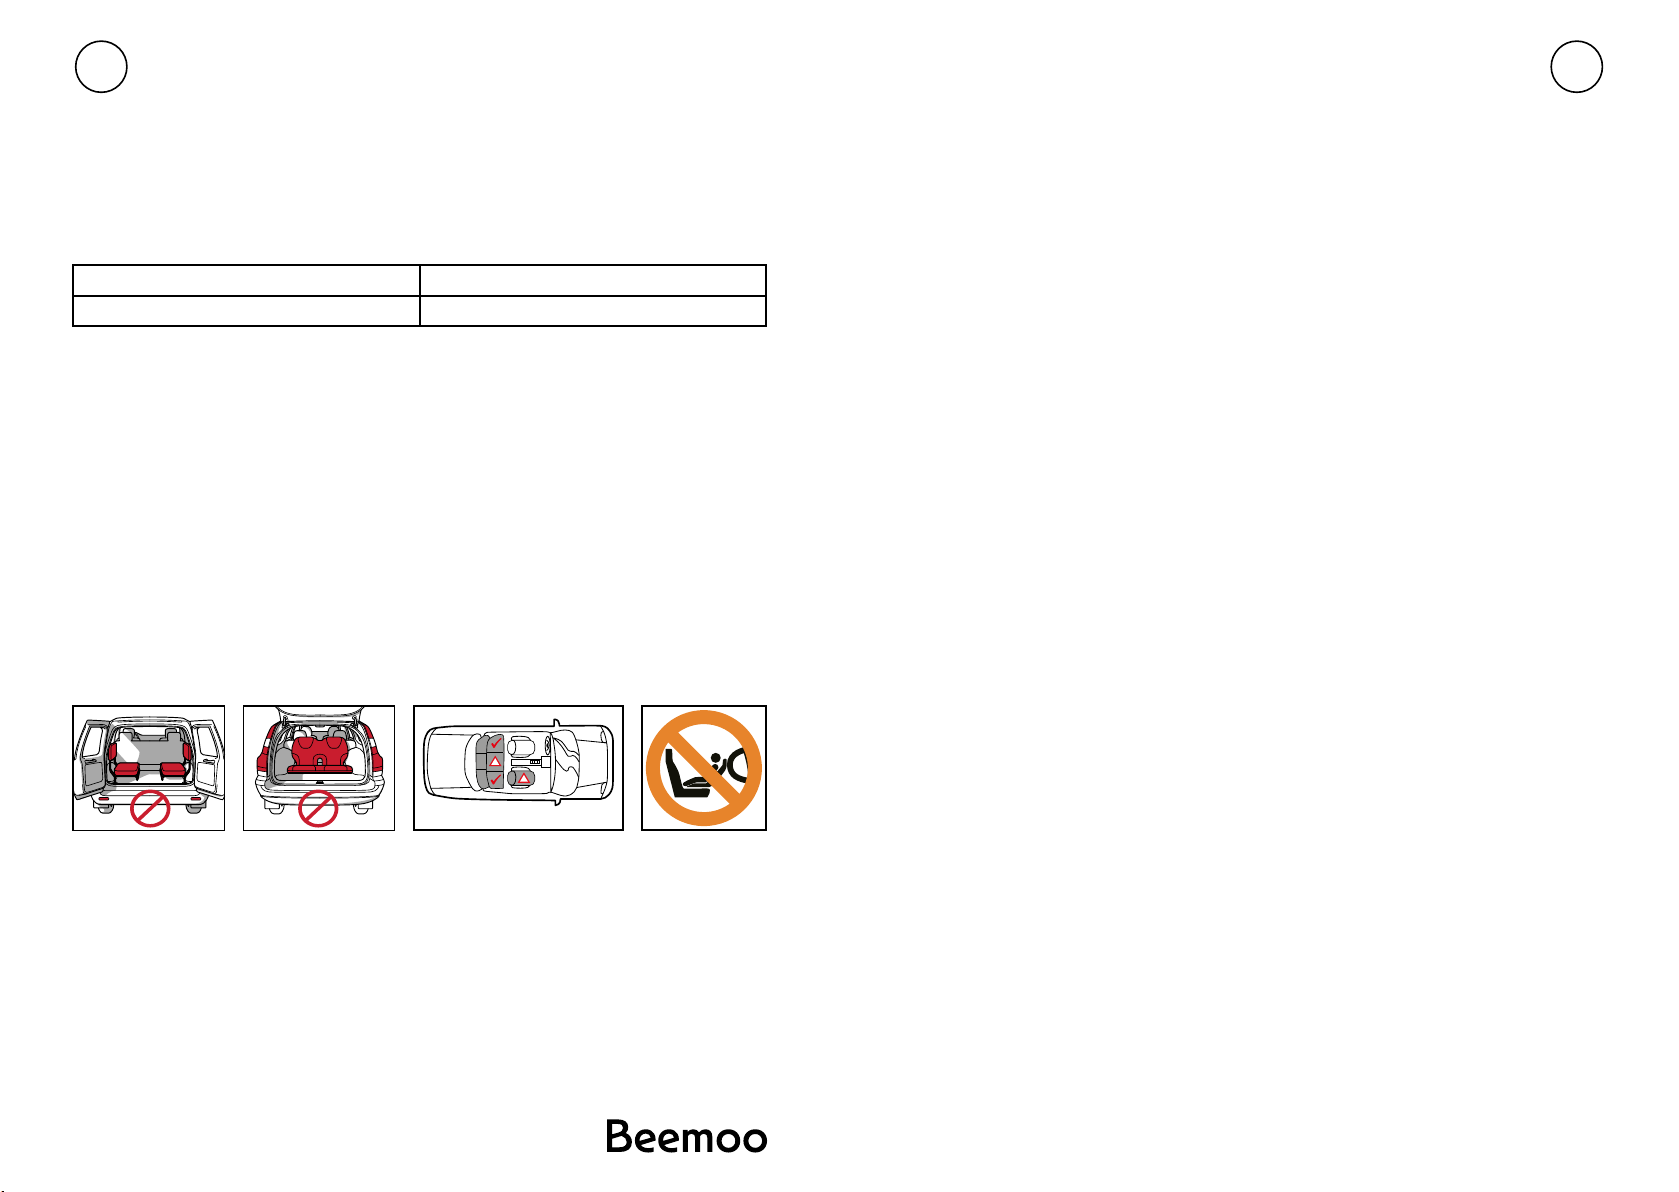
CORRECT POSITION IN THE VEHICLE
This is an i-Size Enhanced Child Restraint System. It is approved according to
Regulation No.129, for use in i-Size compatible vehicle seating positions as indicated
by vehicle Manufacturers in the vehicle users’ manual.
Always check before buying the i-Size infant car seat whether the seat can be properly
installed in your vehicle.
SAFETY IN THE VEHICLE
WARNING!
Never use the car seat on a vehicle seat with an activated front airbag. This does not
apply to so-called side airbags. The large-volume front airbag expands explosively and
may cause your child serious injury or even death.
WARNING!
The car seat must always be secured correctly in the vehicle even when not in use.
In case of an emergency brake or accident, an unsecured car seat may injure other
passengers or yourself.
To guarantee the best possible safety for all passengers make sure that:
• If installing the car seat in the front passenger seat, adjust the vehicle seat in
rearmost position.
• If the infant car seat is used in the passenger seat, the airbag must be deactivated.
• Properly secure all objects likely to cause injury in the case of an accident.
• The car buckle is not reaching all the way to the belt routing. In case of doubt
contact the retailer or manufacturer of the car seat.
• All passengers in the vehicle are using safety belts.
PROTECTING THE VEHICLE
NOTE! Traces of use and/or discoloration can appear on some vehicle seats made
from delicate materials (e.g., velour, leather, etc.) if car seats are used. You can avoid
this by putting, e.g., a blanket or a towel underneath the car seat.
WARNING!
NEVER hold a baby in your lap in a vehicle. The forces released in a collision are way
too high for any person to hold on to the baby. Never secure yourself and the child with
only one vehicle seat belt.
EN Contents ............................................ 1
PROTECTING THE VEHICLE ................................ 2
3
CORRECT POSITION IN THE VEHICLE ........................
SAFETY IN THE VEHICLE .................................. 3
SAFETY FOR THE BABY .................................... 4
ADJUSTING THE CARRYING HANDLE ......................... 7
PARTS LIST 5
PARTS LIST 6
ADJUSTING THE SUN CANOPY .............................. 7
ADJUSTING TO BODY SIZE ................................ 8
8-9
STRAPPING WITH Y-SHAPED BELT SYSTEM .................
CONNECTING THE INFANT CAR SEAT WITH BASE ........... 9-15
CORRECT SECURING OF YOUR BABY ....................... 16
CORRECT INSTALLATION OF THE INFANT CAR SEAT ........... 16
TRAVEL SYSTEM ......................................... 17
REMOVING THE COVER....................................18
CLEANING ..............................................
..............................................
..............................................
19
PRODUCT CARE ......................................... 19
WHAT TO DO AFTER AN ACCIDENT ......................... 20
PRODUCT INFORMATION ................................. 20
PRODUCT LIFESPAN ..................................... 20
DISPOSAL ............................................. 21
WARRANTY ............................................ 22
EN Contents
!
!
01 02
WARNING!
The following short instruction is intended to provide only an overview.
In order to achieve maximum security and comfort for your child it is absolutely
imperative that you read the whole instruction manual carefully.
DEAR CUSTOMER!
Thank you very much for purchasing the DK780 i-Size. We assure
you that in the development process of the car seat we focused on
safety, comfort and user friendliness. The product is manufactured
under special quality surveillance and complies with the strictest safety
requirements.
NOTE!
Please always have the instruction manual at hand and store it
in the dedicated slot under the car seat.
The newborn inlay protects your child. It must be used up to size of 60 cm.
Due to country-specific requirements (e.g. colour labeling on the car seat),
the product features may vary in their external appearance. This, however, does not
affect the correct functioning of the product.
PROTECTING THE VEHICLE
NOTE!
NOTE!
UK UK
4 5
SAFETY FOR THE BABY
WARNING!
Always secure the child with the integrated harness system.
WARNING!
Never leave the child unattended in a vehicle.
NOTE!
Take your baby out of the infant car seat as often as possible to relieve pressure from
the spine. Take breaks during longer car journeys for this purpose. Also ensure that you
do not leave your baby for too long in the car seat even when not in the vehicle.
WARNING!
The plastic parts of the infant car seat can heat up in the sun. Your baby can suer
burns from this.
NOTE!
Protect your baby and the infant car seat from intense sun exposure (e.g., by placing a
light cloth over the seat or by placing sunshades on the vehicles windows).
WHAT TO DO AFTER AN ACCIDENT
WARNING!
An accident may cause damage to the car seat which is not directly visible.
Exchange the seat immediately after an accident.
In case of doubt contact the retailer or manufacturer.
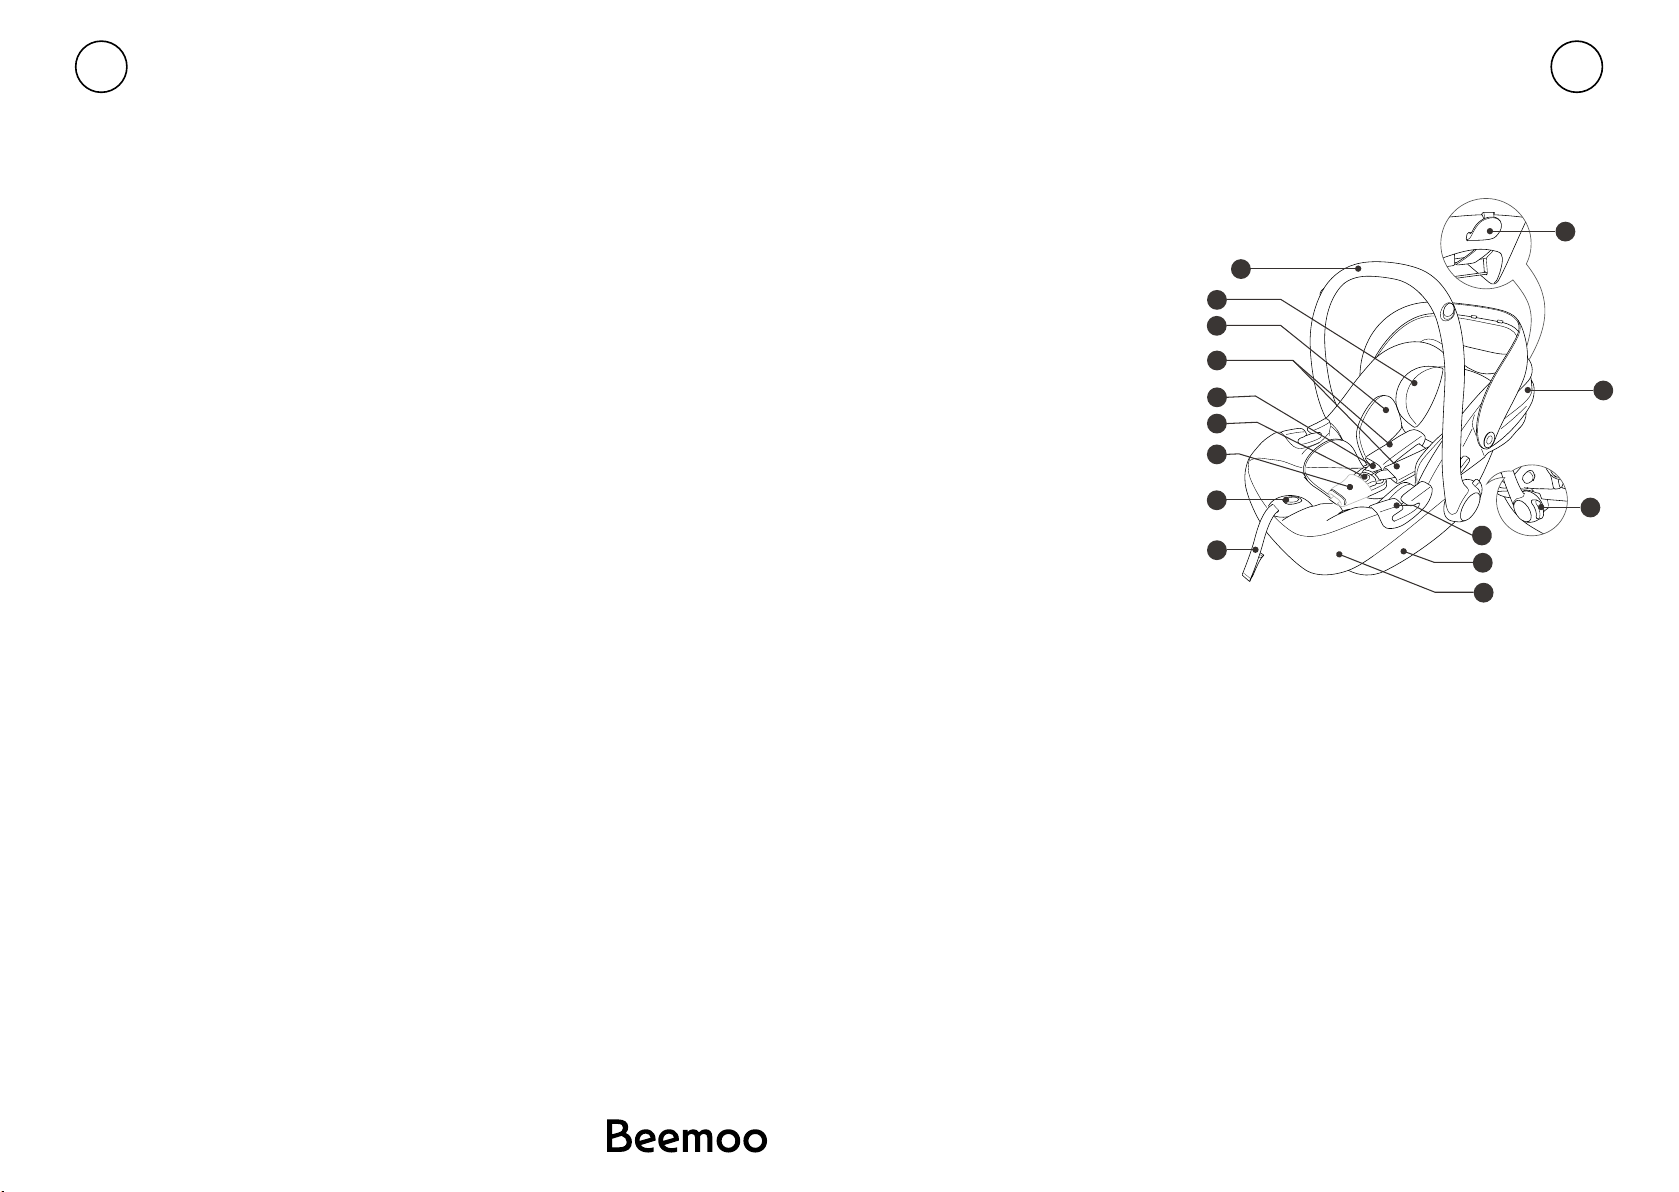
a. Carrying handle
b. Handle adjustment button
f. Harness shoulder pads
c. Crotch pad
h. Harness buckle
e. Shoulder straps
d. Button for harness adjustment
j. Adjustment strap
8. Adjustment strap
9. Guide loops for the seat belt
10. Canopy
11. Headrest
12. Seat reducer cushion
13. Base
14. Seat belt guide loop
15. Seat cover
05 06
PARTS LIST PARTS LIST
f
c
a
b
14
h
e
d
j9
10
11
12
13
15
a. Carrying handle
b. Handle adjustment button
f. Harness shoulder pads
c. Crotch pad
h. Harness buckle
e. Shoulder straps
d. Button for harness adjustment
j. Adjustment strap
8. Adjustment strap
9. Guide loops for the seat belt
10. Canopy
11. Headrest
12. Seat reducer cushion
13. Base
14. Seat belt guide loop
16
17
18
19
20
21
22
23
16. Support leg
17. Car seat release button
18. Car seat fastening brackets
19. Base
20. ISOFIX connectors
21. ISOFIX release buttons
22. Support foot
23. Adjustment button for the support foot
15.
UK UK
67
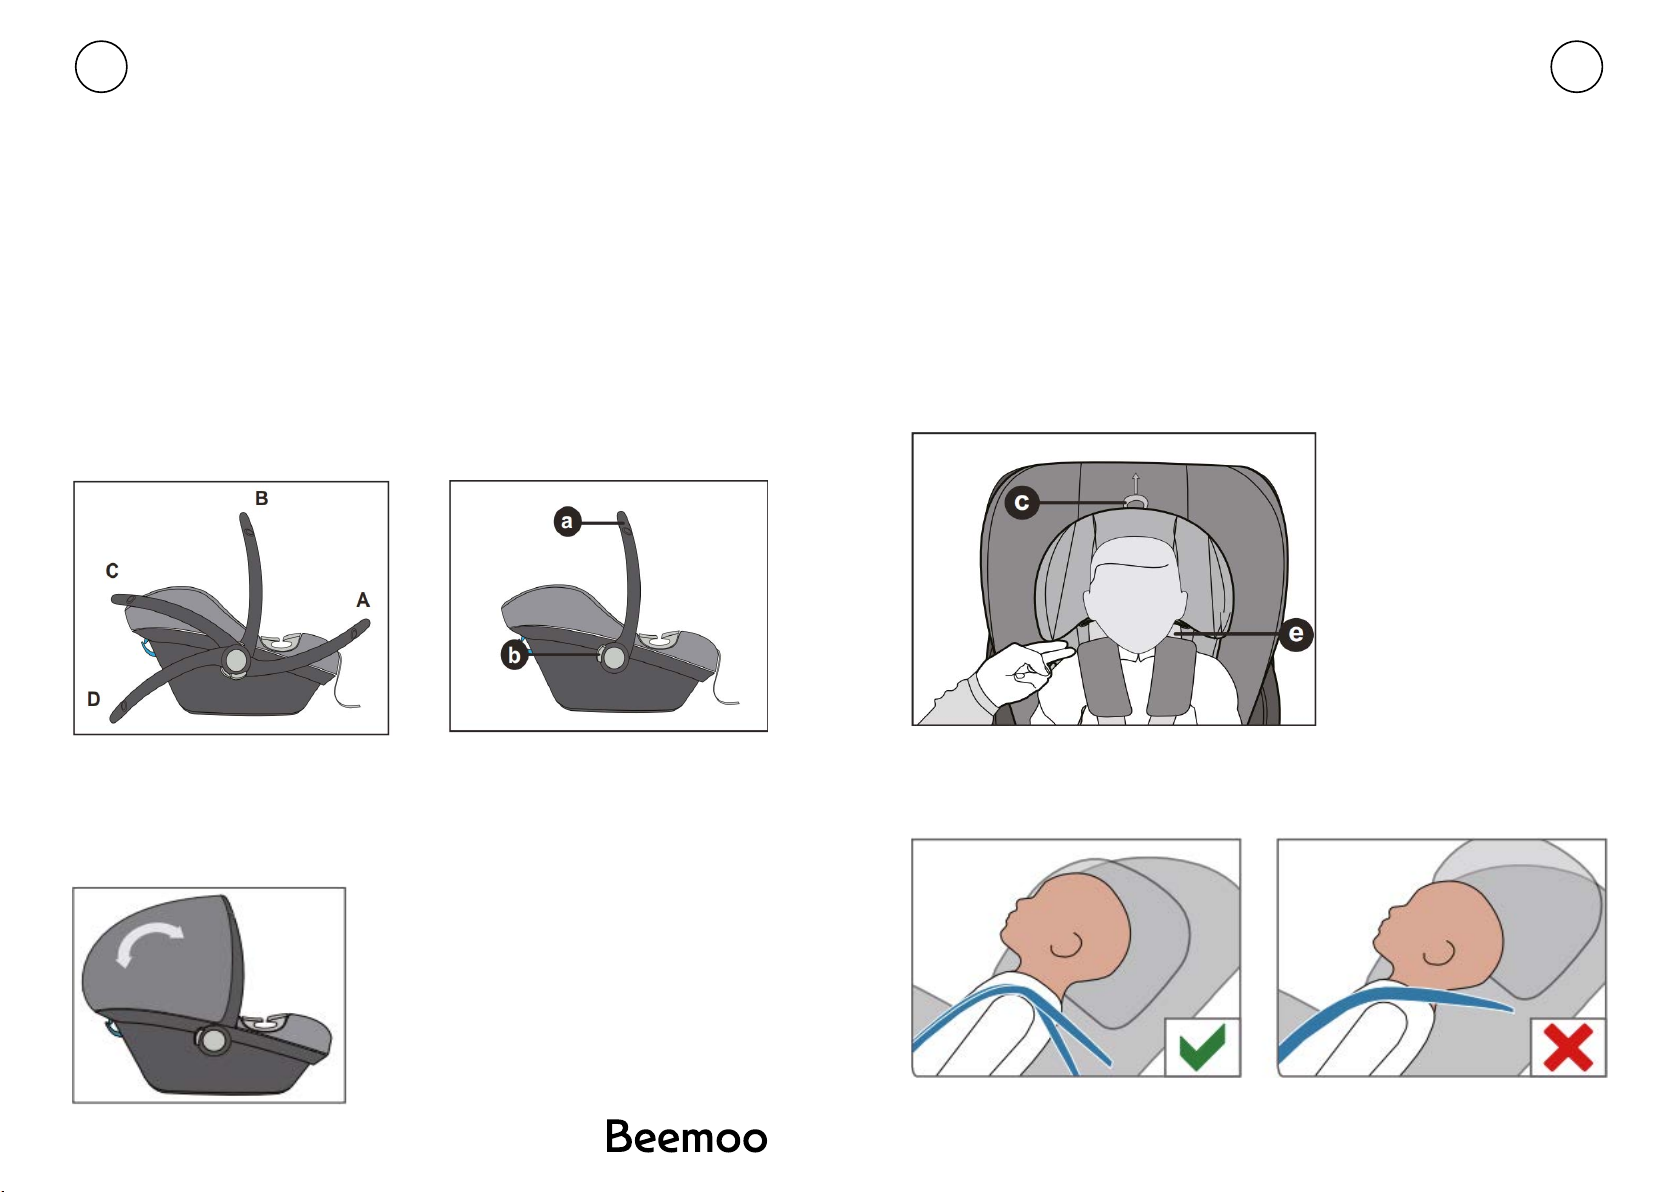
ADJUSTING THE CARRYING HANDLE
You can lock the carrying handle in place in four positions:
A) Driving position
B) Carrying Position
C) For placing the baby in the seat
D) For a safe stand on a level surface outside the vehicle
WARNING!
To prevent the seat from tipping over during carrying, check whether the carrying
handle a is locked in place in carrying position B.
• To adjust the carrying handle, simultaneously press the right and left buttons (b).
• Then Pivot the carrying handle forward or backwards while pressing button (b), until
it automatically locks in place in the desired position
ADJUSTING THE CANOPY
• Unfold the canopy by pulling gradually on the plastic cover.
• To fold up the canopy, push the canopy back to its starting position.
ADJUSTING THE HEADREST
NOTE! The newborn inlay protects your child. It must be used up to size of 60 cm.
The headrest ensures the best possible protection for your child when adjusted to the
optimum height. There are six available positions that can be set. The headrest has to
be adjusted in a way that the distance between the child‘s shoulders and the headrest
doesn‘t exceed 2 cm (approx. 2 ngers width).
• Check the height of the Harness Straps: Position the Harness Straps at or just
below the child‘s shoulders for rear-facing use.
• Pull the adjustment handle (c) upwards to unlock the headrest. Now you can adjust
the headrest.
Note! The shoulder belts (e) are rmly connected to the headrest and must not be
adjusted separately.
You can lock the carrying handle in place in four positions:
A: Driving position.
B: Carrying Position.
C: For placing the baby in the seat.
D: For a safe stand on a level surface outside the vehicle..
WARNING! In order to prevent the seat from tipping over during carrying,
check whether the carrying handle a is locked in place in carrying
position B.
• To adjust the carrying handle, simultaneously press the left and right
buttons (b).
• Then pivot carrying handle a forwards or backwards while pressing
button (b), until it automatically locks in place in the desired position.
.
07 08
Adjusting the Headrest
The headrest only ensures the best possible protection for your child if it is
adjusted to the optimum height. There are six positions that can be set.
The headrest has to be adjusted in a way that the distance between
the child‘s shoulders and the headrest doesn‘t exceed 2 cm
(approx. 2 fingers width).
• Check the height of the Harness Straps: Position the Harness
Straps at or just below the child‘s shoulders for rear-facing use.
• Pull the adjustment handle © upwards to unlock the headrest .
Now you can adjust the headrest.
NOTE !
The newborn inlay protects your child. It must be used up to size of 60 cm
ADJUSTING THE CARRYING HANDLE
ADJUSTING THE SUN CANOPY
Unfold the sun canopy by pulling
gradually on the plastic cover.
To fold up, push the sun canopy
back to its starting position.
ADJUSTING TO BODY SIZE
Note!The shoulder belts (e)
are firmly connected to the
headrest and must not be
adjusted separately.

UK UK
8 9
REMOVING THE NEWBORN INLAY
The newborn inlay (X) may be removed after the baby is 61 cm (approx. 3 months) to
provide more space for the child. To remove the newborn inlay (X) open and remove
the shoulder pads. Next remove the newborn inlay and place the shoulder pads back
on the shoulder belts.
STRAPPING WITH Y-SHAPED HARNESS SYSTEM
Note! Ensure that the infant car seat is free from loose objects and toys.
Note! Ensure that the headrest is correctly locked in place before using the seat.
• Loosen shoulder belts (e) by pressing the adjustment button on central adjuster (d)
and simultaneously pulling both shoulder belts up.
• Undo the belt buckle by pressing red button (h) rmly. Note! Always pull on the
shoulder belt (e) and not on belt pads (f).
• Place the child into the car seat.
• Place shoulder belt (e) directly over the child’s shoulders.
Note! Ensure that shoulder belts (e) are not twisted.
• Place both buckle tongues (g) together and lock them in place in belt buckle (i) with
an audible “CLICK”.
• Pull cautiously on central adjustment belt (j) in order to tighten shoulder belts (e)
until they t your child’s body.
To ensure your baby’s safety, check that:
• The infant car seat is secured with the child facing the rear of the car (the child’s feet
point towards the backrest of the vehicles seat).
• The infant car seat may ONLY be used in the front passenger seat if the vehicles
airbag has been deactivated.
The newborn inlay (x) may be removed
after the baby is 76 cm (approx. 3 months)
to provide more space for the child. To
remove the newborninlay (x) open and
remove the shoulder pads. Then remove the
newborn inlay and place the shoulder pads
back on the shoulder belts.
Note! Ensure that the headrest is correctly locked in place before
using the seat.
09 10
To ensure your baby’s safety, check that:
• Loosen shoulder belts (e) by pressing the adjustment button on
central adjuster (d) and simultaneously pulling both shoulder belts up.
• Undo the belt buckle by pressing red button (h) firmly.
• the infant car seat is secured with the child facing the rear of the car
(the child’s feet point towards the backrest of the infant car seat).
• the infant car seat is only used on the front passenger seat if there is
no front airbag that can impact on the infant car seat.
STRAPPING WITH Y-SHAPED BELT SYSTEM
Note! Ensure that the infant car seat is free from toys and hard objects.
• Loosen shoulder belts (e) by pressing the adjustment button on
central adjuster (d) and simultaneously pulling both shoulder belts up.
• Undo the belt buckle by pressing red button (h) firmly.
Note! Please always pull on shoulder belt (e) and not on belt pads (f).
• Put your child into the child seat.
• Place shoulder belt (e) directly over your child’s shoulders.
Note! Ensure that the infant car seat is free from toys and hard objects.
Note! Please always pull on shoulder belt (e) and not on belt pads (f).
• Put your child into the child seat.
• Place shoulder belt (e) directly over your child’s shoulders.
Note! Ensure that shoulder belts (e) are not twisted.
• Place both buckle tongues together and lock them in place in belt
buckle (i) with an audible “CLICK”.
• Pull cautiously on central adjustment belt (j) in order to tighten
shoulder belts (e) until they fit your child’s body.
CONNECTING THE INFANT CAR SEAT WITH BASE
Before first use
STRAPPING WITH Y-SHAPED BELT SYSTEM
40-87cm Rearward facing ISOFIX+Support leg+shaped belt.
Remove the leg support first, when the base is green, it means the
installation is correct
(x)
Removing the Newborn Inlay
d
eg
f
e
h
i
j
Table of contents
Other Beemoo Baby Carrier manuals


