BEETEL F5-4G User manual
Before Initial Use: Connect battery in battery compartment and charge the
battery for at least 6-8 hrs. before initial use.
For better RF performance, it is recommended to place the fixed wireless
phone at an appropriate location where the signal strength is good.
The battery consumption varies according to the network signal strength. So
for better Standby Time & Talk Time it is recommended to place the fixed
wireless phone at an appropriate location where the signal strength is good.
It is recommended to always use the power adaptor when phone is
connected as Wi-Fi hotspot.
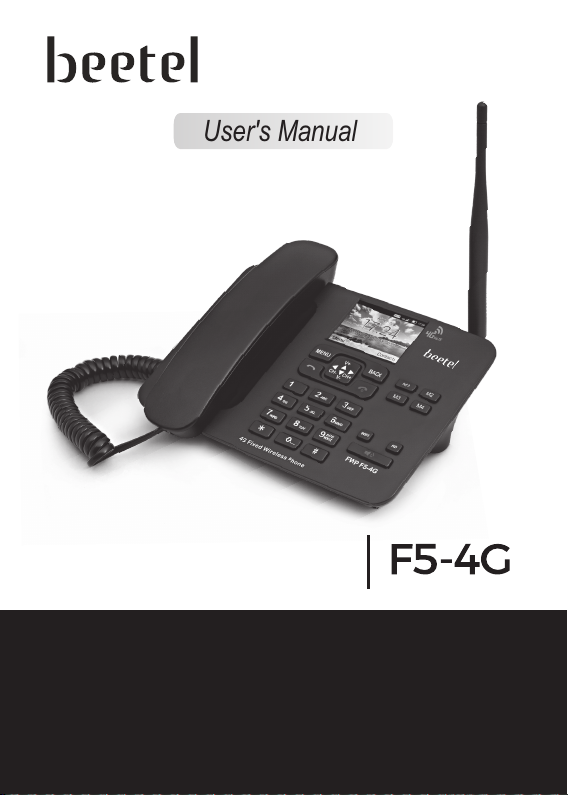
User's Manual

Dear Customer,
Congratulations on your choice of a world class product 4G Fixed Wireless Phone F5-4G
from beetel. Its amazing features have been specially designed to add comfort and easy
to your life.
The F5-4G will make receiving and sending calls the most pleasant experience for you. To
begin, please refer to the friendly Instruction Manual for easy installation.
For any clarification or assistance, kindly contact us at the following
PACKAGE CONTENTS
Coiled Cord - 1 Piece User Manual - 1 Piece
Fixed Wireless Phone
Unit - 1 Piece
Power Adaptor AC/DC
5V/1000mA - 1 Piece
3.7V, 800 mAh
Li-ion Rechargeable
Battery - 1 Piece
TNC Antenna - 1 Piece
For proper Recycling and disposal of this product carry it to the
nearest collection point or call the toll free number 1800-102-8632.
For more details please refer the URL to visit our website E-waste page;
http://www.brightstarcorp.in/beetel/aboutus/sustainability.html
Customer Support Division:
email : customer[email protected]
Toll Free No. 1800-10-23456
CH CH-
WIFI

1. FEATURES................................................................................................01
2. THINGS TO BE TAKE CARE OF ..............................................................01
3. IMPORTANT SAFETY INSTRUCTIONS...................................................02
4. INSTALLING YOUR PHONE ....................................................................03
5. PHONE LAYOUT .................................................................................04-05
6. LCD DESCRIPTION ...........................................................................06-07
7. MENU STRUCTURE ..........................................................................08-09
8. INITIAL SETTINGS ..................................................................................09
9. PHONE OPERATION ..........................................................................10-13
10. MENU SETTINGS ...............................................................................14-44
11. BATTERY USAGE & SAFETY PRECAUTIONS ......................................45
12. TROUBLE SHOOTING .......................................................................46-47
13. WARRANTY..............................................................................................48
CONTENTS

Caller-Line Identification Function
Colour LCD Display
Wallpaper Setting
LCD Display Brightness & Backlight Time Control
Supports Quad Band GSM - 850MHz / 900MHz /
1800MHz / 1900MHz
- 3G HSPA/UMTS -B1/B2/B5/B8 Band
- 4G FDD-LTE –B1/B2/B3/B5/B8 Band
- 4G TDD-LTE –B38/B40/B41 Band
Supports VoLTE (HD Voice Calling Service on
4G-LTE)
Supports Wi-Fi Hotspot Function (Hotspot
Capability- 8 Users)
Receive & Send SMS –Maximum 500 SMS can be
stored
Phone Book to Store 1000 Nos with Name
Speed dial Function for dial out of pre-stored
phone numbers
Direct Memory Keys (M1, M2, M3, M4)
Call Recording Facility
Sound Recording Facility
Hotline Function
Call Log to store Missed, Dialled & Received Calls
Pre-dialling and clearing function
Battery Standby Time (Wi-Fi Off)– 50 Hrs
Battery Talk-Time (Wi-Fi Off) – 3 Hrs
Two-Way Speakerphone with Adjustable Receive
Volume
Handset Receive Volume Control
Bluetooth Function
Selectable Ring Melodies with Adjustable Ring
Volume
Alarm with Snooze
Basic Calculator Function
Screen Lock with Password for Security
Last Number Redial
Battery Capacity, Signal Strength, Date & Time,
Wi-Fi and Data “ON” Display on LCD Display
Power ON/OFF with Time Selection
High performance detachable “TNC” antenna
FM Radio
Read the User Manual carefully before using the phone.
Switching Adaptor:
Use only “beetel” make power adaptor (5V, 1000mA) that comes with the product. Using other make adaptor
may damage your phone or may deteriorate the performance of your phone.
Battery:
It Is recommended to use 3.7V 800mAh Li-ion rechargeable battery supplied with the product. Using non-
confirming battery can damage the product.
Phone Placement:
For better RF performance, Stand-by Time and Talk Time, it is recommended to place the phone at an
appropriate location where the signal strength is good.
Use of this phone may interfere with nearby medical equipment with poor shielding such as heart Pacemaker
etc.
As the phone (F5-4G) emits radio signal which could interfere with other electronic equipment such as TV,
Radio, Telephones etc.It is recommended that a distance of at least 1 meter should be maintained between
F1N and other electronic equipment. This will minimize the risk of such interferences.
Antenna:
For best RF performance, keep the antenna free from obstructions.
Keep the antenna position straight-up. This will ensure best communication quality.
Do not hold the antenna. This may affect the communication quality.
Wi-Fi Hotspot:
It is recommended to always use the power adaptor when phone is connected as Wi-Fi Hotspot.
FEATURES
THINGS TO BE TAKEN CARE OF

When using your 4G Fixed Wireless Phone, basic safety precautions should always be
followed to reduce the risk of fire, electric shock and injury, including the followings;
Read and understand all the instructions mentioned in the User Manual.
Follow all instructions and warnings marked on the product, battery and adaptor.
Unplug the adaptor (if connected to phone) and Power off the product before cleaning.
Do not use liquid cleaners or aerosol cleaners. Use a damp cloth for cleaning.
Use only the power adaptor and battery that comes with the product. Using other make
adaptor and battery may damage your phone or may deteriorate the performance of your
phone.
Do not attempt to change the security codes or components. It may temporarily block
your phone or damage your phone.
Do not use the phone during lightening /thunder storming.
During lightening do not touch power plug and external antenna. This can cause
electrical shock to body.
Your phone is designed to work with AC input: 100-300V, DC output: 5V, 1000 mA
switching adaptor. Check the adaptor voltage rating before connecting. Other rating
adaptor may damage the phone.
Insert or remove the SIM card only after “Power off” the phone (i.e. when LCD display is
blank).
Install the battery in phone first and then connect the adaptor to the phone for charging it.
Do not use damaged antenna with the product. It may affect the RF performance of the
product.
If the antenna is damaged then use only the antenna approved by “beetel” and get it
replaced by qualified technician or visit nearby “beetel” service centre for replacement of
antenna.
If the phone is not working properly, do not attempt to repair it from unauthorised person.
Visit nearby “beetel” service centre to get the phone repair.
Do not install the phone at wet places. This may cause damage to the phone.
IMPORTANT SAFETY INSTRUCTIONS

Install the SIM and Battery:
Unlock the battery compartment cover.
Insert the SIM card with correct direction in the
SIM tray in battery compartment (Refer Figure
2).
Install the supplied 3.7V Li-ion battery in to the
battery compartment (Refer Figure 2).
Lock the battery compartment cover back.
Connect the Phone:
Connect the handset with base unit by using coil cord (Refer Figure 1).
Plug the power adaptor in to the DC 5V USB port on the base (Refer Figure 3).
Charge the battery for 6-8 hrs. before initial use.
Press and hold the “Power ON/OFF” ( ) key to switch “ON” the 4G Fixed Wireless
Phone. “beetel” will be displayed on the LCD display for some time.
After that service provider name will appear on the LCD display which indicates that now
your phone is ready to receive and make calls. (If signal strength is very poor at the
location of phone and “Emergency” appears on the LCD display then it is
recommended to install the phone at some other location where there is better signal
strength).
Also check the Wi-Fi Hotspot ( ) and data upload/download ( )icon will appear on the
LCD display which indicates that now your phone is ready for use as Wi-Fi Hotspot
function.
Set the time and date manually:
For setting the time and date on LCD display refer page 40
Note: As the default date and time setting is at “Automatic date & time”, so the phone auto select the
date and time after synchronising with SNTP (Simple Network Time Protocol)
INSTALLING YOUR PHONE
Connect Switching
Adaptor Here
Figure 3
SIM
Insert SIM here
with correct
direction
SIM Tray
Figure 2
Place the
battery here
BATTERY
Figure 1
It is recommended to always use power adaptor
when Phone is connected as Hotspot.
CH CH-
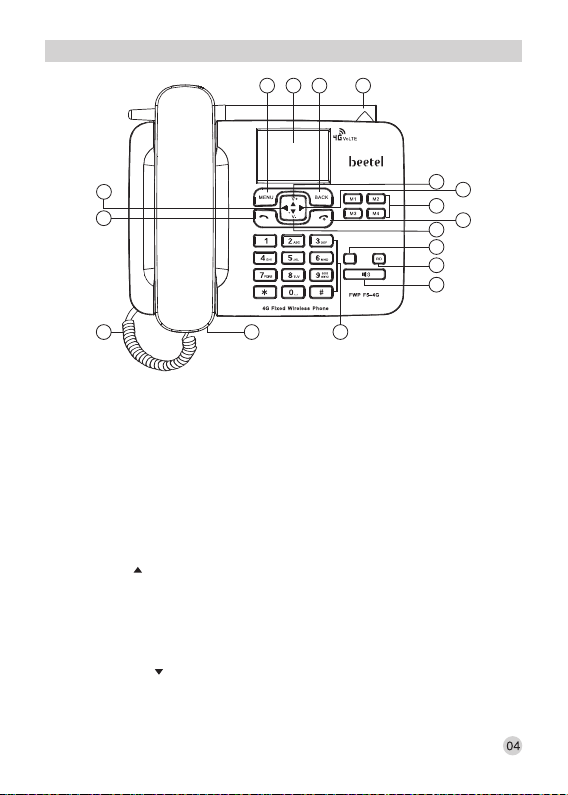
PHONE LAYOUT
1. MENU KEY(LEFT SOFT KEY):
Press to go in to the main menu in idle mode.
In sub Menu mode: Press to confirm the selection.
Press to answer the incoming calls (if wants to attend the call).
2. LCD DISPLAY:
Displays signal strength, battery status, date and time in idle mode.
3. BACK KEY (RIGHT SOFT KEY):
Press to access the Phonebook in idle mode.
In sub Menu mode: Press to go back to previous level.
In editing /pre-dialling mode: Press to clear a character/ digit.
In editing /pre-dialling mode: Long press to clear all character/ digits.
Press to reject the incoming calls (if do not wants to attend it).
4. UP KEY ( ):
Press to access the calendar in idle mode.
In menu mode: Press to scroll up the menu items (In Page Menu mode).
In sub-menu mode: Press to scroll up the sub-menu items.
In phonebook list/missed calls list / received calls list/ dialled calls list: Press to scroll up
the list.
During FM Radio use: Press to increase the FM Radio Volume.
5. DOWN KEY ( ):
Press to access the “Settings” in idle mode.
In menu mode: Press to scroll down the menu items (In Page Menu mode).
In sub-menu mode: Press to scroll down the sub-menu items.
2 3 171
7
8
16
4
5
12
10
11
6
9
13
1415
WIFI

In phonebook list/missed calls list/ received calls list/ dialled calls list. Press to scroll down
the list.
During FM Radio use: Press to decrease the FM Radio Volume.
6. RIGHT KEY ( ):
Press to access the Calculator in idle mode.
During a call: Press to increase the receive volume in handset and speaker mode.
During edit mode (Message/Phonebook): Press this key to move from extreme right to
extreme left and then left to right in steps.
In menu mode: Press to scroll right the menu items (In Grid Menu mode).
7. LEFT KEY ( ):
Press to access the FM Radio in idle mode.
During a call: Press to decrease the receive volume in handset and speaker mode.
During edit mode (Message/Phonebook): Press this key to move from right to left and
extreme left to extreme right in steps.
In menu mode: Press to scroll left the menu items (In Grid Menu mode).
8. CLIST KEY
Press to access call history (All calls) in idle mode.
9. POWER ON/OFF KEY ( ):
When the phone is POWER OFF: Press and hold to POWER ON the phone in idle mode.
Press and hold to POWER OFF the phone in idle mode.
In menu/editing mode: Press to go back to the idle mode.
During a call: Press to end a call and go back to idle mode.
10. WIFI KEY
Press to access the Wi-Fi Hotspot in idle mode.
11. REDIAL KEY:
Press to dial out the last dialled number.
12. DIRECT MEMORY KEYS (M1, M2, M3, M4):
One touch memory to store important phone numbers for direct calling.
After storing numbers press M1, M2, M3 & M4 to dial out the stored number.
13. SPEAKER KEY ( ):
During a call: Press to turn on / off the speaker phone.
14. ALPHANUMERIC KEY PAD, * (STAR), # (HASH):
Press to insert a digit /character/*/# key in idle mode.
Press “0” key for inserting space between two characters/words during SMS writing and
phonebook name entry.
Press “1” key for inserting symbols during SMS writing and phonebook name entry.
Press “#” key for inserting the decimal (.) during use of calculator.
Press “#” key during editing mode (Message/Phonebook) to choose different input
methods.
15. CORDED HANDSET:
For communication between two parties.
16. COILED CORD:
To connect corded handset with base unit.
17. EXTERNAL ANTENNA:
Detachable TNC antenna for better RF signal.

LCD DESCRIPTION
Main Icons with Description
Missed Call Indicator
Unread SMS Indicator
Missed Call-Arrow in RED colour
(During review of call list)
Received/Incoming Call - Arrow in
GREEN colour (During review of Call list)
Dialled/Outgoing Call-Arrow in
GREEN colour (During review of Call list)
Receive volume at minimum (Level 1)
During conversation in Handset Mode
Receive volume at default setting (Level 5)
During conversation in Handset Mode
Receive volume at default setting (Level 5)
During conversation in Speaker Mode
Receive volume at maximum (Level 6)
During conversation in Handset Mode
Receive volume at minimum (Level 1)
During conversation in Speaker Mode
When Alarm is activated
Alarm with Snooze
When caller ringtone volume is
set default (Level 6)
When transmit signal is mute
during conversation
When Call is on Hold
When Wi-Fi Hotspot is “ON”
When data upload/download
function is activated
When VoLTE is “ON”
When Phonebook entry is
stored in SIM Memory
When Phonebook entry is stored
in PHONE Memory
Appears with quick search of
any entry in Phonebook
When Wi-Fi is “ON”
Indicates “draft message” in SMS list
Indicates “sent messages” in SMS list
Indicates “received message” in SMS list
When Bluetooth is “ON”
Menu Contacts
09:05
TUESDAY, OCT 15, 2019
airtel 4G
VoLTE
4G
9:05
Receive volume at maximum (Level 6)
During conversation in Speaker Mode
Ringtone
When SMS notification tone volume
set default (Level 5)
Notifications
VoLTE
Search
Draft
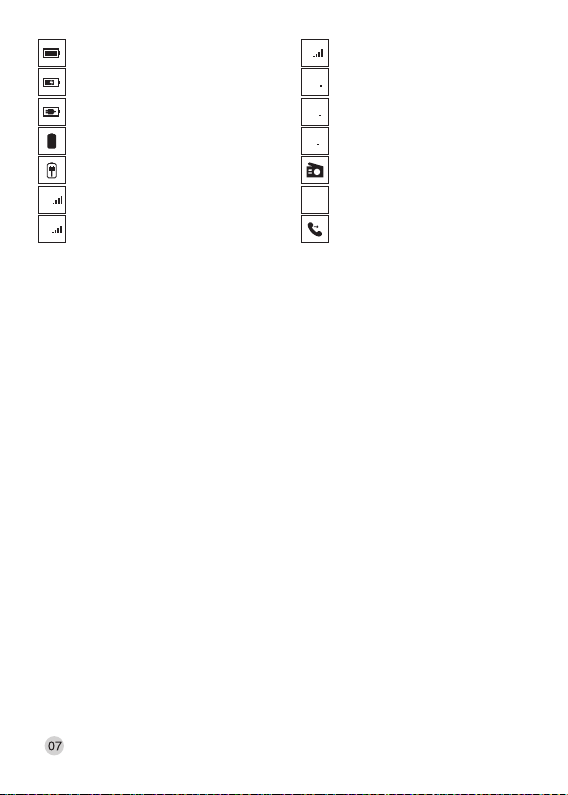
When adaptor is connected to the
phone for charging the battery
Indicates when battery is fully charged
When adaptor is connected to the phone
without battery (Power ON Mode)
When adaptor is connected to the phone
for charging the battery (Power OFF Mode)
When adaptor is connected to the phone
without battery (Power OFF Mode) When FM Radio is “ON”
When 2G signal strength is poor
(Poor Network)
More bars will show when 2G signal
strength is strong (Strong Network)
When 4G signal strength is poor
(Poor Network)
When 3G signal strength is poor
(Poor Network)
E
4G
+
H
More bars will show when the 3G signal
strength is strong (Strong Network)
More bars will show when the 4G signal
strength is strong (Strong Network)
4G
+
H
E
Indicates default “Input Method”
during SMS writing & Phonebook entry
When all voice call are diverted
AB
Add
Contact
• Sound
• Display
• Call settings
• VoLTE
• Wi-Fi
• Bluetooth
• Data usage
• Security
• Date & Time
• Language
• Wallpaper
Setting
• Scheduled
power on/off
• Storage
• Memory
Cleanup
• Reset
• About phone
• More
ALL
MISSED
OUTGOING
INCOMING
Sub
Menu 2
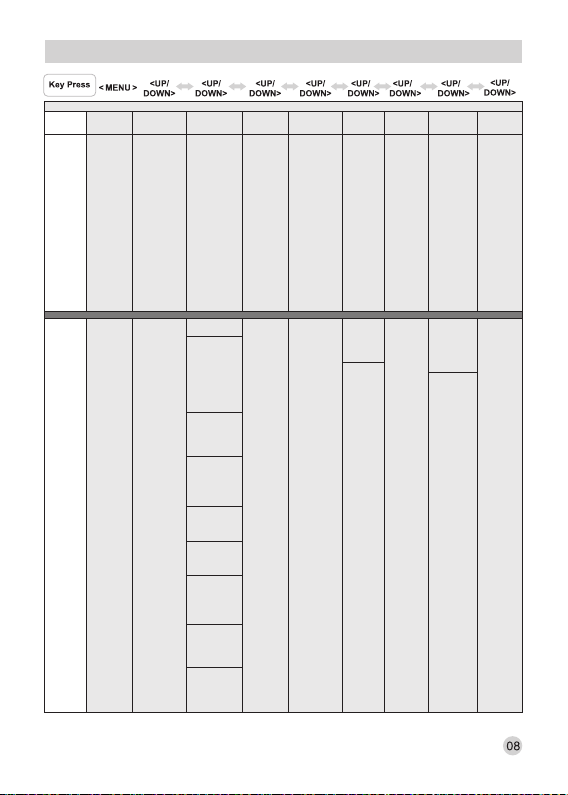
MAIN
MENU
CONTACTS HISTORY
SETTINGS
Sub
Menu 1
MENU STRUCTURE
FM
RADIO
• Turn off
• Auto
search
• Radio list
• Mute
• Manual
input
MESSAGING
• Select
• New
message
• Settings
• Delete
thread
• Cell
broadcasts
• Messages
in SIM
• SIM
Capacity
• Phone
Capacity
MUSIC
• Songs
• Playlists
• Artists
• Albums
EXTRA
• Calulator
• Calendar
• Call Fire
Wall
• Clock
(Alarm)
• Hotline
• SIM
Toolkit
• Sound
Recorder
FILE
EXPLORER
• Audio
• Images
• Video
• Documents
• Local
MEMORY
CLEANUP
• Select
• Edit
• Add to
speed dial
• Add
Contact
• Contacts
to display
• Import/
Export
• Batch
delete
• SIM
Capacity
• Phone
Capacity
• Select
• Add to
blacklist
• Clear call
logs
Sound
• Volume
• Call ringtone
• Default
notification
• Tap sounds
• Screen lock
sound
Display
• Brightness
• Sleep
• Menu mode
Call Settings
• Service
provider PR
• General
Settings
VoLTE
• VoLTE Call
Availability
Wi-Fi
• On
• Advanced
Bluetooth
• On
• Show
received
files
Data usage
• Service
Provider
• Wi-Fi
Security
• Screen lock
• Set up
SIM card
lock
Songs/
Playlist/
Artists/
Albums
• Select
• Quit
Audio/
Images/
Video/
Documents/
Local
• Select
• Settings

MAIN
MENU
CONTACTS HISTORY
SETTINGS FM
RADIO MESSAGING MUSIC EXTRA FILE
EXPLORER
MEMORY
CLEANUP
Date & Time
• Automatic
date & time
• Automatic
time zone
• Set date
• Set time
• Use 24-hour
format
Language
• English
• Espanol
(Spanish)
Wallpaper
Setting
• Wallpaper
1- 5
Scheduled
power on/off
• Power on
• Power off
Storage
• Internal
storage
Memory
Cleanup
Reset
• Factory
data reset
About Phone
• Status
• Model
Number
• Mocor
version
• Baseband
version
• Kernel
version
• Software
version
• Hardware
version
More
• Tethering &
portable
hotspot
• Mobile
Networks
INITIAL SETTINGS
1. Set Year, Month, Date & Time (Refer page 40-41)
2. Set Ring Tone and Ring Volume (Refer page 30-32)
3. Set Scheduled Power On/Off tone (Refer page 41-42)
4. Set tone for incoming message (Refer Page 30-31)
5. Set Phonebook name and number storage (Refer page 14-15)
6. Set Alarm feature (Refer page 27)
7. Set Family Number (Refer page 37)
8. Set Wi-Fi Hotspot (Refer page 43-44)

PHONE OPERATION
Switch the phone on/off
If your phone is powered off before, press and hold “POWER ON/OFF KEY” to turn
on the phone.
You can press and hold “POWER ON/OFF KEY” again to power off the phone.
Making a call
Pick-up the Handset or press the Speaker key and listen for dial tone.
Dial the number you want to call, LCD will display the dialled number. The input
number will be dialled out automatically.
OR
Make sure the phone is off (not in talk mode).Bring the desired number that you
want to call on the LCD display from Phonebook, Missed calls, Dialled calls and
Received call list, press “MENU” key and select the option “Dial”. The number
displayed on the LCD will be dialled out automatically.
When conversation is finished, put the handset on the base unit or press the
Speaker key to end the call.
Receiving a call
When somebody calls you the phone rings and the Caller ID number shall be
displayed on the LCD display.
Pick up the Handset or press the Speaker key to receive the call.
When conversation is finished, put the handset on the base unit or press the
Speaker key to end the call.
Note:
Default receive volume in handset mode is at level 5.
Default receive volume in speaker mode is at level 5.
Adjust the receive volume in handset or speaker mode by pressing the LEFT/RIGHT key
during the conversation.
Press “Speaker” key to alternate between speaker phone and normal handset mode.
During making or receiving a call, the built in call timer will automatically display the call
time. It is shown in Hour, Minutes and Seconds formal (HH:MM:SS). The call timer gives
you approximate idea about the call length.
If you do not want to attend the received call, press the “RIGHT SOFT KEY” twice, phone
busy message will go to other party end.
Pre-dialling
Make sure the phone is off (not in talk mode).

Enter the telephone number that you want to dial (if any mistake is committed
during entering the telephone number, it can be corrected by using “BACK” key).
The telephone number which has to be dialled out is displayed on the LCD display.
Lift the handset or press Speaker key or press “MENU” key and select the option
“Call”. Press “MENU” key again, the displayed number will be dialled out
automatically.
When conversation is finished, put the handset on the base unit or press the
Speaker key to end the call.
Last Number Redial
You can redial the last dialled number.
Lift the handset or press Speaker key.
Hear the dial tone, press the “RD” key.
The last dialled number will be dialled out automatically.
Mute a call
During conversation, press “LEFT SOFT KEY” and select the option “Mute”.
Press “LEFT SOFT KEY” to mute the call. When the call is muted, “Mute” icon
( ) will be displayed on the LCD.
To unmute the call, during conversation, press “LEFT SOFT KEY” and select the
option “Unmute”, “Mute” icon ( ) will be removed from the LCD display.
Note:
Only transmit/sending is muted while using Mute function.
Call Waiting
During call waiting service when you are on a call and a new call comes, you will
hear a beep tone.
The caller ID information of the third party is also displayed on the LCD along with
beep tone.
Press “LEFT SOFT KEY” to answer the third party call and select the option to put
put the current call on hold.
Press “LEFT SOFT KEY” and select the option “Swap”.
Press the “LEFT SOFT KEY” again to call the current party in conversation and
put the third party on hold. In this way you can alternate the call between current
party and third party whenever it is required.
Note:
This feature is related to service provider. Please activate the same from the call waiting
option in Menu setting.
11

Call Forwarding
This feature allows you not to receive the voice call at your phone for a period of
time as desired.
If you do not want to attend any voice call on your phone, you can select for
divert/forward an incoming call to any assigned number according to the status
which you want to set i.e. Always Forward, Forward when busy, Forward when
unanswered, Forward when unreachable etc.
This feature can be activated and deactivated/disabled from Menu (i.e. “Call
settings” sub-menu in “Settings”).
Note:
This feature is related to service provider. Please activate the same from the Call forward
option in Menu setting.
During call forward function is activated on your phone, you cannot receive a voice call on
your phone.
Hold a Call
During conversation, press a “LEFT SOFT KEY” and then press the UP/DOWN
key to select the option “Hold”.
Press “LEFT SOFT KEY” to hold the call. When the call is on hold, the other hand
party receive the message that your call is on hold and “Hold” icon ( ) will be
displayed on the LCD display.
To resume the call, during conversation, press “LEFT SOFT KEY” and then press
the “UP/DOWN” key to select the option “Resume”. Now your conversation will
resume with other end party. “Hold” icon ( ) will be removed from the LCD
display.
“SOS” Button for Emergency Calls
F5-4G supports to make the emergency calls by using the “SOS” button. The key “9”
on the phone keypad is configured as “SOS” button to make the emergency calls
when you have a bad/invalid SIM card in your phone, your phone is without SIM card
and if your phone is in locked mode.
To make the emergency call using “SOS” button proceed as follows;
Press & hold key “9” (SOS button) for 3-5 seconds when the phone is in stand-by
mode.
Emergency Call SOS Number: 112 appears on the LCD display & the
emergency call will go through the emergency service number “112”.
Note:
This feature is applicable for use only when the single emergency number “112” will be
operational throughout India to help people reach immediate services of police,
ambulance and fire department for any emergency. 12

3-Party Call Conferencing
During call waiting service when you are on a call and a new call comes, you will
hear a beep tone.
The Caller ID information of third party is also displayed on the LCD display along
with beep tone.
Press “LEFT SOFT KEY” to answer the third-party call and select the option to
put the current call on hold.
Press the “LEFT SOFT KEY” again and select the option “Merge Calls”.
Press the “LEFT SOFT KEY” again. Now the 3-parties will be connected with
each other and they can interact with each other.
Note:
This feature is related to service provider. Please activate the same from the call waiting
option in menu settings.
13

PHONEBOOK (Contacts)
You can store 1000 private phonebook entries with name & number in the
Phonebook/Contacts list of your phone.
You can save the phonebook entries in the SIM Card or Phone Memory.
By using the phonebook function Add contact, Search & Delete/Batch Delete the
contact/contacts from Phonebook Memory.
In standby mode you can access the phonebook function by “BACK” key directly.
Phonebook Settings
Add contact/new entry in phonebook:
In standby mode, Input the desired phone number to be entered in the phonebook
memory with name.
Press the “LEFT SOFT KEY” and select the option “Add to contacts”.
Press the “LEFT SOFT KEY” once again and select the option to store the new
contact in Phone Memory or SIM Card as desired.
Enter the name in the allocated space on the LCD display and press the “LEFT
SOFT KEY”.
Select the option “Save” and press the “LEFT SOFT KEY” again, “Contact
saved” appears on the LCD display. Now the desired phone number is stored in
the phonebook memory with name successfully.
OR
In standby mode, press “LEFT SOFT KEY” to enter in the main menu. You will
enter in option “Contacts” directly.
Press the “LEFT SOFT KEY” again, “Search” option from phonebook will be
displayed on the LCD display.
Press the “LEFT SOFT KEY” again and select the option “Add contact” from
sub menu.
Press the “LEFT SOFT KEY” once again and select the option to store the new
contact in Phone Memory or SIM Card as desired.
Press the “LEFT SOFT KEY” once again, Enter the name in the allocated space
on the LCD display. Select the phone number to be entered along with name by
pressing the “DOWN” key. To select the option Mobile/ Home/ Work etc for adding
MENU SETTINGS
14

description with each new entry to be stored in phonebook, press the “DOWN”
key.
Press the “LEFT SOFT KEY” and choose the option “Select”. Press the
“UP/DOWN” key to select the desired option (Mobile/Home/Work etc).
Press the “LEFT SOFT KEY” & select the option “Save”. Press the “LEFT SOFT
KEY” again, “Contact saved” appears on the LCD display. Now the desired
phone number is stored in the phonebook memory with name successfully.
Note:
Use “#” key to change the input method (AB, Ab, 12, ab) during phonebook entry.
View contact detail from phonebook memory:
In standby mode, press “LEFT SOFT KEY” to enter in the main menu. You will
enter in option “Contacts” directly.
Press the “LEFT SOFT KEY” and “UP” key to select “Search” option from
phonebook entries.
Enter the first character of the name by multi-tap.
Press “UP/DOWN” key to view the desired contact from Phonebook Memory.
Press the “LEFT SOFT KEY” and choose the option “Select” from sub-menu.
Press the “LEFT SOFT KEY” again, the desired phonebook entry will appear on
the LCD display with name.
Edit contact detail in phonebook memory:
In standby mode, press “LEFT SOFT KEY” to enter in the main menu. You will
enter in option “Contacts” directly.
Press the “LEFT SOFT KEY” and “UP” key to select the “Search” option from
phonebook entries.
Enter the first character of the name by multi-tap.
Press “UP/DOWN” key to view the desired contact from Phonebook Memory.
Press the “LEFT SOFT KEY” and choose the option “Edit” from sub-menu.
Press the “LEFT SOFT KEY” again, the name of desired phonebook entry which
has to be edited appears on the LCD display with blinking cursor on last character.
Press the “LEFT SOFT KEY” to clear and edit the name. Select the phone
number of the desired phonebook entry by pressing the “DOWN” key and follow
the same process to edit the phone number. To select the option Mobile/ Home/
Work etc for adding description with each new entry to be stored in phonebook,
press the “DOWN” key.
Press the “LEFT SOFT KEY” and choose the option “Select”. Press the
15

“UP/DOWN” key to select the desired option (Mobile/Home/Work etc).
Press the “LEFT SOFT KEY” & select the option “Save”. Press the “LEFT SOFT
KEY” again, “Contact saved” appears on the LCD display. Now the desired
phone number is edited and stored in the Phonebook Memory with name
successfully.
Delete/ Batch Delete phonebook entry:
In standby mode, press “LEFT SOFT KEY” to enter in the main menu. You will
enter in option “Contacts” directly.
Press the “LEFT SOFT KEY” again, “Search” option from phonebook will be
displayed on the LCD display.
Press the “LEFT SOFT KEY” & “UP/DOWN” key to select the option “Batch
Delete” from sub menu, “Choose a contact” appears on the top of the LCD
display.
Press the “LEFT SOFT KEY” and choose the phonebook entry/entries to be
deleted from the Phonebook Memory by pressing the “UP/DOWN” key and then
select it by pressing the “LEFT SOFT KEY” once again.
Press the “LEFT SOFT KEY” again and select the option “Done”.
Press the “LEFT SOFT KEY” again, “Delete contact(s)” with OK and Cancel
option will appear on the LCD display.
Press the “LEFT SOFT KEY” again for confirmation to delete the desired contact
(s) from Phonebook Memory.
Press the “LEFT SOFT KEY” again, “Batch deleting” appears on the LCD
display. Now the desired phone number are deleted from the Phonebook Memory.
Note:
You can delete single phonebook entry or multiple phonebook entries in batch from the
Phonebook Memory by following the same method.
Call from phonebook:
In standby mode, press “LEFT SOFT KEY” to enter in the main menu. You will
enter in option “Contacts” directly.
Press the “LEFT SOFT KEY” and “UP” key to select the “Search” option from
phonebook entries.
Enter the first character of the name by multi-tap.
Press “UP/DOWN” key to select the desired contact from Phonebook Memory.
Press the “LEFT SOFT KEY” and choose the option “Select” from sub-menu.
Press the “LEFT SOFT KEY” again, the desired phonebook entry will appear on
the LCD display with name.
16

Press the “LEFT SOFT KEY” again and choose the option “Dial”.
Press the “LEFT SOFT KEY” again, the desired phone number from the
phonebook entries is dialled out successfully.
Memory in Use:
In standby mode, press “LEFT SOFT KEY” to enter in the main menu. You will
enter in option “Contacts” directly.
Press the “LEFT SOFT KEY” again, “Search” option from phonebook will be
displayed on the LCD display.
Press the “LEFT SOFT KEY” again and select the option “Add contact” from
sub menu.
Press the “LEFT SOFT KEY” once again, LCD will display the memory in use for
contact storage. Phone Memory and SIM Card are the options which the phone
user can select as per requirement.
Note:
Default contact storage is in Phone Memory.
Contacts to Display:
In standby mode, press “LEFT SOFT KEY” to enter in the main menu. You will
enter in option “Contacts” directly.
Press the “LEFT SOFT KEY” again, “Search” option from phonebook will be
displayed on the LCD display.
Press the “LEFT SOFT KEY” & “UP/DOWN” key to select the option “Contacts
to display” from sub menu.
Press the “LEFT SOFT KEY” once again, LCD will display the options; All
contacts/Phone/SIM Card. You can select any one option as desired.
Note:
“All contacts” option will display all the phonebook entries.
“Phone” option will display all the phonebook entries in Phone Memory.
“SIM Card” option will display all the phonebook entries in SIM Card.
Default setting is at “All contacts.
View Memory Status (SIM capacity):
In standby mode, press “LEFT SOFT KEY” to enter in the main menu. You will
enter in option “Contacts” directly.
Press the “LEFT SOFT KEY” again, “Search” option from phonebook will be
displayed on the LCD display.
Press the “LEFT SOFT KEY” & “UP/DOWN” key to select the option “SIM
capacity” from sub menu.
17
Table of contents


: ITL-12CG-3 user guide")

TSD-S user manual")


