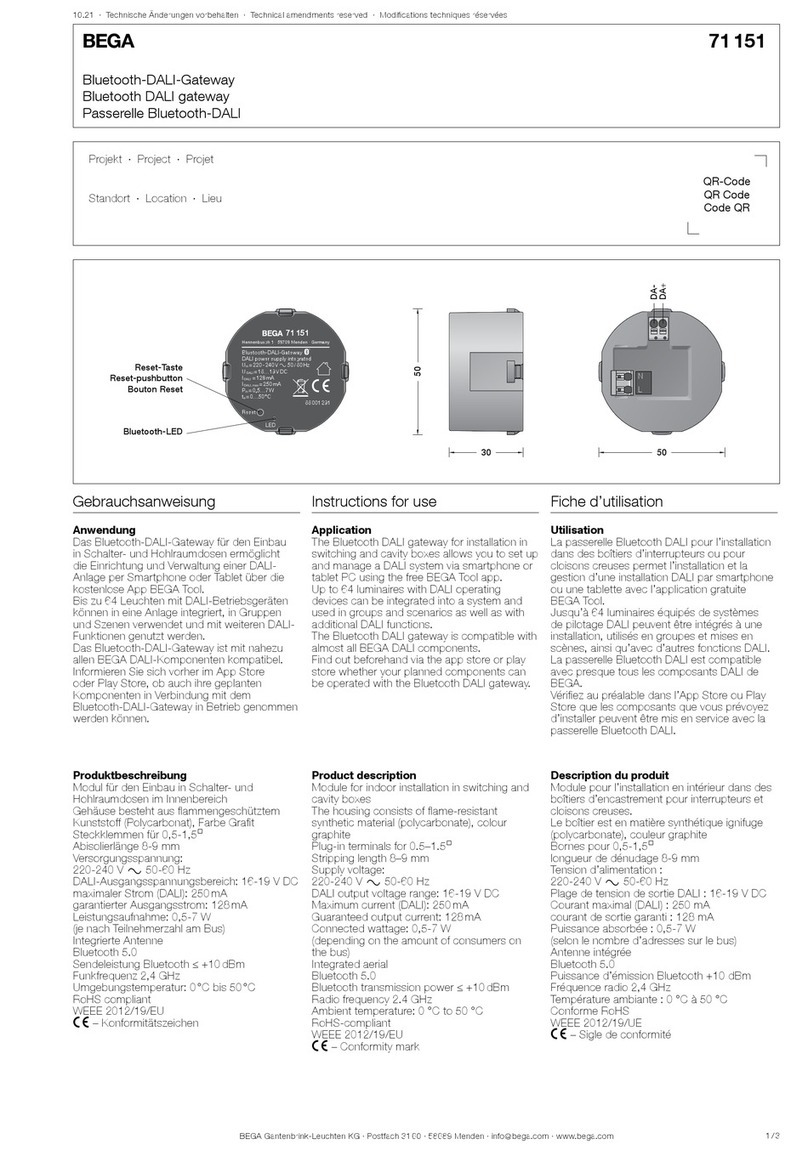
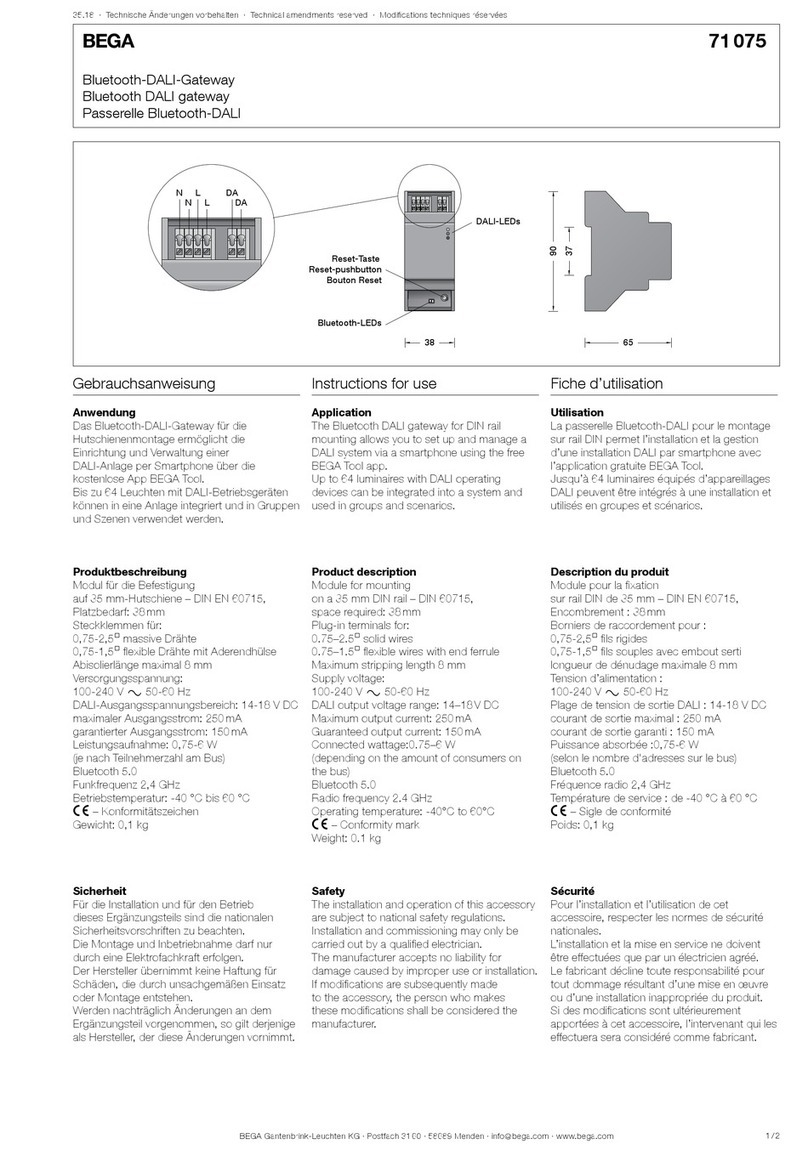
BEGA Gateway 70 588 Instructions and recipes

BEGA Gateway 70 588
Installation and
startup instructions

2Gateway 70 588
1. Release English 04/2015
BEGA Gateway 70 588 Installation and Startup Instructions © 2015 BEGA Gantenbrink-Leuchten, Menden.
All rights reserved.
Reproduction and copying (even in parts) not allowed without the consent of ubisys technologies GmbH.
This document may contain substantive errors. However, it is regularly reworked and appropriately corrected in
the next release. For substantive errors we assume no liability.
Changes in the sense of technical progress can be made without notice.

3Gateway 70 588
Contents
Contents
Chapter 1 | General information
1.1 BEGA Control ZigBee Radio Control
1.2 Security and privacy
1.2.1 Safety of radio links
1.2.2 Gateway safety
1.2.3 Remote maintenance
1.2.4 Updates
1.3 Function
1.4 Ports
1.5 Scope of delivery
1.6 Technical information
1.7 Wall mounting
Chapter 2 | Commissioning
2.1 System requirements
2.2 Connecting the gateway
2.3 Logging in to the gateway
2.4 First steps to configure your gateway
2.4.1 Network settings
2.4.2 Authorizing control device
2.4.3 Add components
Chapter 3 | Configuration
3.1 Status menu
3.1.1 Device information
3.1.2 System status
3.2 Basic settings
3.2.1 Device information
3.2.2 Time and date
3.2.3 Time zone
3.3 Network configuration
3.3.1 Network settings
Dynamic
Static
3.3.2 Proxy settings
3.3.3 Role in the ZigBee network
3.4 Security
3.4.1 Password
3.4.2 The following devices have access to
your system
3.4.3 Enable access for an additional device
3.4.4 Open ZigBee network for additional
devices
3.4.5 Renew ZigBee network key
3.5 Updates
3.5.1 Firmware update for the gateway
3.5.2 Firmware update for the gateway
3.6 Maintenance
3.6.1 Configuration backup
3.6.2 Restore configuration
3.6.3 Restart
3.6.4 Error diagnosis
3.6.5 Remote support
3.6.6 System log files
3.6.7 Reset to default settings
3.7 Determining the network parameters
3.8 Determining gateway address
3.9 Change network parameters for gateway
access
3.9.1 Connect gateway to PC
3.9.2 Change the IP address of your PC
3.10 Controlling Smart Home on the road
3.10.1 Configuring the internet router
3.10.2 Public IP address
3.10.3 Enterprise networks, Firewall
3.10.4 Configuring the app
3.11 LED status signals
3.12 Protected Reset Button on the Rear
Side
3.13 Troubleshooting guide
Chapter 4 | More information
4.1 Storage
4.2 Cleaning
4.3 Disposal Note
4.4 Declaration of Conformity
4.5 Glossary
4.6 Contact
4
5
6
6
6
6
6
7
7
7
8
8
9
10
10
11
13
13
13
14
15
17
17
17
20
20
20
21
22
22
22
22
24
24
25
25
25
26
26
26
27
27
28
31
31
32
32
32
33
33
33
34
35
37
37
38
42
43
43
43
44
46
47
47
48
49
49
49
49
50
52

4Gateway 70 588
Chapter 1
General information

5Gateway 70 588
Chapter 1 | General information
This manual will assist you with starting up your BEGA Control ZigBee remote control. It contains all the
information required for adding new components, debugging and optimizing your system.
1.1 BEGA Control ZigBee Radio Control
The BEGA Control ZigBee Radio Control uses the newest technologies and standards to offer you smart
components that simplify your everyday routines.
Whether you simply turn on lights or control complex scenarios involving many components, the BEGA Control
ZigBee Radio Control will help you to make your home smarter.
A
D
C
B
A ZigBee flush-mounting components
B Smartphone/Tablet
C Gateway 70 588
D Your DSL, UMTS or LTE router
The following components are required for using the ZigBee Remote Control:
• Gateway 70 588: The gateway is the central component of the ZigBee Radio Control. It connects the
ZigBee components to your home network. If connected to your router, you can control the components
via your smartphone or tablet app – from any point in the world if connected to the internet.
• An individual selection of ZigBee components
• Android or iOS apps. Define groups or scenarios, get current power consumption values or create new
bindings.
Note: For some simple applications you can use your components without a gateway or app. In this case
however, your components won’t get any updates. Licensed electricians can do an initial installation of ZigBee
components in the shell construction or set up a basic installation, adding the gateway at a later time.
BEGA Control wireless components are based on the international standards IEEE 802.15.4 and ZigBee.
This guarantees a long term availability of components and a safe investment.

6Gateway 70 588
Chapter 1 | General information
1.2 Security and privacy
From the very beginning our ZigBee Gateway development department focused on developing encryption and
authentication algorithms ensuring that at any time only you can gain access to your system’s components.
However, as the system’s operator you will need to uphold some basic security concepts in order not to
compromise the system’s security.
1.2.1 Safety of radio links
Hacker attacks via radio links are only possible when the attacker is in range of your facility’s radio network.
For this reason, hackers don’t prioritize these objects, but put their focus on devices that can be globally
accessed, such as gateways. Nevertheless, we attached importance to insuring that the radio interface met all
high level safety requirements. As an administrator of a public facility, e.g. a hotel, holiday resort, company or a
government building, you should take the threat of such hacker attacks seriously.
Radio links between the components of your BEGA Control ZigBee network are based on the standard ZigBee
Home Automation System, which is based on the ZigBee PRO core technology. ZigBee PRO includes several
safety features, such as an AES-128 network key to ensure that your data can’t be read by third parties near
your facility. Moreover, it is not possible for attackers to send control commands to your network, or to record
legit control commands for future execution (“replay attack”). Unlike proprietary solutions, the open ZigBee
PRO standard has passed safety tests, allowing it to be used in billing related systems and companies.
1.2.2 Gateway safety
The gateway has several services that are required to gain access to your facility from the outside or for certain
event or time controlled processes. This includes the Smart Facility Service, which establishes the connection
between the facility and the BEGA Gateway app on your mobile device. Naturally, is has to be ensured that this
service is accessible from the outside. Therefore, all connections from your apps to this service are especially
protected and encrypted.
While setting up your facility via app, access authorization will be installed on your smartphone, giving you
access to your facility after the setup. A lost smartphone can be locked out at any time via the gateway’s web
interface.
Make sure that the web interface of your gateway cannot be accessed from the outside. Don’t set up port
forwarding via the TCP port 80, use local accesses or secured connections such as VPN to gain safe access
to the web interface.
1.2.3 Remote maintenance
Remote maintenance is done via a secured connection. This connection is protected by a certificate and has to
be opened explicitly via the gateway’s web interface. The interface will indicate an active remote access.
1.2.4 Updates
Firmware updates for your gateway are signed. Therefore, they cannot be manipulated to install threatening
software. The firmware for ZigBee devices is encrypted and has an integrity test. Every time the gateway firm-
ware is updated, the current firmware version and serial number will be stored for statistic reasons.

7Gateway 70 588
Chapter 1 | General information
1.3 Function
The gateway is the central component in your ZigBee network. It connects your ZigBee components, which are
provided with the ZigBee radio technology (IEEE 802.15.4), to your home or office network and the internet.
When connected to your internet router, you are able to control and monitor all components via smartphone or
tablet app – and when using the internet, even from any location in the world.
The intuitive web interface allows you to set up your gateway by yourself. All you need is an internet browser.
The web interface offers following functions:
• Network configuration: In order to connect your BEGA Control ZigBee system to your home or office
network you have to adjust the gateway’s network settings (IP address, network mask, name server,
optionally proxy settings etc.) to the network environment.
• Firmware updates: The gateway downloads and provides firmware updates for itself and for all other
components in the house. Additionally, you regularly receive new functions. And, in case of facing
problems you can solve errors by using this function.
• Unlocking and locking of mobile devices: Only authorized persons will be able to get access to your
ZigBee system. For this purpose, you can authorize individual devices and grant them access. If devices
become lost, they can easily be locked out again permanently.
• Support access: An integrated remote maintenance function, which only you can enable, allows our
customer service to get access to your device. Thereby, we can work on service cases without any costly
service trips.
1.4 Ports
• 10/100 Base-T Ethernet, PoE PD1)
• Power supply, 5V/1A
• USB 2.0 high speed host port
(for future expansions)
1.5 Scope of delivery
• IEEE 802.15.4/ZigBee Ethernet Gateway
• AC adapter 5V, 1A
• Network wire, CAT6, 2m, black

8Gateway 70 588
Chapter 1 | General information
1.6 Technical information
System information
• ARM926 CPU, 400 MHz
• 128 MB DDR2 SDRAM
• 256 MB NAND Flash
• 8 MB NOR Flash
Standards
• IEEE 802.3af PD
• IEEE 802.15.4
• ZigBee 2007 PRO
Dimensions
Length: 106 mm
Width: 106 mm
Height: 26 mm
Gateway Server Software
• Smart Facility Server
• ZigBee Over-the-Air
Upgrade Server
• ZigBee/IP Gateway (GRIP)
• Linux OS
Power supply
• 5 V DC
• Power consumption <1 W
Colour
Black, aluminium
Material
Aluminium (brushed) &
Synthetic material
Weight
approx. 500 g
1.7 Wall mounting
The gateway can either be simply put up or mounted on a wall. If you want to install the gateway on a fixed
position make sure that you don’t damage switches, power sockets, gas and water pipes, when determining
the mount position and drilling next to the ones mentioned above.
Don’t mount the gateway on metal boards or other environments that can impair RF transmissions. Information
about troubleshooting can be found in section 3.13 “Notes on troubleshooting”.
• Place the drilling template at the desired mount position and adjust it appropriately. Ensure that the
network connectors and power connectors and wires have enough space.
• Mark the position of both the drill holes A and B with the help of the drill template and a pencil.
• Drill at the two marked positions holes with a diameter of 5mm into the wall. After that, put a dowel in each
hole. Turn the screw into the dowel so that they are about 6mm out of the wall. Put the unit with the rear
recess on the screw heads and hang it on.

9Gateway 70 588
Chapter2
Commissioning

10Gateway 70 588
Chapter 2 | Commissioning
If possible the gateway should be installed first, before all other components. This gives you better control of
the installation progress. The following sections explain the usual procedure for the initial operation.
2.1 System requirements
Power supply:
5V DC (via included power adapter up to 100 – 240V AC).
Web browser with HTML4/5, CSS2/3 and JavaScript, e.g.:
Apple Safari, Google Chrome, Microsoft ® Internet Explorer, Mozilla Firefox®, Opera, etc.
Data link:
Ethernet 10/100 Mbit/s and IPv4 network environment (IPv6 will be supported by a future update)
2.2 Connecting the gateway
Connecting the gateway to your network
Use the included patch cable (G) to connect the gateway to your DSL, UMTS or LTE router (see figure).
Connecting the gateway to power supply
Connect the included power supply (H) to your gateway and plug it into the outlet (see figure 2). This device
may only be connected to an easily accessible outlet indoors. In case of danger pull the plug.
Note: To avoid damage to the device, use only the included original AC adapter as a power supply.

11Gateway 70 588
Chapter 2 | Commissioning
A
K
B C D E
F
GL H
J
I
A
B
C
D
E
F
G
H
I
Status LED
USB 2.0 port (not used at the moment)
Ethernet port
Power supply
Reset button
Network cable
Power supply unit
Your DSL, UMTS or LTE router
Socket
Figure 2
Your gateway is ready now for further configuration.
2.3 Logging in to the gateway
The gateway web interface can be reached via web browser. After connecting your gateway to your network
and connecting the power supply (see section 2.2 “Connecting the gateway”), you can start the configuration.
Follow these steps:
1. Open your web browser.
2. Enter the gateway’s default address http://192.168.0.211 in the URL and press the Enter key.
If a confirmation request is displayed which indicates an address
on the local network, accept this.
3. In the appearing window, enter user name and password for authorization (see figure 3).
The default user name and password are both: admin
4. Click “Login” or press Enter.

12Gateway 70 588
Chapter 2 | Commissioning
Figure 3
You are now on the web interface’s home screen (see figure 4). If this site does not open, check the wiring
and make sure that the gateway is in the same logical network as the device from which you opened
the web interface. The gateway’s default device address is 211, in the subnet 192.168.0.X (subnet mask
255.255.255.0). If the IP address of your computer does not start with 192.168.0.*, change it temporarily
in order to configure the gateway properly. More information can be found in section 3.9 “Change network
parameters for gateway access”.
Figure 4

13Gateway 70 588
Chapter 2 | Commissioning
2.4 First steps to configure your gateway
Before you can use the gateway for BEGA Control, the following settings must be made:
• Adjust network settings to the network environment
• Authorize control unit
• Add components (dimmer, power switch, etc.)
2.4.1 Network settings
Configure the network parameters as described in section 3.3.1, or switch to DHCP with the help of the
protected button at the rear side of the device, as described in section 3.9.
2.4.2 Authorizing control device
Before you can configure and control your ZigBee system by app, you need to authorize your smartphone or
tablet at the gateway as a control unit. Navigate to “Security” and follow these steps:
1. In the section “Enable access for an additional device”, enter any access code in the “Access code” text-
box (must be at least 4 digits). Optionally, you can remember the randomly generated 4 digit code
(see figure 8). This code will be automatically generated when opening this site.
2. Click on “Activate”. The next step has to be done within 5 minutes, after that the authorization time frame
automatically closes. After every authorization attempt through an app the time frame is automatically
closed.
3. Start the app on your smartphone or tablet (available in the Apple Store or Google Play Store) and select
the corresponding gateway. You will be asked to enter the recently defined access code. After that, you
will have access to your ZigBee system via the configured device.
Figure 8

14Gateway 70 588
Chapter 2 | Commissioning
2.4.3 Add components
Once you have both successfully configured your gateway and added a smartphone or tablet as a control
unit, you can start to install components, such as dimmers, power switches, shutter controllers etc. When a
component has been connected and power is turned on again, this component will automatically try to log in
to an open ZigBee network. For this, you must open your ZigBee network to accept new components.
On the web interface, navigate to “Security”, then head to “Open ZigBee network for new components” and
click “Open” (see figure 9).
Figure 9
Your ZigBee network will now be opened for approx. 2 minutes. During this time, one or more new
components can log in to the network (see figure 10).
Figure 10
The newly registered components should now appear in your BEGA Gateway app at Configuration -> Basic
Configuration -> Components or as a status message on the status screen of your gateway interface.
Once all the installed components have been registered on the network, you can close your ZigBee network
again. Do this by clicking on “Close” (see figure 10).
A closed network ensures that no foreign devices get unauthorized access to your ZigBee network.
If you wish to add further components, just repeat the procedure.
Note: ZigBee components will search for an open ZigBee network only until they successfully log in to one.
After that, even in case of a power breakdown, there will be no new searching attempts.
If you want to add components that have been signed to another network before, you will have to set
them to their default settings first. More information about how to restore default settings can found in the
corresponding component’s manual (“Factory Reset”).

15Gateway 70 588
Chapter 3
Conguration

16Gateway 70 588
Chapter 3 | Configuration
The gateway offers a web based conguration interface, which can be reached by a web browser via your PC, tablet
or smartphone. This allows you to congure all required settings concerning the gateway.
For this, enter the IP address of your ZigBee gateway in your web browser’s address line http://. After pressing the
Enter key, a conrmation request will be displayed. Here, you enter the username admin and the password (which is
admin as well, by default) (see gure 11).
Default parameters:
IP address: 192.168.0.211
User name/login: admin
Password: admin
Figure 11
If you already congured your gateway, but forgot the address, you can simply look for it in the BEGA Gateway app.
More information about how to determine the IP address of your gateway can be found in section 3.8 “Determining
gateway address”.
Note: Your PC, tablet or smartphone has to be in the same network as the gateway is, in order to configure
it. If this is not the case, more information can be found in section 3.9 “Change network parameters for
gateway access”.

17Gateway 70 588
Chapter 3 | Configuration
3.1 Status menu
In the main menu, navigate to “Status”. Here you will nd detailed information about your ZigBee system and its
operating status.
3.1.1 Device information
In the section “Device information” you nd detailed information about your gateway, such as the model number,
serial number, current rmware version etc. (see gure 12).
Figure 12
3.1.2 System status
All the status, warning and error messages of your ZigBee system are displayed in the “System Status” menu.
Examples:
Figure 13
Figure 14

18Gateway 70 588
Chapter 3 | Configuration
The following feedback can occur:
Status messages (blue highlighted)
Contents Explanation
Initializing The gateway has recently been booted and is about to be ready.
The ZigBee network is being discovered via gateway, to
discover existing components and to integrate them into your
ZigBee system. This procedure may take a few minutes...
At initial operation the gateway will automatically scan your
ZigBee network to find installed components. Only after this
procedure you will be able to control these components via app.
ZigBee network discovery via gateway completed. No new
components were found.
No ZigBee components were found while scanning your ZigBee
network. In case, that installed components couldn’t be found
due to external interferences, you have the option to manually
start a network scan via app.
ZigBee network discovery via gateway completed. One (or
more) new component(s) were found.
The exact number of ZigBee components found during
the network scan will be displayed. In case, that installed
components couldn’t be found due to external interferences, you
have the option to manually start a network scan via app.
A new component (IEEE address: 00:1F:EE:00:00:00:00:01)
was found and integrated into your ZigBee network.
Every ZigBee component found can now be clearly identified by
its IEEE address (EUI-64).
New devices can now be connected with your ZigBee
network.
An access code for adding a new control device has been
enabled via the web interface. To activate a control device in your
ZigBee network, enter this code on the device to be added.
The device (iPhone John Doe) now has access to your ZigBee
network.
Access to your ZigBee network has been successfully granted to
the new control device.
The device (iPhone John Doe) has no access to your ZigBee
network.
Access to your ZigBee network from now on is denied the control
device. Reactivating access is only possible by a new access
code.
The update of the network component with the IEEE
address: 00:1F:EE:00:00:00:00:01 has been successfully
completed.
A new firmware for a ZigBee component has been downloaded
and will be installed afterwards. After successful installation, the
component restarts and will then be available again.
Warning messages (orange highlighted)
Contents Explanation
A command directed to the component (network address
1234) failed (status code: NWK:ROUTE_ERROR).
This error may occur, if the component is temporarily not
available.
This is usually a temporary radio transmission interference in your
ZigBee network, wherein control commands cannot be sent to
the target device.
This kind of error is often caused by external parasitic induction
and will be automatically fixed by the intelligent radio standard
being used.
If this warning message is displayed repeatedly, check, if the
affected component is installed and properly connected to power.
Do the same for temporarily stored ZigBee routers.
A command directed to the group (group address 0001) failed
(status code: MAC:CHANNEL_ACCESS_FAILURE).
This error may occur, if the component is temporarily not
available.
This is usually a temporary interference or overload in the ZigBee
network, wherein control commands cannot be sent to a group of
controlling devices.
This kind of error is often caused by external parasitic induction
or massive radio traffic and will be automatically fixed by the
intelligent radio standard being used.

19Gateway 70 588
Chapter 3 | Configuration
A command directed to the network address (broadcast
address: fffd) failed (status code: MAC:CHANNEL_ACCESS_
FAILURE).
This error may occur, if the component is temporarily not
available.
This is usually a temporary radio transmission interference in your
ZigBee network, wherein control commands cannot be sent to
the target device.
This kind of error is often caused by external parasitic induction
and will be automatically fixed by the intelligent radio standard
being used.
If this warning message is displayed repeatedly, contact the
support.
Your ZigBee network denied access to the unauthorized
device 192.168.0.111.
Authentication of a device has failed during the login attempt.
This is usually a mobile device, which had access to your ZigBee
network.
The update of the network component with the IEEE address:
00:1F:EE:00:00:00:00:01 has failed. Further attempts will
follow.
The download of the new firmware for the appropriate
ZigBee component has been interrupted due to transmission
interferences or a power breakdown, for example. A new attempt
will be done automatically.
An update could not be performed. Further attempts will
follow.
A ZigBee component has prematurely cancelled the download
attempt of a new firmware. A new attempt will be done
automatically.
Error messages (red highlighted)
Contents Explanation
Failed to initialize the Gateway Service.
If the error has not been resolved automatically after some
time, restart the gateway.
An error occurred while initializing the integrated ZigBee adapter
of the gateway. This is an internal error, which should not occur
in general. Restart the gateway. If the error occurs repeatedly,
contact the support.
No ZigBee adapter found.
If the error has not been resolved automatically after some
time, restart the gateway.
An error occurred while initializing the integrated ZigBee adapter
of the gateway. This is an internal error, which should not occur
in general. Restart the gateway. If the error occurs repeatedly,
contact the support.
The ZigBee adapter could not be started.
If the error has not been resolved automatically after some
time, restart the gateway.
An error occurred while initializing the integrated ZigBee adapter
of the gateway. This is an internal error, which should not occur
in general. Restart the gateway. If the error occurs repeatedly,
contact the support.
Failed to initialize the gateway. Further attempts will follow. An error occurred while initializing the integrated ZigBee adapter
of the gateway. This is an internal error, which should not occur
in general. Restart the gateway. If the error occurs repeatedly,
contact the support.
The gateway is temporarily not available. Further attempts will
follow.
During operation, an error occurred in the integrated ZigBee
adapter of the gateway. . This is an internal error, which should
not occur in general. Restart the gateway. If the error occurs
repeatedly, contact the support.
The component (IEEE address: 00:1F:EE:00:00:00:00:01)
does not respond to configuration attempts. Further attempts
will follow.
This could be a temporary radio transmission interference in the
ZigBee network, wherein a configuration command could not be
sent to a target device or acknowledged.
This error can be caused by external parasitic induction, an
inactive ZigBee router or a deactivated target device and is
usually automatically fixed as soon as the affected device is online
or the error source has been disabled.
If this error occurs repeatedly, check if the affected device and
temporarily stored ZigBee routers are installed and properly
connected to power. If the problem still exists, contact the
support.

20Gateway 70 588
Chapter 3 | Configuration
3.2 Basic settings
The basic settings are used for general conguration of your gateway:
3.2.1 Device information
Device information can be freely dened. In environments with several gateways, it helps identifying every single
device. Your dened description of the gateway can also be found, for example, in the BEGA Gateway app.
To make your individual information, follow these steps:
1. Click the “Edit” button (see gure 15).
2. Select the textbox you wish to edit.
3. Fill in your information.
4. After lling the information, click the “Save” button (see gure 16).
Figure 15
Figure 16
3.2.2 Time and date
In the “Time and date” section, the current date and time of your system is displayed. This information is important
when conguring time-dependent actions for your ZigBee network (e.g. automatic raising of blinds at a certain time).
If possible, date and time should be synchronized with an internet time server (NTP server). This conguration is set
by default. For this, the option “Synchronize date and time automatically” should be enabled (see gure 17).
A permanent internet connection, such as DSL, is required.
Figure 17
Table of contents
Other BEGA Gateway manuals