Behringer Micropower PS400 User manual

MICROPOWER PS400
Welcome to Behringer
Thank you for showing your condence in us by purchasing the
Behringer MICROPOWER PS400. Use this ultra-compact phantom
power supply with mixers and microphone preampliers that do not
include phantom power sources. The PS400:
•• supplies phantom power (+12 V or +48 V) to any type of
condenser microphone
•• routes the microphone signal to a mixer or a microphone
preamplier
◊◊ Please read the safety instructions that appear at the
end of this document.
Connectors and Control Elements
This section illustrates and describes each PS400 connector and
control element.
Fig. 1: PS400 connectors and control elements
(2)
(1) (3) (4) (5)
V 1.0

2 3
MICROPOWER PS400 MICROPOWER PS400
(1) 12 V connector:
To connect the power supply unit to the PS400, use the 12 V
connector. Connecting the power supply unit to the mains
automatically switches the PS400 on. To disconnect the unit
from the mains, pull out the main cord plug.
(2) ON LED:
As soon as the unit is connected to the mains, the ON LED is
illuminated.
(3) MIC INPUT connector:
To send a microphone signal to the PS400, you need an audio
cable that includes XLR connectors. Plug:
•• one XLR connector into the MIC INPUT connector
•• the other XLR connector into the condenser microphone
(4) MIC THRU connector:
To route the microphone signal from the PS400 to a mixer or a
microphone preamplier, you need an audio cable that includes
XLR connectors. Plug:
•• one XLR connector into the MIC THRU connector
•• the other XLR connector into the mic input of a mixer or,
alternatively a microphone preamplier
(5) +12 V / +48 V PHANTOM VOLTAGE switch:
To select the voltage that you need, push this switch toward
+12 V or, alternatively +48 V. For details about what value to
use, refer to instructions from the microphone manufacturer.
SERIAL NUMBER: To register the unit, use the serial number that is
located on the bottom of the PS400.
Setup Example
The following is an example of how to set up the PS400:
Fig. 2: PS400 setup example
MICROPOWER PS400
PROMIXER DJX750
STUDIO CONDENSER
MICROPHONE C-1
MIC THRU
MIC INPUT

MICROPOWER PS400
4MICROPOWER PS400
Bienvenido a Behringer
Gracias por mostrar su conanza en nosotros al comprar el Behringer
MICROPOWER PS400. Utilice esta fuente de alimentación fantasma
ultracompacta con mezcladores y preamplicadores de micrófono que
no incluyen fuentes de alimentación fantasma. El PS400:
•• suministra alimentación fantasma (+12 V o +48 V) a cualquier
tipo de micrófono de condensador
•• enruta la señal del micrófono a un mezclador o un
preamplicador de micrófono
◊◊ Lea las instrucciones de seguridad que aparecen al nal
de este documento.
Conectores y elementos de control
Esta sección ilustra y describe cada conector PS400 y elemento de
control.
Fig.1: Conectores y elementos de control PS400
(2)
(1) (3) (4) (5)
1)Read these instructions.
2)Keepthese instructions.
3) Heed all warnings.
4) Follow all instructions.
5) Do not use this apparatus near water.
6) Clean only with dry cloth.
7) Do not block any ventilation openings. Install in accordance with the manufacturer’s
instructions.
8) Do not install near any heat sources such as radiators, heat registers, stoves, or other
apparatus (including amplifiers) that produce heat.
9) Do not defeat the safety purpose of the polarized or grounding-type plug. A polarized
plug has two blades with one wider than the other. A grounding type plug has two blades
and a third grounding prong. The wide blade or the third prong are provided for your safety.
If the provided plug does not fit into your outlet, consult an electrician for replacement of
theobsoleteoutlet.
10) Protect the power cord from being walked on or pinched particularly at plugs,
convenience receptacles, and the point where they exit from the apparatus.
11) Only use attachments/accessories specified by the manufacturer.
12) Use only with the cart, stand, tripod, bracket, or table specified by the manufacturer, or
sold with the apparatus. When a cart is used, use caution when moving the cart/apparatus
combination to avoid injury from tip-over.
13) Unplug this apparatus during lightning storms or when unused for long periods of time.
14) Refer all servicing to qualified service personnel. Servicing is required when the
apparatus has been damaged in any way, such as power supply cord or plug is damaged,
liquid has been spilled or objects have fallen into the apparatus, the apparatus has been
exposed to rain or moisture, does not operate normally, or has been dropped.
Important Safety
Instructions

6 7
MICROPOWER PS400 MICROPOWER PS400
(1) 12 V conector:
Para conectar la fuente de alimentación a la PS400, utilice el
conector de 12 V. La conexión de la fuente de alimentación a la
red enciende automáticamente la PS400. Para desconectar la
unidad de la red, saque el enchufe del cable principal.
(2) EN LED: Tan pronto como la unidad está conectada a la red, el
LED ON se ilumina.
(3) ENTRADA DE MICRÓFONO conector:
Para enviar una señal de micrófono a la PS400, necesita un
cable de audio que incluya conectores XLR. Enchufe:
•• un conector XLR en el conector MIC INPUT
•• el otro conector XLR en el micrófono de condensador
(4) MICRÓFONO A TRAVÉS conector:
Para enrutar la señal del micrófono desde el PS400 a un
mezclador o un preamplicador de micrófono, necesita un cable
de audio que incluya conectores XLR. Enchufe:
•• un conector XLR en el conector MIC THRU
•• el otro conector XLR en la entrada de micrófono de un
mezclador o, alternativamente, un preamplicador de
micrófono
(5) +12 V / +48 V VOLTAJE FANTASMA cambiar:
Para seleccionar el voltaje que necesita, presione este
interruptor hacia +12 V o, alternativamente, +48 V. Para
obtener detalles sobre qué valor usar, consulte las instrucciones
del fabricante del micrófono.
NÚMERO DE SERIE: Para registrar la unidad, utilice el número de serie
que se encuentra en la parte inferior de la PS400.
Ejemplo de conguración
El siguiente es un ejemplo de cómo congurar la PS400:
Fig.2: Ejemplo de configuración de PS400
MICROPOWER PS400
PROMIXER DJX750
STUDIO CONDENSER
MICROPHONE C-1
MIC THRU
MIC INPUT

MICROPOWER PS400
8MICROPOWER PS400
1) Lea estas instrucciones.
2)Conserve estas instrucciones.
3) Preste atención a todas las advertencias.
4) Siga todas las instrucciones.
5) No utilice este aparato cerca del agua.
6) Limpiar solo con un paño seco.
7) No bloquee las aberturas de ventilación. Haga la instalación conforme a las instrucciones
del fabricante.
8) No lo instale cerca de fuentes de calor como radiadores, rejillas de calefacción, estufas u
otros aparatos (incluidos amplificadores) que produzcan calor.
9) No anule el propósito de seguridad del enchufe polarizado o con conexión a tierra. Un
enchufe polarizado tiene dos clavijas, una más ancha que la otra. Un enchufe con conexión
a tierra tiene dos clavijas y una tercera clavija de conexión a tierra. La hoja ancha o la
tercera clavija se proporcionan para su seguridad. Si el enchufe provisto no encaja en su
tomacorriente, consulte a un electricista para reemplazar el tomacorriente obsoleto.
10) Proteja el cable de alimentación para que no se pise ni se pellizque, especialmente en
los enchufes, los receptáculos de conveniencia y el punto por donde salen del aparato.
11) Utilice únicamente los aditamentos / accesorios especificados por el fabricante.
12) Úselo únicamente con el carro, soporte, trípode, soporte o mesa especificados por el
fabricante o vendidos con el aparato. Cuando se utiliza un carrito, tenga cuidado al mover la
combinación de carrito / aparato para evitar lesiones por vuelco.
13) Desenchufe este aparato durante tormentas eléctricas o cuando no se utilice durante
largos períodos de tiempo.
14) Refiera todo el servicio a personal de servicio calificado. Se requiere servicio cuando el
aparato se ha dañado de alguna manera, como el cable de alimentación o el enchufe están
dañados, se ha derramado líquido o han caído objetos dentro del aparato, el aparato ha
estado expuesto a la lluvia o la humedad, no funciona normalmente, o se ha caído.
Instrucciones de
seguridad Bienvenue chez Behringer
Merci de nous avoir témoigné votre conance en achetant le
Behringer MICROPOWER PS400. Utilisez cette alimentation fantôme
ultra-compacte avec des mixeurs et des préamplicateurs de
microphone qui n'incluent pas de sources d'alimentation fantôme.
Le PS400:
•• fournit une alimentation fantôme (+12 V ou +48 V) à tout type
de microphone à condensateur
•• achemine le signal du microphone vers une table de mixage ou
un préamplicateur de microphone
◊◊ Veuillez lire les consignes de sécurité qui apparaissent à
la n de ce document.
Connecteurs et éléments de contrôle
Cette section illustre et décrit chaque connecteur et élément de
commande PS400.
Fig.1: Connecteurs et éléments de commande PS400
(2)
(1) (3) (4) (5)

10 11
MICROPOWER PS400 MICROPOWER PS400
(1) 12 V connecteur:
Pour connecter le bloc d'alimentation au PS400, utilisez le
connecteur 12 V. La connexion du bloc d'alimentation au
secteur met automatiquement le PS400 sous tension. Pour
débrancher l'appareil du secteur, débranchez la che du cordon
d'alimentation.
(2) AU LED: Dès que l'unité est connectée au secteur, la LED ON
est allumée.
(3) ENTRÉE MICRO connecteur:
Pour envoyer un signal de microphone au PS400, vous avez
besoin d'un câble audio comprenant des connecteurs XLR. Prise
de courant:
•• un connecteur XLR dans le connecteur MIC INPUT
•• l'autre connecteur XLR dans le microphone à condensateur
(4) MIC THRU connecteur:
Pour acheminer le signal du microphone du PS400 vers une
table de mixage ou un préamplicateur de microphone, vous
avez besoin d'un câble audio comprenant des connecteurs XLR.
Prise de courant:
•• un connecteur XLR dans le connecteur MIC THRU
•• l'autre connecteur XLR dans l'entrée micro d'une table de
mixage ou, en variante, un préamplicateur micro
(5) TENSION PHANTOM +12 V / +48 V changer:
Pour sélectionner la tension dont vous avez besoin, poussez ce
commutateur vers +12 V ou, alternativement +48 V. Pour plus
de détails sur la valeur à utiliser, reportez-vous aux instructions
du fabricant du microphone.
NUMÉRO DE SÉRIE: Pour enregistrer l'unité, utilisez le numéro de
série situé sous le PS400.
Exemple de conguration
Voici un exemple de conguration du PS400:
Fig.2: Exemple de configuration PS400
MICROPOWER PS400
PROMIXER DJX750
STUDIO CONDENSER
MICROPHONE C-1
MIC THRU
MIC INPUT

MICROPOWER PS400
12 MICROPOWER PS400
1) Lisez ces instructions.
2)Conservez cesinstructions.
3) Tenez compte de tous les avertissements.
4) Suivez toutes les instructions.
5) N'utilisez pas cet appareil à proximité de l'eau.
6) Nettoyez uniquement avec un chiffon sec.
7) Ne bloquez pas les ouvertures de ventilation. Installer conformément aux instructions
du fabricant.
8) Ne pas installer à proximité de sources de chaleur telles que radiateurs, bouches de
chaleur, cuisinières ou autres appareils (y compris les amplificateurs) qui produisent de
la chaleur.
9) Ne supprimez pas la fonction de sécurité de la fiche polarisée ou de mise à la terre. Une
fiche polarisée a deux broches dont l'une est plus large que l'autre. Une fiche de mise à la
terre a deux broches et une troisième broche de mise à la terre. La lame large ou la troisième
broche sont fournies pour votre sécurité. Si la fiche fournie ne rentre pas dans votre prise,
consultez un électricien pour le remplacement de la prise obsolète.
10) Protégez le cordon d'alimentation contre tout piétinement ou pincement, en particulier
au niveau des fiches, des prises de courant et de leur point de sortie de l'appareil.
11) N'utilisez que les pièces jointes / accessoires spécifiés par le fabricant.
12) Utilisez uniquement avec le chariot, le support, le trépied, le support ou la table
spécifiés par le fabricant ou vendus avec l'appareil. Lorsqu'un chariot est utilisé, soyez
prudent lorsque vous déplacez la combinaison chariot / appareil pour éviter de vous blesser
en cas de basculement.
13) Débranchez cet appareil pendant les orages ou lorsqu'il n'est pas utilisé pendant de
longues périodes.
14) Confiez toute réparation à un personnel qualifié. Un entretien est nécessaire
lorsque l'appareil a été endommagé de quelque manière que ce soit, comme le cordon
d'alimentation ou la prise est endommagé, du liquide a été renversé ou des objets sont
tombés dans l'appareil, l'appareil a été exposé à la pluie ou à l'humidité, ne fonctionne pas
normalement, ou a été abandonné.
Consignes de sécurité Willkommen bei Behringer
Vielen Dank für Ihr Vertrauen in uns beim Kauf des
Behringer MICROPOWER PS400. Verwenden Sie dieses
ultrakompakte Phantomspeisungsgerät mit Mischpulten und
Mikrofonvorverstärkern, die keine Phantomspeisungsquellen
enthalten. Die PS400:
•• Versorgt jedes Kondensatormikrofon mit Phantomspeisung
(+12 V oder +48 V)
•• Leitet das Mikrofonsignal an einen Mischer oder einen
Mikrofonvorverstärker
◊◊ Bitte lesen Sie die Sicherheitshinweise am Ende dieses
Dokuments.
Anschlüsse und Steuerelemente
In diesem Abschnitt werden die einzelnen PS400-Anschlüsse und Steuerelemente
dargestellt und beschrieben..
Abb.1:PS400-Steckverbinder und Steuerelemente
(2)
(1) (3) (4) (5)

14 15
MICROPOWER PS400 MICROPOWER PS400
(1) 12 V Verbinder:
Verwenden Sie zum Anschließen des Netzteils an die PS400
den 12-V-Anschluss. Durch Anschließen des Netzteils an das
Stromnetz wird die PS400 automatisch eingeschaltet. Ziehen
Sie den Netzkabelstecker heraus, um das Gerät vom Stromnetz
zu trennen.
(2) AUF LED: Sobald das Gerät an das Stromnetz angeschlossen ist,
leuchtet die EIN-LED.
(3) MIC-EINGANG Verbinder:
Um ein Mikrofonsignal an die PS400 zu senden, benötigen Sie
ein Audiokabel mit XLR-Anschlüssen. Stecker:
•• Ein XLR-Anschluss in den MIC INPUT-Anschluss
•• den anderen XLR-Anschluss in das Kondensatormikrofon
(4) MIC THRU Verbinder:
Um das Mikrofonsignal von der PS400 zu einem Mischpult
oder einem Mikrofonvorverstärker zu leiten, benötigen Sie ein
Audiokabel mit XLR-Anschlüssen. Stecker:
•• Ein XLR-Anschluss in den MIC THRU-Anschluss
•• den anderen XLR-Anschluss in den Mikrofoneingang eines
Mischpults oder alternativ eines Mikrofonvorverstärkers
(5) +12 V / +48 V PHANTOMSPANNUNG Schalter:
Um die benötigte Spannung auszuwählen, drücken Sie diesen
Schalter in Richtung +12 V oder alternativ +48 V. Weitere
Informationen zum zu verwendenden Wert nden Sie in den
Anweisungen des Mikrofonherstellers.
ORDNUNGSNUMMER: Verwenden Sie zum Registrieren des Geräts
die Seriennummer auf der Unterseite des PS400.
Setup-Beispiel
Das folgende Beispiel zeigt, wie Sie die PS400 einrichten:
Abb. 2: Beispiel für die Einrichtung des PS400
MICROPOWER PS400
PROMIXER DJX750
STUDIO CONDENSER
MICROPHONE C-1
MIC THRU
MIC INPUT

MICROPOWER PS400
16 MICROPOWER PS400
1) Lesen Sie diese Anweisungen.
2) Bewahren Sie diese Anweisungen auf.
3) Beachten Sie alle Warnungen.
4) Befolgen Sie alle Anweisungen.
5) Verwenden Sie dieses Gerät nicht in der Nähe von Wasser.
6) Nur mit einem trockenen Tuch reinigen.
7) Blockieren Sie keine Belüftungsöffnungen. Installieren Sie das Gerät gemäß den
Anweisungendes Herstellers.
8) Nicht in der Nähe von Wärmequellen wie Heizkörpern, Heizregistern, Öfen oder anderen
Geräten (einschließlich Verstärkern)installieren,die Wärme erzeugen.
9) Den Sicherheitszweck des polarisierten oder geerdeten Steckers nicht außer Kraft setzen.
Ein polarisierter Stecker hat zwei Klingen, von denen eine breiter als die andere ist. Ein
Erdungsstecker hat zwei Klingen und einen dritten Erdungsstift. Die breite Klinge oder der
dritte Stift dienen Ihrer Sicherheit. Wenn der mitgelieferte Stecker nicht in Ihre Steckdose
passt, wenden Sie sich an einen Elektriker, um die veraltete Steckdose auszutauschen.
10) Schützen Sie das Netzkabel vor dem Betreten oder Einklemmen, insbesondere an
Steckern, Steckdosen und an der Stelle, an der sie aus dem Gerät austreten.
11) Verwenden Sie nur vom Hersteller angegebene Zubehörteile.
12) Nur mit dem vom Hersteller angegebenen Wagen, Ständer, Stativ, der Halterung
oder dem Tisch verwenden oder mit dem Gerät verkaufen. Wenn Sie einen Wagen
verwenden, gehen Sie beim Bewegen der Wagen / Geräte-Kombination vorsichtig vor, um
Verletzungen durch Umkippen zu vermeiden.
13) Trennen Sie dieses Gerät bei Gewittern oder bei längerem Nichtgebrauch vom
Stromnetz.
14) Wenden Sie sich bei allen Wartungsarbeiten an qualifiziertes Servicepersonal. Eine
Wartung ist erforderlich, wenn das Gerät in irgendeiner Weise beschädigt wurde, z. B.
wenn das Netzkabel oder der Netzstecker beschädigt ist, Flüssigkeit verschüttet wurde
oder Gegenstände in das Gerät gefallen sind, das Gerät Regen oder Feuchtigkeit ausgesetzt
war und nicht normal funktioniert. oder wurde fallen gelassen.
Wichtige
Sicherhteitshinweise Bem-vindo a Behringer
Obrigado pela conança que depositou em nós ao adquirir o Behringer
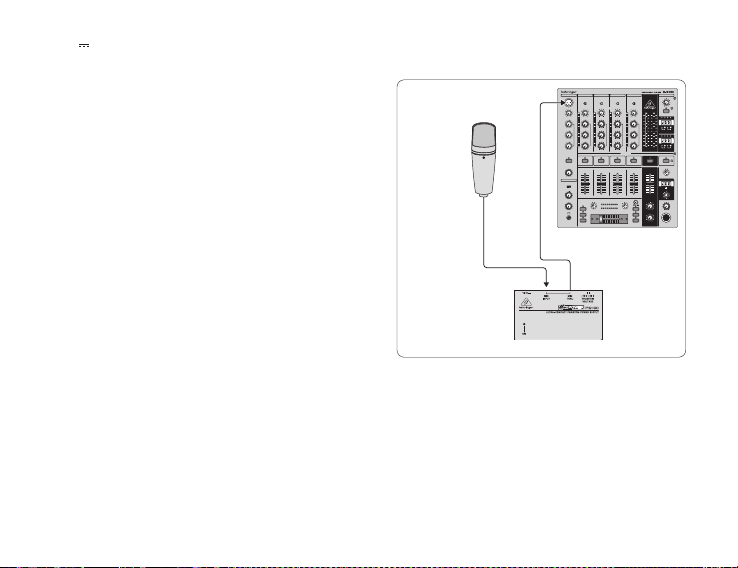
MICROPOWER PS400. Use esta fonte de alimentação fantasma
ultracompacta com mixers e pré-amplicadores de microfone que não
incluem fontes de alimentação fantasma. O PS400:
•• fornece alimentação fantasma (+12 V ou +48 V) para qualquer
tipo de microfone condensador
•• encaminha o sinal do microfone para um mixer ou um pré-
amplicador de microfone
◊◊ Leia as instruções de segurança que aparecem no nal
deste documento.
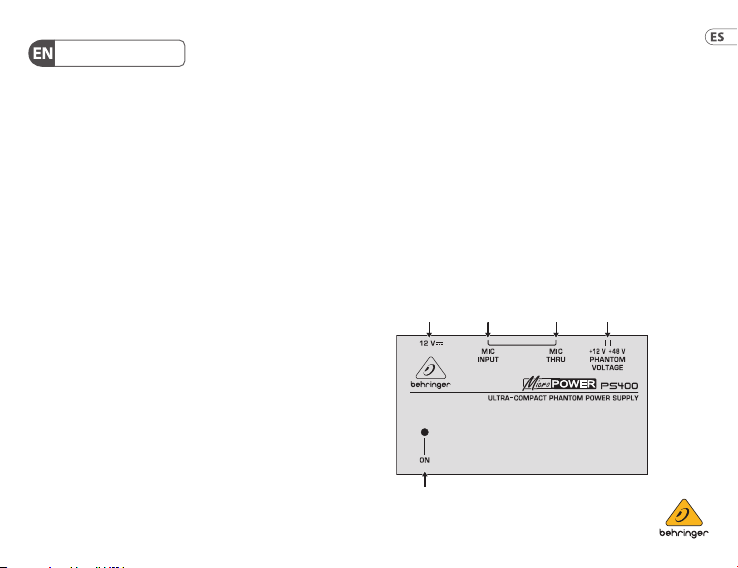
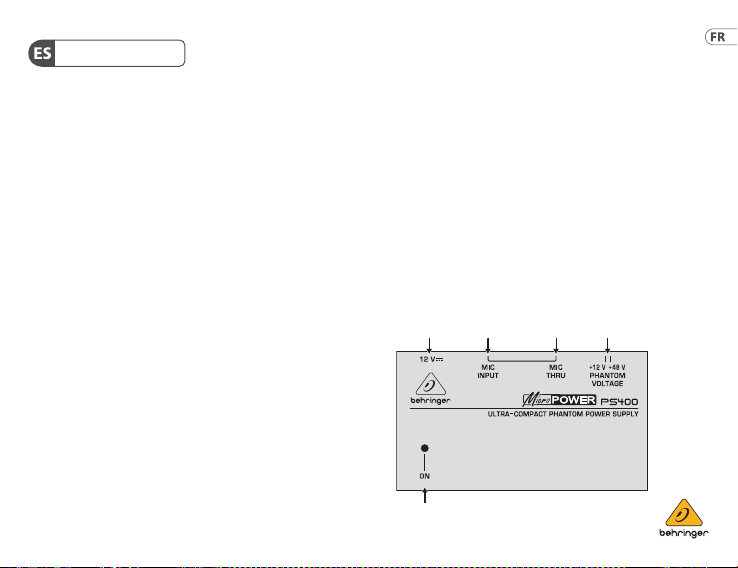
Conectores e elementos de controle
Esta seção ilustra e descreve cada conector PS400 e elemento de
controle.
Fig. 1: Conectores PS400 e elementos de controle
(2)
(1) (3) (4) (5)

18 19
MICROPOWER PS400 MICROPOWER PS400
(1) 12 V conector:
Para conectar a fonte de alimentação ao PS400, use o
conector de 12 V. Conectar a fonte de alimentação à rede liga
automaticamente o PS400. Para desconectar a unidade da rede
elétrica, retire o plugue do cabo principal.
(2) SOBRE LED: Assim que a unidade é ligada à rede, o LED ON
acende.
(3) MIC INPUT conector:
Para enviar um sinal de microfone ao PS400, você precisa de um
cabo de áudio que inclua conectores XLR. Plugue:
•• um conector XLR no conector MIC INPUT
•• o outro conector XLR no microfone condensador
(4) MIC THRU conector:
Para rotear o sinal do microfone do PS400 para um mixer ou
pré-amplicador de microfone, você precisa de um cabo de
áudio que inclua conectores XLR. Plugue:
•• um conector XLR no conector MIC THRU
•• o outro conector XLR na entrada de microfone de um mixer ou,
alternativamente, um pré-amplicador de microfone
(5) +12 V / +48 V TENSÃO FANTASMA interruptor:
Para selecionar a tensão necessária, empurre esta chave na
direção de +12 V ou, alternativamente, +48 V. Para obter
detalhes sobre o valor a ser usado, consulte as instruções do
fabricante do microfone.
NÚMERO DE SÉRIE: Para registrar a unidade, use o número de série
que está localizado na parte inferior do PS400.
Exemplo de conguração
A seguir está um exemplo de como congurar o PS400:
Fig. 2: exemplo de configuração do PS400
MICROPOWER PS400
PROMIXER DJX750
STUDIO CONDENSER
MICROPHONE C-1
MIC THRU
MIC INPUT

MICROPOWER PS400
20 MICROPOWER PS400
1) Leia essas instruções.
2) Guarde estas instruções.
3) Preste atenção a todos os avisos.
4) Siga todas as instruções.
5) Não use este aparelho próximo à água.
6) Limpe apenas com pano seco.
7) Não bloqueie as aberturas de ventilação. Instale de acordo com as instruções do
fabricante.
8) Não instale próximo a fontes de calor, como radiadores, registros de aquecimento,
fogões ou outros aparelhos (incluindoamplificadores)que produzam calor.
9) Não anule o propósito de segurança do plugue polarizado ou de aterramento. Um plugue
polarizado possui duas lâminas, uma mais larga que a outra. Um plugue de aterramento
possui duas lâminas e um terceiro pino de aterramento. A lâmina larga ou o terceiro pino
são fornecidos para sua segurança. Se o plugue fornecido não se encaixar na sua tomada,
consulte um eletricista para substituir a tomada obsoleta.
10) Proteja o cabo de alimentação de pisadelas ou apertos, especialmente nos plugues,
receptáculos de conveniência e no ponto de saída do aparelho.
11) Use apenas conexões / acessórios especificados pelo fabricante.
12) Use apenas com o carrinho, pedestal, tripé, suporte ou mesa especificados pelo
fabricante ou vendidos com o aparelho. Quando um carrinho for usado, tenha cuidado ao
mover a combinação carrinho / aparelho para evitar ferimentos por tombamento.
13) Desconecte este aparelho durante tempestades com raios ou quando não for usado por
longosperíodos de tempo.
14) Todos os serviços de manutenção devem ser realizados por pessoal de serviço
qualificado. A manutenção é necessária quando o aparelho foi danificado de alguma forma,
como cabo de alimentação ou plugue danificado, líquido foi derramado ou objetos caíram
no aparelho, o aparelho foi exposto à chuva ou umidade, não funciona normalmente, ou
foi descartado.
Instruções de Segurança
Importantes Benvenuto a Behringer
Grazie per averci dimostrato la tua ducia acquistando Behringer
MICROPOWER PS400. Usa questo alimentatore phantom
ultracompatto con mixer e preamplicatori microfonici che non
includono sorgenti di alimentazione phantom. La PS400:
•• fornisce alimentazione phantom (+12 V o +48 V) a qualsiasi
tipo di microfono a condensatore
•• indirizza il segnale del microfono a un mixer o un
preamplicatore microfonico
◊◊ Si prega di leggere le istruzioni di sicurezza che
appaiono alla ne di questo documento.
Connettori ed elementi di controllo
Questa sezione illustra e descrive ogni connettore e elemento di
controllo PS400..
Fig.1: connettori PS400 ed elementi di controllo
(2)
(1) (3) (4) (5)

22 23
MICROPOWER PS400 MICROPOWER PS400
(1) 12 V connettore:
Per collegare l'alimentatore al PS400, utilizzare il connettore
a 12 V. Collegando l'alimentatore alla rete elettrica si accende
automaticamente il PS400. Per scollegare l'unità dalla rete,
estrarre la spina del cavo principale.
(2) SOPRA LED: Non appena l'unità è collegata alla rete, il LED ON
si accende.
(3) INGRESSO MIC connettore:
Per inviare un segnale del microfono alla PS400, è necessario un
cavo audio che includa connettori XLR. Spina:
•• un connettore XLR nel connettore MIC INPUT
•• l'altro connettore XLR nel microfono a condensatore
(4) MIC THRU connettore:
Per instradare il segnale del microfono dalla PS400 a un mixer o
un preamplicatore del microfono, è necessario un cavo audio
che includa connettori XLR. Spina:
•• un connettore XLR nel connettore MIC THRU
•• l'altro connettore XLR nell'ingresso microfonico di un mixer o, in
alternativa, di un preamplicatore microfonico
(5) TENSIONE PHANTOM +12 V / +48 V. interruttore:
Per selezionare la tensione necessaria, spingere questo
interruttore verso +12 V o, in alternativa, +48 V. Per i dettagli
sul valore da utilizzare, fare riferimento alle istruzioni del
produttore del microfono.
NUMERO DI SERIE: Per registrare l'unità, utilizzare il numero di serie
che si trova nella parte inferiore del PS400.
Esempio di installazione
Di seguito è riportato un esempio di come congurare PS400:
Fig.2: Esempiodi configurazionedi PS400
MICROPOWER PS400
PROMIXER DJX750
STUDIO CONDENSER
MICROPHONE C-1
MIC THRU
MIC INPUT

MICROPOWER PS400
24 MICROPOWER PS400
1) Leggi queste istruzioni.
2) Conserva queste istruzioni.
3) Prestare attenzione a tutti gli avvertimenti.
4) Segui tutte le istruzioni.
5) Non utilizzare questo apparecchio vicino all'acqua.
6) Pulire solo con un panno asciutto.
7) Non ostruire le aperture di ventilazione. Installare secondo le istruzioni del produttore.
8) Non installare vicino a fonti di calore come radiatori, termoregolatori, stufe o altri
apparecchi (inclusi amplificatori) che producono calore.
9) Non vanificare lo scopo di sicurezza della spina polarizzata o con messa a terra. Una
spina polarizzata ha due lame, una più larga dell'altra. Una spina con messa a terra ha
due lame e un terzo polo di messa a terra. La lama larga o il terzo polo sono forniti per la
vostra sicurezza. Se la spina fornita non si adatta alla presa, consultare un elettricista per la
sostituzione dellapresa obsoleta.
10) Proteggere il cavo di alimentazione dall'essere calpestato o schiacciato, in particolare in
corrispondenza di spine, prese di corrente e nel punto in cui escono dall'apparecchio.
11) Utilizzare solo attacchi / accessori specificati dal produttore.
12) Utilizzare solo con carrello, supporto, treppiede, staffa o tavolo specificato dal
produttore o venduto con l'apparato. Quando si utilizza un carrello, prestare attenzione
quando si sposta la combinazione carrello / apparecchio per evitare lesioni dovute al
ribaltamento.
13) Scollegare questo apparecchio durante i temporali o quando non viene utilizzato per
lunghiperiodi di tempo.
14) Affidare tutte le riparazioni a personale di assistenza qualificato. L'assistenza è
necessaria quando l'apparato è stato danneggiato in qualsiasi modo, come il cavo
di alimentazione o la spina è danneggiato, è stato versato del liquido o sono caduti
oggetti nell'apparecchio, l'apparato è stato esposto a pioggia o umidità, non funziona
normalmente, o è stato abbandonato.
Istruzioni di sicurezza
importanti Welkom bij Behringer
Bedankt voor het vertrouwen dat je in ons hebt getoond door de
Behringer MICROPOWER PS400 te kopen. Gebruik deze ultracompacte
fantoomvoeding met mixers en microfoonvoorversterkers zonder
fantoomvoeding. De PS400:
•• levert fantoomvoeding (+12 V of +48 V) aan elk type
condensatormicrofoon
•• stuurt het microfoonsignaal naar een mixer of een
microfoonvoorversterker
◊◊ Lees de veiligheidsinstructies aan het einde van dit
document.
Connectoren en bedieningselementen
Dit gedeelte illustreert en beschrijft elke PS400-connector en elk
bedieningselement.
Afb. 1: PS400-connectoren en bedieningselementen
(2)
(1) (3) (4) (5)

26 27
MICROPOWER PS400 MICROPOWER PS400
(1) 12 V connector:
Gebruik de 12 V-connector om de voedingseenheid op de PS400
aan te sluiten. Door de voedingseenheid op het lichtnet aan
te sluiten, wordt de PS400 automatisch ingeschakeld. Trek de
stekker van het netsnoer uit het stopcontact om het apparaat
los te koppelen van het lichtnet.
(2) AAN LED: Zodra het apparaat op het lichtnet is aangesloten,
brandt de LED ON.
(3) MIC-INGANG connector:
Om een microfoonsignaal naar de PS400 te sturen, heb je een
audiokabel nodig met XLR-aansluitingen. Plug:
•• een XLR-connector in de MIC INPUT-connector
•• de andere XLR-connector in de condensatormicrofoon
(4) MIC THRU connector:
Om het microfoonsignaal van de PS400 naar een mixer of
microfoonvoorversterker te leiden, heb je een audiokabel nodig
met XLR-aansluitingen. Plug:
•• een XLR-connector in de MIC THRU-connector
•• de andere XLR-connector in de microfooningang van een mixer
of als alternatief een microfoonvoorversterker
(5) +12 V / +48 V FANTOOMSPANNING schakelaar:
Om het voltage te selecteren dat u nodig heeft, drukt u deze
schakelaar naar +12 V of, alternatief +48 V. Raadpleeg de
instructies van de microfoonfabrikant voor details over welke
waarde u moet gebruiken.
SERIENUMMER: Gebruik het serienummer aan de onderkant van de
PS400 om het apparaat te registreren.
Installatievoorbeeld
Het volgende is een voorbeeld van hoe u de PS400 installeert:
Afb.2: Installatievoorbeeld PS400
MICROPOWER PS400
PROMIXER DJX750
STUDIO CONDENSER
MICROPHONE C-1
MIC THRU
MIC INPUT

MICROPOWER PS400
28 MICROPOWER PS400
1) Lees deze instructies.
2) Bewaar deze instructies.
3) Neem alle waarschuwingen in acht.
4) Volg alle instructies.
5) Gebruik dit apparaat niet in de buurt van water.
6) Maak alleen schoon met een droge doek.
7) Blokkeer geen ventilatieopeningen. Installeer volgens de instructies van de fabrikant.
8) Installeer het apparaat niet in de buurt van warmtebronnen zoals radiatoren,
verwarmingsroosters, fornuizen of andere apparaten (inclusief versterkers) die warmte
produceren.
9) Omzeil de veiligheidsfunctie van de gepolariseerde of geaarde stekker niet. Een
gepolariseerde stekker heeft twee pennen waarvan de ene breder is dan de andere. Een
geaarde stekker heeft twee pennen en een derde aardingspen. Het brede mes of de derde
pen zijn bedoeld voor uw veiligheid. Als de meegeleverde stekker niet in uw stopcontact
past, raadpleeg dan een elektricien voor vervanging van het verouderde stopcontact.
10) Zorg ervoor dat er niet over het netsnoer gelopen kan worden en dat het niet bekneld
raakt, vooral bij stekkers, stopcontacten en het punt waar ze het apparaat verlaten.
11) Gebruik alleen hulpstukken / accessoires die door de fabrikant zijn gespecificeerd.
12) Gebruik het apparaat alleen met een karretje, standaard, driepoot, beugel of tafel die
door de fabrikant is gespecificeerd of die bij het apparaat wordt verkocht. Wees bij het
gebruik van een wagen voorzichtig bij het verplaatsen van de combinatie wagen / apparaat
omletsel door omvallente voorkomen.
13) Haal de stekker van dit apparaat uit het stopcontact tijdens onweer of wanneer het
gedurendelangetijd niet wordt gebruikt.
14) Laat al het onderhoud over aan gekwalificeerd onderhoudspersoneel. Onderhoud is
vereist als het apparaat op enigerlei wijze is beschadigd, bijvoorbeeld als het netsnoer of
de stekker is beschadigd, als er vloeistof is gemorst of als er voorwerpen in het apparaat
zijn gevallen, als het apparaat is blootgesteld aan regen of vocht, niet normaal werkt, of
is gevallen.
Belangrijke
veiligheidsvoorschriften Välkommen till Behringer
Tack för att du visade ditt förtroende för oss genom att köpa
Behringer MICROPOWER PS400. Använd denna ultrakompakta
fantomströmförsörjning med blandare och mikrofonförförstärkare
som inte inkluderar fantomströmskällor. PS400:
•• levererar fantommatning (+12 V eller +48 V) till alla typer av
kondensatormikrofoner
•• dirigerar mikrofonsignalen till en mixer eller en
mikrofonförförstärkare
◊◊ Läs säkerhetsinstruktionerna som visas i slutet av detta
dokument.
Kontaktdon och kontrollelement
Detta avsnitt illustrerar och beskriver varje PS400-kontakt och
kontrollelement.
Bild 1: PS400-kontakter och kontrollelement
(2)
(1) (3) (4) (5)

30 31
MICROPOWER PS400 MICROPOWER PS400
(1) 12 V kontakt:
För att ansluta nätaggregatet till PS400, använd 12
V-kontakten. Anslutning av nätaggregatet till elnätet slår
automatiskt på PS400. Dra ut nätkabelkontakten för att koppla
bort enheten från elnätet.
(2) PÅ LED: Så snart enheten är ansluten till elnätet lyser
ON-lysdioden.
(3) MIC INPUT kontakt:
För att skicka en mikrofonsignal till PS400 behöver du en
ljudkabel som innehåller XLR-kontakter. Plugg:
•• en XLR-kontakt i MIC INPUT-kontakten
•• den andra XLR-kontakten i kondensatormikrofonen
(4) MIC THRU kontakt:
För att dirigera mikrofonsignalen från PS400 till en mixer
eller en mikrofonförförstärkare behöver du en ljudkabel som
innehåller XLR-kontakter. Plugg:
•• en XLR-kontakt i MIC THRU-kontakten
•• den andra XLR-kontakten i mikrofoningången på en mixer eller
alternativt en mikrofonförförstärkare
(5) +12 V / +48 V FANTOMSPÄNNING växla:
För att välja den spänning du behöver, tryck den här
omkopplaren mot +12 V eller alternativt +48 V. Mer
information om vilket värde du ska använda nns i
instruktionerna från mikrofontillverkaren.
SERIENUMMER: För att registrera enheten, använd serienumret som
nns på undersidan av PS400.
Installationsexempel
Följande är ett exempel på hur du ställer in PS400:
Bild 2: Installationsexempel för PS400
MICROPOWER PS400
PROMIXER DJX750
STUDIO CONDENSER
MICROPHONE C-1
MIC THRU
MIC INPUT

MICROPOWER PS400
32 MICROPOWER PS400
1) Läs dessa instruktioner.
2) Behåll dessa instruktioner.
3) Följ alla varningar.
4) Följ alla instruktioner.
5) Använd inte denna apparat nära vatten.
6)Rengörendast medtorr trasa.
7) Blockera inte ventilationsöppningar. Installera enligt tillverkarens instruktioner.
8) Installera inte i närheten av värmekällor som värmeelement, kaminer eller andra
apparater (inklusive förstärkare) som producerar värme.
9) Krossa inte säkerhetsändamålet med den polariserade eller jordade kontakten. En
polariserad kontakt har två blad med en bredare än den andra. En jordningskontakt har två
blad och en tredje jordningstapp. Det breda bladet eller det tredje stiftet tillhandahålls för
din säkerhet. Om den medföljande kontakten inte passar i ditt uttag, kontakta en elektriker
för byte av det föråldrade uttaget.
10) Skydda nätsladden så att den inte trampas på eller kläms, särskilt vid kontakter,
stickkontakter och den punkt där den kommer ut ur apparaten.
11) Använd endast tillbehör / tillbehör som anges av tillverkaren.
12) Använd endast med vagnen, stativet, stativet, fästet eller bordet som anges av
tillverkaren eller säljs tillsammans med apparaten. När en vagn används, var försiktig när du
flyttar vagnen / apparatkombinationen för att undvika personskador.
13) Koppla bort apparaten under åskväder eller när den inte används under långa perioder.
14) Överlåt all service till kvalificerad servicepersonal. Service krävs när apparaten har
skadats på något sätt, till exempel att nätkabeln eller kontakten är skadad, vätska har spillts
eller föremål har fallit in i apparaten, apparaten har utsatts för regn eller fukt, fungerar inte
normalt, eller har tappats.
Viktiga
säkerhetsanvisningar Witamy w Behringer
Dziękujemy za okazane nam zaufanie, kupując Behringer
MICROPOWER PS400. Użyj tego ultrakompaktowego zasilacza
phantom z mikserami i przedwzmacniaczami mikrofonowymi, które
nie zawierają źródeł zasilania phantom. PS400:
•• dostarcza zasilanie phantom (+12 V lub +48 V) do dowolnego
typu mikrofonu pojemnościowego
•• kieruje sygnał mikrofonowy do miksera lub przedwzmacniacza
mikrofonowego
◊◊ Prosimy o zapoznanie się z instrukcjami dotyczącymi
bezpieczeństwa, które znajdują się na końcu tego
dokumentu.
Złącza i elementy sterujące
Ta sekcja ilustruje i opisuje każde złącze PS400 i element sterujący.
Rys. 1: Złącza PS400 i elementy sterujące
(2)
(1) (3) (4) (5)

34 35
MICROPOWER PS400 MICROPOWER PS400
(1) 12 V. złącze:
Aby podłączyć zasilacz do PS400, użyj złącza 12 V. Podłączenie
zasilacza do sieci powoduje automatyczne włączenie PS400.
Aby odłączyć urządzenie od sieci, należy wyciągnąć wtyczkę z
głównego przewodu.
(2) NA Dioda LED: Gdy tylko urządzenie zostanie podłączone do
sieci, zapala się dioda ON.
(3) WEJŚCIE MIKROFONOWE złącze:
Aby wysłać sygnał z mikrofonu do PS400, potrzebujesz kabla
audio ze złączami XLR. Wtyczka:
•• jedno złącze XLR do złącza MIC INPUT
•• drugie złącze XLR do mikrofonu pojemnościowego
(4) MIC THRU złącze:
Aby skierować sygnał mikrofonowy z PS400 do miksera lub
przedwzmacniacza mikrofonowego, potrzebujesz kabla audio
zawierającego złącza XLR. Wtyczka:
•• jedno złącze XLR do złącza MIC THRU
•• drugie złącze XLR do wejścia mikrofonowego miksera lub
alternatywnie przedwzmacniacza mikrofonowego
(5) NAPIĘCIE PHANTOMOWE +12 V / +48 V. przełącznik:
Aby wybrać potrzebne napięcie, przesuń przełącznik w
kierunku +12 V lub alternatywnie +48 V. Szczegółowe
informacje na temat wartości używanej znajdziesz w
instrukcjach producenta mikrofonu.
NUMER SERYJNY: Aby zarejestrować urządzenie, użyj numeru
seryjnego, który znajduje się na spodzie PS400.
Przykład konguracji
Poniżej znajduje się przykład konguracji PS400:
Rys. 2: Przykład konfiguracjiPS400
MICROPOWER PS400
PROMIXER DJX750
STUDIO CONDENSER
MICROPHONE C-1
MIC THRU
MIC INPUT

36 37
MICROPOWER PS400 MICROPOWER PS400
1) Przeczytaj te instrukcje.
2) Zachowaj te instrukcje.
3)Przestrzegajwszystkich ostrzeżeń.
4) Postępuj zgodnie ze wszystkimi instrukcjami.
5) Nie używaj tego urządzenia w pobliżu wody.
6) Czyść tylko suchą szmatką.
7) Nie blokuj żadnych otworów wentylacyjnych. Zainstaluj zgodnie z instrukcjami
producenta.
8) Nie instaluj w pobliżu źródeł ciepła, takich jak grzejniki, rejestratory ciepła, piece lub
inne urządzenia (w tym wzmacniacze), które wytwarzają ciepło.
9) Nie lekceważ funkcji bezpieczeństwa, jaką zapewnia wtyczka spolaryzowana lub z
uziemieniem. Wtyczka spolaryzowana ma dwa ostrza, z których jedno jest szersze od
drugiego. Wtyczka z uziemieniem ma dwa ostrza i trzeci bolec uziemiający. Dla twojego
bezpieczeństwa przewidziano szerokie ostrze lub trzeci bolec. Jeśli dostarczona wtyczka
nie pasuje do gniazdka, skonsultuj się z elektrykiem w celu wymiany przestarzałego
gniazdka.
10) Chroń przewód zasilający przed nadepnięciem lub ściśnięciem, szczególnie przy
wtyczkach, wygodnych gniazdkach oraz w miejscu wyjścia z urządzenia.
11) Używaj tylko dodatków / akcesoriów wskazanych przez producenta.
12) Używaj tylko z wózkiem, stojakiem, trójnogiem, wspornikiem lub stołem wskazanym
przez producenta lub sprzedawanym wraz z urządzeniem. W przypadku korzystania z
wózka należy zachować ostrożność podczas przemieszczania wózka / urządzenia, aby
uniknąć obrażeń spowodowanych jego przewróceniem.
13) Odłącz urządzenie podczas burz z piorunami lub gdy nie będzie używane przez
dłuższy czas.
14) Wszelkie czynności serwisowe należy powierzać wykwalifikowanemu personelowi
serwisowemu. Serwis jest wymagany, gdy urządzenie zostało w jakikolwiek sposób
uszkodzone, np. Uszkodzony jest przewód zasilający lub wtyczka, wylano płyn lub
przedmioty wpadły do aparatu, urządzenie zostało wystawione na działanie deszczu lub
wilgoci, nie działa normalnie, lub został upuszczony.
Ważne informacje o
bezpieczeństwie Specications
Mic Input and Mic Thru
Type XLR connector balanced
Phantom Power Supply
Voltage (switchable) +12 V or +48 V
Power Supply
Mains connector external power supply, 12 V / 150 mA
Mains Voltage
USA/Canada 120 V~, 60 Hz
China/Korea 220 V~, 50 Hz
U.K./Australia 240 V~, 50 Hz
Europe 230 V~, 50 Hz
Japan 100 V~, 50 - 60 Hz
Power consumption approx. 2 W
Dimensions/Weight
Dimensions (H x D x W) approx. 2 ¼ x 1 ¼ x 4"
(approx. 58 x 32 x 103 mm)
Weight approx. 0.8 lbs / 0.36 kg
Operation Ambient Temperature up to 45° C
Behringer is constantly striving to maintain the highest professional standards. As a result of these
eorts, modicationsmay be made from time to time to existing products without prior notice.
Specications and appearance maydier from those listed or illustrated.

38 MICROPOWER PS400 MICROPOWER PS400
LEGAL DISCLAIMER
Music Tribe accepts no liability for any loss which may be suered by any
person who relies either wholly or in part upon any description, photograph,
or statement contained herein. Technical specications, appearances and
other information are subject to change without notice. All trademarks are
the property of their respective owners. Midas, Klark Teknik, Lab Gruppen,
Lake, Tannoy, Turbosound, TC Electronic, TC Helicon, Behringer, Bugera, Aston
Microphones and Coolaudio are trademarks or registered trademarks of Music
Tribe Global Brands Ltd. © Music Tribe Global Brands Ltd. 2021 All rights
reserved.
LIMITED WARRANTY
For the applicable warranty terms and conditions and additional information
regarding Music Tribe’s Limited Warranty, please see complete details online at
community.musictribe.com/pages/support#warranty.
NEGACIÓN LEGAL
Music Tribe no admite ningún tipo de responsabilidad por cualquier daño o
pérdida que pudiera sufrir cualquier persona por conar total o parcialmente en
la descripciones, fotografías o armaciones contenidas en este documento. Las
especicaciones técnicas, imágenes y otras informaciones contenidas en este
documento están sujetas a modicaciones sin previo aviso. Todas las marcas
comerciales que aparecen aquí son propiedad de sus respectivos dueños. Midas,
Klark Teknik, Lab Gruppen, Lake, Tannoy, Turbosound, TC Electronic, TC Helicon,
Behringer, Bugera, Aston Microphones y Coolaudio son marcas comerciales
o marcas registradas de Music Tribe Global Brands Ltd. © Music Tribe Global
Brands Ltd. 2021 Reservados todos los derechos.
GARANTÍA LIMITADA
Si quiere conocer los detalles y condiciones aplicables de la garantía así como
información adicional sobre la Garantía limitada de Music Tribe, consulte
online toda la información en la web community.musictribe.com/pages/
support#warranty.
DÉNI LÉGAL
Music Tribe ne peut être tenu pour responsable pour toute perte pouvant être
subie par toute personne se ant en partie ou en totalité à toute description,
photographie ou armation contenue dans ce document. Les caractéristiques,
l’apparence et d’autres informations peuvent faire l’objet de modications sans
notication. Toutes les marques appartiennent à leurs propriétaires respectifs.
Midas, Klark Teknik, Lab Gruppen, Lake, Tannoy, Turbosound, TC Electronic,
TC Helicon, Behringer, Bugera, Aston Microphones et Coolaudio sont des
marques ou marques déposées de Music Tribe Global Brands Ltd. © Music Tribe
Global Brands Ltd. 2021 Tous droits réservés.
GARANTIE LIMITÉE
Pour connaître les termes et conditions de garantie applicables, ainsi que
les informations supplémentaires et détaillées sur la Garantie Limitée de
Music Tribe, consultez le site Internet community.musictribe.com/pages/
support#warranty.
HAFTUNGSAUSSCHLUSS
Music Tribe übernimmt keine Haftung für Verluste, die Personen entstanden
sind, die sich ganz oder teilweise auf hier enthaltene Beschreibungen,
Fotos oder Aussagen verlassen haben. Technische Daten, Erscheinungsbild
und andere Informationen können ohne vorherige Ankündigung geändert
werden. Alle Warenzeichen sind Eigentum der jeweiligen Inhaber. Midas,
Klark Teknik, Lab Gruppen, Lake, Tannoy, Turbosound, TC Electronic, TC Helicon,
Behringer, Bugera, Aston Microphones und Coolaudio sind Warenzeichen oder
eingetragene Warenzeichen der Music Tribe Global Brands Ltd. © Music Tribe
Global Brands Ltd. 2021 Alle Rechte vorbehalten.
BESCHRÄNKTE GARANTIE
Die geltenden Garantiebedingungen und zusätzliche Informationen bezüglich
der von Music Tribe gewährten beschränkten Garantie nden Sie online unter
community.musictribe.com/pages/support#warranty.
Other manuals for Micropower PS400
4
Table of contents
Languages:
Other Behringer Power Supply manuals
Popular Power Supply manuals by other brands

Eaton
Eaton MTL 9493-PS Series instruction manual

TDK-Lambda
TDK-Lambda CUS60M instruction manual

Allied Telesis
Allied Telesis AT-FAN01 installation guide

Allen-Bradley
Allen-Bradley PowerFlex 700 AFE Migration guide

Allanson
Allanson AHVPS714-40-MV-PCB Product Specifications and Operating Manual

EVGA
EVGA BRONZE BA Series user manual