BEING BOV-20 User manual

Quick Start Guide
Vacuum Ovens - BOV-20, BOV-50 & BOV-90
Professional
Instrument
Supplier
document number
1. Observation window
2. Door lock handle
3. Vacuum pump electrical outlet - Not available on BOV-90
4. Circuit breaker & Power switch
5. Power cord
6. Air (inert gas) inlet (3/8” ID hose barb)
7. Balance hole
8. Vacuum KF-25 ange
9. Vacuum guage
10. Controller
11. Observation light power switch
12. Purge switch
13. Pump switch
14. Articulating glass door
15. Swinging metal door
16. Feet - Non-adjustable
17. Casters - Non-locking (BOV-90 only)
18. Casters - Locking (BOV-90 only)
19. Removable/adjustable shelves
20. Electic plug
BOV-20 & BOV-50: NEMA 5-15
BOV-90: NEMA 6-20
Accessories
21. 13mm ID x 29mm OD x 925mm long vacuum hose
22. 14mm x 17mm open-end spanner wrench
23. 8mm x 10mm open-end spanner wrench
24. KF-25 clamp
25. KF-25 o-ring
26. KF-25 x 16mm hose barb
Oven Components
Set Up
STEP 1: Remove protective covering(s).
STEP 2: Position unit for use.
Position the vacuum oven on the oor or
a work surface strong enough to carry the
oven’s weight.
Model Weight
BOV-20 60 KG / 132 LBS
BOV-50 95 KG / 210 LBS
BOV-90 145 KG / 320 LBS
Additionally, the oven requires a minimum
clearance area as shown in the diagram (left).
STEP 2a: Lock the front casters. (BOV-90 only)
Using your foot, press down on the caster’s pedal to lock the oven in place.
Lift up on the bottom of the pedal to unlock the caster to reposition or move
the oven.
STEP 3: Relieve oven chamber vacuum.
Rotate the balance hole 180Oto relieve the vacuum applied at the
factory prior to shipping. Upon relieving the applied vacuum, close
the balance hole.
STEP 4: Unlock and open door. Remove
supplied accessories.
STEP 5: Push hose onto KF-25 hose barb
and your vacuum pump or cold trap tting.
STEP 6: Assemble the KF-25 hose barb, seal
ring, and clamp to the oven’s KF-25 ange.
Attach your tting to your vacuum pump or
cold trap.
STEP 8: Plug your vacuum pump electrical
cord into the outlet on the oven and turn
the vacuum pump on. (BOV-20 & BOV-50)
For BOV-90 plug vacuum pump into nearest
electrical outlet.
STEP 7: Attach your inert gas or air hose to
the oven’s air inlet hose barb.
STEP 9: Plug the oven’s electrical cord into
appropriate outlet.
Rotate the door handle counterclockwise 90O
to unlock the door and carefully pull the
door open. Remove the supplied accessories
and shelves. Remove protective shelf covering.
If the door does not move easily, DO NOT TUG on the door.
Doing so can damage the door seal. Use your nger or a at
blade (standard) screwdriver to ick the door seal to release
the seal from the glass door.
Review the vacuum pump specications to ensure it is a
two-stage pump and has the following ow rate capacity.
BOV-20 and BOV-50: 2 liters/second (4 CFM)
BOV-90: 4 liters/second (8 CFM)
Drawing Vacuum
STEP 1: Close and lock door.
STEP 2: Ensure balance hole is closed.
STEP 4: Turn the PUMP switch on.
Rotate the PUMP switch clockwise 90O.
Vacuum pump will instantaneously turn on,
solenoid valve will open, and vacuum will be
applied to the chamber.
It will take approximately 3-4 minutes to reach
-14.7 PSI / -1 bar. Use the balance hole to lengthen
the time to reach maximum applied vacuum.
Remove the black cap from the hose barb tting.
Option 1: Leave the barb tting bare
Option 2: Push a 3/8”ID hose onto barb tting. Attach other end of hose to
your inert gas or air supply, or if neccessary, attach the hose to a cold trap.
Lift the outlet cover. Push
the vacuum pump’s power
cord into the 120 VAC, 5
Amp rated receptacle. Turn
the vacuum pump’s power
switch on.
After placing specimens on the oven
shelves, close the door and turn the door
handle clockwise 90O.
The balance hole arrow must point
between 2 and 10 o’clock for the
balance hole to be fully closed.
Use the balance hole to control
vacuum draw speed.
It must be fully closed to reach a
-14.7 PSI / -1 bar.
BOV-20 & BOV-50
STEP 4: Turn your vacuum pump on.
Rotate the PUMP switch clockwise 90O.
Solenoid valve will open and vacuum will be
applied to the chamber.
It will take approximately 3-4 minutes to reach
-14.7 PSI / -1 bar. Use the balance hole to lengthen
the time to reach maximum applied vacuum.
BOV-90
STEP 5: Turn the PUMP switch on.
It is not required to draw a vacuum to apply heat to the
specimens in the oven. However, applying a vacuum rst
will reduce the humidity in the oven and increase the speed
to reach desired temperature.
STEP 3: Turn on unit power
Push the circuit breaker’s lever
down to turn on the power to
the oven.
BEING Instrument Inc.
847 Palmyrita Ave, Unit A Riverside CA 92507 USA | T: +1 (800) 278-1390 | suppor[email protected] | www.beinglab-usa.com document number
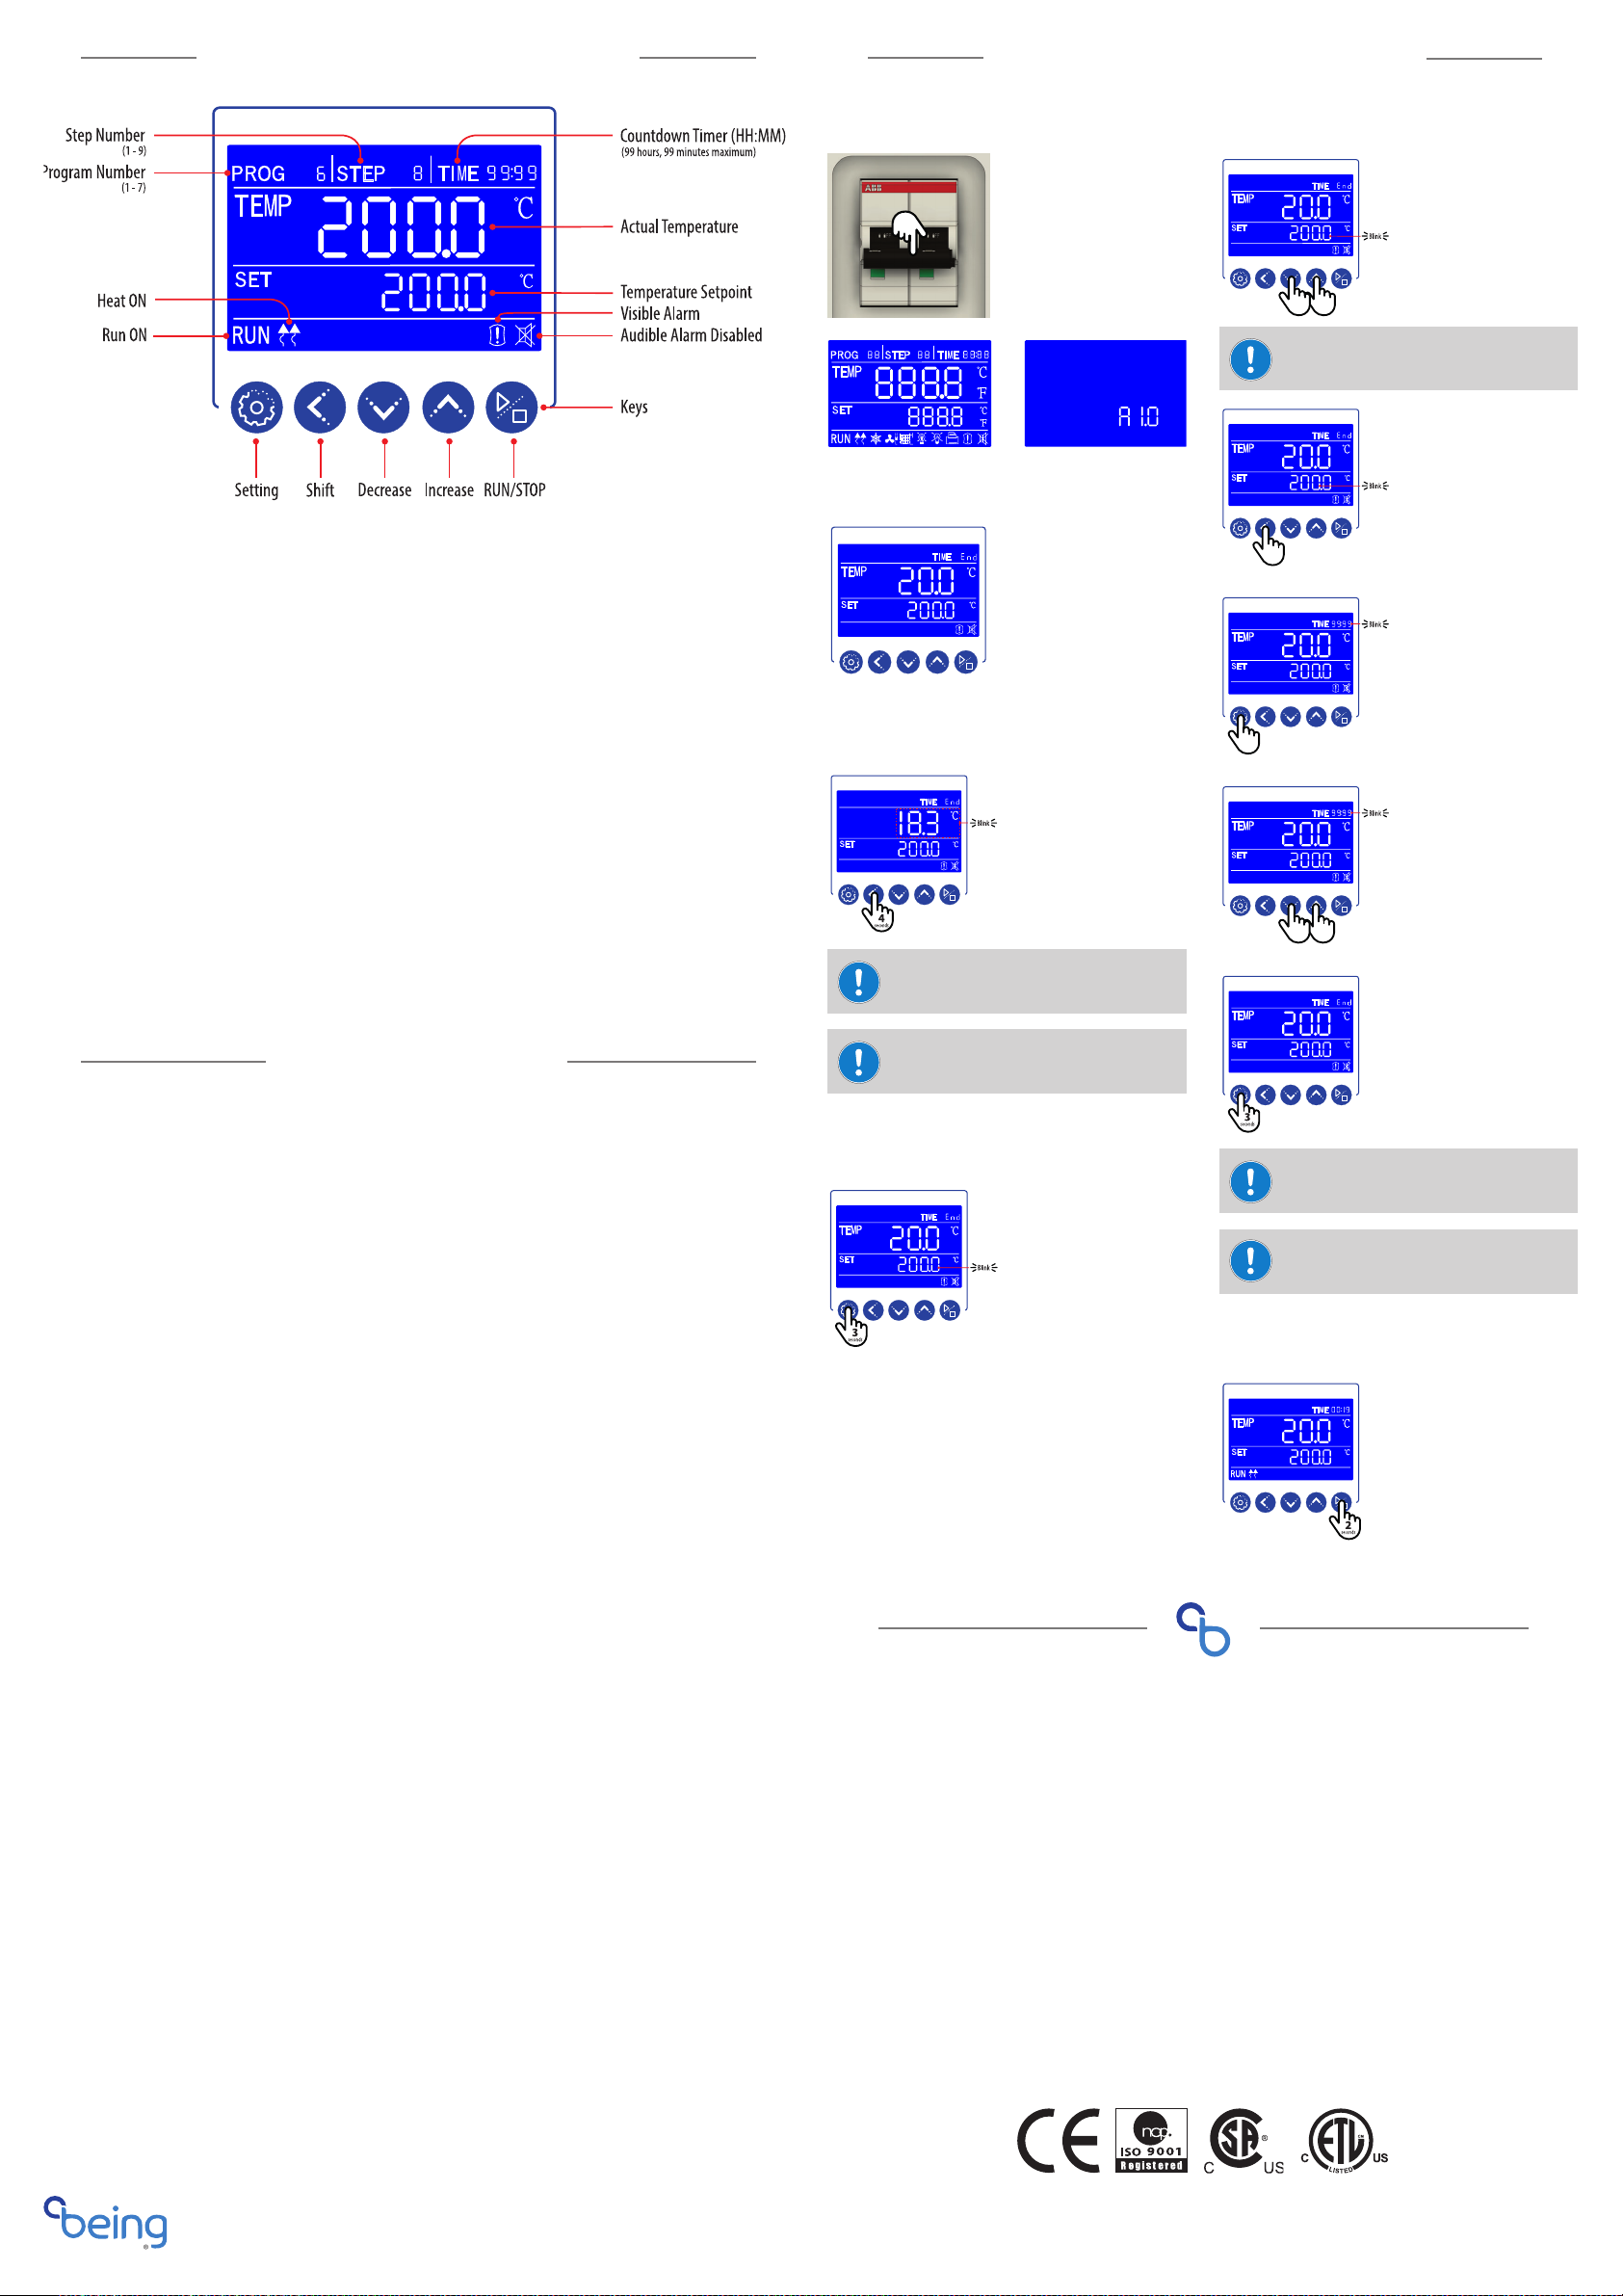
Setting Temperature & Timer
The unit is ready for use.
Upon turning the unit’s power on, the controller will cycle through these
two start-up screens.
STEP 1: Turn on unit power
PROG Area: Displays the program working or setting
group. Controller is capable of programming and storing
up to 7 programs.
STEP Area: Displays the number of the step within a
program. There are 9 steps available for each program.
TIME Area: Displays the running time or parameter
value.
TEMP Area: Displays the measured (actual) temperature
within the oven’s chamber. Also, displays the ambient
room temperature when requested.
SET Area: Displays the temperature setpoint.
RUN: Illuminates when the oven’s program is working.
Turns o when program is stopped.
HEAT: Arrows illuminate and blinks when the oven’s
heater is on. Turns o when heating elements are o.
Visible Alarm: Illuminates when the program has
completed, has been stopped by user, or when an over
temperature condition occurs. Additionally, when the
visible alarm illuminates an audible alarm will start.
Audible Alarm Disabled: Illuminates when the user
presses any key or when the unit’s power is turned o.
Keys
Setting: Starts the programming of the temperature and
run time. Accepts the temperature and run time values.
Shift: For changing the parameter value being set and
viewing ambient temperature.
Decrease: Used for setting parameter value, modication
of various values, or start/stop auto-tuning.
Increase: Used for setting parameter value, or press and
hold for more than 2 seconds to view the remaining
program time.
RUN/STOP: Press for 2 seconds to run or stop the controller.
STEP 2: Check ambient temperature.
Press and hold shift key for 4 sec-
onds to view ambient temperature.
Temperature value will blink. Press
and hold shift key for 4 seconds to
return to main screen.
Function also works while program
is running.
Temperature setpoint must be.
ambient + 10OC to 200OC
ambient + 18OF to 392OF
STEP 3: Push setting key
STEP 4: Input temperature & time values
Press decrease or increase key to set
tenths value. Value will blink as it
is being set.
Press the shift key to move to the
next parameter digits. Each move
will cause parameter to blink.
Press the setting key to accept
temperature setpoint.“End”in TIME
area will change to run time digits.
First digit will blink.
Use decrease or increase key to set
each minute and hour value.
Press the shift key to move to the
next parameter digits.
Upon setting the run time, press
and hold the setting key for 3
seconds to complete the program.
TIME area will return to “End.”
If unit power is on and ambient temperature is known,
start programming process at Step 3.
If changing temperature only, press and hold setting key
for 3 seconds, change temperature, press setting key, and
press and hold setting key for 3 seconds.
If changing time only, press and hold setting key for 3
seconds, when temperature blinks press setting key, change
time, and press and hold setting key for 3 seconds.
Safety Messages
Controller Element Overview
STEP 5: Push RUN key
Pushing the RUN key for 2 seconds,
starts the program. RUN, HEAT, and
run time illuminate.
Pushing the setting key for 3
seconds, starts the programming
process.
The tenths temperature value
blinks.
Press and release to decrease/increase one digit at a time.
Press and hold to rapidly cycle through digits.
Push the circuit breaker’s lever
down to turn on the power to
the oven.
This manual suits for next models
2
Popular Oven manuals by other brands


Viking Range
Viking Range VEDO5302T Use & care manual

AEG
AEG BEB331110M user manual

AEG
AEG DE4003020 user manual

Siemens
Siemens HM676G0 1I Series User manual and installation instructions

Summit
Summit SGWO30SS Owner's Manual with Installation and Maintenance Instructions

Siemens
Siemens CN678G4 1B Series instruction manual


