Beko DF8421TX0 User manual

Please read this manual first!
Dear Client,
Thank you for choosing a Beko appliance.
We hope that your device which has been
made with high quality materials and
advanced technology will give you the best
results. We advise you to read this manual
and any other documents provided carefully
before using your device and to keep it for
reference. If you pass the device on to
someone else, give them the manual as well.
Pay attention to all the details and warnings
given in the user manual and follow the
instructions therein.
Use this user manual for the model listed
on the cover page.
WARNING !
• Warning against hot surfaces.
WARNING !
• Warning regarding the risk of
overheating
VSREMARK
• Important information or practical
advice on use.
The packaging materials of the
device are made from recyclable
materials in accordance with the
regulations relating to the
environment in force in our
country.
• Read the instructions.
Explanation of symbols
The following symbols are used throughout
the user manual: Do not dispose of packaging waste with
household or other waste, hand it over to
dedicated collection points designated by
local authorities.
BDANGER!
• Warning against the risk of
electrocution.
DANGER!
• Warning against the risk of fire.
HAS
WARNING !
• Warning against dangerous situations
concerning life and property.
This product has been produced using state-of-the-art technology and under environmentally friendly conditions.

1 Important safety and security instructions
highlight
VSREMARK HAS
WARNING !
• This section includes safety
instructions that will help
protect you from personal injury
or property damage. Failure to
comply with these instructions
will void any warranty.
• The adjustable feet must not
be removed. The openings
must not be obstructed by a
carpet. This could cause
problems with the dryer.
• Installation and repair procedures
should always be performed by an
authorized service agent. The
manufacturer cannot be held
responsible for damage resulting
from maneuvers carried out by
unauthorized persons.
1.1 General requirements
in matters of security
HAS
WARNING !
• This appliance can be used by
children aged at least 8 years and
by people with reduced physical,
sensory or mental abilities or
lacking in experience or
knowledge, if they are properly
supervised. ) or if instructions
relating to the use of the
appliance in complete safety have
been given to them and if the
risks involved have been
apprehended. Children should not
play with the device. Cleaning and
user maintenance shall not be
made by children without
supervision.
• Never wash your dryer by pouring
or spraying water on it! You will
expose yourself to the risk of
electric shock!
For products with steam
function:
HAS
WARNING !
• Only use distilled water or
condensed water in the
machine's water tank on steam
programs. Do not use tap
water or additives. When using
water
condensed in the water tank, it must
be filtered and cleaned.
Dryer / User Manual 3

HAS
WARNING ! HAS
WARNING !
• Do not open the door when
steam programs are running.
Hot water can be expelled.
• Do not connect the unit to an
external switching device such
as a timer. Born the
nor connect to a circuit
regularly turned on and off by
the power utility.
• Before putting laundry in a
steam programme, stains
must be removed.
• You can only put laundry that is not
soiled or stained, but impregnated with
an unpleasant odor in the
steam program (odor
removal).
BDANGER!
• Unplug the dryer when not in
use.
• Disconnect the dryer from
the mains during
installation, maintenance,
cleaning and repair work.
• Do not use any dry cleaning
kits or additives during the
steam program or any other
program. • Do not touch the plug with wet
hands! Never unplug the
machine by pulling on the
cable, only grasp the plug to
unplug it.
1.1.1 Electrical Safety
BDANGER!
• Observe electrical safety
guidelines when making the
electrical connection during
installation.
• Do not use extension cords,
multiple sockets or adapters to
connect the dryer to the mains to
reduce the risk of fire and electric
shock.
• Connect the dryer to a socket
equipped with an earth connection
protected by a fuse of the value
indicated on the rating plate. Be
sure that any grounding installation
is performed by a qualified
electrician. Our company will not be
held liable for any damage caused
by using the dryer without an earth
connection in accordance with local
regulations.
• The power cable socket must
be easily accessible after
installation.
• Any damaged power cord should
be replaced, followed by
notification to Authorized
Service.
• If the dryer is faulty, do not use it
until it has been repaired by an
authorized service agent! You
will expose yourself to the risk of
electric shock!
• The voltage and the authorized
protection value of the fuse are
indicated on the nameplate.
• The voltage specified on the
nameplate must be equal to that
of your electrical network.
4Dryer / User Manual

BDANGER! DANGER!
• If the power cable is damaged, it
must be replaced by the
manufacturer, its after-sales
service or similarly qualified
persons in order to avoid a
hazard.
For this reason in particular,
items containing the types of
stains specified above should be
washed very well. For this, use a
suitable detergent and select the
type of washing at high
temperature.
The type of laundry or articles
described below are not
suitable for drying in the
tumble dryer, taking into
account the risk of fire:
• Linens or pillows filled with
foam rubber (latex foam),
bathing caps, waterproof
textiles, materials containing
latex backing and foam rubber
pads.
1.1.2 Product Safety
HAS
WARNING !
• Make sure the dryer's air inlet
is open and well ventilated.
• The product contains R290
refrigerant.
• R290 is an environmentally
friendly refrigerant but
flammable.
• Keep the product away
from potential heat
sources that could ignite.
• Clothes washed with industrial
chemicals. Items such as light
coins, matches, coins, metal
coins, needles, etc. may
damage the drum or cause
problems
functional. So please check all
the laundry you want to load
into your dryer. Remove all
objects such as lighters and
matches from the pockets.
DANGER!
Points to consider for fire
hazards:
The laundry or items specified
below should not be dried in the
dryer
considering the risk of
fire.
• Unwashed laundry
• Items soiled with oil, acetone,
alcohol, fuel oil, stain remover,
turpentine, paraffin, gasoline,
wax or household solvents. wax
should be washed in hot water
with plenty of detergent before
being dried.
HAS
WARNING !
• Never stop the dryer before the
end of the program. If you
must, quickly remove all linens
and lay them out to dissipate
the heat.
Dryer / User Manual 5

DANGER! HAS
WARNING !
Improperly washed clothes can
ignite, even after drying is
complete.
• You must provide sufficient
ventilation to prevent the
accumulation of gases escaping
from appliances burning
gasoline or other types of fuel.
This also includes open flames
which may be
generated by the backfire
effect.
Never attempt to repair the
dryer yourself. Do not carry out
any repair or replacement
operation on the product, even
if you know or have the ability
to do so, unless it is expressly
mentioned in the instructions
for use or in the service manual
supplied. Otherwise, you will
risk your life as well as that of
other people.
• Make sure the location of your
clothes dryer does not contain
appliances with lockable, sliding
or sliding doors.
hinged, likely to block the
opening of the loading door.
HAS
WARNING !
• Lingerie containing metal
fittings should not be placed in
the dryer. The dryer can be
damaged if metal fittings
stretch and break during
drying.
• Install your dryer in locations
suitable for household use.
(Bathroom, closed balcony,
garage, etc.)
VSREMARK • Make sure that pets do not
enter the dryer. Check the
interior of the dryer before
switching it on.
• Use fabric softeners and similar
products in accordance with their
manufacturers' instructions.
• Always clean the lint filter
before or after each load.
Never use the dryer without
the fluff filter. HAS
WARNING !
• Do not lean on the loading
door of your dryer when it is
open, otherwise the dryer may
fall.
• Do not leave a buildup of lint
around the dryer.
6Dryer / User Manual

1.2 Installation on a washing machine 1.4 Child safety
• A fixing device must be used between
the two machines in order to use the
dryer on a washing machine. Have
the mounting device installed by the
authorized service agent.
• The total weight of the fully loaded
washing machine and dryer when
placed on top of each other is
approximately 180 kg. Place the device
on solid ground that has sufficient load-
bearing capacity!
• The packaging materials are dangerous
for children. Keep them out of their
reach.
• Electrical appliances are dangerous for
children. Keep them away from the
machine when it is running.
Don't let them play with the dryer. Use
the child safety lock to prevent children
from touching the dryer.
HAS
WARNING ! VSREMARK
• The Child Safety Lock feature is located
on the control panel of your
machine. (See child safety)
• Avoid placing the washing machine on top of
the dryer. Pay attention to the above
warnings when installing on your washing
machine.
• Keep the loading door closed even when
the dryer is not in use.
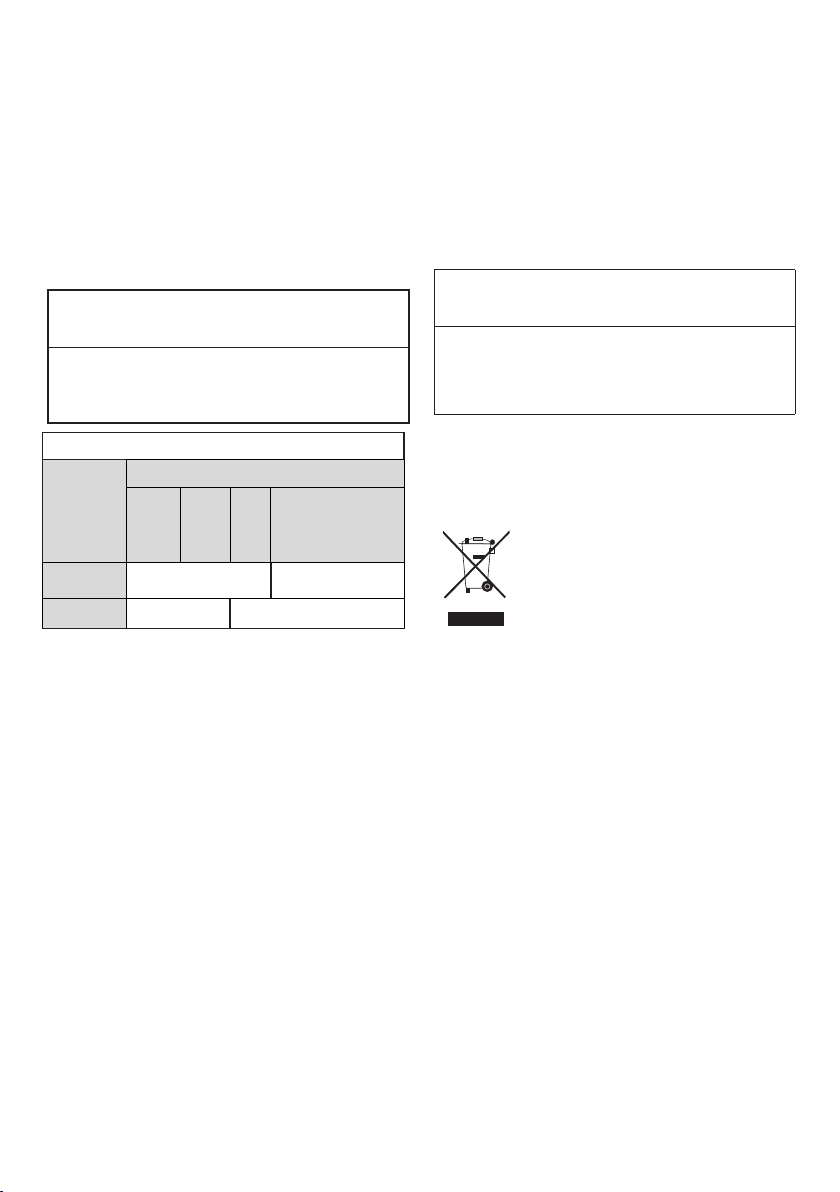
Installation diagram for washing machine and dryer
washing machine depth
Depth
dryer
laundry
1.5 WEEE Directive Compliance and
Waste Disposal:
This product complies with the
WEEE Directive (2012/19/EU) of
the European Union). This product
bears a classification symbol for
the disposal of
electrical equipment and
electronic devices (WEEE).
This symbol indicates that this product should
not be disposed of with household waste at the
end of its useful life. Used devices must be
returned to the official collection point for the
recycling of electrical and electronic devices. To
find these collection systems, please contact
your local authorities or the retailer from which
you purchased the product. Every household
plays an important role in the recovery and
recycling of used household appliances. Proper
disposal of used devices helps to prevent
potential negative consequences for the
environment and human health.
54cm Can be installed Cannot be
installed
60cm Perhaps
installed Cannot be installed
1.3 Intended use
• The dryer has been designed for domestic
use. Therefore, it is not suitable for
commercial use and should not be used
outside of its intended use.
• Use the dryer only to dry laundry that
bears a label authorizing this
operation.
• The manufacturer declines all liability
arising from the use or transport
incorrect from the device.
• Original spare parts are available for 10
years from the date of purchase of the
product.
Dryer / User Manual 7
62cm
60cm
54cm
< 50cm

1.8 Technical data
DANGER!
FR
• R290 is a flammable refrigerant. Make
sure that the system and pipes are
not damaged during operation and
handling.
• Keep the product away from potential
heat sources that could ignite if
damaged.
• Do not dispose of the product by putting it into a
fire.
Height (Minimum /
Maximum) 84.6cm / 86.6cm*
Lenght 59.7cm
Depth 59.9cm
Capacity (max.) 8kg**
Net weight (± %10) 44kg
Tension
1.6 RoHS Compliance: output power
nominal See MSDS***
The device you purchased complies with the
RoHS Directive (2011/65/EU) of the European
Union. It does not contain the dangerous and
prohibited materials mentioned in the directive.
Model code
* Minimum height: Height of your device
when the adjustable feet are not extended.
Maximum height: Height of your device
when the adjustable feet are fully
extended.
* * Weight of dry laundry before washing.
* * * The data sheet is located behind the
loading door.
1.7 Packaging Information
The product packaging is made of recyclable
materials, in accordance with our national
regulations. Do not dispose of the packaging
elements with household waste and other
waste. Drop them off at one of the packaging
collection points indicated by the local
authority on which you depend. VSREMARK
• The technical characteristics of the dryer may
be modified without notice, with the aim
of improving the quality of the product.
• The diagrams presented in this manual are
indicative and may not correspond
exactly to your product.
• The values indicated on the labels of the
dryer or in the documents supplied with it,
have been obtained in the laboratory, in
accordance with the applicable standards.
These values vary in
depending on the conditions of use
and environment of the dryer.
8Dryer / User Manual

2 Your dryer 2.2 Package contents
6. Container
of
filling
water*
2.1 Overview 1. Hose
drain
of water *
11
12. Filter
spare in
mousse*
2
10 7. Pure Water*
3
88. Fragrance
Caps
Group*
43. Manual
of
the user
75
6
1. Top of the dryer
2. Control panel
3. Appliance window
4. Cover plate release button
5. Ventilation grid
6. Adjustable feet
7. For bottom tank models, the water tank is
inside the unit .
8. MSDS
9. Lint filter
10. Water tank drawer (For models with
above tank)
11. Power cord
4. Basket of
drying* 9.Brush*
5. Manual
of
the user
from the basket of
drying*
10. Filter
Fabric*
* It may be supplied with your machine
depending on its model.
Dryer / User Manual 9
9

3 Setup • Keep at least 1 cm away from the edges
of other furniture.
• Your dryer can be used at temperatures
between +5°C and +35°C. If the
conditions of use are outside these
values, the operation of the dryer will be
impaired and it may be damaged.
• The rear surface of the dryer should be
placed against a wall.
Before calling the nearest authorized
service agent for installation of the dryer,
ensure that the electrical installation and
the drain pipe are suitable by referring to
the user manual . If not, contact a qualified
electrician and service technician to make
the necessary connections.
VSREMARK BDANGER!
• The preparation of the installation of the
dryer and the electrical installations
and water drainage are the
customer's responsibility.
• Do not place the dryer on a power cord.
*Ignore the following warnings if
your product system does not
contain R290
HAS
WARNING !
DANGER!
• Before installation, visually check the
dryer for any defects.
If the dryer is damaged, you should
not install it. Damaged products may
pose risks to your safety.
• Wait 12 hours before operating
your dryer.
• The dryer contains R290 refrigerant.*
• R290 is an environmentally friendly but
flammable refrigerant.*
• Make sure the dryer's air inlet is open
and well ventilated.*
• Keep potential flame sources away from
the dryer.*
3.1 Suitable installation
location
• Install the dryer on a stable and even
surface.
• The dryer is heavy. Don't move it by
yourself.
• Use your dryer in a well-
ventilated, dust-free
environment.
• The gap between the dryer and the floor
should not be reduced by materials such
as carpets, wood and tape.
• Do not cover the air vents of the dryer.
• A lockable, sliding or hinged door must
not block the opening of the loading
door where your dryer is to be
installed.
• When the dryer is installed, it must remain
in the same place where the connections
were made. When you install the dryer,
make sure that its rear wall is not in
contact with any element (tap, socket,
etc.).
10 Dryer / User Manual

3.2 Remove the safety elements
used for transport VS
REMARK
HAS • The water drain hose must be The water
drain hose must be attached at a
maximum height of 80 cm.
• Zorg ervoor dat de filters schoon zijn. Voor
meer informatie verwijzen wij naar de
sectie Onderhoud & Reiniging
• If there is an accessory pack supplied with
your product, see the detailed
description.
WARNING !
• Remove the
elements of
security‚ reserved
to transportation
before using the
dryer for the
first time
• To change lateral
pivoting
from the door of
your device,
if it's possible
to do,
refer
to instructions
reversible door
assembly.
3.4 Adjusting the feet
• Turn the feet to the
left or to the
right, until
dryer is stable
and horizontal.
3.5 Transporting the dryer
Drain any remaining water in the dryer.
If a direct connection to a water drain
hose is made, then remove the hose
connections.
3.3 Connect the exhaust duct
You can drain the water directly using the
drain hose supplied with the machine
(depending on the model) instead of regularly
emptying the water accumulated in the tank. HAS
WARNING !
Water drain hose connection We recommend carrying the dryer in an
upright position. If it is not possible to
transport it in a vertical position, the machine
must be transported tilting it to the right when
viewed from the front.
1-2Pull to the
hand the pipe
behind the
clothes dryer
in order to
unplug
from his point
connection.
Do not use
no tools
to remove this
pipe..
1 2
3 4
3Connect one end of the drain hose supplied
separately with the dryer (depending on the
model) to the connection point from which
you removed the hose from the appliance in
the previous step.
The other end of the drain hose can be
directly connected to the sewage pipe or
sink.
4
Dryer / User Manual 11

3.6 Noise warnings
VS
REMARK
• Sometimes a
metallic sound is
generated by the
compressor;
it is
completely
normal.
• During operation, the collected
water is pumped into the
water reservoir. At this stage, the
operating sound of the pump is normal.
3.7 Changing the light bulb
If your dryer has a light bulb
Contact your authorized service if you wish
to change the bulb/LED used for the
lighting of your dryer
The lamp(s) used in this appliance is (are)
not suitable for lighting a household room.
This lamp is designed to help the user to
place the laundry in the dryer in a
comfortable way. The lamps used in this
device can withstand extreme physical
conditions such as vibration and
temperatures above 50°C.
12 Dryer / User Manual

4 Preparation • For models with condensing unit; clean
the condenser once a month or after
every 30 operations regularly.
• Clean the filter periodically when there is
visible lint buildup or when the symbol
illuminates, if there is a filter drawer
cleaning warning symbol available.
• For models with duct unit; follow the duct
connection instructions and clean the
duct.
• During the drying process, properly
circulate the air in the room where your
dryer is operating.
• On models equipped with a heat pump,
check the condenser at least every 6
months and clean it if it is dirty.
• If you use the eco filter, you do not need
to clean it with
each cycle. Replace filter cloth
of the ecological filter is
4.1 Laundry suitable for tumble
drying
• Always follow the instructions given
on the labels of the
clothes. Only dry laundry with a label
indicating that it can be tumble
dried.
• 4.2 Laundry not suitable for
tumble drying
Do not dry
in the dryer
Items with this symbol
should not be dried in theclothes dryer.
not
VSREMARK
• Delicate embroidered fabrics, wool, silk
garments, delicate and precious
fabrics, airtight items and tulle
curtains are not suitable for tumble
drying. Iwhen the symbol
displayed on the screen.has
4.3 Preparing laundry for drying 4.5 VSapacity of ch appropriate size
• Laundry may become tangled after
washing. Separate your laundry before
placing it in the dryer.
• Lay clothes with metal fittings, such
as zippers, inside out to dry.
• Fasten zippers, hooks, loops and buttons.
Follow the instructions
of the whiteboard
selection of
program and
consumption ".
Do not charge
more than capacity
indicated in the
picture.
The weights known living are given for information only
4.4 Measures to adopt to
save energy Weight Weight
approximate
(g)*
Laundry approximate Laundry
• Spin the laundry at maximum speed
during washing. Thus, drying time
and energy consumption are
reduced.
• Sort laundry according to type and
thickness. Dry the same type of laundry
together. For example, thin kitchen
towels and tablecloths dry faster than
thick bath towels.
• Please follow the information in the user
manual for the
program selection.
• Do not open the machine door during
drying unless necessary. If you must
open the door, be careful not to leave it
open too long.
(g)*
Comforter in
cotton (double) 1500 Blouse 150
Comforters in
cotton (single)
Shirt in
cotton
1000 300
Bed sheet
(double) 500 Shirts 250
Bed sheet
(simple)
Dress in
cotton
350 500
large tablecloth 700 Dress 350
Small tablecloth 250 Jeans 700
Tissues (10
items)
tea towel 100 100
towel
bath 700 T-shirt 125
Hand towels 350
* Weight of dry laundry before washing.
Dryer / User Manual 13

5 Operation of the device
5.1 Control panel
1
5 4 3 2
1. On/Off/Program selection button 3. End time button
4. Dryness Level Button
2. Start/Standby button 5. Volume/alarm time program
selection button
5.2 Symbols
Tank
full
Cleaning
of the filter
Filter drawer ( Cleaning the
heat exchanger)
Security
children
Bring into
mute
Volume
high
Express
14'
Delicate Shirts Sport Fresh Cycle Cotton mixed
Final /Anti-
crumpling
Walking/
stop
Delayed end/
Departure Sun
Drying Ready to
carry
Ready to
iron
Jeans BabyProtect
(Babe)
Extra dry Ready to wear
more
Starting Grid Synthetic Button
drying / Express
30'
time
Pause TimeDry
Bedding/
Feather
Drying
Economic
in cotton
Express Level of
drying+
Level of
drying++
Hygiene
(Baby+)
Shirts 30 refreshment Low
temperature
Daily Level of
drying
Feather
Freshness
Oldest boy
5.3. Preparing the dryer Select the desired program by pressing the
On/Off/Program selection button, the
appliance will start.
• Plug in the dryer.
• Open the dryer door
• Place the laundry in the dryer drum without
jamming it.
• Push and close the door of
loading. VSREMARK
HAS • Selecting a program using the On/Off/
Programme selection button does not
mean that the program has started.
Press the Start/Standby button to start
the program.
WARNING !
Ensures
that none
stuck
dryer
z you
a cloth is not
on the door of
ing.
14 Dryer / User Manual

5.4 Program selection and consumption table
FR
Programs Description of the program
You can dry single-ply or cotton casual
fabrics when they are slightly damp so
that they are ready for ironing.
Cotton Dry iron 8 1000 145
Single-ply or cotton casual textiles are dried
in the most economical way possible.Eco-cotton 8 1000 197
You can use this program for additional
drying of thick clothes such as trousers,
tracksuits. You can store your laundry in the
wardrobe without ironing it.
Cotton Ready to wear 8 1000 205
With this cycle you can dry multi-layered or
heavy cotton fabrics that are heat resistant
and difficult to dry.
Extra dry cotton 8 1000 210
With this cycle, you can dry your synthetic
textiles to be ironed when they are a little
damp to facilitate ironing.
Synthetics Iron dry 4 800 60
With this cycle you can dry all your synthetic
textiles. You can store your laundry in the
wardrobe without having to iron it.
Synthetics Ready to wear 4 800 70
You can select timed programs between 10
and 160 minutes to achieve the desired level
of dryness at low temperature. In this
program, the dryer operates for the set time
regardless of the degree of dryness of the
laundry. This appliance must be used with an
optional drying basket. For products sold
without a basket, approach an authorized
service to obtain one and use the drying
programs mentioned above. For more
information on using the drying basket, refer
to its user guide.
timer - - -
Ventilate for 10 minutes without blowing hot
air. You can air cotton and linen clothes that
have been locked up for a long time with
this program to remove their odor. You can
use this program to air and soften woolen
laundry that can be washed in a washing
machine. Do not use for complete drying.
Refresh - - 10
This program dries shirts more sensitively,
reduces creases and makes ironing easier.
Delicate
Shirts 2 1200 50
With this program you can dry your
trousers, skirts, shirts or denim jackets.Jeans 4 1200 140
Dryer / User Manual 15
Capacity (kg)
Speed
wringing the
washing machine (tr/
min)
Duration
drying
(minutes)

Use it to dry your clothes made of synthetic,
cotton or mixed fabrics or waterproof
products such as functional jacket, raincoat,
etc. Turn them upside down before drying
them.
Outdoor/Sport 2 1000 130
This program allows you to dry cotton and
synthetic laundry. Sports and fitness clothes
can be dried with this programme.
mixed 4 1000 125
It is a long-term program that you can use
for clothes (baby clothes, towels, underwear,
etc.) that require some hygiene. Hygiene is
guaranteed at high temperatures. (( This
program is identified and endorsed by the
British Foundation (Allergy UK). ))
Hygiene+ 5 800 195
You can dry your textile filled with fibers or
feathers that can be dried in a drier label in
one piece of laundry. You can dry a king size
quilt, pillow or coat in one piece of laundry.
Dry your clothes such as inside-out coats and
jackets.
Down jacket/Downwear - 800 100
Use this program to make the 2 shirts
ready to iron.
Daily Express 0.5 1200 30
Energy consumption values
Programs Capacity (kg)
Cotton Ready to hang* 8 1000 60% 1.97
Cotton Ready-to-iron 8 1000 60% 1.50
Synthetic Ready-to-wear 4 800 40% 0.75
The "Cotton Ready to Hang Programme" used at full and partial load is the standard
drying program to which the information on the label and the leaflet refers, that this
program is suitable for normal drying of damp cotton laundry and that it is the most
efficient in terms of energy consumption for cotton.
*: Standard energy label program (EN 61121) All values in the table are determined
according to EN 61121 standard Consumption values may differ from those in the table
depending on the type of laundry, spin speed, ambient conditions and voltage values.
16 Dryer / User Manual
Speed
wringing the
washing machine (tr/
min)
Amount
approximate
humidity
residual
Value
consumption
energy
(kWh)

Allergy UK is the brand of the
British Allergy Association.
British). Seal of Approval is
designed to guide
people who need product
recommendations that the product
concerned restricts/reduces/eliminates
allergens or significantly reduces the
allergen content in the environment
where allergic patients exist. It aims to
provide assurance that products are
scientifically tested or reviewed to provide
measurable results.
1. Open the dryer door and place your
laundry.
2. Select the drying program.
. Press the end time selection button and set
the delayed period
desired. Delayed end the LED lights
up. (When you press and hold the
button, the end time continues
uninterrupted).
4. Press the Start/Standby button. End time
countdown begins. The “:” separator in
the middle of the displayed delay time
flashes.
5.5 Optional functions VSREMARK
Alarm / Time
At the end of the program, your machine
emits an audible alert. If you do not want
the machine to give an audible warning,
press the “Alarm/Time” button. When you
press the Alarm/Time button, a light will
turn on and no warning sound will be made
when the program ends.
• You can add or remove laundry even if the
delayed end is started. The time
displayed on the screen is the sum total
of the normal drying time and the end
time. The end time timer turns off
when the countdown ends, drying
begins and the drying icon illuminates.
End time change
If you want to change the duration during
the countdown:
VSREMARK Cancel the program by pressing the On/Off/
Program selection button. Select the desired
program and repeat the end time selection
process. Cancellation of the delayed end
function
• You can select this function before or
after the start of the
program.
The Alarm/Time button is used to set the
program duration while timed programs
are selected. Dryness Level: The Dryness
Level button is used to adjust the dryness
to the desired level. Program duration may
vary depending on selection
If you want to cancel the end time
countdown and start the program
immediately:
Cancel the program by pressing the On/Off/
Program selection button. Select the
desired program and press the Start/
Standby button.
VSREMARK 5.6 Warning indicators
• You can only activate this function before
starting the program.
Delayed end VSREMARK
• Warning indicators vary depending on
your dryer model.
You can delay 24 hours to
maximum the program end time, with
the delayed end function.
Dryer / User Manual 17

Filter cleaning
At the end of the program, the indicator
When the Child Lock is activated: When the
dryer is working, or in standby mode, the
indicator lights do not change when you
change the position of the program selection
button.
filter cleaning warning light illuminates.
Water reservoir
If the water tank fills up while the program
is running, the warning indicator starts
flashing and the machine goes into standby
mode. In this case, empty the water tank
and restart the program by pressing the
Start/Standby button. The warning indicator
goes out and the
VSREMARK
• When the dryer is running, the childproof
lock is activated. It beeps twice when
the program selection knob is turned.
If the Child Lock is deactivated without
returning the program selection knob
to its previous position, the program
will end due to the change in the
position of the program selection
knob.
program resumes.
Cleaning the heat exchanger located at the
bottom of the dryer
The warning light flashes periodically to
remind you to clean the filter located at the
bottom of the dryer.
5.7 Starting the program
Press the Start/Standby button to start the
program.
The Start/Standby and Drying indicators
light up to indicate that the program is
starting.
5.9 Modifying a running program
You can change the program selected for
drying your laundry and choose a different
program even if the dryer is running.
• For example, select the Extra Dry program
by turning the On/Off/Programme
selection button to select Extra Dry instead
of the Ready to Wear programme.
• Press the Start/Standby button to
5.8 Child lock
The dryer is fitted with a child safety device
which prevents any interruption of the
program cycle by locking the buttons when
a program is in progress. All buttons except
the On/Off/Program selection button are
disabled when Child Lock is activated.
Press the Dryness level and Alarm buttons
simultaneously for 3 seconds to activate the
child lock.
You must deactivate the Child Lock to be
able to start a new program at the end of
the current program or to interrupt the
current program. To deactivate Child Lock,
long press the same buttons for 3 seconds.
launch the program.
Adding or removing laundry in standby mode
If you want to add or remove laundry from
the tumble dryer after the drying program
has started:
• Press the Start/Standby button to switch
the dryer to Standby mode. The drying
process stops.
• When the appliance is in Standby, open
the loading door and close it after
adding or removing laundry.
• Press the Start/Standby button to start
the programme.
VSREMARK
• When the Child Lock is activated, the
Child Lock warning indicator on the
screen lights up.
• The Child Lock deactivates when you
press the On/Off/Cancel button to
switch the dryer off and on.
18 Dryer / User Manual

VS 5.11 End of program
REMARK When the program ends, the Filter and Anti-
Crease cleaning warning lights appear on
the program monitoring indicator light up.
The dryer door can be opened and the dryer
is ready for a second cycle. Turn the On/Off/
Program selection knob to the On/Off
position to switch off the dryer.
• Adding laundry during the drying process
can cause wet and dry laundry to mix in
the machine, resulting in damp laundry
at the end of the process.
• You can add or remove laundry during
drying as many times as you want.
However,
the drying process will be
permanently interrupted, which will
extend the program duration and
increase energy consumption. We
therefore recommend that you add
the laundry before the program
starts.
• If you select a new program by turning
the program selection knob while
the dryer is in standby mode, the
current program ends.
VSREMARK
• If the laundry is not removed after the
program is finished, the anti-crease
function will activate for 2 hours to
prevent the laundry inside the machine
from being wrinkled. The program allows
you to turn the laundry every 10 minutes
in intervals to prevent them from
creasing.
WARNING !
• Do not touch the inner surface of the
drum when adding or removing
laundry during a running program
because it is hot.
5.10 Canceling the program
If you want to cancel a program and stop
the drying process for any reason after the
dryer has started, long turn the On/Off/
Cancel button the program will be cancelled.
HAS
WARNING !
• The inside of the dryer can be extremely
hot when you cancel the program while
it is running. It is therefore advisable to
wait a few minutes to let it cool.
Dryer / User Manual 19

6 Maintenance and cleaning • Open both door filters and remove lint
with your hand or use a cleaning brush
at the air channel cover. If necessary,
use a vacuum cleaner to clean the
filters.
The life of the device increases and
frequently encountered problems decrease
if it is cleaned at regular intervals.
6.1 Cleaning the Filters
The hairs and fibers mixed with the air and
extracted from the laundry during the drying
process are collected by the Door Filter.
VSREMARK
• Lint appears during the drying phase
• You can clean the door filter with the
electric vacuum cleaner.
HAS
WARNING !
• Clean both filters with a soft brush or your
hands and water in the opposite
direction of lint buildup. Dry the filter
before inserting it.
• Be absolutely sure to clean the internal
surfaces of the door filter after each
cycle.
To clean the door filter
• Open the dryer door
• Remove by pulling up the first part of the
door filter
• Clean hair, fibers and cotton pellets
manually or with a
cloth.
• Remove by pulling up the second door
filter.
VSREMARK
• Take care that hair, lint and cotton pellets
do not fall into the cavity of the door
filters.
20 Dryer / User Manual
Table of contents
Other Beko Dryer manuals

Beko
Beko DTBC 10001W User manual

Beko
Beko DPU 7360 GX User manual

Beko
Beko DC 7230 XS User manual

Beko
Beko DS 7433 CSRX User manual

Beko
Beko DCU 1670 User manual

Beko
Beko 600772CH User manual

Beko
Beko DTGV 8000W User manual

Beko
Beko DU8133GA0W User manual

Beko
Beko DCU 7230BX User manual

Beko
Beko DS 7536 MM User manual