Beko GN1406224XBR User manual

GN1406222XP-GN1406222GB-GN1406224XBR-GN1406222GW
EN/HE/AR
58 8979 0000/AB-EN-HE-AR
Refrigerator
User Manual
ררקמ

Please read this manual before using the product!
Dear Customer,
We'd like you to make the best use of our product, which has been manufactured in modern facilities
with care and meticulous quality controls.
Thus, we advice you to read the entire user manual before you use the product. In case the product
changes hands, do not forget to hand the guide to its new owner along with the product.
This guide will help you use the product quickly and safely.
• Please read the user guide carefully before installing and operating the product.
• Always observe the applicable safety instructions.
• Keep the user guide within easy reach for future use.
• Please read any other documents provided with the product.
Keep in mind that this user guide may apply to several product models. The guide clearly indicates any
variations of different models.
CImportant information and useful
tips.
ARisk of life and property.
BRisk of electric shock.
The product’s packaging is made of
recyclable materials, in accordance
with the National Environment
Legislation.
A
A
A
C
SUPPLIER’S NAME MODEL IDENTIFIER (*)
INFORMATION
C
.The model information as stored in the product data base
can be reached by entering following website and searching
for your model identifier (*) found on energy label.
https://eprel.ec.europa.eu/

2 /30 EN Refrigerator / User Manual
1. Safety and environment instructions3
2 Your Refrigerator 7
2 Your Refrigerator 8
3 Installation 9
3.1 Appropriate location for installation . . . . . . . .9
3.2 Installing the plastic wedges . . . . . . . . . . . . .9
3.3* Adjusting the feet . . . . . . . . . . . . . . . . . . .10
3.4 Electric connection . . . . . . . . . . . . . . . . . . .11
4 Preparation 12
4.1 Things to be done for saving energy . . . . .12
4.2 Recommendations about the fresh food
compartment. . . . . . . . . . . . . . . . . . . . . .12
4.3 Initial use. . . . . . . . . . . . . . . . . . . . . . . . .13
5 Operating the product 14
5.1 Indicator panel . . . . . . . . . . . . . . . . . . . . . .14
5.2 Indicator panel. . . . . . . . . . . . . . . . . . . . .18
5.3 Freezing fresh food. . . . . . . . . . . . . . . . . . .20
5.4 Recommendations for preserving the frozen
food . . . . . . . . . . . . . . . . . . . . . . . . . . . .21
5.5 Deep-freeze information . . . . . . . . . . . . . . .21
5.6 Placing the food . . . . . . . . . . . . . . . . . . . . .21
5.7 Door open warning . . . . . . . . . . . . . . . . . . .21
5.8 Chiller compartment . . . . . . . . . . . . . . . . . .22
5.9 Crisper. . . . . . . . . . . . . . . . . . . . . . . . . . . .22
5.10 Humidity-controlled crisper . . . . . . . . . . . .22
(FreSHelf) . . . . . . . . . . . . . . . . . . . . . . . . . . . . .22
5.11 Egg tray . . . . . . . . . . . . . . . . . . . . . . . . . .22
5.12 Movable Middle Section . . . . . . . . . . . . . .23
5.13 Cool Control Storage Compartment . . . . .23
5.14 Blue light . . . . . . . . . . . . . . . . . . . . . . . . .23
5.15 Odour filter. . . . . . . . . . . . . . . . . . . . . . . .23
5.16 Wine cellar compartment . . . . . . . . . . . . .24
5.17 Using internal water dispenser . . . . . . . . .25
5.18 Dispensing water . . . . . . . . . . . . . . . . . . .25
5.19 For using water dispenser. . . . . . . . . . . . .26
5.20 Icematic . . . . . . . . . . . . . . . . . . . . . . . . .26
5.21 Icematic and ice storage container . . . . . .27
6 Maintenance and Cleaning 28
7. Troubleshooting 29

3 / 30 EN Refrigerator / User Manual
1. Safety and environment instructions
This section provides the safety
instructions necessary to prevent
the risk of injury and material
damage. Failure to observe these
instructions will invalidate all
types of product warranty.
Intended use
A
WARNING:
Keep ventilation openings,
in the appliance enclosure
or in the built-instructure,
clear of obstruction.
A
WARNING:
Do not use mechanical
devices or other means to
accelerate the defrosting
process, other than those
recommended by the
manufacturer.
AWARNING:
Do not damage the
refrigerant circuit.
A
WARNING:
Do not use electrical
appliances inside the food
storage compartments
of the appliance, unless
they are of the type
recommended by the
manufacturer.
This appliance is intended to be
used in household and similar
applications such as
– staff kitchen areas in shops, offices
and other working environments;
– farm houses and by clients in
hotels, motels and other residential
type environments;
– bed and breakfast type
environments;
– catering and similar non-retail
applications.
1.1.General safety
• This product should not be
used by persons with physical,
sensory and mental disabilities,
without sufficient knowledge and
experience or by children. The
device can only be used by such
persons under supervision and
instruction of a person responsible
for their safety. Children should not
be allowed to play with this device.
• In case of malfunction, unplug the
device.
• After unplugging, wait at least 5
minutes before plugging in again.
• Unplug the product when not in
use.
• Do not touch the plug with wet
hands! Do not pull the cable to plug
off, always hold the plug.
• Do not plug in the refrigerator if the
socket is loose.
• Unplug the product during
installation, maintenance, cleaning
and repair.

4 /30 EN Refrigerator / User Manual
Important instructions regarding safety and environment
• If the product will not be used
for a while, unplug the product
and remove any food inside.
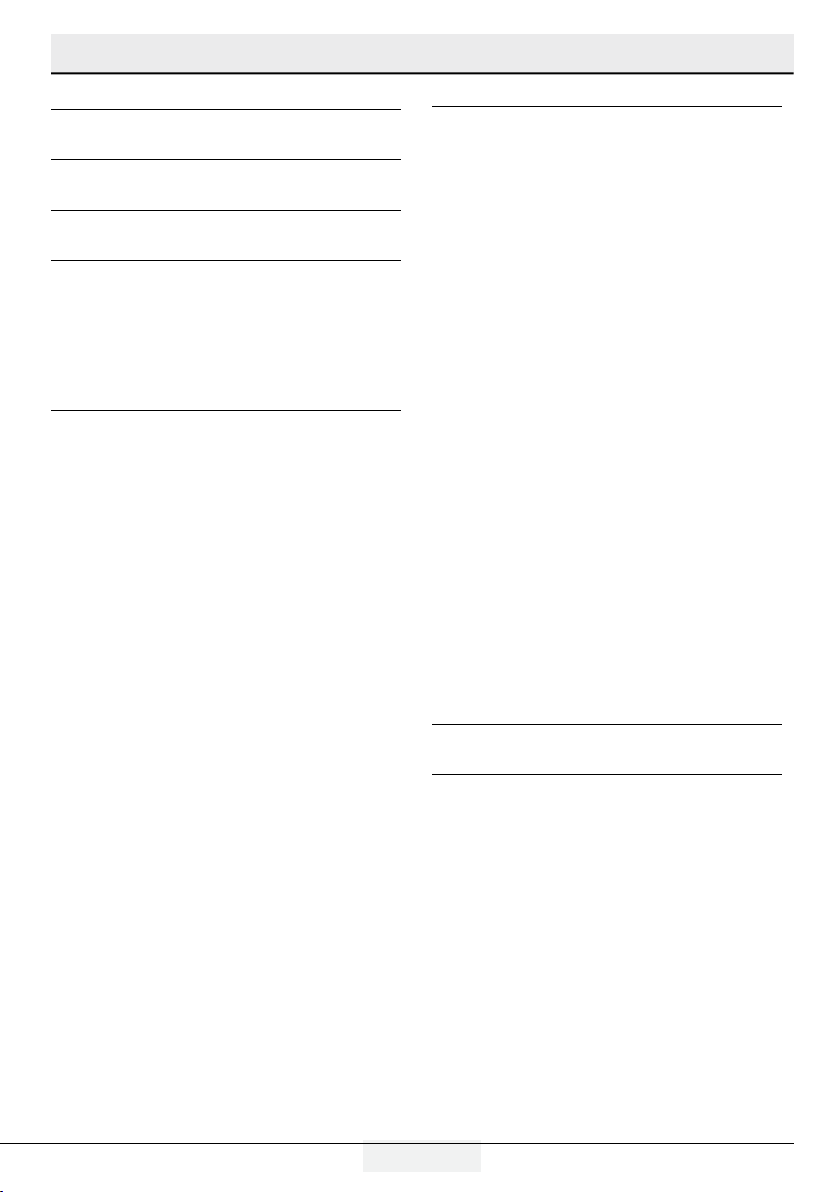
• Do not use the product when
the compartment with circuit
cards located on the upper back
part of the product (electrical
card box cover) (1) is open.
1
1
• Do not use steam or steamed
cleaning materials for cleaning
the refrigerator and melting the
ice inside. Steam may contact
the electrified areas and cause
short circuit or electric shock!
• Do not wash the product by
spraying or pouring water on it!
Danger of electric shock!
• In case of malfunction, do not
use the product, as it may
cause electric shock. Contact
the authorised service before
doing anything.
• Plug the product into an earthed
socket. Earthing must be done
by a qualified electrician.
• If the product has LED type
lighting, contact the authorised
service for replacing or in case
of any problem.
• Do not touch frozen food with
wet hands! It may adhere to
your hands!
• Do not place liquids in bottles
and cans into the freezer
compartment. They may
explode.
• Place liquids in upright position
after tightly closing the lid.
• Do not spray flammable
substances near the product,
as it may burn or explode.
• Do not keep flammable
materials and products with
flammable gas (sprays, etc.) in
the refrigerator.
• Do not place containers
holding liquids on top of the
product. Splashing water on
an electrified part may cause
electric shock and risk of fire.
• Exposing the product to rain,
snow, sunlight and wind will
cause electrical danger. When
relocating the product, do not
pull by holding the door handle.
The handle may come off.
• Take care to avoid trapping any
part of your hands or body in
any of the moving parts inside
the product.

5 / 30 EN Refrigerator / User Manual
Important instructions regarding safety and environment
• Do not step or lean on the door,
drawers and similar parts of
the refrigerator. This will cause
the product to fall down and
cause damage to the parts.
• Take care not to trap the power
cable.
1.1.1 HC warning
If the product comprises a cooling
system using R600a gas, take
care to avoid damaging the
cooling system and its pipe while
using and moving the product.
This gas is flammable. If the
cooling system is damaged, keep
the product away from sources
of fire and ventilate the room
immediately.
CThe label on the inner left
side indicates the type of
gas used in the product.
1.1.2 For models with
water dispenser
• Pressure for cold water inlet
shall be maximum 90 psi (6.2
bar). If your water pressure
exceeds 80 psi (5.5 bar), use a
pressure limiting valve in your
mains system. If you do not
know how to check your water
pressure, ask for the help of a
professional plumber.
• If there is risk of water hammer
effect in your installation,
always use a water hammer
prevention equipment in
your installation. Consult
Professional plumbers if you
are not sure that there is no
water hammer effect in your
installation.
• Do not install on the hot water
inlet. Take precautions against
of the risk of freezing of the
hoses. Water temperature
operating interval shall be 33°F
(0.6°C) minimum and 100°F
(38°C) maximum.
• Use drinking water only.
1.2.Intended use
• This product is designed for
home use. It is not intended for
commercial use.
• The product should be used to
store food and beverages only.
• Do not keep sensitive
products requiring controlled
temperatures (vaccines,
heat sensitive medication,
medical supplies, etc.) in the
refrigerator.

6 /30 EN Refrigerator / User Manual
Important instructions regarding safety and environment
• The manufacturer assumes no
responsibility for any damage
due to misuse or mishandling.
• Original spare parts will be
provided for 10 years, following
the product purchasing date.
1.3.Child safety
• Keep packaging materials out
of children’s reach.
• Do not allow the children to
play with the product.
• If the product’s door comprises
a lock, keep the key out of
children’s reach.
1.4. Compliance with WEEE Directive
and Disposing of the Waste Product
This product complies with EU WEEE
Directive (2012/19/EU). This product bears a
classification symbol for waste electrical and
electronic equipment (WEEE).
This product has been manufactured
with high quality parts and materials
which can be reused and are suitable
for recycling. Do not dispose of the
waste product with normal domestic
and other wastes at the end of its
service life. Take it to the collection
center for the recycling of electrical and electronic
equipment. Please consult your local authorities to
learn about these collection centers.
1.5. Compliance with RoHS Directive
• This product complies with EU WEEE Directive
(2011/65/EU). It does not contain harmful and
prohibited materials specified in the Directive.
1.6. Package information
• Packaging materials of the product are
manufactured from recyclable materials in
accordance with our National Environment
Regulations. Do not dispose of the packaging
materials together with the domestic or other
wastes. Take them to the packaging material
collection points designated by the local
authorities.

7 / 30 EN Refrigerator / User Manual
CFigures in this user manual are schematic and may not match the product exactly. If the subject parts
are not included in the product you have purchased, then those parts are valid for other models.
2 Your Refrigerator
*2
*3
4
56
7
*8
*9
1
*10
*11
5
1- Control and indicator panel
2- Butter & Cheese section
3- 70 mm moving door shelf
4- Fridge compartment glass shelf
5- Fridge compartment crisper
6- Gallon door shelf
7- Chiller compartment
8- Icebox drawer
9- Multizone compartment glass shelf/cooler
10- Freezer compartment drawers
11- Multizone Compartment's drawer
* OPTIONAL

8 /30 EN Refrigerator / User Manual
CFigures in this user manual are schematic and may not match the product exactly. If the subject parts
are not included in the product you have purchased, then those parts are valid for other models.
2 Your Refrigerator
1- Control and indicator panel
2- Butter & Cheese section
3- 70 mm moving door shelf
4- Fridge compartment glass shelf
5- Fridge compartment crisper
6- Gallon door shelf
7- Chiller compartment
8- Icebox drawer
9- Multizone compartment glass shelf/cooler
10- Freezer compartment drawers
* OPTIONAL
*2
*3
4
56
7
*8
*9
1
10
5

9 / 30 EN Refrigerator / User Manual
3.1 Appropriate location
for installation
Contact an Authorized Service for the installation
of the product. In order to prepare the product
for use, refer the information in the user manual
and ensure that electrical installation and water
installation are appropriate. If not, call a qualified
electrician and technician to have any necessary
arrangements carried out.
BWARNING: Manufacturer shall not
be held liable for damages that may
arise from procedures carried out by
unauthorized persons.
BWARNING: Product must not be plugged
in during installation. Otherwise, there is
the risk of death or serious injury!
A
WARNING: : If the door clearance of the
room where the product shall be placed is
so tight to prevent passing of the product,
remove the door of the room and pass the
product through the door by turning it to
its side; if this does not work, contact the
authorized service.
•Placetheproductonalevelfloorsurfaceto
prevent jolts.
•Installtheproductatleast30cmawayfrom
heat sources such as hobs, heater cores and
stoves and at least 5 cm away from electrical
ovens.
•Productmustnotbesubjectedtodirectsunlight
and kept in humid places.
•Appropriateairventilationmustbeprovided
around your product in order to achieve an
efficient operation. If the product is to be placed
in a recess in the wall, pay attention to leave at
least 5 cm distance with the ceiling and side
walls.
•Donotinstalltheproductinplaceswherethe
temperature falls below -5°C.
3.2 Installing the plastic wedges
Plastic wedges supplied with the product are
used to create the distance for the air circulation
between the product and the rear wall.
3 Installation
1.
To install the wedges, remove the screws on the
product and use the screws supplied together with the
wedges.
2.
Insert the 2 plastic wedges onto the rear ventilation
cover as illustrated in the figure.

10 /30 EN Refrigerator / User Manual
Installation
3.3* Adjusting the feet
If the product stands unbalanced after installation,
adjust the feet on the front by rotating them to the
right or left.
*If your product does not have a wine
compartment or is not a glass door, your product
does not have adjustable stands, the product has
fixed stands.
To adjust the doors vertically,
Loosen the fixing nut located at the bottom.
Rotate the adjusting nut according to the position
of the door (clockwise/counter-clockwise).
Tighten the fixing nut in order to fix the position.
To adjust the doors horizontally,
Loosen the fixing nut located at the top.
Rotate the side adjusting nut according to the
position of the door (clockwise/counter-clockwise).
Tighten the fixing nut which is at the top in order to
fix the position.
adjusting nut
fixing nut
fixing nut
adjusting nut

11 / 30 EN Refrigerator / User Manual
Installation
3.4 Electric connection
AWARNING: Do not make connections via
extension cables or multi-plugs.
BWARNING: Damaged power cable must
be replaced by the Authorized Service
Agent.
CIf two coolers are to be installed side
by side, there should be at least 4 cm
distance between them.
• Our company shall not be liable for any
damages that will arise when the product
is used without grounding and electrical
connection in accordance with the national
regulations.
• Power cable plug must be within easy reach
after installation.
• Do not extension cords or cordless multiple
outlets between your product and the wall
outlet.
-Upper hinge group is fixed with 3 screws.
-The hinge cover is attached after the sockets are
installed.
- Then the hinge cover is fixed with two screws.

12 /30 EN Refrigerator / User Manual
4 Preparation
• Thawing the frozen foods in the fridge
compartment both saves energy and reserves
the quality of the foods.
CTemperature of the room where your
refrigerator is located should at least
be 10ºC /50°F. Operating your
refrigerator under cooler conditions is not
recommended with regard to its efficiency.
CInside of your refrigerator must be cleaned
thoroughly.
CIf two coolers are to be installed side
by side, there should be at least 4 cm
distance between them.
4.2 Recommendations about the
fresh food compartment
• Make sure that the food does not touch the
temperature sensor in fresh food compartment.
To allow the fresh food compartment to keep
its ideal storage temperature, the sensor must
not be hindered by food.
• Do not place hot foods or beverages inside the
product.
4.1 Things to be done for
saving energy
AConnecting your refrigerator to systems
that save energy is dangerous as they may
cause damage on the product.
• Do not leave the doors of your refrigerator open
for a long time.
• Do not put hot food or drinks in your
refrigerator.
• Do not overload the refrigerator. Cooling
capacity will fall when the air circulation in the
refrigerator is hindered.
• Do not place the refrigerator in places subject
to direct sunlight. Install the product at least
30 cm away from heat sources such as hobs,
ovens, heater units and stoves and at least 5
cm away from electrical ovens.
• Pay attention to store your food in refrigerator
in closed containers.
• To be able store maximum food in the freezer
compartment of your refrigerator, the upper
drawer has to be removed and placed on top
of glass shelf. Power consumption stated for
your refrigerator has been determined after
removing the icematic and the upper drawers
as to allow maximum loading. It is strongly
recommended to use the lower drawers in the
freezer and the multizone compartment while
loading.
• Since hot and humid air will not directly
penetrate into your product when the doors are
not opened, your product will optimize itself
in conditions sufficient to protect your food.
In this energy saving function, functions and
components such as compressor, fan, heater,
defrost, lighting, display and so on will operate
according to the needs to consume minimum
energy while maintaining the freshness of your
foodstuff.
• Airflow should not be blocked by placing
foods in front of the freezer and the multizone
compartment fans. Foods should be loaded by
leaving minimum 5 cm space in front of the
protective fan grid.

13 / 30 EN Refrigerator / User Manual
Preparation
4.3 Initial use
Before using the product, make sure that all
preparations have been made in accordance
with the instructions given in the "Important
instructions regarding safety and environment" and
"Installation" chapters.
• Clean the interior of the refrigerator as
recommended in the “Maintenance and
cleaning” section. Before you start the
refrigerator, make sure that the interior is dry.
• Plug the refrigerator in a grounded socket. The
interior illumination is lit when the door of the
refrigerator is opened.
• Operate the refrigerator for 6 hours without
placing any food in it and do not open its door
unless it is necessary.
CYou will hear a noise when the compressor
starts up. The liquids and gases sealed
within the refrigeration system may also
give rise to noise, even if the compressor is
not running and this is quite normal.
CFront edges of the refrigerator may
feel warm. This is normal. These areas
are designed to be warm to avoid
condensation.

14 /30 EN Refrigerator / User Manual
5 Operating the product
CFigures in this user manual are schematic and may not match the product exactly. If the subject parts
are not included in the product you have purchased, then those parts are valid for other models.
5.1 Indicator panel
Touch-controlled indicator panel allows you to set the temperature and control the other functions related
to the refrigerator without opening the door of the product. Just press the relevant buttons for function
settings.
Select
Quick Freeze
Quick Cool
FN
OK
3 “
3 “
1234568910
11
12
13
14
15
16
17
*29
18
19
25
26
27
28
Select
Quick Freeze
Quick Cool
FN
OK
3 “
3 “
7
21 20
22
23
24

15 / 30 EN Refrigerator / User Manual
Operating the product
1. Quick Cool Function Indicator
This indicator will light up when the quick
refrigeration function is activated
2. Fridge Compartment Temperature Indicator
It displays the temperature of the fridge
compartment; it may be set at 8, 7, 6, 5, 4, 3, 2, 1.
3. Fahrenheit Indicator
It shows the temperature in degree Fahrenheit.
When the degree Fahrenheit indicator is activated,
the temperature setpoint values are displayed in
degree Fahrenheit together with the display of its
corresponding icon.
4. Key Lock Indicator
This indicator lights up when the Key Luck Function
is activated Buttons will not function if Key Lock
mode is active.
5. Power Outage / High Temperature / Error
Warning
This indicator lights up in the event of power
outage, abnormal high temperature and error
warning. During prolonged power outages, the
maximum temperature value reached by the freezer
compartment blinks on the digital display. Upon
inspecting the food in the freezer compartment,
press the alarm off button to clear the warning.
If you notice that this indicator is lit, please refer
to the section “Recommended Solutions for
Troubleshooting” in your manual.
6. Filter Replacement Icon
This Icon is displayed when the water filter has to be
replaced.
7. Wine Cellar Temperature Change Icon
It shows the compartment whose temperature has
to be modified. When the compartment temperature
change icon blinks, this means the corresponding
compartment has been selected.
8. Freezer Compartment Temperature Indicator
It displays the temperature of the freezer
compartment; it may be set at -18, -19, -20, -21,
-22, -23, -24 °C.
9. Quick freeze function indicator
This indicator will light up when the Quick Freeze
Function is activated
10. Fahrenheit Indicator
It shows the temperature in degree Fahrenheit.
When the degree Fahrenheit indicator is activated,
the temperature setpoint values are displayed in
degree Fahrenheit together with the display of its
corresponding icon.
11. Quick freeze function button
Press this button to activate or deactivate the quick
freezing function. When you activate this function,
the freezer compartment will cool at a temperature
below the setpoint.
CUse the quick freeze function when you
want to quickly freeze the food placed
in freezer compartment. If you want
to freeze large amounts of fresh food,
activate this function before putting the
food into the product
CAfter 1 hours or when the freezer
compartment reaches the desired
temperature, the Quick Freeze Function
will turn off automatically if you do not
do so.
CThis function is not recalled when
power restores after a power failure.
12. Filter Replacement
You can reset the water filter replacement alarm by
pressing the Quick Freeze Button for 3 seconds.
13. FN Button
This button allows you to toggle between functions
that you want to select. When you press this
button, the icon whose function must be activated
or deactivated starts blinking together with its
indicator. The FN Button is automatically deactivated
if not used within 20 seconds. Hence, you would
have to press this button again if you wish to modify
functions.
14. Celsius Indicator
It displays temperature in degree Celsius. When
the degree Celsius Indicator is activated, the
temperature setpoint values are displayed in
degree Celsius together with the display of its
corresponding icon.

16 /30 EN Refrigerator / User Manual
Operating the product
15. OK Button
Upon scrolling through the functions thanks to
the FN button, activate the selected function by
pressing the OK button. When the function is
activated, the icon will remain lit up
16. Temperature Increase Button
Select the corresponding compartment with the
selection button; the compartment icon for the
said compartment will blink. If you press the
Temperature Increase Button during this process,
the setpoint value will increase If you press this
button repeatedly, the setpoint value will be reset.
17. Freezer Compartment Temperature
Change Icon
It shows the compartment whose temperature
has to be modified. When the compartment
temperature change icon blinks, this means the
corresponding compartment has been selected.
18. Temperature Decease Button
Select the corresponding compartment with the
selection button; the compartment icon for the
said compartment will blink. If you press the
Temperature Decrease Button during this process,
the setpoint value will decrease. If you press this
button repeatedly, the setpoint value will be reset.
19. Fridge Compartment Temperature Change
Icon
It shows the compartment whose temperature
has to be modified. When the compartment
temperature change icon blinks, this means the
corresponding compartment has been selected.
20. Setting Celsius and Fahrenheit Indicators
Touch this button by pressing the FN Button and
select Fahrenheit and Celsius by pressing the OK
button. When the corresponding temperature is
selected, the Fahrenheit and Celsius indicators will
light up.
21. ON/OFF Ice Maker Indicator
To turn off the Ice Maker, press the FN button (until
it reaches the ice icon and the bottom line). The
Ice Maker OFF icon and its ON indicator blinks
when you touch them. Hence, you would be able to
determine if the Ice Maker is ON or OFF. When you
press the OK button, the Ice Maker icon will display
continuously while its indicator will continue to blink
throughout the process. If no button is pressed
within 20 seconds, the icon and indicator will remain
lit up. And, the Ice Maker will go off. To turn the Ice
Maker ON again, touch the icon and the indicator
and they will blink. If no button is pressed within 20
seconds, the icon and indicator will go off and the
Ice Maker will be ON again.
CIndicates whether the icematic is
on or off.
CWater flow from water tank
will stop when this function is
selected. However, ice made
previously can be taken from the
icematic
22. Eco-Fuzzy Function Icon
Press the FN Button (until it reaches the e-letter
icon and the bottom line). The Eco-Fuzzy Icon and
indicator will blink when you touch them. Thus, you
would be able to tell if the Eco-Fuzzy Function is
activated or deactivated. When you press the OK
button, the Eco-Fuzzy Icon will display continuously
while its indicator will continue to blink throughout
the process. If no button is pressed within 20
seconds, the icon and indicator will remain lit up.
Hence, the Eco-Fuzzy Function will be activated. To
deactivate the Eco-Fuzzy Function, touch its icon
and indicator once more, then press OK. And both
icon and indicator will begin to blink. If no button is
pressed within 20 seconds, the icon and indicator
will go off and the Eco-Fuzzy Function will be turned
OFF.
23. Vacation Function Icon
To activate the Vacation Function, press the FN
Button (until it reaches the umbrella icon and
the bottom line). The Vacation Function Icon and
indicator will blink when you touch them. Thus,
you would be able to tell if the Vacation Function
is activated or deactivated. When you press the
OK button, the Vacation Function Icon will display
continuously and this function will be activated.
Its indicator will continue to blink throughout this
process. Press the OK button to deactivate the
Vacation Function. Both icon and indicator of the

17 / 30 EN Refrigerator / User Manual
Operating the product
Vacation Function will begin to blink and this
function will be deactivated
24. Celsius Indicator
It displays temperature in degree Celsius. When
the degree Celsius Indicator is activated, the
temperature setpoint values are displayed in
degree Celsius together with the display of its
corresponding icon.
25. Key lock
Press and hold the Key Lock button for 3 seconds.
When the Key Lock symbol goes OFF,
Key Lock will be disabled. Buttons will not function
if Key Lock mode is active. Press and hold the Key
Lock button for 3 seconds again. When the Key
Lock icon goes OFF, Key Lock will be disabled.
Press the Lock Key button if you want to prevent
any changes to the temperature settings of the
refrigerator.
26.Selection Button
Use this button to select the compartment
which you intend to modify its temperature. By
pressing this Button, you can toggle between
compartments. You can determine if the
compartment was selected from compartment
icons (7, 17, 18, 20, 28, 29). Irrespective of
the blinking of the compartment icon, the
compartment with the temperature setpoint value
which you want to modify will be selected. You can
then change the setpoint by pressing the setpoint
decrease button of the compartment (27) and the
setpoint increase button of the compartment (19)
If you do not press the selection button within 20
seconds, the compartment icon will go off Hence,
you would have to press this button again if you
wish to select a compartment.
27. Alarm off warning
In case of power outage/high temperature alarm,
and after inspecting food kept in the freezer
compartment, press the alarm off button to clear
the warning
28. Quick Cool Function Button (QuickCool)
The button has two functions. To activate or
deactivate the quick cool function press it briefly.
Quick Cool indicator will turn off and the product
will return to its normal settings.
Sabbath Mode:
Press the OK Button for 3 seconds to activate
or deactivate the Sabbath Mode. When Sabbath
Mode is activated, the display, alarm, door opening
or light buttons will not function:
CUse quick cooling function when you
want to quickly cool the food placed
in the fridge compartment. If you want
to cool large amounts of fresh food,
activate this function before putting the
food into .the product
CAfter 24 hours or when the refrigerator
compartment reaches the desired
temperature, the Quick Cool Function
will turn off automatically if you do not
do so.
CIf you press the quick cooling button
repeatedly with short intervals, the
electronic circuit protection will be
activated and the compressor will not
start up immediately.
CThis function is not recalled when
power restores after a power failure.
29. Wine Cellar Temperature Indicator
The temperature setpoint values of the wine cellar
compartment display.
If the user does not deactivate the Sabbath mode,
the refrigerator will automatically cancel it in 76
hours.
Select
Quick FreezeQuick Cool
FN
OK
3 “
3 “
Select
Quick FreezeQuick Cool
FN
OK
3 “
3 “

18 /30 EN Refrigerator / User Manual
Operating the product
1-On/Off function
Press the On/Off button for 3 seconds to turn off or
turn on the fridge.
2. Quick freeze function button
Press this button to activate or deactivate the quick
freeze function. When you activate the function,
the freezer compartment will be cooled to a
temperature lower than the set value.
CUse the quick freeze function when you
want to quickly freeze the food placed
in freezer compartment. If you want
to freeze large amounts of fresh food,
activate this function before putting the
food into the product.
CIf you do not cancel it, Quick Freeze
will cancel itself automatically after 1
hours at the most or when the fridge
compartment reaches to the required
temperature.
CThis function is not recalled when
power restores after a power failure.
3.Select button
Use this button to select the cabin whose
temperature you want to change. Switch between
the cabins by pressing this button. The selected
cabin can be understood from the cabin icons (6,
25, 24 ). Whichever cabin icon is power on, the
cabin, whose temperature set value you want to
change, is selected. Then, you can change the set
value by pressing the cabin set value Temperature
Adjustment button (4)
4.Temperature Adjustment / Temperature
Decrease
When pressed, decreases the temperature of the
selected compartment.
5-Quick freeze Indicator
This icon lits when the Quick freeze function is
active.
6. Fridge compartment indicator
When this indicator is active, the temperate
of the fridge compartment is displayed on the
temperature value indicator.Fridge compartment
can be set to 8, 7, 6, 5, 4, 3, 2 or 1°C / 46, 45,
44, 43, 42, 41, 40,39,38,37,36,35,34 or 33°F by
pressing Temperature Adjustment button (4).
7. Temperature value indicator
Shows the temperature value of the selected
compartment.
CFigures in this user manual are schematic and may not match the product exactly. If the subject parts
are not included in the product you have purchased, then those parts are valid for other models.
2
167
58*9
24
12
23
14 15 17 18 19
3413
22 21 *20
*11
10 16
26 25
5.2 Indicator panel
Touch-control indicator panel allows you to set the temperature and control the other functions related
to the product without opening the door of the refrigerator. Just press the relevant buttons for function
settings.

19 / 30 EN Refrigerator / User Manual
Operating the product
8. Fahrenheit indicator
It is a Fahrenheit indicator. When the Fahrenheit
indication is activated, the temperature set values
are shown in Fahrenheit and the relevant icon
turns on.
9. Joker fridge icon
When you select the joker fridge icon using the FN
button (16) and press the OK button (17) the joker
cabin turns into a fridge cabin and operates as a
cooler.
10. Joker cabin icon
It shows joker cabin icon.
11. Joker freezer icon
When you select the joker freezer icon using the
FN button (16) and press the OK button (17) the
joker cabin turns into a freezer cabin and operates
as a freezer.
12. Power failure/High temperature / error
warning
This indicator illuminates during power failure, high
temperature failures and error warnings. During
long-term power failures, the highest temperature
value that the freezer compartment reaches will
blink on the digital display. After checking the food
located in the freezer compartment, press the
alarm off button (19) to clear the warning.
13.Setting the Celsius and Fahrenheit
indicator
Hover over this key using the FN key and select
Fahrenheit and Celsius via the OK key. When
the relevant temperature type is selected, the
Fahrenheit and Celsius indicator turns on.
14. Vacation function icon
Press the FN key (until it reaches the umbrella
icon) to activate the vacation function. When you
hover over the vacation function icon, it start
flashing. Thus, you can understand whether the
vacation function will be activated or deactivated.
When you press the OK button, the vacation
function indicator lights continuously and thus the
Vacation function is activated. Press the OK key
to cancel the vacation function. Thus, the vacation
function indicator will start flashing and the
vacation function will be cancelled.
15. Quick cooling function indicator
It turns on when the quick fridge function is
activated.
16. FN button
Using this key, you can switch between the
functions that you want to select. Upon pressing
this key, the icon, whose function is required to be
activated or deactivated, and this icon’s indicator
starts flashing. The FN button gets deactivated if
not pressed for 20 seconds. You need to press this
button to change the functions again.
17. OK button
After navigating the functions using the FN button,
when the function is cancelled via the OK button,
the relevant indicator flashes. When the function is
activated, it remains on. The indicator continues to
flash in order to show the icon it is on.
18. Quick cooling function button
The button has two functions. To activate or
deactivate the quick cool function, press it briefly.
Quick Cool indicator will turn off and the product
will return to its normal settings.
19. Alarm off warning
In case of power failure/high temperature
alarm, after checking the foods in the freezer
compartment, press the alarm off button to clear
the High temperature warning icon (12).
20. Filter reset
The filter is reset when the alarm off button (19) is
pressed for 3 seconds. Filter reset icon goes off.
21. Eco fuzzy function icon
Press the FN key (until it reaches the letter e
icon) to activate the eco fuzzy. When you hover
over the eco fuzzy icon it start flashing. Thus,
you can understand whether the eco fuzzy
function will be activated or deactivated. When
you press the OK button, the eco fuzzy function
icon lights continuously during this process. If you
do not press any button after 20 seconds, the
icon remains on. Thus, the eco fuzzy function is
activated. In order to cancel the eco fuzzy function,
hover over the icon again and press the OK key.
Thus, the eco fuzzy function icon will start flashing.
This manual suits for next models
3
Table of contents
Other Beko Refrigerator manuals

Beko
Beko BCSA306K2SLH Instruction Manual

Beko
Beko GNE114612 X User manual

Beko
Beko DSK28000 User manual

Beko
Beko D 9459 NM User manual

Beko
Beko DN161230ZX User manual

Beko
Beko RSNE445DW User manual

Beko
Beko 674580 EB User manual

Beko
Beko SS 137020 User manual

Beko
Beko BCFV7030 Assembly Instructions

Beko
Beko BCBFD1973 Instruction Manual

Beko
Beko CSA 29034 User manual

Beko
Beko RCNA366K30XB Instruction Manual

Beko
Beko RCNA365E20ZW User manual

Beko
Beko GN141622ZGB User manual

Beko
Beko BFFD3614ZSS User manual

Beko
Beko DSA25020 User manual

Beko
Beko DSK25000 User manual

Beko
Beko CNA365EC3X User manual

Beko
Beko RCSA360K20PT User manual

Beko
Beko RCNA406E60LZXRN Instruction Manual