Beko GNEV320 User manual

GNE V322 S
GNE V 320 X
Refrigerator
Холодильник
Réfrigérateur
GNEV320S
GNE V322 P
GNE V322 PX

Please read this manual first!
Dear Customer,
We hope that your product, which has been produced in modern plants and
checked under the most meticulous quality control procedures, will provide you
an effective service.
For this, we recommend you to carefully read the entire manual of your product
before using it and keep it at hand for future references.
This manual
• Will help you use your appliance in a fast and safe way.
• Read the manual before installing and operating your product.
• Follow the instructions, especially those for safety.
• Keep the manual in an easily accessible place as you may need it later.
• Besides, read also the other documents provided with your product.
Please note that this manual may be valid for other models as well.
Symbols and their descriptions
This instruction manual contains the following symbols:
CImportant information or useful usage tips.
AWarning against dangerous conditions for life and property.
BWarning against electric voltage.
This product bears the selective sorting symbol for waste electrical and
electronic equipment (WEEE).
This means that this product must be handled pursuant to European Directive
2002/96/EC in order to be recycled or dismantled to minimize its impact on
the environment. For further information, please contact your local or regional
authorities.
Electronic products not included in the selective sorting process are potentially
dangerous for the environment and human heatlh due to the presence of
hazardous substances.
Recycling
www.beko.com
This product was manufactured using the latest technology in environmentally friendly conditions.

EN
5
CONTENTS
1 Your Refrigerator 5
2 Important Safety Warnings 6
Intended use........................................ 6
General safety...................................... 6
Child safety.......................................... 8
Things to be done for energy saving..... 8
HCA Warning....................................... 8
3 Installation 9
Points to be considered when re-
transporting your refrigerator................ 9
Before operating your refrigerator......... 9
Electric connection............................... 9
Disposing of the packaging................ 10
Disposing of your old refrigerator........ 10
Placing and Installation....................... 10
Floor balance adjustment................... 11
Adjusting the gap between the upper
door .................................................. 13
Installing Water Filter ......................... 14
Connection of the Water Pipe to the
Refrigerator........................................ 15
Connection of Water Hose to the Jug 16
Connection of the Water Pipe to the Cold
Water Mains Line .............................. 17
(in some models)................................ 17
Prior to first use of Ice/Water Dispenser18
4 Preparation 20
5 Using your refrigerator 21
Setting the fridge compartment
temperature....................................... 22
Setting the freezer compartment
temperature....................................... 22
Fresh Freeze Function........................ 22
Quick Qool Function .......................... 23
Vacation Button ................................. 23
Auto Eco Button (Special Economy
function) ............................................ 23
Ionizer Button .................................... 23
Key Lock Button ................................ 23
Water Dispenser Illumination .............. 23
Water/Ice Type Selection.................... 23
Ice/Water Dispenser........................... 23
Using the Ice Dispenser ..................... 24
Ice Off................................................ 24
Using the water spring ....................... 25
Spillage Tray ...................................... 25
Sliding Body Shelves.......................... 25
Blue light ........................................... 26
Ion: ................................................... 26
Egg tray............................................. 26
Fresh Freeze Compartment................ 26
Crisper humidity control sliders........... 26
Recommendations for preservation of
frozen food ........................................ 27
Defrosting.......................................... 27
Replacing the Interior Light Bulb......... 27
6 Maintenance and cleaning29
Chill compartment.............................. 30
Icebox and Water Dispenser .............. 30
Protection of plastic surfaces ............ 30
7 Recommended solutions for
the problems 31

EN
6
1Your Refrigerator
1. Freezer compartment
2. Fridge compartment
3. Fridge compartment interior light
4. Butter and cheese lid
5. Fan
6. Ioniser
7. Fridge compartment glass shelves
8. Egg tray
9. Fridge compartment door racks
10.Wine cellar
11. Snack tray
12. Bottle holder
2
1
8
9
14
19
7
13
16
*4
16
3
5
24
21
*20
25
22
23
6
*10
15
*1718
11
*12
13. Bottle shelves
14.Crisper compartments
15.Crisper cover
16.Adjustable front legs
17. Blue light
18.Water reservoir
19.Ventilation lid
20.Freezer compartment drawers
21.Freezer Compartment glass shelves
22.Ice duct lid
23.Freezer compartment interior light
24.Fresh Freeze compartment
25.Ice container
CFigures that take place in this instruction manual are schematic and may not
correspond exactly with your product. If the subject parts are not included in the
product you have purchased, then it is valid for other models.

EN
7
2Important Safety Warnings
Please review the following
information. If these are not followed,
personal injury or material damage
may occur. Otherwise, all warranty and
reliability commitments will become
invalid.
The usage life of the unit you
purchased is 10 years. This is the
period for keeping the spare parts
required for the unit to operate as
described.
Intended use
. This product is designed for domestic
use.
. It should not be used outdoors. It is
not appropriate to use it outdoor even
if the place is covered with a roof.
General safety
When you want to dispose/scrap the
product, we recommend you to
consult the authorized service in
order to learn the required information
and authorized bodies.
. Consult your authorized service for
all your questions and problems
related to the refrigerator. Do not
intervene or let someone intervene to
the refrigerator without notifying the
authorised services.
. Do not eat cone ice cream and ice
cubes immediately after you take
them out of the freezer compartment!
(This may cause frostbite in your
mouth.)
. Do not put bottled and canned
liquid beverages in the freezer
compartment. Otherwise, these may
burst.
. Do not touch frozen food by hand;
they may stick to your hand.
. Vapor and vaporized cleaning
materials should never be used in
cleaning and defrosting processes of
your refrigerator. In such cases, the
vapor might get in contact with the
electrical parts and cause short circuit
or electric shock.
. Never use the parts on your
refrigerator such as the door and
drawer as a means of support or
step. You may cause the product
topple over or damage on its part.
. Do not use electrical devices inside
the refrigerator.
. Do not damage the cooling circuit,
where the refrigerant is circulating,
with drilling or cutting tools. The
refrigerant that might blow out when
the gas channels of the evaporator,
pipe extensions or surface coatings
are punctured may cause skin
irritations and eye injuries.
. Do not cover or block the ventilation
holes on your refrigerator with any
material.
. Repairs of the electrical products
must only be made by qualified
persons. Repairs performed by
incompetent persons may create a
risk for the user.
. In case of any failure or during
a maintenance or repair work,
disconnect your refrigerator’s mains
supply by either turning off the
relevant fuse or unplugging your
appliance.
. Do not pull by the cable when pulling
off the plug.
. Place the beverage with higher proofs
tightly closed and vertically.

EN
8
. Flammable items or products that
contain flammable gases (e.g. spray)
as well as the explosive materials
should never be kept in the product.
. Do not use mechanical devices
or other means to accelerate the
defrosting process, others than those
recommended by the manufacturer.
. This appliance is not intended for use
by persons (including children) with
reduced physical, sensory or mental
capabilities, or lack of experience
and knowledge, unless they have
been given supervision or instruction
concerning use of the appliance by a
person responsible for their safety.
. Do not operate a damaged
refrigerator. Consult your service if
you have any doubts.
. Electrical safety of your refrigerator
shall be guaranteed only if the earth
system in your house complies with
standards.
. Exposing the product to rain, snow,
sun and wind is dangerous with
respect to electrical safety.
. If there is any problem with the power
cable or the plug, they must be
replaced by the authorised service in
order to avoid any accidents.
. Never plug the refrigerator into
the wall outlet during installation.
Otherwise, risk of death or serious
injury may arise.
. Intended use of the product is to
preserve foods; it should never be
used for other purposes.
. Rating plate containing product's
technical specifications is in the inner
left part of the product.
. Connecting the product to electric
energy saving systems is risky as it
may cause damage on the product.
. If your product is equipped with blue
light, the light should not be looked
into by optical appliances.
. In products with mechanical control
(thermostat), wait for 5 min. to re-plug
the product if it is unplugged.
. This operation manual should be
handed in to the new owner of the
product when it is given to others.
.
Power cable and plug should not
be damaged when moving the
refrigerator. To avoid risk of fire, the
cable should not be kinked or put
under heavy things. Do not touch the
plug with wet hands when plugging
the product.
. The product should not be plugged if
the receptacle is loose.
. Water should not be sprayed directly
on inner or outer parts of the product
for safety purposes.
. Flammable pressurized sprays should
not be sprayed near the product to
avoid risk of fire or explosion.
. Containers with liquid inside should
not be placed on top of the product.
Spilling water on an electrical
component may cause electric
shocks or risk of fire.

EN
9
. Foods more than the capacity of the
product should not be kept in the
product. It may fall when the door is
opened and cause injury or damage.
Similar problems may occur in case
of putting things on the product.
. Products that need a precise
temperature control (vaccines,
heat-sensitive medicine, scientific
materials, etc.) should not be kept in
the refrigerator.
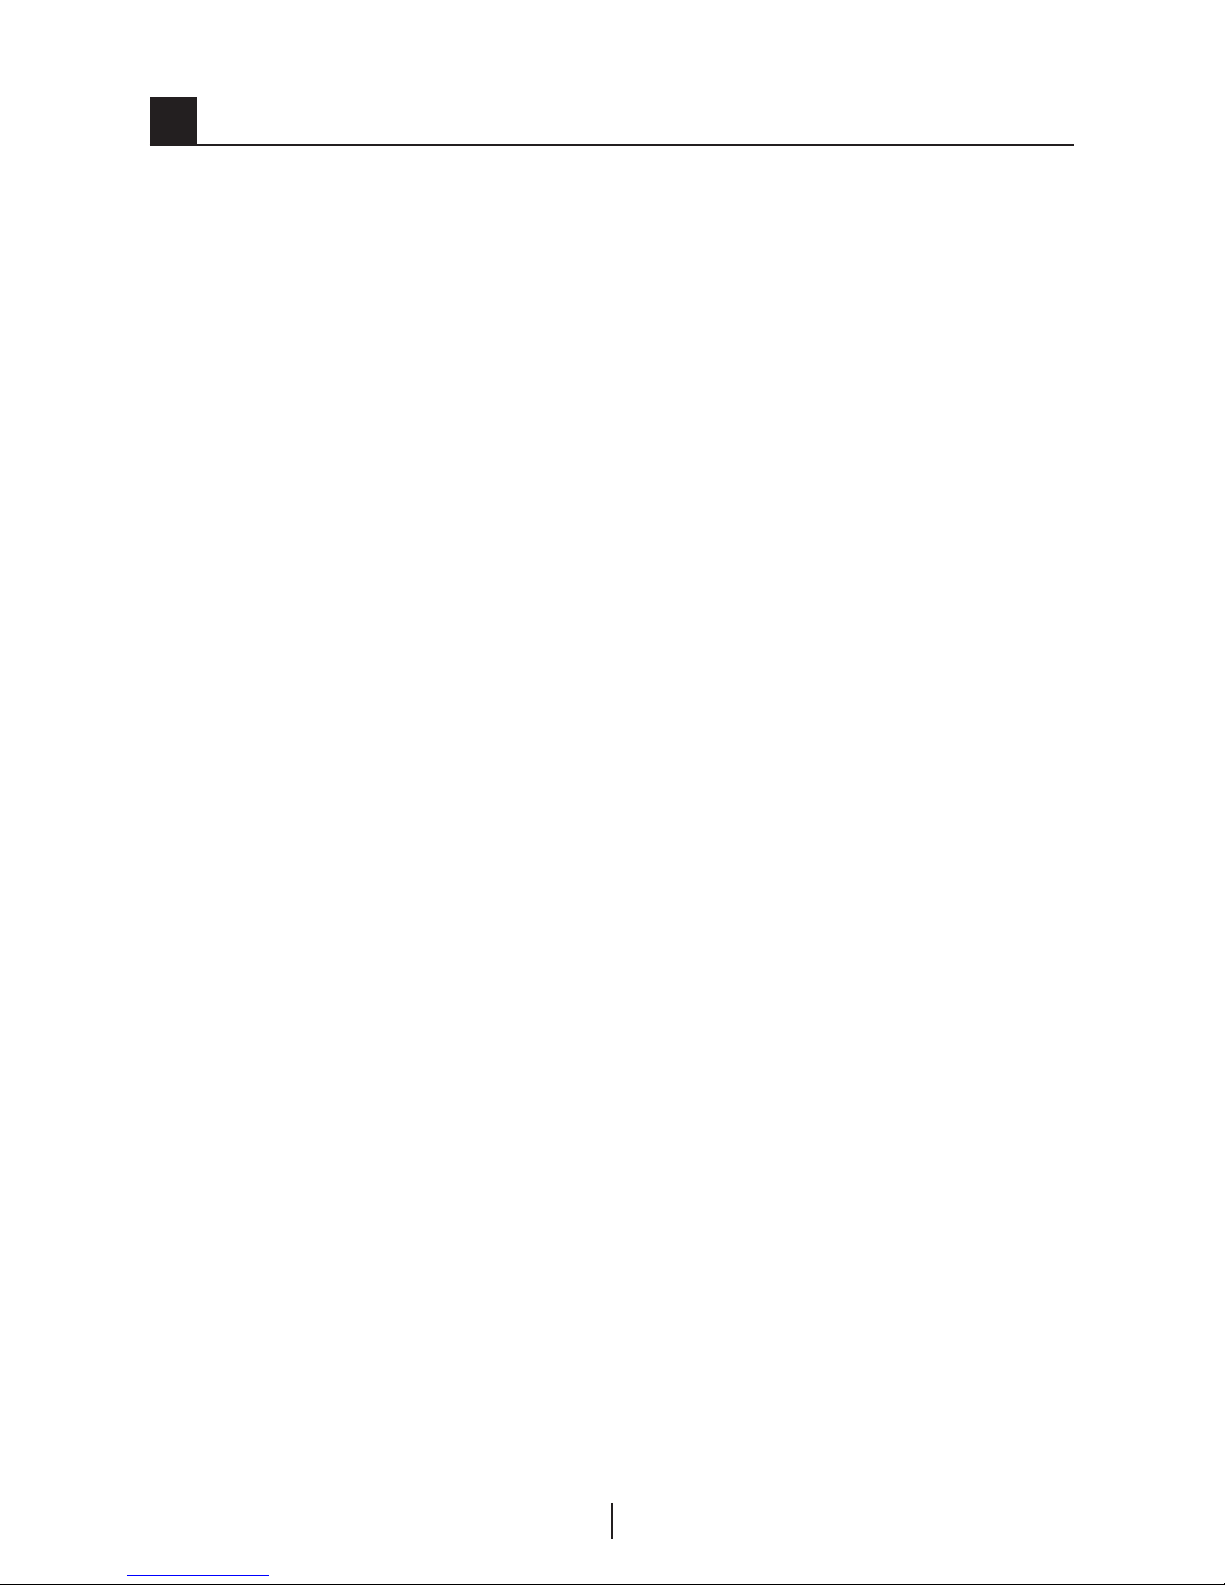
. Refrigerator should be disconnected
if it is not going to be used for a
long time. Any problem in the cable
insulation may cause fire.
. Dirt and dusts on tip of the electric
plug must be cleaned, otherwise,
they may cause risk of fire.
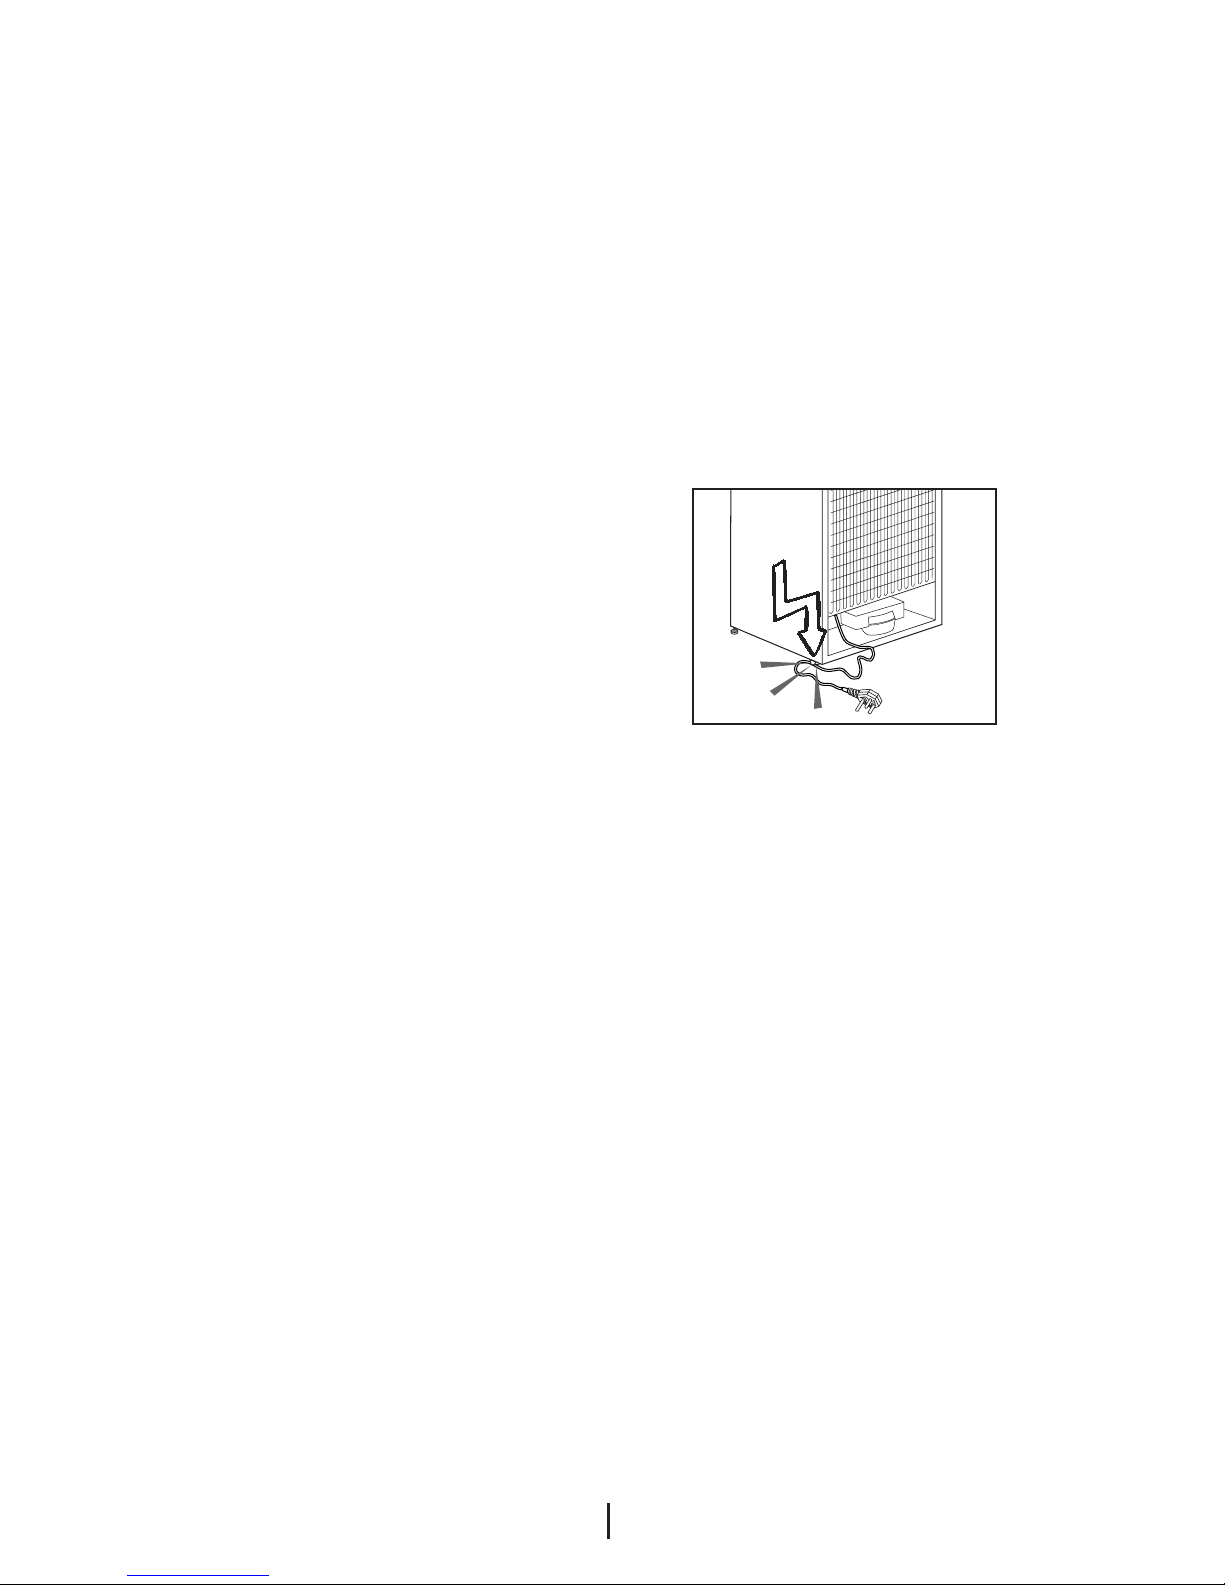
. The product may move when level
adjustment feet of the product do not
stand on the floor well.
. If your product has a door handle, the
product must not be pulled by the
handle, because the handle may be
forced out.
.Care should be paid as there is risk of
squeezing hands or feet between the
movable parts inside the product.
Child safety
. If the door has a lock, the key should
be kept away from reach of children.
. Children should be supervised to
ensure that they do not play with the
appliance
Things to be done for energy
saving
. Do not leave the doors of your
refrigerator open for a long time.
. Do not put hot food or drinks in your
refrigerator.
. Do not overload your refrigerator so
that the air circulation inside of it is not
prevented.
. Do not install your refrigerator
under direct sunlight or near heat
emitting appliances such as ovens,
dishwashers or radiators.
. Pay attention to keep your food in
closed containers.
. Maximum amount of food can be
put in your refrigerator's freezer
compartment when the freezer
compartment shelf or drawer
is removed. Declared energy
consumption value of your refrigerator
was determined when the freezer
compartment shelf or drawer was
removed and under maximum
amount of food load. There is no risk
in using a shelf or drawer according
to the shapes and sizes of the foods
to be frozen.
HCA Warning
If your product is equipped with
a cooling system that contains
R600a:
This gas is flammable. Therefore, pay
attention to not damaging the cooling
system and piping during usage and
transportation. In the event of damage,
keep your product away from potential
fire sources that can cause the
product catch a fire and ventilate the
room in which the unit is placed.
Ignore the warning if your product
is equipped with a cooling system
that contains R134a.
You can see the gas used in
production of your product on the
rating plate that is located on the left
inner part of it.
Never dispose the product in fire.

EN
10
3Installation
CPlease remember that the
manufacturer shall not be held liable if
the information given in the instruction
manual is not observed.
Points to be considered
when re-transporting your
refrigerator
1. Your refrigerator must be
emptied and cleaned prior to any
transportation.
2. Shelves, accessories, crisper and etc.
in your refrigerator must be fastened
securely by adhesive tape against any
jolt before repackaging.
3. Packaging must be tied with thick
tapes and strong ropes and the
rules of transportation printed on the
package must be followed.
CAlways remember...
Every recycled material is an
indispensable source for the nature
and for our national resources.
If you wish to contribute to recycling
the packaging materials, you can
get further information from the
environmental bodies or local
authorities.
Before operating your
refrigerator
Before starting to use your refrigerator
check the following:
1. Is the interior of the refrigerator dry
and can the air circulate freely in the
rear of it?
2. Clean the interior of the refrigerator as
recommended in the “Maintenance
and cleaning” section.
3. Plug the refrigerator into the wall
outlet. When the door is open the
respective interior light will come on.
4. You will hear a noise as the
compressor starts up. The liquid and
gases sealed within the refrigeration
system may also give rise to noise,
even if the compressor is not running
and this is quite normal.
5. Front edges of the refrigerator may
feel warm. This is normal. These
areas are designed to be warm to
avoid condensation.
Electric connection
Connect your refrigerator to a grounded
socket which is being protected by a
fuse with the appropriate capacity.
Important:
BThe connection must be in
compliance with national regulations.
BThe power cable plug must be easily
accessible after installation.
BVoltage and allowable fuse protection
are specified in the “Technical
Specifications” section.
BThe specified voltage must be equal
to your mains voltage.
BExtension cables and multiway plugs
must not be used for connection.

EN
11
BA damaged power cable must be
replaced by a qualified electrician.
BThe appliance must not be operated
before it is repaired! There is danger
of electric shock!
Disposing of the packaging
AThe packing materials may be
dangerous for children. Keep the
packing materials out of the reach
of children or dispose them of by
classifying them in accordance
with the waste instructions. Do not
dispose them of along with the normal
household waste.
The packing of your refrigerator is
produced from recyclable materials.
Disposing of your old
refrigerator
Dispose of your old machine without
giving any harm to the environment.
AYou may consult your authorized
dealer or waste collection center of
your municipality about the disposal
of your refrigerator.
A Before disposing of your refrigerator,
cut out the electric plug and, if there
are any locks on the door, make them
inoperable in order to protect children
against any danger.
Placing and Installation
BCaution: Never plug the refrigerator
into the wall outlet during installation.
Otherwise, risk of death or serious
injury may arise.
AIf the entrance door of the
room where the refrigerator will be
installed is not wide enough for the
refrigerator to pass through, than call
the authorised service to have them
remove the doors of your refrigerator
and pass it sideways through the door.
1. Install your refrigerator to a place
that allows ease of use.
2. Keep your refrigerator away from
heat sources, humid places and direct
sunlight.
3. There must be appropriate air
ventilation around your refrigerator in
order to achieve an efficient operation.
If the refrigerator is to be placed in a
recess in the wall, there must be at
least 5 cm distance with the ceiling
and at least 5 cm with the wall.
If the floor is covered with a carpet,
your product must be elevated 2.5 cm
from the floor.
4. Place your refrigerator on an even
floor surface to prevent jolts.
5. Do not keep your refrigerator in
ambient temperatures under 10°C.

EN
12
Floor balance adjustment
If your refrigerator is unbalanced;
You can balance your refrigerator by
turning the front legs of it as illustrated
in the figure. (See Figure A) The corner
where the leg exists is lowered when
you turn in the direction of black
arrow and raised when you turn in the
opposite direction. Taking help from
someone to slightly lift the refrigerator
will facilitate this process.
Door height adjustment
In case there is a problem with the
alignment of the doors with respect
to each other, they may be aligned by
ascension vertically in the order given
below. Ensure that door shelves are
empty when adjusting the door height.
2. Loosen the three screws of the
hinges of the lower door, which you
wish to escalate, with the help of a
screwdriver as shown in the figure
below. (Do not remove completely)
(See Figure C)
(A)
(B)
4
1 2 3
(C)
2
1. Remove the lower ventilation cover
by unscrewing its screws as shown in
the figure below. (See Figure B)
2

EN
13
• If the freezer compartment door is
lower than the fridge compartment
door, bring them to the same level by
turning the turning the elevation screw
on the freezer compartment side in
the direction of arrow using a M6 Allen
wrench as illustrated in Figure D.
• If the freezer compartment door is
higher than the fridge compartment
door, bring them to the same level
by turning the elevation screw on
(D)
the freezer compartment side in the
direction of arrow using a M6 Allen
wrench as illustrated in Figure D.
After bringing the doors to the same
level by elevating the front part with
the aid of the elevation screws, doors
of the refrigerator shall close properly.
If the doors do not close properly, this
might adversely affect the efficiency of
the refrigerator.

EN
14
CYou can adjust the gap between
the fridge compartment doors as
illustrated in the figures.
Door shelves should be empty when
adjusting the door height.
CUsing a screwdriver, remove the
screw of upper hinge cover of the door
you want to adjust.
CAdjust the door appropriately as
you desire by loosing the screws.
Adjusting the gap between
the upper door
CFix the door you have adjusted by
tightening the screws without changing
the position of the door.
C Replace the hinge cover and fix
with the screw.
Center Screw

EN
15
CNote: Since the following parts are
not required in use with a jug, they
may not be found in the product you
purchased.
3. 5 meter long water pipe (1/4 inch in
diameter)
4. Cold mains water valve with mesh
filter (Tap Adapter)
5. Water Filter to be fitted to the bracket
inside the fridge compartment.
Installing Water Filter
(in some models)
Installation Requirements
Two different water sources may be
connected to the refrigerator for water
supply: the mains cold water supply
and water in a jug.
A pump should be used for jug water
usage.
Check that the parts stated below are
supplied with your appliance.
1. Union for connection of the water
pipe to the rear of the appliance
2. 3 pieces of pipe clips (In case
required to secure the water pipe)
3
1
4
2
5

EN
16
c
a
a
b
1
2
Water connection to the
refrigerator
Please follow the instructions
below.
Connection of the Water
Pipe to the Refrigerator
1. After installing the union onto the
water pipe, insert the water pipe to
the refrigerator inlet valve by pressing
downwards firmly.
2. Fix union as seen in the opposite
figure, by squeezing by hand on the
refrigerator inlet valve.
(a- Water Pipe, b-Union, c-Valve)
CNote 1: You should not need to
tighten the union with a tool to achieve
water tight assembly. In case of a leak
use a spanner or a pair of pliers to
tighten the union.

EN
17
2. Put and fix the pump hose into the
jug as shown in the figure.
3. After completing the connection, plug
in and run the pump.
To provide an efficient operation of the
pump, wait for 2-3 minutes after
starting the pump.
CNote: You may refer to the user
manual of the pump while making the
water connection.
Connection of Water Hose to
the Jug
(in some models)
To connect water to the refrigerator
from a jug, a pump is needed. Follow
the instructions below after connecting
one end of the water pipe coming
out of the pump to the refrigerator as
described on the previous page.
1. Finish the connection by pushing
the other end of the water pipe into
the water pipe inlet of the pump as
shown in the figure.
2
1a
1b

EN
18
Connection of the Water
Pipe to the Cold Water Mains
Line
(in some models)
If you want to use your refrigerator by
connecting it to the cold water mains
line,
you will have to connect a standard
1/2” valve connection fitting to the cold
water supply in your house. In case
this valve is not present or in case
you are not sure, consult a qualified
plumber.
1. Separate the union from the tap
adaptor. (Figure A)
2. Install the tap adaptor to 1/2” valve
fitting as shown in the figure. (Figure
B)
3. After inserting the water pipe to the
union, install it to the tap adaptor
and insert to the tap as shown in the
figure. (Figure C)
4. Tighten the union manually. In case of
a leak use a spanner or a pair of pliers
to tighten the union.
AWarning: Secure the water pipe
to suitable points by means of the
pipe clips supplied to avoid any
damage or displacement or accidental
disconnection.
AWarning: After turning on the water
valve, make sure that there is no
leakage at both connection points of
the water pipe. In case of a leak, turn
off the valve immediately and tighten all
joints again using a spanner or a pair
of pliers.
Mesh Filter
Tap
Adaptor
Tap
Adaptor
Tap
Adaptor
Union
Union
Water Pipe
Main Cold Water Line
Mains
Valve

EN
19
AWarning: Make sure that standard
1/2" valve fitting fed by cold mains
water supply is available and is turned
off fully.
Note -1: There is no need to use water
filter in case a jug is used.
Note -2: Pump must be used when jug
will be used.
To fit the water filter follow the
instructions below referring to figures
supplied:
1. Press ice cancel button on the
display. (Figure 1)
2. Remove the filter cover in the fridge
compartment by pulling it forward.
(Figure 2)
3. Take out the water filter by-pass
cover by rotating it downwards.
(Figure 3-4)
AWarning: Make sure that the “Ice
off” mode is active before taking out
the by-pass cover.
Note: It is normal that a few drops of
water drip after the cover has been
taken out.
4. Remove the lid on top of the water
filter to place it as shown in the figure
and turn upwards to lock it. (Figure 5)
5. Press ice cancel button on the
display again to exit from this mode.
Water filter should be replaced every
6 months. The water filter must be
removed as shown in the figure when
it is going to be replaced or when it will
no longer be used and by-pass cover
must be attached. It must be made
sure that Ice Off mode is active before
taking it out.
AWarning: Water filter cleans some
foreign particles in the water. It does
not purify water from microorganisms.
AWarning: Ice Off button must
always be pressed during replacement
of the water filter or installing the by-
pass cover.

EN
20
Prior to first use of Ice/Water
Dispenser
CWater mains pressure must not be
below 1 bar.
CWater mains pressure must not be
over 8 bars.
CPumps must be used in case the
supply water pressure drops below 1
bar or if a jug is going to be used.
CWater system of the refrigerator
must be connected to the cold water
line. It must not be connected to hot
water line.
CNo water may be obtained in the
initial startup of the refrigerator. This
is caused by the air in the system. To
discharge air from the system, press
Dispenser latch for periods of 1 minute
until water comes from the Dispenser.
Water flow may be irregular in the
beginning. Irregular water flow will be
normalized after the air in the system is
discharged.
CAt the initial startup of the
refrigerator approx.12 hours must pass
before cold water can be obtained.
CWater mains pressure must be
between 1-8 bars for the operation
of Ice/Water Dispenser smoothly. For
this, check that 1 glass of water (100
cc) can be filled in 10 seconds.
CThe first 10 glasses of water should
not be consumed.
C12 hours must pass to obtain ice
from the Ice Dispenser for the first
time. If there is not enough ice in the
ice dispenser, ice may not be obtained
from ice dispenser.
CApproximately the first 30 cubes
of ice to be obtained from the Ice
Dispenser must not be used.
CAlways use the water filter when a
jug is not being used.

EN
21
4Preparation
CYour refrigerator should be installed
at least 30 cm away from heat
sources such as hobs, ovens, central
heater and stoves and at least 5
cm away from electrical ovens and
should not be located under direct
sunlight.
CThe ambient temperature of
the room where you install your
refrigerator should at least be 10°C.
Operating your refrigerator under
cooler conditions than this is not
recommended with regard to its
efficiency.
CPlease make sure that the interior
of your refrigerator is cleaned
thoroughly.
CIf two refrigerators are to be installed
side by side, there should be at least
2 cm distance between them.
CWhen you operate your refrigerator
for the first time, please observe the
following instructions during the initial
six hours.
- The door should not be opened
frequently.
- It must be operated empty without
any food in it.
- Do not unplug your refrigerator. If
a power failure occurs out of your
control, please see the warnings in
the “Recommended solutions for the
problems” section.
COriginal packaging and foam
materials should be kept for future
transportations or moving.

EN
22
Freezer Set button
Quick
freeze
button
Auto Eco button
Water Dispenser light button
Ice / Water
selection button
Ice Off button
Key lock button
Fridge Set button
Water Dispenser Lights
Fast Freeze indicator High humidity indicator
Economy mode indicator
Quick cool indicator
Freezer Compartment Temperature Setting indicator
Filter reset indicator Auto Eco
indicator
Cube Ice
indicator Crash Ice
indicator
Key Lock indicator
High temperature/
error warning
indicator
-24 °C
-22 °C
-20 °C
-18 °C
2 °C
4 °C
6 °C
8 °C
Filter Reset button
Quick fridge button
Vacation mode button
Vacation mode indicator
Water indicator
No ice indicator
Freezer door open indicator
Ioniser indicator
Fridge temperature
setting indicator
Fridge door
open indicator
5Using your refrigerator
This manual suits for next models
5
Table of contents
Other Beko Refrigerator manuals

Beko
Beko RSSE415M24W User manual

Beko
Beko GN163120 User manual

Beko
Beko GNE91640E30ZX User manual

Beko
Beko DN135120X User manual

Beko
Beko DSE 25006 User manual

Beko
Beko TL 654 W User manual

Beko
Beko ICQFD155 Instruction Manual

Beko
Beko GNE480E20FDZX User manual

Beko
Beko RCNE720E3VZP User manual

Beko
Beko GN163130ZGB User manual

Beko
Beko KG366I40XBCHN Instruction Manual

Beko
Beko RSSA290M31WN Instruction Manual

Beko
Beko CSA240K20XP User manual

Beko
Beko B3RCNA344HXB User manual

Beko
Beko GNO163040X User manual

Beko
Beko TS 190320 User manual

Beko
Beko CNA29121X User manual

Beko
Beko B1RCNA364G User manual

Beko
Beko RDNE350K20X User manual

Beko
Beko RSNE415E23DW User manual