Bel Canto E.ONE Series DAC 3.5vb User manual


TM
DAC3.5VB
Upsampl i n g A u d io D A C
wi t h Ma s t er R e fer e nce U ltr a - Clo c
T A B L E O F C O N T E N T S
Safety Information ……………………………………………………………………………………2
Certifications/Standards ……………………………………………………………………………………3
Warranty ………………………………………………………………………………………………
Unpacking ………………………………………………………………………………………………
Power Connection ……………………………………………………………………………………
Setup and Placement ……………………………………………………………………………………5
Design Features ……………………………………………………………………………………5
Control Functions and Display …………………………………………………………………………6
Remote Control ………………………………………………………………………………………………7 - 8
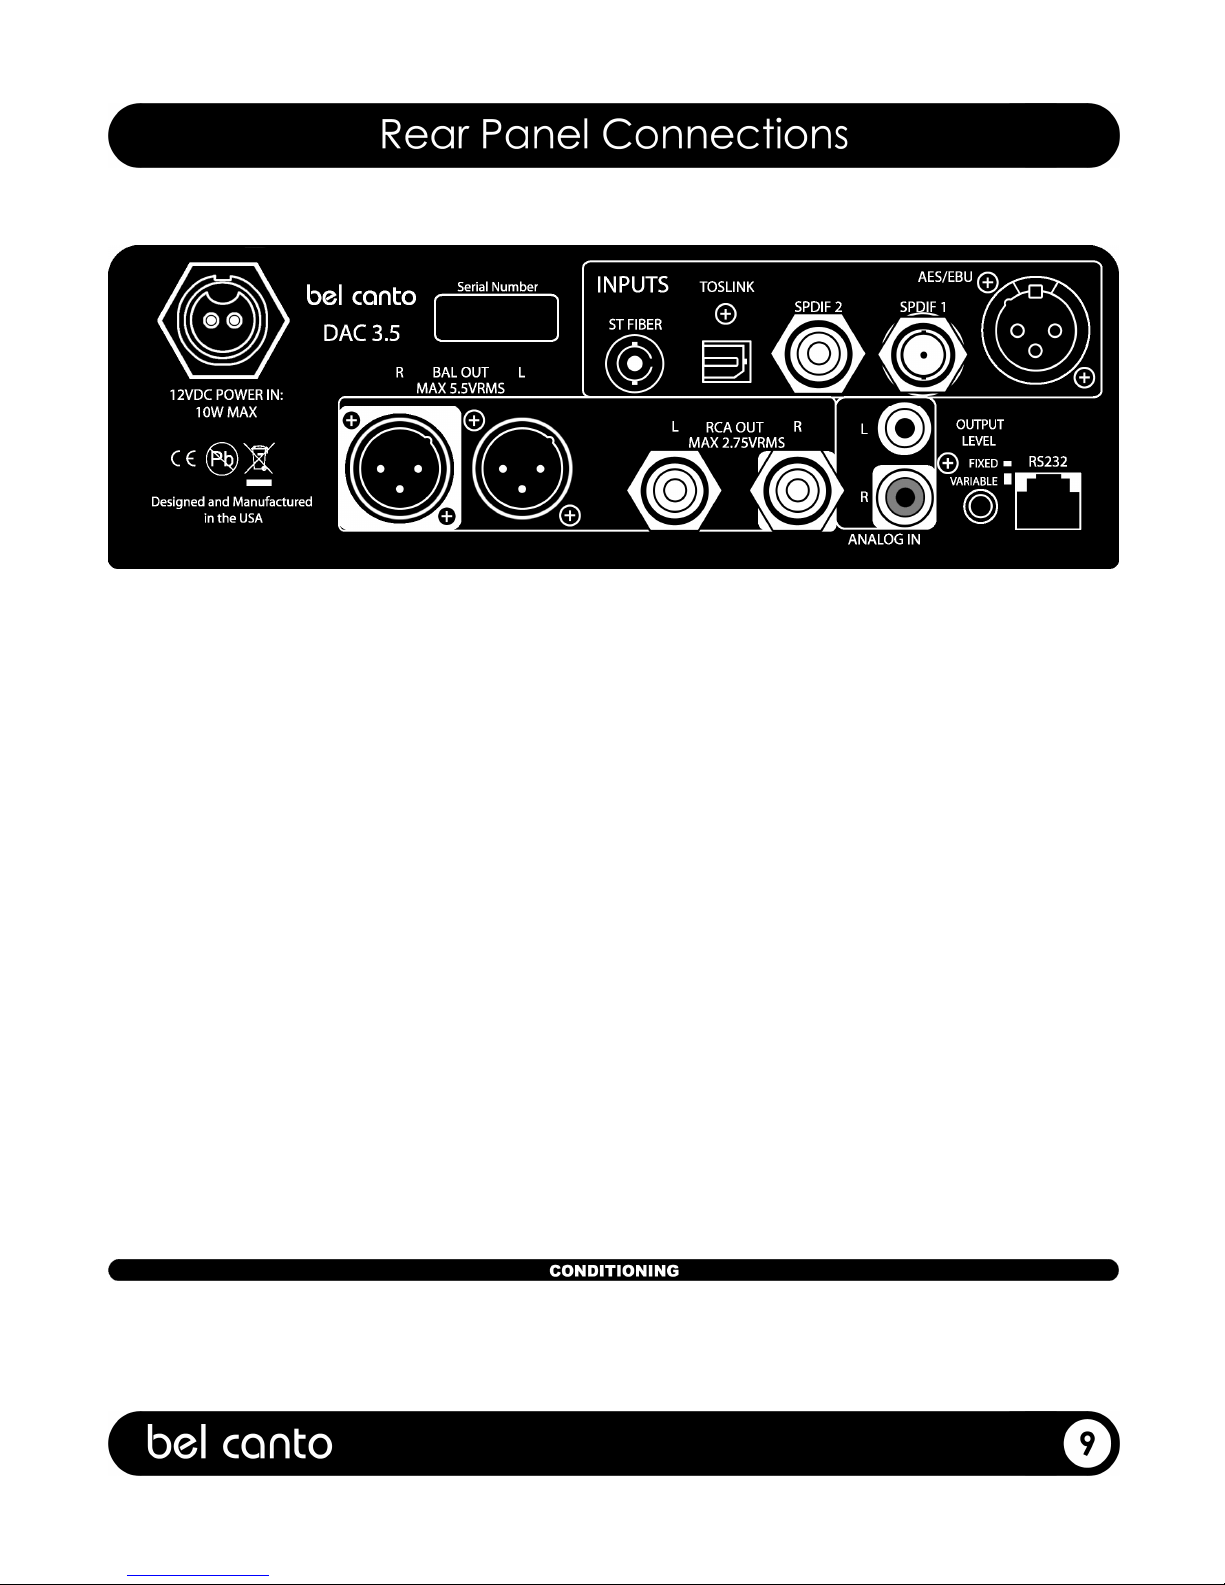
Rear Panel Connections ……………………………………………………………………………………9
Conditioning ………………………………………………………………………………………………9
Connecting the LNS1 ……………………………………………………………………………………10
Tips for Operation ……………………………………………………………………………………11
Specifications ………………………………………………………………………………………………12
Copyright © 2010 Bel Canto Design Ltd.
Bel Canto Design Limited
221 North 1
st
Street
Minneapolis, MN 55 01
United States
All rights reserved. No part of this publication may be reproduced, stored in a retrieval system, or transmitted, in any form or by
any means, electronic, mechanical, photocopying, recording, or otherwise, without the prior written permission of Bel Canto
Design. The content of this manual is provided for information use only, is subject to change without notice, and should not be
construed as a commitment by Bel Canto Design Limited. Bel Canto Design Limited assumes no responsibility or liability for
any errors or inaccuracies that may appear in this manual. Trademarks used in this publication: Bel Canto and the Bel Canto
logo are registered trademarks of Bel Canto Design Limited. DAC3.5
VB
and Ultra-Clock are trademarks of Bel Canto Design
Limited. Bel Canto Design Limited disclaims any proprietary interest in trademarks and trade names other than its own. Printed
in the United States.
The Lightning Flash with arrowhead symbol
within an equilateral triangle, is intended to
alert the user to the presence of uninsulated
"dangerous voltage" within the product
enclosure that may be of sufficient magnitude
to constitute a risk of shock to persons.
Explanation of symbols used in this manual or on the
rear/underside of the apparatus:
TO COMPLETELY DISCONNECT THIS APPARATUS
FROM THE AC MAINS, DISCONNECT THE POWER
SUPPLY CORD PLUG FROM THE AC RECEPTACLE.
THE MAINS PLUG OF THE POWER SUPPLY CORD
SHALL REMAIN READILY ACCESSIBLE.
Disconnect supply cord before changing fuse.
Refer servicing to qualified service personnel.
WARNING: TO REDUCE THE RISK OF FIRE OR
ELECTRIC SHOCK, DO NOT EXPOSE THIS
APPARATUS TO RAIN OR MOISTURE AND OBJECTS
FILLED WITH LIQUIDS, SUCH AS VASES, SHOULD
NOT BE PLACED ON THIS APPARATUS.
• Read, keep and follow these instructions.
• Heed all warnings.
• Do not use the apparatus near water, ie near a
bathtub, kitchen sink, laundry tub, in a wet
basement, near a swimming pool etc.
• Clean only with dry cloth.
• Do not block any ventilation openings. Install in
accordance with the Manufacturer’s instructions.
Site the apparatus so that its location or position
does not interfere with its proper ventilation. For
example, the apparatus should not be situated on
a bed, sofa, rug, or similar surface that may block
the ventilation openings, or placed in a built in
installation such as a bookcase or cabinet that
may impede the flow of air through the ventilation
openings.
• Do not install near any heat sources such as
radiators, heat registers, stoves, or other
apparatus that produce heat.
• This apparatus uses Class I construction and
must be connected to a mains socket with
protective earthing connection.
• Protect the power cord from being walked on or
pinched particularly at plugs, convenience
receptacles, and at the point where they exit from
the apparatus.
• Unplug this apparatus during lightning storms or
when unused for long periods of time.
• Refer all servicing to qualified service personnel.
Servicing is required when the apparatus has
been damaged in any way, such as power-supply
cord or plug has been damaged, liquid has been
spilled or objects have fallen into the apparatus,
the apparatus has been exposed to rain or
moisture, does not operate normally, or has been
dropped.
• Mains plug: Use the mains plug to disconnect the
apparatus from the mains supply. The mains plug
must be accessible at all times. Use the mains
switch (if applicable) when the apparatus is not in
use.
• Objects and liquid entry: Do not let objects or
liquids fall into the apparatus. Do not expose the
apparatus to dripping or splashing. Do not place
a vessel containing liquid on top of the apparatus.
• No naked flame sources, such as lighted
candles, should be placed on the apparatus.
• The apparatus has been designed for use in
moderate and tropical climates
The exclamation point within an equilateral
triangle is intended to alert the user to the
presence of important operating and
maintenance (servicing) instructions in the
literature accompanying the product.

Fuse replacement:
This appliance is fitted with a non-rewireable 10 amp
mains plug. The plug contains a 10 amp fuse. If the fuse
has blown it can be replaced as follows:
a) Pull out the black fuse cover/carrier.
b) Remove and dispose of the blown fuse.
c) Fit a new 10 amp BS1362 approved fuse into the carrier
and push the carrier back into the plug.
Always ensure the fuse cover is fitted. If the fuse cover is
missing do not use the plug. Contact your Bel Canto
retailer to obtain a replacement fuse cover. Fuses are for
fire protection and do not protect against electric shock.
WARNING: THIS APPLIANCE MUST BE
GROUNDED.
Bel Canto Design Ltd. declare that this product is in conformance
with the Low Voltage Directive 73/23/EEC and Electromagnetic
Compatibility 89/336/EEC as amended by 92/31/EEC and
93/68/EEC.
The conformity of the designated product with the provisions of
Directive number 73/23/EEC (LVD) is proved by full compliance
with the following standards:
EN60065 2002 General requirements
The conformity of the designated product with the provisions of
Directive number 89/336/EEC (EMC) is proved by full compliance
with the following standards:
EN55013 2001 Conducted emissions
EN55013 2001 Absorbed emissions
EN55020 2002 Immunity
The conformity of the designated product with the provisions of
Directive number 2005/32/EC ecodesign requirements is proved
by full compliance with the ‘off mode’ setting power of 0.0 Watts.
Note: This equipment has been tested and found to
comply with the limits for a Class B digital device, pursuant
to Part 15 of the FCC Rules. These limits are designed to
provide reasonable protection against harmful interference
in a residential installation. This equipment generates,
uses and can radiate radio frequency energy and, if not
installed and used in accordance with the instructions,
may cause harmful interference to radio communications.
However, there is no guarantee that interference will not
occur in a particular installation. If this equipment does
cause harmful interference to radio or television reception,
which can be determined by turning the equipment off
and on, the user is encouraged to try to correct the
interference by one or more of the following measures:
• Reorient or relocate the receiving antenna.
• Increase the separation between the equipment and
receiver.
• Connect the equipment into an outlet on a circuit
different from that to which the receiver is connected.
• Consult the dealer or an experienced radio/TV
technician for help.

Bel Canto products are automatically covered by a 90 day factory warranty that covers all internal parts and labor.
Register online (http://www.belcantodesign.com/Belcanto_Warranty.html) within 30 days of purchase from an
authorized dealer to automatically extend your warranty for 2 years starting from the date of purchase. If you do
not have web access, please contact your dealer for assistance. Upon fully completing registration, within 5
business days you will receive an email that officially validates your warranty. Your information will be used for
internal use only and will not be sold or released outside Bel Canto. Your comments and suggestions are
appreciated and help us continually improve our products and services.
The warranty is only valid to the original owner and is non-transferable. Damage caused by unauthorized
modification, abuse, or neglect of product will void your warranty. Any cost associated with return of product is
the sole responsibility of the owner. All returns require a return authorization number issued after completing the
RMA form in the support section of our website. If you have any questions, please feel free to contact us online at
info@belcantodesign.com.
DAC3.5VB packaging contains the following:
1 (one) – DAC3.5VB
1 (one) – DAC3.5VB User’s Guide
1 (one) – VB Interconnect Power Cable
1 (one) – Remote Control
Carefully unpack each piece and check for shipping
damage. If there is any damage, or if anything is
missing, please contact your dealer, distributor or
Bel Canto Design.
IMPORTANT: Save all packing materials as they
are specially designed to protect the unit during
transportation or shipping. If the packing becomes
lost or damaged, please contact your dealer,
distributor or Bel Canto before attempting to
transport your unit
.
The power supply on the DAC3.5VB is preset for the
proper power voltage and must be used with the Bel
Canto VBS1 or LNS1 power supplies. The power
cable should have the correct plug for your local
power system. If you believe this to not be true,
please contact your dealer immediately.
This product, like any electrical component, can be
dangerous and cause injury unless correct handling
procedures are observed and used. Before
powering this product, it is necessary to read and
follow proper setup and procedures.
WARNING!
Do not connect power
to this product yet!

Because the DAC3.5VB runs cool, it can be placed in
many system locations without compromise. We do not
recommend placing weights or other objects directly on
the DAC3.5VB. This may scratch or mar the chassis finish.
Do not use harsh chemicals when cleaning the outside of
your DAC3.5VB.
Single Ended RCA and Balanced XLR connectors are
available. XLR jacks allow balanced hookup using the
standard North American pin configuration:
• Master Reference Ultra-Clock with high rate jitter
filter ensures maximum dynamic range from any source.
• 110dB dynamic range 2 /192 ADC input for your analog
sources
• 8 Digit Alphanumeric Green LED Display
• Internal VB supply with LC filter and > 00,000uF of
capacitance
• Uses the VBS1 or LNS1, Custom Ultra-Low noise
switching supply for isolated analog power
• Critical analog supply filters using new Solid Polymer
technology capacitors
• 5.5Vrms balanced output level to drive any amplifier
The DAC3.5
VB
musical performance rests on the solid foundation of the Master Reference Ultra-Clock™. The Master
Reference Ultra-Clock™ provides jitter performance 50x better than other clocks. Specifications of 2 picoseconds RMS and
frequency accuracy of 0.0001% insure maximum dynamic range. The Master reference Ultra-Clock circuit uses a new
aggressive 2Hz jitter filter, insuring that any incoming jitter on the data inputs can not compromise the final analog output
signal quality.
The DAC3.5
VB
has been optimized to provide the highest level of performance for all of these critical functions. It provides
digital preamplifier as well as D/A conversion and bridge from traditional CD or DVD player sources and from a USB LightLink
input for computer music playback sources.
All digital input sources experience 2 jitter rejection stages, one analog PLL stage at the SPDIF input and a second 2Hz digital
PLL stage that rolls off incoming jitter by more than 10X at 10Hz frequencies and greater than 10,000X by 100 Hz. Any
incoming jitter at frequencies above 10Hz is reduced to levels that have no effect on measured or sonic performance. The
combination of the VBS1, internal VB stage and the new jitter filtration provide an extremely well isolated environment for the
DAC3.5
VB
Digital to Analog stage. The final conversion to analog is no longer subject to external noise and interference
sources and the resulting purity and dynamic quality is uniquely musical and compelling. See page 9 for back panel.
The High Dynamic Range analog input section provides 110dB of dynamic range for any of your analog sources-it can be
connected to a PHONO3 preamplifier for a complete system including a turntable source, or it can be configured as a Home
Theater Bypass to integrate into a complete high performance system offering the best performance for your 2-channel
sources.
The dual-differential multi-bit delta-sigma DAC circuit achieves remarkable analog performance. The 5.5VRMS true balanced
XLR outputs provide 126dB of dynamic range. The noise floor of this DAC/processor is so low and so clean that the DAC3.5
VB
is optimally used as a complete DAC/Preamplifier with a digital level control. Because of dither applied to the 2 bit word there
is no loss of effective resolution. The application of optimized dither insures that the analog output noise floor maintains a
clean sound, devoid of any tones or artifacts. The DAC3.5
VB
can provide an optimum solution with the addition of a Bel Canto
e.One amplifier, eliminating the need for an analog preamplifier.
IMPORTANT!
Make all connections before
powering your unit!
Pin 1 Ground
Pin 2 Signal +
Pin 3 Signal -
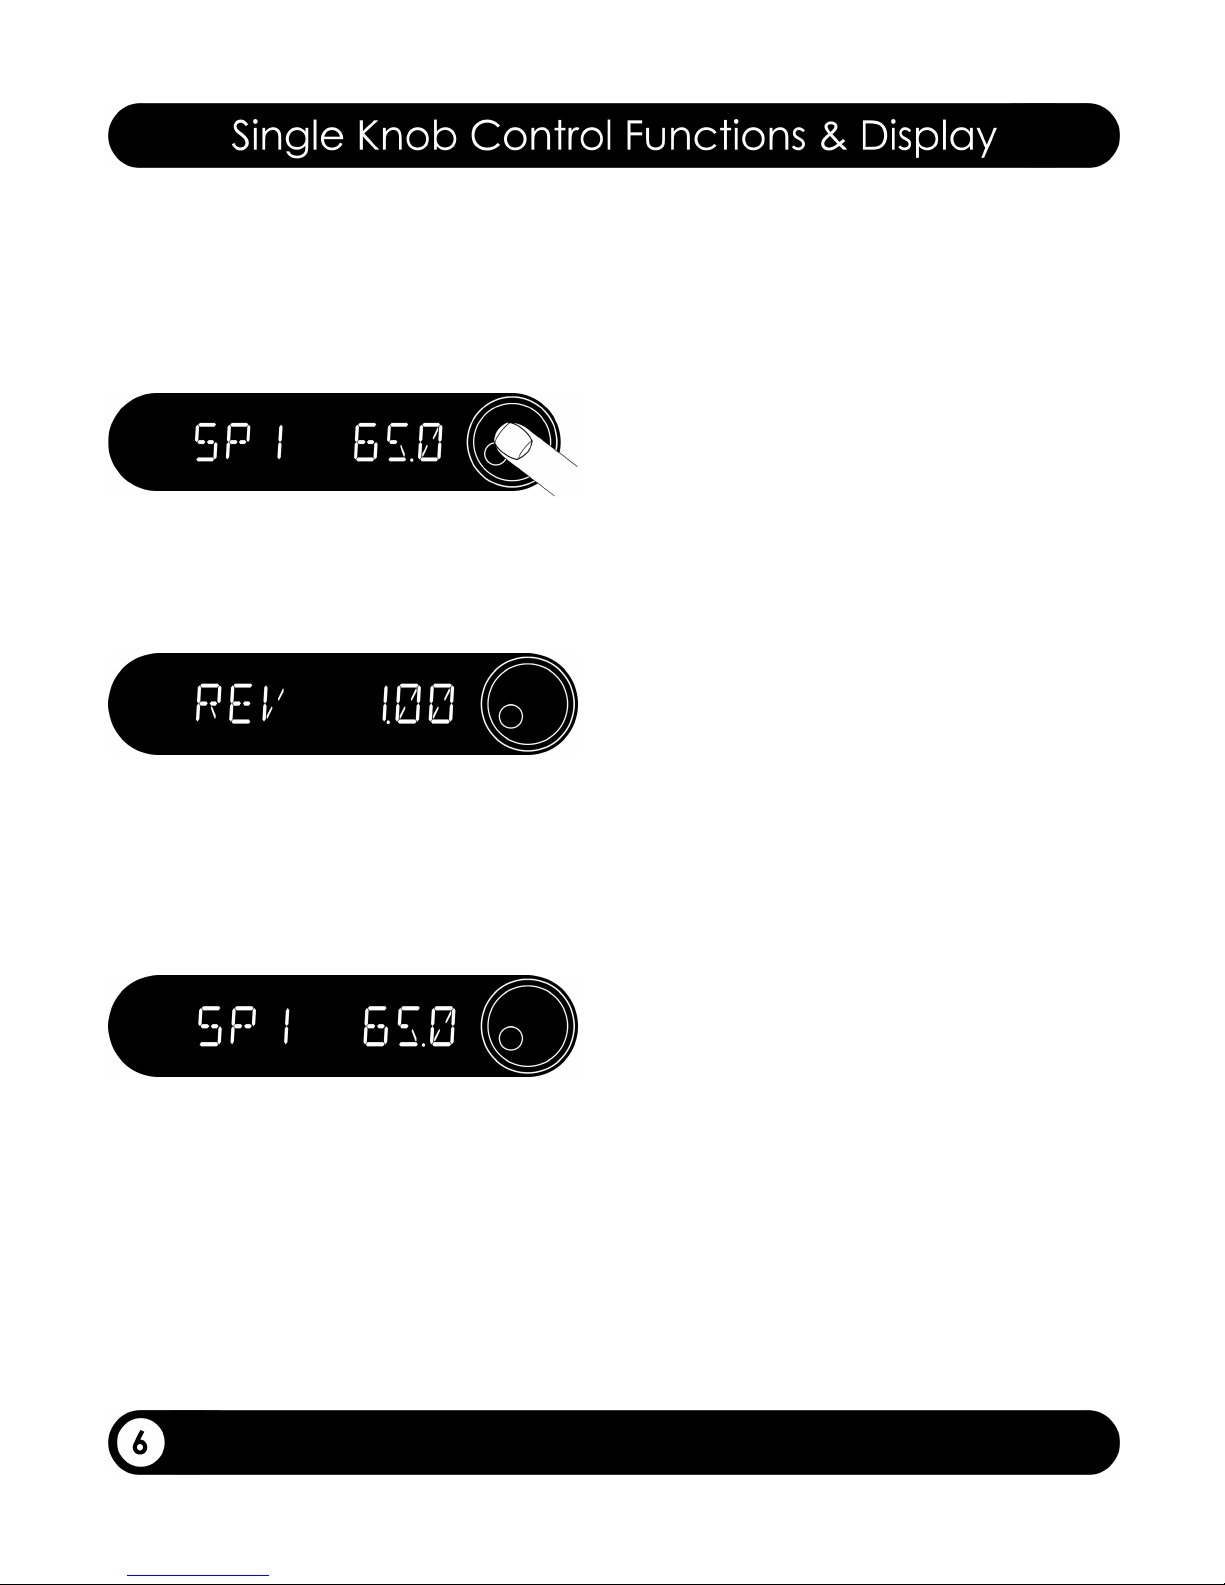
Front Panel Control Knob:
The control knob is a continuously rotating control
with a push-switch function. Always push the button
with your finger in the direct center of the knob.
Pushing the knob will switch between selectable
values on the display. Rotating the control left or
right will adjust the selected value.
Upon Power Up:
When switched on, the DAC3.5VB will perform its
startup sequence followed by displaying the
firmware revision.
After 2 seconds, Input Selection Mode will become
active. The AES input will be selected by default
and Soft Mute will be active. The volume will be set
to 50.0 even if the fixed/variable button is in Fixed
mode. The selected input is on the left of the display
and the volume is on the right. The volume level
will automatically ramp down and up during this
selection process
Input Selection Mode:
Briefly press the control knob and the input on the
left of the display will be highlighted. Rotate the
control knob to scroll to the desired input. Inputs are
indicated as: AES, SP1 (SPDIF1), SP2 (SPDIF2),
OPT (TOSLINK), ST (High Speed ST Fiber) and
ANLG (Analog Input).
Variable Output Mode:
The DAC3.5VB Variable Output operating mode,
selected from the rear panel Fixed/Variable output
switch, allows you to change volume level by
rotating the knob or via the supplied remote control.
To adjust the volume, rotate the knob until the
volume number on the right of the display is
highlighted.
The volume down function (counter-clockwise
rotation) is very rapid and allows quick changes in
the volume level. Volume up (clockwise rotation)
functions rapidly up to a displayed volume level of
65.0. Volume is adjustable from 0.0 to 100.0 by
increments of 0.5.
Fixed Output Operating Mode:
Pressing the rear panel Fixed/Variable Output switch
to the in position will set the DAC3.5VB in a fixed
output operating mode. This mode is used when
driving an analog preamp or integrated amplifier
input. The volume control function is then provided
by the associated preamplifier or integrated
amplifier.
To use the Fixed Ouput mode set the ouput level to
100.0 for a 2.75Vrms maximum level from the RCA
outputs or 5.5Vrms level for the Balanced XLR
outputs. If you want the outputs set for a lower level
then set the volume control to a lower level. For
example, for about 2 Vrms out from the balanced
outputs set the volume control to 91.0. This will
represent about a 2 Vrms output level on the
balanced outputs. When the level is set then press
the rear panel Fixed/Variable Output button. The
front panel display will now show the selected input.
Rotating the knob will scroll to different inputs and
the Volume and Mute functions on the remote will
not function.
Front Panel Digital Loc Indicator:
When no digital input signal is present on an input,
LOS (Loss Of Signal) will appear on the display. If
this occurs you need to check that the correct input
is selected and then check that the digital source is
connected, active and functioning correctly.
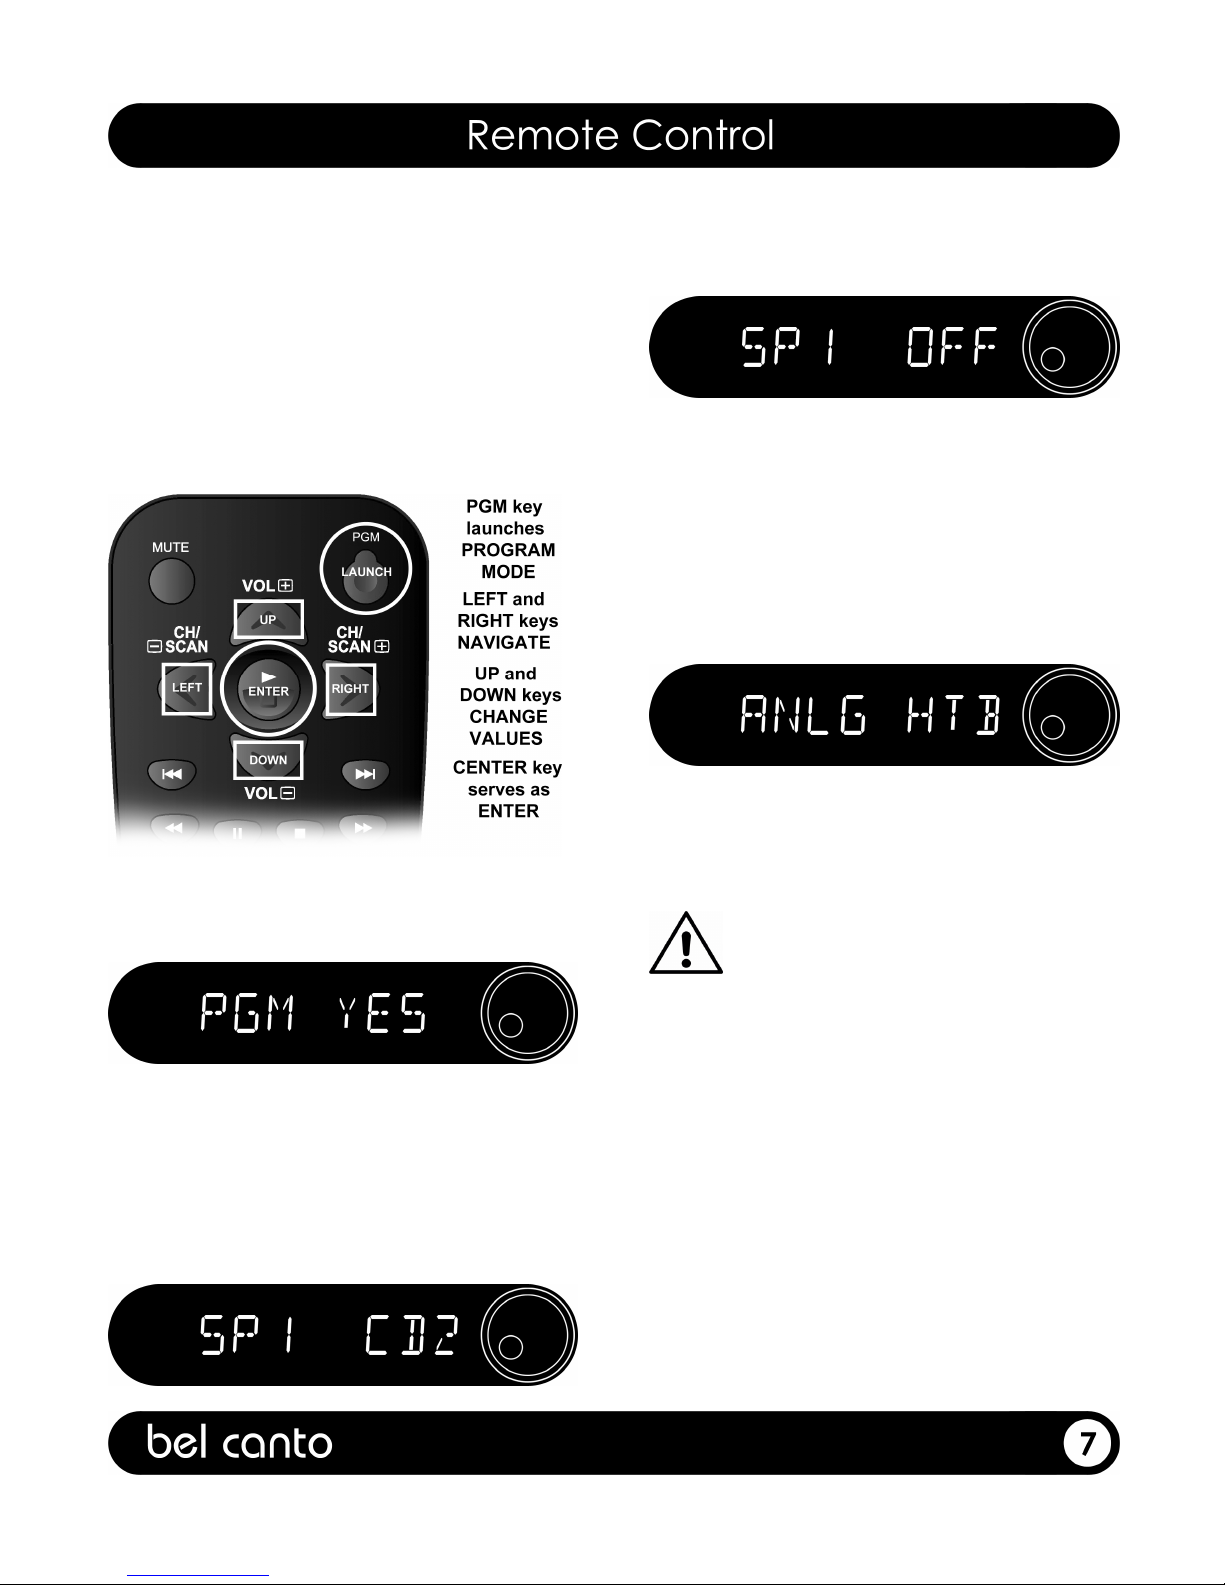
The DAC3.5VB Remote Control has a comprehensive
set of control features that are not available on the
front panel, including expanded programmability.
To access all DAC3.5VB control features press the
button mar ed DAC towards the bottom of the
remote control. (The Main CD controls will still
operate in the DAC, PRE and Tuner modes.)
PGM: Enter program mode. Here you can assign a
four character name to each input, turn each input ON
or OFF, and/or activate Home Theater Bypass for the
Analog Input.
Use the four directional keys at the top of the remote
to navigate programming options. Make your
selection by pressing the ENTER key.
After selecting YES when entering program mode,
you can name any or all inputs. Use the LEFT or
RIGHT arrow to select the input to name. Hit ENTER.
Use the right key to select one of four characters to
modify. You can quickly scroll through the characters
(A-Z, 0-9, or blank) using the UP and DOWN arrows.
After finishing naming the selected input, press
ENTER.
Before or after naming an input, you can turn an
input ON or OFF by using the UP and DOWN
buttons to select ON or OFF and then hitting
ENTER.
When on the ANALOG input, you can also choose
Home Theatre Bypass (HTB). In this mode, the
analog input simply passes signal through with a
fixed output level. Note that this disables the volume
control and requires that the volume control on the
Home Theater processor be used. Use this feature
only with a volume controlled line level source.
Using this with the fixed output of a CD player,
for example, could result in damage to the
amplifier or loudspea er!
When you wish to exit Program mode, simply hit the
PGM button. You will then be prompted to save
your changes. Toggle between YES and NO and
then hit ENTER.
To restore Factory Default settings: Hold
in the Control Knob while powering up the
DAC3.5VB, and continue to hold until the
display finishes its startup sequence.
VOL+: Increases the volume setting in Variable
Output mode. This will Punch Through to any Bel
Canto unit in Variable Output mode. The display will
show the volume level while changing.
VOL-: Decreases the volume setting in Variable
Output mode. This will Punch Through to any Bel
Canto unit in Variable Output mode. The display will
show the volume level while changing.
CH/SCAN+: Toggles the input selection up in
number and wrap around. Note that the first press of
this control will show the active input selection.
CH/SCAN-: Toggles the input selection down in
number and wrap around. Note that the first press of
this control will show the active input selection.
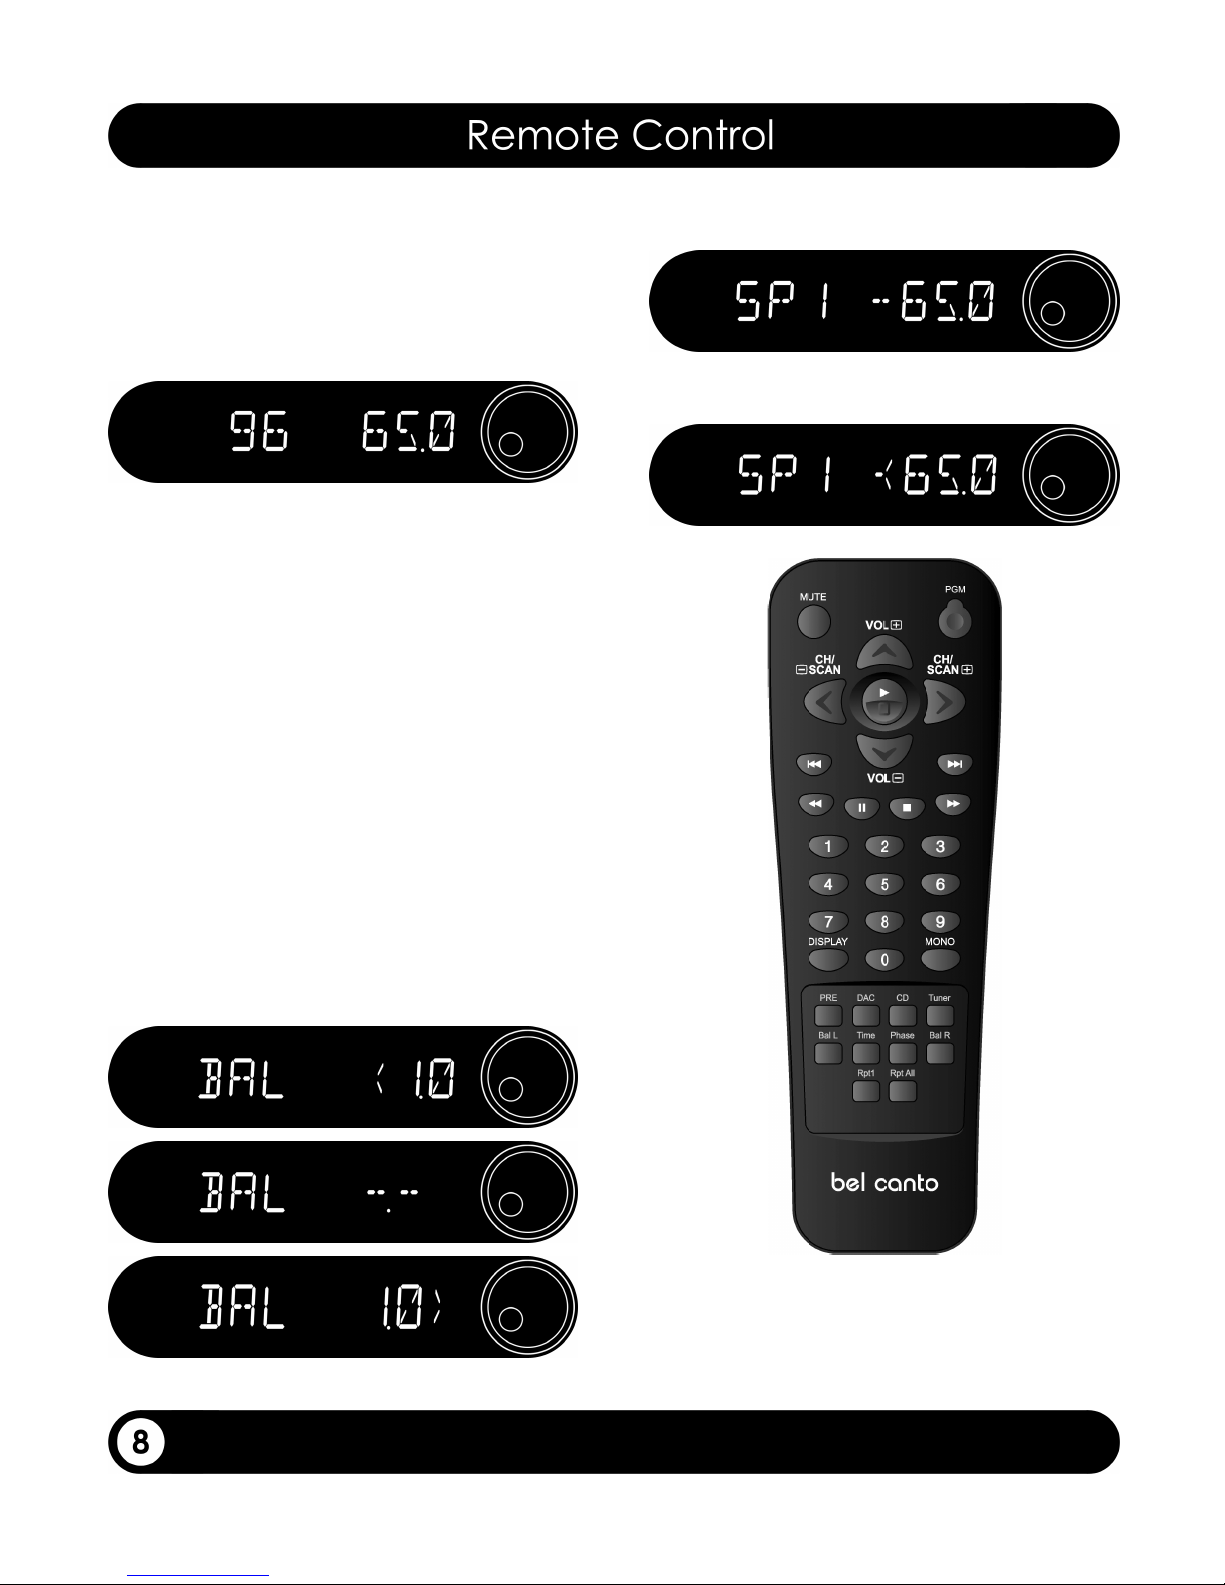
Display: Toggles through several display options:
1. Standard: displays selected Input on the left
and Volume on the right.
2. Sample Rate: displays selected sample rate.
Regardless of the display mode you are in, this
display will appear whenever your source
changes sample rate:
3. Product Name
. Software Version see page 6 for image
5. Display Off. Using the remote or using the
control knob will turn the display back on for 3
seconds.
Mute: When in variable output mode this will switch
the analog outputs from Soft to Hard Mute and Un-
muted modes. Soft Mute is indicated by the word
SOFT overwritten on the volume level display. Hard
mute over-writes the level display with MUTE. The
Mute function will Punch Through to any Bel Canto
unit set in Variable Output mode.
Number Buttons: Use for direct input selection.
1: AES 2: SPDIF1 3: SPDIF2 4: TOSLINK
5: High Speed ST Fiber 6. Analog Input
Bal L/ Bal R: Shift the balance up to 6.0 dB towards
either channel in increments of 0.5 dB. If the
balance is activated, a carrot will appear on the
display. It will point towards the direction in which
the balance is shifted
Phase: Invert the phase. If enabled, you will see a
dash to the left of the volume.
When both Balance and Phase shift are in effect,
you will see this:
IMPORTANT: When using the DAC3.5VB directly into a power amplifier, ensure that the Fixed/Variable
Output button is in the OUT (variable) position. Operation in Fixed Mode directly into the amplifier could
cause extreme output levels, clipping and damage to the loudspea ers, amplifiers or your ears!
• 12VDC VB power interconnect jack to
interface with either the VBS1 or LNS1
power supplies
• ST Fiber Input operates up to 2 /192 data
rate
• TOSLINK input accept any standard plastic
or glass fiber optical TOSLINK cable and
operates up to 2 /192 data rate
• SPDIF1 and SPDIF2 accept BNC or RCA
connections from any 75 ohm SPDIF source
and operate to at least 2 /192 data rate
• AES/EBU Input accepts any AES/EBU
standard 110 ohm digital source and
operates up to 2 /192 data rate
• XLR 5.5Vrms or 7. RCA 2.75Vrms outputs
are used for directly driving a power
amplifier in variable output mode or a
preamplifier input when in fixed output
mode.
• RCA Analog Inputs
• Output Level Button selects Fixed or
Variable Output Mode
• RS232 Connection
When all connections to and from the unit have been made then double check everything before plugging the
DAC3.5VB into the power source.
The sonic performance of the DAC3.5VB will begin to stabilize after 100 hours of continuous power up.

• The DAC3.5VB must be powered by either the VBS1 or the LNS1. If using the VBS1, please refer to the
VBS1 User’s Guide for connectivity. If using the LNS1, please read the following
• The LNS1 is designed to power Bel Canto VB equipped products only. Use of any cable other than the
supplied power interconnect may damage either the LNS1 or VB equipped unit and will void any
warranty. Certain non-VB equipped units can be factory upgraded. To begin the upgrade process, fill out
the RMA form in the Support Section of our website
• When connecting your VB unit to the LNS1, be careful to observe the alignment notches on both units
power receptacles and the power interconnect cable
• When inserting the power interconnect cable, align the notch on the cable end and the alignment teeth on
the outer sleeve to the 12 o’clock position. This will allow the interconnect cable to fully seat and ensure
that the plug mates correctly with the power receptacle
• Once the power interconnect cable is fully seated in the receptacle, lock in the power interconnect cable
by turning the outer sleeve clockwise one quarter turn. Proper seating of the LNS1 cable will ensure safe
and secure operation of the LNS1 and all connected components
• The LNS1 has been designed to run on non-regulated, non-filtered AC Mains. Usage of any additional
isolation or filtration from the AC Mains supply may compromise LNS1 performance

Output Connections
We strongly recommend that you use the Balanced XLR output to drive your e.One amplifier. Because of the DC
coupled nature of the DAC3.5VB there is a small residual DC offset on the outputs. This is typically less than
10mV (0.01 Volts) and will not be a problem for any Bel Canto amplifier or any vacuum tube or solid state
amplifier with AC coupling or DC servo control. There is no problem connecting the DAC3.5VB to any preamplifier.
If using a Bel Canto preamp there will be no small click or pop when selecting the input. Other preamplifiers that
do not ramp the volume up or down may produce a small click when selecting the DAC3.5VB input.
Power Up
We recommend leaving the DAC3.5VB powered at all times as the sonic quality is best after several hundred
hours of play and 8-72 hours of power on after the initial break-in time.
Connection to a Computer
For connections up to 2 /96, use the USB out of your computer to connect into the DAC3.5VB via either the USB
Link 2 /96 or the USB Light Link 2 /96. For more details on optimizing computer audio sources please refer to
our on-line guide at: www.belcantodesign.com
What to do if there is hum or ground noise
The design of the DAC3.5VB greatly reduces the chance for ground loop induced hum and noise. We recommend
using the balanced outputs for best performance. The balanced outputs can drive long lines to 10 meter length.
Connect all power cables of the audio system to a common outlet box. Having the audio system components
share a common ground will greatly reduce the possibility for ground current noise being introduced into the audio
signal path.
Volume Control Punch Through
The Volume Up, Down and Mute functions on the remote control will affect any Bel Canto unit in Variable Output
mode regardless of whether PRE, DAC, CD or TUNER is selected. It is recommended that only the device with
volume control closest to the power amps be in Variable Output mode. Any other devices that are capable of
volume control should be in Fixed Volume mode.

Digital Section:
Maximum Input Data Rate:
2 bit Data at 192Ks/s: AES 110ohm XLR, SPDIF 75ohm BNC/RCA, ST Fiber and
TOSLINK
Master Clock jitter: 2picosecond RMS
Analog 24/192 DAC Section:
Maximum Output: 5.5 Vrms balanced XLR, 2.5 Vrms RCA
Output Impedance: 200 ohms balanced XLR, 100 ohms RCA
Frequency Response: 20 Hz-20 KHz, +/- 0.5dB
THD+N: < 0.0015%, 5.5Vrms balanced out, 1KHz
Output Noise: < 3uVrms A-weighted 20Hz-20KHz
Dynamic Range: 126dB A-weighted 20Hz-20KHz
Analog 24/192 ADC Section:
Maximum Input: 2.5 Vrms RCA
Input Impedance: 12K ohms RCA
Frequency Response: 20 Hz-20KHz, +/- 0.5dB
THD+N: 0.003%, 2.5Vrms in, 1KHz
Dynamic Range: 110dB, A-weighted 20Hz-20KHz
General:
Power Usage On: 9W
Power Usage Off: 0.0W
Power Requirement: 12VDC 0.75A
Dimensions : 8.5” W x 12.5” D x 3.5” H (216 mm x 318 mm x 88 mm)
Weight: 1 lbs. (6.5 kg)
Features and specifications are sub ect to improvements and changes without prior notice.

version 3.0
Other manuals for E.ONE Series DAC 3.5vb
1
This manual suits for next models
1
Other Bel Canto Media Converter manuals


