BEL i-Thermo L Series User manual
Filename: QUICK_GUIDE_BILANCE_iThermo_EN+IT+POR_rev122;08/09/16
1
Declaration of Conformity
EC-Konformitätserklärung
EC-Déclaration de conformité
EC-Dichiarazione di conformità
EC-Declarção de conformidad
EC-Declaration of conformity
EC-Declaración de conformidad
BEL Engineering s.r.l., Via Carlo Carrà 5 Monza 20900 (MB) ITALY
G
B
Declaration of conformity
We hereby declare that the product to which this declaration refers
complies with the following standards.
D
Konformitätserklärung
Wir erklären hiermit, dass das Produkt, auf das sich diese Erklärung
bezieht, mit den nachstehenden Normen übereinstimmt.
F
Déclaration de conformité
Nous déclarons avec cela responsabilité que le produit, auquel se
rapporte la présente déclaration, est conforme aux normes citées ci-après.
I
Dichiarazione di conformità
Di
chiariamo con ciò che il prodotto al quale la presente dichiarazione si
riferisce è conforme alle norme di seguito citate.
E
Declarção de conformidade
Manifestamos en la presente que el product al que se refiere esta
declaración està de acuerdo con las normas siguientes..
P
Declaración de
conformidad
Declaramos por meio da presente que o produto no qual se refere esta
declaração, corresponde às normas seguintes
Electronic Balance: Series i-Thermo, I-Thermo Touch
E
uropean Directive
Harmonized Standa
rd
2014/30/EU (EMC) EN 61326-1:2013
2014/35/EU (LVD) EN 61010-1:2010
EN 61010-2-010:2014
2011/65/EU (RoHS) EN 50581:2012

ENGLISH
QUICK GUIDE
ELECTRONIC PRECISION MOISTURE BALANCES
Series: i-Thermo L
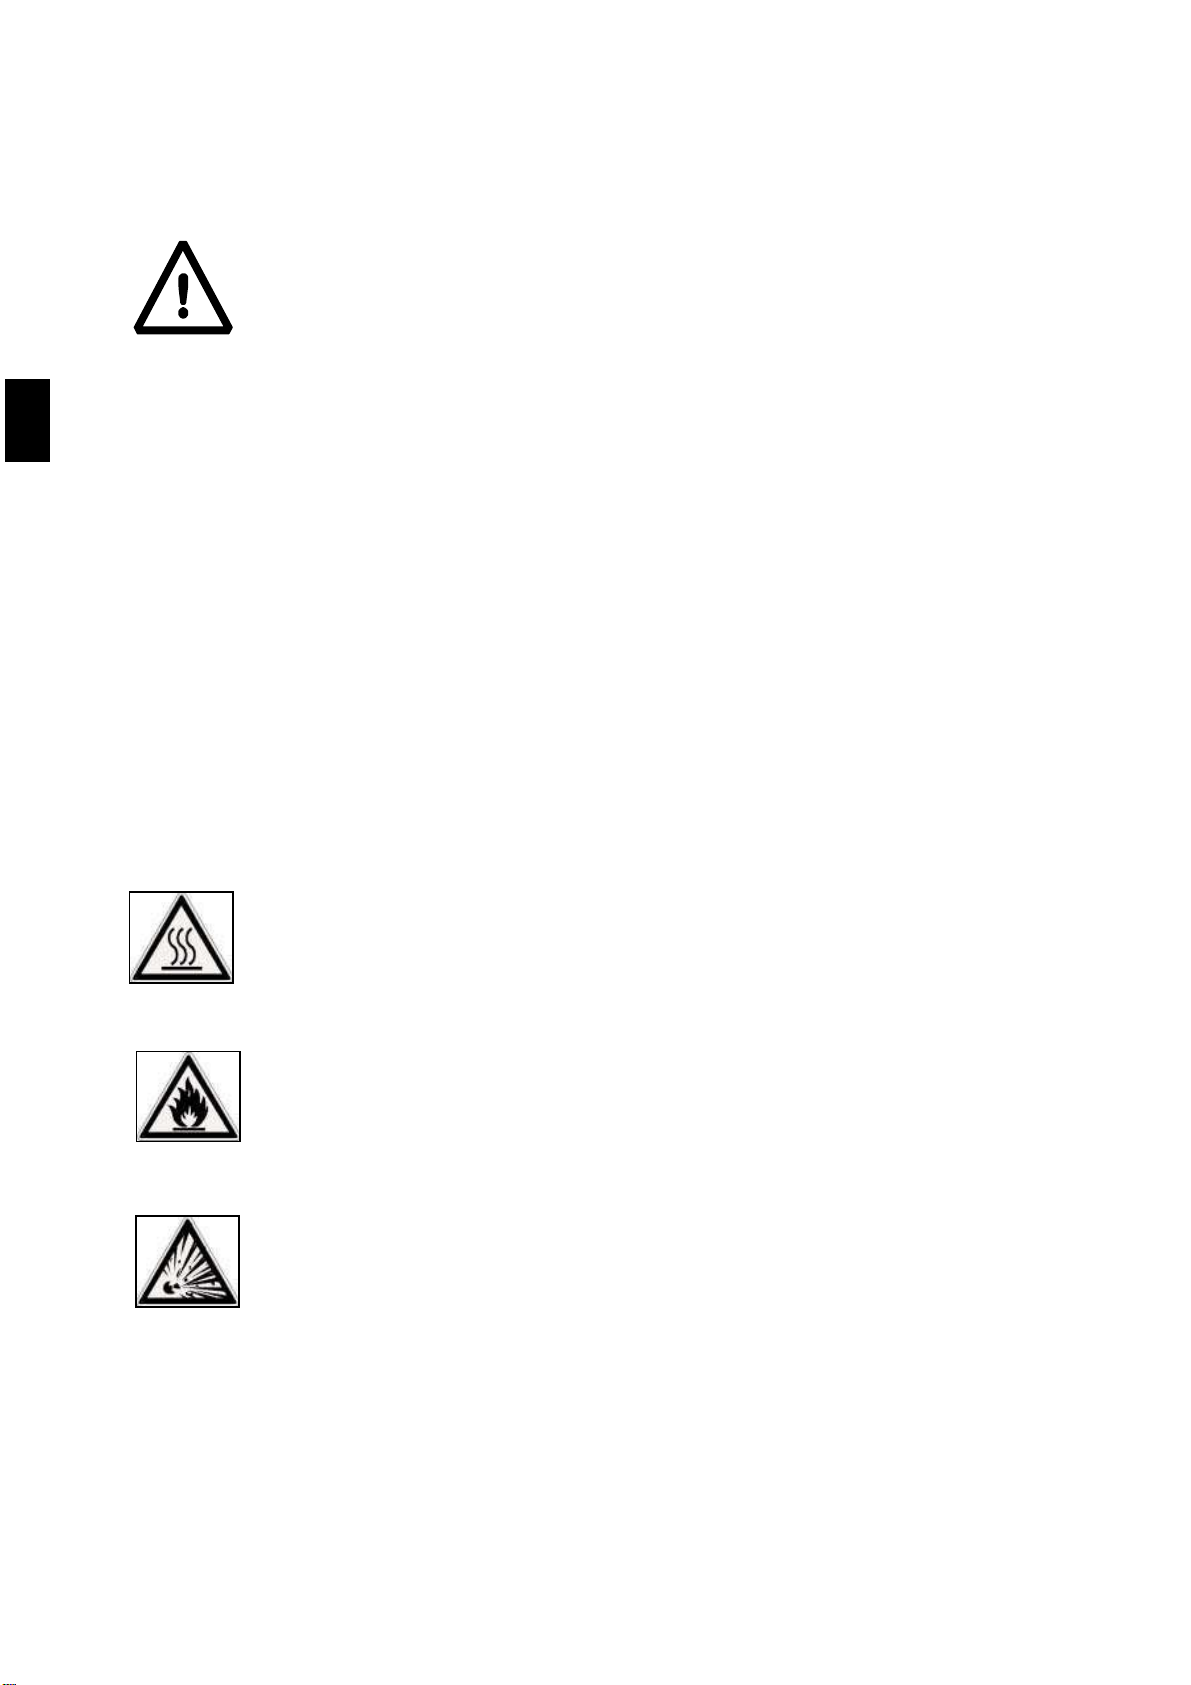
ATTENTION:
This is a guide to start quickly working and do NOT substitute the complete user manual; we
please you to read completely the user manual for a correct installation and a right use of your
new electronic balance.
Usage of the instrument different from the one reported in the user manual does not ensure
anymore the safety of the product.
1. INSTALLATION INSTRUCTIONS
•Remove the balance, the calibration weight (if included) and the accessories from the package and
check if any visible damage of the instrument
•Do not install the balance in places with air flows, heavy thermal changes and vibrations. Place the
support pan and weighing pan on the balance
•Level the balances using the levelling feet and looking at the level
bubble
•Wait for 30 minutes from switch on and the calibrate the balance (using the appropriate mass if
included) following the instructions of the paragraph “calibration”
Filename: QUICK_GUIDE_BILANCE_iThermo_EN+IT+POR_rev12;08/09/16
3
ENGLISH
WARNING:
Please follow carefully these steps for installing and use the new balance before starting your
work routine. A way of use of the instrument different from this user manual will not guarantee
the instrument’s safety anymore. Keep this manual in a safe place.
Please follow these indications to avoid problems and to grant a safe use of moisture
analyzer:
Use the moisture analyzer exclusively for the moisture determination of samples. Every
incorrect use of this instrument may create danger for safety of persons and may cause
damages at the instrument or at other objects.
Do not use the instrument in areas where there is danger of explosions; also make the
instrument work only respecting the enviroment conditions as reported in this manual.
If this material is used in plants or in enviroment conditions that require strict safety
conditions, please respect the instructions of the directives regarding the installation of this
material currently existing in your country.
This instrument must be used only by qualified personell, who knows the features and
characheristics of the sample under test.
Before starting to work with the instrument for the first time, please check that voltage is the
same of your electric mains.
To get the instrument free from tension, remove the power supply cable.
Place straight the power supply cable so that to avoid contact with the very hot surfaces of
the instrument.
Use only extension cables that are conform to normatives and that are equipped of a
protection conductor.
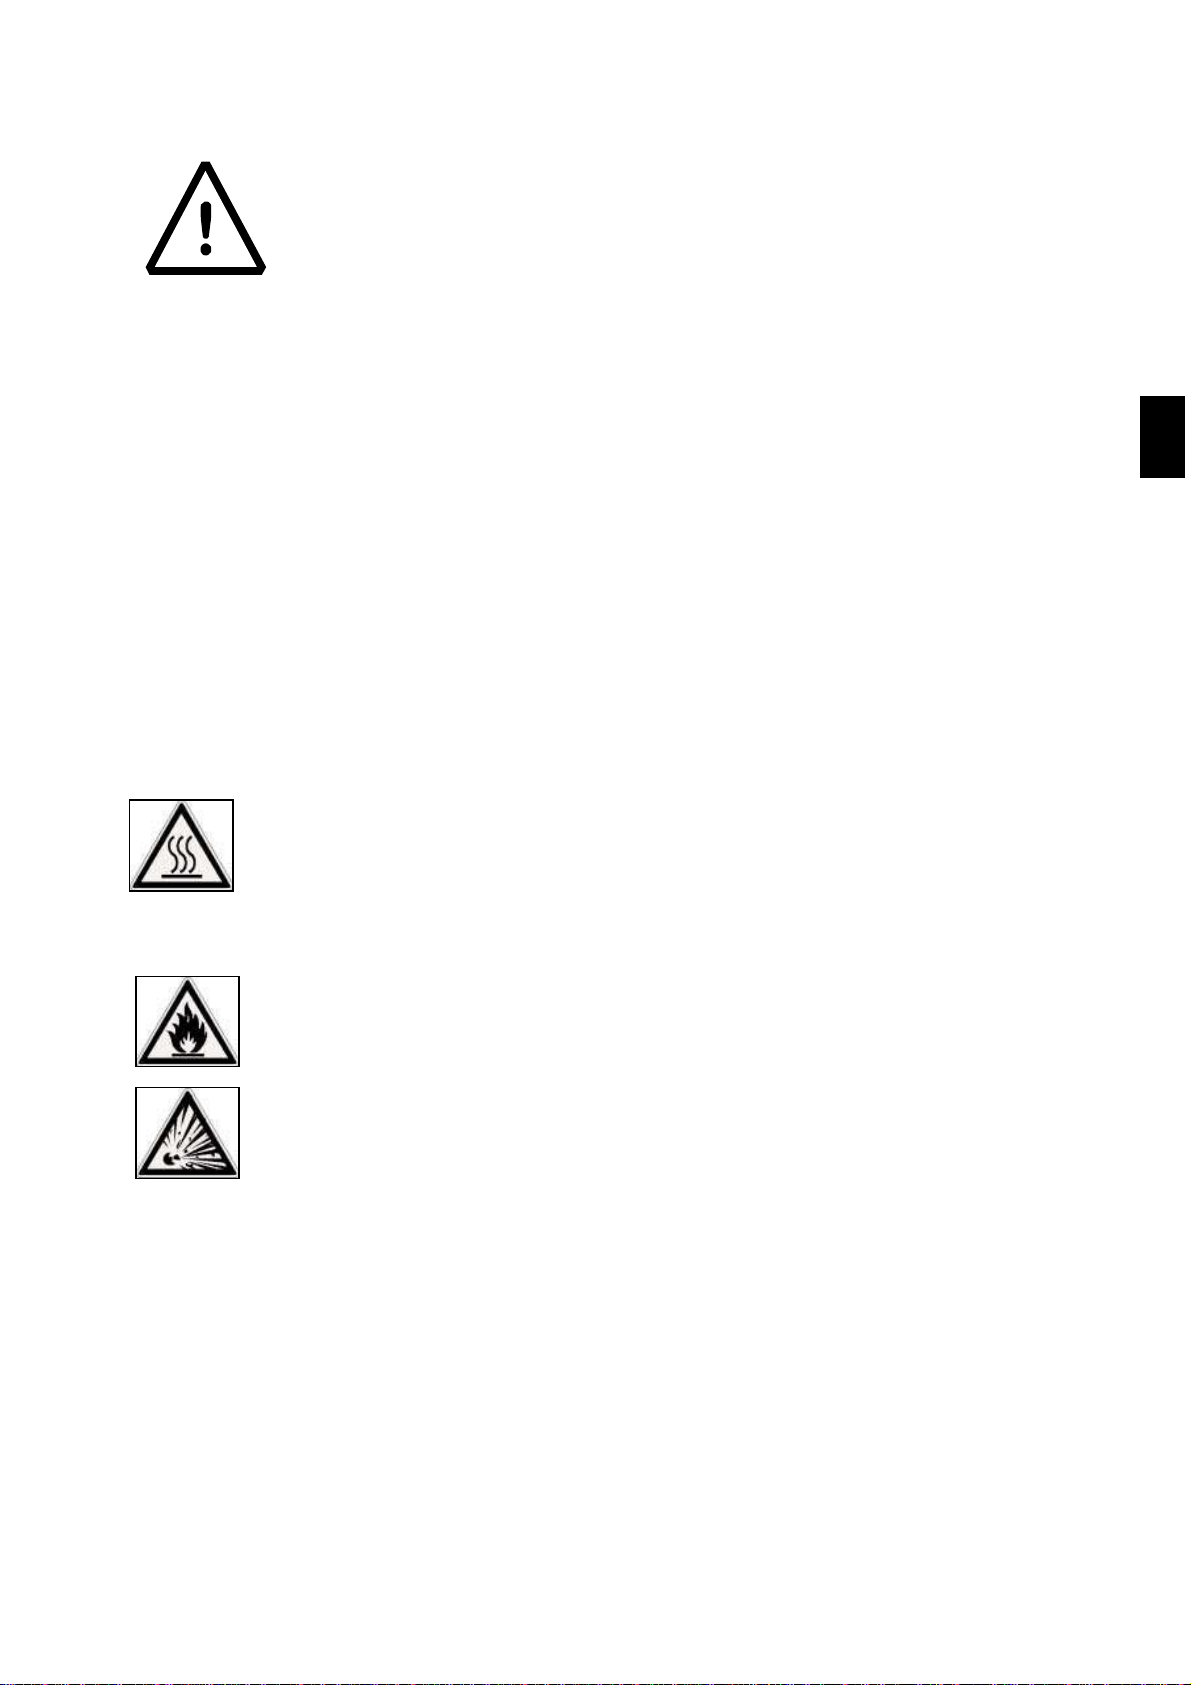
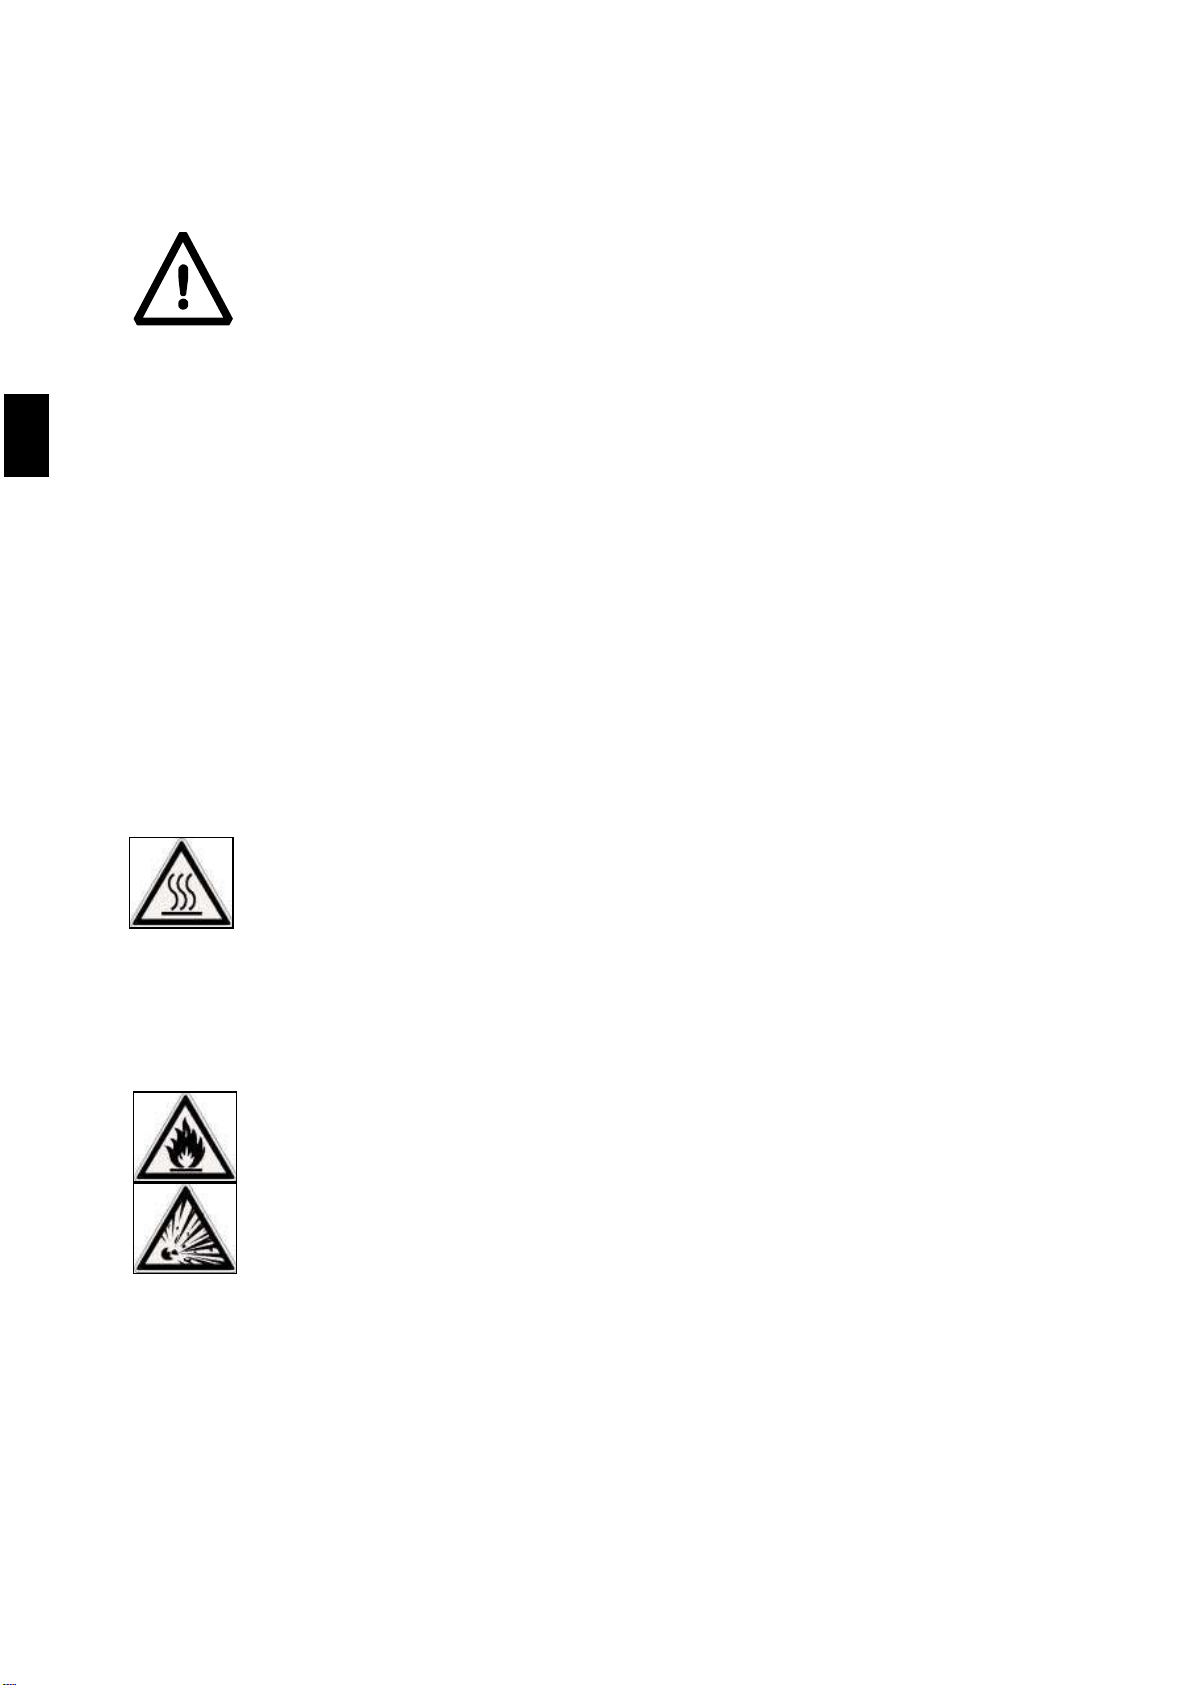
Attention, protection against heat
Respect the distance and the free space around the instrument to avoid an accumulation of
heat in the instrument and and the over heating of the instrument ifself:
- 20 cm around the instrument
- 1 m upon the instrument
Do not place flammable materials upon, below or near the instrument since the heater
warms the surroinding area.
Remove the samples carefully, the heater and the dishes for samples may be still very hot.
Danger for persons or objects when working with particular samples: Fire Explosion
Flammable or explosive substances
Substances that contain solvents
Substances that during drying emit gas or flammable explosive vapors
ENGLISH
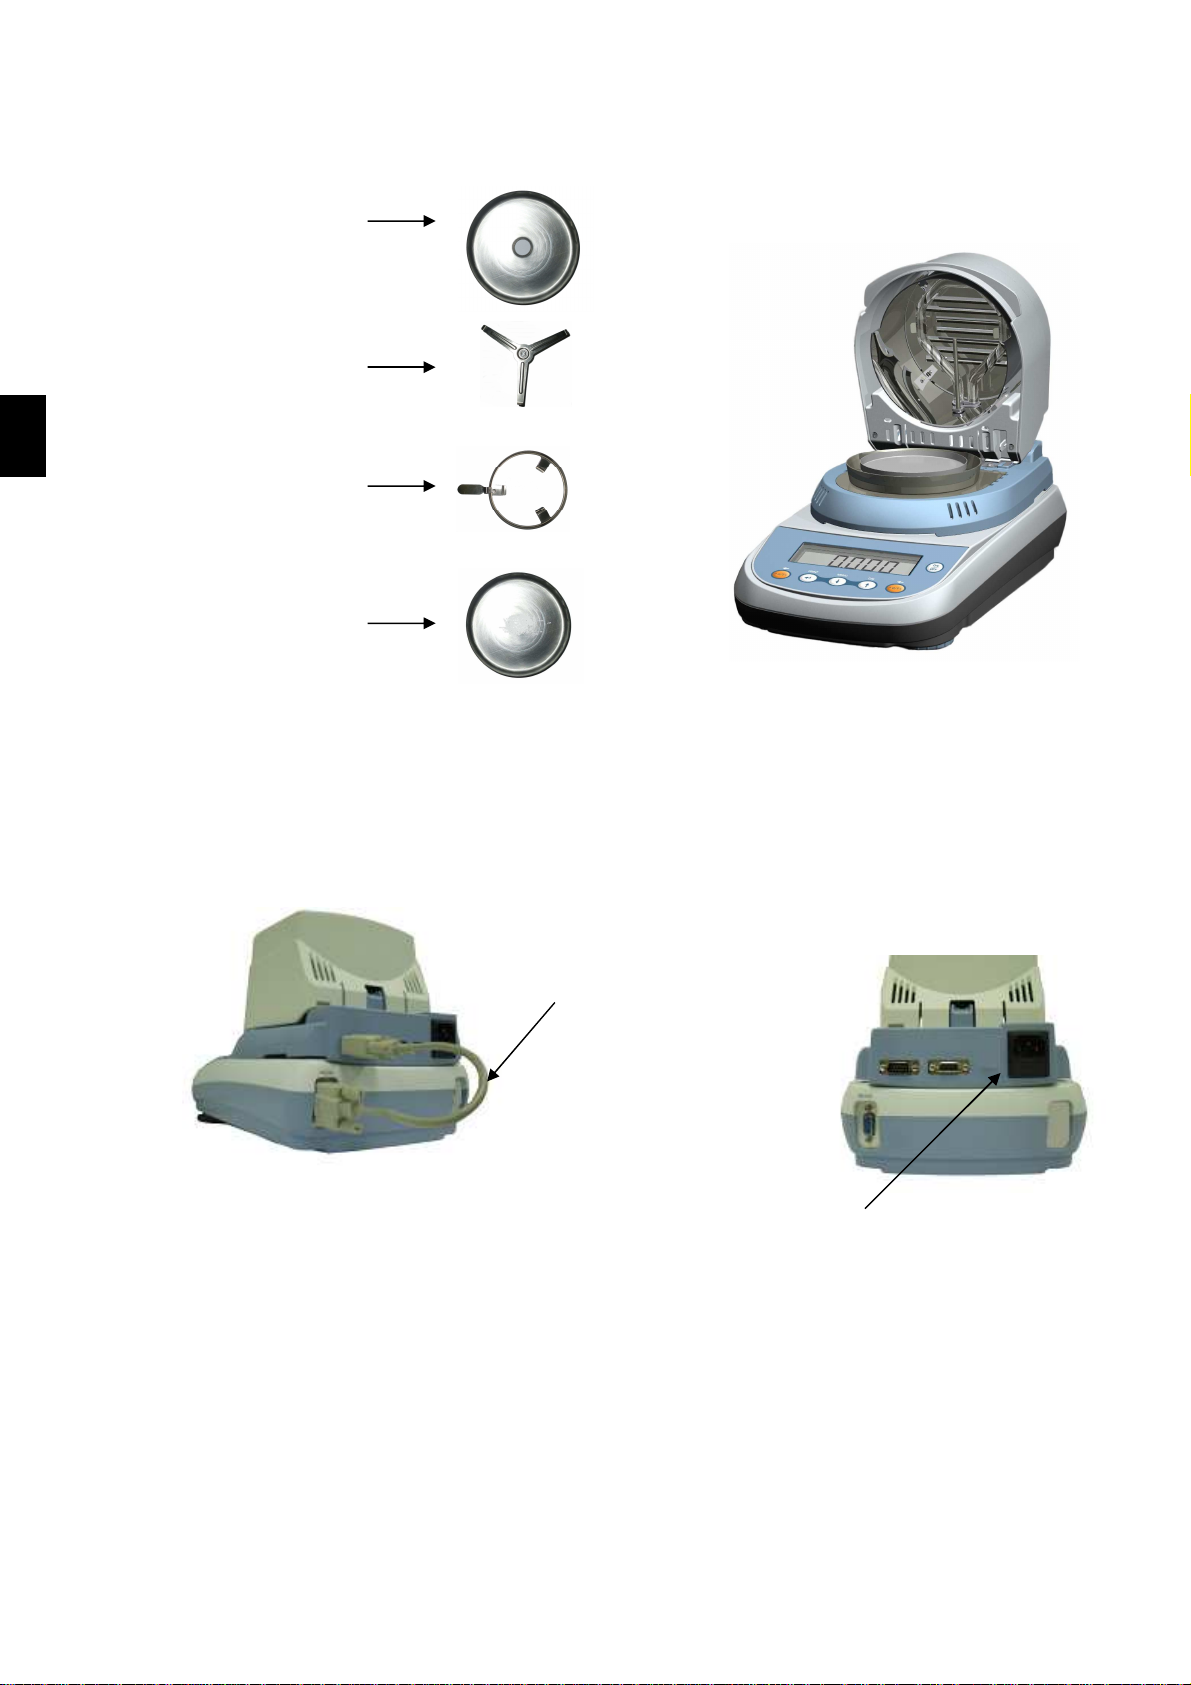
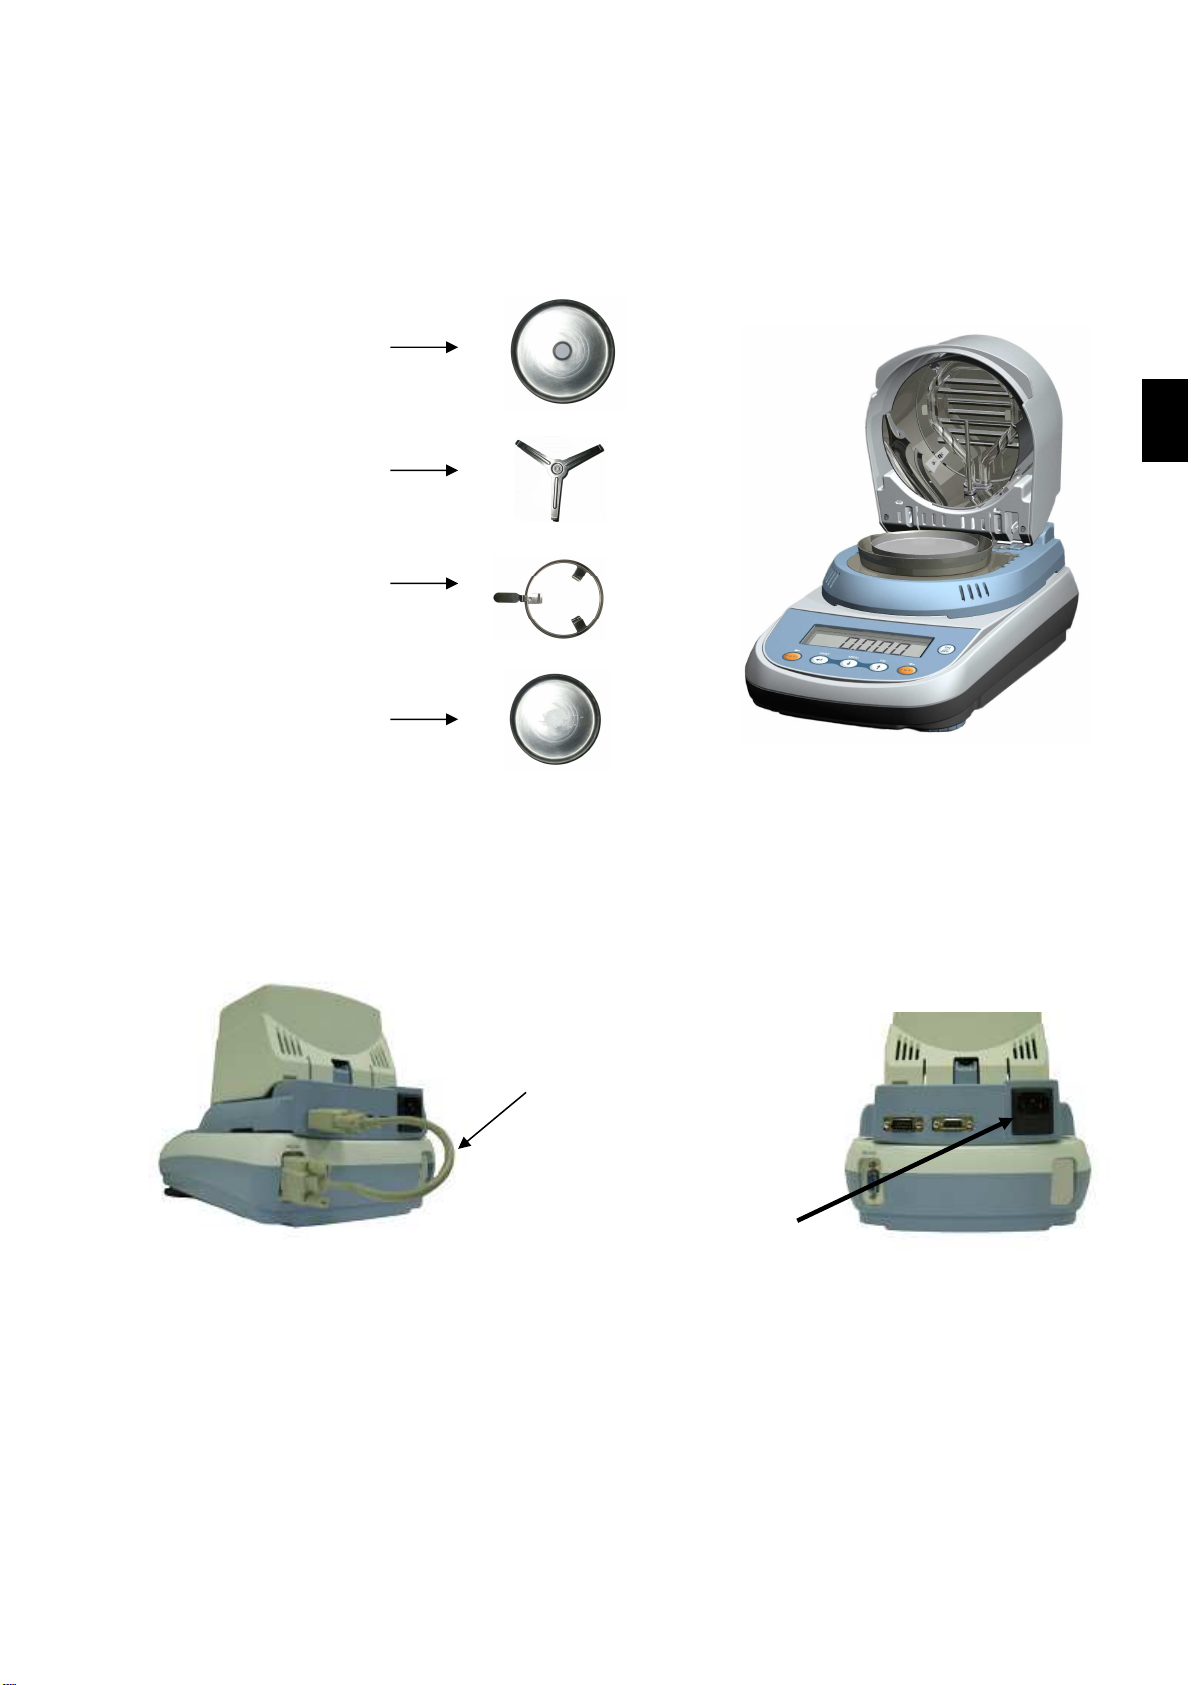
Pan for the sample
Underpan
Stainless pan protection
with ventilation stopper
Pan extractor
2. Balance power supply:
Cable VDE
1. 15 poles M/F
cable for
connection
balance-heater
2. Preparing the balance to work
1. Insert stainless pan protection.
2. Insert underpan on the cone of weigth.
3. Insert pan extractor
4. Put the pan for the sample.
1. Connect the heater to the balance via cable 15-pin M / F, insert the cable into the two
connectors on the rear of the instrument as shown in the figure.
2. Insert the VDE cable in the power connector on the back of the instrument
N.B. Verify that the power supply indicated on the instrument nameplate matches the one in
use in the country where you are installing.
3. Then connect the VDE cord to the power outlet located near the instrument. Do not use non-
compliant with current regulations cables / extensions.
Filename: QUICK_GUIDE_BILANCE_iThermo_EN+IT+POR_rev12;08/09/16
5
ENGLISH
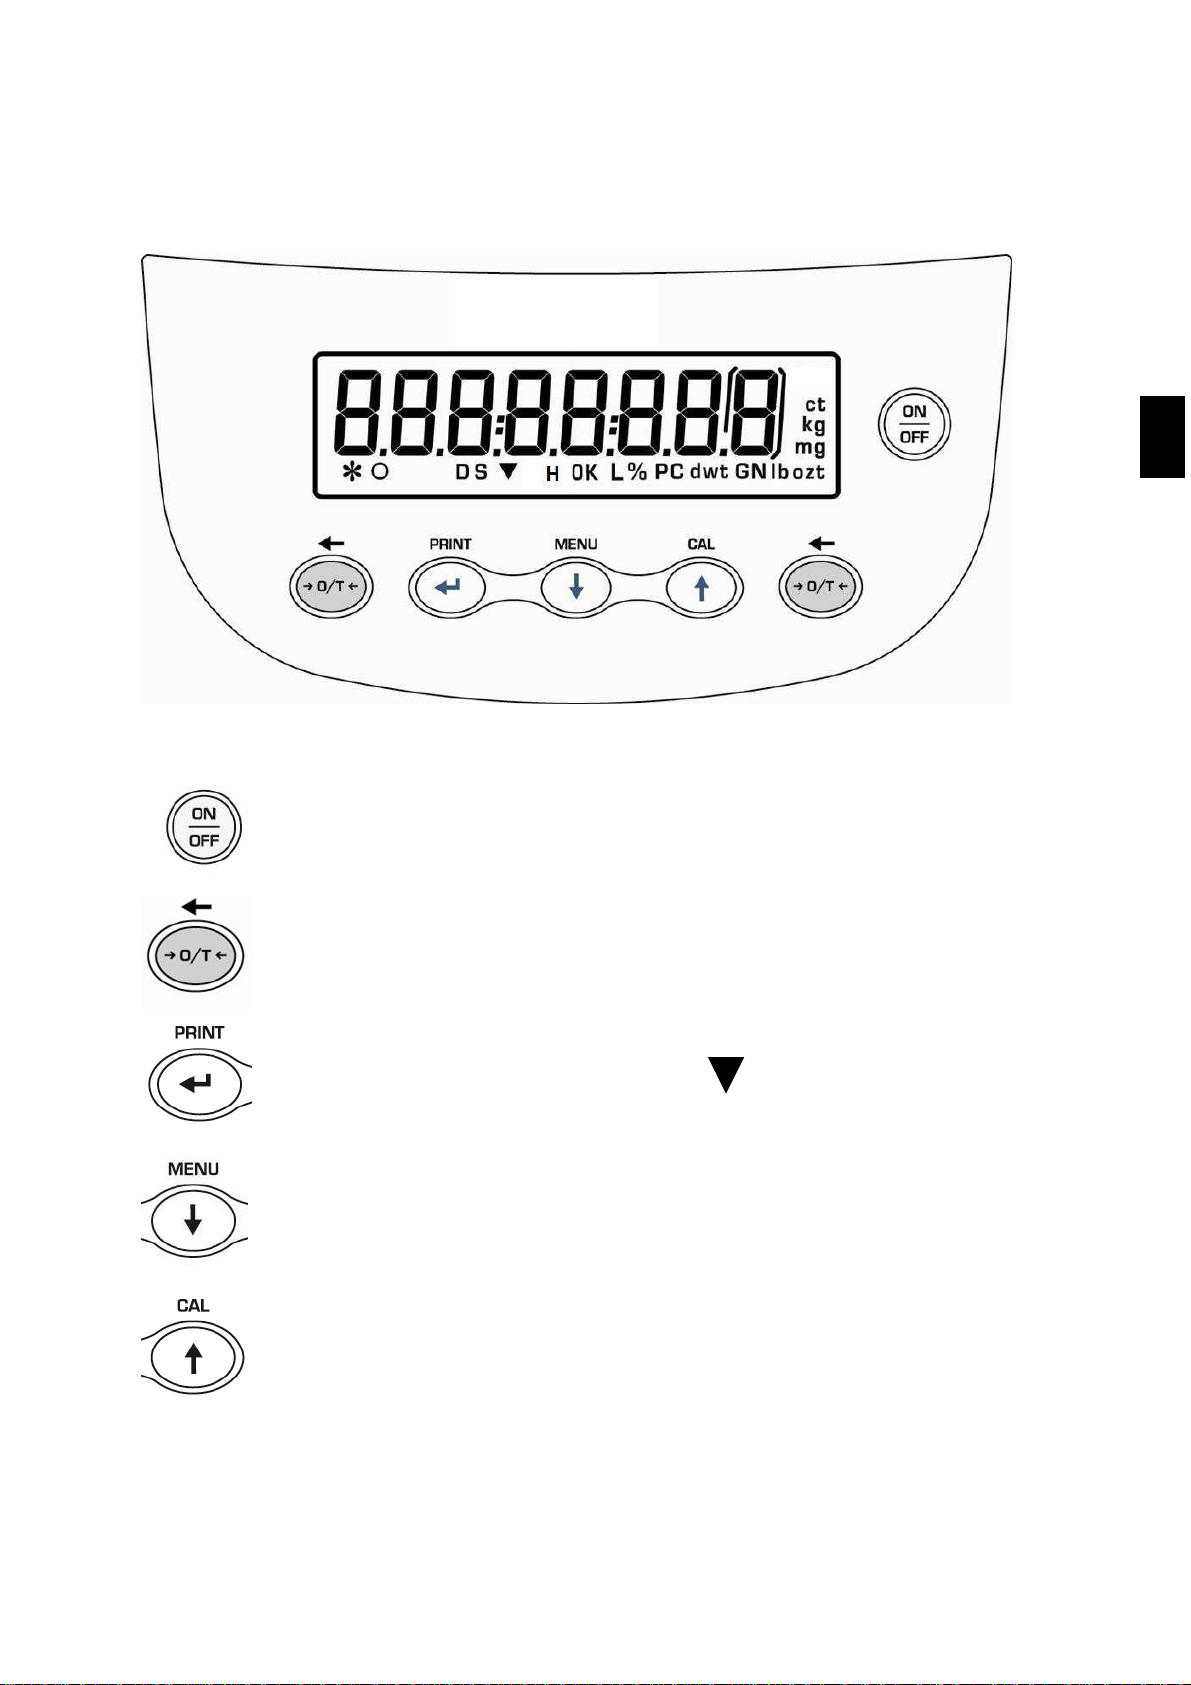
3. Keyboard and display
*
Stability indicator
O
Zero indicator
%
Percenage weighing
Insert data mode
H
Heater is working
g
Measure unit
Standby (OFF) or power on (ON)
button
Escape function button
TARE or zero button .
Selection CONFIRM or SEND data to
printer button.
Balance setup MENU button, to set
balance’s parameters.
Balance CALIBRATION button.
ESC
ESC
ENGLISH
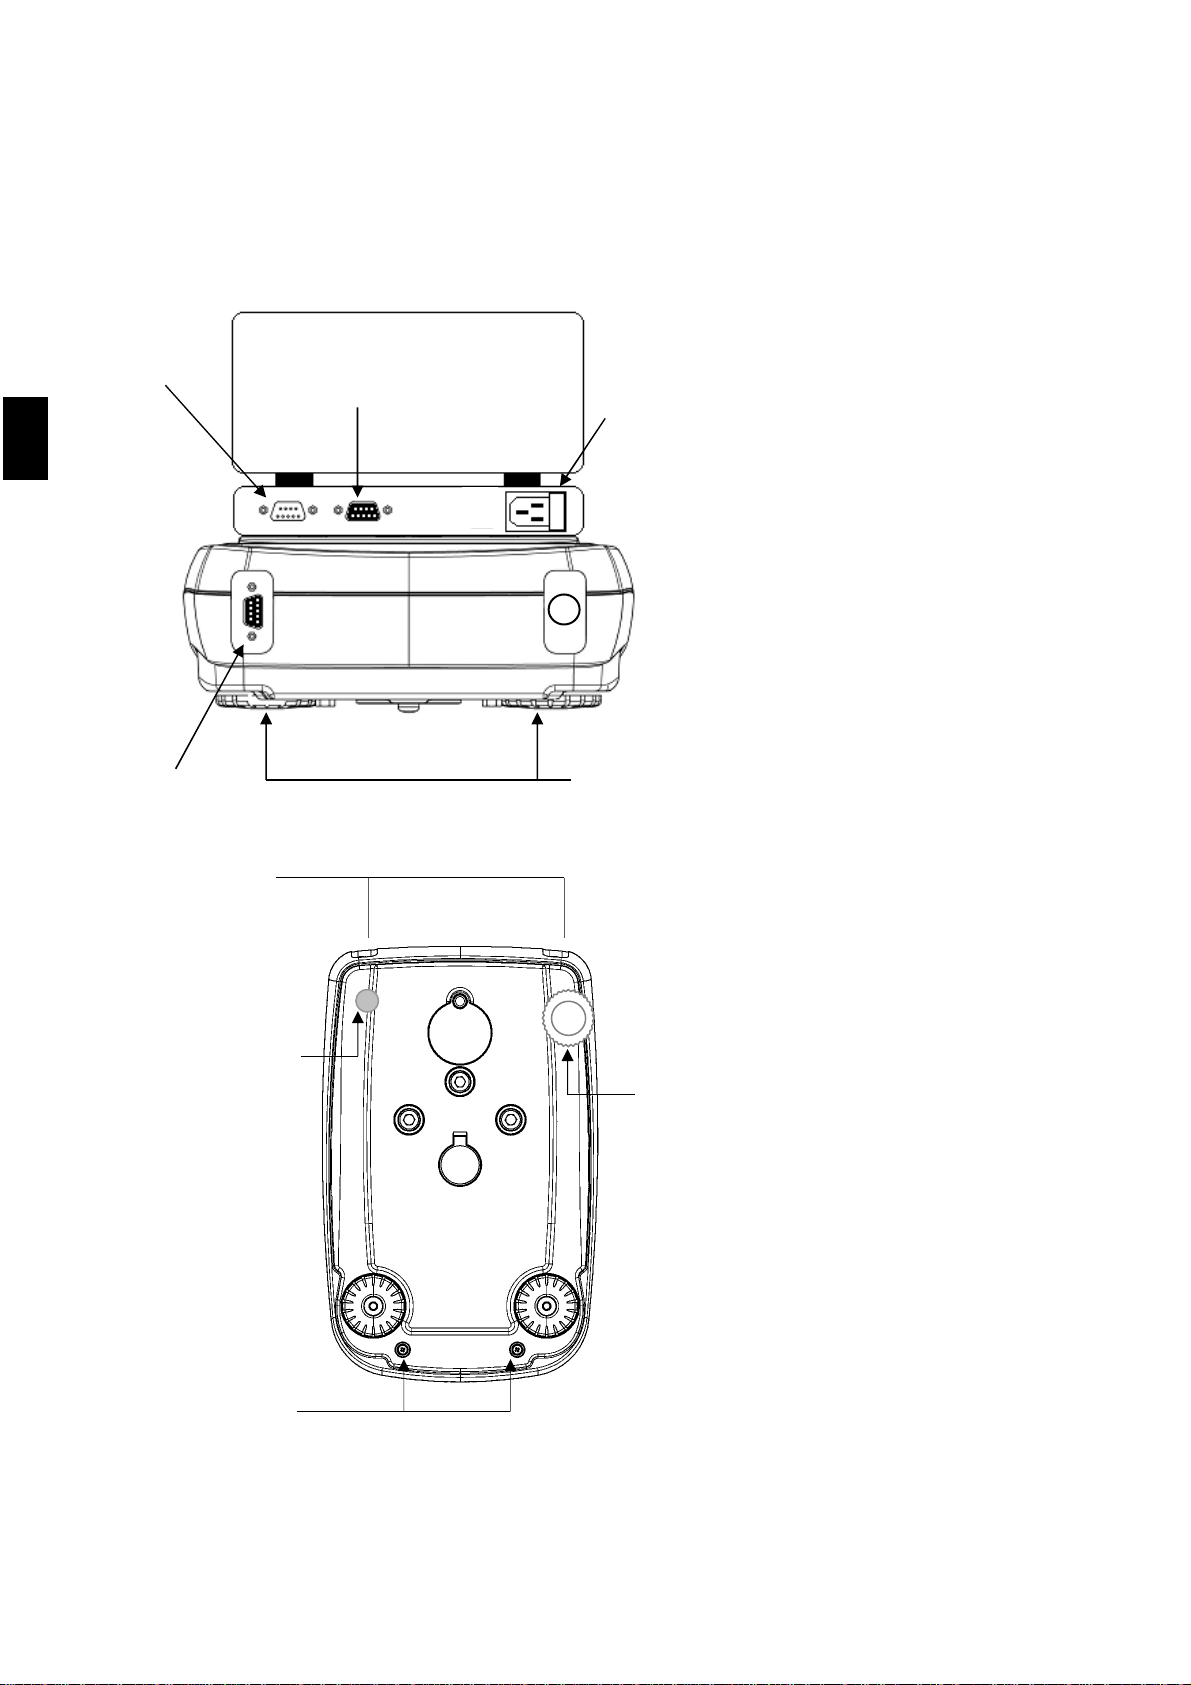
4. Inputs and outputs
Rear side and bottom side of the balance model i-Thermo
1. CONNECTOR 1
Balance’s power supply (VDE)
2. CONNECTOR 2
Connect heater to balance.
3. CONNECTOR 3
Connect balance to heater.
4. CONNECTOR 4
9 pin RS232 Interface for PC and
printer
5. ADJUSTABLE FEET
6. N°2 closing screws of the balance
7. N°2 closing screws of the
balance: first remove the screws
remove adjustabel rear feet(8) and
fixed rear feet(9).
8. Adjustable rear feet
9. Fixed rear feet
7
6
9
8
1
4
2
5
3
7/ 25
5. WEIGHING
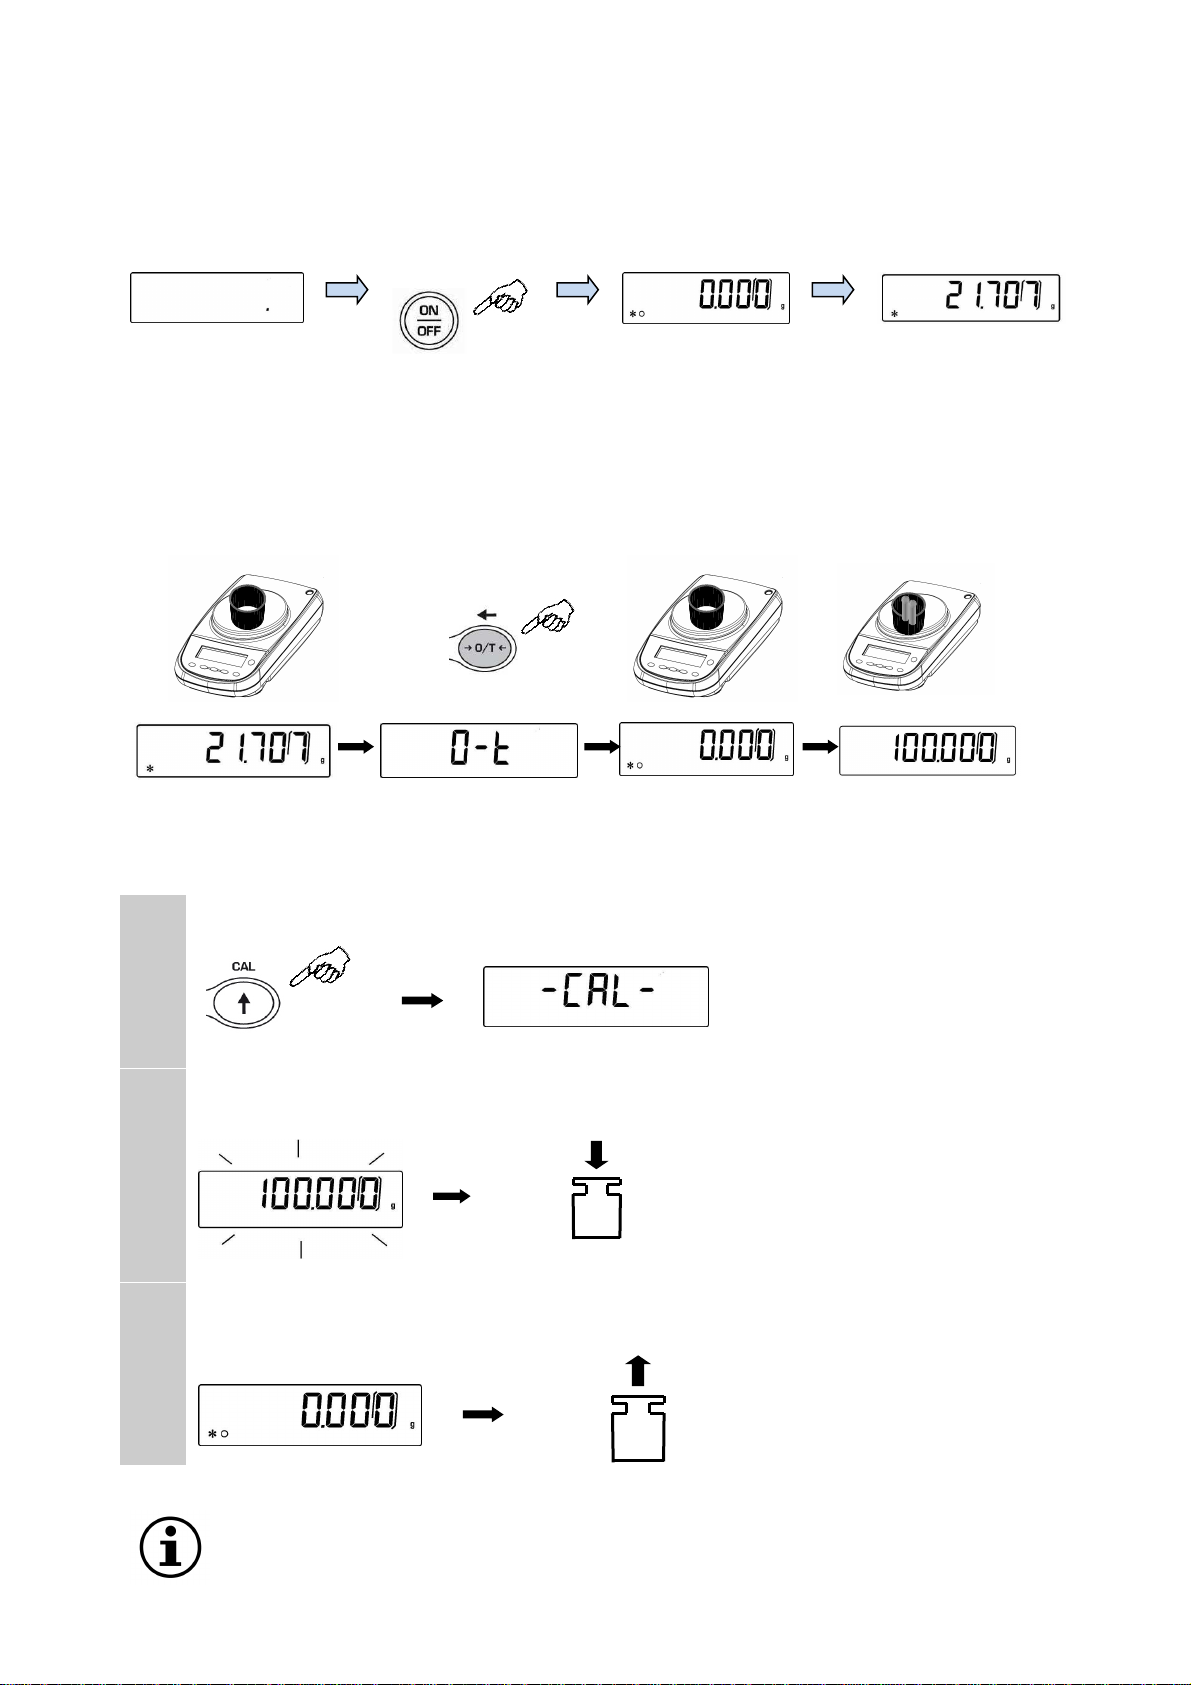
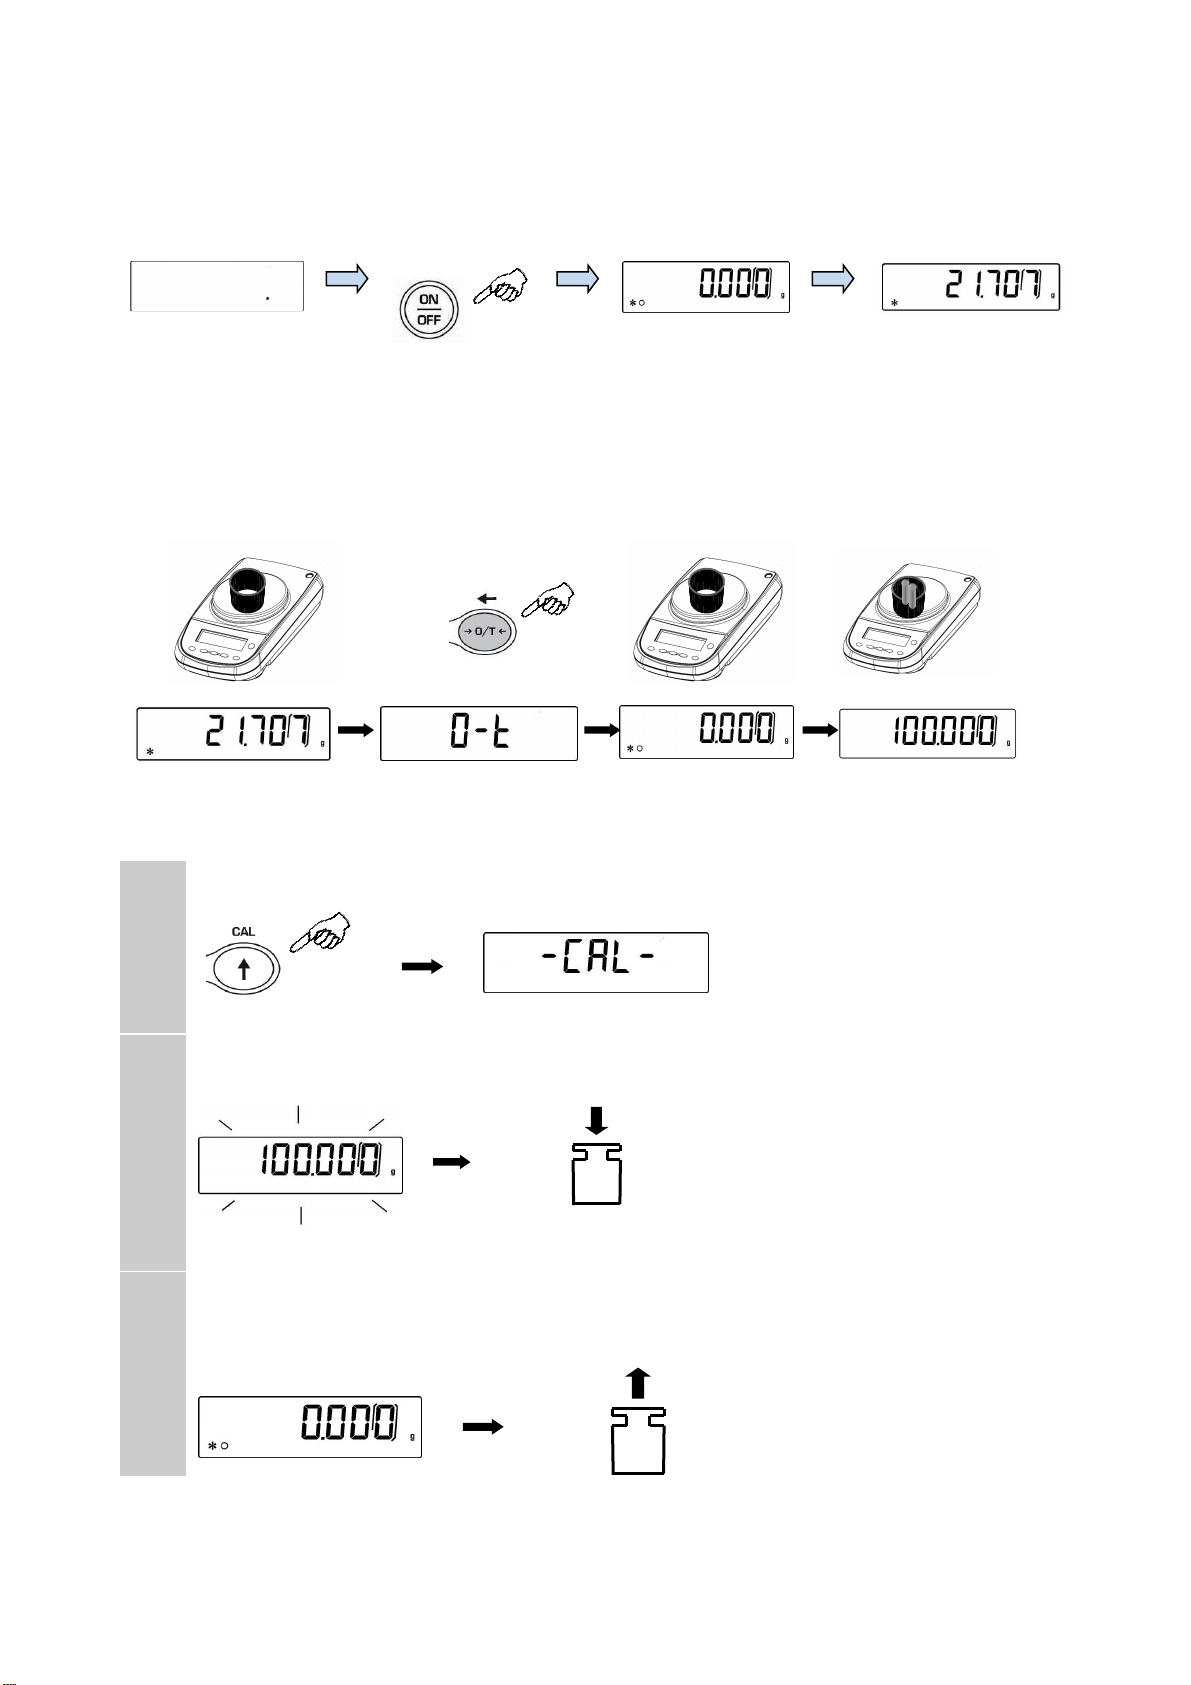
In “STAND BY” mode press the ON/OFF button. Place goods to be weighed on the pan, wait the stability
symbol ж(asterisk) to appear and then read the weight value
Press again ON/OFF button to return to “STAND BY” mode.
6. TARING
Place the container on the pan and press O/T button. “O-t”is displayed. As soon as the stability is reached
the value of zero “0.000” will be displayed (weight of container is internally stored). Place the goods to be
weighed in the container, the net weight will now be displayed
7. EXTERNAL CALIBRATION
1
Press the
CAL
button when no object is on the weighing pan; “CAL” will be dispalyed.
2
Wait until the value of required calibration weigh appears flashing, then put the required calibration
weight carefully in the center of the weighing pan.
3
The display will stop flashing. After calibration is performed, the value of calibrated weight is
displayed. Remove the calibration weight. Balance automatically returns to weighing mode and it is
ready for weighing operations.
NOTE: if there is any interference during calibrationo process, an error message will be
visualized.
ENGLISH
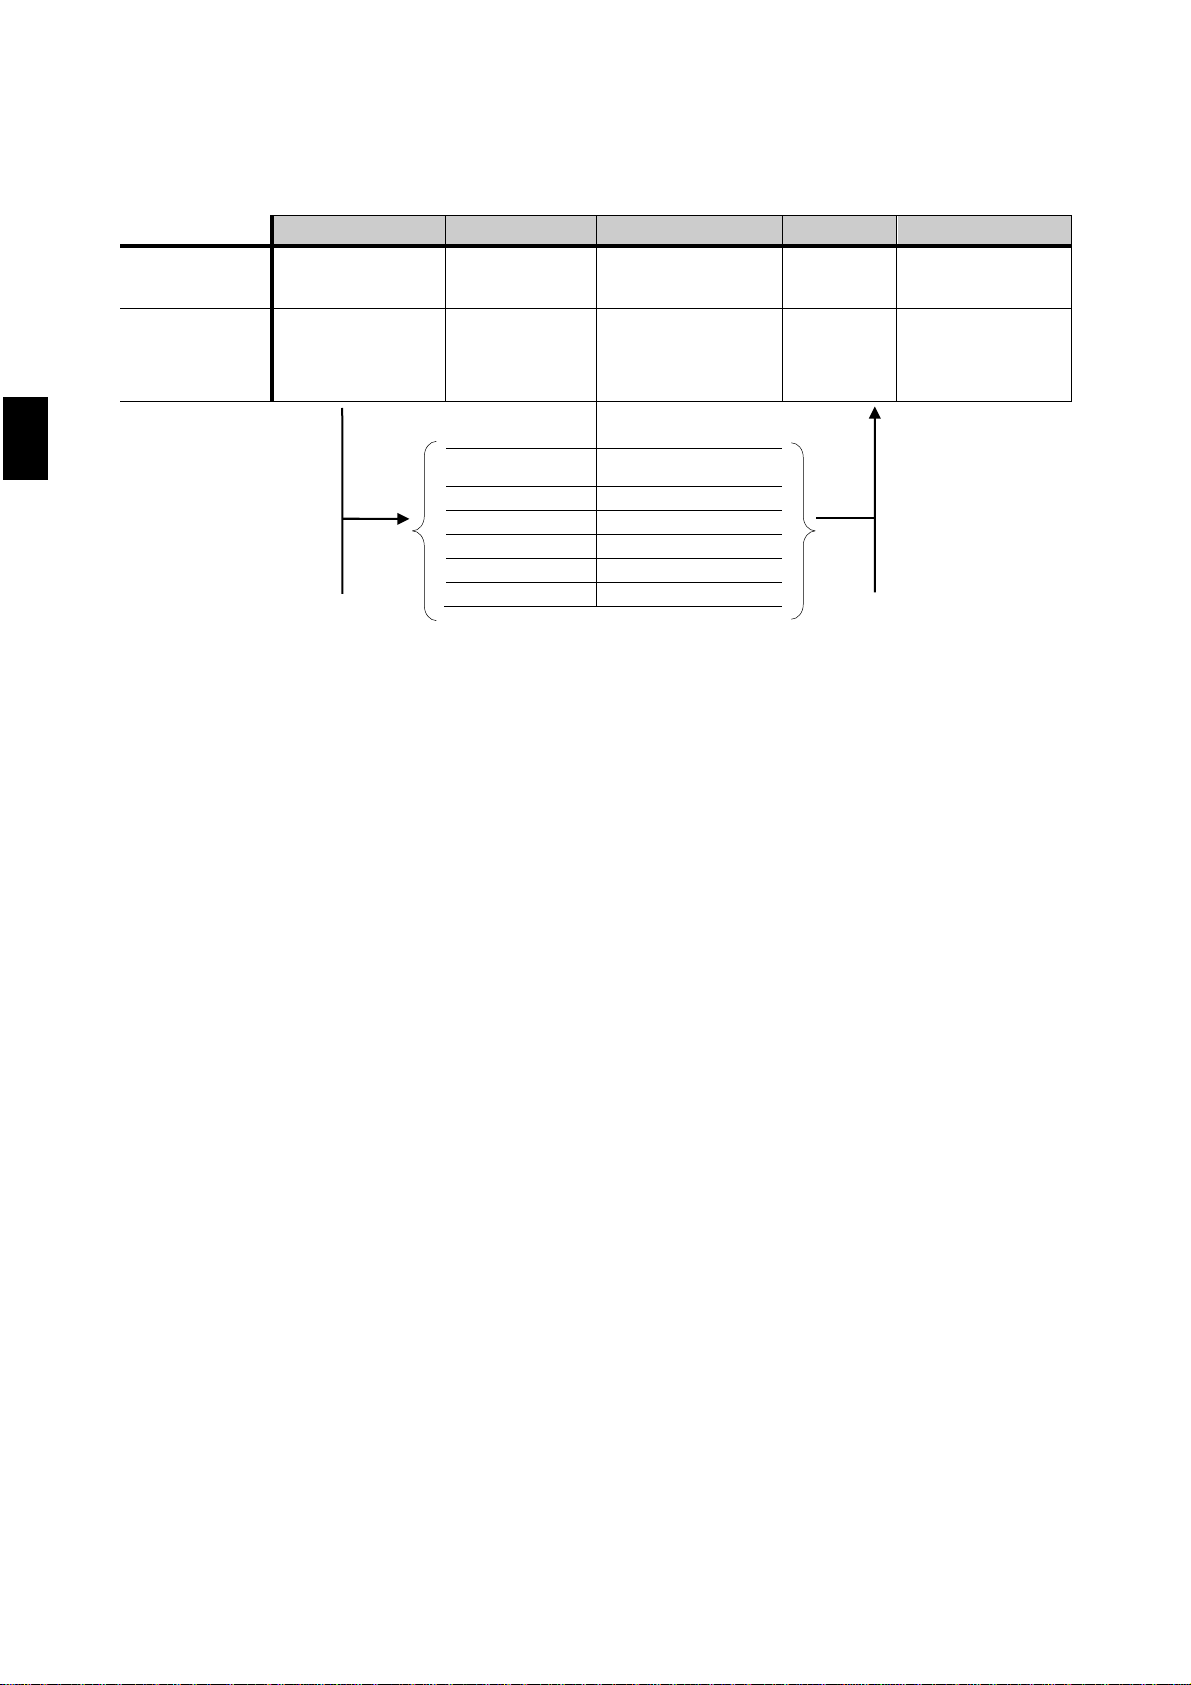
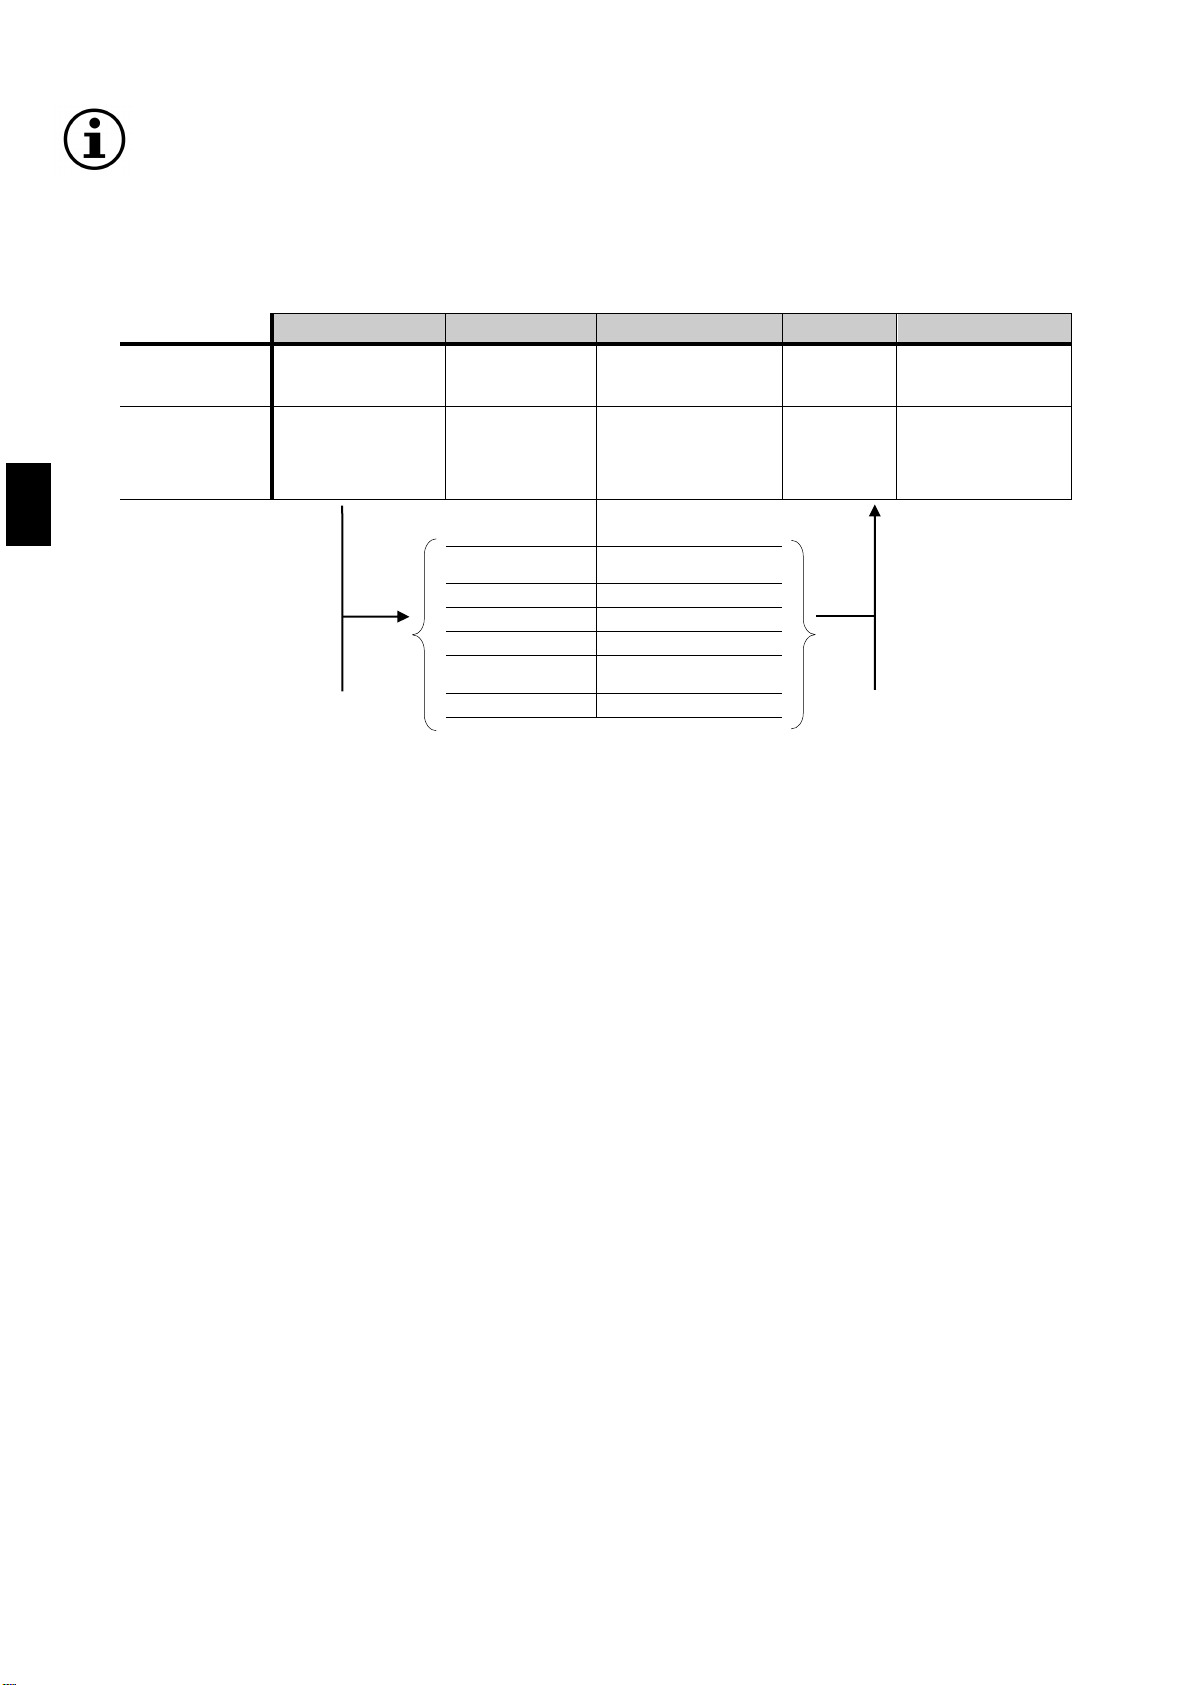
8. OVERVIEW OF BALANCE PARAMETERS MENU
SEQUENCE
1
2
3
4
5
ACTION
MENU
BUTTON
LONG TIME
PRESSING
MENU
BUTTON CAL BUTTON ENTER
BUTTON
MENU BUTTON
LONG TIME
PRESSING
RESULT
you enter in
balance
parameters set
menu
scroll
backward the
menu
scroll forward the
menu
confirm
the choice
selected
you exit from
balance
parameters set
menu
Parameters Description
BAUD RT
set velocity of serial
communication
AUTO 0
auto-zero setting
FILTER
filters level
STABIL
stability level
BLT
backlight mode
CONTR
display contrast
For a complete description of functions, it is warmly suggested to read the user manual of the balance
9/ 25
9. Quick guide to the use of the balance’s programs
To enter the menu of balance programs press the MENU button.
Then use the MENU button to go to the next parameter, use the CAL button to return to previous parameter, use the PRINT button to confirm your selection.
To escape from the menu press and keep pressed the MENU button until the acoustic sound is over.
Prg 1
Load
sample
Ente
r
Test begins
On/Off
Escape
Prg 2
Prg 3
Prg 4
Prg 5
Measure
Prg time
Set time
Set
temperature
Load sample
Enter
inizioprova
On/Off
Escape
Prg Auto
Set
min.moistu
re loss
Set
temperature
Load sample
Enter
Test begins
On/Off
Escape
Therm
Prg Set
Prg 1
Prg 2
Prg Time
Set time
Set
temperature
Save no
Enter
confirm
Menù
Prg 3
Save yes
Prg 4
Prg 5
Prg Auto
Set
min.moistur
e loss
Set
temperatur
Save no
Enter
confirm
Save yes
Serial
Solo per
assistenza
tecnica
Weig PC
Enter
confirm
Temp Adj
Manu Prt
Auto Prt
Manu PC
Soft rEL
tH x.xx
Enter
Auto PC
Auto t50
Manu t50
End
End
Enter

ITALIANO
GUIDA VELOCE
TERMOBILANCE
Serie: i-Thermo L
ATTENZIONE:
Questa è una guida rapida per iniziare subito a lavorare e non sostituisce il manuale completo; vi preghiamo
quindi di leggere attentamente il manuale completo d’istruzioni per una completa installazione e un corretto
utilizzo della vostra nuova bilancia. Un utilizzo dello strumento differente da quello riportato nel manuale non
garantisce più la sicurezza del prodotto
10. ISTRU IONI PER L’INSTALLA IONE
•Togliere la bilancia ed il relativo peso di calibrazione (ove previsto) dall’imballo e verificare eventuali
danni visibili dello strumento.
•Non installare la bilancia in ambienti in cui vi siano correnti d’aria, forti sbalzi termici e vibrazioni.
Porre sulla bilancia il sottopiatto ed il piatto
•Mettere in bolla la bilancia regolando gli appositi piedini della
bilancia.
•Attendere 30 minuti dall’accensione e calibrare la bilancia (usando l’apposito peso se in
dotazione) seguendo le istruzioni al paragrafo “calibrazione”
11
ITALIANO
ATTENZIONE:
Vi preghiamo di leggere attentamente le presenti istruzioni per l’installazione e l’uso prima di
iniziare il Vostro lavoro con la nuova bilancia.Un utilizzo dello strumento differente da quello
riportato in questo manuale non garantisce più la sicurezza del prodotto.Conservare
accuratamente il manuale d’istruzioni.
Osservare le seguenti indicazioni per un funzionamento dell’analizzatore di umidità
sicuro e senza problemi:
Utilizzare l’analizzatore di umidità esclusivamente per la determinazione di umidità di
campioni. Ogni utilizzo non idoneo dell’apparecchio può mettere in pericolo la sicurezza
delle persone e causare danni allo strumento o ad altri oggetti.
Non impiegare l’apparecchio in aree a pericolo d’esplosione; inoltre far funzionare lo
strumento solo nel rispetto delle condizioni ambientali riportate in questo manuale
d’istruzioni.
Se si utilizza il materiale elettrico in impianti e in condizioni ambientali che richiedono
maggiori misure di sicurezza, rispettare le disposizioni previste nelle direttive per
l’installazione di tale materiale in vigore nel proprio Paese.
L’apparecchio deve essere utilizzato solo da personale qualificato che conosca le
proprietà/caratteristiche del campione utilizzato.
Prima di mettere in funzione per la prima volta l’apparecchio controllare se il voltaggio di
alimentazione corrisponde alla tensione di rete.
Per disconnettere l’apparecchio dalla tensione di rete staccare il cavo di alimentazione.
Stendere il cavo di alimentazione in modo tale da evitare il contatto con superfici molto
calde dell’apparecchio.
Utilizzare solo cavi di prolunga conformi alle normative e dotati di un conduttore di
protezione.
Avvertenza protezione contro il calore
Rispettare la seguente distanza e lo spazio libero attorno all’apparecchio per evitare un
accumulo di calore nell’apparecchio e un surriscaldamento dell’apparecchio stesso:
- 20 cm attorno all’apparecchio
- 1 m sopra l’apparecchio
Non collocare materiali infiammabili sopra, sotto o vicino all’apparecchio in quanto
l’elemento di riscaldamento surriscalda l’area circostante.
Togliere i campioni con cautela, l’elemento di riscaldamento e i piattelli portacampione
potrebbero essere ancora molto caldi.
Pericolo per persone o cose lavorando con campioni particolari: Incendio Esplosione
Sostanze infiammabili o esplosive
Sostanze che contengono solventi
Sostanze che durante l’essiccazione emettono gas o vapori infiammabili o esplosivi
Togliere la bilancia ed il relativo peso di calibrazione dall’imballo e verificare eventuali danni
visibili dello strumento.
ITALIANO
Piatto per campione
Sottopiatto
Vaschetta inferiore
Con cilindro
antiventilazione
Estrattore piatto
2. Alimentazione bilancia:
Cavo VDE
1. Cavo
collegamento
riscaldatore
bilancia 15 poli
M/F
11. Messa in funzione
5. Posizionare la vaschetta inferiore.
6. Applicare sottopiatto su cono di pesata.
7. Posizionare l’ estrattore piatto
8. Posizionare piatto per campione.
1. Connettere il riscaldatore alla bilancia tramite cavo 15 poli M/F, Inserire il cavo nei due
connettori posti sul retro dello strumento come indicato in figura.
2. Inserire il cavo VDE in dotazione nel connettore di alimentazione posto sul retro dello
strumento
N.B. Verificare che l’alimentazione indicata sull’etichetta di targa dello strumento
corrisponda a quella in uso nel paese in cui si sta effettuando l’installazione.
3. Collegare quindi il cavo VDE alla presa di corrente posta nelle vicinanze dello strumento. Non
utilizzare cavi/prolunghe non conformi alle normative vigenti.

13
ITALIANO
ESC
3. Tastiera e display
*
Indicatore di stabilità
O
Indicatore di zero
%
Indicazione percentuale
Modalità di inserimento dati
H
Riscaldatore in funzione
g
Unità di misura
Tasto di standby (OFF) o di esercizio
(ON).
Tasto funzione uscita menù.(ESC)
Tasto di TARA e azzeramento.
Tasto di CONFERMA selezione o di
INVIO dati alla stampante.
Tasto di accesso al MENU’ di
settaggio dei parametri della bilancia.
Tasto di CALIBRAZIONE bilancia.
ESC
ESC

ITALIANO
4. Ingressi e uscite
Retro e parte inferiore bilancia modello i-Thermo
1. CONNETTORE 1
Connettore collegamento
alimentazione bilancia (VDE).
2. CONNETTORE 2
Connettore collegamento
riscaldatore-bilancia.
3. CONNETTORE 3
Connettore collegamento
bilancia-riscaldatore.
4. CONNETTORE 4
9 pin RS232 Interfaccia Uscita per
PC e stampante
5. PIEDINI REGOLABILI
6. N°2 viti chiusura bilancia
7. N°2 viti chiusura bilancia: per
accedere rimuovere il piedino
fisso(9) e quello regolabile(8)
8. Piedino posteriore regolabile
9. Piedino posteriore fisso
6
4
5 1
4
2
5
3
7
6
9
8
15 / 25
5. PESATURA
Dallo stato di “STAND BY” premere il tasto ON/OFF. Porre il campione da pesare sul piatto e leggere il
valore del peso sul display non appena il simbolo ж(asterisco) di stabilità appare
Per riportarla nello stato di “STAND BY”, premere nuovamente il tasto ON/OFF.
6. FUN IONE DI TARA
Caricare un recipiente sul piatto. Sul display sarà visualizzato il relativo peso. Premere il tasto O/T. Verrà
visualizzata la scritta “O-t”. Raggiunta la stabilità verrà visualizzato il valore di zero “0.000”. Porre gli oggetti
da pesare nel recipiente. Leggere sul display il valore del peso netto
7. CALIBRA IONE ESTERNA
1
Premere il tasto
CAL
a piatto scarico; verrà visualizzata la scritta CAL.
2
Quando il valore del peso di calibrazione inizia a lampeggiare, caricare il peso indicato dal display
sul piatto.
3
Il display smetterà di lampeggiare indicando il valore del peso di calibrazione. Una volta eseguita
la calibrazione verrà visualizzato il peso calibrato con l’indicazione dell’unità di misura corrente.
Rimuovere il peso di calibrazione. La bilancia è pronta per le operazioni di pesata.
ITALIANO
NOTA: se si verifica un’interferenza durante il processo di calibrazione, verrà visualizzato un
messaggio d’errore.
8. SCHEMA DEI MENU SETTAGGIO PARAMETRI BILANCIA
SEQUENZA
1
2
3
4
5
AZIONE
TASTO MENU’
PRESSIONE
PROLUNGATA
TASTO
MENU’ TASTO CAL TASTO
ENTER
TASTO MENU’
PRESSIONE
PROLUNGATA
RISULTATO
si entra nel
menu’ settaggio
parametri
bilancia
navigazione
indietro nel
menu’
navigazione avanti
nel menu’
conferma
della
selezione
scelta
uscita dal menu’
settaggio
parametri
bilancia
Parametri Descrizione
BAUD RT
impostazione velocità
comunicazione seriale
AUTO 0
settaggi auto zero
FILTER
livello di filtraggio
STABIL
livello di stabilità
BLT
modalità
retroilluminazione
CONTR
contrasto display
Per una descrizione approfondita delle funzioni si consiglia di leggere il manuale d’uso della bilancia
17 / 25
9. Guida rapida utilizzo programmi bilancia
Per entrare nel menù dei programmi della bilancia premere tasto MENU.
Usare poi i tasti MENU per passare al parametro successivo, il tasto CAL per tornare al parametro precedente ed il tasto PRINT per confermare la selezione.
Per uscire dal menù premere e tener premuto il tasto MENU sino alla disattivazione del segnale acustico.
Prg 1
Caricare
campione
Enter
inizio
prova
On/Off
Uscita
Prg 2
Prg 3
Prg 4
Prg 5
Measure
Prg time
Impostare
Tempo
Impostare
Temperatura
Caricare
campione
Enter
inizioprova
On/Off
Uscita
Prg Auto
Impostare
Perdità min
umidità
Impostare
Temperatura
Caricare
campione
Enter
inizio
prova
On/Off
Uscita
Therm
Prg Set
Prg 1
Prg 2
Prg Time
Impostare
Tempo
Impostare
Temperatura
Save no
Enter
conferma
Menù
Prg 3
Save yes
Prg 4
Prg 5
Prg Auto
Impostare
Perdita min
umidità
Impostare
Temperatura
Save no
Enter
conferma
Save yes
Serial
Solo per
assistenza
tecnica
W
eig PC
Enter
conferma
selezione
Temp Adj
Manu Prt
Auto Prt
Manu PC
Soft rEL
tH x.xx
Enter
Auto PC
Auto t50
Manu t50
End
End
Enter

PORTOG
GUIA RÁPIDO
TERMOBALANÇA
Serie: i-Thermo L
ATENÇÃO:
Esta é uma referência rápida para começar a trabalhar imediatamente, não substitui o manual
completo, por isso leia atentamente o manual completo de instruções para uma instalação
completa e correta utilização De sua balança. Usar o instrumento diferente daquela indicada no
manual já não garante a segurança do produto.
1 INSTRUÇÕES DE INSTALAÇÃO
•Retire a balança e seu peso de calibração (se houver) da embalagem e verifique se há qualquer
dano visível no instrumento.
Nos modelos com calibração interna
com a mão retire o parafuso do lado inferior
esquerdo da
balança (ver pag.3.1)
AT
ENÇÃO
•Não instale a balança em ambientes onde há correntes de ar, choque térmico, alta e vibração.
•Coloque em nível a bolha na base ajustando o equilíbrio da
balança.
•Warm-up da Balança: aguarde 8 horas após a ligação para balanças analiticas (0,001g) e 30
minutos para outros modelos, então calibrar a balança (usando o peso adequado se fornecido),
seguindo as instruções abaixo em "calibração”.
QUICK_GUIDE_BILANCE_iThermo_EN+IT+POR_rev12; 08/09/16
19
PORTOG
2 Instruções de instalação
AVISO:
Por favor, leia atentamente as instruções para instalar e usar antes de começar o seu trabalho com
a nova balança. O uso do instrumento de forma diferente do descrito neste manual não garante a
segurança produto.Conservar cuidadosamente o manual instrução.
Observe as seguintes orientações para um funcionamento seguro e sem problemas do
Analisador de Umidade:
* Usar o analisador de umidade exclusivamente para a determinação de umidade das amostras.
Qualquer utilização indevida do dispositivo pode pôr em perigo a segurança de pessoas e danos
ao instrumento ou outros bens.
* Não use o aparelho em áreas com risco de explosão, além de operar o equipamento somente de
acordo com as condições ambientais especificados neste manual de instruções.
* Se você usar equipamentos elétricos em instalações e em condições ambientais que exigem
padrões mais elevados de segurança, respeitar as diretrizes para a instalação de tal material em
vigor no seu País.
* O aparelho deve ser utilizado apenas por pessoal qualificado, que estejam familiarizados com as
propriedades / características da amostra utilizada.
* Antes da colocação em funcionamento pela primeira vez, verificar se a tensão de alimentação
corresponde à tensão de rede.
* Para desligar o aparelho da rede desconecte seu cabo de alimentação.
* O cabo de alimentação deve ser instalado de forma a evitar o contacto com as superfícies
quentes do aparelho.
* Use apenas cabos de extensão que estejam em conformidade com as normas e com um
condutor de proteção (terra).
Advertência proteção contra o calor
Manter as seguintes distância livres ao redor do equipamento para evitar sobreaquecimento do
mesmo:
- 20 cm ao redor do aparelho
- 1M, acima do aparelho
Não coloque materiais inflamáveis sobre, por baixo ou em torno da unidade, com o elemento de
aquecimento em funcionamento.
Remover as amostras com cuidado, o elemento de aquecimento e porta amostra podem ainda
estar muito quente.
Perigo para pessoas ou bens, trabalhando com determinadas amostras: Explosão de Fogo
As substâncias inflamáveis ou explosivas
As substâncias que contenham solventes
Substâncias que durante a secagem emitem gases ou vapores inflamáveis ou explosivos
Retirar a balança da embalagem e verifique se há qualquer dano visível para o instrumento.

PORTOG
Prato de amostra
Base do prato
Recipiente inferior
Extrator de prato
2. Alimentação
balança
1. Cabo 15 pinos
M/F aquecedor-
balança
3 Operação
9. Inserir o recipiente inferior.
10. Inserir a base do prato de pesagem sobre o cone de pesagem.
11. Inserir o extrator de prato
12. Inserir o prato de amostra.
1. Conecte o aquecedor para o equilíbrio através de um cabo de 15 pinos M / F, insira o cabo
nas duas conectores na parte traseira do instrumento, conforme mostrado na figura.
2. Insira o cabo VDE no conector de alimentação na parte de trás do instrumento
N. B. Verifique se a fonte de alimentação indicada na placa de identificação instrumento
corresponde a um em uso no país onde está a instalar.
3. Em seguida, conecte o cabo VDE à tomada de energia localizado perto do instrumento.
Não use não-conformidade com os regulamentos atuais cabos / extensões
This manual suits for next models
1
Table of contents
Languages:


