Bell and Howell DV550 User manual
DV550 Instruction Manual
1. Getting to Know Your Camera
12.0 Mega Pixels Resolution Max (5.0 Mega Pixels Sensor)
2.0”LTPS LCD Color Display
Flip-Up USB Interface
SD/SDHC Memory Card Support up to 8GB
8x Digital Zoom w/Macro Mode
Digital Still Camera Mode
TV Output
16MB Internal Flash Memory
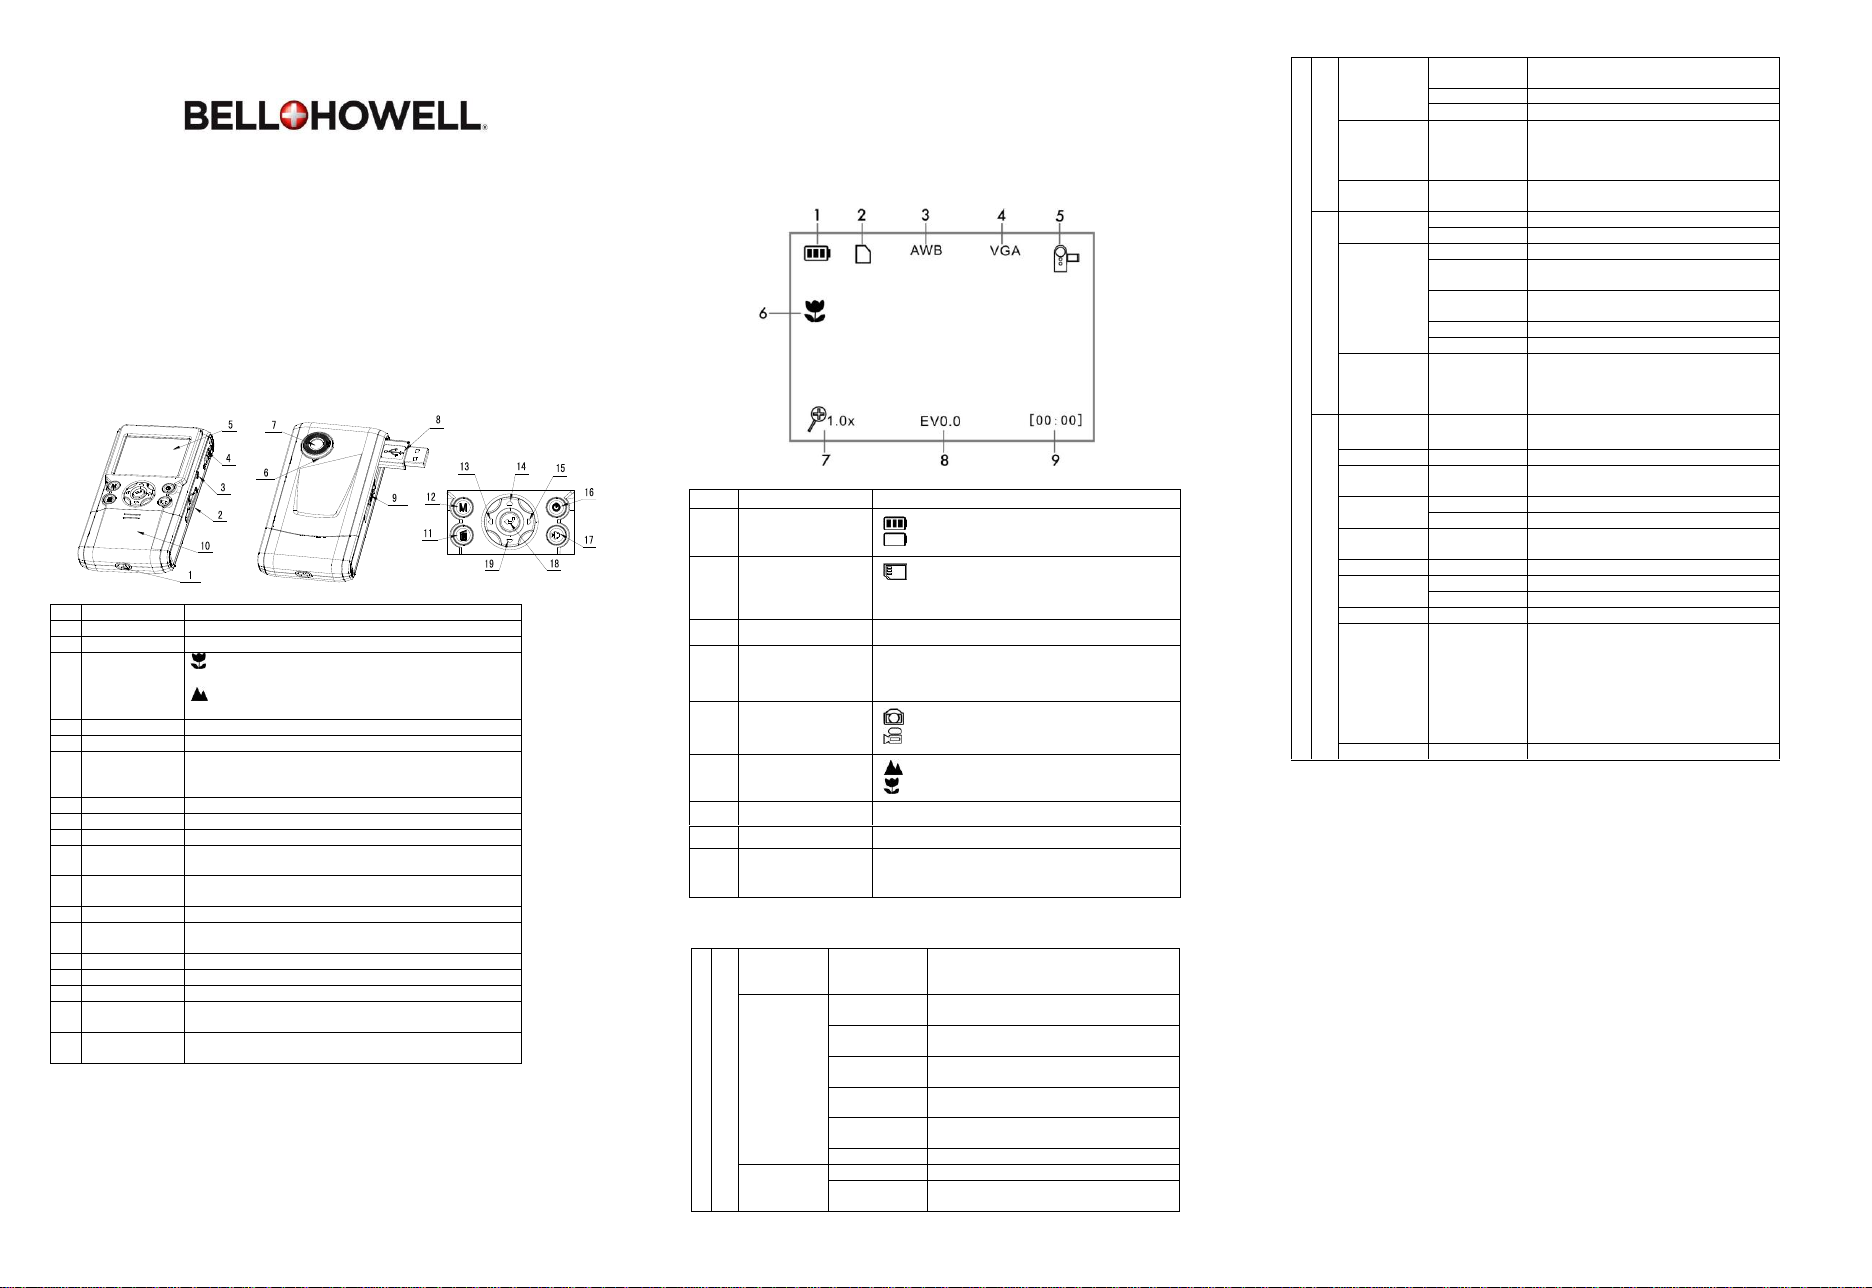
2. Parts Diagram
1
Strap Hook
Hook for attaching the wrist strap to the camera.
2
SD Card Slot
SD card storage location.
3
A/V Out
Connect the video and audio output cable to a TV.
4
Macro Switch
MACRO mode: Select this mode to take close-up
photographs (distance 11cm - 18cm).
NORMAL mode: Select this mode to take
photographs from 0.5m - infinity.
5
LCD screen
Displays photos, video clips, camera settings and menu.
6
Microphone
For voice input.
7
Lens
Optical input to records video and capture images.
Note: Keep the lens clean. Dirt and fingerprints will affect
the quality of the picture.
8
USB Interface
Download images and video clips to a computer.
9
USB Switch
Flip it out to expose the USB interface.
10
Battery Door
Compartment for the AA batteries.
11
Delete
Press to delete an image or video clip in PLAYBACK
mode.
12
Mode
Press to select a different mode. Press and hold to enter
settings menu.
13
Left
LEFT directional selection in menu mode.
14
Up
UP directional selection in menu mode. Digital zoom-in
during photo and video mode.
15
Right
RIGHT directional selection in menu mode.
16
Power Button
Press this button to power the unit of or off.
17
Speaker
For audio output.
18
REC
Press to take photographs or to start and stop recording
a video clip. Press to confirm changes in menu mode.
19
Down
Down directional selection in menu mode. Digital
zoom-out during photo and video mode.
3. Explanation of Status Icons
Item
Function
Description
1
Battery Status
Indicator
Battery status, fully charged.
Battery status, no charge remaining.
2
SD card indication
An SD card is currently inserted in the slot
and will be used as the storage for PHOTO and
VIDEO.
3
White Balance
White balance selection.
4
Current Resolution
12M 8M
5M 3.1M
1.3M VGA
5
Recording Mode
PHOTO mode.
VIDEO mode.
6
Normal / Macro
Mode Indicator
NORMAL mode (0.5m –infinity).
MACRO mode (11cm –18cm).
7
Digital Zoom
Shows the current digital zoom magnification.
8
Exposure Value
Shows the current EV± value.
9
Counting Indicator
Show the pictures remaining in PHOTO mode.
Shows the time remaining in VIDEO mode.
Show the elapsed time during recording.
4. Details for Camera Setup
SET
DC (Camera) Capture
Quality
Super Fine
(Default)/ Fine
/Normal
Picture quality setting.
Resolution
12M pixel
resolution
3920 x 2940 pixels (12.0 Mega Pixels)
8.0M pixel
resolution
3200 x 2400 pixels (8.0 Mega Pixels)
5.0M pixel
resolution
2592 x 1944 pixels (5.0 Mega Pixels)
3.1M pixel
resolution
2048 x 1536 pixels (3.0 Mega Pixels)
1.3M pixel
resolution
1280 x 960 (1.3 Mega Pixels)
VGA resolution
640 x 480 (300k Pixels)
White
Balance
Auto (Default)
Automatic white balance mode.
Sunny
Whitebalancemodefor Sunny/Outdoor
setting.
Cloudy
Whitebalancemode for Cloudy/Outdoor
setting.
Fluorescent
Whitebalancemode for fluorescent setting.
Tungsten
Whitebalancemode for tungsten setting.
EV Setup
0.0,+/-0.3,
+/-0.7, +/-1.0,
+/-1.3, +/-1.7,
+/-2.0
Levels of exposure values.
Date Stamp
Off(Default)/Se
t
DD,MM,YYYY
DV (Video output)
Movie Size
VGA
640 x 480
QVGA
320 x 240
White
Balance
Auto (Default)
Automatic white balance mode.
Sunny
Whitebalance modefor Sunny/Outdoor
setting.
Cloudy
Whitebalancemode for Cloudy/Outdoor
setting.
Fluorescent
Whitebalancemode for fluorescent setting.
Tungsten
Whitebalancemode for tungsten setting.
EV setup
0.0,+/-0.3,
+/-0.7, +/-1.0,
+/-1.3, +/-1.7,
+/-2.0
Levels of exposure values.
Setup
Auto Power
-off
1,3 min and
Off
Auto power off after 1 or 3 minutes of no
input/response.
Beep
On/Off
Turn On/Off the audible menu sounds.
Brightness
0.0,+/-2.0,
+/-1.0,
Levels of brightness values.
TV Output
NTSC
American and Japanese video format.
PAL
European video format.
Format
Yes / No
Format the SD card. CAUTION: All data
will be erased if you chose to format.
Date/Time
YYYY/MM/DD
Date and Time setting.
Flicker
60Hz
American standard electricity frequency.
50Hz
European standard electricity frequency.
Default
Yes / No
Reset all settings to factory settings.
Language
English(Defaul
t)/T-Chinese/S
-Chinese/Fren
ch/
Deutsch/Italian
/Spanish/Portu
guese/
Japanese
Select display language.
Version
Displays the current firmware version
5. Using the Camera
5.1 Battery Installation
1. Open the battery door.
2. Insert 2x AA alkaline batteries into the camera.
3. Close the battery door.
4. Press the POWER button to turn on the camera.
5.2 Inserting an SD Memory Card (not included)
Your DV550 contains 16MB of internal memory. This memory can be extended with an SD
memory card.
1. Power off the camera.
2. Insert the SD card into the camera by clicking it in.
NOTE: There is only one right direction to insert the SD memory card into the slot. Do not force
the card into the slot, or else it may damage both the camera and the SD memory card.
NOTE: The SD memory card must be formatted before taking photographs. See the following
sections for more information.
5.3 Formatting an SD Memory Card
1. Press and hold the MODE button to enter the settings menu.
2. Select the SETUP MODE by using the navigation keys and press the REC button to confirm.
3. Select FORMAT by using the navigation keys and press the REC button to confirm.
4. Press the REC button to format the SD memory card or internal memory.
5.4 Setting the Resolution
Your DV550 can be set to different resolutions to compensate on memory or quality.
1. Press and hold the MODE button to enter the settings menu.
2. Select RESOLUTION by using the navigation keys and press the REC button to confirm.
3. Different resolution options will be displayed. Select the desired resolution by using the
navigation keys and press the REC button to confirm.
5.5 Recording Video or Taking Photographs
1. Power the DV550 on.
2.Press the MODE button to select either PHOTO mode or VIDEO mode.
Depending on the distance to the object being photographed, use the MACRO switch to
adjust the distance. Select the flower symbol if you want to take a close-up
photograph (11cm –18cm)
If you want to take a video or photograph of anything else (0.5m - infinity), set the MACRO
switch to the Normal mode ( ).
3. Use the LCD screen as a viewfinder to take videos or photos.
4. Press the REC button to begin recording or taking photos.
NOTE: Max video file size is 4GB (4,000 megabytes).The unit will stop recording automatically
once it’s reached the max file size threshold.
5.6 Zoom in and out
The DV550 has an 8 step zooming selection.
Zoom in or out by pushing the ▲ or ▼ (UP) or (DOWN) buttons. ‘8.00’is the maximum zoom.
5.7 Playback Photographs
1. Press the MODE button to enter Playback mode. Use (LEFT) or (RIGHT) keys to
select the media which you’d like to play.
2. Press the▲(UP) or ▼(DOWN) key to zoom in or out of the image.
5.8 Playback Video Clips
1. Press the MODE button to enter Playback mode. Use (LEFT) or (RIGHT) keys to
select the media which you’d like to play.
2. When video clips are displayed, press the REC button to play, and press again to pause.
3. Press (LEFT) or (RIGHT) keys for fast forward or rewind.
4. Press the MODE button to exit.
5.9 Deleting Photographs and Video Clips
1. Press the MODE button to select Playback mode.
2. Press and hold the MODE button to enter DELETE mode.
3. Select SINGLE or ALL and press the REC button to confirm.
Note: You may also press the DELETE button in playback mode to delete photos or videos.
6. Connecting Your DV600HD
6.1 Connecting to a TV
1.Connect the DV550 using the male cable on one end to the DV550 and the red, white and
yellow cables for input to the TV.
6.2 Connecting to a computer
Your DV550 can be connected to the computer as a Mass Storage Device and can
download the videos and photos to PC. Simply attach the camera to an open USB port. Go to
Start My Computers and find the removable disk. Your DV600HD acts like a card-reader
when connected and can be easily accessed this way. Your media will be stored in a folder on
this removable disk.
7. Specifications
Sensor
5.0 Mega pixels CMOS sensor
Image resolution
DV
VGA (640x480)
QVGA (320x240)
DC
12.0 Mega Pixels: (3920x2940) (Hardware Interpolation)
8.0 Mega Pixels: (3264x2448) (Hardware Interpolation)
5.0 Mega Pixels: (2560x1920)
3.1 Mega Pixels: (2048x1536)
1.3 Mega Pixels: (1280x960)
VGA: (640x480)
Lens
F/2.8 f=8.5mm
Focus Range
0.5m. ~ Infinity
Macro Mode
11cm –18cm
Digital Zoom
8x
LCD Display
2.0" Real Color LTPS TFT LCD
White Balance
Auto / Sunny / Cloudy / Fluorescent / Tungsten
Internal Memory
16 MB Flash Memory
External Memory Card
SD card supports up to 8GB
File Formats
Picture: JPEG Video: AVI
PC interface
USB 1.1
TV-Output
NTSC/PAL
Power Source
2x AA Alkaline Batteries
8. Computer System Requirements
Operating System
CPU
Windows XP(SP2)/Vista or above
Mac 10.4.9 or above
Pentium 4 / 3.0Ghz or above
Operating System
Windows XP(SP2)/Vista or above
Mac 10.4.9 or above
RAM
At least 1G
Interface
USB port
CD
4x speed CD ROM or above
8. Trouble shooting
Problem
Cause
Solution
Cannot power on.
Low battery power.
Battery not inserted
properly.
Fully charge or install the
battery correctly.
Photos cannot be
saved when taking
pictures.
The memory card
hasn’t been formatted
properly or memory is
full.
Format the memory in
SETUP mode of the
camera. Please refer to
section 5.3.
Cannot find removable
disk after connecting
the camera to the
computer.
Connection failure.
Make sure all cable
connections are secured
and restart the computer if
necessary.
The batteries used up
very fast.
Use wrong type of
battery.
Replace with new
ALKALINE battery.
The photos are blurry
1. The camera is not
held steadily
2. The lens of camera
is dirty.
3. The camera is set to
the wrong focus
mode.
1. Hold the camera steadily
until it beeps when taking
video/photo.
2. Clean the lens with a soft
dry cloth.
3. Set the macro/normal
mode according to the
distances of subject.
Other Bell and Howell Digital Camera manuals


Popular Digital Camera manuals by other brands


Richter Optica
Richter Optica Eyepiece SCMOS03000KPA quick start guide

Olympus
Olympus C-2000 - Zoom 2.1MP Digital Camera Troubleshooting

Panasonic
Panasonic Lumix DMC-LC50 operating instructions

FujiFilm
FujiFilm Instax mini Evo Quick user guide

FujiFilm
FujiFilm X-PRO2 user manual

Siren
Siren SV-TCL user guide