Bellodigital BDS4012-40 User manual

bello-digital.com
A316
Bell’O International Corp; 711 Ginesi Drive, Morganville, NJ 07751
Made in China • Printed in China • Fabricado en China • Impreso en China • Fabriqué en China • Imprimé en Chine
www.tsicustomerservice.com
bello-digital.com
1-888-235-7646
Twin-Star International, Inc. Delray Beach, FL 33445
Made in China • Printed in China • Fabricado en China • Impreso en China • Fabriqué en Chine • Imprimé en Chine
MODEL/ MODÈLE/ MODELO:
BDS4012-40
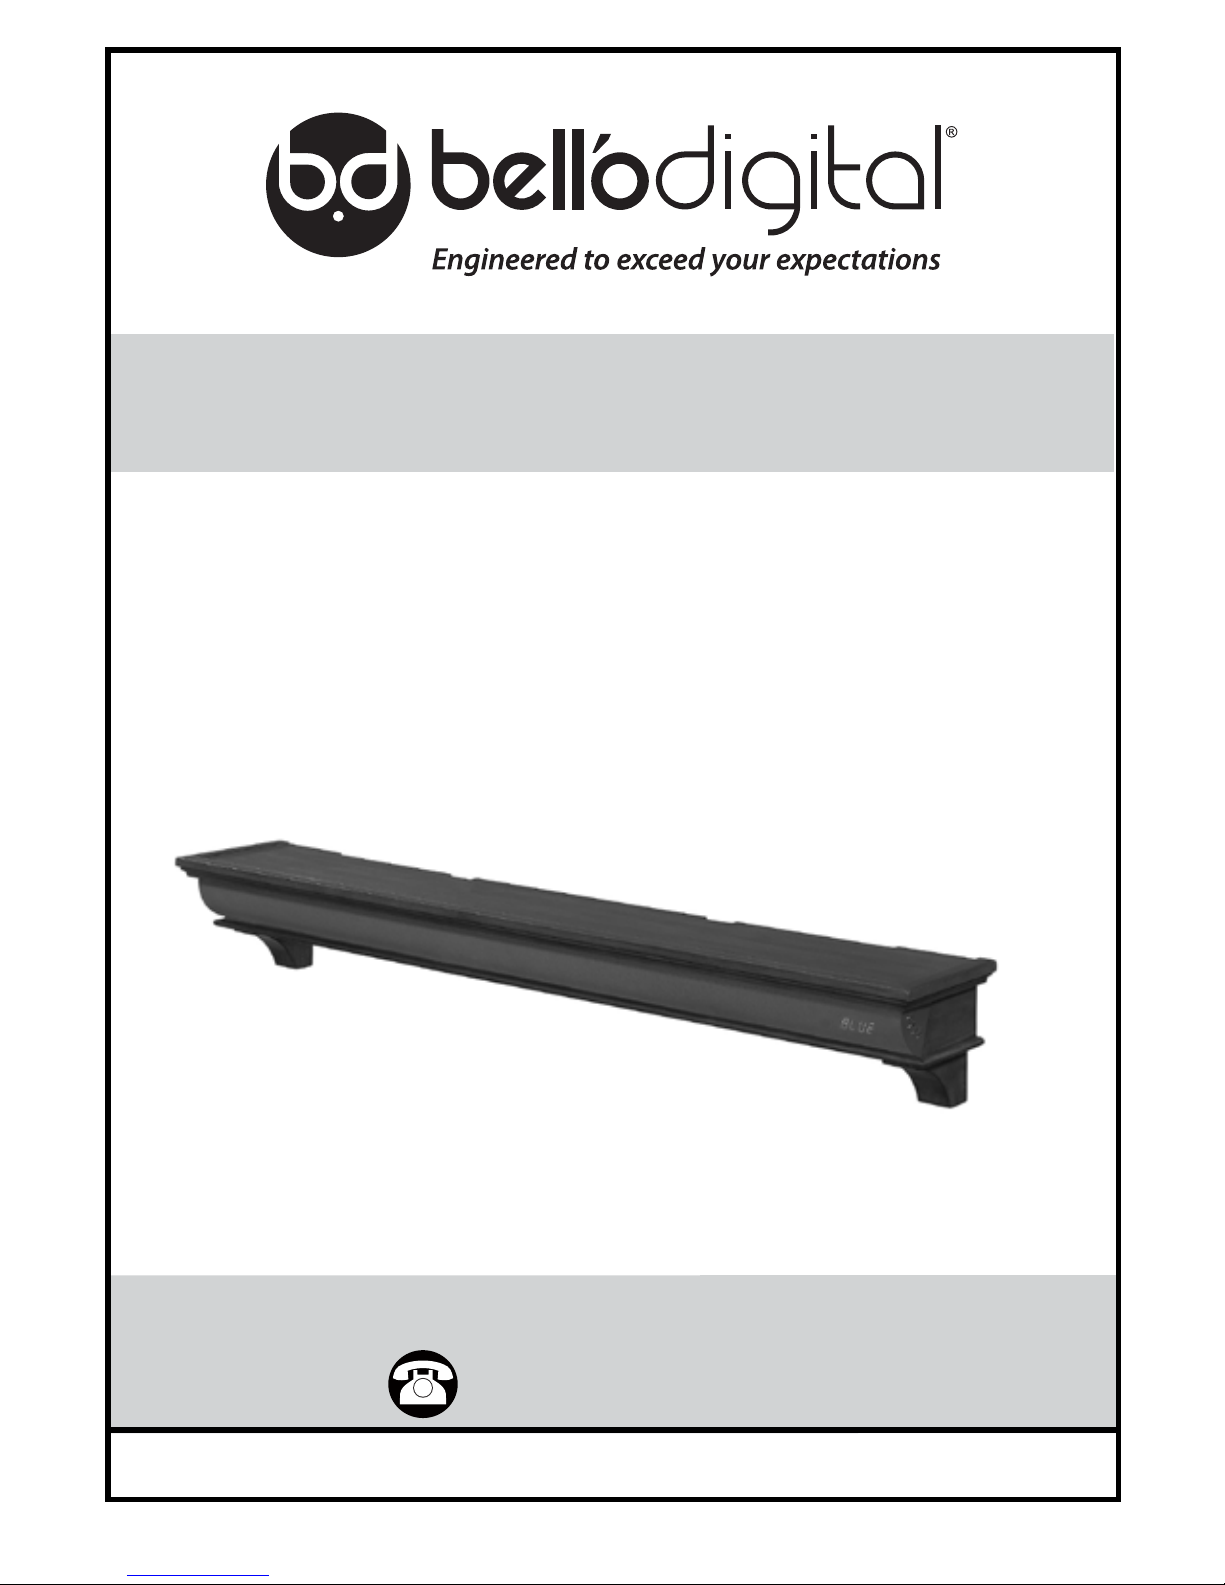
Sound Shelf

bello-digital.com
A316 1
If at any time you are unclear about the directions and believe you need further assistance, contact
customer service at: 1-888-235-7646 (US/Canada) from 8:30am – 5:30pm EST, Monday through
Friday.
NEVER EXCEED THE MAXIMUM LOAD CAPACITY OF: 80 lbs (36.3kg) WHEN INSTALLED INTO
2 OR MORE STUDS, CONCRETE OR CONCRETE BLOCK WALLS.
Wood studs should be 2” x 4”, at minimum: 1.5” x 3.5” (38mm x 89mm). Designed to be
mounted to 2” x 4” wood studs that are spaced 16” on center.
is speaker shelf was designed to be installed and utilized ONLY as specied in this manual.
Twin-Star International. will not be responsible for failure to assemble as directed or for the
improper assembly, use, or incorrect assembly.
If the mounting bracket will be attached to any structure other than specied in this
manual, only a licensed professional contractor/installer should perform this installation.
e supporting structure must support, at minimum, four times the combined weight of
the sound shelf, plus anything place on top of it. It is the responsibility and liability of the
installer to ensure the suitability of the supporting structure.
Check carefully to ensure that there are no missing or damaged parts. Never use defective parts.
To receive replacement or missing part(s) under this Warranty, visit our website at www.bello-
digital.com or call our Customer Service Department at 1-888-235-7646. Please have the model
number, lot code, part number(s) and your sales receipt or other proof of purchase available for
reference. We will ship you any necessary replacement parts in the Continental United States or
Canada.
Specications are subject to change without notice.
Precautions
Furniture Guideline
It is best to keep your furniture in a climate-controlled environment. Temperature and humidity
changes can cause fading, warping, shrinking and splitting of wood. It is advised to keep
furniture away from direct sunlight as sun may damage the nish. Proper care and cleaning
at home will extend the life of your purchase. Following these important and helpful tips will
enhance your furniture as it ages.
A touch-up pen has been provided to repair any small nicks or scratches that may occur during
assembly or shipping.
We hope you enjoy your purchase for many years. ank you for your purchase!
bello-digital.com
A316 2
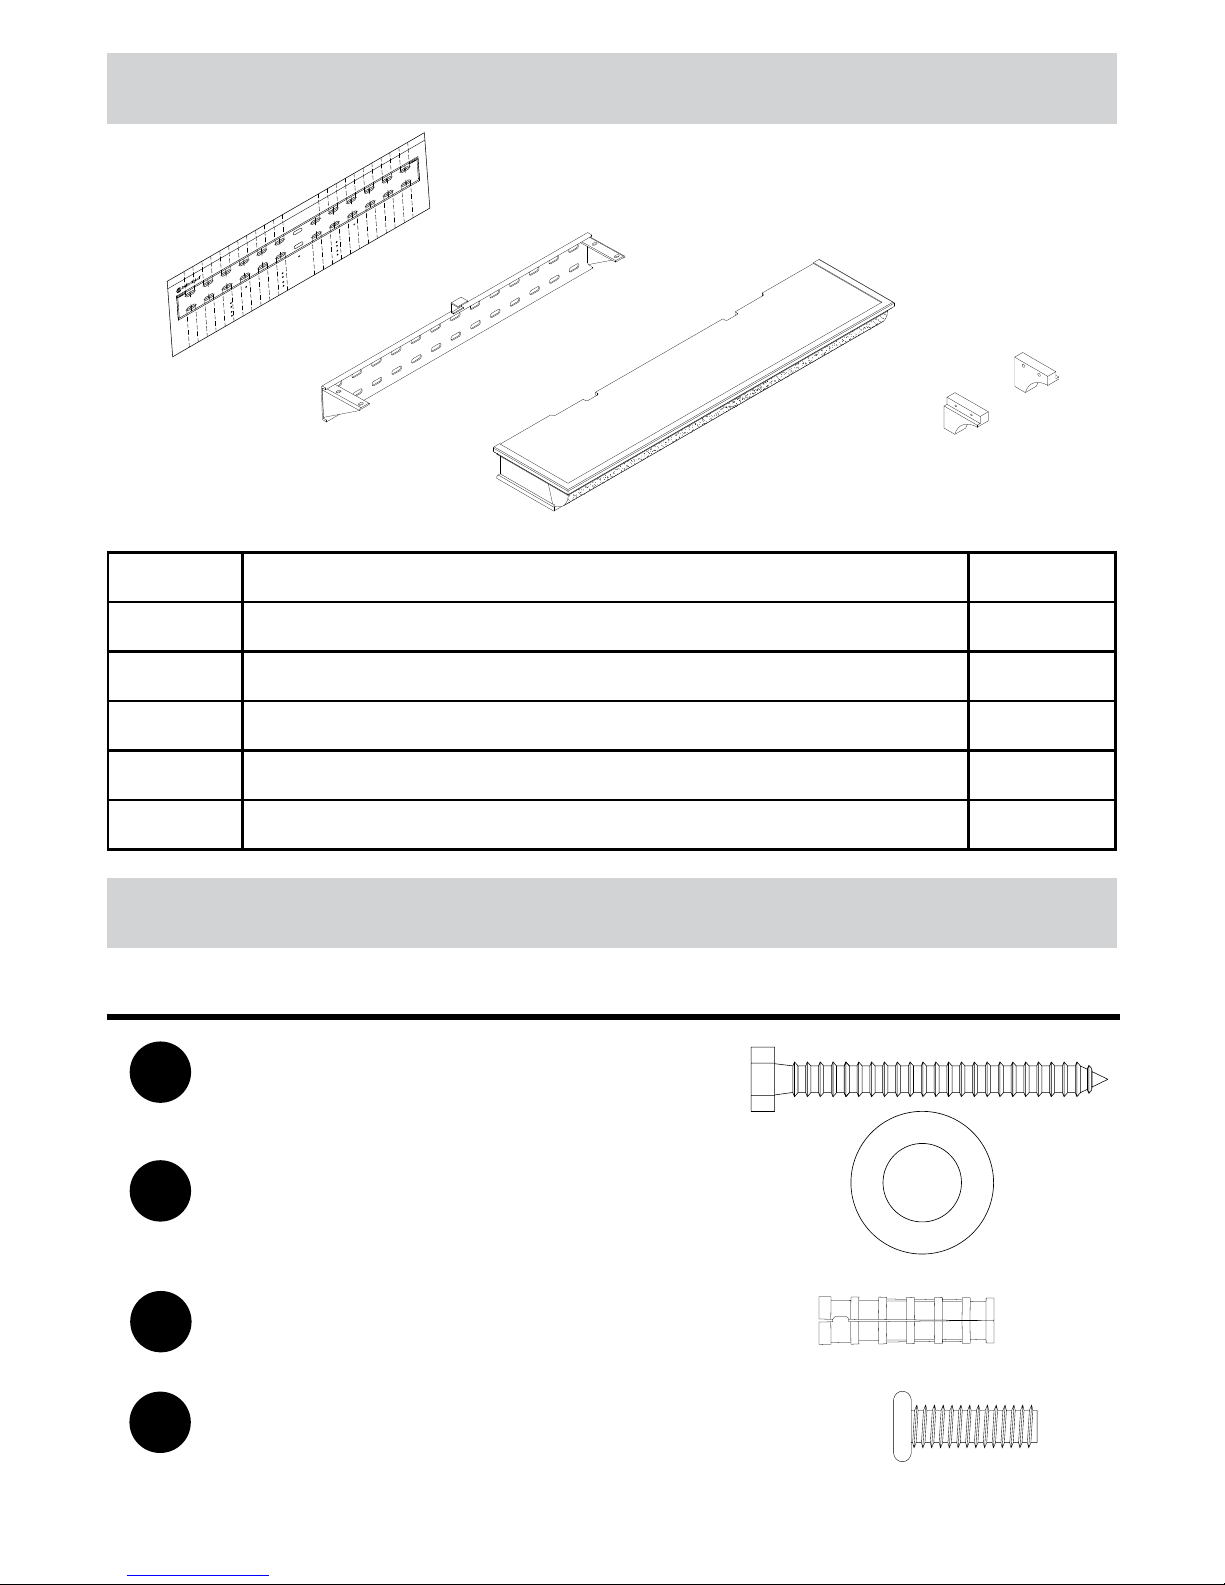
Packing Content
Hardware Kit
Part Desciption Qty
AInstallation Template 1
B Wall Bracket 1
CSound Shelf 1
DLe Corbel 1
E Right Corbel 1
A
C
B
D
E
BDS4012-40
SHELFTOPLINE ÉTAGÈRELIGNESUPÉRIEURE LÍNEADE ESTANTESUPERIOR
INSTALLATIONTEMPLATE
CAREFULLYFOLLOWDIRECTIONS
INYOURMANUAL
GABARIT DE POSE
VEILLEZÀBIEN SUIVRE LES
INSTRUCTIONSDU MANUEL
PLANTILLADE INSTALACIÓN
SIGADETENIDAMENTELAS
INSTRUCCIONESDESU MANUAL
POSESURMONTANTS EN BOIS :
(VOIRLESINSTRUCTIONS DE POSE SUR MAÇONNERIE DANS LE MANUEL)
Àl'aided'un détecteur de montant, déterminez l'emplacement des bords du
montantetmarquez-les au crayon comme indiqué dans le Guide de pose.
Percezavecsoin à travers les points « A »,« B », « C », et«D» qui conviennent.
Posezdestire-fond dans les quatre trous et serrez-les fermement.
Usingastud finder, locatethe edges of wall studs and mark stud edges
withapencil as shown in the Installation Guide.
CenterInstallationTemplateover studs, align drill points “A”,“B”,“C”and “D”
withpencilmarks. Use a level to ensure the template is straight,and
tapeintoplace.
Carefullydrillfour holes through appropriate points “A”,“B”,“C”and “D”.
InstallLagBolts through the four holes and tighten securely.
MOUNTINGTOWOOD STUDS:
(SEEINSTALLATIONGUIDEFOR MASONRY INSTALLATIONS)
INSTALACIÓNENMONTANTESDE MADER A:
(VERELMANUAL DE INSTALACIÓN PARAINSTALACIONES DE MAMPOSTERÍA)
Conunlocalizador de montantes, localice los bordes del montante de
paredymárquelos con un lápiz como se muestra en el manual de instalación.
Hagacuidadosamentecuatro perforaciones en los puntos apropiados “A”,“B”,“C”,y “D”.
Instaletirafondosen las cuatro perforaciones y ajuste firmemente.
1
2
3
4
1
2
3
4
1
2
3
4
Centrezlegabarit de pose sur le montant et alignez les points de perçage
«A», « B », « C », et « D » sur les repères au crayon. Utilisez un niveau pour vérifier
quelegabarit est droit, et l'attacher avec du ruban adhésif.
Centrelaplantilla de instalación sobre el montante, alinee los puntosde
perforación“A”,“B”,“C”,y“D”con las marcas de lápiz.
Utiliceunnivel para asegurarse
deque la plantilla esté derecha, y sujete con cinta adhesiva en el lugar.
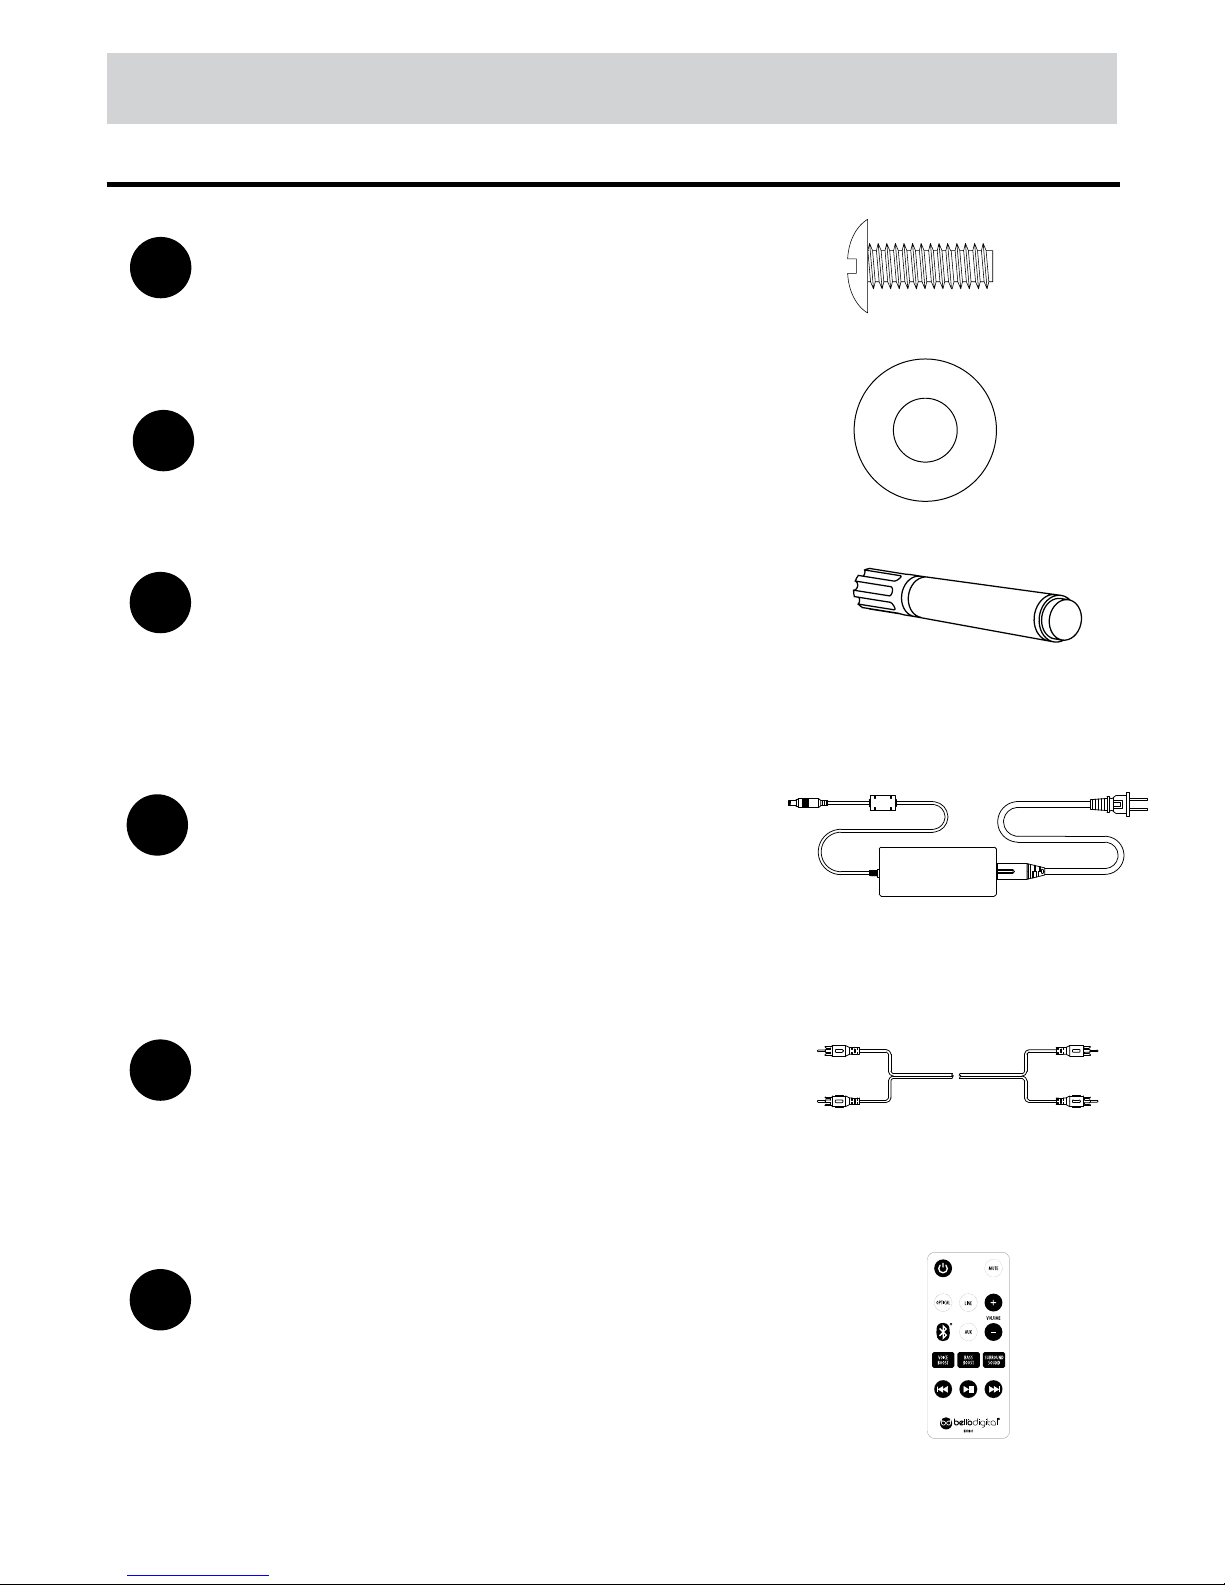
Part Description Quantity Picture
Lag Bolt
0.3 in. x 2.68in.
7.6 mm x 62 mm
Masonry Anchor
0.48 in. x 1.75 in.
12.3 mm x 44.5 mm
Washer
outer dia. 19 mm (0.75in.)
inner dia. 8.5 mm( 0.33in.)
4
4
BB
AA
4
CC
4
DD
Screw
0.25 in. x 1.1 in.
6.3 mm x 25 mm
bello-digital.com
A316 3
Hardware Kit
Part Description Quantity Picture
1
GG Touch-up Pen
1
HH Power Supply
1
II RCA Stereo Cable
1
JJ Remote Control
Screw
0.25 in. x 1.1 in.
6.3 mm x 25 mm
4
EE
Washer
outer dia. 16 mm (0.63in.)
inner dia. 8.5 mm( 0.33in.)
4
FF

bello-digital.com
A316 4
Necessary Tools
Phillips head
Screwdriver
Pencil
Drill Bit
Wood: 3/16”
Masonry:1/2”(12.5mm)
Masking Tape
Socket Wrench
(optional)
Stud Finder Drill
Level
bello-digital.com
A316 5
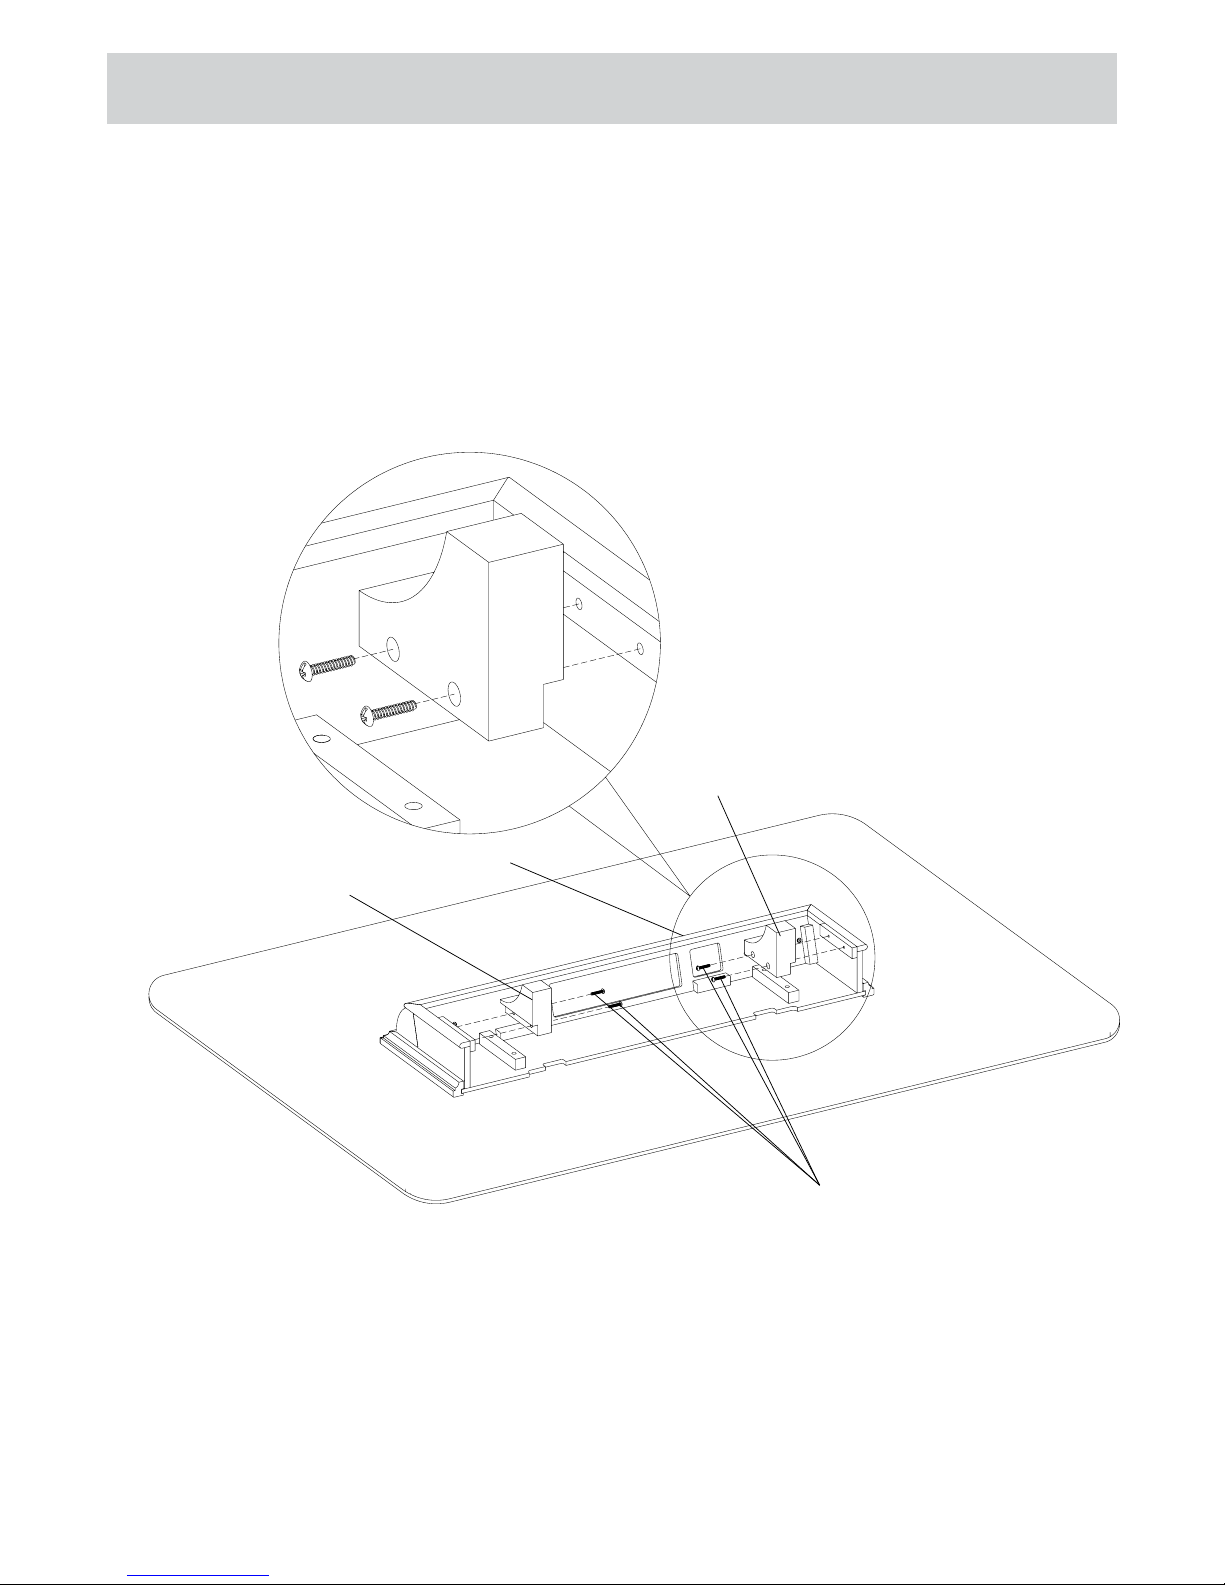
• Attach Le Corbel D and right Corbel E to the back of Sound Shelf C as shown. Carefully
screw the corbels in as shown using screws DD.
Attaching e Corbel
D Le Corbel
E Right Corbel
C Sound Shelf
DD Screw
0.25 in. x 1.1 in.
6.3mm x 28mm

bello-digital.com
A316 6
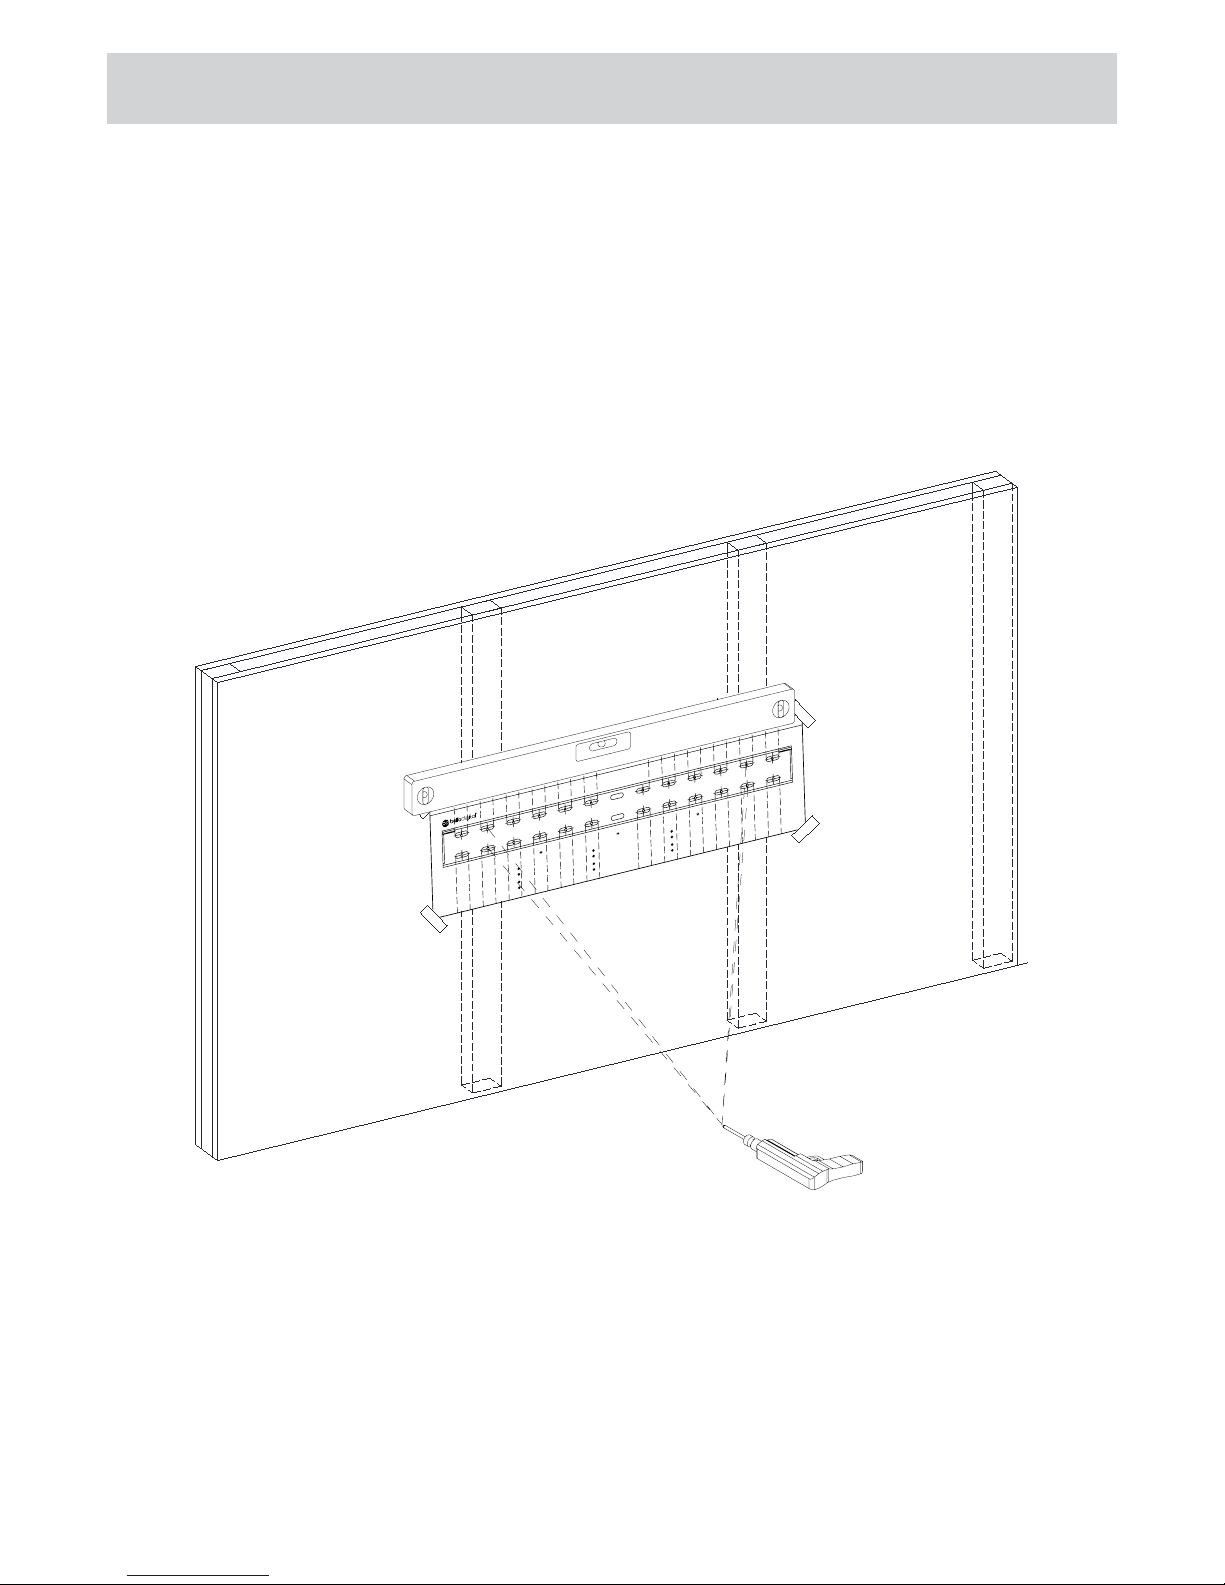
• FIND THE WOOD STUD:
Using a stud nder, nd the exact location of the studs to which you want to attach the wall
mount. Mark the right and le side to determine the center of each stud.
Installing e Sound Shelf Bracket In Wood
FOR WOOD STUD WALLS INSTALLATIONS, SEE PAGE .
FOR MASONRY INSTALLATIONS, SEE PAGE 8.
7
bello-digital.com
A316 7
Installing e Sound Shelf Bracket In Wood
• DETERMINE INSTALLATION LOCATION:
Use the Installation Template in order to determine the location on the wall that you want to
install the shelf.
Carefully drill four holes at 2.5” deepth through apppropriate points “A”, “B”, ‘’C’’ and “D” in
the installation template.
Center the bracket on 2 studs.
A
BDS4012-40
SHELFTOP LINE ÉTAGÈRELIGNE SUPÉRIEURE LÍNEADE ESTANTE SUPERIOR
INSTALLATIONTEMPLATE
CAREFULLYFOLLOWDIRECTIONS
INYOUR MANUAL
GABARIT DE POSE
VEILLEZÀ BIEN SUIVRE LES
INSTRUCTIONS DU MANUEL
PLANTILLADE INSTALACIÓN
SIGADETENIDAMENTE LAS
INSTRUCCIONESDE SU MANUAL
POSESUR MONTANTS EN BOIS :
(VOIRLES INSTRUCTIONS DE POSE SUR MAÇONNERIE DANS LE MANUEL)
Àl'aide d'un détecteur de montant, déterminez l'emplacementdes bords du
montantet marquez-les au crayon comme indiqué dans le Guide de pose.
Percezavec soin à travers les points« A », « B », « C », et« D » qui conviennent.
Posezdes tire-fond dans les quatre trous et serrez-les fermement.
Usinga stud finder,locate the edges of wall studs and mark stud edges
witha pencil as shown in the Installation Guide.
CenterInstallation Template over studs,align drill points “A”,“B”,“C” and“D”
withpencil marks. Use alevel to ensure the template is straight, and
tapeinto place.
Carefullydrill four holes through appropriate points“A”, “B”,“C”and “D”.
InstallLag Bolts through the four holes and tighten securely.
MOUNTINGTO WOOD STUDS:
(SEEINSTALLATIONGUIDE FOR MASONRY INSTALLATIONS)
INSTALACIÓNEN MONTANTESDE MADERA:
(VEREL MANUAL DE INSTALACIÓN PARAINSTALACIONES DE MAMPOSTERÍA)
Conun localizador de montantes,localice los bordes del montante de
paredy márquelos con un lápiz como se muestra en el manual de instalación.
Hagacuidadosamente cuatro perforaciones en los puntos apropiados“A”,“B” ,“C”,y “D”.
Instaletirafondos en las cuatro perforaciones y ajuste firmemente.
1
2
3
4
1
2
3
4
1
2
3
4
Centrezle gabarit de pose sur le montant et alignez les points de perçage
«A », « B »,« C », et« D » sur les repères au crayon. Utilisez un niveau pour vérifier
quele gabarit est droit, et l'attacher avecdu ruban adhésif.
Centrela plantilla de instalación sobre el montante,alinee los puntos de
perforación“A”,“B”,“C”,y “D”con las marcas de lápiz.
Utiliceun nivel para asegurarse
de que la plantilla esté derecha, y sujete con cintaadhesiva en el lugar.

bello-digital.com
A316 8
n Masonry
• DRILL PILOT HOLES
mined your desired Sound Shelf location, Line up the Installation Tem
plate to ensure you will not drill into any mortar joints. Tape the Installation Template in
place securely on the wall with masking tape. Use a Level. Carefully drill 4 holes using a
1/2” (or 12.5 mm) masonry drill bit Into holes A, B, C, D, Each hole should be at least
2.5” (63mm) deep.
Note: Each hole should be at least 5” apart.
hole on the bottom row of the wall bracket.
DO NOT DRILL INTO MORTAR JOINTS! DRILL HOLES AT LEAST 1” (25.4 MM) FROM
THE JOINTS. USE A NEW DRILL BIT TO ENSURE OPTIMUM HOLDING ABILITY. DO
NOT USE A HAMMER DRILL!
• Insert the anchors CC:
A
CC
CC
CC CC
BDS4012-40
SHELFTOP LINE ÉTAGÈRE LIGNE SUPÉRIEURE LÍNEA DE ESTANTESUPERIOR
INSTALLATIONTEMPLATE
CAREFULLYFOLLOWDIRE CTIONS
INYOUR MANUAL
GABARIT DE POSE
VEILLEZÀ BIEN SUIVRE LES
INSTRUCTIONS DU MANUEL
PLANTILLADE INSTALACIÓN
SIGADETENIDAMENTE LAS
INSTRUCCIONESDE SU MANUAL
POSESUR MONTANTS EN BOIS :
(VOIRLES INSTRUCTIONS DE POSE SUR MAÇONNERIE DANS LE MANUEL)
Àl'aide d'un détecteur de montant,déterminez l'emplacement des bords du
montantet marquez-les au crayon comme indiqué dans le Guide de pose.
Percezavec soin à travers les points « A »,« B », « C », et« D » qui conviennent.
Posezdes tire-fond dans les quatre trous et serrez-les fermement.
Usinga studfinder, locate the edges of wall studs and mark stud edges
witha pencil as shown in the Installation Guide.
CenterInstallationTemplate over studs, align drill points“A” ,“B”,“C”and “D”
withpencil marks. Use a level to ensure the template is straight,and
tapeinto place.
Carefullydrillfour holes through appropriate points“A”,“B”,“C”and “D”.
InstallLag Bolts through the four holes and tighten securely.
MOUNTINGTOWOOD STUDS:
(SEEINSTALLATIONGUIDE FOR MASONRY INSTALLATIONS)
INSTALACIÓNENMONTANTES DE MADERA:
(VEREL MANUAL DE INSTALACIÓN PARAINSTALACIONES DE MAMPOSTERÍA)
Conun localizador de montantes,localice los bordes del montante de
paredy márquelos con un lápiz como se muestra en el manual de instalación.
Hagacuidadosamente cuatro perforaciones en los puntos apropiados“A”,“B”, “C”,y “D”.
Instaletirafondos en las cuatro perforaciones y ajuste firmemente.
1
2
3
4
1
2
3
4
1
2
3
4
Centrezle gabarit de pose sur le montant et alignez les points de perçage
«A »,« B », « C », et« D » sur les repères au crayon.Utilisez un niveau pour vérifier
quele gabarit est droit,et l'attacher avecduruban adhésif.
Centrela plantilla de instalación sobre el montante,alinee los puntos de
perforación“A”,“B”,“C”, y“D”con las marcas de lápiz.
Utiliceun nivel para asegurarse
de que la plantilla esté derecha,y sujete con cinta adhesiva en el lugar.
CC
CC
CC
CC
63mm
2.5

bello-digital.com
A316 9
Installing e Sound Shelf Bracket on Wall
• Install e Wall Bracket:
Aer you have prepared the holes, place the Wall Bracket B over them and screw in the Lag
Bolts AA and washers BB about half way. Use a level to make sure the Wall Bracket B is level
and make any necessary adjustments. Once straight, tighten all of the Lag Bolts completely
(do not over tighten!).
NOTE: It is important to center the Wall Bracket on
these 2 studs to evenly support the weight.
A
BB
B
AA
BB AA
EE
FF FF
FF FF
EE
EE
EE
bello-digital.com
A316 10
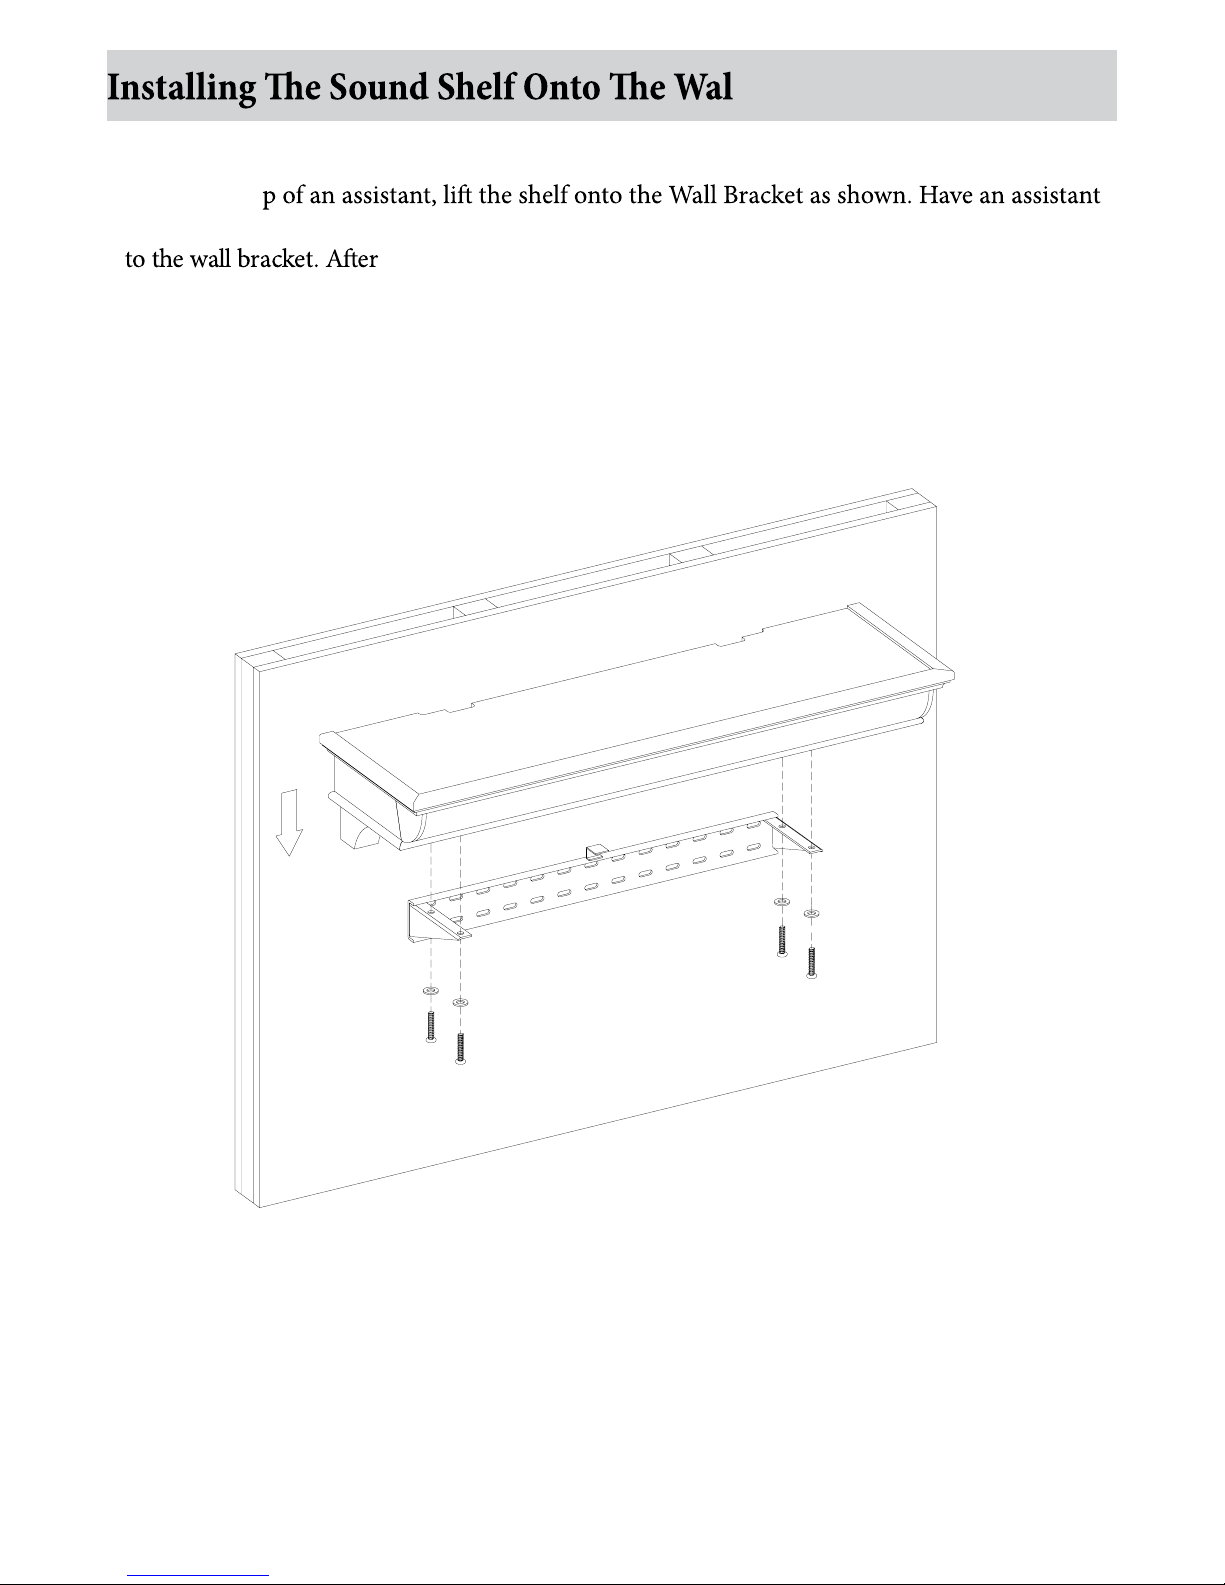
• Mount the Sound Shelf:
With the hel
hold the shelf in place while you use the 4 bolts EE and washers FF, to secure the sound shelf
installation apply some light pressure to the shelf to insure it is stable
and properly installed.
l Bracket
EE
FF FF
FF FF
EE
EE
EE
EE
FF FF
FF
EE
EE
bello-digital.com
A316 11
Operation Instruction
Product Specications
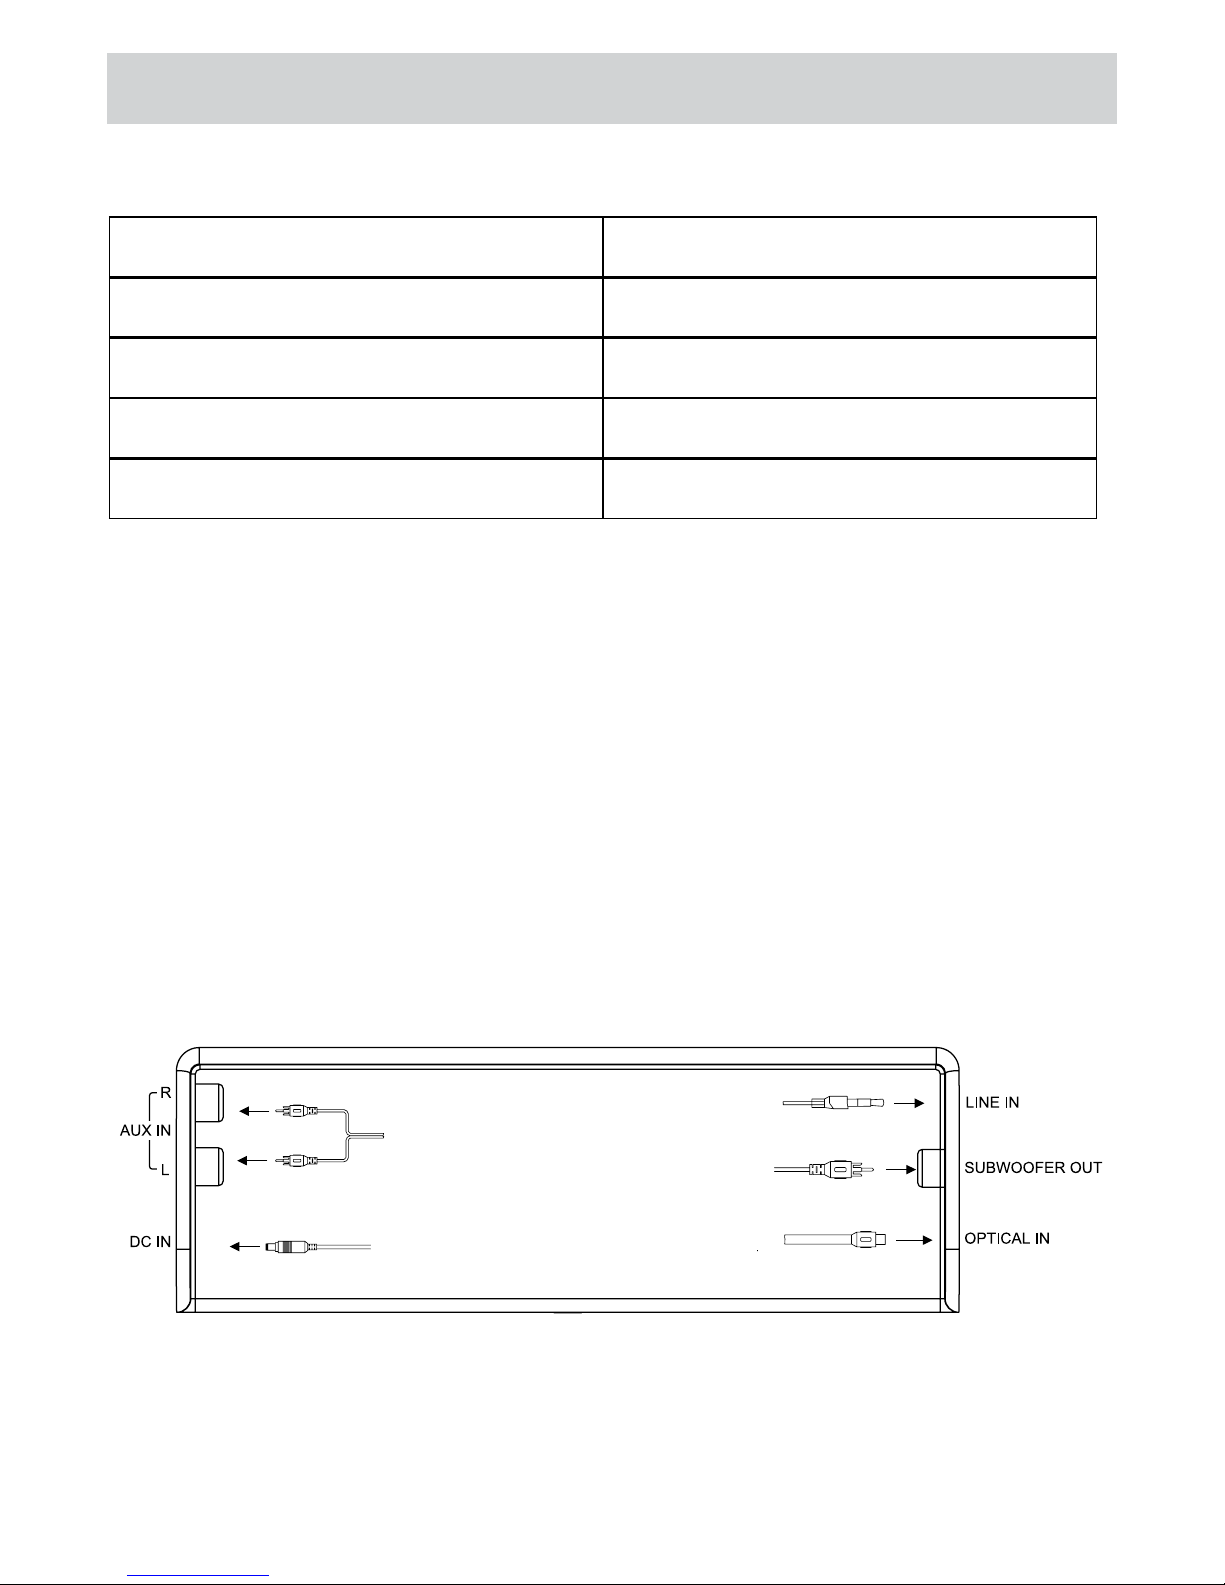
Wiring
1. AUX IN R/L - RCA plug AUX IN for connecting to an audio source
2. DC IN - Connect the power supply
3. LINE IN (Line 1) - 3.5mm input for connection to an audio source
4. SUBWOOFER OUT - Subwoofer output for connecting to a subwoofer
5. OPTICAL IN - Input for digital ber optic cable
6. DONGLE CONNECTOR - Connect for optional Bell'O Digital wireless subwoofer
7. Bell’o Digital Wireless subwoofer connection (USB) port: For use only with Bell'O
Digital USB Dongle.
Adapter Input AC100-240V, 50/60Hz
Adapter Output DC16V/ 3.0A
Power Consumption 40 Watts
Standby Power Consumption < 1 W
Peak Music Power Output 200 W

bello-digital.com
A316 12
Operation Instruction
1. POWER Button - Turns the Sound Shelf
on or o
2. SOURCE Button - To scroll through the
dierent input options:
BLUE – Bluetooth
L 1 - 3.5mm Input 1
L 2 - 3.5mm Input 2
AU - AUX Input
OP - Optical Input
3. VOL + Button – volume increase
4. VOL - Button - volume decrease
Control Panel
Remote Control
- Power / Standby
- Mute
- Optical in
- Line in (Press to select Line 1 or Line 2
- Bluetooth (Hold down to pair for 3 seconds)
- AUX Input
- Volume Increase
- Volume Decrease
- Voice Boost (Enhances dialog in noisy environments)
- Bass Boost (Enhances the bass sound)
- Surround Sound (Digital surround sound eect on/o)
- Back (Previous)
- Play/Pause
- Forward (Next)
Works with Bluetooth devices only.
Note: A short delay in response
is normal.
LED Display Function
Light Flash
OP
L1/L2
Blue
AU
00-30
00-30
ON/OFF
ON/OFF
ON/OFF
b
PL11
F

bello-digital.com
A316 13
Operation Instruction Continued
Select an input: Use the SOURCE Button on the control panel to scroll through the inputs, or
select the input on the remote control.
Bluetooth Pairing Process:
1) Make sure your wireless device is ready for pairing. If you are unsure how to do this, check
the manual that came with your device.
2) To start the pairing process:
Control Panel: Press the POWER button until the blue light starts to ash.
or
Remote: Press the BLUETOOTH button until blue light starts to ash.
Pairing: Select BDS4012-40 on your device. e blue light will stop ashing when it is
paired.
NOTE: Only 1 device can play through the sound shelf at a time. Please disconnect the
other device if you cannot connect.
DISPLAY MESSAGES
BLUE - Bluetooth mode
L 1 - is is for the device connected to the 3.5mm line input on the back of the speaker.
L 2 - is is for the device connected to the 3.5mm line input on the control panel.
AU - is is for the device connected to the RCA Stereo line input on the back of the
speaker.
OP - is is for the device connected to the Optical in input on the back of the speaker.

bello-digital.com
A316 14
Operation Instruction Continued
Learning Function
e learning function allows your Sound Shelf to be controlled by your TV remote control
(Note: Remote must send infrared signals). Any unused button on your TV remote control can
be used to control the Sound Shelf. For example, when you connect your TV to the Sound Shelf
using the RCA Stereo cables or Digital Fiber Optic Cable the TV volume and mute will no
longer be controlled by the remote that came with it. Some TV remotes also come with extra
buttons. ese buttons can also be used for any of the learning options below.
Some of the programmable functions need to be selected from the remote contol as noted
below.
Note: Sound shelf is able to learn most IR protocols, not all remote can be programmed.
To start the learning function:
• Press POWER and VOL + together for 3 seconds to learn mode. SEL starts ashing.
• Select the function to learn on the control panel or remote.
o e function (below) will ash. Point your TV remote at the ashing LED on the sound
shelf and hold down the button you want it learn from.
o When learning is complete the function goes solid for 3 seconds (stops ashing) and
simultaneously beeps 2 times. SEL will now start ashing.
o You can now select the next function to learn or end the process by pressing the POWER
butting an VOL+ for 3 seconds.
VOL Volume up [control panel or remote control]
VOL- Volume down [control panel or remote control]
-O- Mute [control panel or remote control]
ON Power [control panel or remote control]
SOUr Source [control panel ]
Ln In Line In [remote control]
OPtI Optical [remote control]
BLUE Bluetooth [remote control]
AU Aux [remote control]
BAC Track Back [remote control]
FOr Track Forward [remote control]
PLA Play [remote control]
VBOO Voice Boost [remote control]
BBOO Bass Boost [remote control]
SUrr Surround [remote control]
Volume up [control panel or remote control]
Volume down [control panel or remote control]
Mute [control panel or remote control]
Power [control panel or remote control]
Source [control panel ]
Line In [remote control]
Optical [remote control]
Bluetooth [remote control]
Aux [remote control]
Track Back [remote control]
Track Forward [remote control]
Play [remote control]
Voice Boost [remote control]
Bass Boost [remote control]
Surround [remote control]

bello-digital.com
A316 15
FCC/IC
Battery Replacement
Warning: Changes or modications to this unit not expressly approved by the party responsible for
compliance could void user’s authority to operate the equipment.
NOTE: is equipment has been tested and found to comply with the limits for Class B digital device,
pursuant to part 15 of the FCC Rules. ese limits are designed to provide reasonable protection against
harmful interference in a residential installation. is equipment generates, uses, and can radiate radio
frequency energy and, if not installed and used in accordance with the instructions, may cause harmful
interference to radio communications. However, there is no guarantee that interference will not occur in a
particular installation. If this equipment does cause harmful interference to radio or television reception,
which can be determined by turning the equipment o and on, the user is encouraged to try to correct the
interference by one or more of the following measures:
• Reorient or relocate the receiving antenna.
• Increase the separation between the equipment and the receiver.
• Connect the equipment into an outlet on a circuit dierent from that to which the receiver is
connected.
• Consult the dealer or an experienced radio/TV technician for help.
is device complies with Part 15 of the FCC Rules. Operation is subject to the following two conditions:
(1) is device may not cause harmful interference, and
(2) this device must accept any interference received, including interference that may cause undesired
operation.
is Class B digital apparatus complies with Canadian ICES-003.
When the remote control stops operating or its range seems reduced, it is time to replace the battery with
a new one.
1. e battery compartment is located on the back end of the remote.
2. Press and slide the battery door open and remove the old battery.
3. Insert 1pc CR2025 battery, checking that the + and - sides of the battery match inside the battery
compartment.
4. Replace the battery compartment door.
CAUTION:
• Always purchase the correct size and grade of battery most suitable for the intended use.
• Replace all batteries of a set at the same time.
• Clean the battery contacts and also those of the device prior to battery installation.
• Ensure the batteries are installed correctly with regard to polarity (+ and -).
• Remove batteries from equipment which is not to be used for an extended period of time.
• Remove used batteries promptly.
Note: Keep batteries out of reach of children. Caution do not ingest batteries. If batteries are swallowed
immediately call poison control.

bello-digital.com
A316 16
Troubleshooting
PROBLEM SOLUTION
Sound is distorted.
Decrease the volume.
If the original sound source is of poor quality, distortion and noise are
easily noticed with high-power speakers.
Try a dierent audio source such as a music CD.
If you are using an external sound source like older generation of iPod,
try reducing the output volume on the device itself.
Turn o voice enhance and/or bass enhance.
Unit gets warm aer
extended play at high
volume.
Turn the unit o for a period of time or lower the volume.
Sound bar has no power
Turn the power on manually using the power button on the side of the
speaker shelf.
Check to make sure:
- Check to see if the green power light is illuminated on the power supply
module. If not check:
- Is the power supply plugged into the wall.
- Is the cable from the wall fully inserted into the power supply box.
If the green light is illuminated check:
- Is the round cable from the power supply module is plugged into the
sound bar.
Optical input is
not working.
Check to see if the soundbar is set to the optical source.
Check to see if the optical connection is rmly in the port on the source
and the soundbar.
Try a dierent cable to see if it resolves the problem. If the issue still
persists please contact www.tsicustomerservice.com
If Bluetooth is not
working.
Check to see if the soundbar is set to the Bluetooth source.
Check to see if your device is paired, and connected, to the sound bar.
Check to see if someone else is connected to the sound bar. Only one
device can be connected at a time. Please ask them to disconnect their
device.
bello-digital.com
A316 17
Care and Maintenance
• Use a so, clean cloth that will not scratch the surface when dusting.
• Use of furniture polish is not necessary. Should you choose to use polish, test rst in an
inconspicuous area.
• Using solvents of any kind on your furniture may damage the nish.
• Never use water to clean your furniture as it may cause damage to the nish.
• Liquid spills should be removed immediately, as it may damage the furniture. Use a so,
clean cloth and blot the spill gently. Avoid rubbing.
• Always use protective pads under hot dishes and plates. Heat can cause chemical changes
that may create spotting within the furniture.
• If the supply cord is damaged it must be replaced by the manufacturer, it’s service agent or
similarly qualied persons in order to avoid a hazard.
• Only a qualied service person should repair this product.
• Do not use outdoors.
• Do not insert or allow foreign objects to enter the system as this may cause an electric shock,
re, or damage to the appliance.
• Use this appliance only as described in the manual. Any other use not recommended by the
manufacturer may cause re, electric shock or injury to persons.
PROBLEM SOLUTION
Aer trying
above, the
Bluetooth is still
not working
Go into the device settings on the device/source and delete the sound
bar. en go through the pairing process again, as shown earlier in the
manual to set up a new device.
If the above step does not correct the problem, unplug the sound bar
from the wall outlet for 10 minutes and try again. If the issue still persists
please contact www.tsicustomerservice.com
If there is no volume, or
low volume
If you are using your device/source to control the volume, make sure the
volume on the sound bar is turned up.
If you are using the sound bar remote to control the volume, make sure
the volume on your device/source is at maximum.
The LED display if not
reading correctly If the display is showing half the digits, or not displaying correctly please
contact www.tsicustomerservice.com
Troubleshooting

bello-digital.com
A316 18
1-Year Limited Warranty
e manufacturer warrants that your new Sound Shelf is free from manufacturing and material defects
for a period of one year from date of puchase, subject to the following conditions and limitations.
1. Install and operate this Electric Appliance in accordance with the installation and operating
instructions furnished with the product at all times. Any unauthorized repair, alteration, willful abuse,
accident, or misuse of the product shall nullify this warranty.
2. is warranty is non-transferable, and is made to the original owner, provided that the purchase was
made through an authorized supplier of the product.
3. e warranty is limited to the repair or replacement of part(s) found to be defective in material or
workmanship, provided that such part(s) have been subjected to normal conditions of use and service,
aer said defect is conrmed by the manufacturer’s inspection.
4. e manufacturer may, at its discretion, fully discharge all obligations with respect to this warranty by
refunding the wholesale price of the defective part(s).
5. Any installation, labor, construction, transportation, or other related costs/expenses arising from
defective part(s),repair, replacement, or othe wise of same, will not be covered by this warranty, nor
shall the manufacturer assume responsibility for same.
6. e owner/user assumes all other risks, if any, including the risk of any direct, indirect or
consequential loss or damage arising out of the use, or inability to use the product,except as provided
by law.
7. All other warranties – expressed or implied –with respect to the product, its components and
accessories, or any obligations/liabilities on the part of the manufacturer are hereby expressly
excluded.
8. e manufacturer neither assumes, nor authorizes any third party to assume on its behalf, any other
liabilities with respect to the sale of the product.
9. e warranties as outlined within this document do not apply to non accessories used in conjunction
with the installation of this product.
10. is warranty gives you specic legal rights, and you may also have other rights which vary from state
to state.
is warranty is void if:
a. e Sound Shelf is subjected to prolonged periods of dampness or condensation.
b. Any unauthorized alteration, willful abuse, accident, or misuse of the product.
c. You do not have the original receipt of purchase.
MODEL/ MODÈLE/ MODELO:
BDS4012-40
ÉTAGÈRE SONORE
A316
www.tsicustomerservice.com
bello-digital.com
1-888-235-7646
Twin-Star International, Inc. Delray Beach, FL 33445
Made in China • Printed in China • Fabricado en China • Impreso en China • Fabriqué en Chine • Imprimé en Chine
Table of contents


