beloxx BeCode EVO+ User manual

www.beloxx.com
Version 2.0
!
!
Einbauanleitung
Installation Instructions

2
///Congratulations! ///
You have selected the BeCode, an innova-
tive keyless locking system that replaces
traditional furniture locks. Whether at
work, at home or at play – the BeCode
promises comfort and security.
Not only is the BeCode EVO+ easy to
use, it can also be easily installed into
your furniture doors. It can be mounted
without any problems on wooden or on
metal furniture.
///Herzlichen
Glückwunsch! ///
Mit dem BeCode haben Sie sich für ein
innovatives, schlüsselfreies Schließsystem
entschieden, das herkömmliche Möbel-
schlösser ersetzt. Ob am Arbeitsplatz, zu
Hause oder in der Freizeit – der BeCode
verspricht Komfort und Sicherheit.
So einfach wie seine Bedienung lässt sich
der BeCode EVO+ auch in Möbeltüren
integrieren. Dabei können Sie ihn
problemlos an Möbeln aus Holz oder aus
Metall anbringen.

www.beloxx.com 3
///You’ll need this ///
You’ll require the following tools and
accessories to install the BeCode EVO+:
Drill with 6 mm bit
Torque spanner with sizes 16 and 24 mm
Only for wooden doors:
Hammer
Only for wooden doors:
Drive-in tool
Beloxx Art. No. 7-1-4004
Only for wooden doors:
Drive-in Sleeve
Beloxx Art. No. 7-1-4003
(for each mounted EVO+ an extra sleeve
is needed)
///Das brauchen Sie ///
FolgendesWerkzeug und Zubehör benöti-
gen Sie zum Einbau des BeCode EVO+:
Bohrmaschine mit 6 mm Bohreinsatz
Drehmomentschlüssel mit Schlüsselwei-
ten 16 und 24 mm
Nur für Holztüren:
Hammer
Nur für Holztüren:
Einschlaghilfe
Beloxx-Artikel-Nr. 7-1-4004
Nur für Holztüren:
Einschlaghülse
Beloxx-Artikel-Nr. 7-1-4003
(für jeden eingebauten EVO+ wird eine
Hülse benötigt)

4
///Connecting
dimensions ///
///Anschlussmaße ///

www.beloxx.com 5
///Preparations ///
These instructions assume, that there
is already an angle bracket or another
blocker for the cam installed, like in the
two examples on the left.
If not, please mount one at an appropri-
ate position.
The example pictures in this manual
show the mounting of the BeCode EVO+
at the left hand side of doors, that open
to the right.
For doors, that open to the left, simply
mirror the shown measurements and
positions.
///Vorbereitungen ///
Diese Anweisungen setzen voraus,
dass bereits ein Schließwinkel oder ein
anderer Stopper für den Riegel installiert
wurde, so wie in den zwei Beispielen
links.
Falls nicht, montieren Sie bitte einen
solchen an der passenden Position.
Die Beispielbilder in dieser Anleitung
zeigen den Einbau des BeCode EVO+ auf
der linken Seite vonTüren, die nach rechts
önen (DIN rechts).
FürTüren, die nach links önen (DIN
links), spiegeln Sie einfach die angegebe-
nen Maße und Positionen.
6
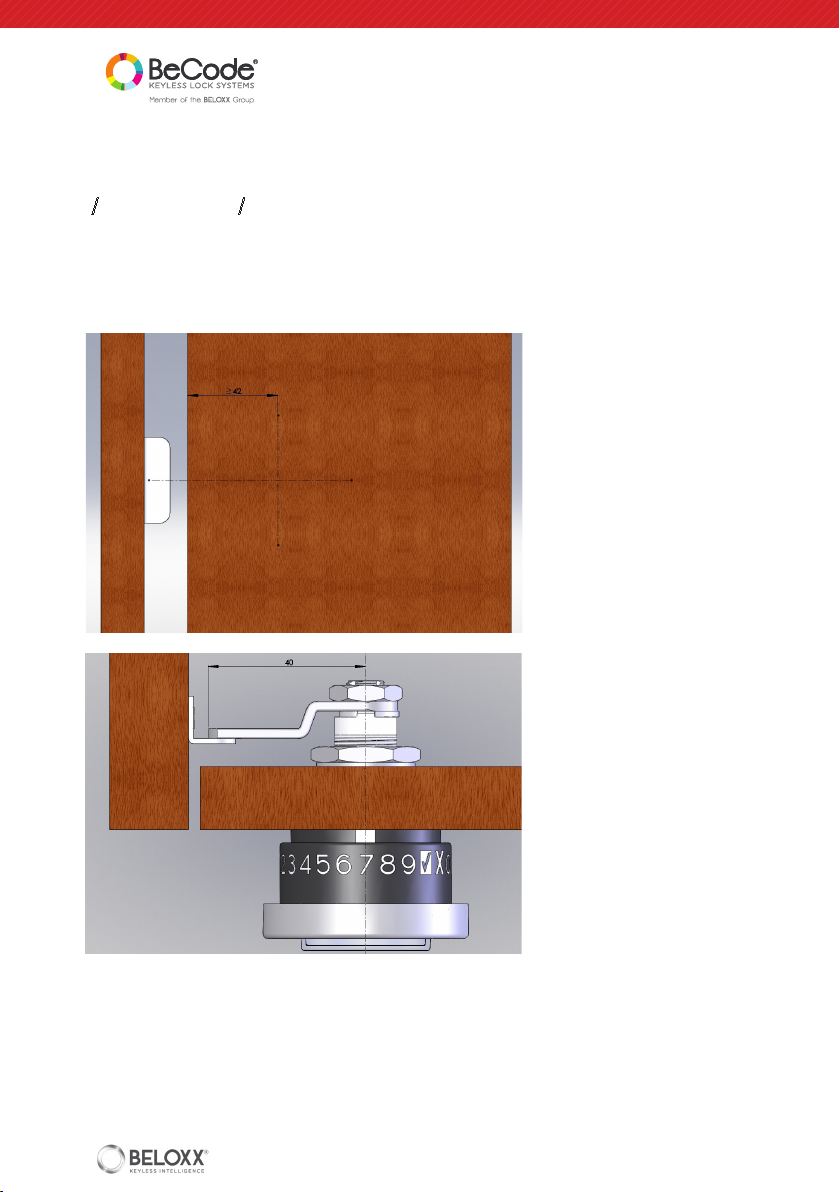
///Mounting position ///
for wooden doors (or metal
doors with pre-mounted angle
brackets)
The EVO+ should be mounted on the
same height as the angle bracket (or
other cam stopper) and with at least 42
mm distance from the edge of the door.
Attention: There must be enough space
for turning the cam freely (rotation
radius = 40 mm). If the angle bracket is
too thick or if there are other obstacles
on the internal wall of the cabinet, the
mounting position must be changed
accordingly.
///Einbauposition ///
fürTüren aus Holz (oder für
Metalltüren mit montiertem
Schließwinkel)
Der EVO+ sollte auf der gleichen Höhe
wie der Schließwinkel (oder einem
anderen Stopper) und mit mindestens
42 mm Abstand vomTürrand eingebaut
werden.
Achtung: Es muss genug Platz vorhanden
sein, damit sich der Riegel frei drehen
kann (Rotationsradius = 40 mm). Falls
der Schließwinkel amTürrahmen zu
breit ist oder andere Hindernisse an der
Seitenwand vorhanden sind, muss die
Einbauposition entsprechend angepasst
werden.
www.beloxx.com 7
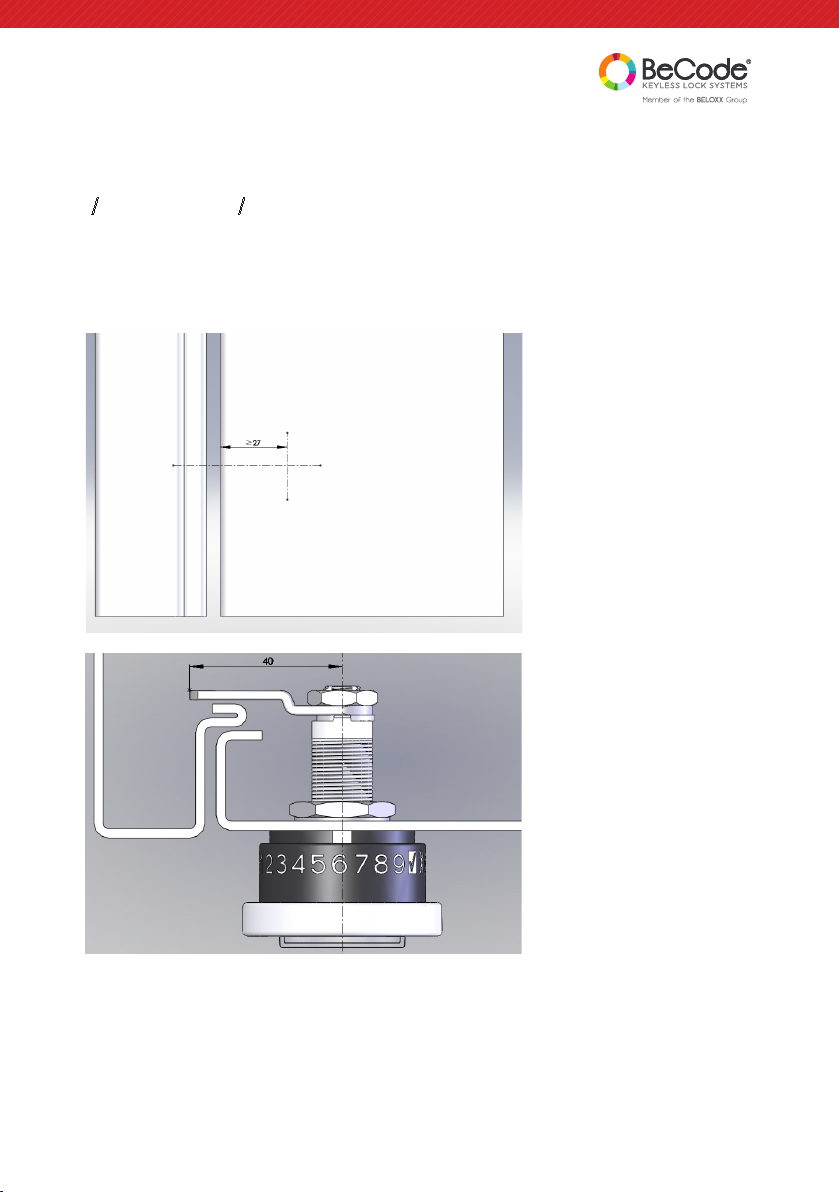
///Mounting position ///
for metal doors with a protruding
door frame
The EVO+ should be mounted within
easy reach and with a minimal distance
of 27 mm from the edge of the door and
a minimum of 42 mm from the inner side
of the wardrobe.
Attention: There must be enough space
for turning the cam freely (rotation radius
= 40 mm). If there are any obstacles on
the internal side wall of the cabinet, the
mounting position must be changed
accordingly.
///Einbauposition ///
FürTüren aus Metall mit
vorstehendemTürrahmen
Der EVO+ sollte auf Grihöhe und mit
einem Mindestabstand von 27 mm vom
Türrand und minimal 42 mm von der
Schrankinnenwand eingebaut werden.
Achtung: Es muss genug Platz
vorhanden sein, damit sich der Riegel frei
drehen kann (Rotationsradius = 40 mm).
Falls irgendwelche Hindernisse an der
inneren Seitenwand oder dem Rahmen
vorhanden sind, muss die Einbauposition
entsprechend angepasst werden.

8
///Drill hole ///
for metal doors
At the determined position, apply a
perforation to the door for the BeCode
EVO+.
For this purpose, use the supplied hole
pattern on the left hand side.
///Bohrung ///
fürTüren aus Metall
Versehen Sie an der festgelegten Position
dieTür mit einer Lochung für den BeCode
EVO+.
Verwenden Sie dafür das vorgegebene
Bohrbild auf der linken Seite.

www.beloxx.com 9
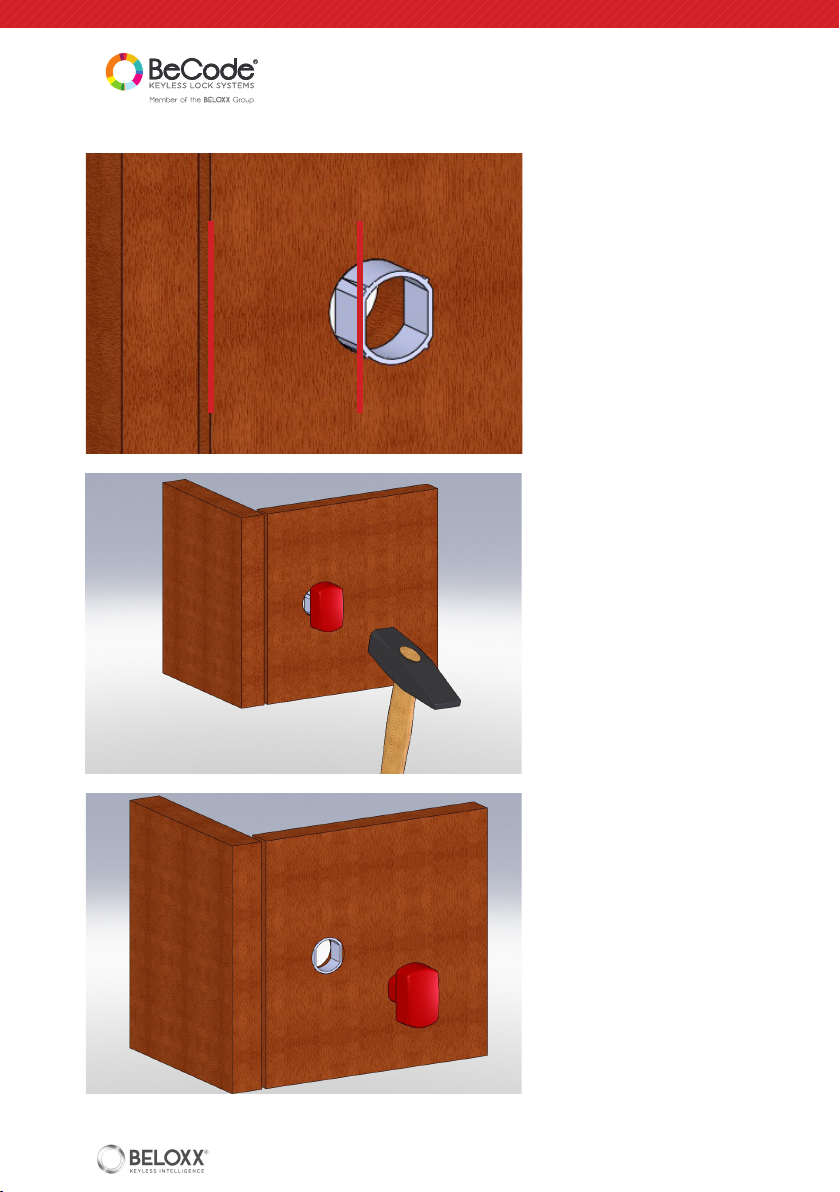
///Drill hole ///
for wooden doors
At the determined position, Drill a hole
with a diameter of 22 mm.
Plug the Drive-in Sleeve into the drilling
hole from the front and insert the
Drive-in Tool.
///Bohrung ///
fürTüren aus Holz
Bohren Sie an der festgelegten Position
ein Loch mit dem Durchmesser 22 mm.
Stecken Sie die Einschlaghülse von
vorne in das Bohrloch und setzen Sie die
Einschlaghilfe ein.
10
Attention: The two plane sides of the
Drive-in Sleeve should lie exactly parallel
to the door frame.
Hammer the Drive-In Sleeve down, until
it rests completely inside the drilling hole.
Attention: No part of the Sleeve should
obtrude from the door afterwards.
Remove the Drive-inTool.
Achtung: Die beiden geraden Seiten der
Einschlaghilfe sollten genau parallel zur
Türkante liegen.
Schlagen Sie die Einschlaghülse mit
einem Hammer ein, bis sie vollständig im
Bohrloch sitzt.
Wichtig: KeinTeil der Hülse sollte danach
aus derTür hervorstehen.
Entfernen Sie die Einschlaghilfe.
Table of contents
Other beloxx Lock manuals


