manuals.online logo
Brands
  1. Home
  2. •
  3. Brands
  4. •
  5. Belvedere
  6. •
  7. Plumbing Product
  8. •
  9. Belvedere 3100 CAMEO User manual

Belvedere 3100 CAMEO User manual

Shampoo
Bowls
3100 CAMEO BOWL
3800 ALPHA BOWL
Belvedere USA Corporation
A wholly owned subsidiary of The Wella Corporation
One Belvedere Boulevard, Belvidere, Illinois 61008
Printed in U.S.A. E.C.O. 9162 4001146 Rev. 04-05
PORCELAIN ENAMEL SHAMPOO
BOWL WITH MODEL 522 FIXTURE
AND 603 BACKFLOW PREVENTER
INSTALLATION AND PLUMBING
NOTE: Read the instructions through before starting
to familiarize yourself with the components.
Any conformance with LOCAL CODES or
INSPECTIONS is the RESPONSIBILITY
OF THE PURCHASER.
1. Attach the fixture to the bowl according to
the instructions packed with the fixture.
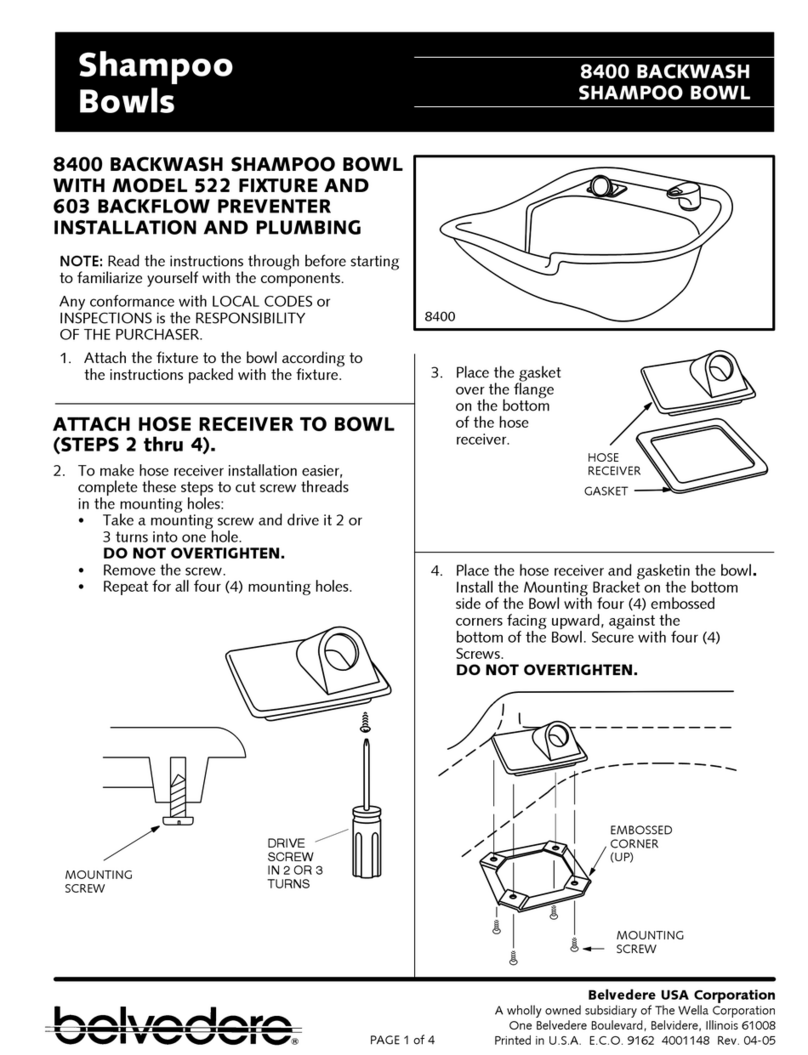
3. Place the gasket
over the flange
on the bottom
of the hose
receiver.
PAGE 1 of 4
3100
3800
DRIVE
SCREW
IN 2 OR 3
TURNS
MOUNTING
SCREW
HOSE
RECEIVER
GASKET
4. Place the hose receiver and gasketin the bowl.
Install the Mounting Bracket on the bottom
side of the Bowl with four (4) embossed
corners facing upward, against the
bottom of the Bowl. Secure with four (4)
Screws.
DO NOT OVERTIGHTEN.
MOUNTING
SCREW
EMBOSSED
CORNER
(UP)
ATTACH HOSE RECEIVER TO BOWL
(STEPS 2 thru 4).
2. To make hose receiver installation easier,
complete these steps to cut screw threads
in the mounting holes:
STake a mounting screw and drive it 2 or
3 turns into one hole.
DO NOT OVERTIGHTEN.
SRemove the screw.
SRepeat for all four (4) mounting holes.
8. From the underside of the Bowl, place the fiber
and rubber washers over the strainer
body. Secure
the strainer
body
with
the nut.
DO NOT
OVER-
TIGHTEN.
When the
strainer body
is tightened
securely to
the Bowl,
clean off
any excess
plumber’s
putty.
9. Attach the
gasket and
tailpiece to
the strainer
body.
DO NOT
OVERTIGHTEN.
6. Apply a liberal amount
of plumber’s putty
(available at
most hard-
ware stores)
around the
top of the
drain
opening.
5. Attach the backflow preventer to the fixture
tailpiece. Do not overtighten. Place the end of
the spray hose with the brass connector through
the hole in the hose receiver. Attach the Spray
Hose connector to the backflow preventer.
PLUMBER’S
PUTTY
DRAIN OPENING
STRAINER
BODY
PLUMBER’S
PUTTY
DRAIN
OPENING
INSTALL THE DRAIN ASSEMBLY
(STEPS 6-9)
7. Place the strainer body in the opening,
and press it into the plumber’s putty.
TAILPIECE
GASKET
BOWL
RUBBER
WASHER
STRAINER
BODY
BOWL
NUT
PAGE 2 of 4
SPRAY
HOSE
RECEIVER
TAIL-
PIECE
FIBER
WASHER
BACKFLOW
PREVENTER
CLEANING INSTRUCTIONS
Paste wax monthly to preserve and protect
against common soils.
With normal care your bowl will last many years.
CLEAN ONLY WITH A NON-ABRASIVE
LIQUID CLEANER.
Dow Tub & Tile CleanerR409R
Mr. CleanRFantasticR
DO NOT USE HARSH ABRASIVES
These will dull the sparkling surface.
See back page for rough-in specifications.
ALL PLUMBING TO BE PLANNED AND
PERFORMED BY A QUALIFIED PLUMBER
TO MOUNT THE 3100 and 3800
BOWLS TO THE WALL
(STEPS 10 THRU 12)
10. Install the Wall Bracket so that the top edge
is 31-1/4” from the finished floor.
(This backet height is suggested to obtain
the most suitable neckrest height.
However, the bracket height may be varied
to suit personal preference.)
Be sure that the Bracket is securely
fastened to a structural member in the wall.
Also, be sure the Bracket is level. Install
the Leveling Bolt into the Wall Bracket.
11. Check to be sure the Bowl is level side-to-side and
front-to-back. Connect the Fixture to the hot and
cold supply lines. Install the trap and connect the
drain. Apply a bead of silicone to the back edge
of the Bowl to seal it to the wall.
12. Mount the Bowl onto the Wall Bracket by
lowering the Lugs on the back of the Bowl
into the Wall Bracket.
BRACKET
BOWL LEVELING
BOLT
31 1/4”
LUGS
IMPORTANT NOTE:
It is the responsibility of the owner
and/or the installer to be sure that
the installation conforms to all local
plumbing codes and regulations.
TRAP
SUPPLY
LINES
BOWL
LEVELING
BOLT
PAGE 3 of 4
APPLY SILICONE HERE
This Shampoo Bowl is designed for optimum comfort when the Bowl Neckrest is at 31”.
However, this may vary to suit individual salon owners.
SEE NOTE BELOW.
Belvedere Recommends a Bowl Neckrest height of 31”.
To mount the Bowl at this height, locate the bracket height as shown in these specifications.
PAGE 4 of 4
ROUGH-IN PLUMBING SPECIFICATIONS.
IMPORTANT!
DO NOT OVERTIGHTEN
DRAIN ASSEMBLY!
31/2”BASKETSTRAINER
SIDE
VIEW
FRONT
VIEW
TOP
VIEW
BRACKET
COLDHOT
FINISHED FLOOR LINE
6” TAILPIECE
FURNISHED
31”
RECOMMENDED
4” 4”
18”
LEVELING
BOLT
31 1/4”
TOP OF
BRACKET
TO FLOOR
APPROX.
16”
LEVEL
APPLY SILICONE HERE

This manual suits for next models

1

Other Belvedere Plumbing Product manuals

Belvedere 8600 User manual

Belvedere

Belvedere 8600 User manual

Belvedere 8400 BACKWASH SHAMPOO BOWL User manual

Belvedere

Belvedere 8400 BACKWASH SHAMPOO BOWL User manual

Popular Plumbing Product manuals by other brands

GoBidet 2003 user manual

GoBidet

GoBidet 2003 user manual

Hans Grohe Talis S 32851 Series Assembly instructions

Hans Grohe

Hans Grohe Talis S 32851 Series Assembly instructions

VADO INDIVIDUAL user guide

VADO

VADO INDIVIDUAL user guide

Kohler RUBICON 20147T-4 installation instructions

Kohler

Kohler RUBICON 20147T-4 installation instructions

Kalia KONTOUR BF1285 installation instructions

Kalia

Kalia KONTOUR BF1285 installation instructions

Grohe Eurodisc 32 302 manual

Grohe

Grohe Eurodisc 32 302 manual

Gessi goccia 33712 manual

Gessi

Gessi goccia 33712 manual

Hans Grohe Talis S 32855 Series Instructions for use/assembly instructions

Hans Grohe

Hans Grohe Talis S 32855 Series Instructions for use/assembly instructions

SIMILOR KUGLER arwa-curveprime WI9.32076.100.000 installation instructions

SIMILOR KUGLER

SIMILOR KUGLER arwa-curveprime WI9.32076.100.000 installation instructions

Graff G-11520 L1 Series manual

Graff

Graff G-11520 L1 Series manual

Bradley Express ELX-3 Installation

Bradley

Bradley Express ELX-3 Installation

baliv 620 Series manual

baliv

baliv 620 Series manual

Moen FINA ExacTemp TS31710 Illustrated parts list

Moen

Moen FINA ExacTemp TS31710 Illustrated parts list

Clou Freddo 9 CL/06.03013 installation instructions

Clou

Clou Freddo 9 CL/06.03013 installation instructions

KWC Purismo Star S.10.X1.06 Specification sheet

KWC

KWC Purismo Star S.10.X1.06 Specification sheet

Moen S612 installation guide

Moen

Moen S612 installation guide

Clou CL/06.05.004.21.R installation instructions

Clou

Clou CL/06.05.004.21.R installation instructions

Gerber D460134 quick start guide

Gerber

Gerber D460134 quick start guide

manuals.online logo
manuals.online logoBrands
  • About & Mission
  • Contact us
  • Privacy Policy
  • Terms and Conditions

Copyright 2025 Manuals.Online. All Rights Reserved.