Bend-Pak R76LT Reference manual

R76LT Installing the Tilt Tower Page 1 of 9
BendPak TSB 82-092021
BendPak Technical Service Bulletin
R76LT Installing the Tilt Tower, Inflation Gauge and Bead
Breaker
Ranger TSB 82 – 092021
The purpose of this Technical Service Bulletin is to detail changes to the Manual not currently reflected
in the latest R76LT Series Installation and Operation Manual P/N 5900346 (dated December 2019 -
Revision C).
Installing the Tower, Inflation Gauge and the Bead Breaker
(R76LT Only)
After removing the shipping cover, remove the components from where they are secured on the
shipping pallet and install the Tower/Swing Arm, Inflation Gauge and Bead Breaker on the Tire
Changer Cabinet.
Tools required:
•Open end Metric Wrenches
•Utility Knife
•Hex Keys, Metric
•Screwdriver set, Slot and Phillips
•Pliers
•Rags
•Hammer or Mallet
•Shop Crane or Forklift
•Pry Bar
To Install the Tilt Tower on the Tire Changer:
⚠WARNING Wear OSHA-approved (publication 3151) Personal Protective Equipment: leather
gloves, steel-toed work boots, back belts, hearing protection, and ANSI-approved
eye protection (safety glasses, face shield, or goggles). Keep rags nearby to remove
excess grease.
1. Remove the Accessories and Covers on top of the Tire Changer and store in a safe place for later
use.
2. Carefully remove the plastic wrapping the Tire Changer, but do not free the Tilt Tower located on
the side of the Tire Changer.
3. Retain any parts located in bubble wrap or plastic bags and store with Accessories previously
removed.
4. The Tower is secured to the shipping pallet in several locations.
Carefully
remove the plastic and
strap that secures the Tilt Tower to the Tire Changer.
⚠WARNING Use care when moving the Tilt Tower. The Tower is top heavy and the weight is not
distributed evenly. If it is dropped, you could injure yourself, bystanders and
damage the equipment.

R76LT Installing the Tilt Tower Page 2 of 9
BendPak TSB 82-092021
5. Use a lifting strap capable of supporting the Tilt Tower. Secure and orient the Tower using a Shop
Crane or Forklift as shown below. Adjust the Lifting Straps or Chains to hold the Tilt Tower
securely, oriented with the Tilt Tower base downwards.
6. Move the Tilt Tower out of the way and secure from movement where it cannot fall and injure
anyone. Do not remove the Lifting Straps or Chains until the Tower is secured on the Tire Changer.
7. Remove the side Service Access Panel (7 Screws).
8. Remove the Air Regulator and Oiler (2 screws). Set aside where they will not be lost.
R76LT Installing the Tilt Tower Page 3 of 9
BendPak TSB 82-092021
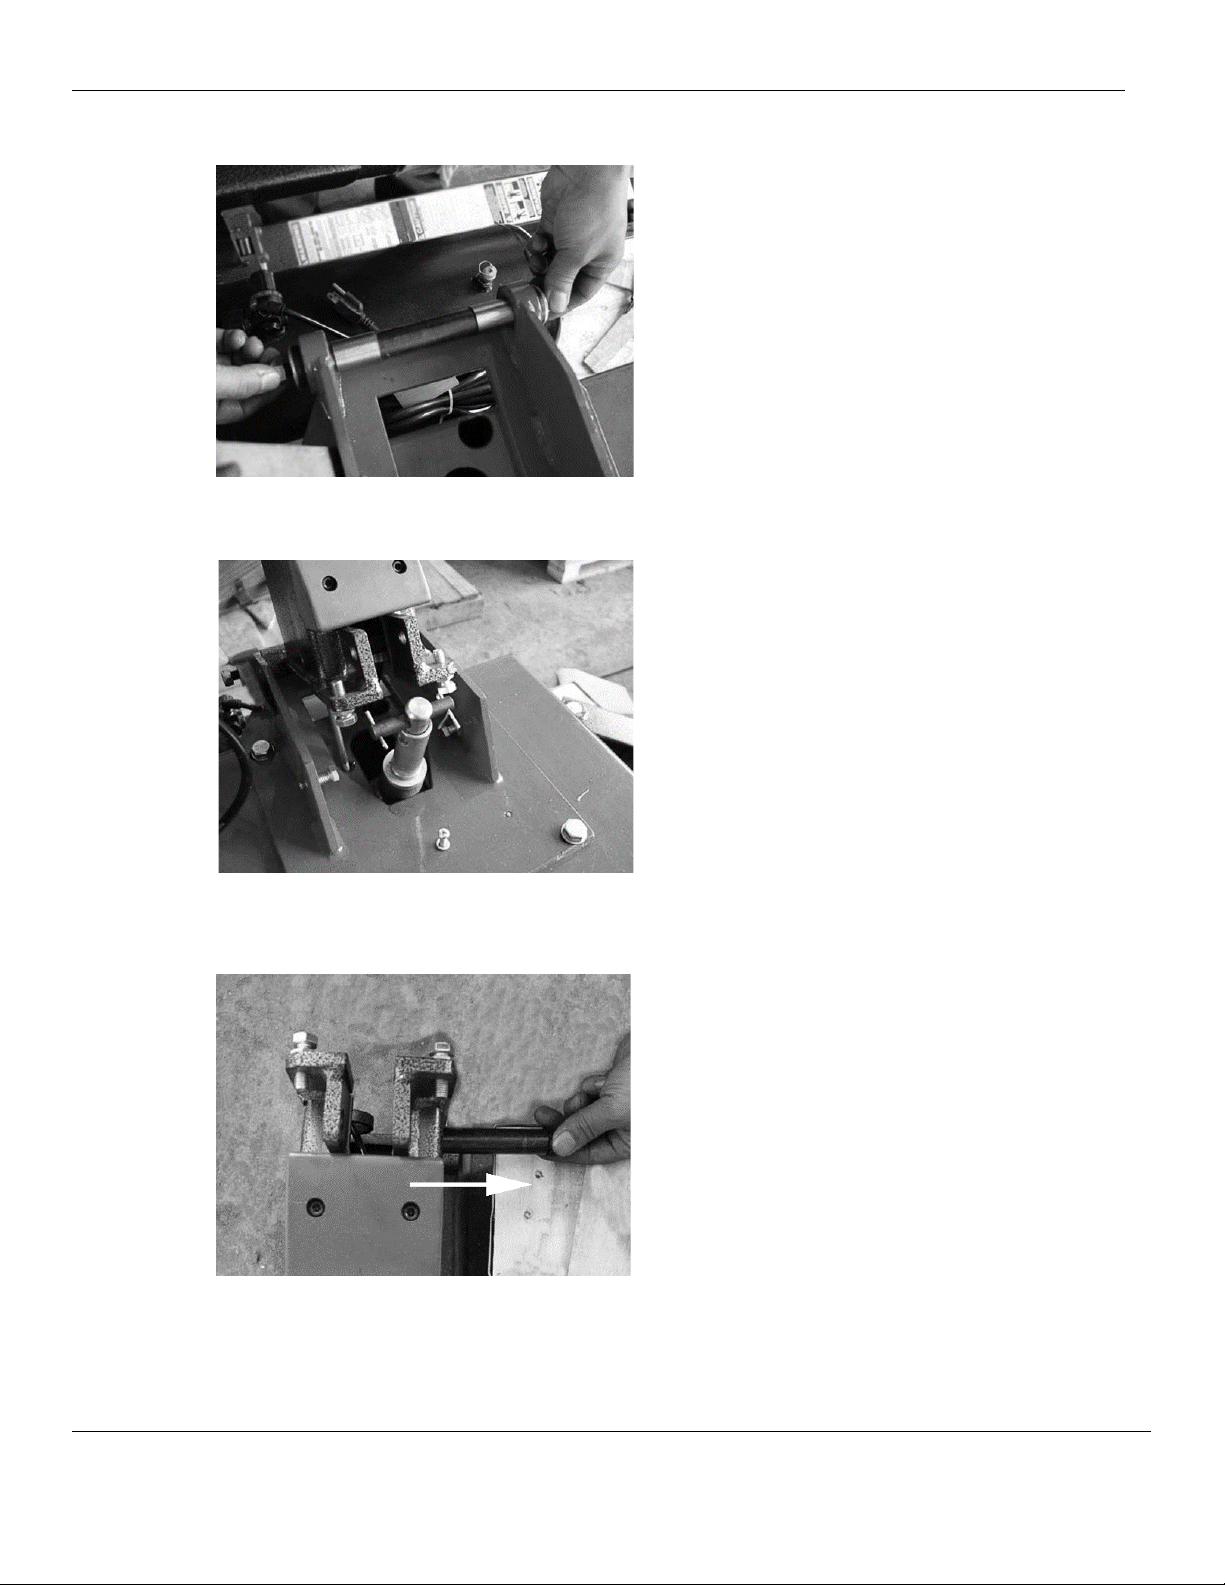
9. Remove the Tilt Tower Main Pivot Pin, Nuts and Washers from the Tire Changer. Set the Main
Pivot Pin, Nuts and Washers aside to prevent loss.
10. Carefully move the Tilt Tower into place over the Tire Changer using a Forklift or Shop Crane. Take
care to not damage the bottom of the Tilt Tower or the Air Line exiting the Tilt Tower.
11. Remove one of the Snap Rings securing the Safety Pin and remove the Safety Pin from the Tilt
Tower. Set these parts aside where they will not be lost.

R76LT Installing the Tilt Tower Page 4 of 9
BendPak TSB 82-092021
12. Remove Cotter Pins from the Tilt Tower Cylinder Pin and remove the Pin. Set aside where they will
not be lost.
13. Feed the Air Line from the Tilt Tower into the Tire Changer base.
14. Insert the Main Pivot Pin through the holes in the Tire Changer Base and Tilt Tower. You may need
to tap the Pivot Shaft lightly with a Hammer or Mallet to drive the Main Pivot Pin into place. Secure
the Pivot Pin with the Washers and Nuts previously removed.

R76LT Installing the Tilt Tower Page 5 of 9
BendPak TSB 82-092021
15. Align the Tilt Tower and the Safety Hook. Push the Tilt Tower Safety Pin through the Tower, and
Safety Hook.
16. Verify the Pin passes through the Safety Hook. Secure the Safety Pin with Snap Rings.
17. Align the Cylinder Shaft, Cylinder Pin and Tilt Tower opening. Insert the Cylinder Pin through the
holes and secure with the Cotter Pins removed earlier. Bend to lock Cotter Pins in place.
18. When the Tilt Tower is secure, you may remove the Lifting Straps or Chains from the Tilt Tower
and move the Shop Crane or Forklift away from the work area.

R76LT Installing the Tilt Tower Page 6 of 9
BendPak TSB 82-092021
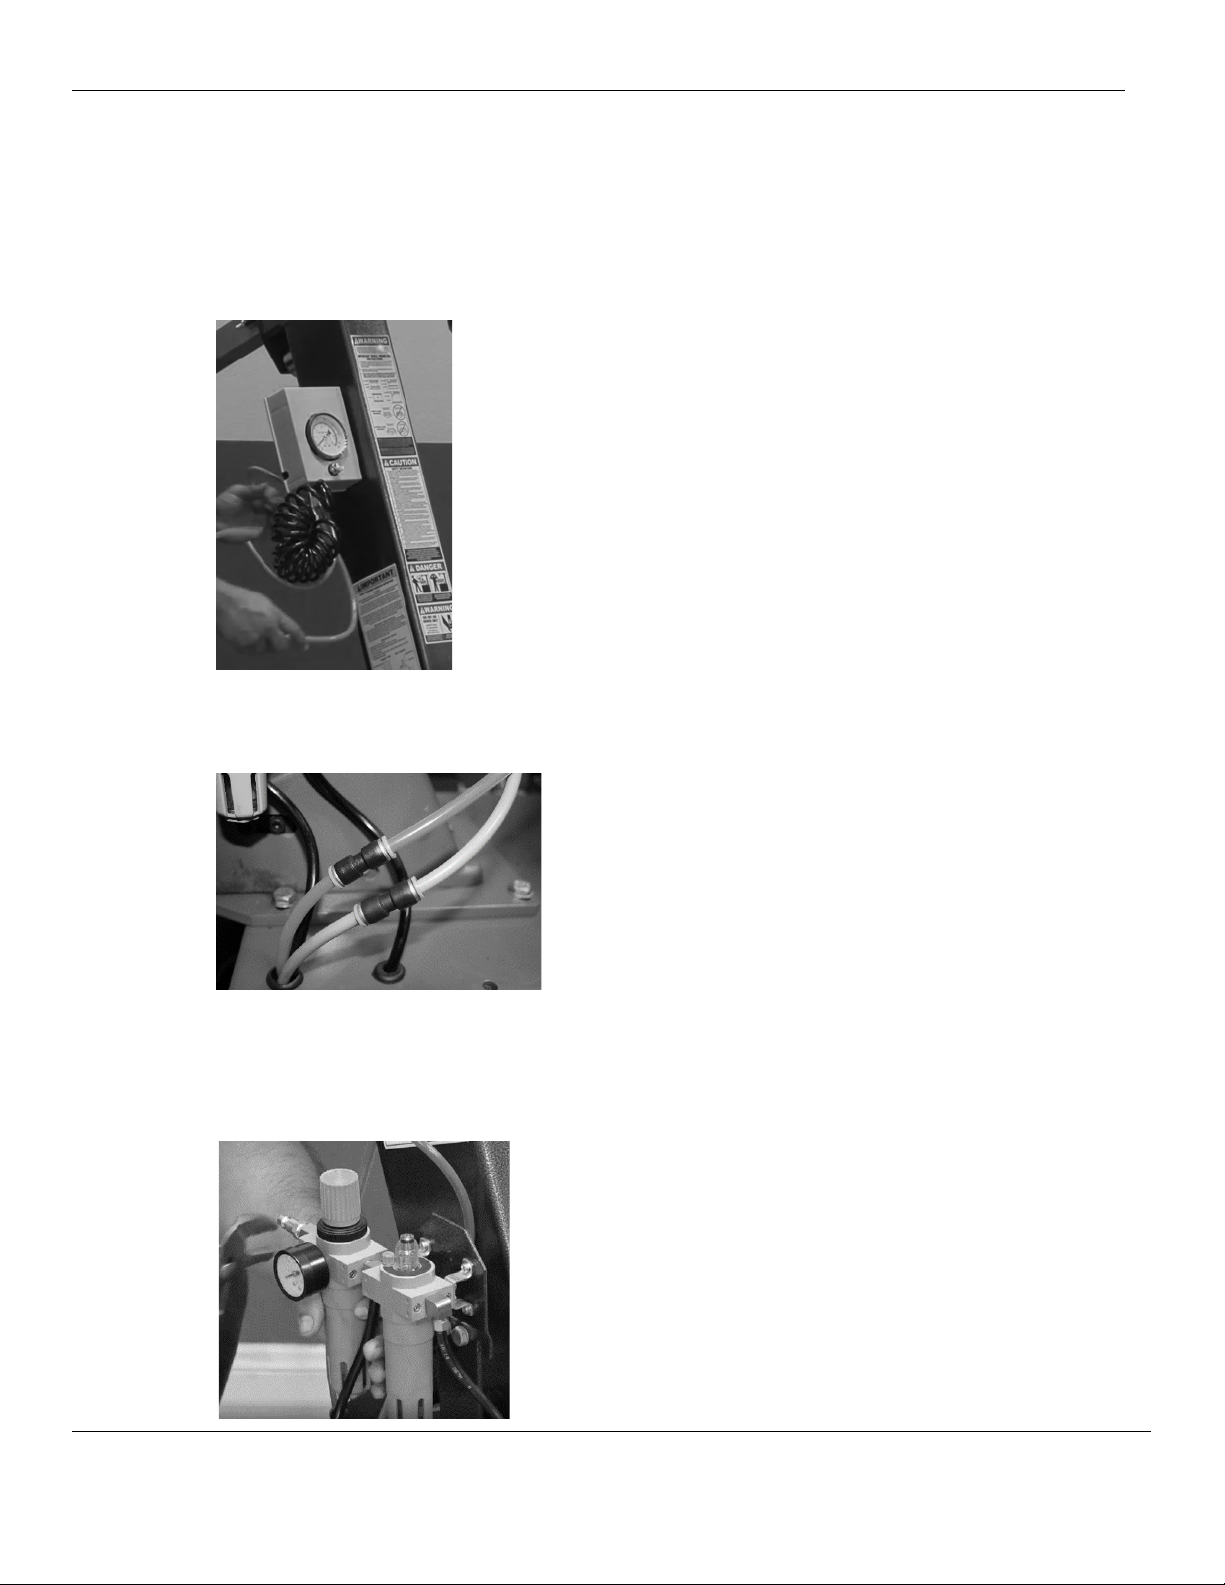
19. Mount the Air Regulator and Oiler Back on Tire Changer Mount (2 Screws and Washers).
20. Locate the Black Air Line from the Tower inside the Tire Changer. Route the Air Line from the Tilt
Tower out the back of the Tire Changer through the open hole with a Grommet.
21. Connect the Black Air Line from the Tilt Tower to the Hose Compression Coupling on the back of
the Tire Changer and tighten. Refer to the photo below.
R76LT Installing the Tilt Tower Page 7 of 9
BendPak TSB 82-092021
To Install the Inflation Gauge:
1. Locate the Inflation Gauge mounting on the left side of the Tilt Tower. Remove and retain the two
M6 Machine Screws, Lock Washers and Washers from the Tilt Tower.
2. Retrieve the Inflation Gauge from its bag or protective wrap. Orient the Inflation Gauge so the Air
Lines are exiting at the bottom and the Gauge faces forward. Secure the Inflation Gauge to the Tilt
Tower using the M6 Screws, Lock Washers and Washers removed in the previous step. Refer to
the photo below.
3. Route the Blue and Orange Air Lines from the Inflation Gauge behind the Air Pressure Regulator
and Oiler into the push-to-connect Pneumatic Couplings on the Blue and Orange Air Lines coming
out of the Tire Changer.
⚠WARNING The Tire Changer uses pneumatic and electrical energy; if your organization has
Lockout/Tagout policies, implement them once the unit is connected to the Air
Source.
4. Install the Air Line Quick Disconnect using either PTFE Thread Sealant or Teflon®Tape.

R76LT Installing the Tilt Tower Page 8 of 9
BendPak TSB 82-092021
⚠WARNING Clear everything off the Turntable, and out of the path of the Tilt Tower
prior
to
connecting the Tire Changer to pressurized air.
⚠WARNING Stay clear of pinch points and moving components. Once Air Pressure is provided to
the Tire Changer the Tilt Tower will return to its upright position and the Wheel Clamps
on the Turntable will move to the outside of the Turntable.
5. Connect to air source 140-165 PSI (10-11 BAR) maximum. Be aware of moving components; stay
clear of pinch points.
6. Replace the Service Access panel (seven M6 Machine Screws).
7. Remove the Air Regulator and Oiler to provide installation clearance for the plastic Tilt Tower Base
Cover.
8. Install the Tilt Tower Base Cover (M6 Phillips Machine Screw).
9. Install Air Regulator and Oiler.
10. Install back cover (two Hex Nuts).

R76LT Installing the Tilt Tower Page 9 of 9
BendPak TSB 82-092021
To Install the Bead Breaker:
1. Retrieve the Bead Breaker Blade from its plastic bag. Remove excess shipping grease, if required.
2. Remove the M14 x 95 mm Bolt, Lock Washer and Lock Nut from the Bead Breaker assembly.
3. Insert the Bead Breaker Blade on to the Bead Breaker Arm and secure with the M14 Bolt, Lock
Washer and Nut just removed.
If you have questions about your Ranger BendPak Tire Changer, go to Bendpak.com/support, email
support@bendpak.com, or call (805) 252-2363.


