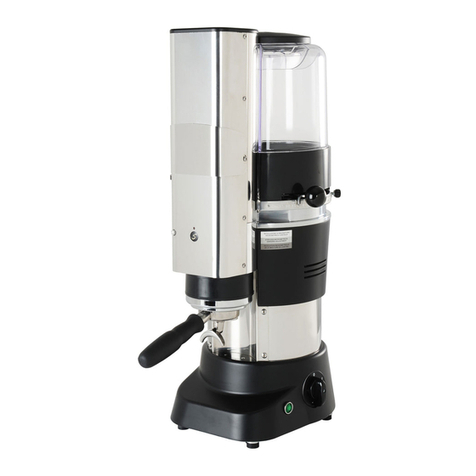
Bentwood VERTICAL 63 Instruction Manual

VERTICAL 63
220-230V Version
User Handbook (Original Instructions)
To download the user manual please visit our homepage: https://www.bentwoodcoffee.ch/vertical-63/

Reading and storing the instruction manual
Before you start using the Vertical 63 Coffee Grinder, carefully read through this original instruction
manual and the safety information. Only then will you be able to use the Vertical 63 Grinder safely and
without danger. The company cannot be held liable for any damage to people or property resulting
from failure to respect the instructions concerning safety, installation and maintenance contained in
this manual. The original instruction manual is based on the standards and regulations in force in the
European Union.Please also note the guidelines and laws that apply inyour country. For greater clarity,
the Vertical 63 Grinder will be referred to below simply as the “grinder”. Please keep this original
instruction manual safe for subsequent questions. Please also pass this original instruction manual on
to subsequent owners and users of the grinder.
Explanation of symbols used
The following symbols and signal words are used in this original instruction manual, on the grinder or
on the packaging.
WARNING! This signal word/symbol indicates a moderate risk, which, if it is not avoided, can lead to
death or serious injury.
CAUTION! This signal word/symbol indicates a low risk, which, if it is not avoided, can lead to minor
or moderate injury.
NOTE! This signal word warns of possible material damage
Declaration of Conformity (see “Declaration of Conformity” section): Products marked with this
symbol fulfil all applicable community provisions of the European Economic Area.
Products marked with this symbol are only permitted for use indoors.
This symbol indicates a risk of electric shock.
This symbol indicates that the grinder conforms to protection class I.

This symbol indicates that an equipotential bonding is needed for the appliance, as it is a stationary
appliance.
Safety
Intended use
The grinder is suitable only for grinding roasted coffee beans. Do not use the grinder to grind other
products or objects. It is only to be serviced by trained personnel. Any other use is not considered to
comply with intended use and can result in material damage or even personal injury. Do not make any
changes to the grinder. Neither the manufacturer nor the supplier can accept liability for any injury or
damage resulting from failure to comply with the safety information.
Safety information
WARNING!
Risk of electric shock!
Improper use, incorrect electrical installation or too high voltage can lead to electric shock. The grinder
shall be installed only by authorized, qualified personnel.
- Children are to be supervised not to play with the appliance.
-Before connecting the machine, check that electrical power supply corresponds to the specifications
on the grinder’s data plate.
- Only connect the grinder to a socket with good accessibility, allowing you to disconnect it quickly
from the power supply in the event of a malfunction. Should the grinder’s plug not be compatible with
your socket, have the plug replaced with a suitable type by a qualified technician.
- Do not use the grinder if you notice any visible damage or if the power cable or plug is faulty.
- If the grinder power cable is damaged, it must be replaced by the manufacturer or by qualified
personnel in order to avoid hazards.
- If damaged, replacement of the cord shall be done by qualified and professional service.
- Connect the grinder only to a power supply with a 16 A-slow fuse. If the power connection at the
installation location of the grinder is not protected in this way, have a 16 A-slow fuse fitted by a
qualified electrician.
- Never conceal the fan grids.
- Never insert objects into the fan grids.
- Install the grinder only in locations where its use can be supervised by trained personnel.
- Do not operate the grinder above an altitude of 2,000 meters.
- Do not immerse the grinder, the power cable or the power plug in water or any other liquids.
- Do not clean the grinder with a water jet.
- Do not clean the grinder with compressed air (e.g. with a compressed air blow gun).
- Never touch the power plug with wet hands.
- Never unplug the power plug from the wall socket by pulling on the power cable; always grip the
power plug.
- Never use the power cable to carry the grinder.
- Keep the grinder and power cable / power plug away from open flames and hot surfaces.
- Do not position the power cable in such a way that it could create a tripping hazard.
- Do not bend the power cable and do not place it over sharp edges.
- Use the grinder in indoor areas only. Never operate the grinder in damp areas or in the rain.
- If you recognize there is a malfunction, switch the grinder off and remove the power plug from the
socket.

- Do not open the grinder casing; leave repairs to the experts. If repairs are required, please contact
qualified and professional technical service. If unauthorized repairs are carried out, the connection is
not made correctly or the grinder is operated incorrectly, all liability and warranty claims are excluded.
Only parts that comply with the original appliance specifications may be used for repairs. This grinder
contains electrical and mechanical parts that are essential for protection against potential hazards.
WARNING!
The appliance must not be used by children or people with reduced, physical, sensorial or mental
abilities. It must also never be used by people without the necessary skills and experience unless
under supervision or during training. Do not allow children to play with this equipment at any time
and make sure that children do not insert any objects into the grinder.
- Do not leave the grinder unsupervised when in operation.
- Do not let children play with the packaging materials. Children can become entangled in it and
suffocate while playing.
- Do not let children play with small parts. They can be life threatening if swallowed.
- The user must respect the general safety regulations in force in the country in which the machine is
installed as well as the rules of common sense, and shall be responsible for ensuring that periodic
machine maintenance is correctly performed.
- Maintenance needs to be carried out by qualified, professional personnel.
CAUTION!
Risk of tipping and injury!
Incorrect handling of the grinder can result in injury.
- Position the power cable so that nobody can become entangled in it and cause the grinder to fall.
- Always place the grinder on a flat and level surface, that is able to support its weight, to prevent it
from falling off.
Before using for the first time
Checking the grinder and scope of delivery
NOTE! Risk of damage!
The grinder can be damaged if the packaging is opened carelessly with a sharp knife or other pointed
object. Open with care.
1. Remove the grinder from its packaging.
2. Check that the delivery is complete (see Fig. on the next page).
3. Check for damage to the grinder or any of the individual parts. If this is the case, do not use
the grinder and contact your supplier.

❶Lid ❾On / Off Button
❷Bean Hopper ❿Power Cable Outlet
❸Slider ⓫Ventilation Grid
❹Grind Adjustment
❺Grinding Degree Scale
❻Screen
❼Outlet
❽Drip Tray*(not available in the US)

A. Setting up the grinder
1. Inserting the bean container
You will need a slot screwdriver (not supplied) to fix the bean hopper).
1. Place the grinder on a level and stable surface, that can hold the grinder’s weight and does not
vibrate.
2. Make sure that the grinder is switched off (On/Off switch (11) to “0” position).
3. Position the bean hopper (2) on the bean hopper intake. When positioning the bean hopper, make
sure the slide is on the right side and the screw thread on the left side.
4. Use a slot screwdriver to tighten the locking screw for the bean container clockwise.
5. Connect the grinder to the power supply by inserting the power plug into a properly installed
earthed socket.
2. Setting the portafilter support –PORTAFILTER SUPPORT IS NOT PART OF THE STANDARD
PRODUCT AND ONLY SUPPLIED IF ORDERED ACCORDINGLY.
To adjust the portafilter support for your portafilter, follow the instructions engraved at the bottom
of the portafilter support. In case you wish to fix the portafilter support to a certain position, use the
two screws supplied to fix it on the wooden drip tray (8).
3. Operation
NOTE! Risk of overheating!
Exceeding the maximum permissible operating cycle can cause the grinder to overheat.
–Do not exceed the maximum operating cycle (see “Technical data” section).
–Observe the recommended break when the maximum permissible operating cycle is reached (see
“Technical data” section).
The grinder has athermal overcurrent circuit-breakerwhich interrupts the electric circuitof the grinder
in case of electricaloverload. To use the grinder again, first set the On/Off switch (11) to switch position
0 (off). You can now switch the grinder on by setting the On/Off switch to switch position I and resume
using the grinder (see “Troubleshooting” section).
NOTE! Risk of damage!
The operator cannot adjust the thermal overcurrent circuit-breaker. If the circuit-breaker has been
triggered several times, a service partner must be contacted for advice as the motor winding may be
damaged.
4. Inserting coffee beans
1. Remove the lid (1) from the bean hopper (2).
2. Pour roasted coffee beans into the bean hopper from above.
The maximum filling quantity should be approx. 1 cm below the edge of the bean container.
The minimum filling quantity should not fall below approx. 2 cm in order to ensure that there are no
dispensing fluctuations.
3. Place the lid back onto the bean container.
4. If necessary, open the bean container by pulling out the sliding valve (3).
5. Switching on the grinder
1. Ensure that the power plug is inserted into a properly installed earthed socket.
2. Switch on the grinder by moving the On/Off switch (11) to position “I”.

6. Setting the grinding degree
1. Select the grinding degree by moving the grind adjustment handles (4) until the targeted
grind size is shown through the lens (5).
2. Reduce the grinding degree only while the grinder is in operation.
NOTE! Risk of damage!
Do not grind below grind size 100 and above 1000, as indicated through the lens (5).
7. Functioning and basic settings
The shot sizes, i.e. the volume of grounds per serving, are defined by the grinding time. The user can
save settings for a single shot and for a double shot. As well, the grinding time can be controlled
manually by pressing the manual mode button.
The precise time needed for a requested grammage depends on the chosen grind size, type of coffee
and operating climate.
8. Select the grinding time
Press the menu button (1) and select set dose in the menu. By using the up (3) or down (7) arrows
select the dose you want to change. Single Dose relates to the single cup on the key pad, Double
Dose sets the time for the symbol with two cups on the key pad. Use the check arrow (2) to confirm
your selection and then adjust the grinding time by using the up (3) and down (7) buttons. To confirm
and save the new grinding time, press the check button (2).
Manual grinding mode
By pressing the manual button (6), the grinding process starts and continues until the button is
pressed again.
9. Changing Language
Press the menu button (1) and select language. Select the desired language by moving the up (3) and
down (7) buttons and then confirm with the check button (2).
10. Set Date and Time
Press the menu button and select Date/Time, then use the up (3) and down (7) arrows to adjust and
then confirm with the check button (2).

11. Shot Counter
Press the menu button (1) and select shot counter. The shot counter shows the number of grind
cycles, since the first activation of the grinder.
B. Cleaning
CAUTION!
Risk of injury!
-Always handle the grinder with care to avoid the danger of its falling.
-Place the grinder on a stable surface that will not tilt.
-Ask for help if the grinder is too heavy for you to carry it by yourself.
NOTE! Risk of short-circuit!
Water penetrating the grinder can cause a short-circuit.
–Never immerse the grinder in water or any other liquids.
–Never clean the grinder with a water jet.
–Never introduce any water into the ventilation or openings.
–Also ensure that no water or other liquids make their way into the casing.
NOTE!
Risk of damage!
Improper handling can cause damage to the grinder.
–Do not use any harsh cleaning products or sharp or metallic cleaning objects such as knives, metal
scouring pads or similar. These can scratch the surface.
–Do not clean the grinder with compressed air (e.g. with a compressed air blow gun).
–Do not put any components into the dishwasher.
–Do not lift the grinder by the bean container; lift only by the casing and always use both hands.
1. Cleaning the surface on which the grinder stands
1. Switch off the grinder (On/Off switch (11) to position 0) and remove the power plug from the
socket.
2. Lift the grinder by the casing with both hands and place on a clean surface.
3. Clean the surface and the underside of the grinder with a damp cloth and dry the surfaces. The
surfaces must be dry and free from oil and grease.
4. Place the grinder back onto the clean surface.
2. Cleaning the casing
1. Switch off the grinder (On/Off switch (11)to position 0) and remove the
power plug from the socket.
2. Also clean the following parts of the grinder with a brush:
• the outlet (7),
• the start button (11),
• the drip tray (8).
Wipe the casing and the drip tray with a damp cloth as often as necessary.

3. Cleaning the bean container
The bean container must be cleaned daily to remove any coffee oil residue, as it can have a negative
effect on the taste.
1. Close the bean container (2) by pushing in the sliding valve (3).
2. Grind the espresso beans that remain in the grinding mechanism until the grinder runs idle.
3. Use a slot screwdriver to release the locking screw from the bean container.
4. Take off the bean container from the grinder, remove it by lifting upwards.
5. Temporarily transfer the espresso beans into another container if necessary.
6. Clean the bean container inside and outside with a damp cloth and then dry it.
7. Remove any excess beans from the bean container intake.
8. Position the bean container on the bean container intake. When positioning the bean container
intake, ensure that the nose of the bean container is located in the corresponding recess in the bean
container intake.
9. Push the bean container down slightly into the bean container intake. If the bean container cannot
be fixed in place by rotating it, it may not be positioned correctly.
and try again to fix it in place by rotang it.
10. Use a slot screwdriver to tighten the locking screw for the bean container clockwise.
11. Pour the espresso beans back into the bean container.
12. Open the bean container by pulling out the sliding valve.
4. Cleaning the grinding mechanism
The manufacturer recommends using GRINDZ™or CAFETTO™cleaning products to be used every 2-5
days, that the grinder is working.
C. Troubleshooting
Problem
Cause
Remedy
The grinder is
not grinding;
the display
does not
light up.
The power
plug is not
plugged into a
socket.
The bean container
is not
inserted.
The thermal
overcurrent
circuit-breaker
has been
triggered.
Insert the power plug into a
properly
installed wall socket.
Insert the bean container.
Check whether the circuit-
breaker’s release button has
popped out. Push it back in if
necessary. If the circuit breaker
repeatedly pops out, contact
your supplier.
Check the electric fuse. Return
it to its original state or replace

The electric
fuse has
tripped.
it. Check whether other loads
are connected to this fuse and
if so, pull their plugs.
If the fuse trips repeatedly,
contact your supplier.
The grinder is
humming but
not grinding.
The grinding
mechanism is
blocked.
Turn the grind adjustment gear
to the maximum and then start
grinding. The grinder will clear
itself.
The grinder is not grinding
finely enough.
The grinding discs may be
worn out.
Contact your supplier.
D. Technical data
Model: Vertical 63
Voltage / frequency:
220–230 V; 50-60 Hz
Protection type: IPX1
Protection class: I
Fuse: 6,3Amp Fuse Time leg
Idle speed: 1400 rpm
Sound emission values (during grinding): 80 dBA
Grinding capacity (fine–coarse): 3–8 g/s*
Max. permitted operating cycle:
30 seconds ON / 6 min OFF
Max. daily output: 20 kg
Dimensions (W × D × H): 198 × 415 × 550 mm
Weight (net): 22.0 kg
Max. funnel filling quantity: 600g
*Depending on the espresso bean type selected, the grinding degree selected and
the mains frequency.
E. Disposal
Disposing of the packaging
Dispose of the packaging by correctly sorting the recyclable materials.
Dispose of cardboard as waste paper and film as recyclable
materials.
CAUTION!
The packaging materials can cut or wound if not handled properly with care. Keep packaging
materials out of reach of children and irresponsible persons.
Disposing of the grinder

Used appliances may not be thrown into commercial/domestic waste! The grinder
must not be considered as normal waste but must be disposed at an appropriate
collection centre for the recycling of electric and electronic appliances. Recycling materials
helps to preserve our natural resources. For further information contact respective local
authorities or the retailer from whom you bought the grinder.
User Manual Version 01042021
Bentwood GmbH
Gewerbestrasse 5, 6330 Cham, Switzerland
info@bentwoodcoffee.ch Mobile:+41 79 883 03 06
www.bentwoodcoffee.ch
Table of contents

