BENZINA ZERO V-10 User manual

1
Electric Scooter
Owner’s Manual

2
Contents
Preface .......................................................... 3
Disclaimer ..................................................... 4
Safe Riding .................................................... 5
Part 1 - Scooter Introduction ......................... 6
Scooter Overview ......................................... 6
LED Display Overview .................................. 7
Power/Light and Mode Button Instructions . 7
Part 2 - Scooter Assembly .............................. 8
Unboxing ...................................................... 8
Front Tube Assembly .................................... 8
Post Assembly Inspection ............................. 9
Part 3 - Learn to Ride ................................... 10
Basics of Riding .......................................... 10
How to Charge ........................................... 11
Fold and Carry ........................................... 12
Part 4 - Safety .............................................. 13
Dangerous Operation ................................ 14
Part 5 - Scooter Maintenance ....................... 15
Brake ......................................................... 15
Front Steering Shake .................................. 16
Folding Stem Shake ................................... 16
Storage and Maintenance ......................... 17
Part 6 - Scooter Specifications ...................... 18
Part 7 - Warranty Policy ............................... 20
Warranty ................................................... 20
Non-Warranty Regulations ........................ 20
Declaration .................................................. 21

3
Preface
Welcome to the Benzina Zero Family!
Thank you for choosing the electric scooter.
Please ensure you activate your warranty at www.benzinazero.com/warranty-form
Please read this user manual carefully before using your .
All information in this Owner’s Manual is correct at the time of publication. Benzina Zero
reserves the right to make changes at any time without incurring obligation. © Benzina Zero
2023.

4
Disclaimer
When purchasing any Benzina Zero electric scooter, you:
1. Agree to being solely responsible and liable for violation of any laws, rules, regulations,
and/or ordinances whilst riding the e-scooter.
2. Agree to being solely responsible and liable for any and all consequences, claims,
demands, causes of action, losses, liabilities, damages, costs and expenses, penalties,
lawyers' fees, judgements, fees and/or disbursements of any kind or nature whatsoever,
whether foreseeable or unforeseeable, and whether known or unknown, as a result of
your actions whilst riding any e-scooter bought from Benzina Zero.
3. Acknowledge and accept that you must wear a helmet that meets the AS/NZS 2063:2008
standard certification ("Permitted Helmet") as varied by federal regulation and all times
while riding Benzina Zero e-scooters, whether required by law or not.
4. Acknowledge that accidents, personal injuries, death and other harm can happen when
you are operating an e-scooter purchased from Benzina Zero, including as a result of
falling, collisions, encountering hidden obstacles and varying terrain and aggravation of
existing health conditions.
5. Acknowledge that you have been warned about these possibilities, and you assume all
risk in relation to the operation of Benzina Zero purchased e-scooters. This provision will
constitute a "risk warning" for the purposes of any applicable law and may operate to
exclude or limit any rights you might otherwise have against Benzina Zero.

5
Safe Riding
1. Take the tim e to l ea rn t he basics of how to ride your electric scooter to avoid any
accidents.
2. Obey all road regulations and ride in a manner befitting road conditions.
3. Keep your hands and feet fixed firmly to the scooter at all times when riding.
4. Always be extra cautious at intersections, crossing and in crowded and high traffic
situations.
5. A compliant helmet must be worn at all times when riding.
6. Wearing a rider jacket, gloves and boots is strongly advised.
7. Ensure that you hold the required rider licence for your state or country.
8. Never lend your scooter to an inexperienced rider.
9. Never ride in another driver’s “blind spot”.
10. Above all, ride to live; employ common sense in all situations.

6
Part 1 - Scooter Introduction
Scooter Overview
1. Handlebar
2. Throttle
3. LED display
4. Front LED headlight
5. Front reflector
6. Brake lever
7. Folding stem
8. Folding safety lock
9. Folding safety lever
10. Benzina Zero branding
11. Front mud guard
12. Front wheel
13. Drum brake
14. Kick stand
15. Foot pad
16. Folding hook buckle
17. Taillight
18. Rear mud guard
19. Side reflector
20. Rear wheel with motor

7
LED Display Overview
1. Speed
2. Speed unit - km/h
3. Single trip mileage
4. Mode
5. Headlight
6. Fault indicator
7. Trip/Range
8. Battery power level
9. Mode button
10. Power/Light button
11. Cruise
Power/Light and Mode Button Instructions
1. Long press the power button to turn on, long press again to turn off.
2. Type in passcode (000 is factory passcode) M to adjust, “Power” button to select.
3. Once on, short press the power/light button to turn on/off the headlights.
4. Short press the mode button to switch between power modes 1, 2 and 3
8
Part 2 - Scooter Assembly
Note: We always recommend that the instructions in Part 2 to be carried out by a qualified
skilled technician, if you are unsure then do not attempt to carry out any assembly or repairs by
yourself.
Unboxing
1. User Manual
2. Screws
3. Allen key (3mm)
4. Charger
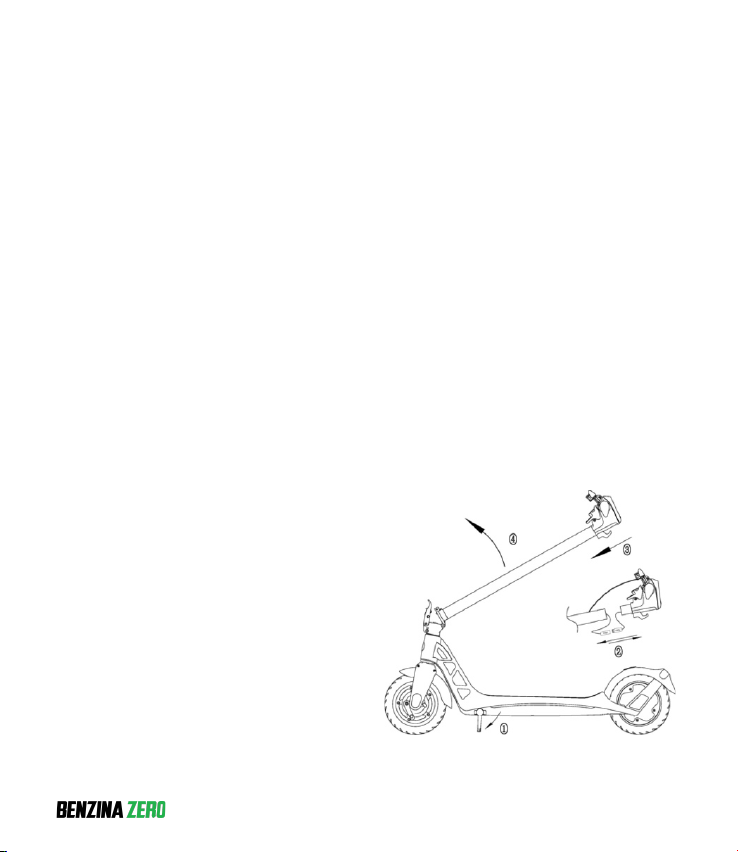
Front Tube Assembly
1. After taking the whole scooter out of the
box, place it on a flat ground. Open kick
stand ①. Connect the waterproof cable
between the handlebars and folding stem
②. Lift the folding stem to the upright
position ③,&then couple the safety lever to
the folding stem ④. Once you hear a
‘click’, the stem is locked in place.

9
2. Fasten the handlebars and the folding
stem with the provided allen key and
screws.
Post Assembly Inspection
1. Power on inspection
2. Gear shift inspection
3. Front headlight inspection
4. Braking force inspection
10
Part 3 - Learn to Ride
Note: Beginners learning how to ride electric scooters are at risk of falling and injury. Please
always wear a helmet and protective gear.
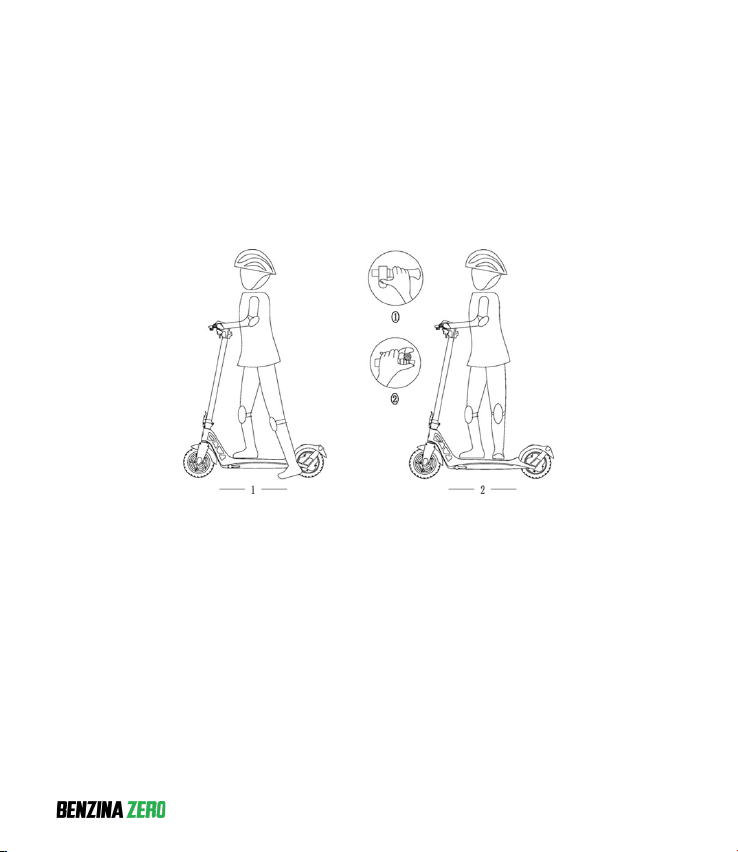
Basics of Riding
1. Start on a flat, paved road. Place your weak leg on the middle of the foot pad. It should
be facing straight ahead and your knee should be bent. Push off the ground with your
strong leg.
2. When the scooter is moving at more than 3km/h, move your kicking foot onto the
scooter, behind your other foot. When the scooter is stable, then push the throttle ①.
3. To brake , s q u e e z e t h e l e f t h a n d o n the brake lever tightly to brake ②. Front wheel drum
brake and the rear electronic brake will be in effect simultaneous.
11
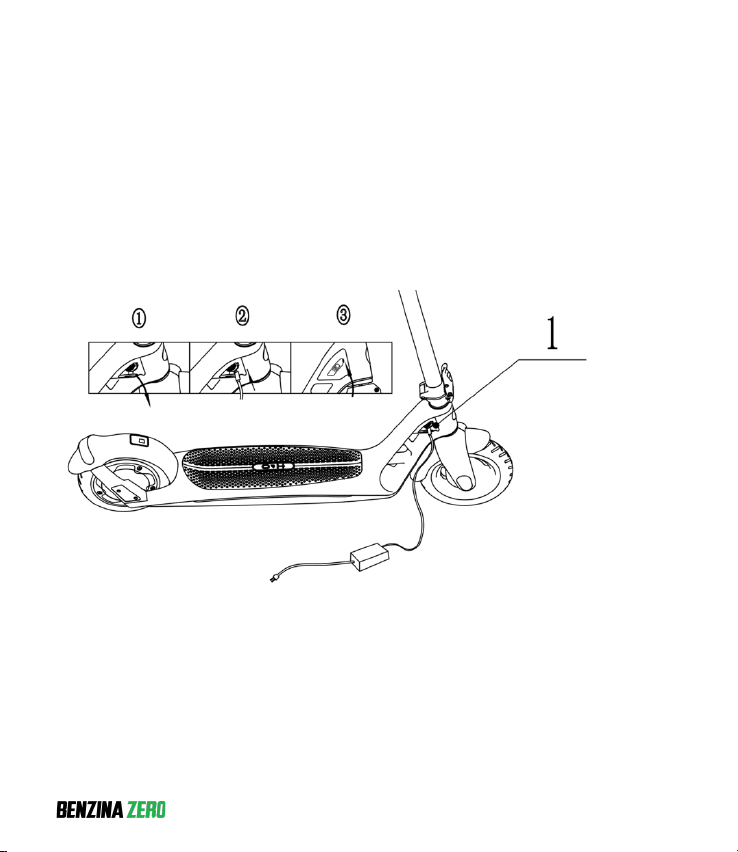
How to Charge
Note:
1. When the battery power is low, charge the battery to avoid damaging the battery.
2. When charging is complete, unplug the charger from the scooter. Do not charge the
battery for a long time.
3. Do not charge the battery unattended.
The charging port is at the front right side of the scooter. When charging, open the dust-proof
cap of the charging port, and then insert the charging cable. When the indicator light on the
charger is red, it means charging is in progress. When the indicator light of the charger turns
green, it means charging is complete. Typically, charging time for 10Ah battery from zero to full
takes 5-6 hours. When the battery is charged, unplug the charging cable from the port and
fasten the dust-proof cap.

12
Fold and Carry
Before folding, turn off the power. First lift the safety lock, then uncouple the safety lever. Then
fold the folding stem and fasten the hook between the handlebars to the buckle on the top of
the rear mud guard. Pick up the scooter using the fastened folding stem to carry.

13
Part 4 - Safety
1. Only use the product in accordance with local regulations.
2. Do not ride the scooter close to a water source.
3. Do not ride the scooter when damaged.
4. As with any mechanical component, a vehicle is subject to high stresses and wear. The
various materials and components may react differently to wear or fatigue. If the
expected service life for a component has been exceeded, it may break suddenly,
therefore risking injuries to the user. Cracks, scratches and discoloration in the areas
subject to high stresses indicate that the component has exceeded its service life and
should be replaced.
5. WARNING! Keep plastic covering away from children to avoid suffocation.
6. Do not jump the scooter.
7. Do not ride the scooter with more than one rider.
8. Riders should wear enclosed shoes when riding the scooter.
9. When riding in dark areas, turn on the headlight and ride slowly.
10. When the surface condition is not good, stop riding and walk the scooter.
11. When the scooter is on and not being ridden, do not push the throttle.
12. Do not hang backpacks or other objects on the handlebars when riding the scooter.
13. Do not ride the scooter in the rain.
14. Do not accelerate when going downhill.
15. Do not ride high speed on bumpy roads.

14
Dangerous Operation
1. While riding, you need to hold the handlebars with both hands.
2. While riding, please do not lift one foot or do other dangerous actions.
3. Do not ride in water deeper than 2cm.
4. When travelling at high speed, do not sway or turn the handlebars aggressively.
5. Do not step on or stand on the rear mud guard during riding.
15
Part 5 - Scooter Maintenance
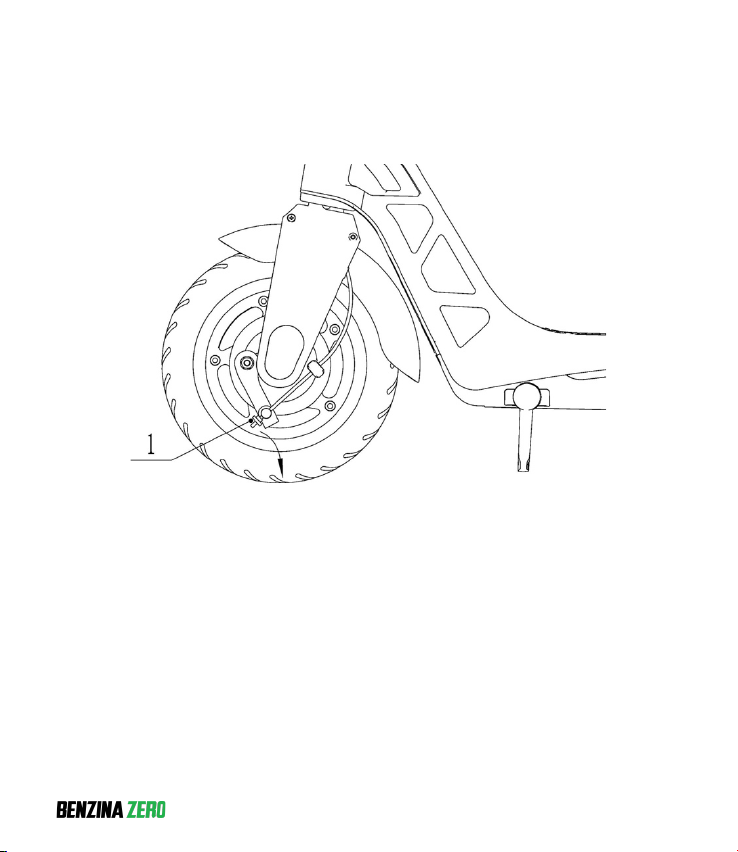
Brake
If the brakes feel loose, tighten the brakes using the adjustment nut by turning it
counterclockwise. On the contrary, if the brakes feel too tight, you can turn the adjustment the
nut by hand in a clockwise direction to loosen.

16
Front Steering Shake
If the stem of the scooter is shaking, please use the allen key provided to tighten the four
screws at the joint between the handlebars and the folding stem. Also tighten the two screws
at the base of the stem.
Folding Stem Shake
When riding for a period of time and feel that the gap between the folding stem is too large, we
can use tools to adjust the folding mechanism on the folding base. Use a 2.5mm hex socket
tool to unscrew the set screw in clockwise direction. Use a 3mm hex socket tool to tighten
counterclockwise the folding mechanism screw to the proper position. Use a 2.5mm hex
socket tool to tighten the set screw.

17
Storage and Maintenance
1. Please do not store the scooter in direct sunlight and rain.
2. Check the screws and tighten them regularly.
3. If there are stains on the surface of the scooter body, use a soft cloth dipped in a small
amount of water to wipe it. Do not use alcohol, gasoline or other corrosive or volatile
chemical solvents. Otherwise, the appearance or internal structure of the scooter body
could be damaged.

18
Part 6 - Scooter Specifications
No
Content
Parameter
1
Unfold scooter size L×W×H
1086*483*1198 mm
2
Folding scooter size L×W×H
1086*483*485 mm
3
Min. turning angle
830 mm
4
Net Weight
About 15.8 kg
5
Max climbing angle
14°
6
Battery capacity
36V 10.4 Ah
7
Motor Rated power
300W rear drive
8
Max speed
25 KM/h
9
Gear Switch
First gear:12KM/h second gear:
20KM/h third gear:25KM/h
10
Typical Range
35KM
11
Max load
100 kg
12
Wheel size
9 inches front and rear
13
Brake type
Front drum brake & rear EABS
14
Braking Distance
<10 m (Dry state)
15
Charger input voltage
AC 100-240V~50/60HZ
16
Charger output voltage
DC 42V 2A
17
Duration of Charging
About 4h
18
Packing size L×W×H
1120*180*505mm

19
19
Gross weight after packaging
About 18 kg
20
Recommend tire pressure
35-40 psi
21
Applicable age
Check State based regulations

20
Part 7 - Warranty Policy
Warranty
Type
Warranty Content
Starting Time
Warranty
Foot-pad, hub motor, front tube, handlebar, driven hub,
brake system, folding stem, front fork, cables, battery,
charger, throttle, brake lever, front light, tail light,
atmosphere light, LED dashboard
12 months
Non-Warranty Regulations
1. Service items not included – tires, grips, brake pads
2. Unauthorized maintenance, misuse, collision, negligence, abuse, liquid ingress, accident,
alteration, incorrect use of accessories, tearing, altering, or anti-counterfeiting labels.
3. Damage caused by force majeure.
4. Damage caused by human-made reasons (including but not limited to scooter fluid,
punctured tires, impact, marks and damage caused by normal use of exterior parts, etc.);
5. If this scooter is used for commercial purposes, warranty will not be guaranteed.
Table of contents
Other BENZINA ZERO Scooter manuals


