BENZINA ZERO Sport 2022 User manual

Owner’s Manual

2Owner’s Manual
Welcome
Welcome to the Benzina Zero Family
The sport is powered by the latest in high performance Bosch technology. The sport will tackle everything the urban
jungle can throw at it and more.
Owner/s Manual
2022

Owner’s Manual 3
The sport is rated to carry the operator and one passenger. Combined weight of rider, passenger, accessories and
cargo must never exceed the maximum rated weight capacity of 267kg. Minimising load will improve the vehicle’s
performance.
The sport is designed to travel on sealed roads only. Personal injury or mechanical damage may result if you do not
operate the vehicle in accordance with the guidelines of this manual.
Read this Owner’s Manual carefully, and retain it for future reference.
Running in the Battery, Brakes and Tyres
• Battery: Allow 5 to 8 cycles for optimal battery performance as the system analyses your battery characteristics.
During the first 200km do no run your battery below 40% .
• Brakes and tyres: Ride slowly and apply brakes gently to run in tyres and brake pads during the first 100km. We
recommend keeping speed below 45km/h during the run in period.
⚠Warning! Throughout this Owner’s Manual, these warning boxes indicate that severe personal injury or damage to equipment may result if
instructions are not followed.
All information in this Owner’s Manual is correct at the time of publication. Benzina Zero reserves the right to make changes at any time without
incurring obligation. © Benzina Zero 2022.
Important Notice

4Owner’s Manual
Contents
Important Notice 3
• Running in the Battery, Brakes and Tyres 3
Safe Riding 5
Right Side Overview 6
Left Side Overview 7
Handlebar Controls 8
Display 9
Key Remote 10
• Activate/Deactivate the Alarm System via Key Remote 10
• Power On/O via Key Remote 10
Ignition 11
• Power On/O via Ignition 11
• Steering Lock 11
• Disengaging Steering Lock 11
• Access Storage via Key Blade 11
Stands 12
Battery 13-15
• What is Lithium Ion? 13
• Accessing the Batteries 14
• Remove/Refit the Batteries 14
• Battery Storage 15
• Operating Temperature 15
• Charge Intervals 15
• Long-Term Storage 15
Charging 16-17
• Charging Options 16
• Charger Operations 16
• Charger Features 16
• Safety Information 17
• Limited Warranty 17
Range & Performance 18
Riding Modes 19
• Performance Modes 19
• Reverse Mode 19
Pre-Ride 20
• Pre-Ride Inspection 20
• Starting Procedure 20
Riding 21
• Throttle 21
• Braking 21
• CBS 21
Storage & Weight 22
• Accessing Underseat Storage 22
Pillion Passenger 23
Maintenance 24-25
• Cleaning 24
• Tyres 24
• Brakes 25
• How to check the brake fluid 25
Bluetooth Audio System 26
Vehicle Identification 27
Warranty 28
Specifications 29
Notes 30

Owner’s Manual 5
Safe Riding
⚠Warning! Conduct a pre-ride inspection before you turn on the vehicle (see page 20). This will prevent any accidental damage to equipment.
Safe Riding Rules
• Obey all road regulations and ride in a manner befitting road conditions.
• Keep your hands and feet fixed firmly to the vehicle at all times when riding.
• Always be extra cautious at intersections and in high trac situations.
• A compliant motorcycle helmet must be worn at all times when riding.
• Wearing a rider jacket, gloves and boots is strongly advised.
• Ensure that you hold the required rider licence for your state or country.
• Never lend your vehicle to an inexperienced rider.
• Never ride in another driver’s “blind spot”.
• Above all, ride to live; employ common sense in all trac situations.
Further riding rules and tips can be found on the website of your local transportation authority.

1
2
3
4
10 11
5
7 68
13 12
14
9
6Owner’s Manual
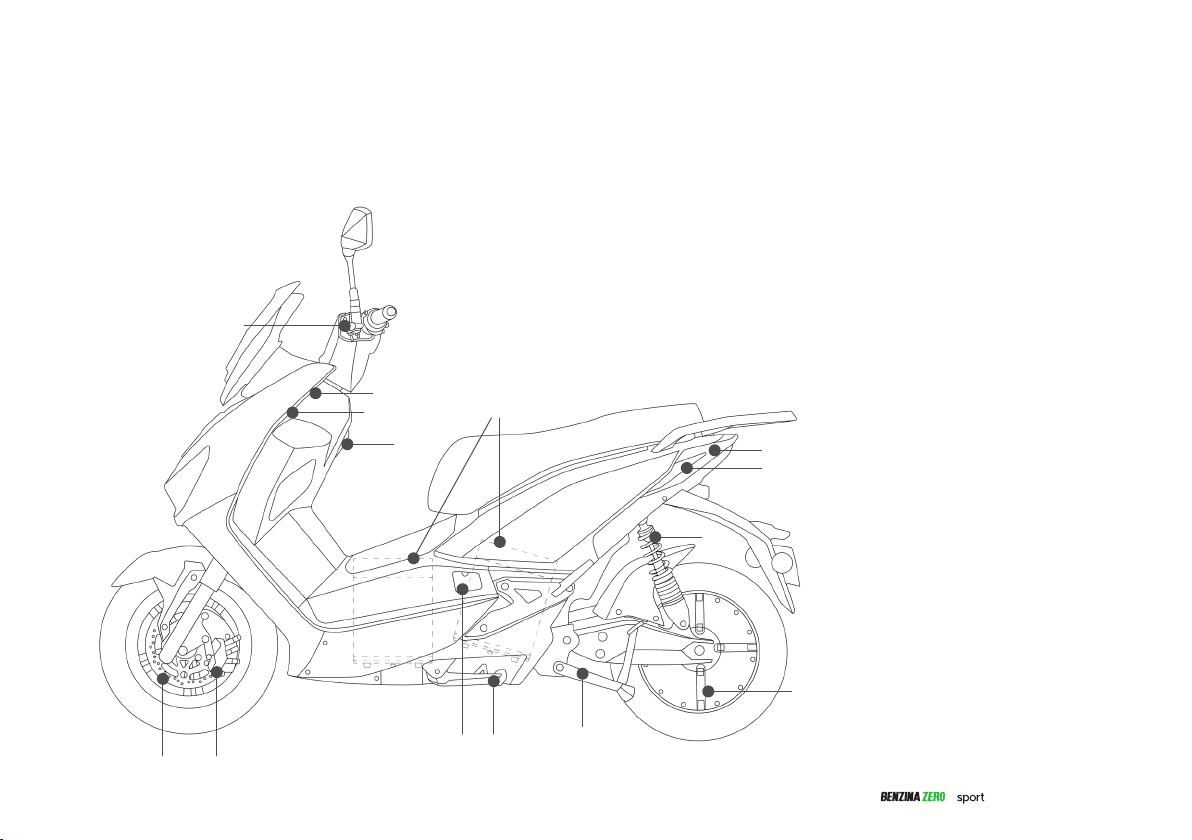
Right Side Overview
1. Rear view mirror
2. Front brake lever
3. Front indicator
4. Headlamp
5. Front suspension
6. Pillion footpegs
7. Rear disc brake
8. Rear brake caliper
9. Rear reflector and number plate light
10. Seat
11. Underseat storage
12. Storage pockets
13. Ignition
14. Throttle
6
4
7
8
9
10
12 11
14 13
1
3
2 5
Owner’s Manual 7
Left Side Overview
1. Rear brake lever
2. Bluetooth audio system
3. USB charger
4. Carry hook
5. Twin battery compartments
6. Tail light
7. Rear indicator
8. Rear suspension
9. Motor
10. Centre stand
11. Side stand
12. Charging socket
13. Front brake caliper
14. Front disc brake

2
5
10
3
4
7
6
8
9
1
8Owner’s Manual
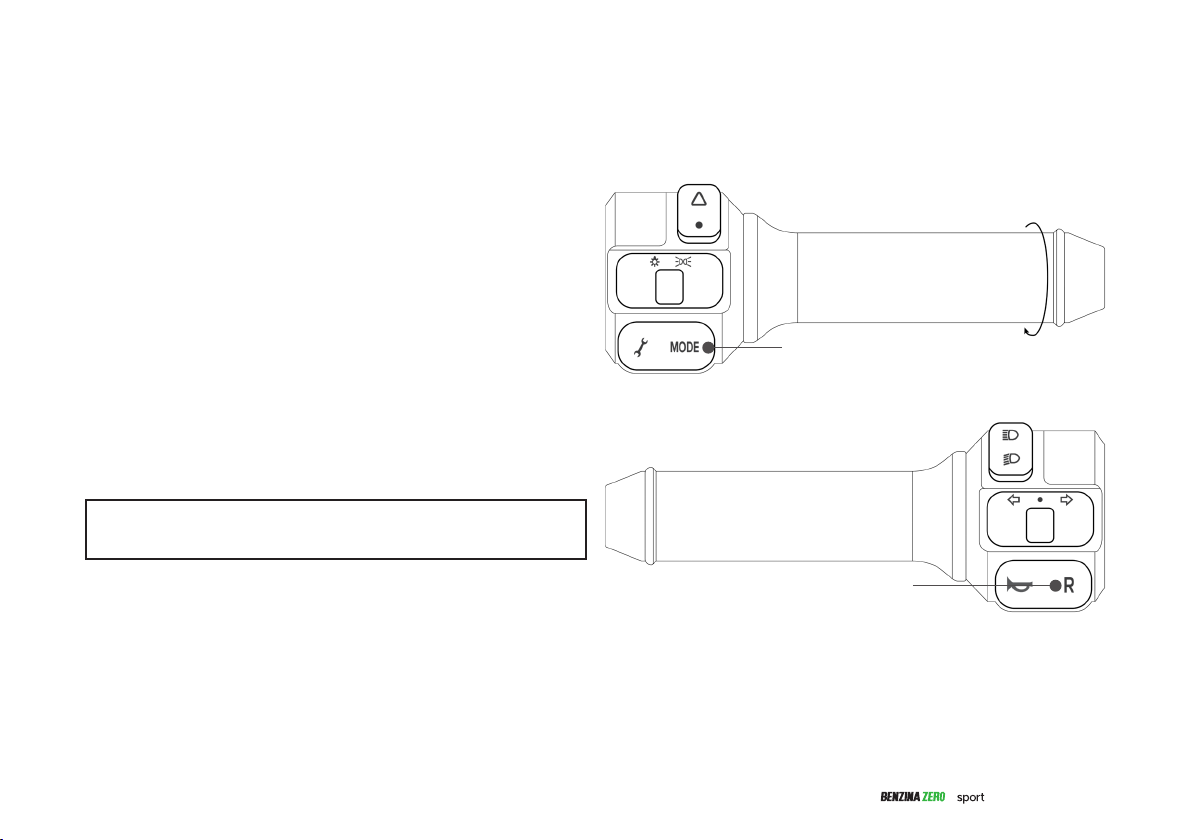
Handlebar Controls
1. One key recovery switch
2. Hazard light switch
3. Headlight switch
4. Performance mode switch
5. Throttle
6. Passing switch (forward of
handlebar)
7. High beam and low beam
8. Indicator switch
9. Horn
10. Reverse mode switch
Left handlebar
Right handlebar

1201101009080706050403020100-10-20-30-40-50
km/h
km
Ampere
km
TRIP
ODO
E2
E1
MODE
%
%
15
14
13
12
1 2
11 10 9
43
5
6
7
8
Owner’s Manual 9
Instrument Display
1. Accumulated ride time
2. Speed
3. Real-time “current” display
4. Fault code warning indicator
5. Headlight indicator
6. Right turn indicator
7. Charging indicator
8. Fault warning indicator
9. Odometer and trip meter
10. Battery percentage indicator
11. Mode indicator
12. Low battery warning indicator
13. Ready indicator
14. Left turn indicator
15. High beam indicator
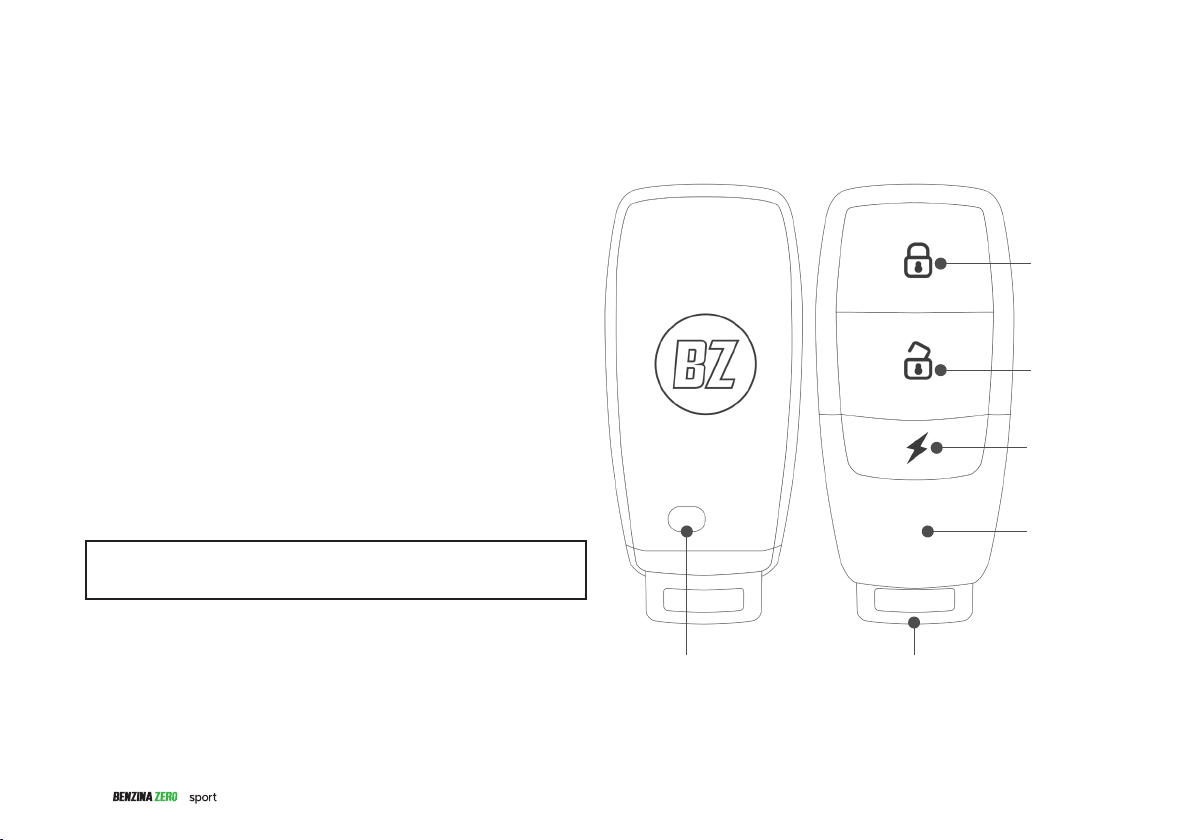
Keyless Start
Button
Key Remote
Release Button for
Key Blade
Key Blade
Alarm On
Button
Alarm O
Button
10 Owner’s Manual
Activate/Deactivate the Alarm System via Key Remote
• To deactivate the alarm system, press the ‘alarm o button’ once. The
lights will flash and a confirmation tone will sound twice. Once the
alarm has been deactivated the scooter is ready to be powered on
using the ignition switch (see page 11).
• To activate the alarm system, press the ‘alarm on button’ once. The
lights will flash and a confirmation tone will sound once.
• Important: For the security of your scooter, ensure that you use the
steering lock every time you park your sport (see page 11).
• Important: The sport will self activate the alarm 15 seconds after the
vehicle is powered o.
Power On/O via Key Remote
• After deactivating the alarm system via the key remote.
• Turn ‘ignition switch’ clockwise to ‘power on’ position (see page 11).
⚠Warning! Ensure that the steering lock is disengaged before
operating the scooter in keyless mode.
Key Remote
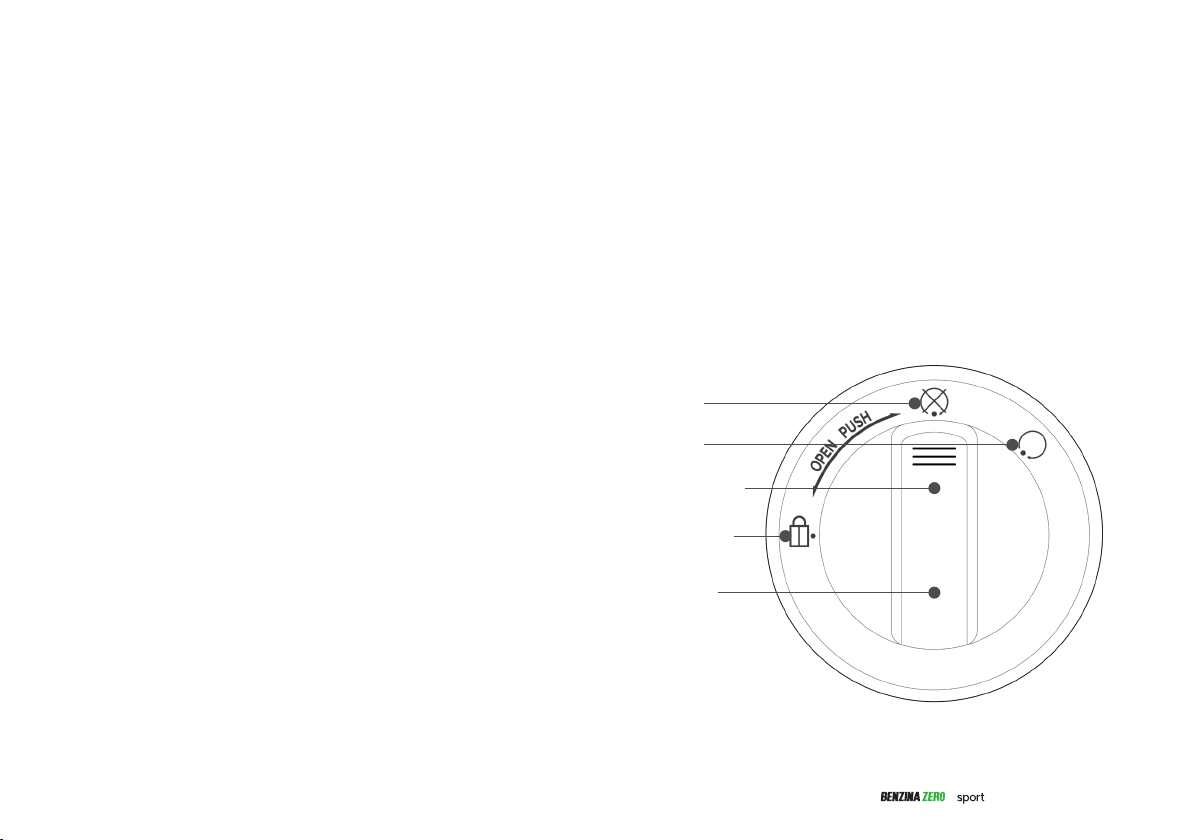
Power O
Power On
Ignition Switch
Steering Lock
Key Access
Cover
Owner’s Manual 11
Power On/O via Ignition
1. First, deactivate alarm system by following the steps above or by
pressing in on the ‘ignition switch’ (wait for two beeps to confirm
alarm system is deactivated).
2. To power on, turn ‘ignition switch’ clockwise to ‘power on’ position.
• Important: If the key remote is not in the proximity field, the ignition
won’t turn.
Steering Lock
1. Turn ignition to ‘power o’ position.
2. Ensure the handlebars are turned to the full left position.
3. From the ‘power o’ position, push the ‘ignition switch’ in and rotate
anti-clockwise to the ‘steering lock’ position.
4. If the steering lock does not immediately engage, gently move the
handlebars a few degrees left to right while turning the key.
Disengaging Steering Lock
1. Handlebars will be in the full left position.
2. From the ‘steering lock’ position, push the ‘ignition switch’ in and
rotate key clockwise to the ‘power o’ position.
3. If the steering lock does not immediately disengage, gently move
the handlebars a few degrees left to right while turning the key.
Access Storage via Key Blade
1. To retrieve the ‘key blade’, press the ‘release button’ on the back of
the key remote and pull out the ‘key blade’ (see page 10).
2. Lift ‘key access cover’ to reveal key barrel.
3. Insert key and turn anti-clockwise to access the underseat storage
and/or battery compartments to charge/change the batteries (see
page 14).
Ignition

Centre StandSide Stand
12 Owner’s Manual
Stands
Side Stand
Use the ‘side stand’ when parking the scooter for a short time.
1. Position the scooter on firm, level ground. If you park on inclined
ground, ensure that the front wheel is pointing up-hill.
2. Turn o scooter.
3. Swing the ‘side stand’ down, and support the scooter on the ‘side
stand’.
4. Dismount the scooter, and turn the handlebars fully to the left.
5. Turn the key anticlockwise to the lock position.
⚠Warning! If side stand is down, the scooter will not operate.
Centre Stand
The ‘centre stand’ should be used when parking the scooter for extend-
ed periods or when undertaking maintenance.
1. Turn scooter o.
2. While dismounted, hold the left hand grip with your left hand.
3. With your right hand, hold the under seat grip.
4. While applying firm pressure to the main stand foot lever, ensuring
the scooter is balanced, lift the rear of the scooter.
5. Ensure the weight is fully supported by the ‘centre stand’ before
you release your grip on the scooter.
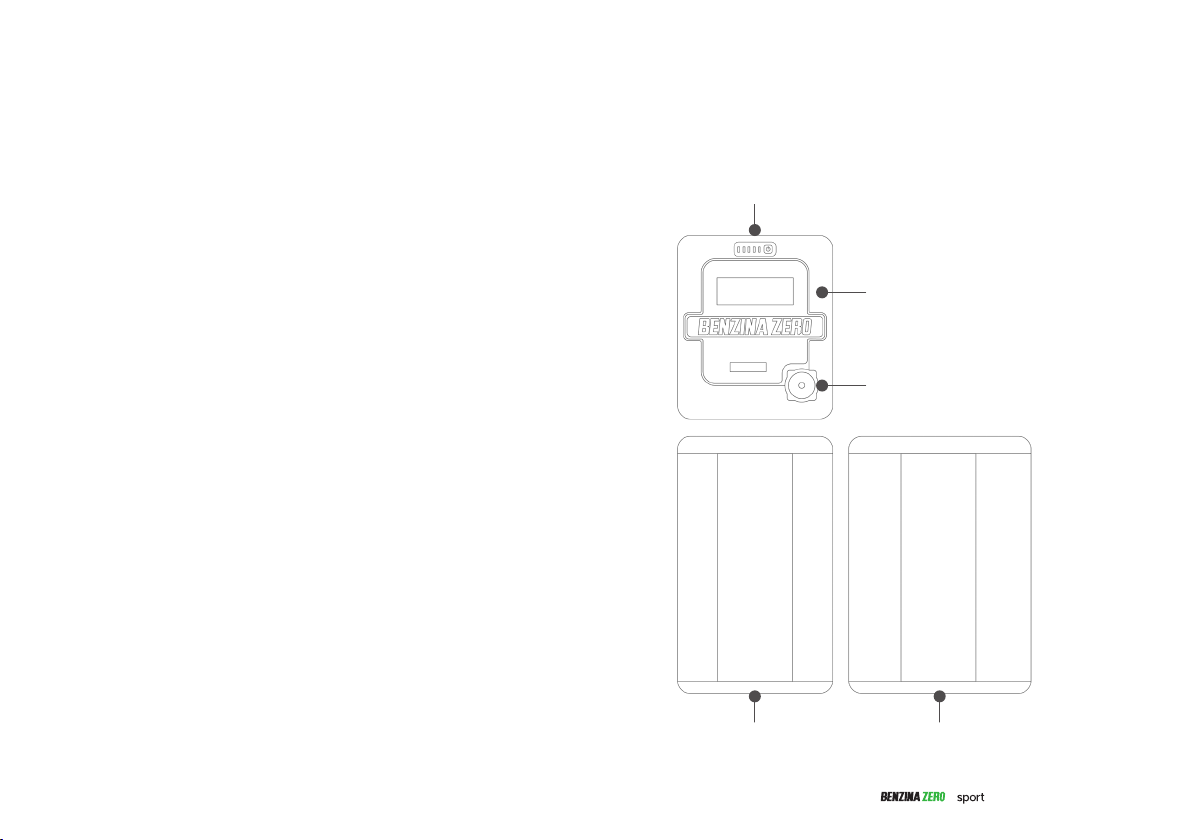
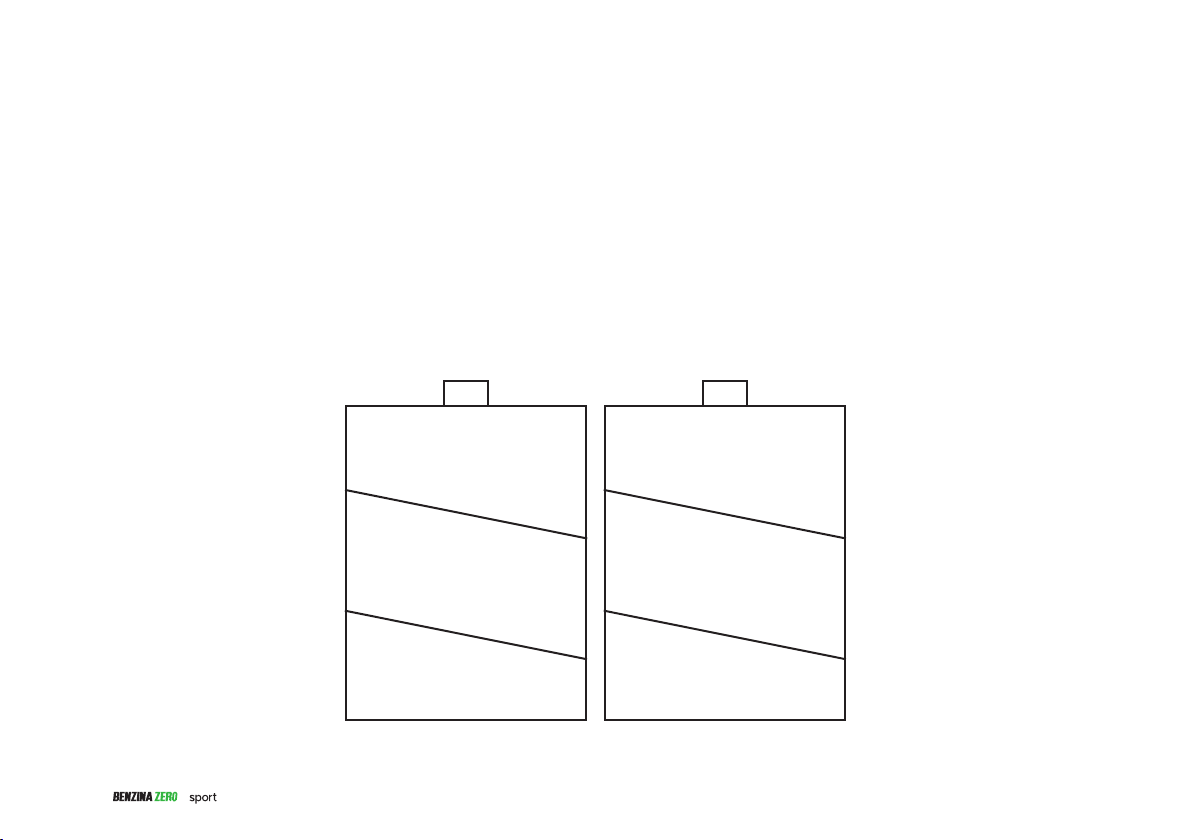
Battery Top View
Battery Charging Socket
Battery Level Indicator
Battery Side View Battery Side View
Owner’s Manual 13
Battery
What is Lithium Ion?
Lithium Ion is an environmentally sustainable technology
and does not use heavy metals like mercury or cadmium
found in other batteries.
The battery in your sport uses high quality lithium
technology; it’s at the forefront of rechargeable cell
technology with superior reliability, recharging time and
power to weight ratio.
The battery does not develop charge memory so you can
recharge as frequently as it is convenient to do so.
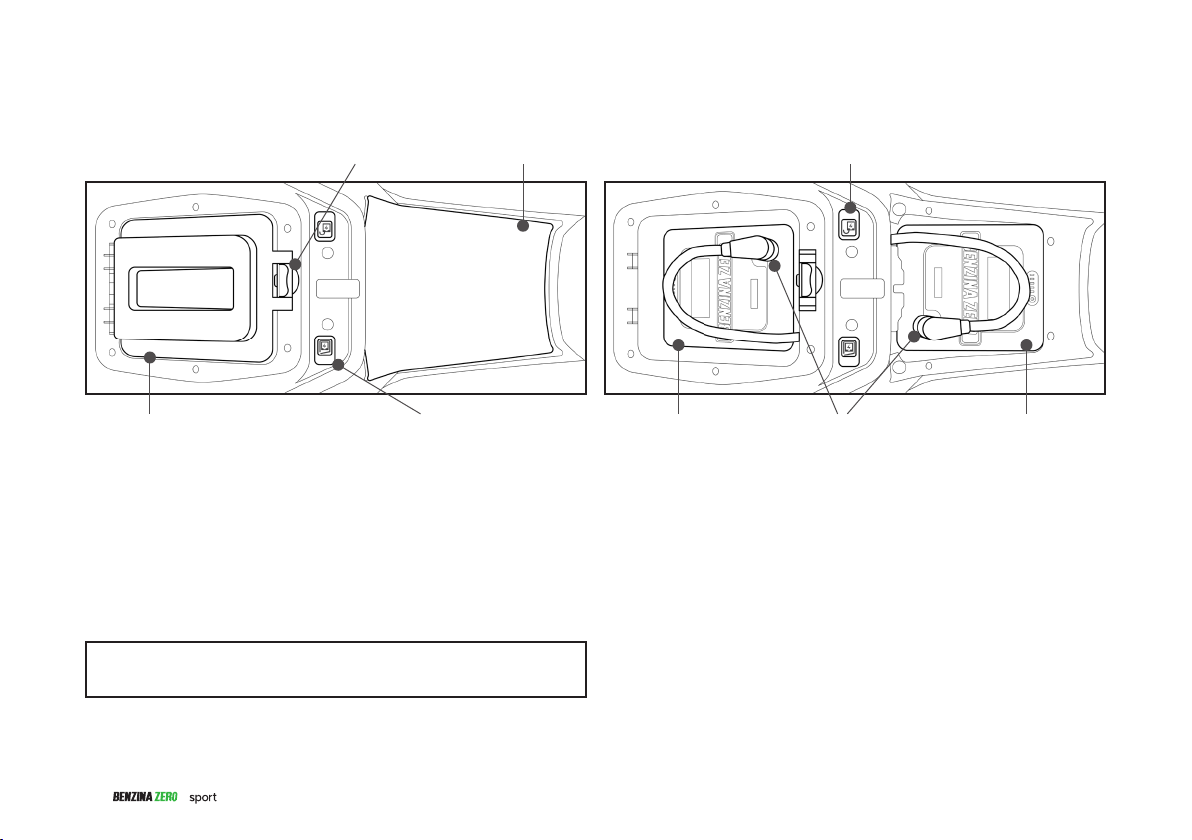
Front Battery Compartment
Unlock Button
Cover Release
Back Battery
Compartment
Back Battery Blue Locking
Collar
Battery Unlock ButtonFront Battery Compartment
Front Battery
14 Owner’s Manual
Remove/Refit the Batteries
1. Turn ‘blue unlocking collar’ anti-clockwise and unplug battery power
cable.
2. Press ‘battery unlock button’ to release both batteries.
3. Lift batteries out of compartment.
4. When refitting battery, ensure the battery is installed correctly (as
per diagram) with battery charging socket located towards the other
battery.
5. Route battery charge cable correctly as per diagram and connect
charge cable to charge socket ensuring the ‘blue locking collar’ is
secure.
Accessing the Batteries
1. Deactivate alarm system (see page 10).
2. Open underseat storage (see page 22) to reveal ‘back battery com-
partment’ and ‘unlock front battery compartment button’.
3. To unlock the ‘front battery compartment’, press the ‘unlock front
battery compartment button’.
⚠Warning! For a longer service life, and to prevent arcing wear and
tear, ensure the ignition is turned to o.
Battery

Owner’s Manual 15
Charge Intervals
While the battery cells in your battery will not be aected by charge
memory, from time-to-time you should discharge your battery to calibrate
with the cell management system.
Long-Term Storage
If the battery is kept stored for a long time (3 months or more), it
is strongly recommended that the cell is kept at dry and at a low
temperature. If you do not ride for an extended time (such as during
winter) we recommend to repeat the battery running in procedure for
2–3 cycles. Optimal battery storage range is between 60% to 80%.
⚠Warning! The battery must not be stored below 60% for long term
storage. Never leave the battery discharged less than 10%.
Important: Any problems caused by malfunction of the battery due to
unsuitable use and care of the battery is not covered under warranty.
The handling conditions described above must be followed or warranty
will be voided.
Battery Storage
Storing the battery for extended periods (longer than 2 months) can
result in minimal loss of capacity (maximum 1%–2%). Storing the battery
in ideal conditions will obtain optimum safety and minimise the eect of
capacity loss:
1. Store the battery in a cool, dry place ~15°C.
2. Charge the battery to 80% before storage.
3. Periodically check battery charge level and charge back to 80%
(every few months).
⚠Warning! Store battery at 80%. Never store battery at 0%. Storing
Lithium Ion cells at 0% state-of-charge for extended periods of time
will result in destruction of the battery due to internal shorting.
Operating Temperature
0° to 45°C
⚠Warning! If air temperature is 38°C or above and/or high humidity,
allow the sport to rest for up to 1 hour prior to charging.
Battery
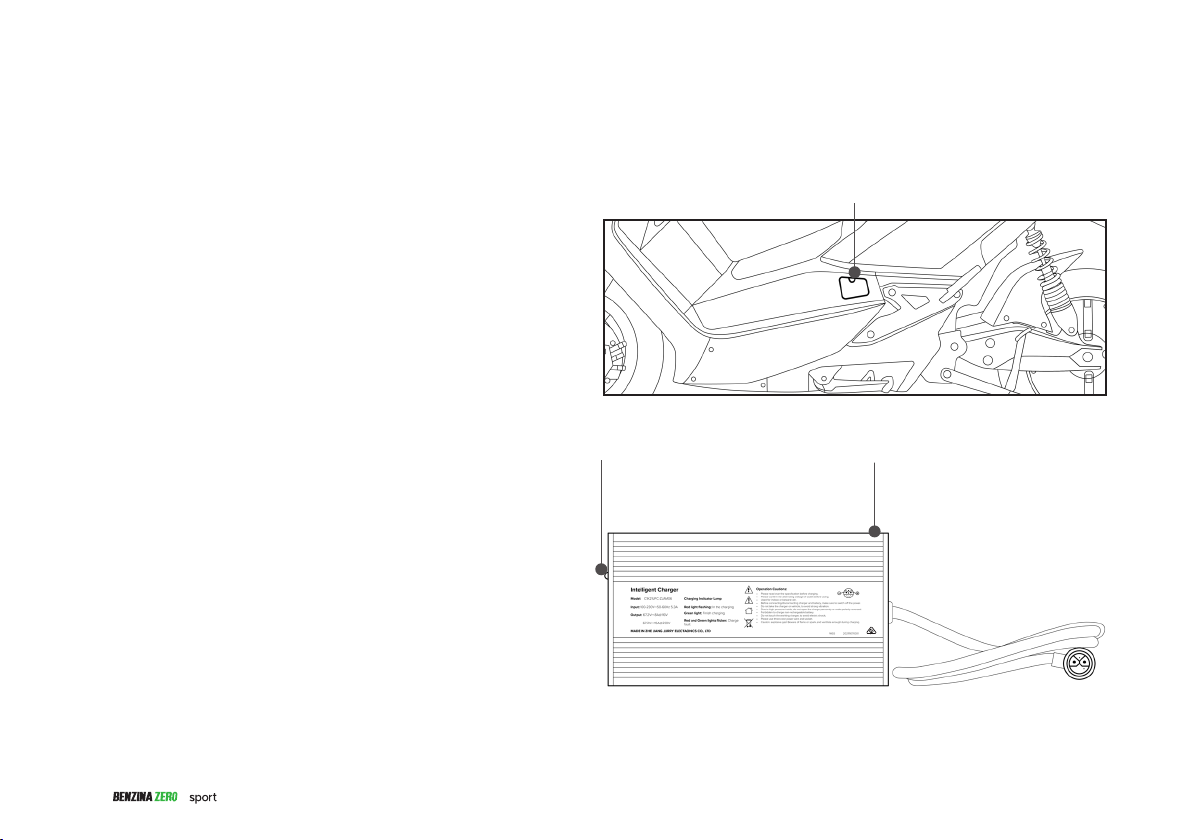
Charge Indicator Lights Charger
Charging Socket
16 Owner’s Manual
Charging
Charging Options
There are 2 ways that you can charge your sport’s battery; while its
installed in the scooter via the ‘charging socket’ on the left side of the
scooter, or by removing the battery and charging it directly via the
‘battery charging socket’ located on the top of the battery (see page 13).
When charging via charging socket on the scooter you will charge both
batteries simultaneously.
Charger Operations
• Make sure the charger is firmly connected to the charging socket.
• Important:Plug the charger into the battery after plugging into the
standard AC outlet.
• The charger will be turned o automatically after the battery is fully
charged. Unplug the charger from AC outlet when the charger is not
in use.
• Important: Unplug the charger from AC outlet before unplugging the
battery.
Charger Features
• Constant current and voltage (CC & CV)
• Multi-stage charging
• Built-in microcontroller (MCU)
• Pulse width modulation (PWM)
• LLC resonance and synchronous rectification
*This image is shown for illustration purposes only, and charger may be subject to change.

Owner’s Manual 17
Charging
Safety Information
• NEVER store the charger outdoors. Always store indoors when not
in use.
• NEVER place the output cable, power cord or charger on a wet
surface.
• NEVER use a charger with defective power cord and/or damaged
wires.
• DO NOT use in extremely humid conditions. DO NOT place the
charger directly in sun light.
• NEVER use the charger near flammable and explosive areas.
• ALWAYS keep the charger vent 10cm away from other objects and
DO NOT cover.
• Unplug charger from AC outlet before attempting any maintenance
or cleaning.
• Place the charger in a clean and ventilated environment while
charging.
• Plug in and unplug the AC power cord by grasping the plug. Do not
drag the power cord itself to reduce risk of damaging power cord.
Important: These techniques will ensure system integrity and will
precisely control the charging voltage and current. The battery will be
fully charged but not overcharged.
⚠Warning! You must only use the charger supplied by Benzina
Zero. Do not use aftermarket products with the battery.
⚠Warning! Chargers are not designed to be carried onboard the
vehicle. Please make sure the voltage from AC outlet matches that
required by the charger. Benzina Zero is not responsible for any
improper operations.
Limited Warranty
Every charger has been tested before shipping. Please contact an
authorised Benzina Zero dealer immediately if there is any damage to
the charger.
The warranty is void if:
• Operation instructions are not followed.
• Warranty period has expired.
• The damage is caused by improper operation.
• Damage caused by force majeure.
18 Owner’s Manual
Range & Performance
Your range results are a direct reflection of your riding habits. The more conservatively you ride, the better range you
can expect from your sport scooter.
Key factors that will aect range include speed, acceleration, number of starts/stops, load weight, air temperature and
terrain.
Ride conservatively when you first get your sport and adjust your riding style to reflect what you want out of your ride.
Modulated riding
Streamlined seat position
Reduced cargo
Tyres correctly inflated
Lower speeds
Fewer stops
Flat terrain
Smooth roads
Warmer weather
No wind/tailwind
Dry roads
Aggressive riding
Upright seating position
Heavier cargo
Tyres under-inflated
Higher speeds
More stop/start
Hilly terrain
Bumpy roads
Cooler weather
Headwind
Wet/slippery roads
Decrease RangeIncrease Range
Performance Mode Switch
Reverse Mode Switch
Owner’s Manual 19
Riding Modes
Performance Modes
Your sport is equipped with 3 performance modes. You can control the
performance and eciency of your sport by pressing the ‘performance
mode switch’.
When you start the scooter, the default mode set to ‘2’.
Reverse Mode
1. Hold down the ‘reverse mode switch’ and twist the throttle to slowly
reverse the scooter. The display will show the scooter switch from
the chosen performance mode to the reverse mode.
2. Once you release the reverse switch, the scooter with return to the
previous performance mode.
⚠Warning! Ensure that the brakes are engaged when switching
between modes (moving forward and back).
Left handlebar
Right handlebar

20 Owner’s Manual
Pre-Ride Inspection
A pre-ride inspection only takes a few minute, and should
be conducted every time before you ride your sport.
1. Check tyre condition and pressure.
2. Ensure the battery is correctly fitted, and battery
cables are correctly connected with ‘blue locking
collar’ fastened.
3. Check brakes for correct operation; make sure there
is no fluid leakage.
4. Test lights and indicators for correct operation.
5. Check throttle for correct and smooth operation.
6. Adjust mirrors.
7. Check battery charge level.
Contact an authorised Benzina Zero dealer if you identify
an issue.
⚠Warning! If the pre-ride inspection is not conducted before using
the sport, damage to equipment or severe injury could result.
Pre-Ride
Starting Procedure
1. Deactivate alarm system (see page 10).
2. Turn ignition clockwise to the ‘power on’ position (see
page 11).
3. Mount the sport, and move side stand to up position.
4. Ensure the centre stand is up and all warning lights
are o.
5. Disengage idle safety mode by applying brake lever.
6. Your sport is ready to ride when the ‘ready indicator’ is
illuminated (see item 13, on page 9).
⚠Warning! The scooter will enter idle safety mode when stationary
for more than 10 seconds without holding the brake lever.
Table of contents
Other BENZINA ZERO Scooter manuals


