BENZINA ZERO V-50 User manual
1
Electric Scooter
Owner’s Manual

2
Contents
Preface .......................................................... 3
Disclaimer ..................................................... 4
Safe Riding .................................................... 5
Part 1 - Scooter Introduction ......................... 6
Scooter Overview ......................................... 6
LED Display Overview .................................. 7
Smart Card and Power/Mode/Light Button
Instruction .................................................... 8
Part 2 - Emoving App ..................................... 9
Download Emoving App .............................. 9
Pair your V50 ............................................... 9
Turn on your V50 via Emoving App .............. 9
Part 3 - Scooter Assembly ............................ 10
Unboxing .................................................... 10
Handlebar Assembly .................................. 11
Post Assembly Inspection ........................... 12
Part 4 - Learn to Ride ................................... 13
Basics of Riding ......................................... 13
How to Charge Battery in Scooter ............. 14
How to Charge the Battery Separately ...... 15
Part 5 - Safety .............................................. 16
Name and Content of Harmful Materials in
the Product ................................................ 17
Part 6 - Scooter Maintenance ....................... 18
Brake ......................................................... 18
Shaking Adjustment .................................. 18
Storage and Maintenance ......................... 19
Part 7 - Scooter Specifications ...................... 20
Part 8 -Warranty Policy ................................ 21
Warranty ................................................... 21
Non-Warranty Regulations ........................ 21
Declaration .................................................. 22

3
Preface
Welcome to the Benzina Zero Family!
Thank you for choosing the electric scooter.
Please ensure you activate your warranty at www.benzinazero.com/warranty-form
Please read this user manual carefully before using your .
All information in this Owner’s Manual is correct at the time of publication. Benzina Zero
reserves the right to make changes at any time without incurring obligation. © Benzina Zero
2023.

4
Disclaimer
When purchasing any Benzina Zero electric scooter, you:
1. Agree to being solely responsible and liable for violation of any laws, rules, regulations,
and/or ordinances whilst riding the e-scooter.
2. Agree to being solely responsible and liable for any and all consequences, claims,
demands, causes of action, losses, liabilities, damages, costs and expenses, penalties,
lawyers' fees, judgements, fees and/or disbursements of any kind or nature whatsoever,
whether foreseeable or unforeseeable, and whether known or unknown, as a result of
your actions whilst riding any e-scooter bought from Benzina Zero.
3. Acknowledge and accept that you must wear a helmet that meets the AS/NZS 2063:2008
standard certification ("Permitted Helmet") as varied by federal regulation and all times
while riding Benzina Zero e-scooters, whether required by law or not.
4. Acknowledge that accidents, personal injuries, death and other harm can happen when
you are operating an e-scooter purchased from Benzina Zero, including as a result of
falling, collisions, encountering hidden obstacles and varying terrain and aggravation of
existing health conditions.
5. Acknowledge that you have been warned about these possibilities, and you assume all
risk in relation to the operation of Benzina Zero purchased e-scooters. This provision will
constitute a "risk warning" for the purposes of any applicable law and may operate to
exclude or limit any rights you might otherwise have against Benzina Zero.

5
Safe Riding
1. Take the tim e to l ea rn the ba si cs of how to ride your electric scooter to avoid any
accidents.
2. Obey all road regulations and ride in a manner befitting road conditions.
3. Keep your hands and feet fixed firmly to the scooter at all times when riding.
4. Always be extra cautious at intersections, crossing and in crowded and high traffic
situations.
5. A compliant helmet must be worn at all times when riding.
6. Wearing a rider jacket, gloves and boots is strongly advised.
7. Ensure that you hold the required rider licence for your state or country.
8. Never lend your scooter to an inexperienced rider.
9. Never ride in another driver’s “blind spot”.
10. Above all, ride to live; employ common sense in all situations.

6
Part 1 - Scooter Introduction
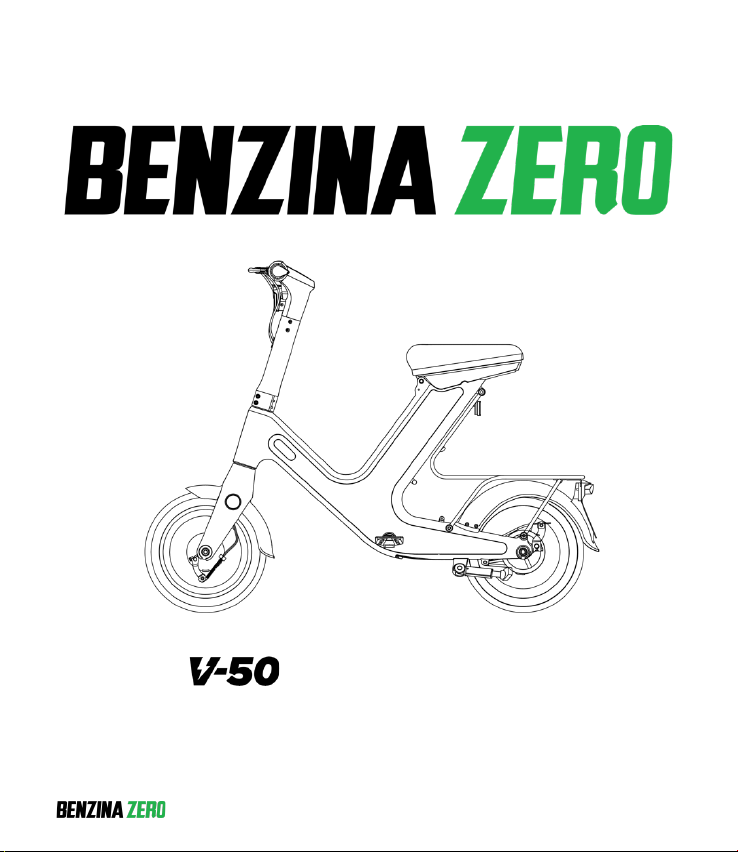
Scooter Overview
1. Handlebar
2. Throttle
3. Right brake lever
4. LED display
5. Power/Mode/Light button
6. Steering head
7. Bell
8. Left brake lever
9. Stem
10. Frame
11. Front fork
12. Front mud guard
13. Side reflector
14. Front brake
15. Wheel
16. Seat
17. Rear reflector
18. Rear rack
19. Tail ligh t
20. License plate
21. Rear mud guard
22. Motor
23. Rear brake
24. Kick stand
25. Foot rest

7
LED Display Overview
1. Low beam
2. Bluetooth connection
3. Park light
4. Battery level
5. Speed
6. Speed unit - km/h
7. Sport mode
8. Drive mode
9. Speed unit - mph
10. ECO mode
11. Power/Mode/Light button

8
Smart Card and Power/Mode/Light Button Instruction
1. To tu r n o n s c o ot e r, long press the power
button, long press again to turn off.
2. To un l o c k u s i ng t h e s m a rt ca r d , s w i pe t h e
smart card over the power button until the
scooter unlocks.
3. To turn on/off the headlights, short press
the power button twice.
4. To switch between power modes, short
press the power button once.
• Eco (Economical) 10km/h
• D (Drive) 15km/h
• S (Sport) 25km/h

9
Part 2 - Emoving App
Download Emoving App
Search "Emoving" in "App Store" or "Google Play", download and install.
Pair your V50
Open the Emoving app. Click the ‘+’ button to open the QR scanner. Scan the QR code
found underneath the seat. Once you have done this, your phone will be paired to the
scooter using Bluetooth. From now you can unlock the scooter using the app interface
rather than using the smart card.
Yo u c a n a d d t h e s c o o t e r t o m u l t i p l e d e v i c e s f o l l o w i n g t h e s t e p s a b o v e . A l t h o u g h , i f a
device is already paired with the scooter, the scooter will not pair with a new device.
Disconnect the previously paired device to connect a new one.
Turn on your V50 via Emoving App
Press power button on display panel, open Emoving app and select “get started”. Select
the bound device on Emoving to enter the main interface, then click “Power” within the
app to unlock the e-scooter.

10
Part 3 - Scooter Assembly
Note: We always recommend that the instructions in Part 3 to be carried out by a qualified
skilled technician, if you are unsure then do not attempt to carry out any assembly or repairs by
yourself.
Unboxing
1. User Manual
2. Screws
3. Allen key (5mm)
4. Charger
5. Smart card
6. Battery key
11
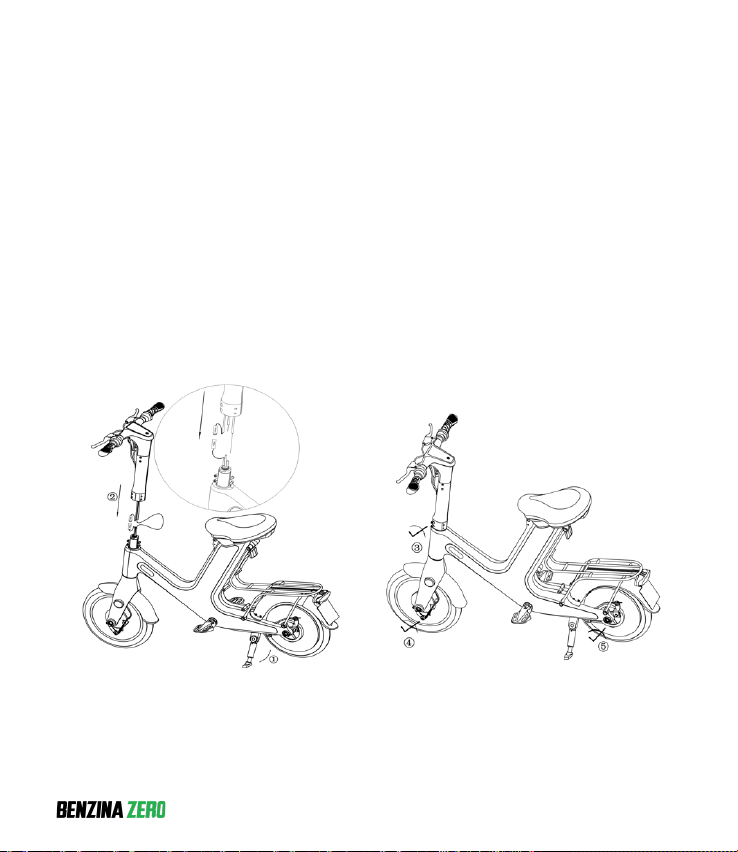
Handlebar Assembly
After taking the whole scooter out of the box, place it on a flat ground. Open kick stand ①.#
Connect the cable between the scooter head and stem, then thread the inner wires of the front
and rear brake cables into the two brake pipes which are exposed on the frame respectively
(Note: the longer brake inner wire is penetrated into the lower brake cable pipe, the short
brake inner wire is penetrated into the higher brake cable pipe, and the inner wire of the brake
cable must be inserted into the fixed position of the locking brake cable manually). Then insert
the scooter head to the stem ②. Use the allen key provided with the scooter to fasten the front
end and the riser ③, and then adjust the front and rear brakes ④, ⑤.

12
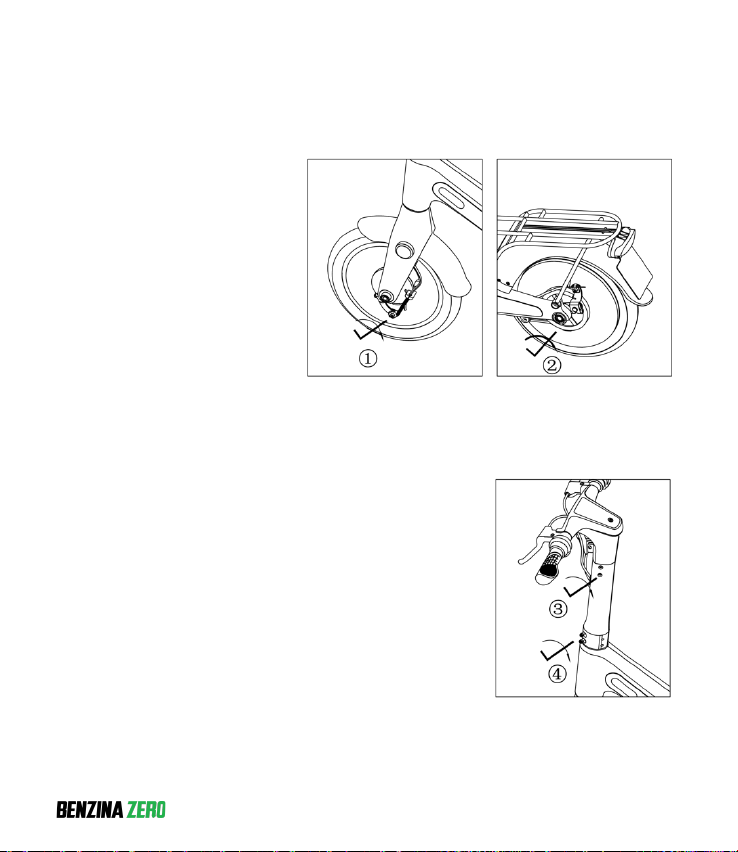
Post Assembly Inspection
1. Power on inspection
2. Gear shift inspection
3. Front headlight inspection
4. Braking force inspection

13
Part 4 - Learn to Ride
Note: Beginners learning how to ride electric scooters are at risk of falling and injury. Please
always wear a helmet and protective gear.
Basics of Riding
1. Start on a flat, paved road.
2. Mount the scooter. Kick up the kick stand with your left foot while leaning on your right
foot to keep the scooter balanced. Place left foot on the left foot rest.
3. Slowly and smoothly press the throttle to accelerate. When the scooter is moving lift and
place your right foot on the right foot rest.
4. Release the throttle to coast, and apply the brake to come to a pause.

14
How to Charge Battery in Scooter
Note:
1. When the battery power is low, charge the battery to avoid damaging the battery.
2. When charging is complete, unplug the charger from the scooter. Do not charge the
battery for a long time.
3. Do not charge the battery unattended.
Pull out the pull pin under the right side of seat and turn over the seat to see the battery
charging port. Then insert the charging head and connect charger to wall socket and turn on.
When the charger indicator light turns red, it indicates that it is charging. When the charger
indicator light turns green, it indicates that the charging is completed. Turn ch arger off at wall
socket and disconnect. Do not connect charger plug into scooter with charger turned on as this
could cause damage to scooter or electrical shock.

15
How to Charge the Battery Separately
Pull out the pull pin under the seat, then turn over the seat. Unlock the battery using the key,
then pull out the battery. Then follow the instructions for “How to Charge Battery in Scooter”,
observing safety warnings.

16
Part 5 - Safety
1. Only use the product in accordance with local regulations.
2. Do not ride the scooter close to a water source.
3. Do not ride the scooter when damaged.
4. As with any mechanical component, a vehicle is subject to high stresses and wear. The
various materials and components may react differently to wear or fatigue. If the
expected service life for a component has been exceeded, it may break suddenly,
therefore risking injuries to the user. Cracks, scratches and discoloration in the areas
subject to high stresses indicate that the component has exceeded its service life and
should be replaced.
5. WARNING! Keep plastic covering away from children to avoid suffocation.
6. Do not jump the scooter.
7. Do not ride the scooter with more than one rider.
8. Riders should wear enclosed shoes when riding the scooter.
9. When riding in dark areas, turn on the headlight and ride slowly.
10. When the surface condition is not safe, stop riding and walk the scooter.
11. When the scooter is on and not being ridden, do not push the throttle.
12. Do not hang backpacks or other objects on the handlebars when riding the scooter.
13. Do not ride the scooter in the rain.
14. Do not accelerate when going downhill.
15. Do not ride high speed on bumpy roads.

17
Name and Content of Harmful Materials in the Product
Type
Harmful Materials
Pb
Hg
Cd
Cr(VI)
PPB
PBDE
Metal
O
O
O
O
O
O
Paint
O
O
O
O
O
O
Plastic
O
O
O
O
O
O
Rubber
O
O
O
O
O
O
This form is compiled according to SJ / T 11364
O: The content of the toxic and harmful substance in all homogeneous materials of the
component is below the limit specified in GB / t26572 standard
X: The content of the toxic and harmful substance in at least one
homogeneous material of the component exceeds the limit specified in GB /
18
Part 6 - Scooter Maintenance
Brake
If the brakes feel loose, tighten
the brakes using the adjustment
nut by turning it
counterclockwise. On the
contrary, if the brakes feel too
tight, you can turn the adjustment
the nut by hand in a clockwise
direction to loosen.
Shaking Adjustment
When you feel scooter head is shaking, use the tools to
tighten the screw at the connection between scooter head
and the stem counterclockwise, and also tighten the screw at
the connection between the stem and the frame.

19
Storage and Maintenance
1. Please do not store the scooter in direct sunlight and rain.
2. Check the screws and tighten them regularly.
3. If there are stains on the surface of the scooter body, use a soft cloth dipped in a small
amount of water to wipe it. Do not use alcohol, gasoline or other corrosive or volatile
chemical solvents. Otherwise, the appearance or internal structure of the scooter body
could be damaged.

20
Part 7 - Scooter Specifications
No
Content
Parameter
1
Dimensions
1245*580*1030 mm
2
Wheelbase
930mm
3
Max torque
≥65N.m
4
Net weight
About 33 kg
5
Max climbing angle
15°
6
Battery capacity
48V 10.4 Ah
7
Rated power
500 W Rear driven
8
Max speed
25 KM/h
9
Gear
10KM/h 15KM/h 25KM/h
10
Full charge range
30-35KM
11
Max load
120 kg
12
Wheel diameter
Front and rear 14 inch
13
Brake
Front and rear drum brake
14
Braking distance
<10 m (Dry)
15
Charger input voltage
AC 100-240V~50/60HZ
16
Charger output voltage
DC 54V 2A
17
Charging time
About 5h-6h
18
Packing size
1350*290*840mm
Table of contents
Other BENZINA ZERO Scooter manuals


 Service station manual")


