BEP Marine 710-125A User manual
Copyright © 2007 BEP Marine Limited. All rights reserved. A product of New Zealand. Page of 2
VOLTAGE SENSITIVE RELAY
DUAL BATTERY CHARGING MADE EASY
Dual battery charging made easy
Protects electronics on house battery circuit from engine start up spikes
Fully automatic
www.bepmarine.com
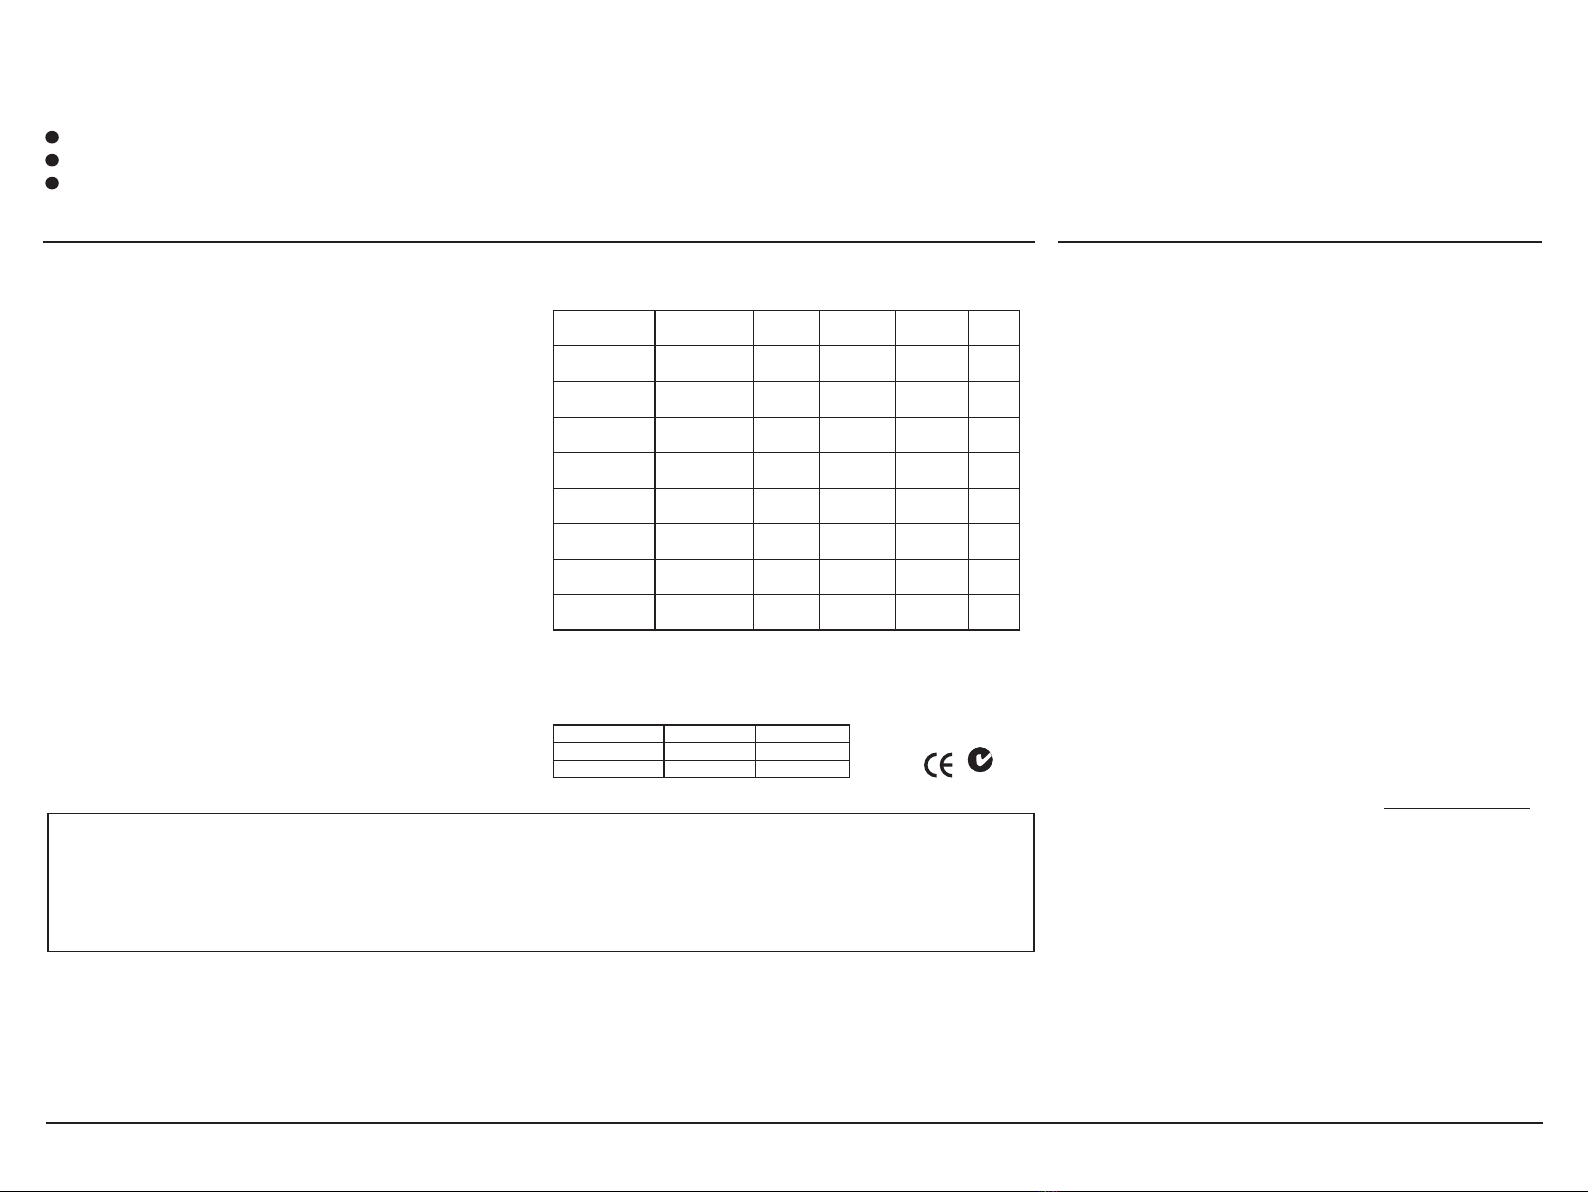
VOLTAGE DROP CHART
Total Cable
Length (m) Total Cable
Length (ft) Amps Voltage
Drop (%) mm² AWG
3
350
00 2.3%
3% 4 mm
6 mm
0
2
26
650
00 3%
3.5% 6 mm
0 mm 0
7
3
39
950
00 2.7%
3.4% 0 mm
6 mm 7
5
4
42
2 50
00 3.6%
2.6% 0 mm
25 mm 7
3
5
55
5 50
00 2.8%
3.3% 6 mm
25 mm 5
3
6
68
8 50
00 3.4%
3.9% 6 mm
25 mm 5
3
7
72
2 50
00 3.9%
4.6% 6 mm
25 mm 5
3
8
824
24 50
00 2.6% 25 mm 3
SPECIFICATIONS
Continuous 25 Amps
Intermittent 40 Amps
Ignition Protected UL07
System size 2 V DC 24 V DC
Engages 3.7 V DC 27.4 V DC
Disengages 2.8 V DC 25.6 V DC
24 V DC system is 70-25A-24V Z168
BEP’s unique VSR
Modern charging systems must be able to safely charge two or
more different types of batteries from one engine.
Now, thanks to BEP’s unique VSR (Voltage Sensitive Relay) boat
owners can enjoy the benets of fully charged engine starting
batteries and deep cycle house batteries with one easy-to-install
charging system.
70-25A (SINGLE SENSE) VSR OPERATION
The Voltage Sensitive Relay (VSR) allows two batteries to be
charged at the same time. When the engine is started and the start
battery reaches 3.7 volts, the VSR engages, allowing two battery
banks (start and house) to be charged simultaneously. When the
voltage drops below 2.8 volts (eg the engine is stopped), the VSR
disengages, separating the batteries.
This system eliminates the possibility of draining the wrong battery
and protects sensitive electronic equipment powered from the
house battery from harmful engine start up spikes.
70-25A-DS (DUAL SENSE) VSR OPERATION
Same as the 70-25A with the added feature of dual sensing.
This allows the unit to sense the voltage of both batteries that it is
connected between. If either battery is receiving a charge the VSR
will activate paralleling the two battery banks.
The 70-25A-DS is designed for situations where a battery charger
or second charging source is used into the house battery.
Q: To which side of the battery switch should the VSR be wired?
A: It is vital to follow the wiring installation diagram which shows
correct connection to the master switch. BEP only recommends
the supplied option. Other options can lead to accelerated battery
discharge as the sense circuit draws 0.0 Amps continuously. The
output wire of the VSR should always be connected to the battery
side of the House battery switch to ensure true isolation of house
circuits if the VSR is engaged.
Q: Why does the LED stay on after engine is turned off?
A: System voltage has not dropped below 2.8 V DC due to battery
charging. VSR will disengage once residual battery voltage drops
below 2.8 V DC.
Q: How do I ensure that the correct size of battery is matched
to my VSR?
A: See the battery sizing chart on next page.
Q: Why does my VSR ‘chatter’?
A: Because the charging system is too small for the batteries and
this is not allowing the VSR to work properly. Instead, once the
starting battery has reached the right voltage and the house battery
is connected the systems voltage is ‘caving down’ below 2.7 volts
and the relay is automatically disconnecting. The voltage then rises,
the relay re-engages; then the voltage drops the relay disengages
and the ‘chattering’ sound is heard as the relay quickly switches in
and out. Refer to battery sizing chart on next page.
More information can be found on our Website www.bepmarine.com.
Important information Frequently asked questions
IMPORTANT
It is the installer’s sole responsibility to install and use this product in a manner that will not cause accidents, personal injury or property damage.
Please follow the installation instructions supplied. If installation is not correct, the unit may not perform at its designed potential. If in doubt,
consult your local BEP Marine dealer. BEP Marine Limited disclaims all liability for any use of this product that may cause accidents, damage or
be a violation of any laws.
Copyright © 2007 BEP Marine Limited. All rights reserved.
Copyright © 2007 BEP Marine Limited. All rights reserved. A product of New Zealand. Page 2 of 2
VOLTAGE SENSITIVE RELAY
DUAL BATTERY CHARGING MADE EASY
Installation instructions
BEFORE INSTALLING
IMPORTANT
Do not use any type of corrosion inhibiting spray such as CRC,
INOX etc. on any part of this unit. These units are hermetically
sealed so do not require any other form of sealing. The studs have
been tinned to inhibit corrosion, use petroleum grease if required
(on metal parts only).
ENSURING CORRECT BATTERY SIZING:
The charging system must be correctly sized to
the batteries. If the charging system is too small for the batteries
the VSR will not work properly.
How the VSR works
Once the starting battery’s voltage rises to above 3.7 VDC,
the VSR switches to charge both batteries in parallel, when the
voltage drops below 2.8 V DC the VSR disengages. A buzzer-
like sound can be heard as the relay quickly switches in and out.
Disengagement can occur at idle (low amps out due to slow speed
of alternator) or if the house battery is at a low charge. An increase
of the engine’s RPM will increase the alternator output and hold up
the voltage.
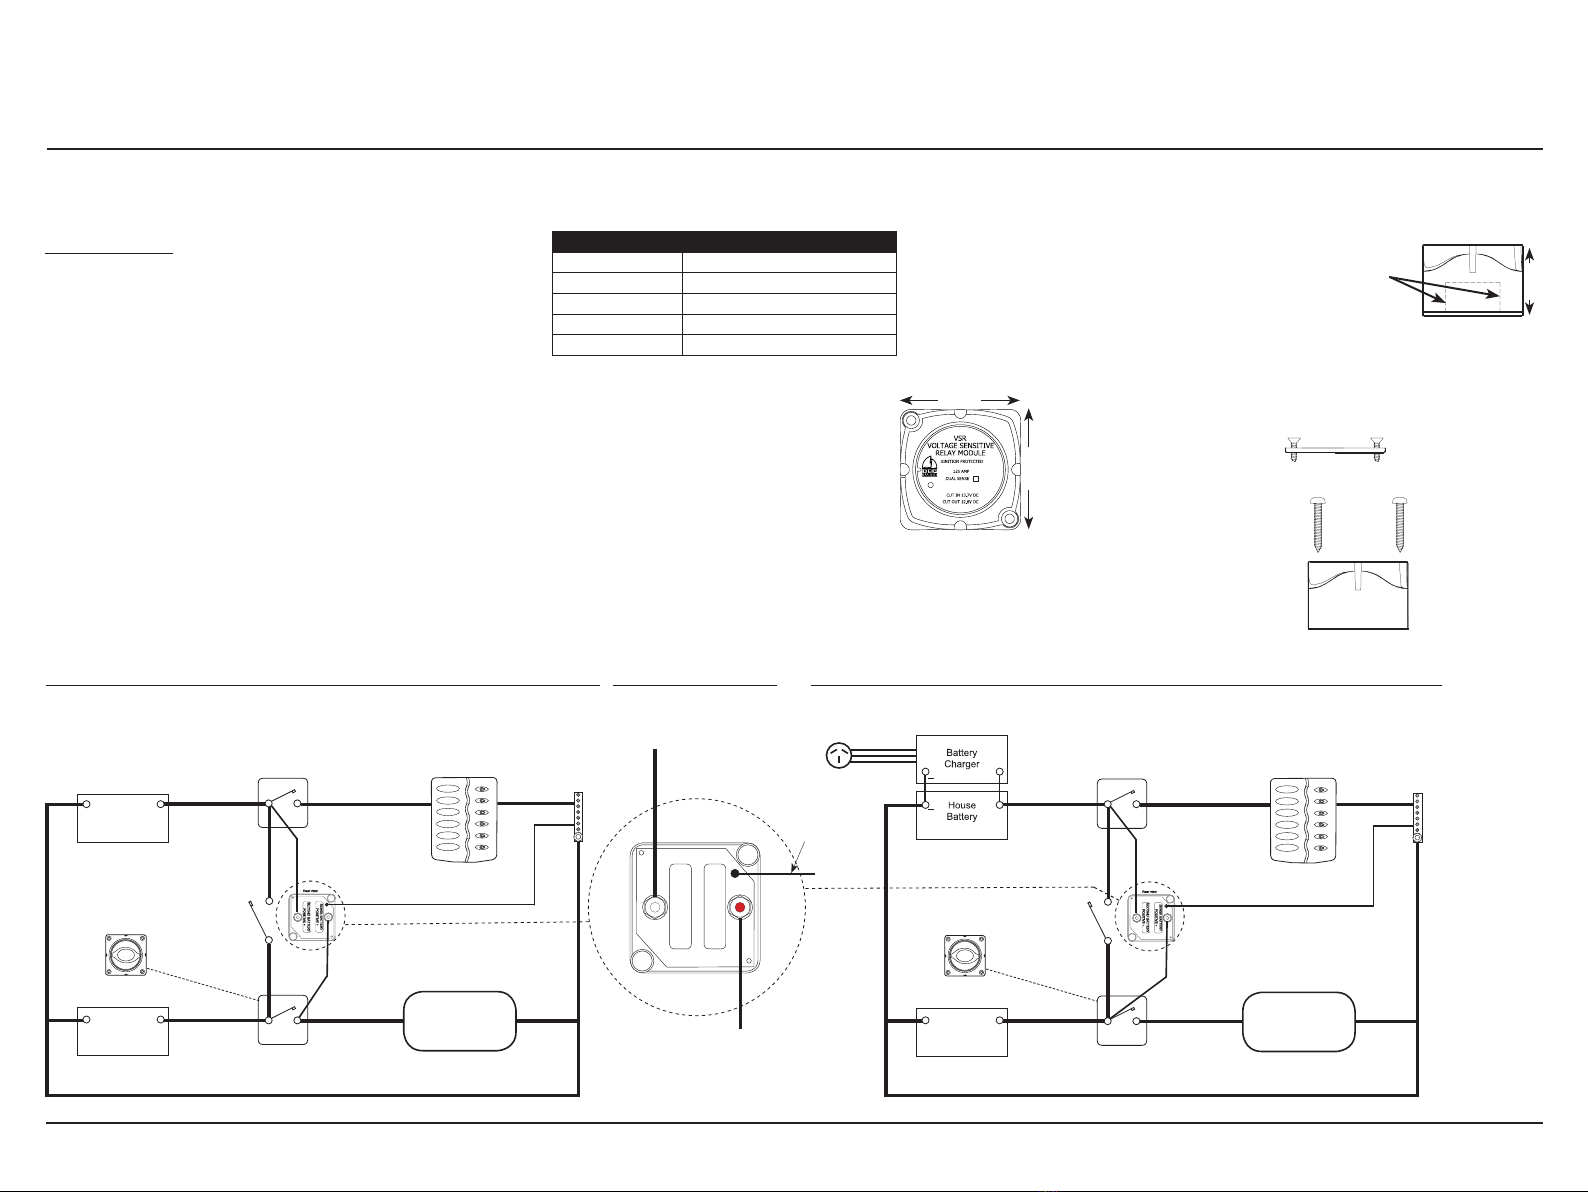
Alternator vs battery capacity
Alternator Size Second battery size
0 Amp 60 AH GRP 22
6 Amp 85 AH GRP 24
25-35 Amp 85-00 AH GRP 27
50-60 Amp 00-30 AH GRP 3
80-90 Amp 30-220 AH GRP 80
INSTALLATION
Connect the VSR to the back of the battery
isolating switches, ensuring that the battery cable
is correctly sized. This will ensure good current
ow to the battery, reducing unwanted voltage
drops to the VSR. The LED on the front of the
VSR should be visible, as it will instantly show
when it is in operation.
Note: When using a VSR in conjunction with a high performance
voltage regulator (eg Next Step Regulator) the regulator sense wire
must go to the same point as the sense for the VSR ie the start battery.
Remove base to expose studs and negative lead. Cut out cable
access slots:
) With a hacksaw blade, cut vertical lines
into the side walls of the VSR case, as shown
by dashed lines (approximate positions). Stop
cutting at the point where the plastic steps up
to a thicker wall. Take care not to damage the
circuit board with the blade.
2) Once the two slots have been cut, with a pair of pliers bend the
middle section (between the two slots) inwards until it snaps away
from the main body (Along horizontal dashed lines)
Use countersunk screws for
fastening base down.
Use Panhead screws for
fastening the VSR onto the base.
48 mm
Base (side view)
Voltage
Sensitive
Relay
Panel
70
House Batt
Isolator Negative
Bus Bar
70
Motor Batt
Isolator
Start
Battery
708-68.5
Link Bars
70
Emergency
Start
Isolator
708-68.5
Link Bars
House
Battery
–+
–+
ENGINE
BATTERY
NAV LIGHTS
POLE LIGHTS
CABINLIGHTS
COCKPIT LT
BILGE PUMP
SPARE
Engine
+Panel
70
House Batt
Isolator Negative
Bus Bar
Dual Sensing
Voltage Sensitive
Relay
70
Motor Batt
Isolator
Start
Battery
708-68.5
Link Bars
70
Emergency
Start Isolator
708-68.5
Link Bars
+
–+
ENGINE
BATTERY
NAV LIGHTS
POLE LIGHTS
CABINLIGHTS
COCKPIT LT
BILGE PUMP
SPARE
Engine
House Battery
Isolator
Motor Batt
Isolator
SECOND BATTERY
POSITIVE +
SENSE BATTERY
POSITIVE +
Rear view
Wiring for Voltage Sensitive Relay Wiring for Dual Sensing Voltage Sensitive RelayVSR Rear view
(same with both installations)
Battery
Negative
Black mm
(Supplied)
68 mm
68 mm
This manual suits for next models
1
Table of contents


