Berkey Black Berkey Elements User manual

Instructions for Black Berkey® Elements
(A)
Black Berkey®
Elements
(Set of 2)
We strongly recommend using the Berkey Primer™ (sold separately), a handheld priming pump that makes the elements easy to prime
without the need for faucets or hose connections. Berkey Primers™ are available from Authorized Berkey®Dealers worldwide.
Black Berkey®Elements may also be primed using a bottle of ltered water. Have one person hold the element, with the priming button
attached and facing upward. Have a second person press the mouth of the bottled water against the priming button and squeeze until
water is forced through entire exterior wall of element and it begins to sweat beads of water.
1. Prime Your Black Berkey®Elements (3 Methods Shown Below)
Parts List
Parts shown for illustration only and are not to scale.
(B)
Prime Rite™
Universal
Primer
Priming uses water to displace air out of the elements’ pores, ensuring that water can ow freely. Elements will not operate properly
if they are not primed. We recommend setting up your system on a countertop or other waterproof surface. If process dust is present,
wipe it o with a Scotch-Brite
®
pad under cold running water.
Before You Get Started:
•
Wash hands before installing and priming elements to reduce the chances of contaminating the system’s components.
•
Keep all parts, instructions and original packaging in the event that your elements need to be returned to the manufacturer. Write
the installation date in the space provided on the elements’ box to serve as a reminder as to when elements need replacement.
•
Determine the best priming method based on your faucet’s design and where you will be priming the elements.
(E)
Tan
Priming
Button
(C)
Sealing
Washers
(Set of 2)
(D)
Wing
Nuts
(Set of 2)
Priming Method 1: Using the Included Prime Rite™ Universal Primer
Black Berkey® Elements Instructions - V3 2023 © Copyright 2002-2023 - New Millennium Concepts, Ltd. All Rights Reserved.
Prime Rite™ is a third-party trademark and Berkey®makes no claim to ownership of such trademark.
Priming Method 2: Traditional Method Using Tan Priming Button
Priming Method 3: Without Pressurized Faucet / Alternative Priming Options
The Prime Rite™
Universal Primer (B)
ts both larger and
smaller faucet styles.
Tip: Your Black Berkey®Elements will be wet after priming them. We recommend placing your primed elements
in a clean bowl or sink while priming and installing your other remaining Black Berkey®Elements.
(B)
5. Allow element to
sweat beads of water
for 1 minute. Water
may be discolored
at rst, as excess
media exits element.
Continue running
water until it runs
clear, and the entire
element appears to
be saturated.
Element is now
primed and ready
for installation.
Repeat steps 1-5
for remaining
elements.
3. Keep one hand on
element and use
other hand to slowly
turn on faucet. Use
only cold water. Do
not allow element
to dangle unsecured.
4. Gradually increase
water pressure until
a moderate ow is
reached. If primer
inates like a bulb,
immediately reduce
water pressure.
1. Attach blue Prime
Rite™ Universal
Primer (B) to
faucet, with end of
primer pulled up
as close to end of
faucet’s spout as
possible.
2. Hold Black
Berkey®Element
(A) in one hand,
and gently push
element’s stem
into primer.
3. Place the
threaded
stem of
element
between
ngers,
and press
tan priming
button up
against
faucet.
4. Slowly turn on cold
water (gradually
increasing water
pressure) while
holding element
and tan priming
button rmly
against faucet
to create a seal,
allowing water to
saturate element.
5. As water pushes air out
of the element’s pores,
allow element to sweat
beads of water for
1 minute. Water may
be discolored at rst,
as excess media exits
element. Continue
running water until
it runs clear, and the
entire element appears
to be saturated.
The element is now
primed and ready for
installation. Repeat
steps 1-5 for remaining
elements.
Tip: Your Black Berkey®Elements will be wet after priming
them. We recommend placing your primed elements in a clean
bowl or sink while priming and installing your other
remaining Black Berkey®Elements.
1. Loosen wing nut
(D) on Black
Berkey®Element
(A) stem until the
top of wing nut (D)
reaches the top
of stem’s threads
(about 1/8" from
top end of stem).
2. Place tan
priming
button (E) on
top of wing
nut. Top of tan
priming button
should be slightly
higher than top
of the stem.
(K) (K) (K)
1/8" (D)
(A)
(D)
(E)
(K)
(A)
(B)
(A)
(B)
New Millennium Concepts, Ltd. Limited Warranty
New Millennium Concepts, Ltd. warrants their product against defects in materials or workmanship during ordinary consumer use. This Limited Warranty
does not cover product issues caused by any other reason, for the time periods and conditions set forth below when purchased directly from an Autho-
rized Berkey
®
Dealer. New Millennium Concepts, Ltd. shall not be held liable for incidental or consequential damage to personal property from, but not
limited to, a defective unit, improper use, abuse, accident, or neglect, etc. It is the customer’s responsibility to prevent misuse of the system and to replace
parts, when, due to the natural course of wear and tear, they must be replaced. To obtain warranty service, you must provide a dated receipt for the prod-
uct and may be responsible to pay for any shipping charges incurred to return the product to New Millennium Concepts, Ltd. when required. This warranty
will not apply to units which have been used for purposes not intended, which have been altered so as, in the manufacturer’s judgment, to adversely aect
its performance. This warranty is for the original retail purchaser only, and cannot be transferred. For a period not to exceed the specied warranty cov-
erage from the date of receipt of the product by the original purchaser on the original invoice, New Millennium Concepts, Ltd. will, solely at its discretion,
replace said product or component that New Millennium Concepts, Ltd. deems is not functioning properly during the stated warranty period. The laws
of the state of Texas, USA will govern any disputes regarding this warranty or claim made. This warranty, which is given expressly in lieu of all warranties,
expressed or implied, or merchantability and tness for a particular purpose, constitutes the only warranty made by New Millennium Concepts, Ltd. This
warranty applies only to products manufactured or exclusively distributed by New Millennium Concepts, Ltd. and its Authorized Berkey
®
Dealers, and does
not apply to extended warranties oered by some Authorized Berkey
®
Dealers. Black Berkey
®
Elements are covered under a two year limited prorated
warranty, calculated in six-month intervals. Warranty period begins from the date of receipt of the product by the original purchaser on the original invoice.
If water drained from system has a red or pink hue during the assembly verication test,
repeat the procedure again in this manner to determine the source of the leak:
1. Place the upper system chamber only (with Black Berkey®Elements installed) on top of
same-sized cups or jars, each positioned so that an element can drip water into it. This will
help you identify which blocking plug or element may be leaking.
2. Fill upper chamber with water and red food coloring as directed above.
3. Allow system to lter water. Check the color of water expelled from the elements.
If water color is clear, your system is ready to use. If red dye is still present, reinstall
the element(s) or blocking plug(s) where leaking occurs and re-run test.
4. If system continues to fail the test, contact our Customer Service department for assistance.
Use of softened water or salt water can clog the lter’s pores and will void your warranty.
Never allow wet Black Berkey®Elements to freeze. Exposure to freezing temperatures can expand the water into ice, which may damage
the elements and cause them to crack or break. Allowing elements to freeze will void your warranty.
If you are going to be leaving the system unattended for 4-15 days and want to reduce the necessity of re-priming the elements,
remove the elements from your system and place them in a sealable plastic bag (gallon-size or larger) while elements are still damp (this allows
the elements to stay wet, making priming unnecessary). Then, place the elements in your refrigerator where they will not freeze. When ready,
thoroughly rinse elements under cold water, then reinstall them in your system.
For longer-term storage, we recommend completely drying the elements rst. Ensure they are bone-dry (zero moisture) before storing
them long-term. Shake excess water from elements, then air-dry by leaving them on a windowsill or other sunny location for 1-3 days until
completely dry.
Once elements are bone-dry (zero moisture), store them in a sealable plastic bag (gallon-size or larger)—this prevents elements from absorbing
odors. When you are ready to re-use your elements, clean them by scrubbing the outside with a sti brush or a Scotch-Brite®pad under cold
running water. Then re-prime the elements before putting them back in your system.
Alternatively, you can use a Berkey Primer™ (sold separately) which assists in both priming and purging. Purging speeds up the drying pro-
cess by pushing water out of the element before you place them in the sun or air dry to complete the process. Note: when purging, valves on
the Berkey Primer™ must be reversed.
3. Assembly Verication*(Red Food Coloring Test)
This simple test veries that your system has been assembled correctly, and that there are no internal leaks in your system. We recommend
this test be done after the rst assembly of this system, after removal or replacement of Black Berkey®Elements, or the rst use after
drying and storing the elements for an extended period of time. Ensure that you do not have Berkey PF-2®Fluoride and Arsenic
Reduction Elements installed in the system when performing this test.
1. Addup to 1/8 teaspoon (10 drops) of articial red food coloring (must be red)for every gallonthat yourBerkey®System can hold into the
upper chamber.We recommend McCormick’s red food coloring or any articial food coloring.Acceptable food color ingredients include
water, propylene glycol, FD&C Red 40 and FD&C Red 3, and propylparaben. Avoid using food coloring that is not red, or contains citric
acid, sodium benzoate or natural ingredients such beet juice, turmeric, etc. Using organic food
colorings will result in a false failed test (stating that your system is not sealed correctly).
2. Place a cup under spigot and drain water.If dispensed water does not have a red or pink hue,
this indicates that the elements are sealed and system has been assembled correctly.
*Note: This test is meant to conrm that the system was assembled as intended.
Cups or jars
(same size)
Black Berkey®Elements Precautions and Storage
Table or countertop
Berkey®
system
upper
chamber
Clear
water
Red or pink-
hued water
Water with
red food
coloring
ü
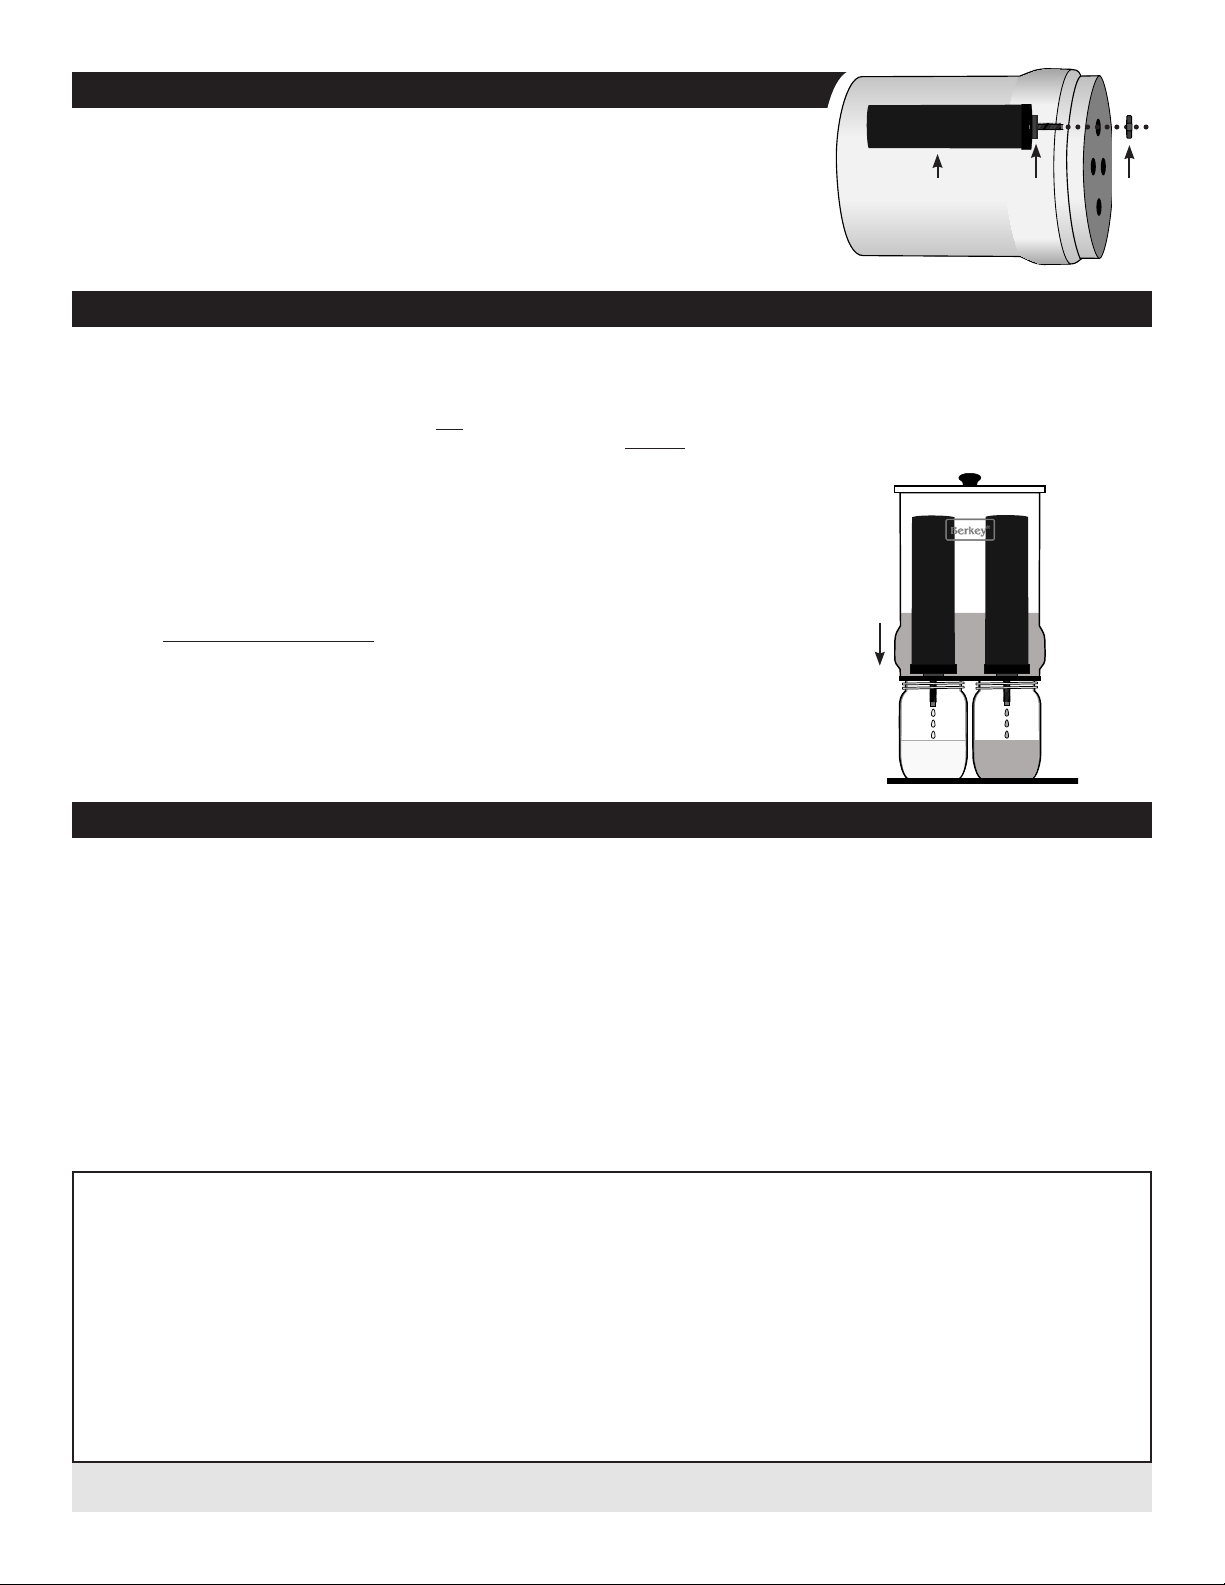
2. Install Primed Black Berkey®Elements In Your System
1. Remove wing nut from threaded stem while leaving sealing washer on element.
2. Place threaded stem, with sealing washer attached, into the hole in the interior base
of upper chamber.
3. Secure element in the base of the chamber by screwing wing nut onto threaded mount until
hand-tight. Caution: hand tighten only. Over-tightening wing nut can strip the nut’s
threads, which could cause the system to leak. Repeat these 3 steps for remaining elements.
4. With elements (and blocking plugs, if needed) in place, carefully place upper chamber onto
lower chamber. Your system is ready to use.
Black Berkey® Elements Instructions - V3 2023 © Copyright 2002-2023 - New Millennium Concepts, Ltd. All Rights Reserved.
Questions About Installing or Using Your Black Berkey®Elements?
Phone: (888) 803-4438 Monday - Friday 9AM - 5PM CST Holiday hours may vary.
Wing
nut
(D)
Sealing
washer
(C)
Berkey®System upper chamber
Black Berkey®
Element (A)
Other Berkey Water Filtration System manuals

Berkey
Berkey PF-2 User manual

Berkey
Berkey PF-2 User manual

Berkey
Berkey PF-2 User manual

Berkey
Berkey Light User manual

Berkey
Berkey PF-2 User manual

Berkey
Berkey Wellspring User manual

Berkey
Berkey Big User manual

Berkey
Berkey inline Shower Filter User manual

Berkey
Berkey PF-2 User manual

Berkey
Berkey Big Berkey User manual


