Champ AirDog A6HSDE640 User manual

PATENT
www.AirDogDiesel.com/patents
INSTALLATION MANUAL
For DETROIT SERIES 60 ENGINES
Model Years 2003-2009
Part No. A6HSDE640
Providing “Test Cell Performance” in “Real World Conditions” Since 1993
Proudly Made in the USA
www.airdogdiesel.com
1-573-635-0555 or
1-877-463-4373
High Pressure Fuel Air Separator
with Positive Fuel Air Separation System
PLEASE READ
THESE INSTRUCTIONS
THOROUGHLY
BEFORE BEGINNING
INSTALLATION
Revised 10/14/2022

2
Amazingly Simple Installation
Mounts on frame and connects between the
engine transfer (fuel) pump and engine. Air/
vapor return line connects to engine fuel
return line.
Amazingly Simple Operation
Operates in conjunction with the fuel flow
and pressure created by the engine’s transfer
pump. Separates and removes entrained air
plus vapor from fuel pump cavitation before
the fuel enters the engine.
The AirDog®Champ is proudly
made in the USA and features
a 4 year limited warranty.
sImproves Fuel Mileage
sLengthens Injector Life
sSmoother Idle
sImproves Throttle Response
sMaximizes Torque
sReduces Emissions
Proudly made in the USA
877-GO-DIESEL (877-463-4373)
airdogdiesel.com
With PureFlow Technologies AirDog®Champ
system installed, your diesel engine can
perform as designed, even under the most
extreme conditions.

3
PureFlow®Technologies, Inc.
AirDog®Champ Detroit Series 60®2003-09
TABLE OF CONTENTS
Section 1………….........…….…...………............…..…………..….Table of Contents
Section 2………………….................….…….…...…Installation and Safety Guidelines
Section 3……………………..........………………………………………..…Parts List
Section 4…………………..................................………...........….....System Overview
Installation Procedures
Section 5………………………............………………...Mounting the AirDog® Champ
Fuel Lines, Fittings, & Fuel Line Upgrade
Section 6A……..…...………....................Fuel Line from Transfer Pump to Secondary
Filter Head and/or AirDog®Champ
Section 6B….….….......…..................Fuel Line from AirDog®Champ to Engine Head
Section 6C…..…….....…….....………………............………Air/Vapor Return to Tank
Maintenance
Section 7...….….....…..............…..……................................................…Filter Service
Optional Kits Available
Section 1 Table of Contents
PN FLK-CHP Champ Fuel Line Kit
This kit contains all components most commonly
needed when installing the Champ frame mount
air separation system using #8 ttings and Eaton
Weatherhead supply lines. This kit uses #6 air and
vapor return lines and includes 8′ of 1/2″ general
purpose high pressure hose to be cut into 2 pieces
for the fuel supply running from the pump or
secondary lter head/housing, if equipped with
one, into the Champ and for the supply running
out of the Champ to the head or fuel rail. 7’ of
low pressure line is also included for the air and
vapor return line.
PN UPG-DEFS Detroit Upgrade Kit
Detroit Series 60 engine utilizes “FOR SEAL”
ttings with steel lines on the high pressure side
of the transfer pump. These ttings have small
passageways and are restrictive to the fuel ow
to the engine. To maximize the eciency of
the engine, it is necessary to replace the restric-
tive fuel ttings and lines with larger and less
restrictive lines and ttings. These ttings and
#8 DOT approved fuel lines are supplied with
the AirDog® Detroit Series 60 Fuel System
Upgrade Kit.

4
PureFlow®Technologies, Inc.
AirDog®Champ Detroit Series 60®2003-09
Section 2 Installation & Safety Guidelines
INSTALLATION GUIDELINES
The installation of your AirDog®Champ can be made relatively easy by following the
steps outlined in this manual, and:
1. Inventory the package components. Notify PureFlow Technologies
immediately of any missing or damaged parts.
2. Read the installation manual completely. Understand how the system
operates and the installation recommendations before beginning.
3. Proper location of the AirDog®Champ on the vehicle is essential. Consider
hazards presented to the equipment by road debris and the elements.
4. Follow the installation recommendations and guidelines contained
herein, but please note that individual installations may vary.
SAFETY GUIDELINES
CAUTION:Chock the vehicle’s tires to prevent rolling.
CAUTION:Wear safety glasses when operating power tools, such as drills and
grinders, or when using a punch or chisel.
CAUTION:Do not drill into or weld the top of the frame rail or within 1-½” of the
frame rail ange on the side of the frame rail.
CAUTION:Route the fuel lines and electrical harnesses, keeping them away from hot
exhaust components and/or moving parts. Properly secure the fuel lines and electrical
harnesses to prevent chang.
If you are uncertain of any installation procedure, please call
PureFlow®Technologies, Inc. at 573-635-0555 for technical assistance.
NOTE: The pictures used in this manual are for example only and may not depict
the exact components as found on your truck.

5
PureFlow®Technologies, Inc.
AirDog®Champ Detroit Series 60®2003-09
Installation Parts List
Section 3 Parts List
1 #6M JIC x 3/8 F NPTF Straight Connector 4A-1-04-06-06-S
1 3/8 M SAE x 3/8 M SAE x 3/8 M NPTF Tee 4A-4-08-06-06-B
1 #6 x #6 F Union Swivel 4A-1-22-06-06-B
1
#6F SAEX x #6F SAEX Union Swivel (Back of Head)
4A-2-01-08-06-SZ-XLG
1 #8M JIC x 1/4 M NPTF Straight Connector - Ported 4A-1-02-08-04-S-P
1
#8M JIC x 16mm M w/O-Ring Straight Connector - Ported
4A-1-01-08-16-S-P
960-06-0640-FK Detroit 03-09 Fitting Kit
(Transfer
Pump)
2 #8M JIC x 1/2 M ORB Straight Connector 4A-1-02-08-08-S
1 #6M JIC x 3/8 M ORB Straight Connector 4A-1-01-06-06-S
960-06-0560 Basic Champ Fitting Kit
CHPFK-640-PB Installation Kit
908-00-0304 Frame Mount Kit
2 Mounting Bracket 002-3C-0003
002-3C-0004
1 901-08-0100 Hardware Kit Includes:
4 ea 3/8-16 x 1-1/4 HHCS 1J-1-C20SZ
4 ea 3/8-16 Hex Nut 1S-1-CSZ
4 ea 3/8 Split Lock Washer 1R-6-CSZ
4 ea 1/4-20 x 2 SHCS 1L-A32C
4 ea 1/4 Split Lock Washer 1R-6-AC
4 ea 1/4-20 Hex Nut 1S-1-AC
QTY Description Part Number Image
1 Installation Manual 206-6-0640
1 AirDog® Champ High Pressure Air Separator A6HS-WIP
1 AirDog® Fuel Filter FF200-MG-6
SBK-1000 Sandwich Bracket Kit
1 901-08-0100-SB Hardware Kit Includes:
4 ea 3/8-16 x 1 FHSCS 1M-C16SZ
3 ea 3/8-16 x 3-1/2 HHCS 1J-1-C56SZ
3 each 3/8-16 x 4-1/2 HHCS 1J-1-C72SZ
7 ea 3/8-16 Hex Nut 1S-1-CSZ
7 ea 3/8 Split Lock Washer 1R-6-CSZ
1 Sandwich Mounting Bracket Kit for AirDog®& Champ
Includes: 1 Front Bracket (002-3C-0010-SBF), 1 Back Bracket 908-00-8888
(002-3C-0011-SBB), & 1 Universal Bracket (002-3C-0006PCB)
OPTIONAL
See page 3 for additional fuel line kit available.

6
PureFlow®Technologies, Inc.
AirDog®Champ Detroit Series 60®2003-09
Section 4 System Overview
SYSTEM OVERVIEW
Welcome to the AirDog®Champ
High Pressure Fuel Air Separation System for Class 8 Trucks
The AirDog®Champ with ADVANCED FUEL AIR SEPARATION is a premium fuel air
separator for the Detroit Series 60 engines.
The AirDog®Champ is installed between the engine transfer pump
or secondary fuel lter and the engine fuel rail, to remove virtually
all entrained air and vapor from the fuel ow to
the engine. Additionally, the engine rail pressure
must be set correctly to completely ll the injector
barrel. Please consult your DDEC manual for your
engine for correct (rail) fuel pressure settings.
TYPICAL INSTALLATION LAYOUT
Fuel to Engine
Air/Vapor Return Line
connects to engine return line
Engine Fuel Pump
Engine
Fuel
Return to Tank
AirDog®Champ
For engines without a secondary
lter, connect the transfer pump
directly to the AirDog®Champ

7
PureFlow®Technologies, Inc.
AirDog®Champ Detroit Series 60®2003-09
Section 5 Mounting the AirDog®Champ
Mounting the Champ to the Frame without Drilling
Determine which holes in
bracket 1 that you are going
to need by holding it up to the
frame of your vehicle.
Use mounting hardware to
mount bracket 1 to bracket
2. The position of bracket
2 can be adjusted vertically
and horizontally to suit your
particular needs.
Using product mounting
hardware, mount product to
brackets.
Install 2 of the frame bracket
bolts on top of bracket 1 &
bracket 3. Slide over frame and
install bottom bolt.
Note: 3.5” and 4.5” bolts are
included. Use the length best
suited to your vehicle’s frame
width.
Tighten bolts as needed.
Install lter.
Bracket 1
Bracket 2
Bracket 3
Mounting Hardware
Bracket Bolts
OPTIONAL KIT AVAILABLE (PN: SBK-1000)

8
PureFlow®Technologies, Inc.
AirDog®Champ Detroit Series 60®2003-09
Section 5 Mounting the AirDog®Champ
Mounting the Champ to the Frame by Drilling
Selecting the best location to mount the AirDog®Champ.
Installing the AirDog®Champ at the proper location on the vehicle is most important. When deciding
where to locate the AirDog®, the following points should be considered:
• Best relationship to the secondary fuel lter and back of engine head.
• Protection from the elements and road debris.
•Accessibility for service.
Figures 2 and 3 depict the AirDog®Champ mounted on the frame. There are many variations in the
arrangements of the components on the various trucks. With a little ingenuity, the AirDog®Champ
can be easily installed on any Class 8 truck.
Figure 2
Figure 3
5-1. Hold the AirDog® Champ, with the brackets and lter attached, next to the frame at the selected
mounting location. Check for clearance. If mounted between the frame and steer tire, turn the
steering wheel fully to the left and right to check for tire clearance.
Figure 4
Figure 5
5-2. Mark and center punch the hole locations. Drill a 3/8” hole at each of the 4 locations and attach
the AirDog®Champ brackets.
WARNING! DO NOT DRILL INTO OR DAMAGE ANY WIRING, AIR
LINES, OR OTHER COMPONENTS LOCATED BEHIND
THE FRAME RAIL.

9
PureFlow®Technologies, Inc.
AirDog®Champ Detroit Series 60®2003-09
Section 6 Fuel Line Overview
FUEL LINE OVERVIEW
AirDog®Series 60 Fuel Line Upgrade
The Detroit Diesel Series 60 engine (model years 2003-2009) utilizes “FOR SEAL” or face
o-ring ttings on the high pressure side of the transfer pump. These ttings have small pas-
sageways and are restrictive to the fuel ow to the engine. To maximize the eciency of the
2003-2009 Detriot Series 60 engine, it is necessary to replace the “OE” restrictive fuel ttings
and lines with the larger and less restrictive AirDog® Champ ttings. Special AirDog®Champ
ttings for this purpose are supplied with the installation kit. #8 fuel lines are available from
your local parts house.
VS
0.240” ID
0.375” ID
0.260” ID
“OE” 14mm Face O-Ring
Fitting with Restricted Passageway
AirDog®Ported Fitting #8 JIC x
14mm with Large Passageway
Figure 6
Figure 7
Fuel Supply Line: The fuel supply line from the transfer pump to the AirDog®Champ and to
the engine should be size 8.
Air/Vapor Return Line: The AirDog®Champ return line should be connected to the engine’s
return line, low pressure side. A size 6 line for the air/vapor return line is adequate.
10
PureFlow®Technologies, Inc.
AirDog®Champ Detroit Series 60®2003-09
Section 6 Fuel Lines & Fittings
Section 6A: Fuel Lines, Fittings, & Fuel Line Upgrade
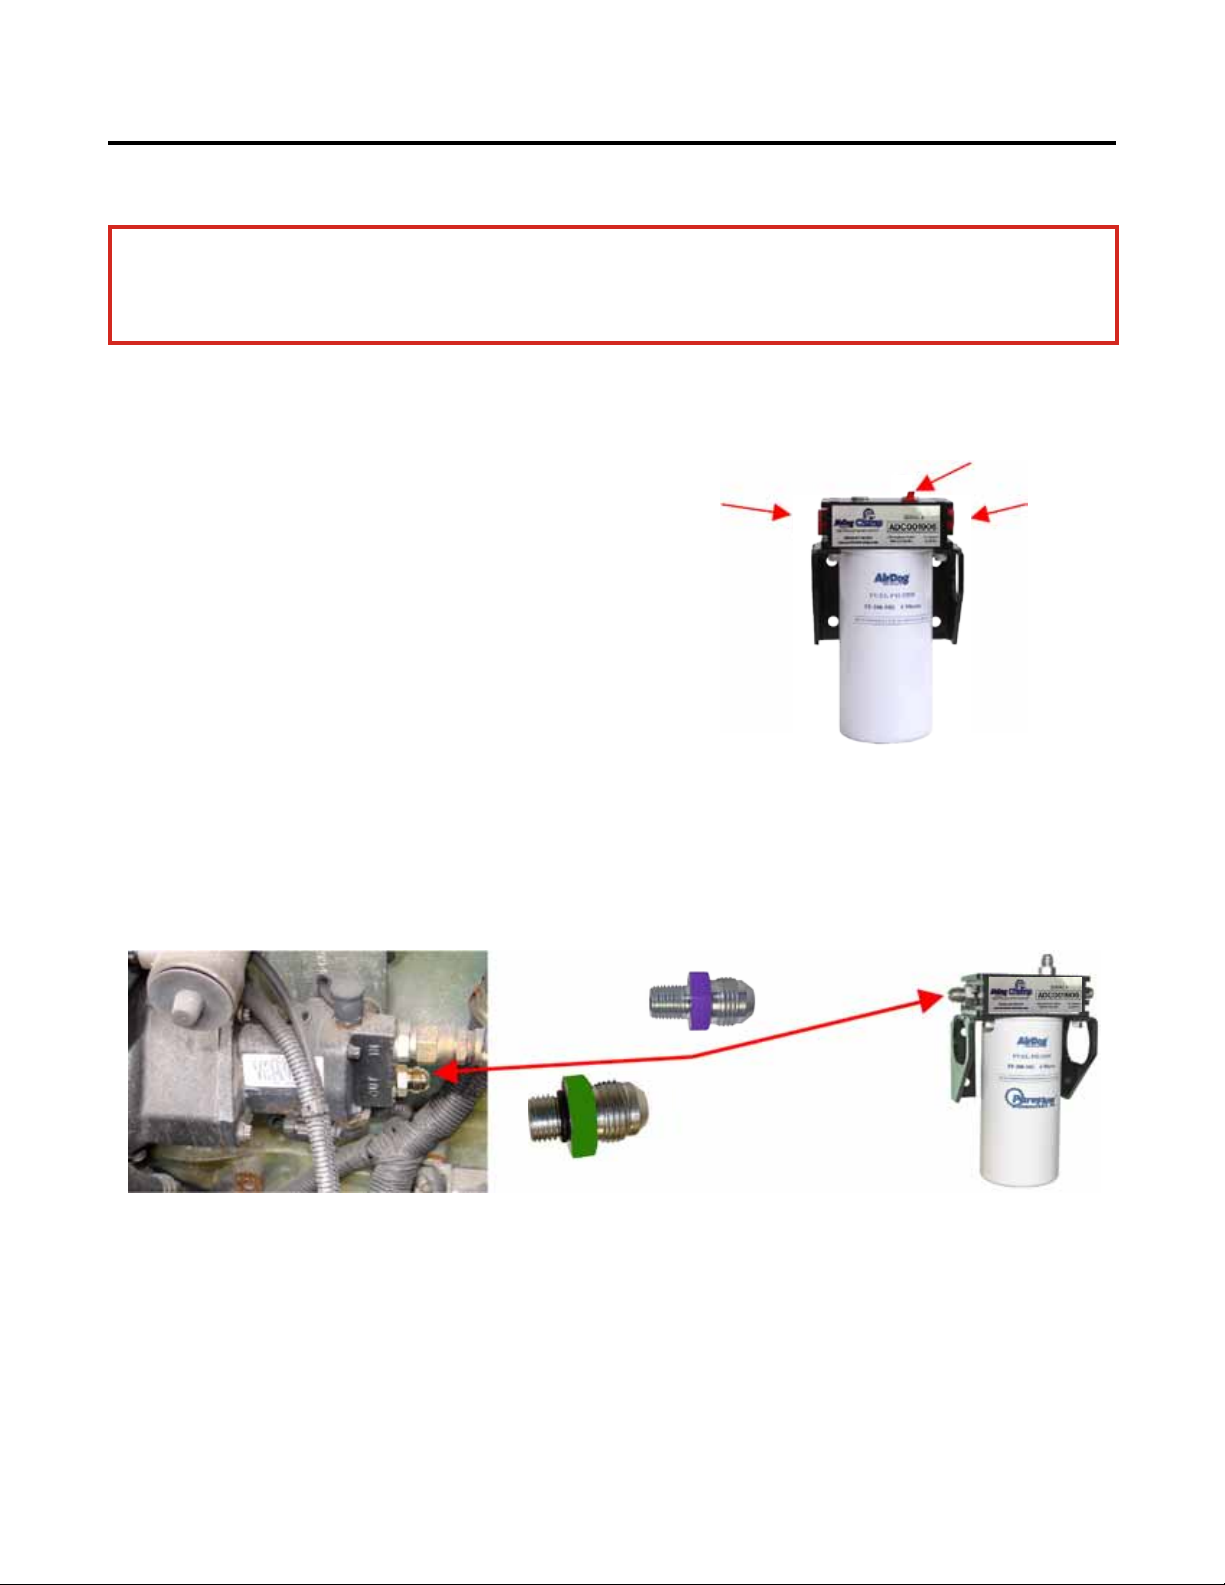
6A-1. Install ttings in the AirDog® Champ as follows:
A#8 M JIC x 1/2” M ORB (PN 4A-1-02-08-08-S) “FUEL IN”
B#6 M JIC x 3/8” M ORB (PN 4A-1-01-06-06-S)“AIR RETURN”
C#8 M JIC x 1/2” M ORB (PN 4A-1-02-08-08-S) “FUEL OUT”
6A-2. Remove the original steel fuel line and tting from the transfer
pump and install a ported
16mm M x #8 M JIC
tting (PN 4A-1-01-08-16-S-P) OR a 1/4” M NPT x #8 M
JIC tting (PN 4A-1-02-08-04-S-P) into the transfer pump “Out” port.
6A-3. Measure, cut, and assemble a #8 fuel line to connect the engine transfer pump to the Champ
“FUEL IN” tting.
Figure 9
Figure 10
1/4” NPT
16mm
FUEL LINE NOT INCLUDED - SEE PAGE 3 FOR AVAILABLE FUEL LINE KIT
- USING THIS OPTIONAL COST EFFECTIVE KIT WILL MAKE
INSTALLATION EASIER AND MORE EFFICIENT.
AC
B
Figure 8

11
PureFlow®Technologies, Inc.
AirDog®Champ Detroit Series 60®2003-09
Section 6 Fuel Lines & Fittings
Section 6B: Fuel Line From Engine Head to AirDog®Champ
6B-1. Remove the fuel supply line and inlet tting from the back of the engine head.
6B-2. Install the new extended
3/8” M NPT x #8 M JIC extra long 90° elbow
(PN 4A-2-01-08-06-SZ-XLG)
in the inlet port at the back of the engine head.
Figure 11
Figure 12
6B-3. Measure, cut, and assemble a #8 fuel line to connect
the AirDog®Champ outlet port to the new #8 JIC fuel
inlet supply tting just installed in the back of the engine
head.
Section 6C: Air/Vapor Return to Tank
6C-1. Remove the ENGINE fuel return
line from the check valve at the back of
the engine head.
6C-2. Assemble the AirDog®Champ
return tee (PN 4A-1-04-06-06-S, PN 4A-4-08-
06-06-B, & PN 4A-1-22-06-06-B) and install
it on the outlet side of the Detroit check
valve. Reconnect the original engine
return line to the return tee.
6C-3. Measure, cut, and assemble a #6
air/vapor return line and connect the
Champ air/vapor return port to the return
tee just installed.
Figure 13
Figure 14
Figure 15 Figure 16 Figure 17
Figure 18 Figure 19
NOTE: Secure all fuel lines to
prevent damage from abrasion.

12
PureFlow®Technologies, Inc.
AirDog®Champ Detroit Series 60®2003-09
Section 7 Filter Service
AirDog® Champ
Fuel Filter
6 Micron Micro-Glass
Built in check valve
Prevents fuel from
draining from the engine
head during lter changes
Servicing the AirDog®Champ Fuel Filter
The AirDog® fuel lters have a typical lifespan of 25,000+ miles, and up to 40,000 miles, as they
are made with a high-quality and high-capacity Micro-Glass media, as opposed to a paper element,
and lter life is aected by many variables. In any case, we do not recommend exceeding 40,000
miles of service with a fuel lter. It is recommended that you keep a replacement AirDog® fuel lter
on hand, ready for replacement. When replacing the fuel lter, be sure to clean the under side of
the Champ base. Rub clean diesel fuel or oil on lter seal before installing to ensure a proper seal.
Follow the instructions on the lter for proper tightening procedures.
NOTE: Due to the fact that fuel lters are often OVER TIGHTENED and dicult to
remove, it is suggested to carry a second lter wrench to use as a backup wrench when
changing the fuel lter.
Dispose of waste fuel and used lters properly to protect our environment.

13
PureFlow®Technologies, Inc.
AirDog®Champ Detroit Series 60®2003-09
NOTES

14
PureFlow®Technologies, Inc.
AirDog®Champ Detroit Series 60®2003-09
NOTES

15
PureFlow®Technologies, Inc.
AirDog®Champ Detroit Series 60®2003-09
NOTES

16
PureFlow®Technologies, Inc.
AirDog®Champ I Detroit Series 60®2003-09
Bulletin No. 206-6-0640
Revised Oct 14, 2022
Copyright©2016
CD Patents, LLC
All Rights Reserved
Table of contents


