Berner BFEM20 User manual

User Manual for
Build-in deep fryer
Construction year 2015
BFEM20, BFEM30, BFEM40, BFEM40/2, BFEM50/2, BFEM60/2
BFEE20, BFEE30, BFEE40, BFEE40/2, BFEE50/2, BFEE60/2
*options: EOH, ESB, BFEM1H, BFEM2H, BEPSF1, BEPSF2
Read the instructions for use and installation instructions
before to start the installation – build-in - commissioning.
Thereby protecting yourself and avoid damages.
Berner- Kochsysteme GmbH & Co. KG
Sudetenstrasse 5 – D-87471 Durach
Tel. +49 (0) 831/697247-0; Fax. - 15
E-Mail: Berner@induktion.de | www.induktion.de

Page 2 von 23 26.08.2014
Ver. 1.9 Copyright Berner Kochsysteme 2015
Content list
Content list .............................................................................................................................. 2
Safety instructions .................................................................................................................... 4
Description of warning symbols and indicators ........................................................................... 5
Danger result from not observing the safety instructions............................................................. 5
Safe application...................................................................................................................... 5
Safety instruction for the operating staff ................................................................................... 5
Improper operation................................................................................................................. 6
Modification / use of spare parts............................................................................................... 6
General information................................................................................................................... 6
Application ............................................................................................................................ 6
Product description.................................................................................................................... 6
Products................................................................................................................................ 6
Technical data........................................................................................................................ 6
Operation and control .......................................................................................................... 6
Technical unit data .............................................................................................................. 6
Function conditions.............................................................................................................. 7
Installation............................................................................................................................... 7
Electrical data of the units .................................................................................................... 7
Unit performance ( 7,5 kW - BFEM20, BFEE20 ) ...................................................................... 7
Unit performance ( 12,0 kW - BFEM30, BFEE30 )..................................................................... 7
Unit performance ( 16,5 kW – BFEM40, BFEE40 ) .................................................................... 7
Unit performance ( 15,0 kW – BFEM40/2, BFEE40/2 ) .............................................................. 7
Unit performance ( 19,5 kW – BFEM50/2, BFEE50/2 ) .............................................................. 7
Unit performance ( 24,0 kW – BFEM60/2, BFEE60/2 ) .............................................................. 7
Optional Filter System ( 0,12 kW – BEPSF1, BEPSF2 ).............................................................. 7
Installation requirements......................................................................................................... 8
Installation intructions ............................................................................................................ 8
Start up ................................................................................................................................... 9
Assembly .............................................................................................................................. 9
Control with knob................................................................................................................... 9
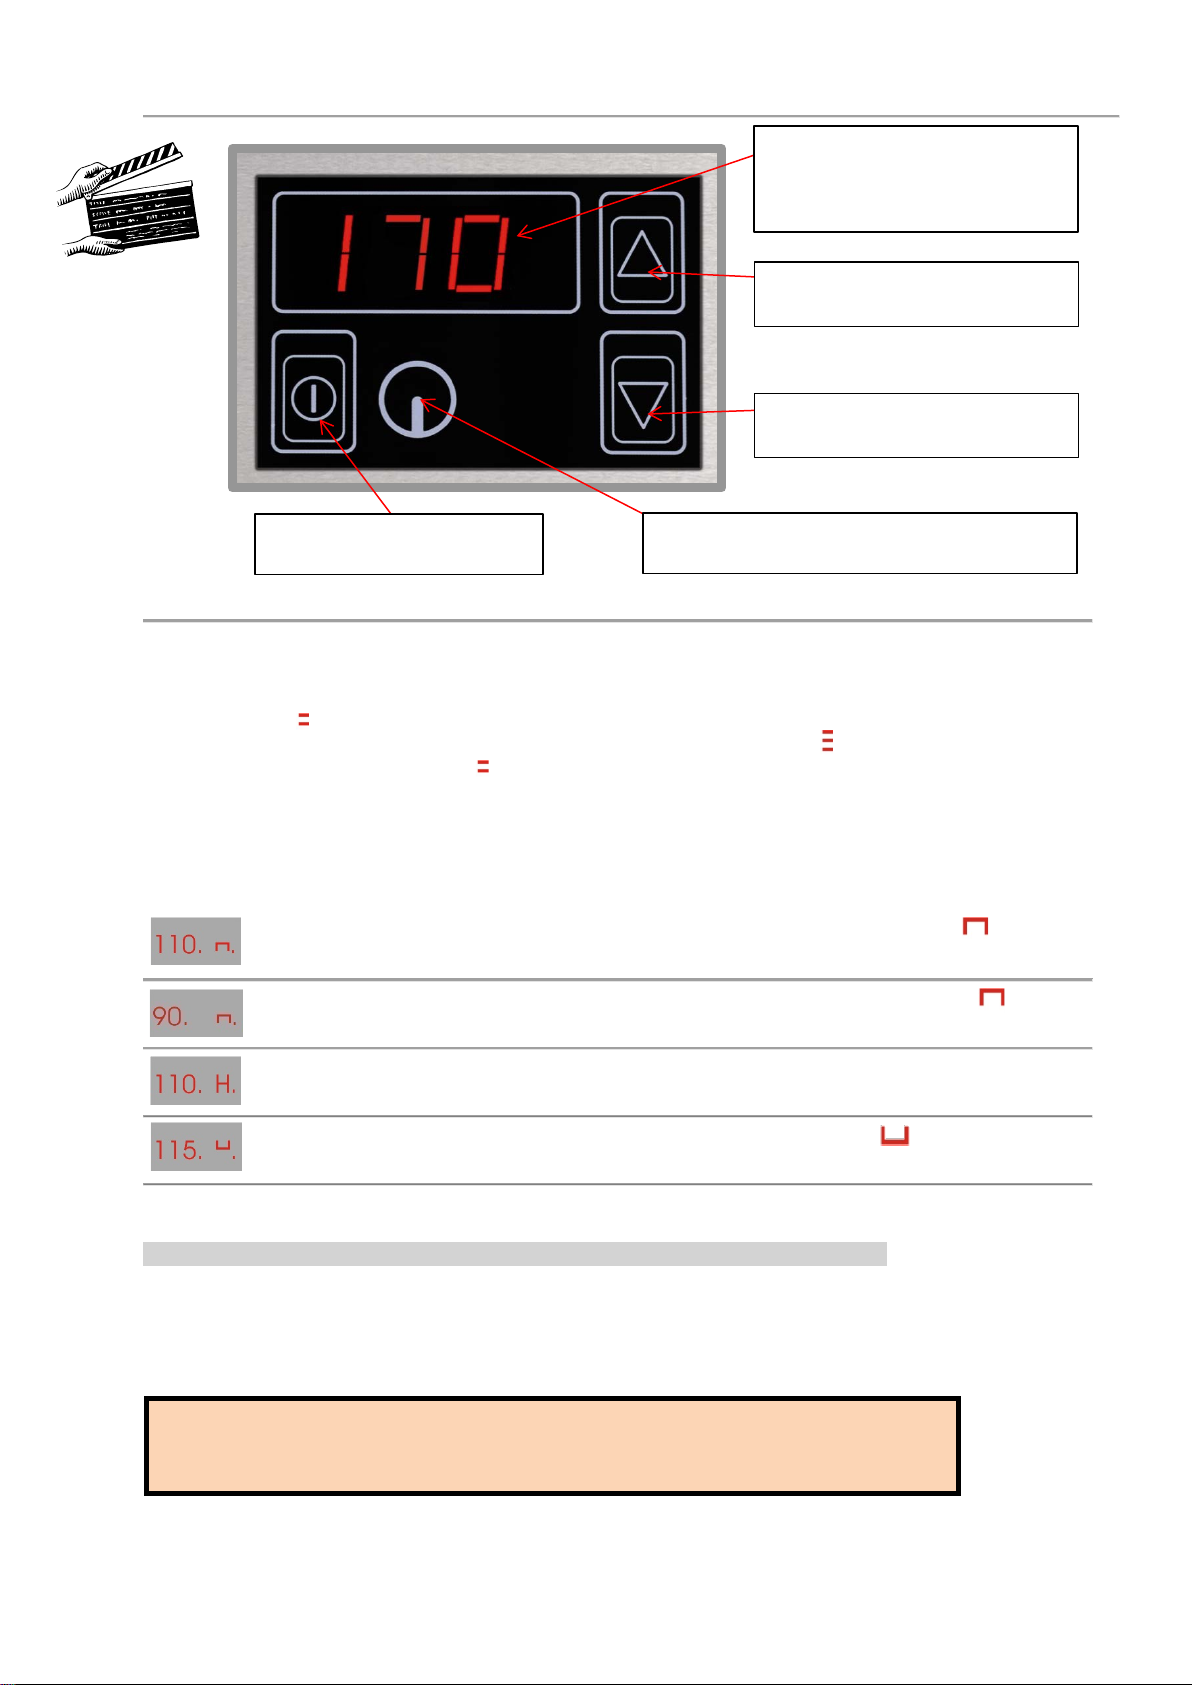
Temperature control with sensor touch control panel ................................................................ 10
Melting step...................................................................................................................... 10
Standby function ............................................................................................................... 10
Cooking process................................................................................................................... 10
Lift automatic ......................................................................................................................... 11
Lift control with sensor touch control panel.............................................................................. 11
Touch control for the basket lift system................................................................................... 11
Function test .......................................................................................................................... 12
Operating............................................................................................................................... 12
Cooking............................................................................................................................... 12
Not in use .............................................................................................................................. 12
Troubleshooting ...................................................................................................................... 13

Page 3 von 23 26.08.2014
Ver. 1.9 Copyright Berner Kochsysteme 2015
Possible faults...................................................................................................................... 13
Overview of possible messages in the display .......................................................................... 13
Cleaning ................................................................................................................................ 14
Exchange of grease or oil ...................................................................................................... 14
Cleaning of the basin ............................................................................................................ 14
Deep frying (Information material)............................................................................................ 15
Maintenance........................................................................................................................... 15
Disposal................................................................................................................................. 15
Warranty................................................................................................................................ 15
Repair during the warranty period .......................................................................................... 15
Declaration of conformity ......................................................................................................... 16
Spare Parts List....................................................................................................................... 17
Technical documentation.......................................................................................................... 19
Instrument view (Example: BFEM50/2)................................................................................... 19
Installation example ............................................................................................................. 19
Installation instructions to build-in of an Berner .......................................................................... 20
Sensor Touch control electronic with frame (Ver. A).................................................................. 20
Installation instructions to build-in of an Berner .......................................................................... 21
Sensor Touch control electronic with frame (Ver. A2)................................................................ 21
Installation instructions to build-in of an Berner .......................................................................... 22
Sensor Touch control electronic with frame (Ver. B).................................................................. 22
Download list for build-in drawings............................................................................................ 23

Page 4 von 23 26.08.2014
Ver. 1.9 Copyright Berner Kochsysteme 2015
Safety instructions
Read this instruction carefully. Keep the instruction for later use, or to pass.
Check the unit after you open the packaging. If the unit is broken, in case of a
transport damage don`t connect the unit to the main supply. Document the
damage with the forwarder and get in touch with the customer service
department, otherwise the warranty will void. Follow the assembly instruction to
install the build-in unit. Use the unit only for preparing food. Use this unit only in closed
rooms. Don´t use hob covers. They can lead to accidents, such as by overheating,
inflammation or splintering materials. Do not use improper safety devices or safety barrier.
They can lead to accidents. This appliance is not intended for use with an external timer or a
remote control.
Fire hazard!
-Hot oil and fat can ignite very quickly. Never leave hot oil and fat unattended. Never delete
a fire with water. Switch the unit off or disconnect the unit from the main supply. Gently
smother flames with a lid, fire blanket, etc.
-The basins and the heating elements getting very hot. Never place combustible items in or
on the basin.
-The unit get hot. Don`t place flammable items or spray cans in the basin on the heating
elements or in drawers direct under the unit.
Risk of burns!
-The deep fryer, the heating element and the surroundings also the outside frame getting
hot. Don`t touch these hot surfaces. Keep children away.
-The deep fryer is working but the display doesn`t work. Switch off the fuse or disconnect
the unit from the main supply. Call your customer service.
-Objects made of metal get very quickly hot in the basin. For this reason don`t place
objects, for example knives, forks, spoons and lids in this zone.
-After the use turn the unit off with the main switch. Don`t wait until the unit switch
automatically off!
Risk of electric shock!
-Incorrect repairs are dangerous. Use only one of our trained service technicians, they
should perform repairs and replace damaged connection cables or spare parts. Is the unit
faulty, plug off the unit or disconnect the unit from the main supply. Call your customer
service.
-Any liquid moisture can cause an electric shock. Don`t use a high pressure cleaner or
steamer.
-A faulty can cause an electric shock. Don`t connect and turn on a faulty unit. Plug off the
unit or disconnect the unit from the main supply. Call your customer service.
-A broken heating element or basin can cause an electric shock. Plug off the unit or
disconnect the unit from the main supply. Call your customer service.
Risk of damage!
-The unit comes with thermostats and safety thermostats. Do not damage the capillary
thermostats.
Attention!
-Aggressive agent cleaners and sponges scratch the heating element or basin.
-Never bring water in contact with hot oil. Danger of burns!
-Don`t place pans or pots on the heating zone. This could lead to damages.
-If hard or pointed objects fall in the heating zone or basin, this could lead this to damages.
-Aluminium foil and plastic containers melt on hot heating elements or hot oil. The use of
kitchen foil in or on top of the basin is not recommended.

Page 5 von 23 26.08.2014
Ver. 1.9 Copyright Berner Kochsysteme 2015
Description of warning symbols and indicators
General warning signals
If you don`t follow the safety instruction, you will place yourself in danger of
injuries
This symbol is warning from dangerous voltage.
(Picture sign 5036 der IEC 60417-1)
Warning symbols that are located directly on the equipment must always be
observed. Their readability must be ensured at all times.
Danger result from not observing the safety instructions
Not observing the safety instructions, may lead to danger for people, the surroundings, and
the unit itself. We are not liable for any damages caused by a failure to observe the safety
instructions.
In detail, ignore of the safety instruction can lead to risk of for example:
-Risk of personal injuries as a result of electric factors
-Risk of personal injuries because of overheated oil or grease
-Risk of personal injuries because of overheated heating elements or components
Safe application
The safety instructions, the existing national regulations for electricity for the prevention of
accidents as well as any house work, application and safety regulations must be followed.
Safety instruction for the operating staff
-Don`t use the deep fryer without grease or oil. Should this happen once, the safety
thermostat switch the unit off after a short time.
-By entering of large amounts and to wet food to be fried, the foaming of the oil is
enhanced.
-Never fight oil or grease fire with water (risk of explosion)!
-To fire-fighting against grease or oil use appropriate aids. Switch off the unit, pull out the
plug or disconnect the device from the power supply. Therefore, appropriate equipment
must be available: e.g. fire blankets and fire extinguishers suitable for extinguishing
burning fat.
-Don`t leave the unit unattended.
-Don`t use the unit as working or storage surface!
-Do not place paper, carton, textiles, etc. in the basin or on the heating elements – they
could catch fire. Aluminium foil and plastic containers may not be placed on the hot
heating elements.
-Prevent liquids from entering the equipment, and try not to let water or food flow over the
basin edge. Do not jet-clean the equipment.
-Old used and dirty oil (contaminated with cooking material) is highly inflammable.
-To exchange the oil, allowed to cool to room temperature.
-PLEASE NOTE: Warning of potentially slippery surfaces in the vicinity of the device. This
can lead to injury.
-ATTENTION:follow the regulation of the local safety and the installation instructions.
-Avoid the ingress of liquids into the basin and the device. Don`t clean the unit with a
water jet cleaner.
Attention
Before you connect or use the unit, you
have to read the operation instructions
Attention
Improper use may result in minor injuries
or damages.

Page 6 von 23 26.08.2014
Ver. 1.9 Copyright Berner Kochsysteme 2015
Improper operation
The working of the unit can only be guaranteed when it’s used correctly. The equipment must
always be operated within the limits given in the technical data.
Modification / use of spare parts
Contact the manufacturer if you intend to make any modifications to the equipment. For
safety reasons, always use original parts and accessories only which have been approved by
the manufacturer. If you use anything other than the original components, the manufacturer
will not assume any liability for any costs that result.
Attention! In case of replacements of parts, the device must be “visible disconnected" from
the power supply.
General information
These operating instructions contain basic information on what needs to be considered during
installation, operation and maintenance of the equipment. The information must be read
entirely by the fitter and operators before the equipment is installed and taken into
operation. They must always be kept close to the cooking site for reference.
Application
The deep fryer is designed to deep fry food.
Product description
Products
BFEM20, BFEM30, BFEM40, BFEM40/2, BFEM50/2, BFEM60/2
BFEE20, BFEE30, BFEE40, BFEE40/2, BFEE50/2, BFEE60/2
*BFEM1H, *BFEM2H, *optional upgrade with lift automatic
-Service friendly
-Easy handling via power control knob (BFEM) or touch control panel electronic (BFEE)
-Upgrade with (* Lift automatic, and grease filter system)
Technical data
Operation and control
Lamp Unit in Use „Unit ON“ green (H1)
Lamp Heating element in use „Heating ON“ yellow (H2)
Lamp Heating element „not in position“ red (H3)
Technical unit data
Model Dimensions Capacity min./max.
B x T in mm in Liter in Liter
BFEM20, BFEE20 200 x 600 8 7/9
BFEM30, BFEE30 300 x 600 12 11/13
BFEM40, BFEE40 400 x 600 17 16/18
BFEM40/2, BFEE40/2 400 x 600 2 x 8 je 7/9
BFEM50/2, BFEE50/2 500 x 600 1 x 8, 1 x 12 7/9, 11/13
BFEM60/2, BFEE60/2 600 x 600 2 x 12 je 11/13
Type Voltage Performance Weight
BFEM20, BFEE20 400V/3~/N/PE 7,5 kW 22,0 / 22,0 kg
BFEM30, BFEE30 400V/3~/N/PE 12,0 kW -- /-- kg
BFEM40, BFEE40 400V/3~/N/PE 16,5 kW -- /-- kg
BFEM40/2, BFEE40/2 400V/3~/N/PE 15,0 kW 34,5 / 34,5 kg
BFEM50/2, BFEE50/2 400V/3~/N/PE 19,5 kW 37,0 / 37,0 kg
BFEM60/2, BFEE60/2 400V/3~/N/PE 24,0 kW 41,0 / 41,0 kg

Page 7 von 23 26.08.2014
Ver. 1.9 Copyright Berner Kochsysteme 2015
Function conditions
-maximum tolerance of the nominal voltage +5%/-10%
-frequency 50 / 60 Hz
-IP CODE (Protection class in delivery state)IP 11
Installation
Electrical data of the units
Unit performance ( 7,5 kW - BFEM20, BFEE20 )
3-phase (Voltage 400V/3~/N/PE +5% / -10%)
Connection
Colour
Frequency
Fuse
Phase
brown, black, grey
or 1,2,3
50 Hz / 60 Hz
B6 (F1)
T1A (F2)
N
blue or 4
PE
yellow/green
Unit performance ( 12,0 kW - BFEM30, BFEE30 )
3-phase (Voltage 400V/3~/N/PE +5% / -10%)
Connection
Colour
Frequency
Fuse
Phase
brown, black, grey
or 1,2,3
50 Hz / 60 Hz
B6 (F1)
T1A (F2)
N
blue or 4
PE
yellow/green
Unit performance ( 16,5 kW – BFEM40, BFEE40 )
3-phase (Voltage 400V/3~/N/PE +5% / -10%)
Connection
Colour
Frequency
Fuse
Phase
brown, black, grey
or 1,2,3
50 Hz / 60 Hz
B6 (F1)
T1A (F2)
N
blue or 4
PE
yellow/green
Unit performance ( 15,0 kW – BFEM40/2, BFEE40/2 )
3-phase (Voltage 400V/3~/N/PE +5% / -10%)
Connection
Colour
Frequency
Fuse
Phase
brown, black, grey
or 1,2,3
50 Hz / 60 Hz
B6 (F1)
T1A (F2)
N
blue or 4
PE
yellow/green
Unit performance ( 19,5 kW – BFEM50/2, BFEE50/2 )
3-phase (Voltage 400V/3~/N/PE +5% / -10%)
Connection
Colour
Frequency
Fuse
Phase
brown, black, grey
or 1,2,3
50 Hz / 60 Hz
B6 (F1)
T1A (F2)
N
blue or 4
PE
yellow/green
Unit performance ( 24,0 kW – BFEM60/2, BFEE60/2 )
3-phase (Voltage 400V/3~/N/PE +5% / -10%)
Connection
Colour
Frequency
Fuse
Phase
brown, black, grey
or 1,2,3
50 Hz / 60 Hz
B6 (F1)
T1A (F2)
N
blue or 4
PE
yellow/green
Optional Filter System ( 0,12 kW – BEPSF1, BEPSF2 )
1-phase (Voltage 230V/1~/N/PE +5% / -10%)
Connection
Colour
Frequency
Fuse
Phase
brown, black, grey
or 1
50 Hz / 60 Hz
-
N
blue or 2
PE
yellow/green

Page 8 von 23 26.08.2014
Ver. 1.9 Copyright Berner Kochsysteme 2015
Installation requirements
The Unit have to be build-in in a flat horizontal area. The place must be allowing a weight at
least 100 kg. To disconnect the Power, the user needs easy access to the power-connection.
Don`t install the deep fryer in the area of water.
Installation intructions
The following points must always be observed during installation:
Install under the unit a removable base plate to install the supplied safety thermostats
accessible. The base plate also supports the easy access for the technical service. If this not
possible then different build-in unit`s has to be proofed. Here, we are ready to provide
assistance.
The switch face plate is not included, but is an available option.
To ensure proper operation, the instructions must be strictly observed.
The mounting frame of the unit must be sealed down (Silicone Pactan 6076) in order to
prevent the ingress of liquids. The penetration of liquids will cause damages.
-Proof and take sure: the voltage of the main supply cable and the voltage
of the nameplate of the unit fit together.
The device must be connected to a PE wire to the terminal screw and the
on-site equipotential point of the cooking suite.
The PE-wire have to connected to the electrical main supply.
-The installation must be tested for practicality.
-Don`t install, set up or install near sources of water.
-Don`t install the unit on the same level with the surface.
-Don`t install the unit in near or on hot surfaces.
-All electric installations must fulfil the local building code regulations. All regulations issued
by the national electricity authorities must be observed.
-The unit comes with main cable(s) and can be connected to a power point with the
necessary plug or directly with the main cable.
-When using fault-current circuit breakers, they must be designed for a minimum fault
current of 30 mA.
-The personnel operating the equipment must make sure that all installation, maintenance,
and inspection work is done by specially trained and certified personnel only.
-The unit comes with an installations box. Install this box accessible in case of a service.
-Please provide a disconnecting from the main supply.
-For service and spare part exchange the unit have to be disconnected from the main
supply. Take sure the unit can`t be turned or switched on in any case.
Observe the points with sensor touch control panel
-Display cables have to be separate from the other cables.
For the electric Connection for the Unit take attention.
The Law Regulations of the Country have to be adhered!
Attention
Wrong voltage can damage
the unit
Attention
The electrical connection must be only by
specially trained staff.
Install the safety thermostat on a
place for easy access for example
in the base.

Page 9 von 23 26.08.2014
Ver. 1.9 Copyright Berner Kochsysteme 2015
Start up
Assembly
The unit is equipped with a main cable(s) which must be connected with a wall socket or
connection box. Electric installations must be carried out by registered installation companies
only, observing the specific national and local regulations. These companies are responsible
for correctly interpreting all regulations and performing the installation in compliance with the
safety instructions.
Indications on warning signs and nameplates must be strictly observed.
Make sure that the main voltage corresponds to the voltage indicated for the unit
(given on the nameplate).
When installing or installation of this
device in close proximity to a wall,
partition walls, kitchen furniture,
decorative panels etc. is recommended
that these are not made of flammable
material; otherwise, they must be
covered with suitable non-combustible,
heat insulating material and the fire
safety regulations must be observed
most carefully!
Turn the controller and main switch in off position before you connect the unit to the main
supply.
To start the function test, the user has to know how to handle the unit.
Control with knob
The value, which point to the marking, shows the choosed temperature.
Position OFF: Position ON:
`0` point to marking (ο) each position, which point to marking (ο)
| 100 | (Min.) till | 185°C | (Max.)
Remove all parts from the heating zone. Stop immediately the start-up if the unit
have a defect. Switch OFF the unit and disconnect the unit from the main supply.
If the unit still doesn’t work, please refer to the “troubleshooting” section of this
manual.
Attention
The heating elements get very hot. To
avoid injuries, don`t touch the heating
element.

Page 10 von 23 26.08.2014
Ver. 1.9 Copyright Berner Kochsysteme 2015
Temperature control with sensor touch control panel
Field confirm a change with an LED.
Melting step
This step can only be activated, if the temperature of the grease or oil is
< 100°C (SCH ) see display, in time of the heating up to 70°C flashes the lower bar. As
soon the melt step is reaching (70°C), change the display to (SCH ). Raise the temperature
> 70°C the display change (SCH ). The upper bar flashes until the temperature decreases.
Standby function
If the temperature of the grease or oil is > 110°C, the Standby function is activated and can
be used. By activated standby function the unit keep the temperature value 110°C.
Target temperature 110°C (Point), real temperature to low ,
Heating: point on the right side of the symbol.
Real temperature 90°C (all 10 sec.), real temperature to low ,
Heating: point on the right side of the symbol.
Target temperature 110°C (Point), real temperature in range +/- 2°C,
No heating.
Real temperature 115°C, real temperature to high ,
No heating.
Cooking process
Fill the basin with enough grease. Use liquid or semi-liquid fat! On the rear in the
basin is a min and max marker for the level control of the grease. Don`t exceed or below this
level when you fill the oil in the basin. During frying fat level should not fall below the
minimum marker. A low level can lead to inflammation of the fat or oil. Choose your
temperature on the controller. The unit is ready for the using after the choosed temperature
is reached.
Main switch
Push 1 sec (Unit ON/OFF)
Field to activate the melting step or the
Standby function (On/Of push 0,5 sec.)
Digital display shows the
temperature
(Precision +/- 2°C) or possible
Faults
Field to raise the temperature
Field to minimize the
temperature
Advantages of the electronic control (BFEExx):
After the choosed temperature is reached, for example 180°C, the deep
fryer use only the needed power to keep the temperature.

Page 11 von 23 26.08.2014
Ver. 1.9 Copyright Berner Kochsysteme 2015
Lift automatic
Lift control with sensor touch control panel
The control of the basket lift system is separated adjustable over an sensor touch control
panel with ON/OFF, Bernerlogo and UP/DOWN button. After the TURN ON of the unit the
timer set the time to 10 minutes. Adjust the time with the UP/DOWN button. Start with the
ON/OFF button the cooking automatic, the lift automatic moves the choosed basket down in
the water. After the basket reach the final position in the basin, the timer starts to count. In
this range of time you can cancel the countdown with the button , the basket moves to
the start position. After a regular countdown, the basket moves automatically back to the
start position and set the timer back for the next circuit. Now it can be starting a new
sequence with the same time or you can choose a different time with the UP/DOWN button.
Touch control for the basket lift system
After the regular countdown the basket moves back to the start position and set the
timer back to the choosed time, for the next frying circle.
ON/OFF button
Start the Countdown.
Cancel the Countdown
Digital display for the time
max. 99min - min. 10 sec.
(Precision +/- 10 sec.)
Standard value is 10min
Field to raise the time +
Field to lower the time -

Page 12 von 23 26.08.2014
Ver. 1.9 Copyright Berner Kochsysteme 2015
Function test
Don`t use the deep fryer without grease or oil!
TURN ON of the unit and the heating on starts. The temperature can be choosed between
100°C and 185°C with the manual knob (BFEM) or the sensor touch control panel (BFEE).
After the reaching of the desired temperature the thermostat or the electronic switch of.
-Set the basket to the lift automatic holder.
-Red lamp is on (heating element not in position).
-Turn the knob in on position (a position between 100°C and 185°C). The unit lamp (green)
and the heating on lamp (yellow) are on. The grease/oil is heating on.
-Turn the knob in off position. The heating on stops and the heating on lamp (yellow)
switch off.
Operating
Cooking
Fill the basin with enough grease. Use liquid or semi-liquid fat! On the rear in the
basin is a min and max marker for the level control of the grease. Don`t exceed or below
this level when you fill the oil in the basin. During frying fat level must not fall below the
minimum marker. A low level can lead to inflammation of the fat or oil. Choose your
temperature on the controller. The unit is ready for the using after the choosed temperature
is reached. This is indicated after the yellow lamp goes out. The green lamp indicates the unit
is ON.
Green lamp unit in use
Yellow lamp heating on
Red lamp heating element not in position
Position 100 > min. temperature
Position Max > max. temperature (185°C)
Not in use
When the unit is not in use, make sure that the main switch and the temperature control
knob is not turned on inadvertently. If you do not use the unit for a longer period of time
(several days), disconnect the unit from the main supply or turn off the main switch. Make
sure that no liquids can get into the unit or base, and do not use excessive amounts of liquid
to clean the equipment.
Attention
The heating elements get very hot. To
avoid injuries, don`t touch the heating
element.
min / max

Page 13 von 23 26.08.2014
Ver. 1.9 Copyright Berner Kochsysteme 2015
Attention
Don’t open the unit!
Dangerous voltage!
Troubleshooting
WARNUNG: During cleaning or maintenance and replacement of parts of the equipment must
be disconnected from the power supply.
With all faults of the unit, which are not due to external
influences or dirt, only approved specially trained
service Employee should open the unit. Turn OFF the
unit immediately and disconnect the unit from the main
supply. The cause analysis or debugging must be done
by qualified personnel.
Possible faults
Fault
Possible cause
Troubleshooting by User or Service staff
No heating up
operation indication
lamp is OFF
No current supply
Control, if the unit is connected to the power
supply (Power cable connected?), Main
switch is in Off Position, check fuses.
No heating up
Safety thermostat
(STB) „capillary tube
to close on the basin”.
If the safety thermostat switches the unit of,
the reason is a high temperature
/continuous load. On constant switching off
can be detected a defect.
Marking:
The feeler is placed
on the heating
element.
The safety thermostat switches also if the
ambient temperature drops under 0°C. On
some local places for example in mobile
shops. Heat up the room to a normal
temperature 20°C before you quit the fault
on the safety thermostat.
Temperature
controller in Off-
position
Turn temperature controller in ON-Position
Insufficient heating or
no heating on.
Operation indication
lamp is ON
Single phase missing
Check the fuses.
Heating element
broken!
Contact your dealer for the repair service.
Disconnect the unit from the power supply.
Deep fryer broken
No reaction by
changing the value
with the knob
Temperature
controller broken
Heating up turn on and
off within minutes.
No reaction by
changing the value
with the knob
Red Lamp lights Heating element not in position
Overview of possible messages in the display
If the unit have a technical problem, the display shows a message.
Over temperature or missing feeler value PT1000 (interruption)
Short circuit feeler PT1000 or temperature value to low < -40°C
In case of replacing parts use only original parts according to the valid parts list, use the
existing or new replacement parts with the same fasteners. This also applies to the assembly
of outer housing parts, such as the bottom plate after a change of the power cord.

Page 14 von 23 26.08.2014
Ver. 1.9 Copyright Berner Kochsysteme 2015
Cleaning
WARNING: During cleaning or maintenance and replacement of parts of the equipment. The
unit must be disconnected from the power supply.
Regular cleaning of the deep fryer contributes to life extension.
List of cleaning agents for specific types of dirt and stain:
Dirt / stain type
Cleaning agent
slight contamination
Moist cloth (Scotch cloth) with some industrial
kitchen cleaning agent
Fatty spots
(Sauces, soups, ...)
Polychrom, Sigolin Chrom, Inox crème,
Vif Super-cleaner, Supernettoyant, Sida,
Wiener Klak, Pudol System care
Lime and water stains
Polychrom, Sigolin Chrom, Inox crème,
Vif Super-Reiniger, Supernettoyant
Strongly shimmering, metallic
discolorations
Polychrom, Sigolin Chrom
Mechanical cleaning Razor blade, Non-abrasive sponge
Do not use abrasive cleaning agents, steel wool, or abrasive sponges, since these may
damage the surface.
Do not use a wire brush to clean the heating elements. It is forbidden to the heating
elements by burning clean (dry run). Disregard any warranty claim is rejected.
Remove remains of cleaning agents with a damp cloth ( Scotch ), because they have a
corrosive effect. An expert maintenance of the equipment requires regular cleaning, careful
treatment and service.
Do not allow liquids to enter the device! Don`t clean the
unit with a water jet or a high-pressure cleaner.
Exchange of grease or oil
Switch off the unit. Place the container (included in delivery) for the
exchange under the drain of the unit. Open the drain valve slowly and fill
the grease in warm condition in the container.
Cleaning of the basin
•For cleaning remove the basket and the sieve below the basket
•Rotate the heating element with the mechanic in the vertical position.
•Remove possible food scabs. Clean the basin with warm water and
regular dishwashing liquid thoroughly.
•Dry the basin complete from water and keep attention there is no
residual water in the drain or basin.
•Rotate the heating element with the mechanic back in the horizontal
position.
•Place the sieve and the basket back in the basin after the final
cleaning.
Don`t clean the basket or sieve with the dishwasher! This will destroy the surfaces of the
equipment!
Risk of burns
by leaking
of hot grease or oil!

Page 15 von 23 26.08.2014
Ver. 1.9 Copyright Berner Kochsysteme 2015
Deep frying (Information material)
Link to the website of the German society for fat science: Interesting facts about fats and oils.
Click on the image to get the document or to the web page for download.
Link: http://1drv.ms/1nQtqgF
Maintenance
The users have to make sure, that all safety-relevant components always
are in perfect working condition. The unit has to be inspected at least
once a year by a specially trained technician from your supplier.
The unit must only be opened by specially trained service personnel.
Attention! For a technical control, the unit must be disconnected from the power supply.
Disposal
When the unit has reached to the end of the service life, it must be disposed of correctly.
Avoid misuse:
The equipment can’t be used, by someone who is not qualified to do. Make sure, that the unit
you want to dispose of, can’t take into operation again. The unit consists of common electro-
mechanic and electronic parts. No batteries are used. The user is responsible for disposing of
the unit correctly and safely.
Note for Waste management:
Units that for this point decide can be shipped to us.
We take only Post-paid Packets.
Delivery address:
Warranty
You have purchased a quality product cookware from BERNER. We as manufacturers provide
a warranty of one year from date of purchase.
Repair during the warranty period
Please contact your dealer.
Attention
Don`t open the unit!
Dangerous voltage!
Berner- Kochsysteme GmbH & Co. KG
Sudetenstrasse 5 – D - 87471 Durach
Tel. +49 (0) 831/697247-0; Fax. - 15
E-Mail: Berner@induktion.de | www.induktion.de

Page 16 von 23 26.08.2014
Ver. 1.9 Copyright Berner Kochsysteme 2015
Declaration of conformity
EG-Konformitätserklärung
Berner- Kochsysteme GmbH & Co. KG
Sudetenstrasse 5 – D-87471 Durach
We hereby declare that the following designated device meets the relevant, basic safety
and health requirements of the EC Directive due to its design and construction, as well
as produced and sold by us conform. In a coordinated not by changes to the unit, this
declaration loses its validity.
Intended use: Unit for frying, blanching and browning of food. We confirm the
conformity of the designated product with the support of this declaration listed below EC
directives.
Low Voltage Directive:2014/35/EU
EMC- Directive:2014/30/EU
The conformity of the designated product with the provisions of Directives 2014/30 / EU
and 2014/35 / EU is evidenced by full compliance with the following standards:
This declaration does not guarantee any properties. The safety of the supplied product
documentation must be observed. It is ensured through internal measures that the
standard units always comply with the requirements of the EC Directives and the applied
standards.
Durach, 15.04.2014 _______________________
Peter Berner
Executive Director
Unit type: build-in deep fryer
Type-Nr.: BFEM20, BFEM30, BFEM40,
BFEM40/2, BFEM50/2, BFEM60/2,
BFEE20, BFEE30, BFEE40,
BFEE40/2, BFEE50/2, BFEE60/2,
Testing basics:
Reference number Release date Reference number Release date
EN 55014-1 2012-05 EN 55014-2 2014-11
EN 60529 2014-09 EN 60335-1 2012-10
EN 60335-2-37 2013-07
Nationale Normen
Reference number Release date Reference number Release date
VDE 0700-38 2008-12 DIN 18856 2003-06

Page 17 von 23 26.08.2014
Ver. 1.9 Copyright Berner Kochsysteme 2015
Spare Parts List

Page 18 von 23 26.08.2014
Ver. 1.9 Copyright Berner Kochsysteme 2015

Page 19 von 23 26.08.2014
Ver. 1.9 Copyright Berner Kochsysteme 2015
Technical documentation
Instrument view (Example: BFEM50/2)
Installation example
Stainless steel cover
Backslash approx. 15 mm
Place the device

Page 20 von 23 26.08.2014
Ver. 1.9 Copyright Berner Kochsysteme 2015
Installation instructions to build-in of an Berner
Sensor Touch control electronic with frame (Ver. A)
Frame inclusive electronic is pre-assembled with glued glass ceramic
Please observe the following installation instructions. The only way to ensure a trouble free
operation and a long life time. To ignore the following guidelines will void the
warranty. See pictures of the build-in versions in our Pricelist on page 210.
This manual suits for next models
11
Table of contents
Other Berner Fryer manuals
Popular Fryer manuals by other brands

emerio
emerio Smart Fryer AF-124176 instruction manual

CONTINENTAL EDISON
CONTINENTAL EDISON CERFRSH24002CB manual

Tower Hobbies
Tower Hobbies T17021BMIO Safety and instruction manual

Bartscher
Bartscher 165.510 Instructions for installation and use

Pitco
Pitco SG Series Installation and operation

Tower Hobbies
Tower Hobbies T17023 Safety and instruction manual