Besantek CABLE TRACER BST-CT103 User manual

CABLE TRACER
Filter Probe & Tone Generator
INSTRUCTION MANUAL
BST-CT103

INDEX PAGE
1. INTRODUCTION.................................................. 1
2. FILTER PROBE.................................................... 1-3
3. TONE GENERATOR............................................ 3-6
4. SPECIFICATION.................................................. 7-8
5. MAINTENANCE................................................... 8

-1-
1. INTRODUCTION
The BST-CT103 has been designed and tested according
to CE safety requirements for electronic measuring
apparatus, EN 61326-1 EN 61000-4-2 EN 61000-4-3
and other safety standard.
The BST-CT103 is designed to identify and trace wires or
cables within a group without damaging the insulation.
2. FILTER PROBE
A. Features
●Works with any Tone Generator to identify wires.
●Volume control for increasing sensitivity and
adjustable to suit work environment.
●2 operation modes: Filter on / Filter off.
●The auto-off function (5 minutes) prevents battery
consumption.
●Power supply is available in any 9V battery with a
life of approximately 50 hours.
●A phone jack is designed for headset or handset.
●Flashlight function.
B. Instructions
●Connecting the tone generator.
In terminated working cables:
Connect one test lead to a terminated wire and the
other test lead to earth or equipment ground. (See
gure 1)
In unterminated or non-working cables:
Connect one test lead to an unterminated wire and
the other test lead to another unterminated wire.
Press the round " " button for more than 1 second
to turn on the lter probe. You can hear a short beep

-2-
when you turn on the unit.
The red LED ashes every 4 seconds as a visual
indicator and reminder.
This is the mode of " Filter off ".
●An instant press of the round " " button to change
into the mode of " Filter on ".
The green LED ashes every 4 seconds as a visual
indicator and reminder.
This is the mode of " Filter on " which can avoid the
AC power line interference of 50Hz/60Hz.
●The " Filter on " mode and the " Filter off " mode can
be exchanged by an instant press.
●The volume control can be adjusted to suit the
environment. The volume can be increased
to overcome noise or decreased to reduce
interference.
●Touch the tip of the lter probe to the insulation of
each suspect conductor.
●Reception of tone will be loudest on the subject
wire. The brighter the LED, the stronger of tone signal
detected.
●Press the round " " button for more than 3 seconds
to turn off the lter probe.
You can hear a long beep when you turn off the unit.
The lter probe also has the auto-off function
(5 minutes).
C. Special Application
●Plug in the phone jack activates the lter probe
automatically without a long press of the round
" " button. It is equipped for connecting a lineman’s
operation.

-3-
●The ashlight function for easier cable tracing in the
dark.
3. TONE GENERATOR
A. Features
●Red and black test leads with a standard 4 conductor
modular cord and plug.
●A 3-position toggle switch controls the modes of
operation and two bi-colored LEDs display line
polarity for Lines 1 and 2. (Figure 2)
●The tone and continuity (cont.) test functions are only
applied to Line 1 using the modular plug.
●A tone selector switch located inside the test set is
provided for choosing either a fast dual alternating
tone or a slow dual alternating tone.
(CAUTION: DO NOT CONNECT TO AN ACTIVE AC
CIRCUIT EXCEEDING 24V IN THIS MODE.)
Figure1

-4-
B. Instructions
All of the following tests can be performed by using the
red and black test leads or the modular plug.
NOTE: When using the modular test plug, the polarity
test function applies to Lines 1 and 2. The continuity
and tone functions ONLY apply to Line 1.
●POLARITY TEST: IDENTIFYING TIP & RING
(SWITCH TO "OFF")
a. Connect the RED test lead to the side of one line
and the BLACK lead to the side of another line.
b. The LED will glow "GREEN" when you connect the
RED test lead to the RING SIDE of the line.
c. The LED will glow "RED" when you connect the
RED test lead to the TIP SIDE of the line.
●IDENTIFYING LINE CONDITION (SWITCH TO
"OFF")
a. Connect the RED test lead to the RING SIDE of
the line and the BLACK to the TIP.
Slow
Figure 2 Figure 3
Fast

-5-
b. Watch the LED:
I. A BRIGHT "GREEN" LED indicates a CLEAR
line.
II. A DIM "GREEN" LED indicates a BUSY line.
III. A BRIGHTLY FLICKERING "GREEN and RED"
LED indicates a RINGING line.
●VERIFYING LINES (SWITCH TO "OFF" THEN
"CONT")
a. Dial the line to be veried.
b. While the line is ringing, connect the RED lead to
the RING SIDE of the line and the BLACK to the
TIP.
c. In the "OFF" position, the indicator lamp will icker
"RED and GREEN" when the test leads are
connected to the subject pair.
d. If you switch the test set to "CONT", it will terminate
the call on the subject line.
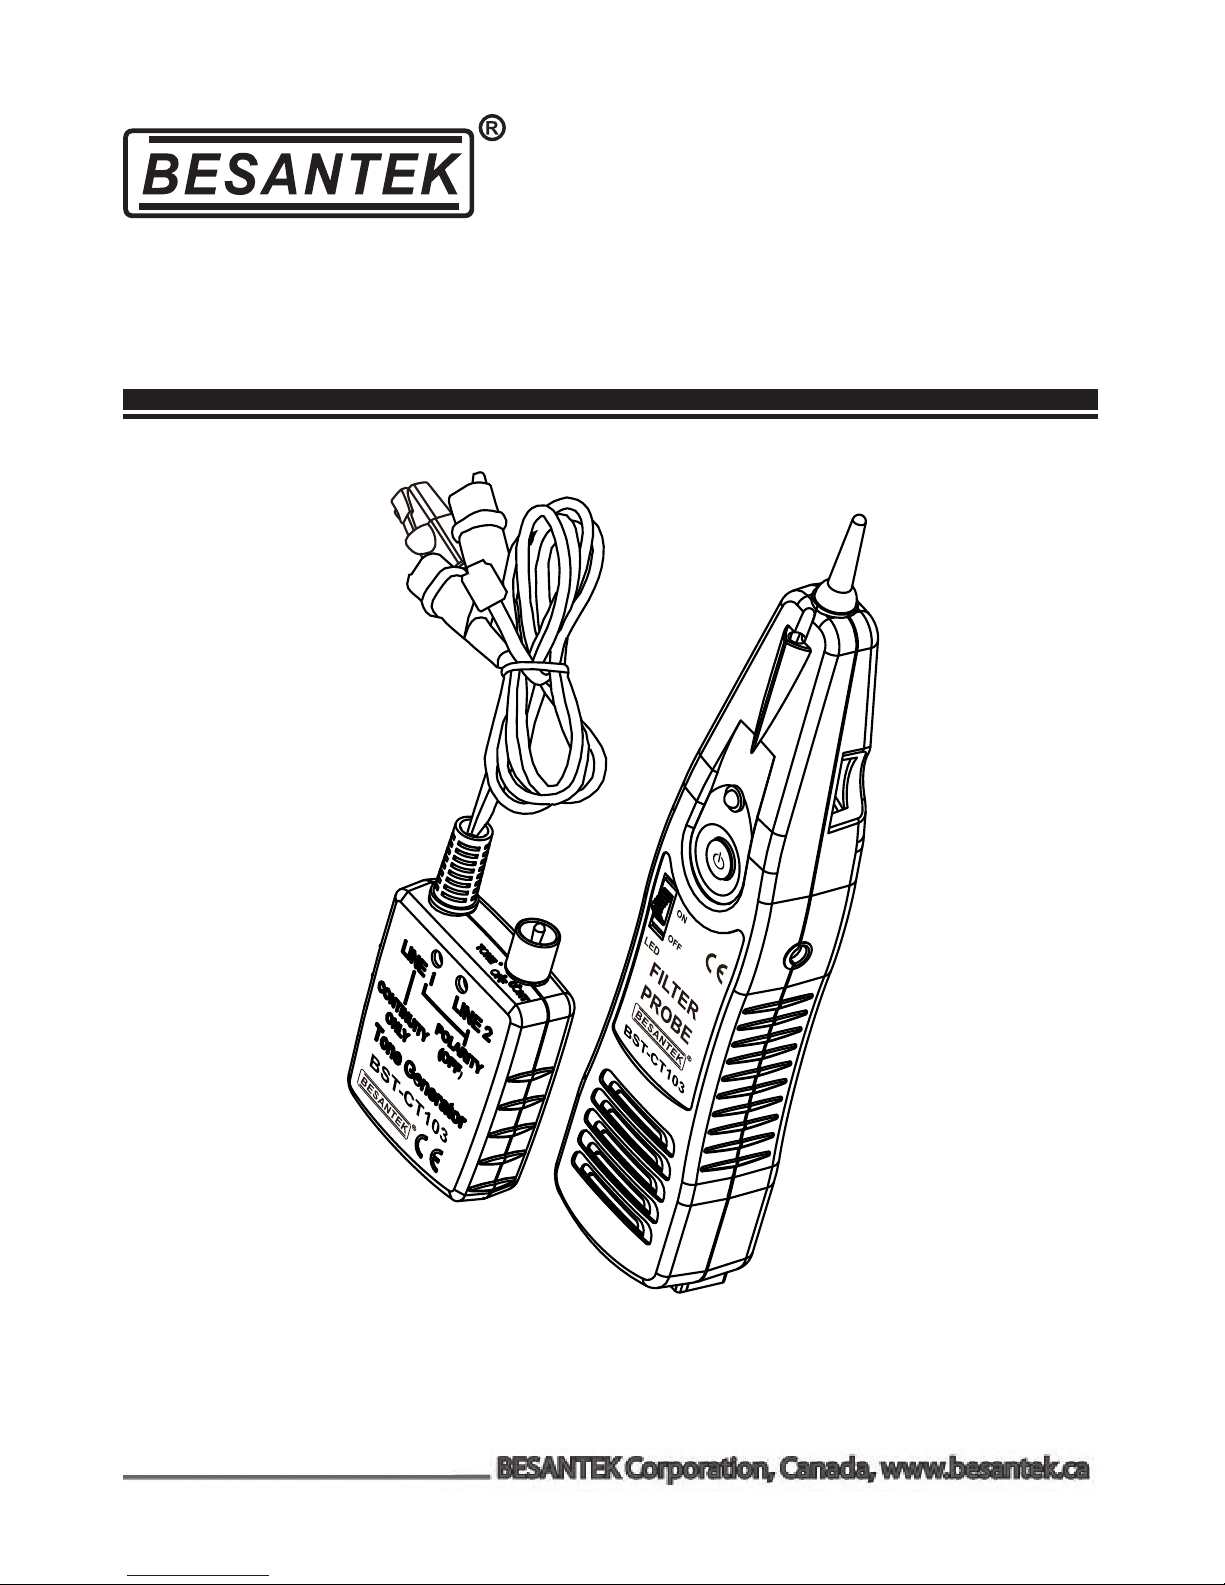
●SENDING TONE (SWITCH TO "TONE")
CAUTION: DO NOT CONNECT TO ANY ACTIVE
AC CIRCUIT EXCEEDING 24V IN THIS MODE.
a. Connect the test leads to the pair, or attach one
lead to ground and one lead to either side of the
line. (See gure 1)
b. A fast dual alternating tone, or a slow dual
alternating tone can be selected from the switch
inside the tone generator. (See gure 3)
c. Probe the suspected wires with the lter probe.
Reception of tone will be strongest on the subject
wire. In case of ready access to bare conductors,
a handset may be used to receive the tone.

-6-
●TESTING CONTINUITY (SWITCH TO "CONT")
CAUTION: DO NOT CONNECT TO ANY ACTIVE
AC OR DC CIRCUIT IN THIS MODE.
a. Connect the test leads to the subject pair.
b. Use "cont" position.
c. A bright "GREEN" light indicates continuity. The
LED will not glow if the line resistance exceeds
12k.
●TESTING CONTINUITY USING TONE (SWITCH
TO "TONE") CAUTION: DO NOT CONNECT
TO ANY ACTIVE AC OR DC CIRCUIT IN THIS
MODE.
a. Connect the test leads to the subject pair.
b. Use a handset at the remote end and touch the
wire end(s) with the clip lead(s).
c. Reception of tone is an indication of continuity.
●MODULAR TESTING
All above tests are available through the modular
plug for line 1 only - red and green wires.
●COAX TESTING
a. To test unterminated coax, connect red to outer
shield and black to center conductor or red to outer
shield and black to ground.
b. To test terminated coax, connect red to connector
housing and black to center pin or red to connector
housing and black to ground.

-7-
4. SPECIFICATION
Filter Probe
Operation mode
Filter on (avoid the interference
of 50Hz/60Hz)
Filter off
Receiver distance < 50 cm
Sensitivity control √
Probe tip Fixed
Power source 9V battery × 1
Dimensions 250(L) × 39(W) × 38(D)mm
Weight
(battery included) Approx. 180g
Tone Generator
Wave form Square Wave
Frequency 1kHz ± 15%
Over voltage protection 80V DC
Alternating tone Fast and Slow
Connection RJ11 connector, alligator clip x 2,
RJ45 connector
Power source 9V battery × 1
Dimensions 86(L) × 63(W) × 26(D)mm
Weight
(battery included) Approx. 130g

-8-
General
Operating Temperature
& Humidity 0°C~40°C, 80% Max
Storage Temperature
& Humidity -10°C~50°C, 80% Max
Safety Standard
EN 61326-1
EN 61000-4-2
EN 61000-4-3
Accessories
Instruction manual
Batteries
Soft pouch
5. MAINTENANCE
A. Cleaning
Periodically wipe with a damp cloth and mild detergent;
do not use abrasives or solvents.
B. Battery Replacement
●The lter probe is maintenance free except for battery
replacement. Remove the screw from the battery
compartment, replace the 9V battery and
reassemble.
●Separate the case of the tone generator, install a
fresh 9V battery and reassemble. DO NOT OVER
TIGHTEN.
C. Warranty limited solely to repair or replacement; no
warranty of merchantability, tness for a particular
purpose or consequential damages.
Table of contents
Other Besantek Recording Equipment manuals
Popular Recording Equipment manuals by other brands

QRS Music Technologies
QRS Music Technologies QRS-Connector user manual

Blackstar Amplification
Blackstar Amplification Carry-on FOLDING CONTROLLER 25 owner's manual

Buxcomm
Buxcomm RASCAL Mk III User's manual and setup instructions

Jupiter Avionics
Jupiter Avionics JA98-001 Installation and operating manual

Qstarz
Qstarz BT-Q1000eX user manual

Yamaha
Yamaha ACD1 Service manual