Besco VEO BP-VNTI-CH User manual

INSTRUKCJA MONTAŻU – ZESTAW PRYSZNICOWY
NATYNKOWY BESCO
MODELE:
VEO / BP-VNTI-CH, BP-VNTI-CZ, BP-VNTI-ZL, BP-VNTI-GR
UWAGA! Przed montażem zestawu
prysznicowego należy dokładnie przeczytać
niniejszą instrukcję oraz wszystkie
ostrzeżenia i zalecenia eksploatacyjne,
zawarte w dołączonej karcie gwarancyjnej.
Niewłaściwy montaż może doprowadzić do
uszkodzenia elementów zestawu i skutkuje
utratą ochrony gwarancyjnej na produkt!
Schemat wymiarów [mm / cale]:
OGÓLNE INFORMACJE I ZALECENIA MONTAŻOWO – EKSPLOATACYJNE:
1. Przed rozpoczęciem montażu zestawu prysznicowego, należy sprawdzić kompletność i zgodność produktu z
zamówieniem. W przypadku stwierdzenia jakichkolwiek braków, wad czy uszkodzeń (np. transportowych), nie należy
go montować.
2. Użytkowanie zestawu powinno odbywać się zgodnie z jego przeznaczeniem. Baterie Besco przeznaczone są wyłącznie
do użytku domowego. Wszelkie inne użycie uważa się za niewłaściwe. Nie należy stosować zestawu komercyjnie.
3. Nie stosować w pomieszczeniach, w których temperatura powietrza spada poniżej 4°C.
4. Przed montażem zestawu prysznicowego, należy odpowiednio przepłukać instalację wodną, by uniknąć ewentualnych
zanieczyszczeń elementów np. osadem, drobinkami kamienia czy rdzy, które mogą prowadzić do ich uszkodzenia.
5. Podczas montażu zestawu, należy bezwzględnie zapewnić łatwy dostęp do części użytkowych oraz ulegających
naturalnemu zużyciu tj. głowice, przełączniki, wężyki przyłączeniowe, itp.
6. Baterie ze szczególnym uwzględnieniem elementów tj. aerator, itd. należy regularnie czyścić czystą wodą lub łagodnymi
środkami myjącymi i osuszać miękką ściereczką, by nie dopuścić do osadzania kamienia. Nie stosować środków
żrących, ścierających oraz zawierających cząsteczki mogące uszkodzić powierzchnię baterii, tj. takich, które nie są
przeznaczone do tego typu produktów.
7. Do montażu zestawu prysznicowego używać kluczy z gładkimi i nie zaciskającymi się powierzchniami szczęk, by nie
uszkodzić jego elementów.

MONTAŻ ZESTAWU PRYSZNICOWEGO:
1. W pierwszej kolejności należy przygotować (zgodnie z
rozstawem wskazanym na poniższym schemacie) oraz
przepłukać wyprowadzenia wody ciepłej oraz zimnej. Nawinąć
taśmę teflonową na łączniki mimośrodowe do baterii (G1/2) i
przykręcić je w miejsce wyprowadzenia wody ciepłej oraz
zimnej.
2. Na łączniki mimośrodowe nałożyć baterię i kluczem
dopasować ich rozstaw do otworów w baterii tak, by bateria była
zamontowana dokładnie w poziomie. Po zdjęciu baterii, na
wyregulowane łączniki należy zamontować podkładki oraz
okrągłe rozety maskujące. Na tak przygotowane wyjścia
zamontować korpus baterii.
3. Prawidłowo połączyć drążek przesuwny zestawu z korpusem
baterii.
4. Po zamontowaniu baterii, zaznaczyć właściwe położenie
uchwytu mocującego drążek przesuwny (przy użyciu poziomicy)
i wywiercić otwory (wiertło Ø6 mm). Następnie zamontować
uchwyt (wraz z rozetą maskującą) za pomocą załączonego
zestawu montażowego.
5. Jeden koniec węża prysznicowego podłączyć do słuchawki
prysznicowej, a drugi koniec do przełącznika głównego korpusu
baterii, słuchawkę prysznicową umieścić w uchwycie.
6. Po zamontowaniu zestawu, przykręcić deszczownicę.
UWAGA! Montaż zestawu prysznicowego należy powierzyć wyłącznie wyspecjalizowanemu wykonawcy. Montaż zestawu przez
nieupoważnione do tego osoby może skutkować uszkodzeniem produktu oraz innych elementów wyposażenia jak płytki, brodzik, itp.
Besco Sp. z o.o.
38-524 Besko, ul. Kościelna 21
Polska

INSTALLATION MANUAL –BESCO WALL-MOUNTED
SHOWER SET
MODELS:
VEO / BP-VNTI-CH, BP-VNTI-CZ, BP-VNTI-ZL, BP-VNTI-GR
CAUTION! Before installing the shower
set, please read this manual and all warnings
and recommendations regarding use
included in the attached warranty card
carefully. Incorrect installation may damage
the components of the set and will result in
the loss of warranty coverage for the
product!
Dimensions scheme [mm / inches]:
GENERAL INFORMATION AND RECOMMENDATIONS REGARDING USE & INSTALLATION:
1. Before installation of the shower set, check the completeness and compliance of the product with the order. In the
event of any deficiencies, defects or damages (e.g. caused by transport) to the faucet, it should not be installed.
2. The shower set should be used in accordance with its intended purpose. Besco faucets are intended for domestic use
only. Any other use is considered improper. The shower set should not be used commercially.
3. Do not use in rooms where the air temperature drops below 4°C.
4. Before installing the faucet, flush the water system properly to avoid any contamination of the faucet components,
e.g. with sediment, limescale or rust particles, which may lead to their damage.
5. When installing the faucet, it is absolutely necessary to secure easy access to the parts that wear out during normal use
of the product, e.g. cartridges, switches, connection hoses, etc.
6. Faucets, especially all components such as function switch, aerator, shower head, etc. should be cleaned on a regular
basis, with clean water or mild cleaning agents and then dried with a soft cloth to prevent limescale. Do not use caustic,
abrasive or particles containing substances that may damage the faucet surface, i.e. those that are not intended for this
type of product.
7. To assemble the shower set use only keys with smooth and non-clamping jaw surfaces to avoid damaging faucet
components.

SHOWER SET INSTALLATION:
1. First, prepare (according to the dimensions sketch below) and
flush the hot and cold water outlets. Wrap the Teflon tape around
the eccentric connectors for the faucet (G1/2) and screw them to
the hot and cold water outlets.
2. Place the faucet body on the eccentric connectors and use a key
to adjust their spacing to the holes in the faucet so that the faucet
is mounted exactly horizontally. After removing the faucet,
mount washers and round decorative rosettes on the adjusted
connectors and then, install the faucet body on the prepared
outputs.
3. Correctly connect the slide rod of the set to the faucet body.
4. After installation of the faucet main body is completed,
determine the correct position of the handle securing the sliding
bar (using a spirit level) and drill holes (use Ø6 mm drill). Then
mount the holder (with masking rosett) using the enclosed
installation kit.
5. Connect one end of the shower hose to the handheld shower
head, and the other end to the main switch of the faucet, place the
handheld shower head in the holder.
6. Finally, connect the overhead shower head.
CAUTION! The installation of the shower set should only be carried out by a specialized contractor. Installation of the shower set by
unauthorized persons may result in damage to the product or other bathroom equipment such as tiles, shower tray, etc.
Besco Sp. z o.o.
38-524 Besko, Kościelna 21
Poland
This manual suits for next models
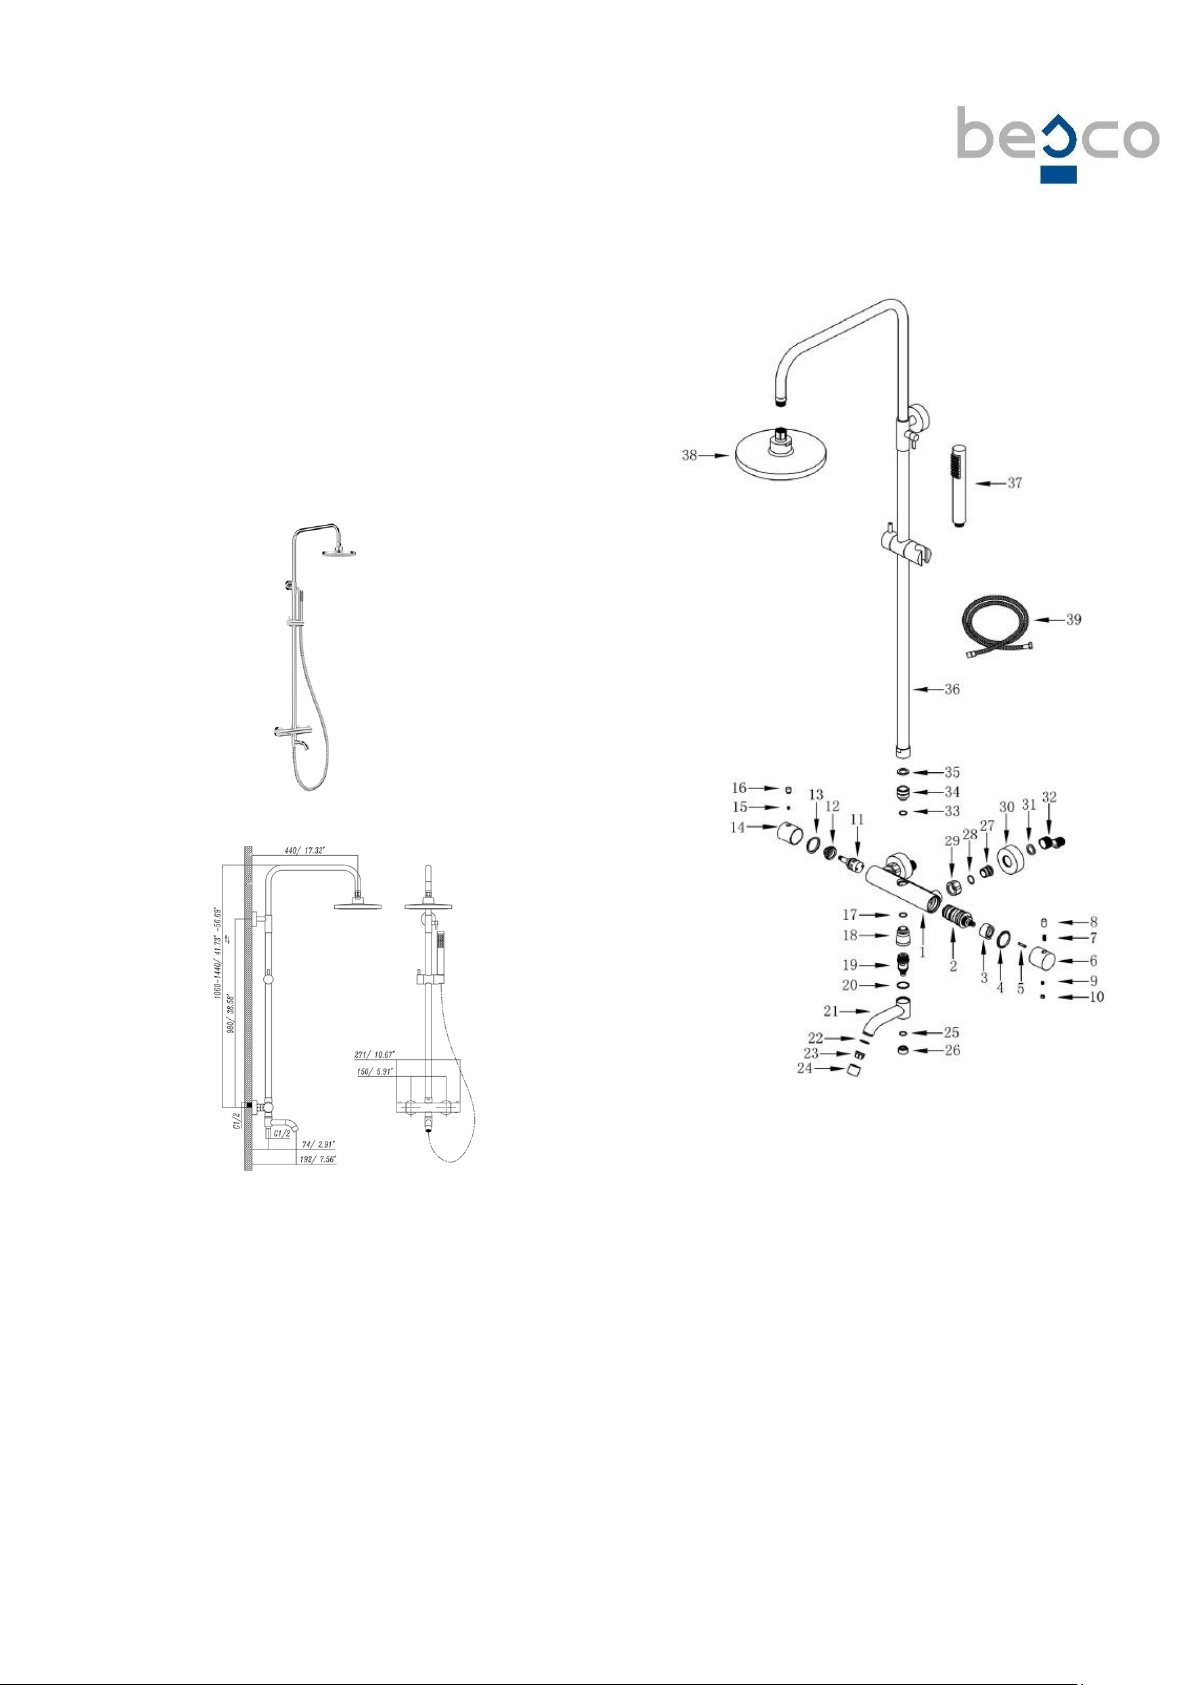
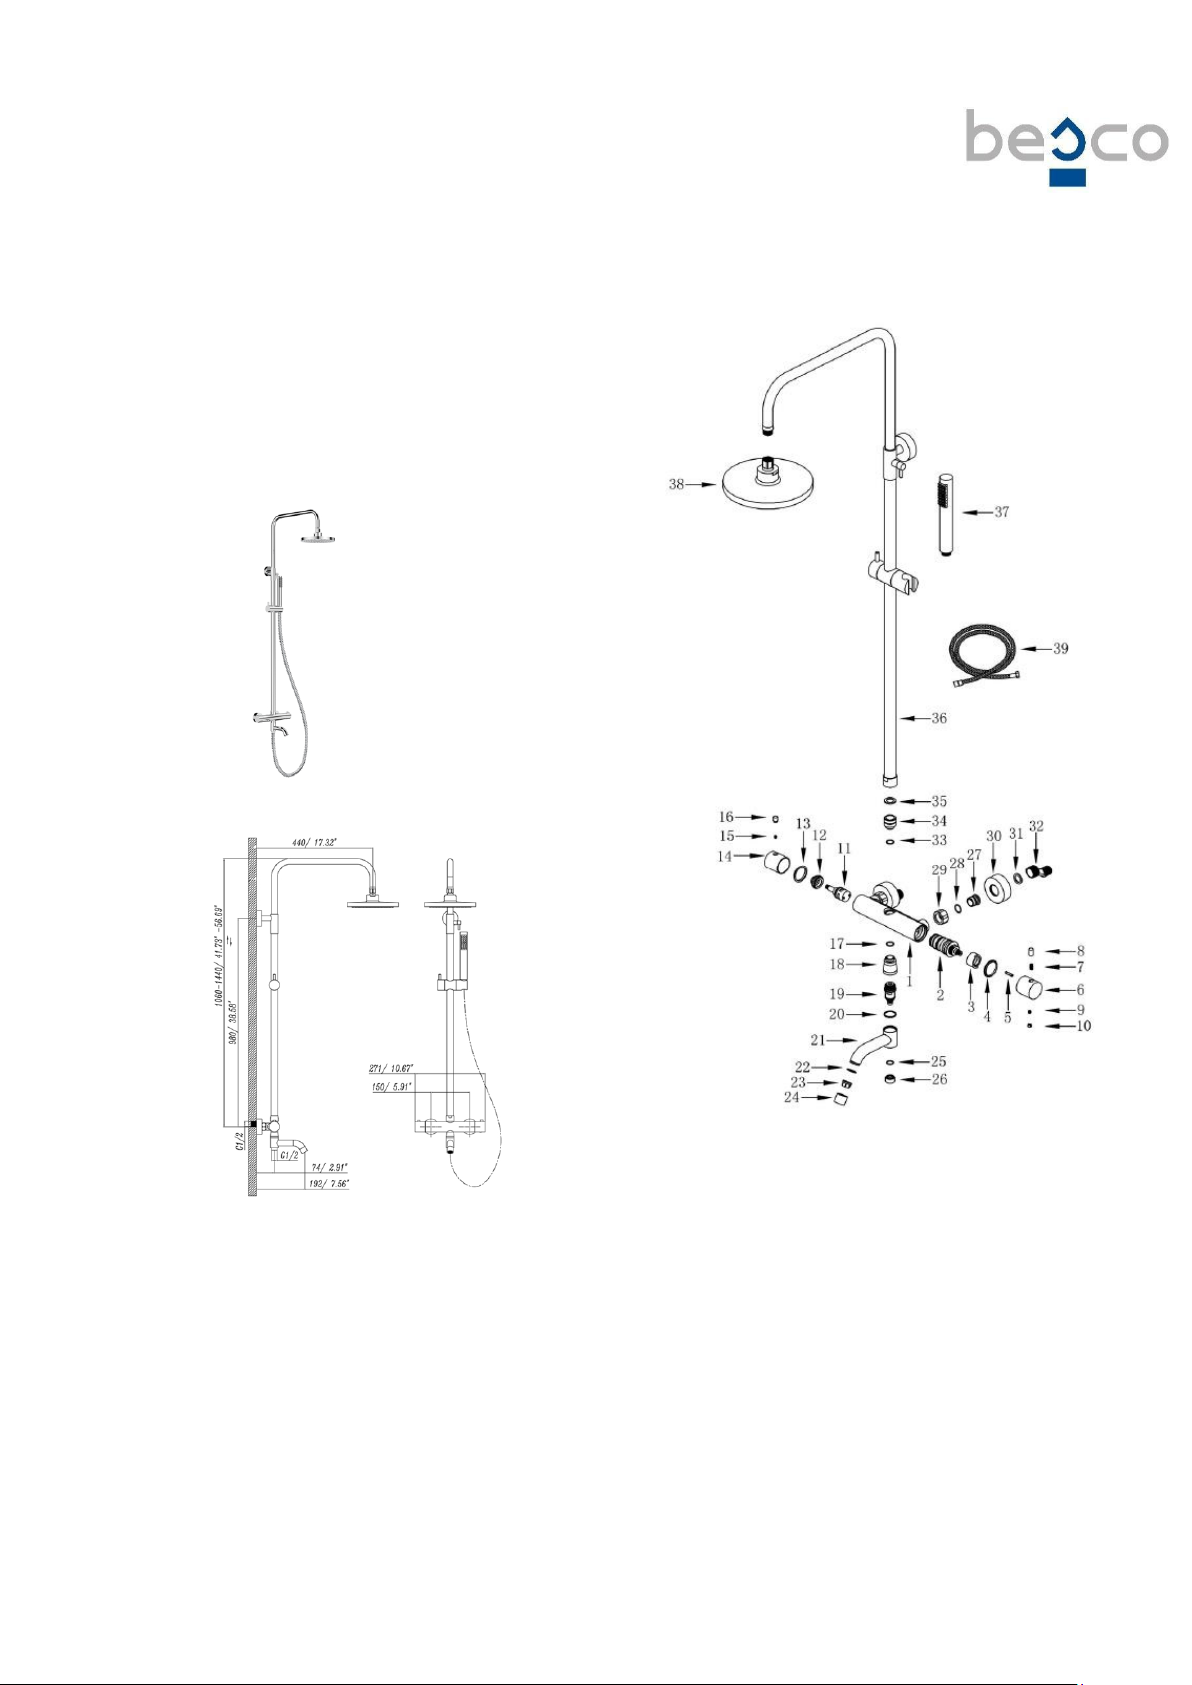
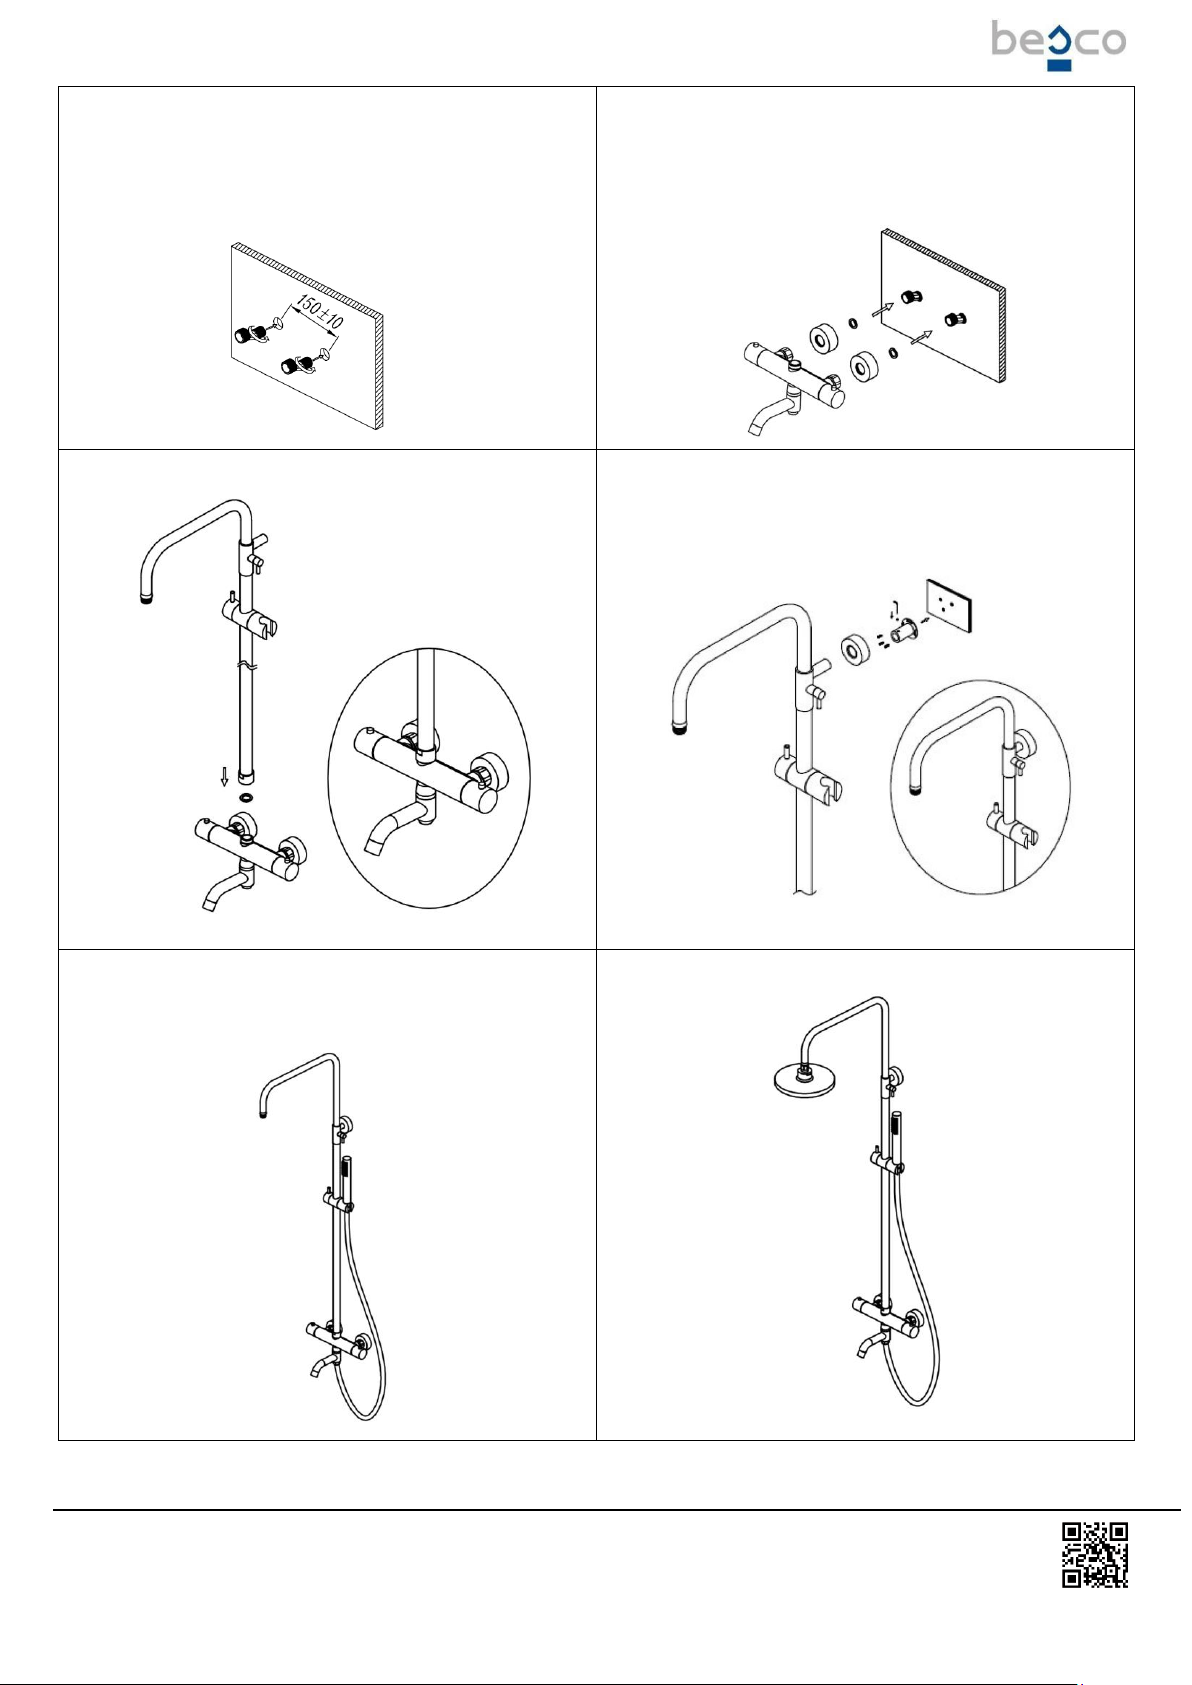
3
Table of contents
Languages:
Other Besco Bathroom Fixture manuals
Popular Bathroom Fixture manuals by other brands

Bharat Photon
Bharat Photon BP-U612 Installation & operation manual

MAAX
MAAX 105539 installation instructions

Kohler
Kohler K-4647 installation guide

BETTE
BETTE BetteSolid installation instructions

Kalia
Kalia Kareo BF1998 installation instructions

Glacier bay
Glacier bay ARAGON HD67090W-6B10H Installation and care guide

odass
odass OD-3040 instruction manual

Glacier bay
Glacier bay 67091W-6A01 Installation and care guide

Pulse Shower Spas
Pulse Shower Spas Bonzai 1017-B owner's manual

VALVEX
VALVEX CARRE 2449980 Assembly and operation instructions

Miomare
Miomare PREMIUM 271370 Assembly, operating and safety instructions

Kohler
Kohler K-1224-HB Roughing-In Guide