BestGuarder WG-50 PLUS User manual

12mp 6x50
Digital Night Vision
Monocular
INSTRUCTION MANUAL
We appreciate your business and want to prove to you we are committed to
providing you the best product and support in the field.
By giving our customers a new state of the art web interface, which provides
you with video tutorials and instruction on how to use the product in the
- 0 -

most effective way. Version_2.0
12mp 6x50 Digital Night
Vision Monocular
Model NO: WG-50 PLUS
INSTRUCTION MANUAL
We appreciate your business and want to prove to you we are committed to
- 1 -

providing you the best product and support in the field.
By giving our customers a new state of the art web interface, which provides
you with video tutorials and instruction on how to use the product in the
most effective way. Version_2.0
CONTENTS
Overview………………………………………………………….…………..….3-4
Camera Setup and Program
Controls/Function…………………….………………………………….….5-7
Display Icons……………………………………………………………….… 8
Setup And Basic Operation ………………………………..……………8
Other Operations …………………………………………..…………....…9
Menu Setting ……………………………………………………………..…...11
WIFI share ….…………………………………………………………….…....12
Firmware upgrade……………………………………………………….……15
Appendix I: Technical Specification………………………………….….........15
Appendix II: Parts List……………………………………………………………17
Appendix III: Warranty and Cautions………………………………………….18
- 2 -

I、Overview
- 3 -

Objective lens cover Battery compartment
1 10
Objective lens Eye piece lens
2 11
IR LED Mounting rail
3 12
Power button TV OUT Jack
4 13
+Zoom/Back button USB Port
5 14
-Zoom/Select button Micro SD card Port
6 15
Screen Brightness/ 4seconds MENU
button
Photo/Video Switch
7 16/1
7
Port/Jack cover
IR/Down button/Playback(long press
4s)
8 18
Record/OK button/ Battery polarity marks(+ to +/ - to
9 19/2
0
WIFI function(long press 4s)
Build in 1.5” TFT screen
ABOUT DIGITAL NIGHT VISION
Congratulations on the purchase of your Digital Night Vision. Comprised of high
quality electronics and optics, it is a hand-held digital night vision viewing system that
utilizes an infrared sensitive CMOS sensor, providing edge-to-edge resolution and
outstanding image quality. Fully multi-coated optics increase light transmission and
decrease glare. The 6x50 Digital Night Vision monocular is versatile enough for many
applications including hunting, camping, boating/fishing, caving, paintball, stargazing,
rescue/recovery, security surveillance, law enforcement, and video recording in
continuously changing light conditions – from dawn to absolute darkness. Not only
can you view your subject at night, you can also record its image as a still photo or
video clip, and store it on micro SD card. The 6x50 Digital Night Vision units also
include a video output port (user switchable to NTSC or PAL standard), which allows
connection to video or computer equipment for recording or "live" monitoring. A
built-in accessory mounting rail enables the user to attach a more powerful IR
- 4 -

illuminator or other compatible accessories.
HOW DIGITAL NIGHT VISION WORKS
Digital Night Vision products collect existing light through the objective lens. The
image is then processed through a digital CMOS sensor module and transferred to
the micro liquid crystal display (LCD). Images viewed on the LCD are magnified 6
times. Digital Night Vision models are equipped with a built-in powerful IR (infrared)
illuminator that enables clear viewing in low ambient light conditions or even total
darkness.
II、Camera Setup and Program
Special Care instructions:
zAccepts up to 64GB Micro SD card for photo storage. Do not insert/remove Micro
SD card and batteries when digital camera is on. (Format Micro SD card before
using, insert Micro SD card by correct front and back side)
zTurn the battery compartment cover in a counter-clockwise direction to remove it,
and insert 4 AA batteries as indicated inside the battery compartment. Lithium AA
batteries are recommended for maximum running time, but alkaline or
rechargeable NiMh AAs may be used as well. Do NOT mix battery types, or new
and old batteries. Remove the batteries if the unit will be stored for a month or
longer between uses.
zDo not clean lenses and unit surfaces with paper based products, such as
newspaper, textbook paper, etc. as it can damage the coating.
zAvoid removing the eyepiece as the LCD display could become damaged.
zDo not leave the device in direct sunlight or rain. The unit is water resistant, but is
not designed for prolonged exposure to moisture and cannot be submerged in
water.
zAvoid dropping or otherwise shocking the unit. Although designed for rugged
outdoor use, the device incorporates sophisticated digital circuitry which could be
damaged in extreme cases of misuse.
zKeep camera power ON while upgrading the device.
CONTROLS/FUNCTIONS
1, POWER BUTTON
The Power button turns the unit on or off.
zPress and hold the power button for 3 seconds to turn the unit ON
zPress and hold the power button for 3 seconds to turn the unit OFF
2, DIGITAL ZOOM BUTTONS
The “+” and “-“ buttons adjust the digital zoom power, with a range of 1.0x to
5.0x.
- 5 -

Hold the button down to zoom in/out rapidly. The Digital Zoom icon at the lower left
corner of the display will indicate the magnification factor, from 1.0x to 5.0x (in
0.1x increments).
zPressing and releasing the “+” button will gradually “zoom in” to the subject in
view, by 0.1x increments.
zPressing and releasing the “+“ button will rapidly zoom in, until the maximum 5.0x
magnification factor is reached.
zPressing and releasing the “-” button will gradually “zoom out” to the subject in
view, by 0.1x increments.
zPressing and releasing the “-“ button will rapidly zoom out, until the digital zoom
returns to the starting point of 1.0x (no digital zoom applied)
Hidden/Display Reticle: Press and Hold “+” button and “Power”
button meanwhile
3, IR BUTTON
The “IR” button turns on/off the Infrared LED illumination for low light
operation, and is also used to reduce its brightness if necessary.
zPress and release the “IR” button to turn on the infrared LED light (D) when
ambient light levels are too low to provide good viewing quality. The IR
illumination will be at “100%” level when turned on, and the display will indicate
“IR9”. The unit has 9 IR brightness settings.
zPress the “IR” button a second time to reduce the IR LED brightness level when
viewing subjects at close range to avoid glare or “washout” of the image. The
display will indicate “IR2”. Press “IR” again if necessary , to reduce the IR LED
brightness to its lowest setting, indicated by “IR1” in the display.
zPress the “IR” button again to switch off the IR LED light. “Black” will be shown at
the lower center of the display. Switching off the IR LED when ambient light levels
are adequate for viewing without it (full moon, near streetlights, etc.) will extend
battery life and running time. Press the “IR” button once again to switch to DAY
Mode-no IR value will be indicated.
Long press 4seconds enter/quit Playback Mode
4, BRIGHTNESS BUTTON
The Image Brightness (Sun Icon) button can be used to change the screen
brightness.
zPress and release the “Brightness” button to turn on screen light when ambient
light levels are too low to provide good viewing quality. The unit has 6 screen
brightness settings.
Long press 4seconds enter/quit MENU setting
- 6 -
5, RECORD BUTTON
The Record button is used to capture still photos or videos of the image being
viewed, dependent on the setting of the Photo/Video switch. The photos and/or
videos are stored on a (user supplied) micro SD card, with up to 64GB capacity.
The unit has no internal memory.
zWhen the unit is in Photo Mode, pressing the record button will take a single
photo of the displayed image, standard .jpg format.
zWhen the unit is in Video Mode, pressing the record button will start a new video
recording. The Record icon in the display will begin flashing, and the Video Time
display will increase as the recording continues. Video is captured in .AVI.
zTo stop recording in Video Mode, press the Record button again.
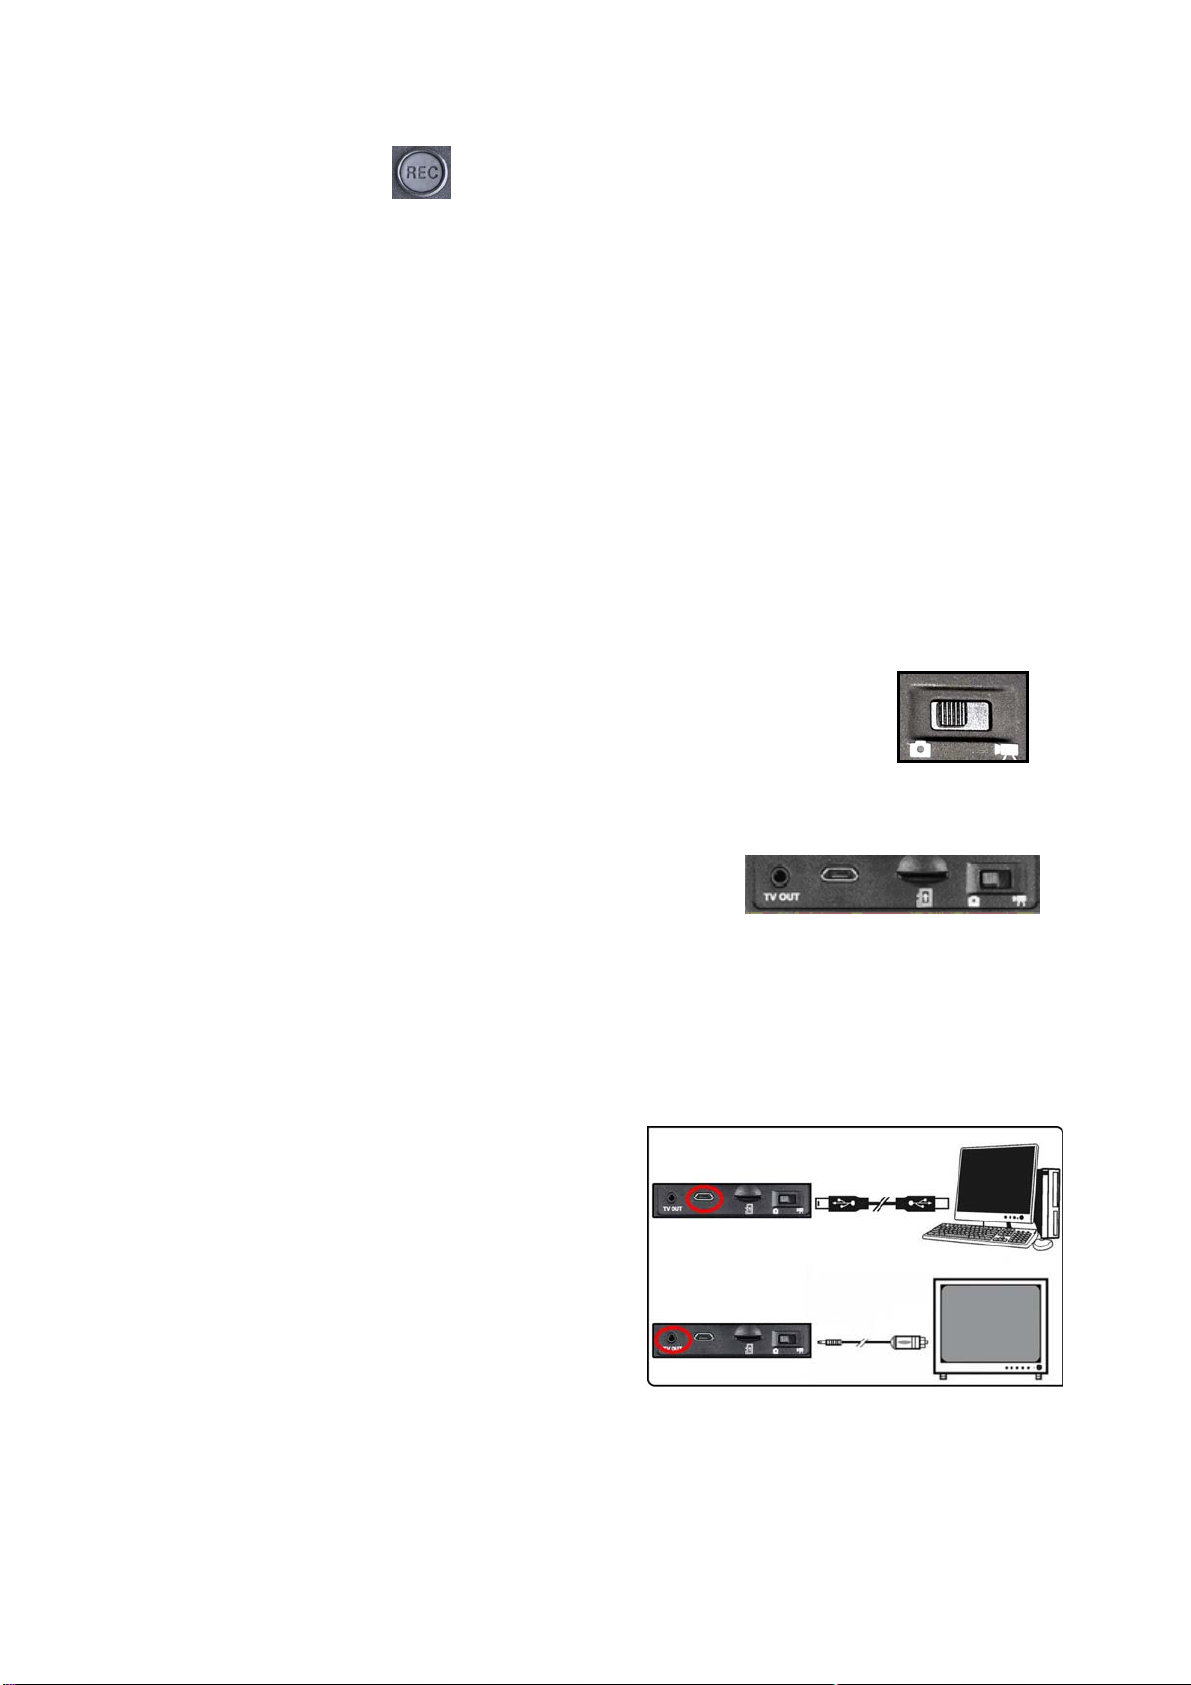
(The following items are located on the bottom of the unit, under the Interface
Cover Flap)
Long press 4seconds to Turn On/Off WIFI function
6, PHOTO/VIDEO SWITCH
The Photo/Video slide switch under the Interface cover flap
determines whether still photos or videos are captured when
using Record.
zSet the switch to the “Photo” position to select still photo recording mode when
the Record button is pressed .
zSet the switch to the “Video” position to select
video recording mode when the Record button is
pressed .
7, MICRO SD CARD SLOT : a micro SD card (user supplied, up to 64GB maximum)
must be inserted before it is possible to use the Record function. If a card is not
inserted, the message “No Card” will be seen on the display when the unit is turned
on.
8, USB PORT : connect a USB cable
between this port and a PC/Mac to download
photos/videos without removing the card, or
work as a web camera.
9, TV OUTPUT JACK: the “live” image as
seen on the unit’s display is output here.
Connect the included video cable between
this jack and a video monitor or recorder to remotely view or record the image from
the night vision unit.
- 7 -

DISPLAYICONS
The
p
hoto count
,
remain record time
,
and SD card status will be dis
p
la
y
ed here
Photo Count
SETUP AND BASIC OPERATION
1) LOAD BATTERIES
Turn the battery compartment cover in a counter-clockwise direction to remove it, and
insert 4 AA batteries as indicated inside the battery compartment. Lithium AA
batteries are recommended for maximum running time, but alkaline or rechargeable
NiMh AAs may be used as well. DO NOT MIX BATTERY TYPES, OR NEW AND
OLD BATTERIES. Remove the batteries if the unit will be stored for a month or longer
between uses.
2) REMOVE THE LENS COVER, ADJUST DISPLAY (EYEPIECE) FOCUS FOR
YOUR VISION
Press the Power button to turn on the unit. A battery level icon is displayed at the top
right corner of the screen. While looking through the eyepiece at the LCD display
Brightness Setting
The Screen brightness status is
displayed here.
Battery Level
This icon indicates
the remaining battery
power level.
Record Indicator
When recording in Video
mode, the Record
indicator is displayed
here. This icon indicates
the remaining battery
power level.
Zoom Factor
The Digital Zoom magnification factor
is displayed here. (1.0x – 5.0x)
IR Setting
The IR LED light status is
displayed here.
When the device is in
photo mode, the number
of photos remaining
(memory available) will be
displayed(5 digits)
Remaining Recording Time Elapsed Recording Time No SD Card
# # # # #
When the device is in video
mode and not recording, the
remaining time will be
displayed(hrs/min/sec)
00:00:00
When an SD card is not
present in the card slot,
the “NO CARD” message
will be displayed.
When the device is in
video mode and
recording, the elapsed
recording time will be
displayed(hrs/min/sec)
00:00:00 NO CARD
Date & Time Display
1
- 8 -

screen, rotate the eyepiece (eye-cup) until the display icons or edges of the display
screen appear sharp to your eye. Remove the lens cover from the front of the
objective lens. Note: since the device uses digital night vision technology (not analog
“Gen 1”, etc.), the unit cannot be damaged by exposure to normal indoor or outdoor
light levels-however, you should avoid pointing it directly at the sun or other very
bright light sources to avoid overloading the sensor.
3) TURN ON IR LIGHT(IF NEEDED), ADJUST OBJECTIVE LENS FOCUS FOR
SUBJECT DISTANCE
If the image is too dark to easily view (in most building interiors, and outdoors when
away from artificial lighting), press the IR button to turn on the Infrared LED light. If
the image is too bright after turning on the IR light (when viewing at close range),
press the IR button again to reduce the IR light level. If the image is still too dark after
turning on the IR light, try pressing the Image Brightness button once or twice to
lower the frame rate of the digital sensor. If the image is not sharp, rotate the
objective lens barrel to change the focus until the subject appears sharp. Do not
re-adjust the Display (Eyepiece) Focus (as set in Step 2), unless the display icons are
un-sharp.
OTHER OPERATIONS
zAUTO POWER OFF
If a button has not been pressed for 10 minutes, the display screen will drop to
50% brightness level. If no button is pressed within one minute after that, the unit
will power off to extend battery life. Pressing any button quickly any time before
the unit turns off will return the screen to full brightness level and reset the auto off
countdown process, without changing any other settings
zICON OVERLAY ON/OFF
The user has the option to control how the icons are displayed on the LCD screen.
Normally, when any button is first pressed, ALL icons are displayed for 5 seconds,
but no change to the unit’s settings is made (the Record and IR buttons is an
exception-image capture begins immediately the first time “Record” is pressed,
and the IR light turns on at the first press of “IR”). If the same button is pressed
again, the button performs its function, and the display icons remain visible for 10
seconds after the last press, before turning off automatically. To display all icons
constantly, press and hold the IR button for 3 seconds. Repeat to switch back to
auto icon overlay (only visible for 10 sec. max following the use of a button)
zUSING THE DIGITAL ZOOM
Press the “+” button (B) to zoom in. Press the “-” button (B) to zoom out. Hold the
button down to zoom in/out rapidly. The Digital Zoom icon at the lower left corner
of the display will indicate the magnification factor, from 1.0x to 5.0x (in 0.1x
increments).
zSELECTING PAL OR NTSC VIDEO OUTPUT
The Video Output jack is set to NTSC format (30fps TV standard in the USA,
- 9 -

Canada, Mexico, etc.) by default. To select PAL video output (25fps) format as
used in other countries, connect the unit to your video device first, then hold both
the IR button and Image Brightness buttons down for 5 seconds while viewing the
display through the eyepiece. When the display changes to “PAL”, release the
buttons. To switch back to NTSC video output format, hold both buttons for 5
seconds until the display indicates “NTSC”, then release the buttons. Note: The
“Auto Off” feature is disabled when using the Video Output jack.
zTROUBLESHOOTING
Unit does not turn on
1. Re-install the batteries, making sure of the correct polarity (+/- terminals)
orientation (refer to the Parts and Controls Guide page).
2. Replace all batteries.
3. Clean the battery compartment, especially the contact points.
Observed image is too bright
The ambient light level is too high, and/or the IR light is at 100% level.
1. If you are using the IR light, press the IR button to select a lower illumination
level.
2. Turn off the unit or place the objective lens cover over the lens.
Observed image is too dark
The ambient light level is too low.
1. Press the IR button to activate the Infrared Light.
2. Press the Image Brightness button to select a lower frame rate from the digital
sensor.
Image is blurry
1. Re-focus by adjusting the objective lens. Adjust the diopter setting if necessary
by rotating the eyepiece until the edges of the LCD display appear sharp (see
“Focusing“ in this instruction manual).
2. Check the condition of the objective lens surface and eyepiece and clean if
necessary.
3. Replace the batteries.
4. In low light conditions, activate the IR illumination.
Image disappears or its quality is reduced
Bright light sources (e. g. street lights at night time) may cause decreased visibility
or reduced contrast.
Turn the night vision unit away from the light source; visibility will return
momentarily.
Power consumption(Test based on new Energizer Battery,Battery life is
different according to battery capacity and surrounding of use..etc)
IR type IR3 IR2 IR1 IR Off
Video type
HD Video 2h 33m 3h 34m 5h 50m 9h 43m
- 10 -

The unit is able to connect with portable power bank to save power of
battery while monitoring purpose only.
MENU SETTING
*Playback Mode: Long press “IR” button 4seconds to Enter/Quit
*MENU Mode: Long press “Brightness” button 4seconds to Enter/Quit
*WIFI Mode: Long press “REC” button 4seconds to turn On/Off
*Hidden/Display Reticle: Press and Hold “+” button and “Power”
button meanwhile
MENU MODE
*Pressing and holding Brightness button 4/5seconds to enter/exit MENU
mode
WG-50 plus MENU
Code MENU Settings Default
1 Photo 4000x3000 / 2592x1944 /
1600x1200 / 640x480 4000x3000
2 Movie Size 1280 x 720 / 640 x 480 (.AVI) 640 x 480
3 Date&Time MM/DD/YY HH:MM 2019/08/01 12:00
4 Time Lapse OFF/On
(Start Time/End time /interval OFF
“+” Button
In MENU mode, Pressing
and releasing the button,
lik
“
UP
“
K
“Brightness” Button
Pressing and holding
4/5seconds to enter/exit MENU
mode.
In MENU mode, Pressing and
releasing the button to back one
step, like “Back” Key.
“-” Button
In MENU mode, Pressing and releasing
the button, select and go next step
MENU, like “Next or Select” Ke
y
.
“-” Button
In MENU mode, Pressing and
releasing the button, go down,
lik
“
D
”
K
“IR” Button
In MENU mode, No function.
“REC” Button
1, In MENU mode, Pressing and releasing the button to confirm
select, like “OK” or “Enter” Key.
2, Long press to Turn On/OFF WIFI function
- 11 -

time/Video Length)
5 USB MSDC/PCCAM MSDC
6 English/German/Russian/French/S
wedish/
Italian/Japanese/Spanish/Czech/P
olish/Finish
Language English
7 Multi shot 1/2/3 1
8 000.000000S
Latitude
(000.000000S/N-090.000000S/N)
9 000.000000W
(000.000000W/E-180.000000W/E)
Longitude
10 OFF/On (Default: SSID:NIGHT
CAM, Passward:00000000)
WIFI OFF
11 Auto Turn
OFF OFF/On (1MIN-23H59MIN) On (10mins)
12 Format Yes/No
13 Version FW version/FW update
USB Connection
MSDC: Device could be used as a disk while connecting with USB cable
PCCAM: Device could be used as a WEB camera while connecting USB
cable with computer
(The unit is able to install Driver used as a WEB camera while computer system is
under Windows2000, And The unit is compatible with kinds of WEB camera
software on line and usage is same as computer camera after installing driver
succesfully), such as: SPCA1628_V1200_WHQL Setup.exe
WIFI Share
Download "iSmart DV" Android or IOS APP firstly
in the application store of mobile device, and then
install it into the mobile device. This app is a free
application developed by our company
- 12 -
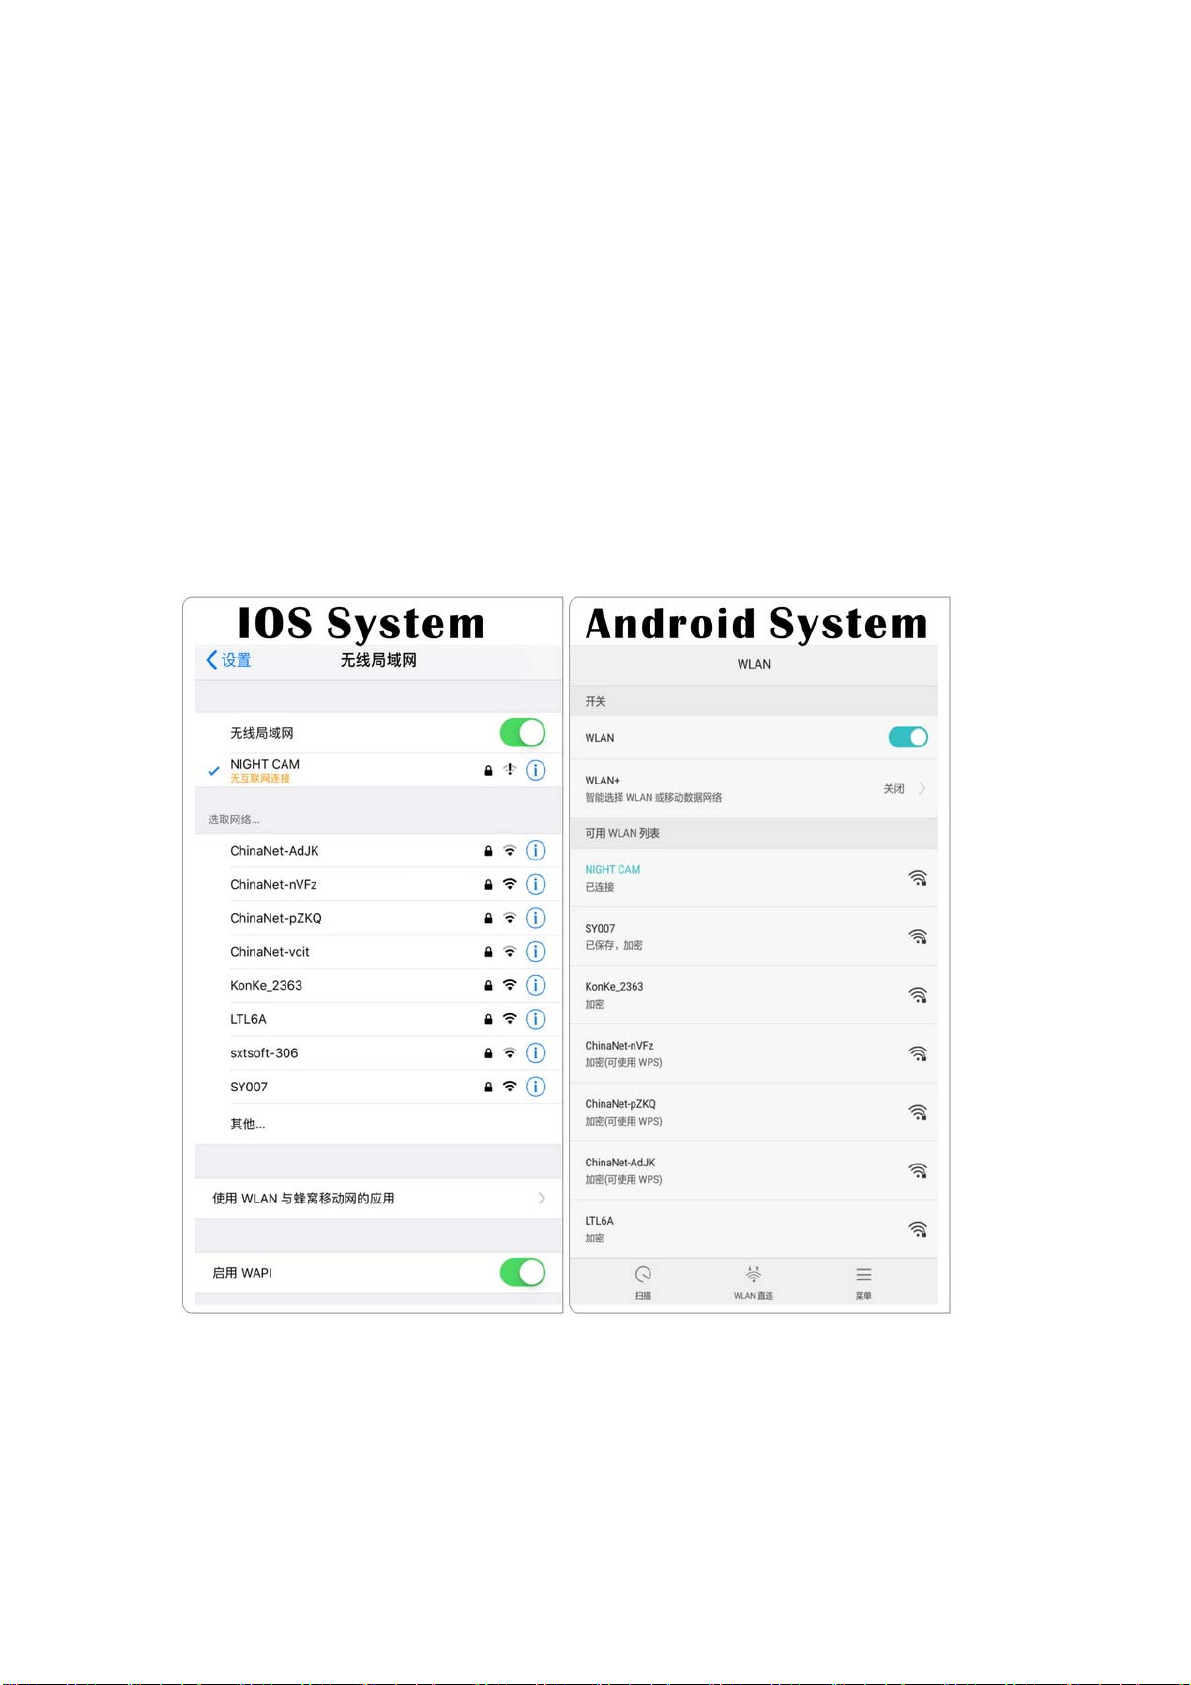
WIFI APP install and setting
1, Turn On NV camera WIFI
zLong press “REC” button to Turn on WIFI function
zIn “MENU” mode - “WIFI”- Turn On/Off
2, Mobile device WIFI connection
Search the device name "NIGHT CAM” on Mobile device and connect, WIFI
default password is 00000000.
3, NV Camera show connecting information on screen
4, Click “iSmart DV” APP, Click “ADD New Camera” to add a NV camera and
enter Operation interface
Please refer to the following APP operation interface
Note: When WIFI is connected successfully, NV camera and the APP would
- 13 -

be synchronised. Changes on APP will be same on NV camera.
- 14 -

Firmware upgrade
Firmware upgrade steps are as following:
1, Ready a Micro SD(TF) card and format the Micro SD card
2, Copy New Firmware files in SD card:
WG50plus_20190821B.BRN
3, Insert this Micro SD card in device, press “Menu” button and Up
/Down button to select “Version”
4, Press Up /Down button to select “FW UPDATE” then press “REC”
button
5, Upgrading information is displayed on LCD screen. Keep device power on until
LCD screen shut down. (Upgrade process needs 1miniutes)
6,Wait for 5seconds after upgrading, then Power On device again. Upgrade is
completed. Check new FW version.
*Upgrading is needed only when an improved firmware is available.
*Keep power on when device is upgrading. Otherwise, device have to
return manufacturer to repair when device data is broken in upgrading.
Appendix I: Technical Specification
Outstanding optical clarity, high performance night vision
Wide field of view
Video out capable
12Mega Pixels CMOS
In-view 1.5” TFT display
Micro SD card: up to 64G(no included)
Adjustable eyepiece
Powerful infrared spotlight
1150ft /350M viewing range
Field of View @ 100 yds/m:20.5ft/6.8m
- 15 -

Magnification(optical): 6
Objective Size:φ50mm
Digital Zoom:5
Field of View:4°x3.3°
The Range of Ocular Adjustment: ±3
Aperture:F=1.3
Obj. field:100yds
Eyepiece exit pupil distance: 20mm
Eyepiece exit pupil Diameter: 18mm
Infrared illuminator: Yes ,850NM
JPEG:4000*3000, 2592*1944,1600*1200,640*480
Video:1280*720, 640*480@30FPS
Observing Distance(Low Light Environment):2m~∞
Observing Distance(Full Dark Environment): 1150ft /350M
Video Out:PAL or NTSC
Language:English/Spanish/French/Italian/Czech/Polish/Swedish/Russian/Jap
anese/German/Finish
Power Voltage:6V
Rechargeable Battery: 4*AA,lithium,alkaline or NI-MH Battery
Built-in 2 tripod mountable:YES
TV:PAL/NTSC
USB:Micro USB
PC camera function:YES
Water Resistance Standard:IPX4
Operating Temperature Range: -10°C - +45°C
CE,FCC.RoHs
*Without battery, Micro SD card
FCC NOTE
This equipment has been tested and found to comply with the limits for a Class
B digital device, pursuant to Part 15 of the FCC Rules. These limits are
designed to provide reasonable protection against harmful interference in a
residential installation. This equipment generates, uses and can radiate radio
frequency energy and, if not installed and used in accordance with the
instructions, may cause harmful interference to radio communications.
However, there is no guarantee that interference will not occur in a particular
installation. If this equipment does cause harmful interference to radio or
television reception, which can be determined by turning the equipment off and
on, the user is encouraged to try to correct the interference by one or more of
the following measures:
• Reorient or relocate the receiving antenna.
• Increase the separation between the equipment and receiver.
- 16 -

• Connect the equipment into an outlet on a circuit different from that to which
the receiver is connected.
• Consult the dealer or an experienced radio/TV technician for help.
Shielded interface cable must be used with the equipment in order to comply
with the limits for a digital device pursuant to Subpart B of Part 15 of FCC
Rules.
Specifications and designs are subject to change without any notice or
obligation on the part of the manufacturer.
Disposal of Electric and Electronic Equipment
(Applicable in the EU and other European countries with separate collection systems)
This equipment contains electric and/or electronic parts and must
therefore not be disposed of as normal household waste. Instead,
it should be disposed at the respective collection points for
recycling provided by the communities. For you, this is free of
charge.
If the equipment contains exchangeable (rechargeable) batteries,
these too must be removed before and, if necessary, in turn be
disposed of according to the relevant regulations (see also the
respective comments in this unit’s instructions). Further information about the
subject is available at your community administration, your local waste
collection company, or in the store where you purchased this equipment.
Appendix II: Parts List
Part Name Quantity
Digital Night vision Monocular 1pc
Instruction Manual 1pc
Warranty Card 1pc
Protection bag 1pc
USB cable 1pc
TV cable 1pc
Lens cloth 1pc
- 17 -

Appendix III: Warranty and Cautions
Warranty
Your device is covered by Warranty on parts and labor from the date of original purchase, and purchases
must be made through an authorized dealer. Warranty period is complying with dealers’ legal requirement. The
warranty covers defects in workmanship and materials. The warranty does not apply to units, which have been
damaged or abused intentionally or unintentionally. A purchase from individuals or unauthorized internet sites
such as eBay voids the warranty.
Tampering with or altering the unit will void the warranty. Any unauthorized service will void warranty. A copy of
your original sales receipt must be produced for any warranty service.
WARNING:
Reading User’s manual before using it.
Changes or modification to this unit not expressly approved by the
party responsible for compliance could void the user’s authority to
operate the equipment.
Cautions:
zPlease install batteries according to shown polarity.
zPlease use good quality AA batteries and take out batteries when device will not be used for longer then
a few weeks.
zIt is recommended to format the Micro SD-card by the camera when used at the first time.
zKeep the device away from any heating and air conditioning vents or other heating devices, direct
sunlight, and moisture.
zAlways store the unit in its carrying case in a dry well ventilated space in temperature above
+15°C(60°F). Do not store near heating devices. Do not store in direct sunlight or high humidity
conditions(higher than 70%)
NOTE: This camera is a precision electronic device. Do not attempt to service his camera yourself, as
opening or removing covers may expose you to dangerous voltage points or other risks.
- 18 -

12mp 6x50 WI-FI
Digital Nachtsichtgerät
Model :WG-50 Plus
- 19 -
Table of contents
Languages:
Other BestGuarder Monocular manuals


