BestGuarder SG-990V User manual

Bgstluardgr
8 in 1 HD 12MP lnfrared game Gamera
SG-990V (850nM & 940nM)
User's Manual
Welcome to buy SG-990V lnfrared digital scouting camera.
For making best use of all functions of the camera, please read
this user's manual carefully before using it.
05/201 5


Modelno.:SG-990V(850nMor94OnM),HighLevelofBestguarderseries,Patent
no.: 201 120230457.3,201 330385070 X
This camera is our patent product, HD lR game camera with great
performance.
It can be triggered by any movement of human or animals or vehicle in a
certain region of interested (Rol) monitored by a highly sensitive Passive lnfra-Red
motion sensor (PlR),and then take high quality pictures (up to'12 mega pixels) or
video clips.
It also has time laps function, which means the camera can capture pictures or
video clips at specified time intervals regardless of if there is a motion of human or
animals.
SG-990V has game call function, it built in a speaker to play animal or alarm
sound to attract their companion in the region of camera surveillance'
The device is equipped with 850nM lR LED and 940nm invisible infrared dark
LEDS for optional, it takes clear black&white picturos or videos in even in the dark
night, while it takes color pictures or videos under sufflcient daylight Also the
camera has a 3W white flash, it takes color picture or video day and night'
850nm: a kind of LED, has Red glow. Some animals ar€ scared of Red glow
and run away. But some animals are attracted by Red glow, camera with 850nM
LED is more easier to take picture at animal's face. (See below plctures) SG-990V
has 42pcs 85OnM LED, capture distance is up to 20-25meters
940nm: a kind of LED, has weak Red glow. People and animal's eyes are hard
to find it. So camera with 940nM LED is more suitable for security and scouting.
SG-990V has 42pcs 940nM LED with black cover, it is totally invisible at night
The camera consumes very little power (0.2-0.3A level) at surveillanco mod6'
Powered by 8 new AA alkaline batteries, the camera stands-by about 6 monthE'
Once a motion by human or animals is detected, the digital camora unlt wlll bo
awoken up at once and then automatically take pictures or videos accordlng to
previously programmed settings.
The device is designed for outdoor ,a" uni ,, resistant against water and snow.
Furthermore, the camera can be used as a portable digital camera. Pictures or videos
can be taken manually by pressing Shot button on the operation panel.
Storing conditions
Operating Enviroment:-22 lo 122 deg FC20 to 60 deg C). 20-85% relative humidity,
non-condensing.
Warranty
Your scouting camera is covered by Warranty on parts and labor from the date of
original purchase, and purchases must be made through an authorized dealer.
Warranty period is complying with dealers' legal requirement. The warranty covers
defects in workmanship and materials. The warranty does not apply to unlts, which
have been damaged or abused intentionally or unintentionally. A purchase from
individuals or unauthorized internet sites such as eBay voids the warranty.
Tampering with or altering the unit will void the warranty. Any unauthorized service will
void warranty. A copy of your original sales receipt must be produced for any warranty
service.
WARNING:
Reading User's manual before using it.
Changes or modification to this unit not expressly approved
by the party responsible for compliance could void the
user's authority to operate the equipment.
Cautions:
a Please do not insert or take out the SD card when the power switch is at ON
position, SD card should be Class 8.
a The working voltage of the camera is 12V The camera is supplied by eight AA
batteries.
. Please install batteries according to shown polarity.
a Please use good quality AA batteries and take out batteries when camera is free
long time.
a ln the TEST mode, the camera will shut down automatically after 30s if no
operation is done. Please turn on the power again if you want to continue to work
with the control.
a lt is recommended to format the SD-card by the camera when used at the first time-
a Please keep power on when camera is upgrading. Wait for Sseconds after
upgrading or power off.
a Keep camera far away from hot and heat source, vent of air condition, lighting etc
to avoid false trigger and shorten camera life.
NOTE: This camera is a precision electronic device. Do not attempt to service his
camera yourself, as opening or removing covers may expose you to dangerous
voltage points or other risks.
a
o
a
a
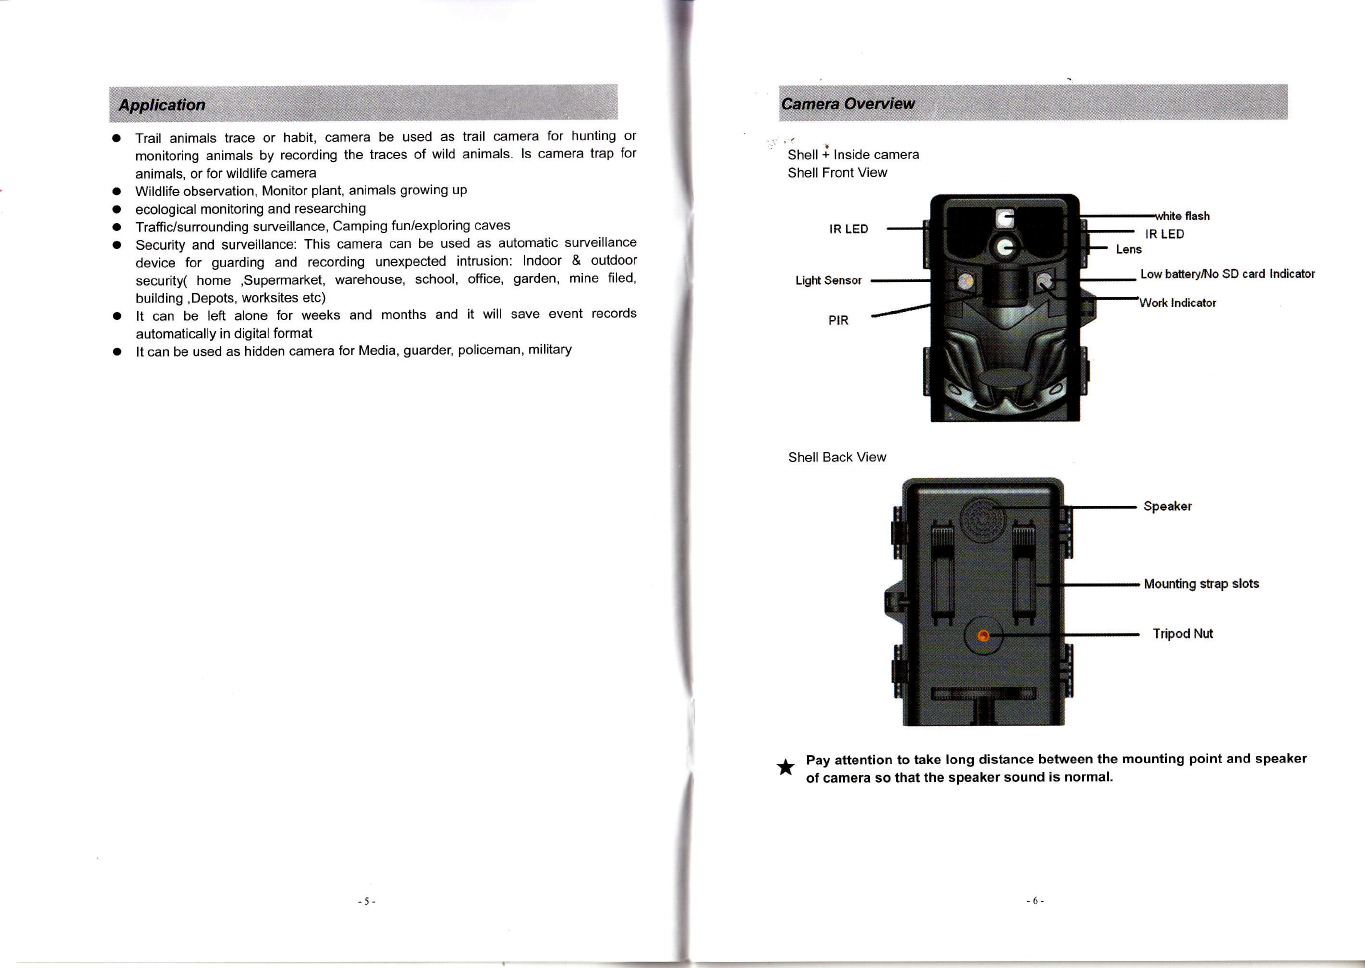
Trail animals trace or hablt, camera be used as trail camera for hunting or
monitoring animals by recording the traces of wild animals. ls camera trap for
animals, or for wildlife camera
Wildlife observation, Monitor plant, animals growing up
ecological monitoring and researching
Traffic/surrounding surveillance, Camping fun/exploring caves
Security and surveillance: This camera can be used as automatic surveillance
device for guarding and recording unexpected intrusion: lndoor & outdoor
security( home ,supermarket, warehouse, school, office, garden, mine filed,
building ,Depots, worksites etc)
It can be left alone for weeks and months and it will save event records
automatically in digital format
It can be used as hidden camera for Media, guarder, policeman, military
Shell + lnside camera
Shell Front View
IR LED
Light S6nsor
PIR
Low bateryNo SD card Indicator
Shell Back View
Speaker
Mounting strap slots
Tripod Nnt
Pay attention to take long distance between the mounting point and speaker
of camera so that the speaker sound is normal.
_l
*
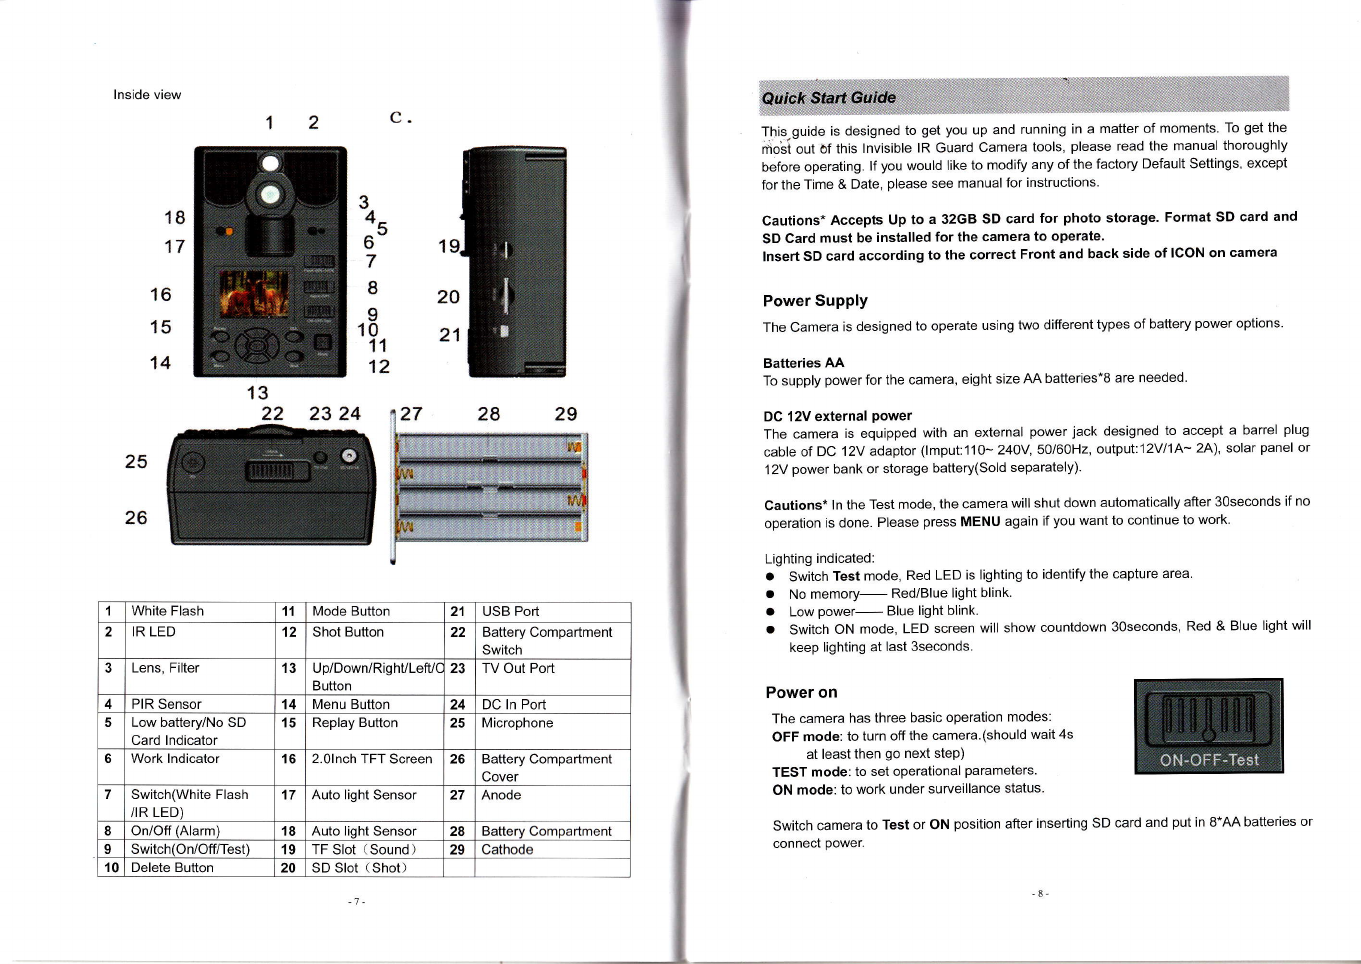
lnside view
20
21
C
34u
6
7
24
2
23
18
17
14
25
26
16
15
8
I
10
11
12
This-guide is designed to get you up and running in a matter of moments. To get the
moli out of this lnvisible lR Guard Camera tools, please read the manual thoroughly
before operating. lf you would like to modify any of the factory Default Settings, except
for the Time & Date, please see manual for instructions.
Cautions* Accepts Up to a 32GB SD card for photo storage. Format SD card and
SD Card must be installed for the camera to operate.
lnsert SD card according to the correct Front and back side of ICON on camera
Power Supply
The Camera is designed to operate using two different types of battery power options
Batteries AA
To supply power for the camera, eight size AA batteries*8 are needed.
DC 12V external power
The camera is equipped with an external power jack designed to accept a barrel plug
cable of DC 'l2V adaptor (lmput:110- 24OY,5Ol6OHz' output:12Vl1A- 2A), solar panel or
1 2V power bank or storage battery(Sold separately).
cautions* ln the Test mode, the camera will shut down automatically after 3oseconds if no
operation is done. Please press MENU again if you want to continue to work
Lighting indicated:
a Switch Test mode, Red LED is lighting to identify the capture area.
. No memory- Red/Blue light blink.
. Low power- Blue light blink.
. Switch ON mode, LED screen will show countdown 3oseconds, Red & BIue light will
keep lighting at last 3seconds.
Power on
The camera has three basic operation modes:
OFF mode: to turn off the camera.(should wait 4s
at least then go next step)
TEST mode: to set operational parameters.
ON mode: to work under surveillance status
switch camera to Test or oN position after inserting sD card and put in 8*AA batteries or
connect power.
13
22
,| White Flash 11 Mode Button 21 USB Port
2IR LED 12 Shot Button 22 Battery Compartment
Switch
3Lens, Filter 13 Up/Down/RighULefU(
Button 23 TV Out Porl
4PIR Sensor 14 Menu Button 24 DC ln Port
5Low battery/No SD
Card lndicator 15 Replay Button 25 Microphone
6Work lndicator 16 2.0lnch TFT Screen 26 Battery Compartmenl
Cover
7Switch(White Flash
/IR LED) 17 Auto light Sensor 27 Anode
IOn/Off (Alarm) 18 Auto lioht Sensor 28 Compartment
9Switch(On/Off/Test) 19 TF Slot (Sound) 29 Cathode
't0 Delete Button 20 SD Slot (Shot)

Enter into the TEST Mode
Preview the scene in LCD screen;
Test PIR detection;
Manual capturing (Press"Mode"to choose five
modes);
"Replay" Playback Picture and video (Press
"DEL" to delete picture or video )
"MENU" Setting camera;
Manual Capturing
*Hot keys:
Up/Down/Lefl:/RighUOK
ress"OK" to confirm your operation
MENU
ln Test mode, press MENU to manually customizing the camera setting
MODE
Press "Mode" to choose five modes: PhotoNideo/Time lapse/Hybrid/Time
lapse/Motion detection
Shot
ln Test mode, press "Shot" to capture photos or record videos.
Flash: Turn on 3W light to capture colorful picture and video at day and
night.
50% & 100%: Turn on 50% or looo/o lR LED to capture picture and
video(Adjust LED quantity according to capture distance and subject's
size)
Alarm' Play sound to attract or chase animals and alarm
OFF' Turn off speaker
Enter into the ON Mode
Switch camera to ON position after setting camera
LCD screen will turn off after countdown 30s, Red & Blue light will keep lighting 3s then
camera is working. Photos and videos are saved in SD card.
Cautions* ln the "ON" Mode, LCD screen will be auto shut down, and hot keys are not
woikable.
Replay/Delete picture and video
Press "Replay" to playback, Press "DEL" to delete picture and video
The camera offers the user different options
for viewing their images.
A, Viewing files on computer via USB
connection
o Make sure the camera's power
switch is in the OFF position. vid@
. The camera will automatically
power ON and display the word- USB on the LCD display.
. At the same time, your computer will recognize the camera as a Removable
Storage device. You will find it under MY COMPUTER.
Cautions* Press "OK" to read SD card or camera work at WEB camera
B, Viewing files on TV via TV cable connection
o Attach the provided TV out cable to the TV port on the bottom of the camera.
o lnsert the other end into the RCA VIDEO lN jacks on the TV.
. Turn on TV
. Switch camera to "Test" mode, press "Replay'to view image.
. Make sure to switch to AUX / VIDEO lN mode on your TV
Cautions* LCD screen will shut down automatically to save power.
- Press LEFT/RIGHT button to choose image/video. Press OK button to back TEST
mode while playing video.
*Press DEL button to delete one image or video
. ln "MENU'--'Format" to delete all images or videos.
* Video volume: Turn up/down by TV or computer
* Live surveillance device
"MENU'--"Power manage"--"Real time Away" to set camera as a live surveillance
device. Alarm system, flash, lR LED is workable. (This function is able to work at an
extensible 2.4G wireless device or a WEB camera to live surveillance, capture
pictures...etc)
C, Vieiving files on computer via SD card reader
D, Viewing picture in "TEST" mode after press "Replay"
Power OFF
Switch to OFF position to power off the camera. And wait
more 3seconds.
Please notg that even in the OFF mode, the camera still consumes certain power at pA
level. Therefore, please remove the battery if the camera will not be used for a long
time.
Iime Stamp
I
t
T
m
U
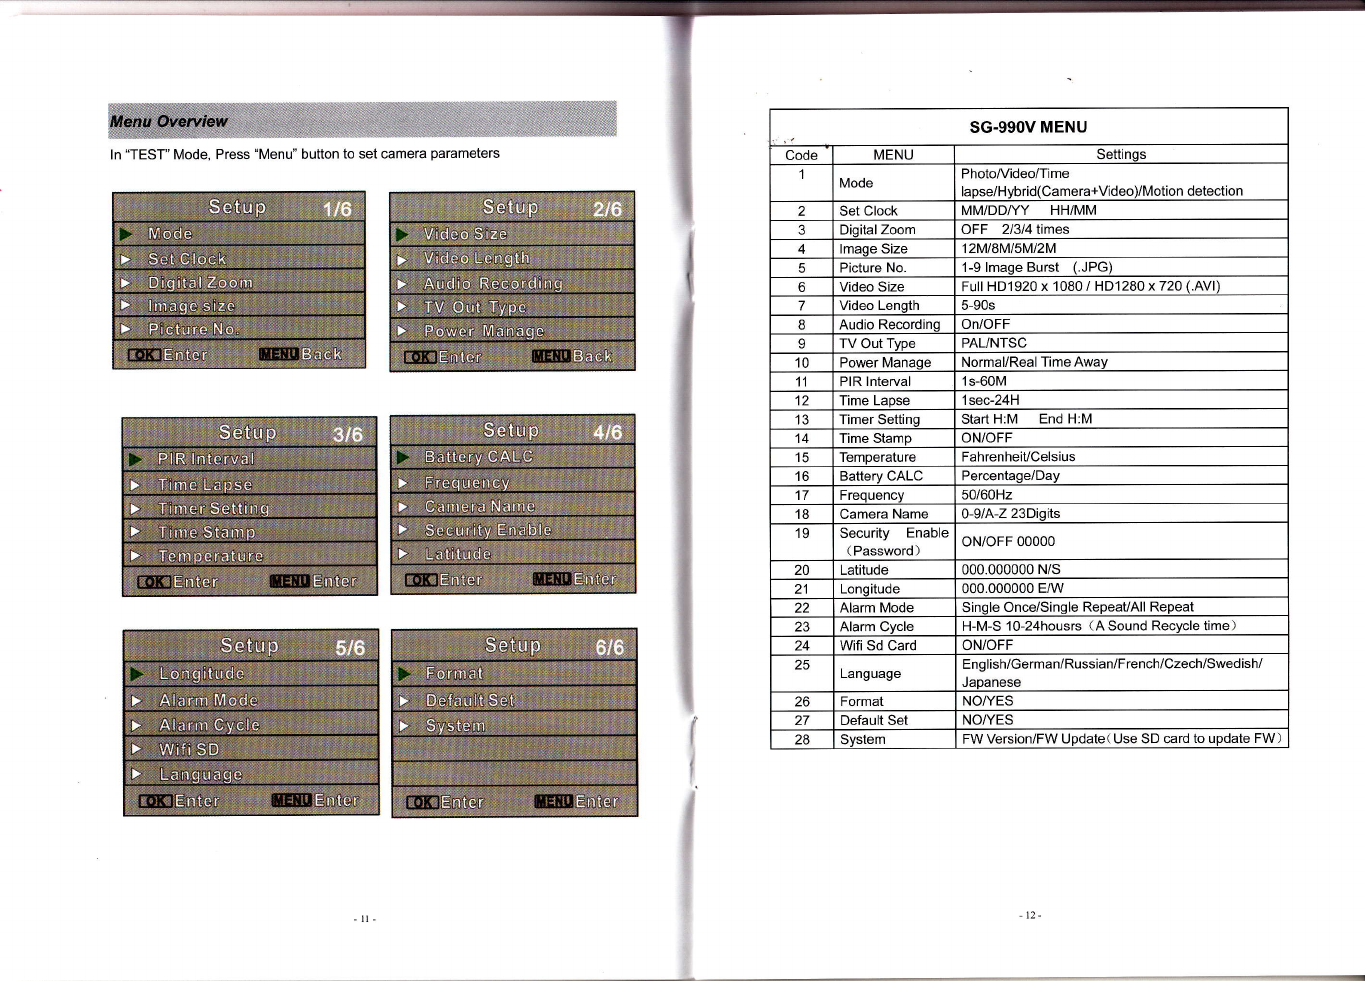
ln "TEST" Mode, Press "Menu" button to set camera parameters
SG.ggOV MENU
Code MENU Settings
Mode Photo/Video/Time
laose/Hvbrid(Camera+Video)/Motion detection
2Set Clock MM/DDI/Y HH/MM
Dioital Zoom OFF 2/3/4 times
4lmaqe Size 12Ml8Ml5Ml2M
Picture No 1-9 lmaqe Burst (.JPG)
6Video Size Full HD'1920 x 1080 / HD1280 x 720 (.AVl)
7Video Lenqth 5-90s
8Audio Recordinq On/OFF
9TV Out Type PAL/NTSC
10 Power Manaoe Normal/Real Time Awav
11 PIR Interual 1s-60M
2Time LaDse 1 sec-24H
3Timer Settinq Start H:M End H:M
4Time Stamp ON/OFF
5Temperature FahrenheiUCelsius
bBatterv CALC Percentage/Day
7Frequency 50/60H2
8Camera Name 0-9/A-Z 23Diqits
'19 Security Enable
( Password )oN/oFF 00000
20 Latitude 000.000000 N/s
21 Longitude 000.000000 E/w
22 Alarm Mode Sinqle Once/Sinqle RepeavAll Repeat
Alarm CVcle H-M-S 1o-24housrs (A Sound Recycle time)
24 Wifi Sd Card ON/OFF
ZC Language English/German/Russian/French/Czech/Swedish/
.laoanese
26 Format NO/YES
27 Default Set NO/YES
ZO Svstem FW Version/Fw Uodate( Use SD card to update FW)
I
...-....................-
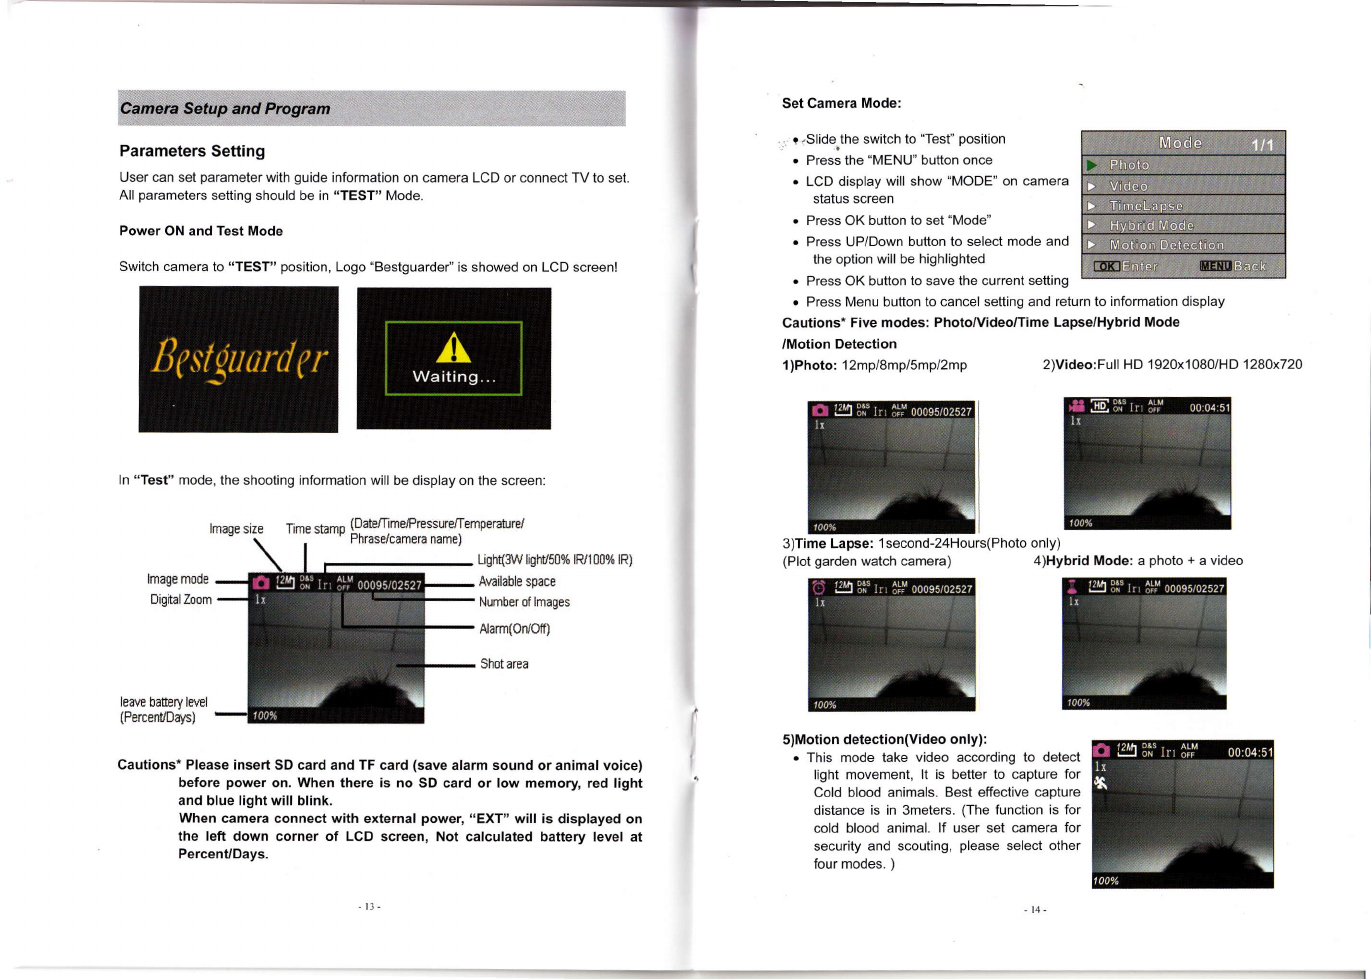
Parameters Setting
User can set parameter with guide information on camera LCD or connect TV to set.
All parameters setting should be in "TEST" Mode.
Power ON and Test Mode
Switch camera to "TEST" position, Logo "Bestguarder" is showed on LCD screen!
ln "Test" mode, the shooting information will be display on the screen;
,
!
i
T
Set Camera Mode:
- r.Slide-the switch to "Test" position
o Press the "MENU" button once
. LCD display will show "MODE" on camera
status screen
o Press OK button to set "Mode"
o Press UP/Down button to select mode and
lhe option will be highlighted
. Press OK button to save the current setting
o Press Menu button to cancel setting and return to information display
Cautions* Five modes: PhotolVideo/Time Lapse/Hybrid Mode
/Motion Detection
1)Photo: I2mp/8mp/5mp/2mp 2)Video:Full HD 1 920x1 080/HD'l28Ox72O
3)Time Lapse: lsecond-24Hours(Photo only)
lmagesize Timestamp (Date/TimeJPressureJTemperaturd
' r . 'Phrasdcameraname)
Ugh{S,V lighU50% lR/I00% lR)
Arailable space
Number of lmages
Aarm(Orlof0
Shot area
(Plot garden watch camera) 4)Hybrid Mode: a photo + a video
lmage mode
DigitalZoom
leave ba[ery level
(PercentlDays)
Cautions* Please insert SD card and TF card (save alarm sound or animal voice)
before power on. When there is no SD card or low memory red light
and blue light will blink.
When camera connect with external power, "EXT" will is displayed on
the left down corner of LCD screen, Not calculated battery level at
PercenuDays.
I' 5)Motion detection(Video only):
o This mode take video according to detect
light movement, lt is better to capture for
Cold blood animals. Best effective capture
distance is in 3meters. (The function is for
cold blood animal. lf user set Glmera for
security and scouting, please select other
four modes. )
-14-

. Press OK button to save the current setting
. Press Menu button to cancel setting and
exit
Video Size-(FHD)l 080(HD)720
o Slide the switch to "Test" position
. Press the "MENU" bufton once
. Press UP/Down button to select "Video
Size"
. Press OK button to enter "Video Size"
. Press UP/Down button to select Video size
o Press OK button to save the current setting
. Press Menu button to cancel setting and exit
*Default setting is '1280x720
Video Length- 5-90seconds
. Slide the switch to "Test" position
. Press the "MENU" button once
o Press UP/Down button to select "Video
Length" and OK button to enter "Video
Length"
o Press UP/Down button to
decrease/increase Vldeo Length
. Press OK button to save the current setting
o Press Menu button to cancel setting and exit
*Default setting is 5s
Audio Recording-ON/OFF
o Slide the switch to "Test" position
. Press the "MENU" bufton once
o Press UP/Down button to select "Audio
Recoding" and OK button to enter
. Press UP/Down button to select audio
. Press OK button to save the current setting
o Press Menu button to cancel setting and
exit
*Default setting is ON
I
1
TV Out Type-PAUNTSC
. Slide the switch to "Test" position
-. Press the "MENU" button once
. Press UP/Down button to select "TV Out
Type" and Press OK to enter
. Press UP/Down button to select TV out
type
. Press OK button to save the current
setting
. Press Menu button to cancel setting and exit
*Default setting is PAL
Power Manage--Normal/Realtime Away
. Slide the switch to "Test" position
. Press the "MENU" button once
. Press UP/Down button to select "Power
Manage" and Press OK button to enter
. Press UP/Down button to select
. Press OK button to save the currenl
setting
o Press Menu button to cancel setting and
exit
*Default setting is Normal
Realtime Away is used to connect TV for real time monitor.
PIR lnterval-lsecond-60minutes(PlR motion detection mode)
This parameter means that how long the PIR will be disabled after each triggering in
ON mode. During this time the PIR of the device will not react to the motion of
human (or animals). The minimum interval is lsecond, it means the PIR will be
disabled for 1 s after each triggering.
*Default setting is 1s.
. Slide the switch to "Test" position
o Press the "MENU" button once
. Press UP/Down button to select "PlR
lnterval" and Press OK button to enter
o Press UP/Down/LefURight button to select
. Press OK button to save the current setting
. Press Menu button to cancel setting and
exit
li
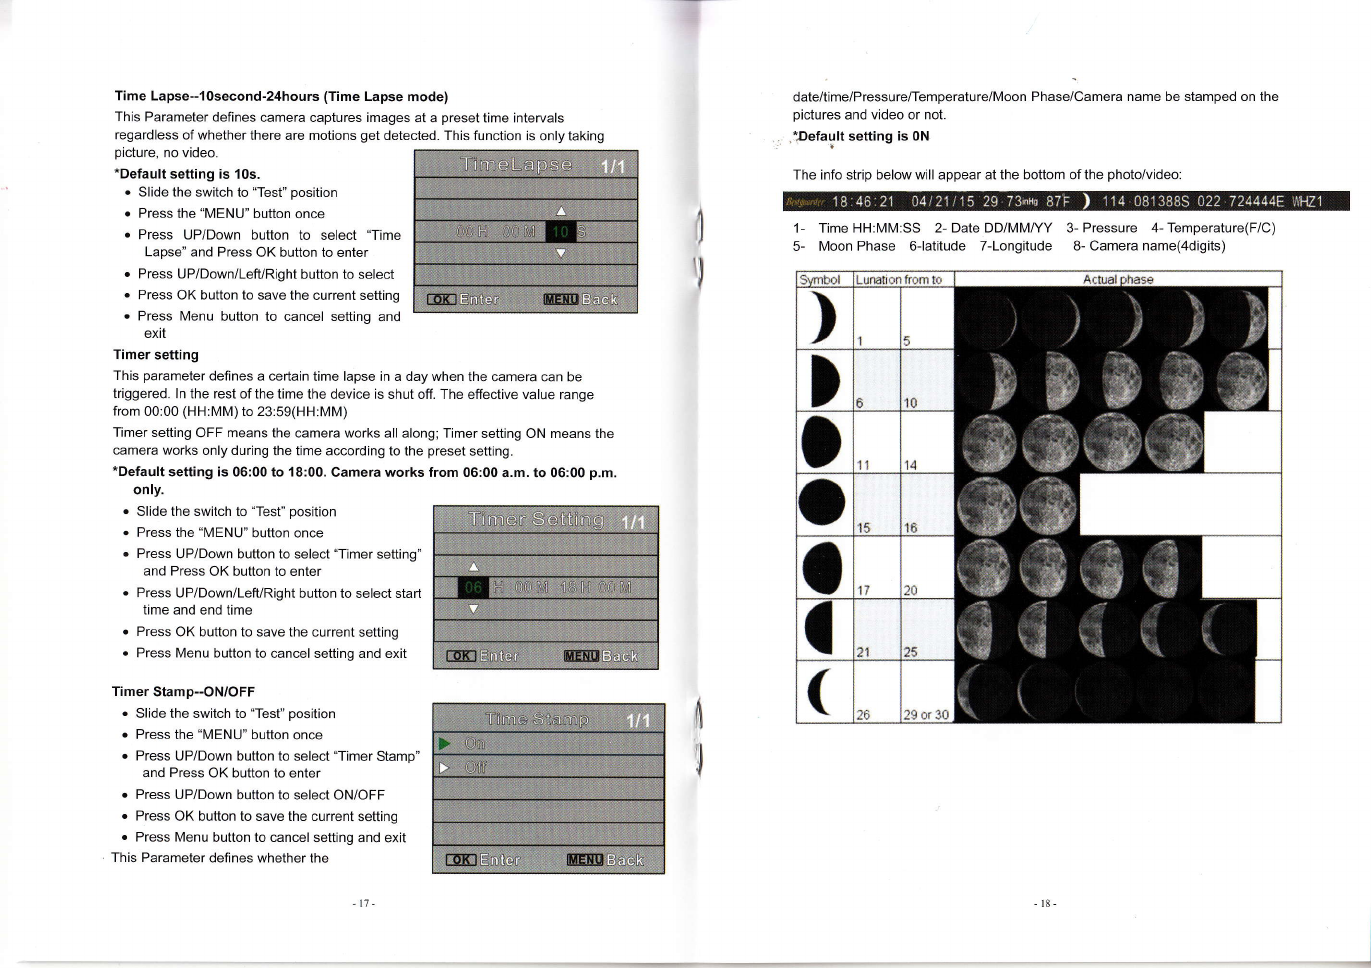
Time Lapse-1osecond-24hours (Time Lapse mode)
This Parameter defines camera captures images at a preset time intervals
regardless of whether there are motions get detected. This function is only taking
picture, no video.
*Default setting is 10s.
' Slide the switch to "Test" position
. Press the "MENU" button once
. Press UP/Down button to select "Time
Lapse" and Press OK button to enter
. Press UP/Down/LefURight button to select
. Press OK button to save the current setting
. Press Menu button to cancel setting and
exit
Timer setting
This parameter defines a certain time lapse in a day when the camera can be
triggered. ln the rest of the time the device is shut off. The effective value range
from 00:00 (HH:MM) to 23:59(HH:MM)
Timer setting OFF means the camera works all along; Trmer setting ON means the
camera works only during the time according to the preset setting.
*Default setting is 06:00 to 18:00. Camera works from 06:00 a.m. to 06:00 p.m.
only.
o Slide the switch to "Test" position
o Press the "MENU" button once
. Press UP/Down button to select "Timer setting"
and Press OK button to enter
. Press UP/Down/LefURight button to select start
time and end time
. Press OK button to save the current setting
o Press Menu button to cancel setting and exit
Timer Stamp-ON/OFF
. Slide the switch to "Test" position
. Press the "MENU" button once
. Press UP/Down button to select "Timer Stamp"
and Press OK button to enter
o Press UP/Down button to select ON/OFF
. Press OK button to save the current setting
. Press Menu button to cancel selting and exit
This Parameter defines whether the
il
1l
date/time/Pressureflemperature/Moon Phase/Camera name be stamped on the
pictures and video or not.
lDefault setting is 0N
The info strip below will appear at the bottom of the photo/video:
1- Time HH:MM:SS 2- Date DD/MM/YY 3- Pressure 4- Temperature(F/C)
5- Moon Phase o-latitude 7-Longitude 8- Camera name(4digits)
-l

The lcon for Moon Phase Camera Name-4digts
The Camera Name stamp on the
photqFNideos. CharacterAto Z, 0 to 9 or
space.
*Default setting is 0000.
Security Enable-.ON/OFF
This function is for user to set a password
Enable, key in security code. (Digits 0-9)
*Default setting is OFF.
to protect the camera. Turn "ON" security
Latitude-S/N
This GPS function allows User to manually enter their location from 000.000000N or S
to 179.999999 N or S for better and more strategic game tracking. This information will
imprint on picture and video.
Longitude-Vlr/E
This GPS function allows User to manually enter their location from 000.000000E or W
to 179.999999 E or W for better and more strategic game tracking. This information will
imprint on picture and video.
tooooooo
5
full
6
Waniflo
Glbbon! Last Wanang
QuarFt Cts(6t
Ner Waxih! REt Wnxihg
Mtpn C.eseol Ouader Clbbont
Temperature-FahrenheiUCelsius
This parameter defines the temperature stamp
on picture/video is Fahrenheit or Celsius.
*Default setting is Celsius.
Battery CALC-Percentage/Day
This parameter defines battery power leave.
When camera connect with external power,
"EXT" will is displayed on the left down corner
of LCD screen, Not calculated battery storage
level at PercenUDays. "100%" means full
power
*Default setting is 100%.
Frequency-50H2/60H2
When camera connect adaptor plug, user
should set frequency same as local power
supply frequency, like TV Out type.
*Default setting is 50H2.
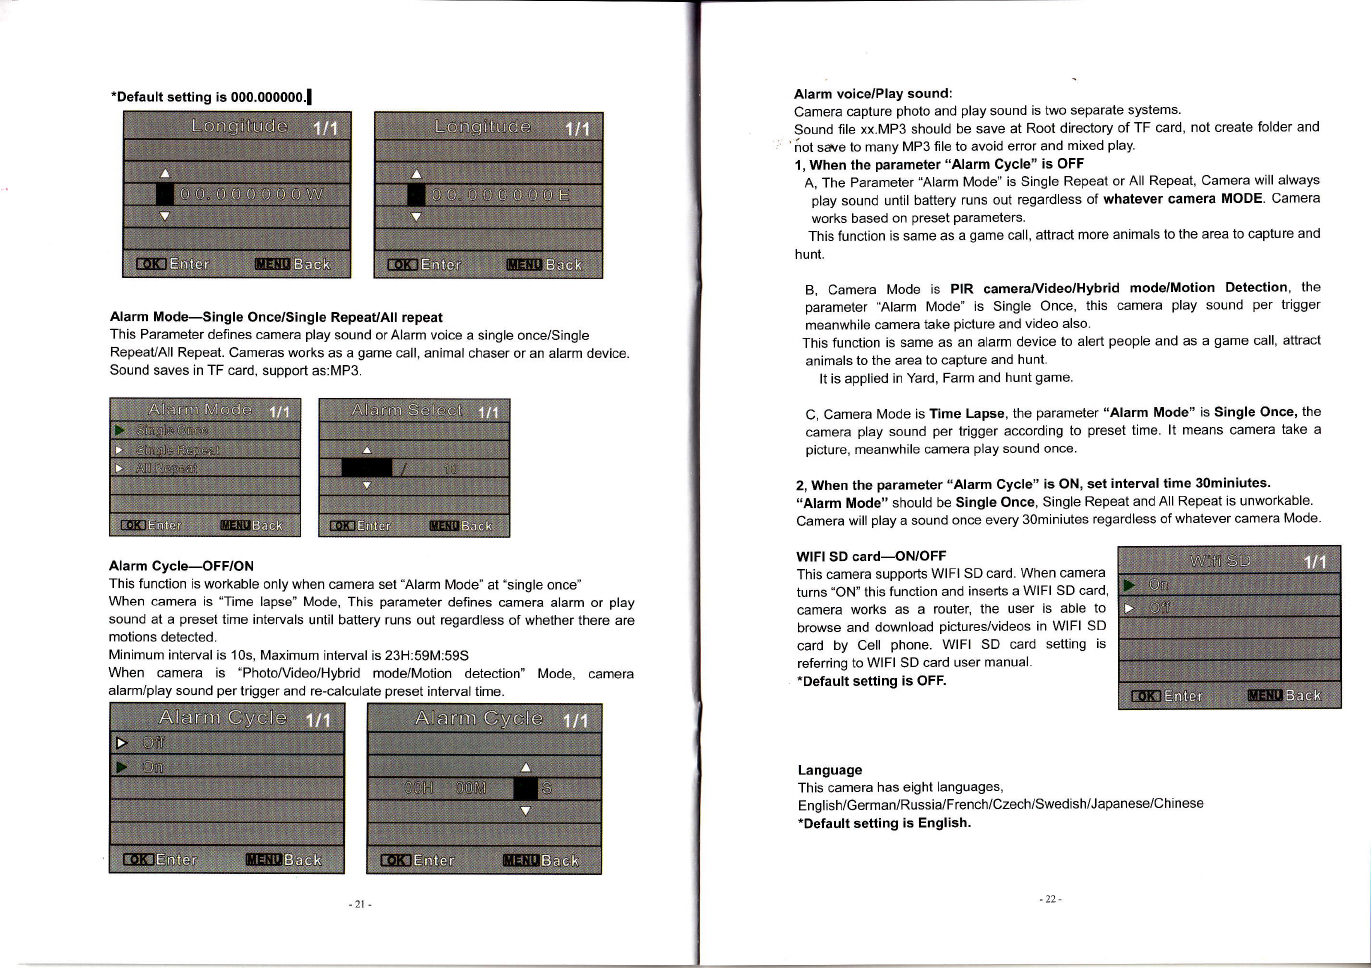
*Default setting is 000.000000.!
Alarm Mode-Single Once/Single RepeauAll repeat
This Parameter defines camera play sound or Alarm voice a single once/Single
Repeat/All Repeat. Cameras works as a game call, animal chaser or an alarm device
Sound saves in TF card, support as:MP3.
Wffi
Alarm Cycle-OFF/ON
This function is workable only when camera set'Alarm Mode" at "single once"
When camera is "Time lapse" Mode, This parameter defines camera alarm or play
sound at a preset time intervals until battery runs out regardless of whether there are
motions detected.
Minimum interval is '10s, Maximum interval is 23H:59M:59S
When camera is "PhotoA/ideo/Hybrid mode/Motion detection" Mode, camera
alarm/play sound per trigger and re-calculate preset interval time.
Alarm voice/Play sound:
Camera capture photo and play sound is two separate systems.
Sound file xx.MP3 should be save at Root directory of TF card, not create folder and
'iot save to many MP3 file to avoid error and mixed play.
1, When the parameter "Alarm Cycle" is OFF
A, The Parameter "Alarm Mode" is Single Repeat or All Repeat, Camera will always
play sound until battery runs out regardless of whatever camera MODE. Camera
works based on preset parameters.
This function is same as a game call, attract more animals to the area to capture and
hunt.
B, Camera Mode is PIR camera/Video/Hybrid mode/Motion Detection, the
parameter "Alarm Mode" is Single Once, this camera play sound per trigger
meanwhile camera take picture and video also.
This function is same as an alarm device to alert people and as a game call, attract
animals to the area to capture and hunt.
It is applied in Yard, Farm and hunt game.
C, Camera Mode is Time Lapse, the parameter "Alarm Mode" is Single Once, the
camera play sound per trigger according to preset time. lt means camera take a
picture, meanwhile camera play sound once.
2, When the parameter "Alarm Cycle" is ON, set interval time 30miniutes.
"Alarm Mode" should be Single Once, Single Repeat and All Repeat is unworkable.
Camera will play a sound once every 3Ominiutes regardless of whatever camera Mode
WlFl SD card-ON/OFF
This camera supports WlFl SD card. When camera
turns "ON" this function and inserts a WlFl SD card,
camera works as a router, the user is able to
browse and download pictures/videos in WlFl SD
card by Cell phone. WlFl SD card setting is
referring to WlFl SD card user manual.
*Default setting is OFF.
Language
This camera has eight languages,
English/German/Russia/French/Czech/Swedish/Japanese/Chinese
*Default setting is English.
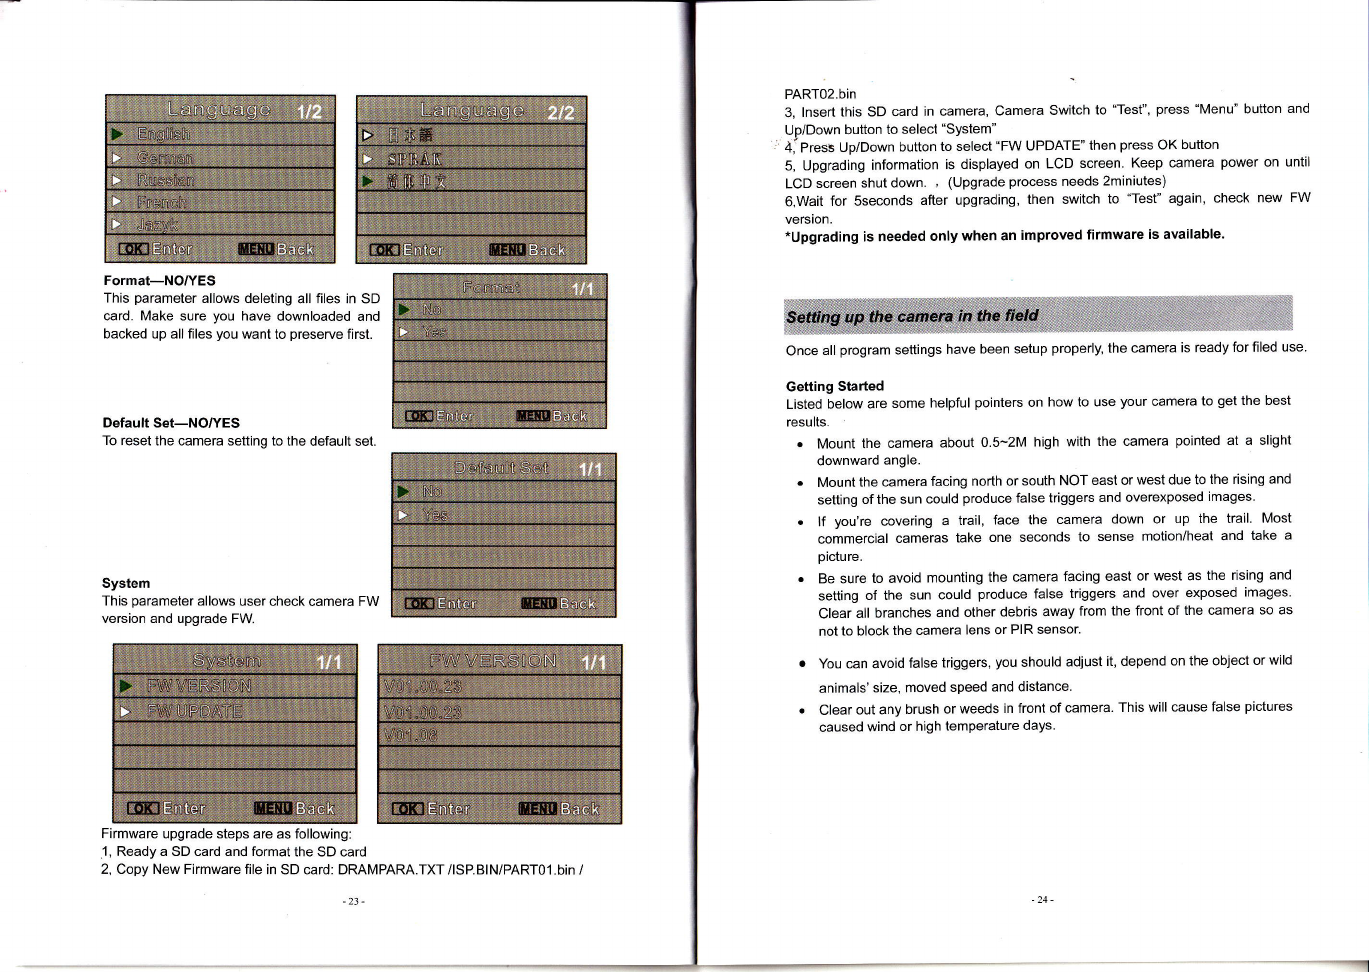
PART02.bin
3, lnsert thls SD card in camera, Camera Switch to "Test", press "Menu" button and
Up/Down button to select "System"
4, Press UplDown button to select "FW UPDATE' then press OK button
Format-NO/YES
This parameter allows deleting all files in SD
card. Make sure you have downloaded and
backed up all files you want to preserve first.
Default Set-NO/YES
To reset the camera setting to the default set
System
This parameter allows user check camera FW
version and upgrade FW.
Firmware upgrade steps are as following:
1, Ready a SD card and format the SD card
2, Copy New Firmware file in SD card: DRAMPARA.TXT /lSPBlN/PARTO1.bin /
5, Upgrading information is displayed on LCD screen. Keep camera
LCD screen shut down. , (Upgrade process needs 2miniutes)
6.Wait for Sseconds after upgrading, then switch to "Test" again,
version.
*Upgrading is needed only when an improved firmware is available.
Once all program settings have been setup properly, the camera is ready for filed use
Getting Started
Listed below are some helpful pointers on how to use your camera to get the best
results.
. Mount the camera about 0.5-2M high with the camera pointed at a slight
downward angle.
Mount the camera facing no(h or south NOT east or west due to the rising and
setting of the sun could produce false triggers and overexposed images.
lf you're covering a trail, face the camera down or up the trail. Most
commercial cameras take one seconds to sense motion/heat and take a
picture.
Be sure to avoid mounting the camera facing east or west as the rising and
setting of the sun could produce false triggers and over exposed images.
Clear all branches and other debris away from the front of the camera so as
not to block the camera lens or PIR sensor.
You can avoid false triggers, you should adjust it, depend on the object or wild
animals'size, moved speed and distance.
. Clear out any brush or weeds in front of camera. This will cause false pictures
caused wind or high temperature days.
power on until
check new FW
-24-
23-

Mount the camera on the way of animal's feeder point, rest area and excise filed
based on animal's Urine, Pugmark, Scrape, Claw mark, Scent-spraying, Prey
remain, Rest site, Roar, tract trap, scat etc.
. Double check battery before turning on the camera for use.
. Make sure to insert the memory card after setting up the camera.
. Make sure to turn the camera to ON mode (or take out of Test Mode) before
you leave.
. Verify time and date is correct.
Example: Mounting
ffi) @
ql i
*il
\I:/-
'* *llA
Nut/Holder Mounting Tree Mounting
(Example: Animal's tract trap, urine etc)

e.
.'"*a- :i';
j.l _
; -- r,-
."t :'tr: -. ,
..l' -:j.'

,f **
."...
Put a Hand-made cover on the top of camera to avoid sunshine direcfly.
(Example: Hand-made plastic cover)
Code Parameter name Default
Mode Camera
2Set Clock 01/012014 00:00
Dioital Zoom 1X
4lmaqe Size 5MP
5Picture No 1P
Video Size HD128O x72O
7Video Lenoth 5s
8Diqital Zoom On
oTV Out Tvpe PAL
10 Power Manaqe Normal
11 PIR lnterval 1s
12 Time Lapse 10s
IJ Timer Settino Star:00H:00M End:23H:59M
14 Time Stamp On
15 Temoerature Celsius
16 Batterv CALC Percentaqe
17 Frequencv 50Hz
't8 Camera Name 0000
1q Security Enable
(Password) oN/oFF 00000
20 Latitude 000.000000 N/s
21 Lonoitude 000.000000 E/vV
22 Alarm Mode Single Once
23 Alarm Cvcle OFF
24 Wifi Sd Card OFF
25 Lanouaoe Enqlish
26 Format No
27 Default Set No
28 System FW Version/Fw Update( Use SD card to update
FW)
*Without battery, SD card, TF card

Displav Screen 2.0" Color viewer TFT LCD
lmaoe Sensor 12.0 Meqa Pixels Resolution.2lS l8l 12
Anqle PIR:65'
Lens F=2.4; FOV=60' ;Max View 62'; Auto lR-Cut-Remove
(at nioht)
3W flash lioht Yes(On/Off) color picture and video dav and nioht
lR-Flash Yes (can choose 50% or 100%) / No
lnfrared Cut Filter YES
IR.LED 42PCS (850nm or 940nm)0-25m/85ft
Memory TF-card (not included)up to 32GB
Memory SD-card (not included)up to 32GB
SD card cyclic record On/Off(soft choose)
Language English, French,German,Swedish, Japanese
& Czech,Russian
Picture Size 'l2MP=4000x3000 / 8MP=3840x2160 / 5MP
2944x1656
,2MP='l 920x1 080 (JPEG)
Video Size HD:1920x1080,1080x720 .24fps (AVl )
Audio Recordino Available
Game call/Predator
call YES
lnternal animals voice Yes
Speaker Yes, on/off, 80-120d8 SPL
voice olaver MP3
Alarm svstem On/Off
PIR animal chaser YES
Diqital Zoom 2x,3x, 4x
Camera+video Yes
Password Yes
Device serial no Yes
Web camera function Yes
Time lapse On/Off
PIR detection On/Off
Motion detection On/Off
Triooer Time 0.6-1 s
Triqqerinq lnterval 1sec. - 60min. oroorammable (Available)
Shootino Numbers 1-9 proorammable(Available)
Video Lenoth 5-90sec. Droorammable(Available)
Power Supply 8 x AA Batteries or 12V DC (not included) or solar
Danel or 12V Dower bank or storaoe batteru
Stand-by Current < 0.3mA
Stand-bv Time Uo to 6 Months(8*AA)
'tPowe? Consumption 170mA (i3oomA when 42-|R-LED lighted
total:<460mA)
Takes up to 40,OOO pictures on 8-AA A!!e!lne lattglles
lnterface iV out (NTSC, PAL); USB; SD card holder;TF card
holder
12V DC external
Operation
TemDerature -30"C - 60'C (Storage temperature: -40'C Tqlq)
Operation Humidity 5% -90%
Waterproof spec tP66
Size 14X 9 x6 cm (Weiqht:2409)
Security authentication CE FCC ROHS

This geuipment has been tested and found to comply with the limits for Class B
digitat device, pursuant to part 15 of the FCG Rules. These limits are designed to
provide reasonable protection against harmful interference in a residential
installation. This equipment generates uses and can radiate radio frequency
energy and, if not installed and used in accordance with the instructions, may cause
harmful interference to radio or television receptions, which can be determined by
turning the equipment ofi and on, the user is encouraged to try to correct the
interference by one or more of the following measure:
. Reorient or relocate the receiving antenna.
. lncrease the separation between the equipment and the receiver.
. Connect the equipment into an outlet on a circuit different from that to which the
receiver is connected.
. Consult the dealer or an experienced radio/Tv technician for help.
o Shield USB cable with fenite must be used with this unit to ensure compliance
with the Class B FCC limits.
This device complies with part 15 of the FCC Rules. Operation is subject to the
following two conditions: (1) This device may not cause harmful interference, and
(2) this device must accept any interference received, including.interference that
may cause undesired operation.
Waming: Changes or modifications to this unit not expressly approved by the
party ,esponsible for compliance could void the use/s authority to operate the
equipment.
Other manuals for SG-990V
1
Other BestGuarder Scouting Camera manuals


