Betec Aquarius Plus User manual
Cool and
Hot Ideas from
Hot ’N
Cold –
Countertops
D
GB
I
F
NL
GR
P
E
BEDIENUNGS-
ANLEITUNG
INSTRUCTIONS
FOR USE
INSTRUCTIONS
DE SERVICE
MANUAL DEL
USUARIO
ISTRUZIONI PER
L’USO
INSTRUÇÕES DE
UTILIZAÇÃO
BEDIENINGS-
HANDLEIDING
AquariusPlus_Anleitung 08.09.2004 15:41 Uhr Seite 1
2
Funktions- und Teilebeschreibung
D
Wir danken Ihnen, dass Sie unseren Water Dispenser gekauft haben. Damit Sie die beste
Leistung aus dem Produkt herausholen, empfehlen wir Ihnen, sich dieses Handbuch gründlich
durchzulesen, bevor Sie es anwenden, und dieses Handbuch gut aufzubewahren.
Einführung in die Funktionen:
Dieses Produkt ist funktionell und gestalterisch fortschrittlich entwickelt, was durch folgende
Eigenschaften zum Ausdruck kommt:
1. Ein einziger Heißwassertank mit einem Heizrohr aus rostfreiem Stahl, mit dem Heißwasser bis
92°C erwärmt werden kann. Mit seiner Wiederaufkochfunktion kann Wasser bis 95°C erhitzt
werden, womit verschiedene Bedürfnisse befriedigt werden, wie z.B. Kochen von Tee, Kaffee,
Fertiggerichten usw.. Man kann es gut zu Hause, im Büro, im Hotel usw. gebrauchen.
2. 3 Wasserhähne in einem – ein Abflussrohr für heißes Wasser, kaltes Wasser und Wasser mit
Raumtemperatur. Heißes und kaltes Wasser erhält man durch einfache Berührung der
entsprechenden Druckknöpfe an der Bedientafel, während die übliche Druckstange Wasser
mit Raumtemperatur liefert.
3. Die zwei großen runden Tanks können zu Reinigungszwecken auseinander genommen werden.
4. Der Filter kann ausgetauscht werden, damit die Reinheit des Wassers verbessert wird.
5. Die Kühlfunktion arbeitet auf der Basis des fortgeschrittenen thermoelektrischen (Peltier)
Systems, das keine lauten Geräusche erzeugt, wie es herkömmliche Kompressorsysteme tun.
6. Eine vielseitige obere Abdeckung, die es erlaubt, mit Hilfe des mitgelieferten Adapters
Wasserflaschen von 9 – 23 l oder in PET-Flaschen von 1,5 – 2 l abgefülltes Wasser
aufzunehmen.
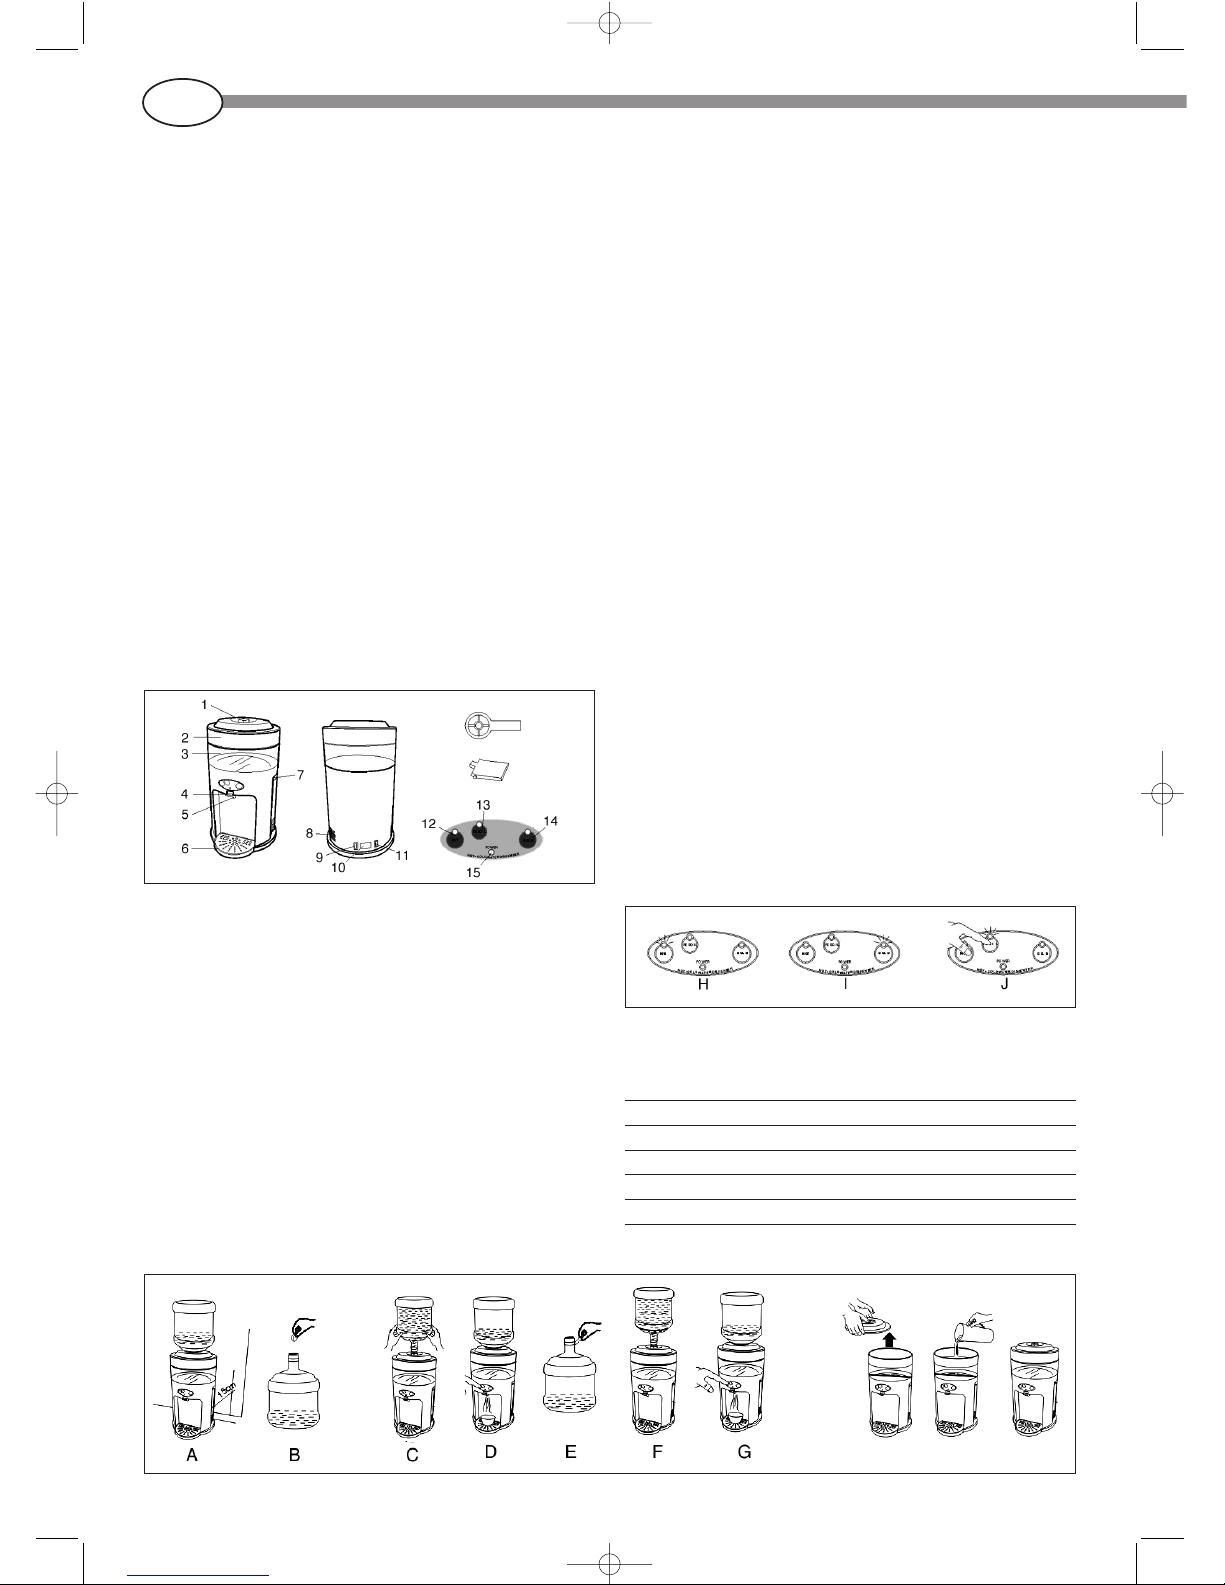
Veranschaulichung der Bauweise & Teilenamen:
Art.-Nr. 4001 Aquarius Plus Wasser Dispenser
1PET-Flaschenadapter 9 Schalter für Kühlfunktion
2Primärer Wassertank (undurchsichtig) 10 Netzanschluss
3Sekundärer Wassertank (durchsichtig) 11 Schalter für Heizfunktion
4Druckbalken für Wasser mit Raumtemperatur 12 Knopf & Anzeige für heißes Wasser
53in 1-Wasserhahn 13 Knopf & Anzeige für Wiederaufkochen
6Wasserauffangbehälter 14 Knopf & Anzeige für kaltes Wasser
7Griff (an 2 Seiten) 15 Netzanzeige
8Belüftungsöffnung
Schraub/Abschraubhebel
Drücker
8. Befolgen Sie bitte
die in Bild (2)
gezeigten
Anweisungen,
wenn Sie
Leitungswasser
benutzen.
Bild (2)
Bild (1)
Modell 006TD Elektrische Sicherheitsklasse I
Spannung 220 – 240 V Kühlkapazität ≤15° C 1 l/h
Nennleistung 475 W Heizkapazität ≥90° C 1 l/h
Heizleistung 400 W Umgebungstemperatur für Betrieb 10 - 32°C
Kühlleistung 75 W
Wichtig:
Wenn das Gerät zum ersten Mal oder nach einer regelmäßigen Reinigung benutzt wird,
müssen Sie sich davon überzeugen, dass der Heißwassertank mit Wasser gefüllt ist, bevor
Sie den Heizschalter (auf der Rückseite des Geräts) anschalten. Sie können feststellen, ob der
Heißwassertank mit Wasser gefüllt ist oder nicht, indem Sie an der Bedientafel den Knopf
“Hot” drücken. Wenn das Gerät ans Netz angeschlossen ist, leuchtet die Netzlampe an der
Bedientafel, und die Knöpfe “Hot” und “Cold” können gedrückt werden, um Wasser
abzugeben. In diesem Stadium hat das Wasser nur Raumtemperatur. Wenn Sie sehen, dass
Wasser aus dem Wasserhahn kommt, können Sie beginnen, die Heiz- und Kühlfunktionen zu
benutzen, indem Sie die Schalter auf der Rückseite des Geräts anschalten.
Dieser Wasserdispenser ist mit einem manuell einstellbaren Thermostat als Sicherheitsgerät
ausgestattet, der Störungen verhindern soll, die durch unangebrachte Erhitzung des
Heißwassertanks entstehen können, wenn der Tank leer ist. Der Thermostat schaltet den
Strom ab, wenn die Temperatur im leeren Heißwassertank den alarmierenden Voreinstellgrad
erreicht. Sie müssen den Einstellknopf am Boden des Geräts drücken, um die Heizfunktion
wieder einzuschalten. Der Einstellknopf ist von einem Etikett bedeckt, das entfernt werden
kann, um den Knopf zu bedienen.
Anmerkungen:
1. Sowohl das heiße als auch das kalte Wasser kann ein paar Grad Temperaturunterschied
haben.
2. Die Wiederaufkochfunktion erhitzt Wasser nicht über 100°C.
Spezifikation für Schalter und Druckknöpfe:
1. Wenn Sie den Heizfunktionsschalter anschalten, leuchtet die rote Anzeige, womit angezeigt
wird, dass Heizen I läuft. Wenn die Anzeige gelb wird, bedeutet das, dass es warm gehal-
ten wird (Bild H).
2. Wenn Sie den Kühlfunktionsschalter anschalten, leuchtet die grüne Anzeige, womit
angezeigt wird, dass Kühlen läuft. Wenn die Anzeige gelb wird, bedeutet das, dass es kühl
gehalten wird (Bild I).
3. In der Betriebsart Heizen oder Warmhalten leuchten der Wiederaufkochanzeiger und der
Heißwasseranzeiger beide rot, wenn die Wiederaufkochfunktion benutzt wird. Nachdem
das Wasser auf etwa 97°C erhitzt worden ist, ertönt der Summer 3mal, und das Heizen
wird beendet, um warm zu halten. Der Wiederaufkochanzeiger und der
Heißwasseranzeiger werden gelb. Im Wiederaufkochmodus können Sie den
Wiederaufkochschalter noch einmal drücken, um zum Warmhaltemodus zurückzukehren
(Bild J).
4. Nachdem der Strom eingeschaltet worden ist und die Netzanzeige leuchtet, können Sie
den Heißwasserknopf oder Kaltwasserknopf drücken, um Wasser zu erhalten, wobei es
egal ist, ob der Heizfunktionsschalter und der Kühlfunktionsschalter an oder aus ist. Wenn
ein Wasserknopf einmal gedrückt wird, wird das Wasserventil geöffnet und es fließt 20
Sekunden lang Wasser, ehe es automatisch geschlossen wird. Während das Wasser
abfließt (entweder heißes oder kaltes Wasser), kann es durch nochmaliges Drücken des
Wasserknopfes angehalten werden.
5. Beim Drücken der wirksamen Knöpfe ertönt der Summer einmal. Sonst ertönt er 10mal,
wenn Funktionen Fehler aufweisen.
Bedienungsanleitungen:
1. Stellen Sie den Wasserdispenser auf eine ebene Fläche im Abstand von etwa 15 cm zur Wand,
damit eine gute Belüftung möglich ist (Bild A):
2. Sterilisieren Sie das Gerät, wenn Sie es zum ersten Mal oder nach längerer Lagerzeit benutzen.
Mit dem neuen Gerät wird eine Desinfektionstablette mitgeliefert. Lösen Sie die Desinfektions-
tablette in etwa 23 l Wasser auf und füllen es durch den primären Tank in das Gerät. Lassen Sie
die Wassermischung etwa 20 Minuten lang im Gerät, bevor Sie sie ablassen. Fügen Sie bitte
während des Ablassens der Wassermischung destilliertes Wasser hinzu, bis es geruchlos wird
(Bild B – G).
3. Schalten Sie die Kühl- und Heizfunktionsschalter (an der Rückseite des Geräts) zunächst in die
Position “OFF” und stecken Sie dann das Netzkabel in die Netzsteckdose. Drücken Sie den
Heißwasserschalter auf der Bedientafel, bis Wasser aus dem Wasserhahn fließt, dann kann die
Heiz- und Kühlfunktion eingeschaltet werden.
4. Schalten Sie bitte den Strom ab, wenn das Gerät längere Zeit nicht benutzt wird. Ziehen Sie das
Netzkabel aus dem Gerät und lassen Sie das restliche Wasser ab (siehe Demontage und
Reinigung), bevor Sie es lagern. Wenn Sie das Gerät wieder in Betrieb nehmen, sorgen Sie bitte
dafür, dass alle Teile wieder richtig zusammengebaut werden und gut abdichten.
5. Wegen allgemeiner Probleme schauen Sie bitte bei der Fehlersuche nach. Demontieren Sie den
elektrischen Teil des Wasserdispensers nicht selbst. Falls eine Reparatur notwendig werden sollte,
wenden Sie sich bitte an eine autorisierte Service-Einrichtung.
6. Starten oder stoppen Sie die Maschine nicht durch Einsetzen oder Herausziehen des
Netzsteckers.
7. Schalten Sie die Kühlfunktion 4 Stunden aus, wenn Eis den Wasserausfluss behindert.
Technische Daten:
AquariusPlus_Anleitung 08.09.2004 15:41 Uhr Seite 2
3
Garantie (gültig nur innerhalb der BRD)
Die Garantiezeit für dieses Gerät beträgt 24 Monate. Bei nachweislichen Material- oder
Fabrikationsschäden wird das Gerät nach unserer Wahl entweder instandgesetzt oder
umgetauscht. Wird ein Mangel festgestellt, so ist das Gerät unter Angabe des
Reklamationsgrundes und ausreichend frankiert an die aufgeführte Adresse einzusenden.
Für unversicherte oder transportgeschädigte Geräte übernehmen wir keine Haftung. Ein
Anspruch auf Wandelung oder Minderung besteht nur dann, wenn uns eine Behebung des
Mangels nicht möglich ist. Indirekte Schäden unterliegen nicht der Garantie. Bei miss-
bräuchlicher oder unsachgemäßer Behandlung, Gewaltanwendung und bei Schäden nor-
maler Abnutzung erlischt die Gewährleistung, ebenso bei Fremdeingriffen und Änderungen
des Originalzustandes. Ihr Kaufbeleg gilt als Garantiekarte und ist eine Urkunde. Unrichtige
Angaben über das Kaufdatum sowie eigenmächtige Änderungen der Eintragungen ent-
binden uns von jeglicher Garantieverpflichtung. Erfüllungsort und Gerichtsstand ist
Offenbach am Main.
Datum des Verkaufs Stempel der Verkaufsstelle
Wir wünschen viel Vergnügen mit Aquarius Wasser Dispensern.
Bei Rückfragen wenden Sie sich bitten an:
BETEC · Bernd Eitel Technologies · Herzogstrasse 55 · 63263 Neu-Isenburg · Germany
Tel.: 49 (0) 6102-31067 · Fax: 49 (0) 6102-320859 · www.BETEC-Ideen.de
E-mail: [email protected]
D
Probleme
Aus dem Hahn
kommt kein
Wasser
Mögliche Ursachen
1. Leere(r) Wassertank(s)
2. Heiz- oder Kühltank
durch Luft blockiert
1. Mit Wasser auffüllen.
2. Drücken Sie den Wasserknopf/die
Wasserknöpfe, damit der Hahn offen
bleibt, und schütteln Sie das Gerät
etwas, bis Wasser ausläuft.
Lösung
Wasser nicht
heiß oder kalt
genug
1. Zu viel Wasser in kur-
zer Zeit aufgenommen
2. Stromversorgung
ausgeschaltet
3. Kühlzeit nicht
ausreichend
Auslaufendes
Wasser 1. Zerbrochene Flasche
2. Der durchsichtige Tank
und seine Dichtungen
sind nach der letzten
Demontage nicht richtig
montiert und fest
1. Setzen Sie eine neue Flasche ein
2. Demontieren und montieren Sie
wieder. Wechseln Sie die gealterten
Dichtungen, wenn nötig.
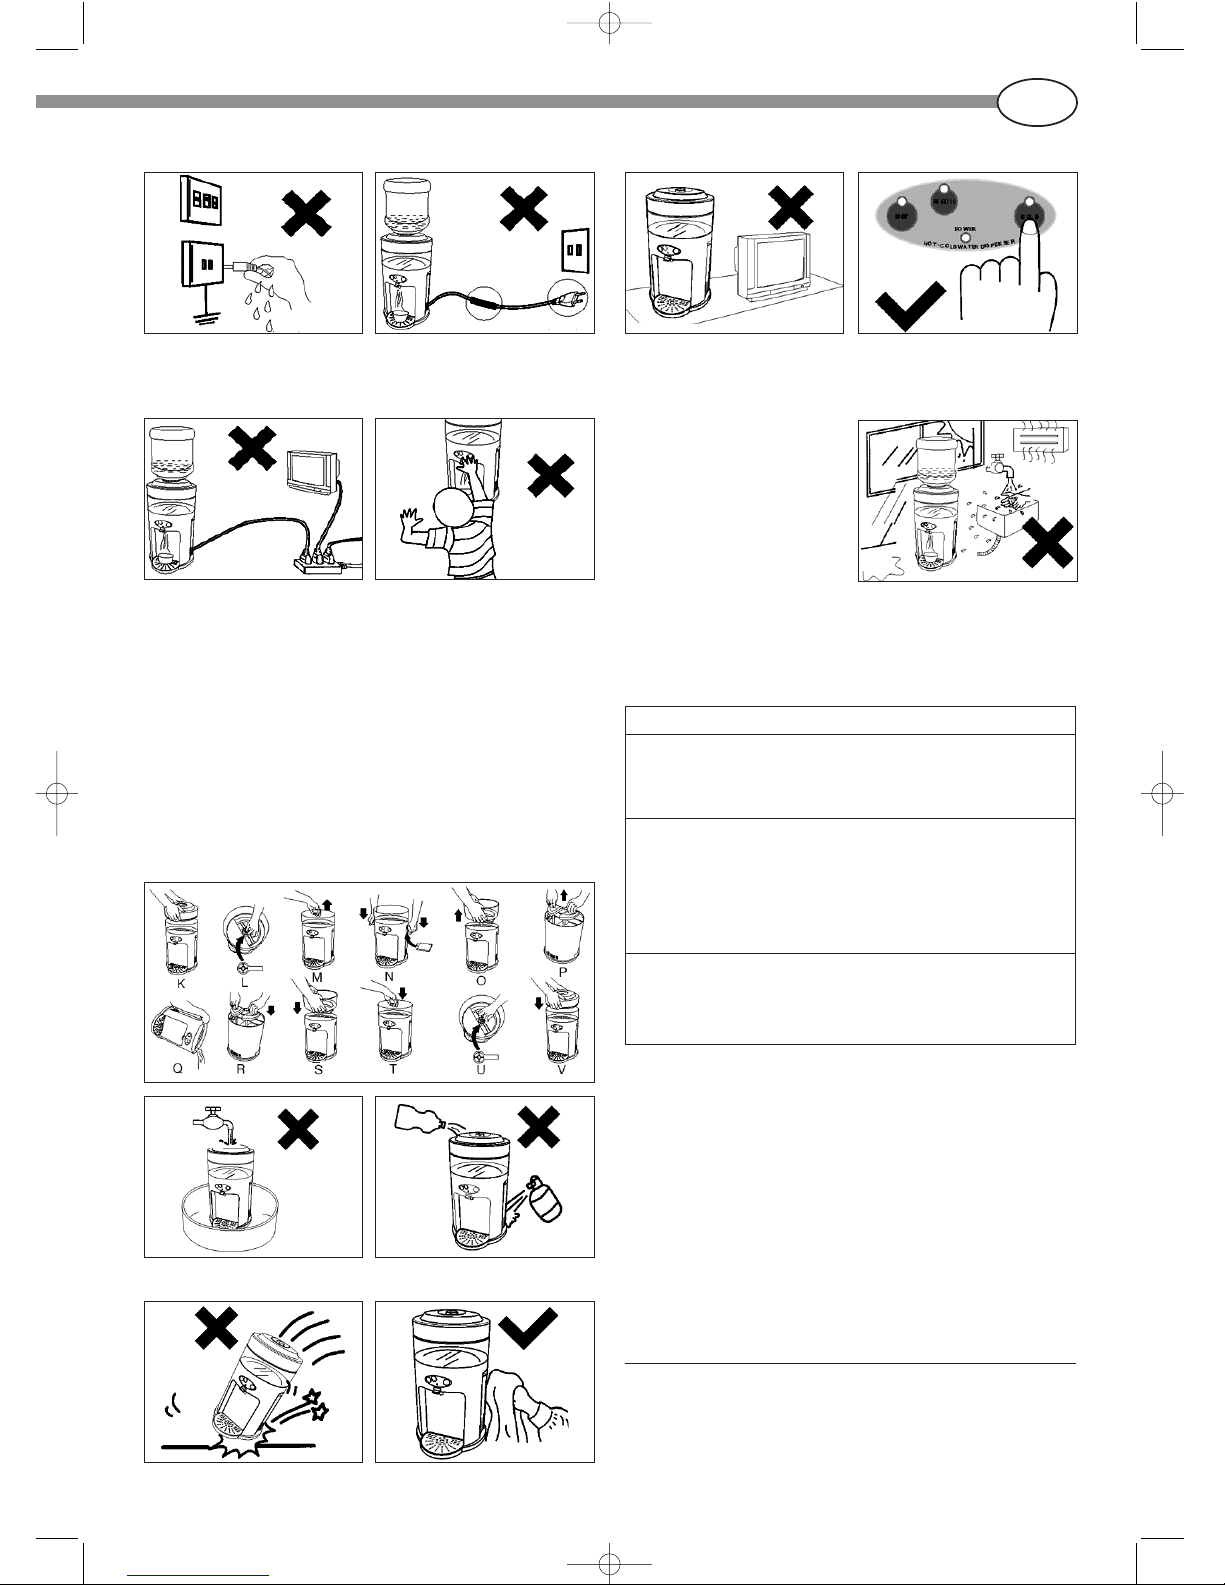
Fehlersuche:
Überprüfen Sie die aufgeführten Punkte, bevor Sie das Gerät zur Reparatur einrschicken.
Achtung:
Um elektrischen Schlag zu vermeiden, stecken
Sie den Netzstecker nicht mit nasser Hand ein. Ändern Sie nie den Stecker des Netzkabels oder
verlängern es, um Überhitzung oder Brand zu
vermeiden. Kaufen oder ersetzen Sie das
(beschädigte) Netzkabel bei einem Händler bzw.
durch eine ermächtigte Serviceeinrichtung.
Um eine Überlastung zu vermeiden, schließen
Sie an eine unabhängige Netzsteckdose an. Verhindern Sie, dass Kinder den Wasser-
dispenser ohne Aufsicht benutzen oder mit ihm
spielen, damit keine Verletzungen oder
Verbrühungen entstehen können.
Stellen Sie den Wasserdispenser an einem
trocknen, kühlen und belüfteten Ort auf. Stellen
Sie ihn nicht in der Nähe wertvoller Möbel oder
anderer Haushaltsgeräte auf, damit diese nicht
durch austretendes Wasser beschädigt werden
können, wenn die Wasserflasche in das Gerät
eingesetzt wird.
Es wird empfohlen, 3 Minuten zu warten, bevor
die Kühlfunktion wieder gestartet wird, nach-
dem sie abgeschaltet war, um die Lebensdauer
der Kühlelemente zu verlängern.
Stellen Sie den Wasserdispenser nicht in
feuchten Räumen oder in der Nähe von
Heizquellen auf. Setzen Sie ihn keiner direkten
Sonneneinstrahlung oder Regen aus.
Lassen Sie niemals Wasser direkt auf das
Gerät laufen. Wischen Sie das Gerät nicht mit einem Reini-
gungsmittel, organischer Flüssigkeit oder
Insektengift usw. ab
Lassen Sie das Gerät nicht fallen und
vermeiden Sie Stöße. Reinigen Sie das Gerät mit einem leicht
angefeuchteten Tuch und lassen Sie es
natürlich trocknen.
Wartungsmaßnahmen:
1. Ziehen Sie das Netzkabel ab und warten Sie etwa 2 Stunden, damit sich das heiße Wasser
abkühlen kann und elektrischer Schlag und Verbrühungen vermieden werden.
2. Demontage und Reinigung:
Nehmen Sie zunächst die Flasche und die undurchsichtige Abdeckung heraus. Zweitens,
schrauben Sie die Mutter am inneren Boden des durchsichtigen Tanks mit dem mitgelieferten
Hebel ab und ziehen Sie den durchsichtigen Tank durch Einsetzen der beiden mitgelieferten
Presspappen nach oben. Nehmen Sie dann die Isolationsblöcke sowohl aus dem Kaltwasser-
tank als auch aus dem Heißwassertank, und schütten Sie das restliche Wasser vorsichtig
aus. Drittens, nachdem der Heißwassertank und der Kaltwassertank mit sauberem Wasser
gereinigt wurden, können Sie das Gerät wieder in umgekehrter Reihenfolge zusammenbauen
–setzen Sie die Isolationsblöcke in den Heißwassertank und den Kaltwassertank ein –
drücken Sie den durchsichtigen Tank richtig in den Hauptkörper zurück (bei diesem Vorgang
muss etwas Kraft eingesetzt werden) – sehen Sie nach, dass die beiden Silikondichtungen
am Boden nicht fehlen – schrauben Sie die Mutter mit dem Hebel zurück – prüfen Sie, dass
die Mutter festgeschraubt ist, sonst kann Wasser auslaufen (Bild K – V).
1. Warten Sie einige Zeit, damit eine
ausreichende Erhitzung und Kühlung
erfolgen kann
2. Prüfen Sie, ob der Heizfunktions-
schalter in der Position “ON” ist, das
Netzkabel richtig angeschlossen ist
und Netzstrom vorhanden ist.
3. Die erste Kühlzeit sollte 2 Stunden für
ein Getränk betragen.
AquariusPlus_Anleitung 08.09.2004 15:41 Uhr Seite 3

Description of functions and parts
GB
Thank you for purchasing our Water Dispenser. To achieve the best performance of the
product, you are recommended reading through this operation manual carefully before
using the product and keep this manual in good condition.
Introduction of features:
This product is advanced in functional design and cosmetic design, which include below
features:
1. Unique hot water tank with stainless steel thermal tube that could heat water to 92°C.
With its re-boiling function, it can heat the water up to 95°C, which will satisfy different
need, such as making tea, coffee and instant noodle, etc. It is good for use at home,
office and hotel, etc.
2. 3 in 1 faucet – one spout for hot water, cold water and room temperature water. Hot
and cold water can be obtained with simple touch of respective push buttons on the
control panel while traditional press bar structure is used for room temperature water.
3. 2 large circular tanks can be dismantled for cleaning purpose.
4. Designed to serve with replaceable filter to enhance purity of water.
5. The cooling function acquires the advanced thermo-electric (Peltier) system, which does
not generate loud noise as traditional compressor system does.
6. Versatile top cover, which allows to hold 2 – 5 Gallon large water bottles or 1.5 – 2L
PET-Bottled water by using the adaptor provided.
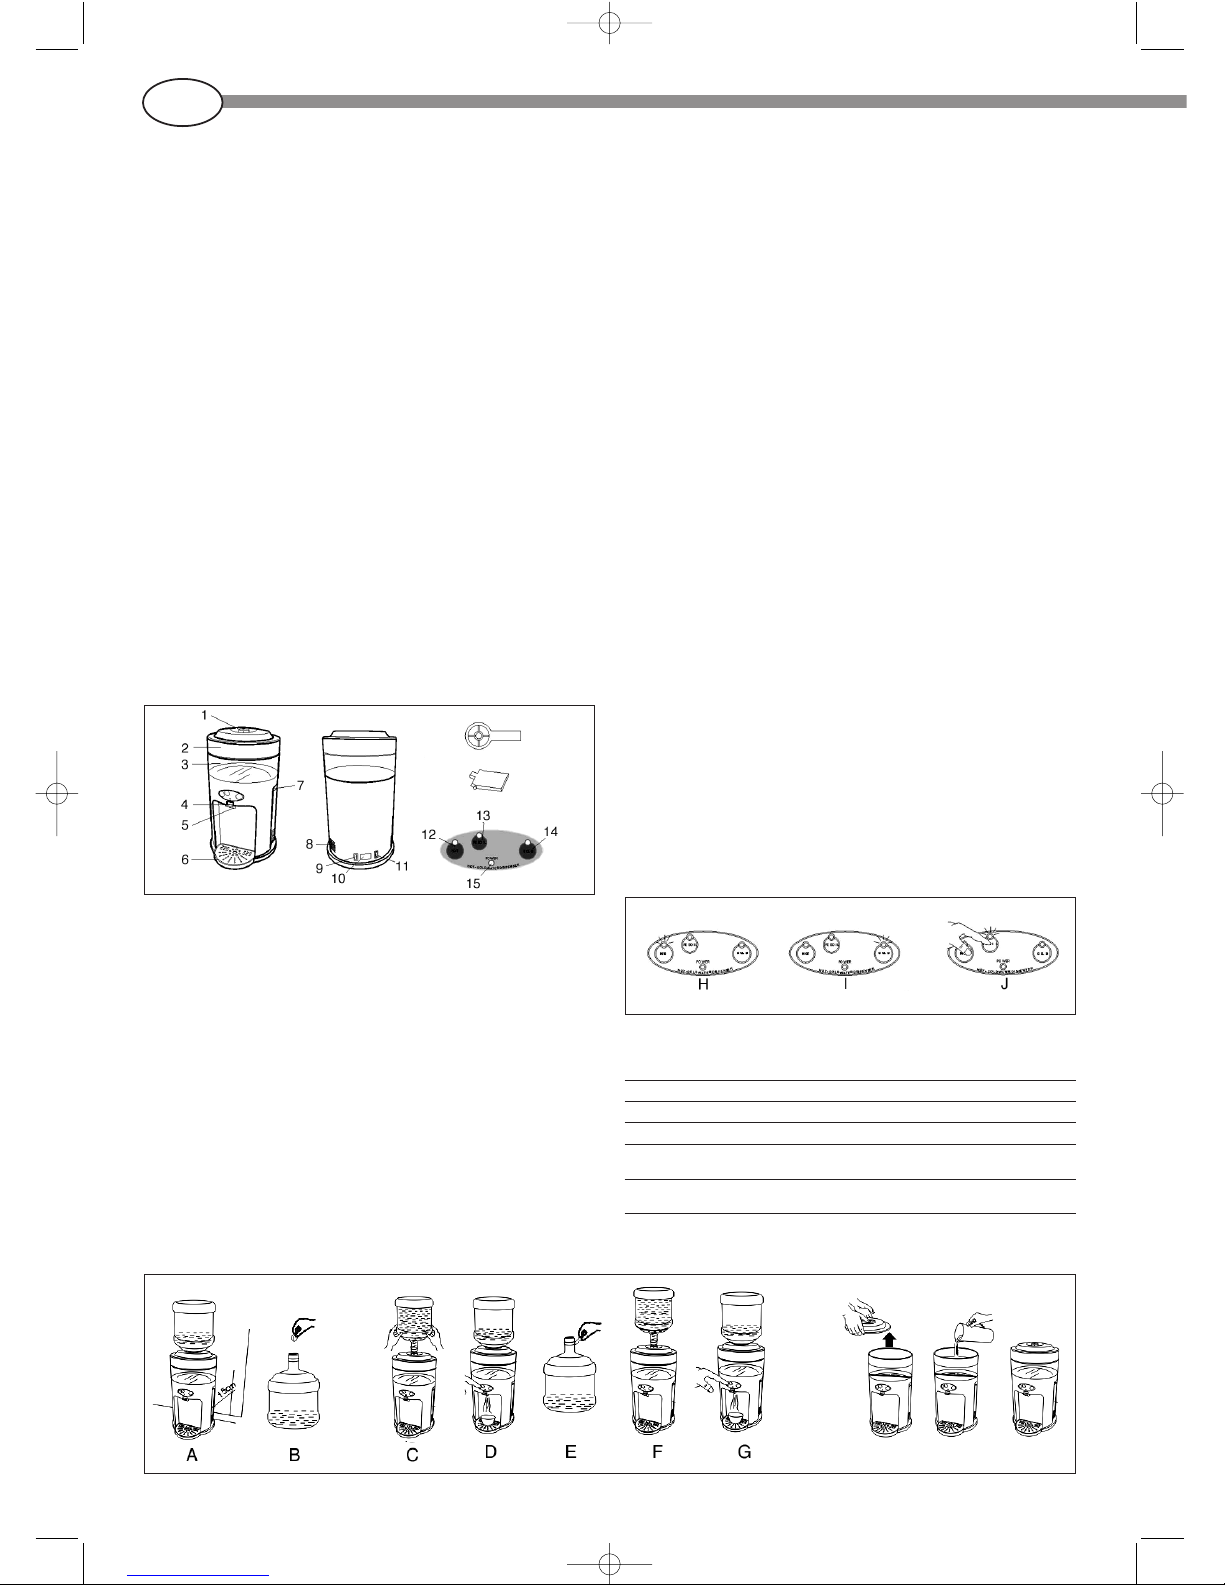
Structure Illustration & Parts Name:
Part No. 4001 Aquarius Plus Water Dispenser
1PET bottle adaptor 9 Cooling-function Switch
2Primary Water Tank (opaque) 10 Power Socket
3Secondary Water Tank (transparent) 11 Heating-function Switch
4Room Temperature Water Press Bar 12 Hot Water Button & Indicator
53in 1 Faucet 13 Re-boiling Button & Indicator
6Water Tray 14 Cold Water Button & Indicator
7Grip (on 2 sides) 15 Power Indicator
8Ventilation opening
4
Screwing/Unscrewing Lever
Press-Board
8. Please follow
the instructions
as shown in
illustration (2),
when you use
tap water.
Illustration (2)
Illustration (1)
Model 006TD Electric Safety Class I
Voltage 220 - 240V Cooling Capacity ≤15°C 1L/h
Rated Power 475W Heating Capacity ≥90°C 1L/h
Heating Power 400W Ambient Temperature for operation 10 - 32°C
Cooling Power 75W
Important
When the unit is firstly used or after periodical cleaning, please make sure that the hot
tank is filled with water before you turn on the heating switch (at the back of the unit). You
can detect whether or not the hot water tank is filled with water by pressing the “Hot” but-
ton on the control panel. Once the unit is connected to power, the power light on the con-
trol panel will be on and at the same time the “Hot” and “Cold” buttons will function to
release water when these buttons are pressed. At this stage, the water will only be at
room temperature. After you see water coming out from the faucet, you can start using
the heating and cooling functions by turning on the switches at the back of the unit.
This water dispenser is featured with a manually re-setting thermostat as safety device to
prevent hazard that may be caused by heating the hot water tank improperly when it is
empty. The thermostat will function to cut the power when the temperature inside the
empty hot tank gets to the alarming pre-set degree. You are required to press the re-set
button on the bottom of the unit to revive the heating function. The re-set button is cov-
ered with a label and you may remove the label to action.
Remarks:
1. There may be a few degrees difference in temperature for both hot and cold water.
2. The re-boiling function will not heat the water up to 100°C.
Specification for Switches and Push-buttons:
1. Turn on the heating-function switch and the red indicator will be lighted to indicate heat-
ing I in progress. When the indicator turns to yellow, it represents state of keeping
warm (Illustration H).
2. Turn on the cooling-function switch and the green indicator will be lighted to indicate
cooling in progress. When the indicator turns to yellow, it represents state of keeping
cool (Illustration I).
3. When the unit is in the mode of heating or keeping warm, the “Re-boiling” indicator and
the hot water indicator will all be lighted in red when the “Re-Boiling” function is used.
After water is heated to approx. 97°C, the buzzer will sound 3 times and heating will
stop to keep warm. The “Re-boiling” indicator and the hot water indicator will turn to
yellow. When the “Re-Boiling” in progress, you may press the “Re-boiling” switch once
again to return to keep-warm mode (Illustration J).
4. After the power is connected and the power indicator is on, you can press the hot water
button or cold water button to get water no matter the heating function switch and the
cooling function switch is turned on or off. When the water button(s) is pressed once,
the water valve will be open to out-flow water for 20 seconds before it turns off auto-
matically. During the out-flow of water (either hot water or cold water), it can be stopped
by pressing the water button again.
5. The buzzer will sound one time on pressing the effective buttons. Otherwise, it will
sound for 10 times if there are faults with the function(s).
Operation Instructions:
1. Place the water dispenser on flat surface and keep it approx. 15 cm from the wall to
allow good ventilation (Illustration A).
2. Sanitize the unit when using it for the first time or after long period storage. One disin-
fection tablet is provided with the new unit. Dissolve the disinfection tablet with approx.
5 gallon of water and fill it in the unit through the primary tank. Let the mixture water in
the unit for approx. 20 minutes before draining it. Pls add distilled water while draining
the mixture water until it becomes odorless (Illustration B – G).
3. Set the cooling-function switch and the heating-function switch (on the back of the unit)
at the “OFF” position first, then insert the power cord to the power socket. Press the
hot-water button on the control panel until water flows out from the faucet, it is then
okay to turn on the heating-function and cooling function
4. Please turn off the power if the unit is not in use for a long time. Disconnect the power
cord from the unit and drain the remaining water (see Dismantle and Clean) before stor-
age. When reviving to use the unit, please ensure that all parts are properly re-assem-
bled with good sealing condition.
5. Please refer to the Trouble Shooting for common problems. Do not disassemble the
water dispenser by yourself for its electrical part. Contact the authorized service facility
for repair when in necessity.
6. Do not start or stop the machine by inserting or pulling off of the power plug.
7. Turn off the cooling-function for 4 hours if ice is found to block the out-flow of water.
Technical Data:
AquariusPlus_Anleitung 08.09.2004 15:41 Uhr Seite 4

5
Guarantee (only valid within Germany)
The guarantee period for this appliance is 24 months. In the event of demonstrable
defects in materials or manufacture we shall, at our discretion, repair or replace the appli-
ance. If you discover a defect, you should send the appliance to the address listed below,
paying all carriage costs and stating the reason for your complaint. We accept no liability
for any appliances that are uninsured or damaged in transit. Your right to claim a revision
or reduction in price exists only if we are unable to remedy the fault. Indirect damage or
losses are not covered by this guarantee. If the appliance is badly or improperly treated, if
force is used or in the event of damage caused by normal wear and tear the warranty shall
lapse. This is also the case in the event of any third party tampering with the device or of
any changes being made to its original condition. Your receipt is your warranty card and
counts as an official document. If you give false details about the date of purchase or
make any changes to the entries on the receipt you release us from any and all warranty
obligations. The place of fulfilment and jurisdiction is Offenbach am Main.
Date of sale Retailer’s stamp
We hope you will enjoy using your Aquarius Water Dispenser.
If you have any questions, please contact:
BETEC · Bernd Eitel Technologies · Herzogstrasse 55 · 63263 Neu-Isenburg · Germany
Tel: 49 (0) 6102-31067 · Fax: 49 (0) 6102-320859 · www.BETEC-Ideen.de
E-mail: [email protected]
GB
Problems
No water coming
out from the faucet
Possible Causes
1. Empty water tank(s)
2. Heating tank or
cooling tank blocked
by air.
1. Refill with water.
2. Press the water button(s) to leave
the faucet open and shake the
unit slightly until water runs out.
Solution
Water not hot or
cold enough 1. Water taken too much
in a short time.
2. Power supply cut off
3. Cooling time not
enough.
1. Wait for some time to allow
sufficient heating and cooling.
2. Wait for some time to allow
sufficient heating and cooling.
3. first cooling time should be 2
hours for drink.
Water leakage 1. Broken bottle.
2. The transparent
tank and its gas-
kets are not re-
assemble properly
and firmly from last
dismantlement.
1. Replace a new bottle.
2. Dismantle and assemble again.
Change the aged gaskets when
necessary.
Trouble Shooting:
Check the listed items before returning the unit for repair.
Attention:
To avoid electric shock, do not insert the
power plug with wet hand. Never change the plug of the power cord or,
extend its length so as to avoid over-heat or
fire. Please purchase/replace the damaged
power cord through dealer or the authorized
service facility.
To avoid over loading, connect to
independent power outlet. Do not allow children to use the water dis-
penser without supervision or play with it to
avoid injury or scald.
Place the water dispenser at dry, cool and
ventilated position. Do not place it close to
the valuable furniture or other household
appliances so as to avoid any possible dam-
age to them due to water spilling when fit-
ting the water bottle into the unit.
It is recommended to wait for 3 minutes
before re-starting the cooling function, after
it was shut off, so as to prolong the life
span of the cooling components.
Do not place the water dispenser in damp
room or close to stove. Also keep it away
from direct sunshine and rain.
Never splash water onto the unit directly. Do not wipe the unit with detergent, organic
liquid or insecticide etc
Do not drop or impact the unit. Clean the unit with lightly moistened cloth
and let it dry naturally.
Maintenance Measures:
1. Disconnect the power cord and wait for approx. 2 hours to let hot water cool down so as
to avoid electric shock and scald.
2. Dismantle and Clean:
2. Firstly take off the bottle and the opaque cover. Secondly, screw off the nut at the inner
bottom of the transparent tank with the lever provided and push up the transparent tank
by inserting the 2 press-boards provided. Then, take out the insulation blocks from both
cold water tank and hot water tank; and pour out the remaining water carefully. Thirdly,
after cleaning the hot-water tank and the cold-water tank with clean water, you may re-
assemble the unit in the reverse procedures – place the insulation blocks in the hot
water tank and cold water tank – press the transparent tank back into the main body
properly (this procedure will require to apply with some strength) – make sure the 2 sil-
icon sealing gaskets on the bottom are not missed – screw the nut back in place with
the lever – make sure the nut is screwed tight, otherwise, it may lead to water leakage.
(Illustration K – V).
AquariusPlus_Anleitung 08.09.2004 15:41 Uhr Seite 5
6
Description du fonctionnement et des éléments
F
Nous vous remercions d'avoir acheté notre distributeur d'eau. Pour obtenir les meilleures
performances de ce produit, nous vous recommandons de lire très soigneusement ce
manuel de service avant d'utiliser le produit, et de conserver ce manuel en bon état.
Description des équipements:
Ce produit possède un design fonctionnel et hygiénique avancé, et il comprend les
équipements suivants :
1. Un réservoir unique d'eau chaude avec un tube à résistance chauffante en acier inoxyd-
able qui peut chauffer l'eau jusqu'à 92 °C. A l'aide de la fonction de réchauffe, l'eau
peut être chauffée jusqu'à 95 °C, ce qui permet de satisfaire différents besoins tels que
faire du thé, du café et des nouilles instantanées, etc.. L'appareil est très pratique pour
une utilisation à la maison, au bureau et à l'hôtel, etc..
2. un robinet 3 en 1 – un écoulement pour l'eau chaude, un pour l'eau froide et un pour
l'eau à température ambiante. L'eau chaude et l'eau froide peuvent être obtenues par
une simple pression sur les boutons respectifs du panneau de commande tandis que la
barre de pression traditionnelle est réservée à l'eau à température ambiante.
3. les 2 grands réservoirs de forme circulaire peuvent être démontés pour les besoins de
nettoyage.
4. Conçu pour fonctionner avec des filtres interchangeables, afin d'augmenter la pureté de
l'eau.
5. La fonction de refroidissement utilise le système thermoélectrique (Peltier) de technolo-
gie avancée qui ne génère pas de bruits désagréables comme les systèmes habituels à
compresseur.
6. Couvercle supérieur à usages multiples, permettant d'installer des bouteilles d'eau con-
tenant 2 à 5 gal. ou des bouteilles en PET de 1,5 à 2 l en utilisant l'adaptateur fourni.
Illustration détaillée et nom des pièces :
Article No.4001 Dispensateur d’eau Aquarius
1adaptateur pour bouteille PET 9 Commutateur de fonction de refroidissement
2Réservoir d'eau primaire (opaque) 10 Prise de courant
3Réservoir d'eau secondaire (transparent) 11 Commutateur de fonction de chauffe
4Barre à presser pour l'eau à
température ambiante 12 Bouton et indicateur pour eau chaude
5Robinet 3 en 1 13 Bouton de réchauffe et indicateur
6Grille à eau 14 Bouton d'eau froide et indicateur
7Poignée (des 2 côtés,) 15 Indicateur de marche
8Ouvertures de ventilation
Clé de vissage/dévissage
Panneau de commande
8. Veuillez suivre
les instructions
(2) si vous
utilisez de l'eau
de distribution.
Illustration (2)
Illustration (1)
Modèle 006TD Classe de protection électrique I
Tension 220 - 240 V Capacités de refroidissement ≤15 °C 1 l/h
Puissance nominale 475 W Capacités de chauffage ≥90 °C 1 l/h
Puissance de chauffe 400 W Température ambiante de
fonctionnement 10 - 32 °C
Puissance de
refroidissement 75 W
Important
Lors du premier usage de l'appareil ou après le nettoyage régulier, assurez-vous que le
réservoir d'eau chaude soit rempli d'eau avant de commuter en marche la fonction de
chauffage (à l'arrière de l'appareil). Vous pouvez savoir si le réservoir d'eau chaude est
rempli ou non, en pressant le bouton «Hot» sur le panneau de commande. Dès que l'ap-
pareil est raccordé au secteur, le voyant marche sur le panneau de commande s'allume et
simultanément les boutons «Hot» et «Cold» fonctionnent pour délivrer de l'eau quand ces
boutons sont pressés. A ce moment l'eau sera uniquement à température ambiante. Après
avoir vu l'eau couler du robinet, vous pouvez commencer à utiliser les fonctions de
chauffage et de refroidissement en tournant les interrupteurs situés à l'arrière de l'ap-
pareil.
Ce distributeur d'eau est équipé d'un thermostat de remise à zéro manuelle, en tant que
dispositif de sécurité, afin de prévenir la possibilité de chauffage involontaire du réservoir
lorsque ce dernier est vide. Le thermostat fonctionne en coupant le courant quand la tem-
pérature à l'intérieur du réservoir d'eau chaude vide atteint une valeur d'alarme présélec-
tionnée. Il faut presser le bouton de remise à zéro sur le bas de l'appareil afin de remettre
en marche la fonction de chauffage. Le bouton de remise à zéro est couvert d'une éti-
quette, il faut donc retirer l'étiquette pour l'actionner.
Remarques:
1. Des différences de quelques degrés peuvent être observées aussi bien pour l'eau
chaude que pour l'eau froide.
2. La fonction de réchauffe ne fait pas bouillir l'eau jusqu'à 100 °C.
Spécifications pour les commutateurs et boutons à pression :
1. En tournant le commutateur de la fonction chauffage le voyant lumineux rouge s'allume
pour indiquer que le chauffage est en cours. Quand le voyant devient jaune cela indique
le fonctionnement du maintien à température (illustration H).
2. Quand on tourne le sélecteur sur la fonction de refroidissement, le voyant lumineux vert
s'allume pour indiquer que le refroidissement est en cours. Quand ce voyant devient
jaune cela signifie que l'appareil est en statut de maintien du froid (illustration I).
3. Quand l'appareil est en mode de chauffage ou de maintien de chaleur, l'indicateur de
réchauffe et celui d'eau chaude sont allumés en rouge quand la fonction de réchauffe
est utilisée. Quand le chauffage de l'eau atteint environ 97 °C, la sonnerie retentit 3 fois
et la fonction chauffage cesse de maintenir la température. Le voyant de réchauffe et
celui d'eau chaude s'allument en jaune. Quand la réchauffe est en cours, on peut press-
er l'interrupteur de réchauffe une nouvelle fois pour retourner au mode de maintien de
température (illustration J).
4. Après le raccordement au secteur le voyant indicateur de marche s'allume, on peut
presser le bouton d'eau chaude ou celui d'eau froide pour obtenir de l'eau, sans se
soucier de savoir si les commutateurs de fonction d'eau chaude ou d'eau de refroidisse-
ment sont en position marche ou arrêt. Quand le(s) bouton(s) d'eau est(sont) pressé(s),
la soupape d'eau s'ouvre pour laisser couler l'eau pendant 20 secondes avant de se
refermer automatiquement. Pendant l'écoulement de l'eau (eau chaude ou froide), on
peut stopper l'écoulement en pressant à nouveau sur le bouton d'eau.
5. La sonnerie retentit une fois quand on presse les boutons déjà actionnés. Autrement elle
retentira 10 fois si des défauts de fonctionnement se produisent.
Instructions de commande:
1. Disposer le distributeur d'eau sur une surface plane et le déposer approximativement à
15 cm du mur afin d'assurer une bomme ventilation (illustration A).
2. Désinfecter l'appareil avant la première utilisation ou après une longue période de
stockage. Une pilule de désinfection est fournie avec un appareil neuf. Dissoudre la
pilule de désinfection dans environ 5 gal. d'eau et remplissez ainsi l'appareil dans le
réservoir primaire. Laisser agir le mélange d'eau dans l'appareil pendant environ 20
minutes avant de l'évacuer. Veuillez ajouter de l'eau distillée pendant la purge du
mélange d'eau, jusqu'à ce que ce dernier devienne inodore (illustration B – G).
3. Mettre en premier lieu les commutateurs de fonctions de refroidissement et de
chauffage (à l'arrière de l'appareil) en position «OFF», ensuite raccorder le cordon
secteur dans la prise de secteur. Presser le bouton d'eau chaude sur le panneau de
commande jusqu'à ce que l'eau s'écoule du robinet, maintenant on peut commuter en
marche les fonctions de chauffage et de refroidissement
4. Si l'appareil n'est pas utilisé pendant une longue période veuillez arrêter ce dernier.
Débrancher le cordon secteur de l'appareil puis vidanger le reste d'eau (voir démontage
et nettoyage) avant le rangement de l'appareil. Lorsque vous désirez remettre l'appareil
en route, veuillez vous assurer que toutes les pièces soient remontées correctement,
avec de bonnes conditions d'étanchéité.
5. Pour les problèmes ordinaires veuillez vous référer à la recherche des pannes. Ne jamais
démonter le distributeur d'eau vous-même pour atteindre les équipements électriques.
En cas de nécessité contacter le service après vente agréé pour les réparations.
6. Ne jamais mettre en marche ou arrêter la machine en branchant ou en tirant le con-
necteur de raccordement au secteur.
7. Si de la glace s'est formée, bouchant le débit d'eau froide, veuillez arrêter la fonction de
refroidissement pendant 4 heures.
Caractéristiques techniques:
AquariusPlus_Anleitung 08.09.2004 15:41 Uhr Seite 6

7
Garantie (valable uniquement au sein de la RFA)
Le délai de garantie pour cet appareil est de 24 mois. En cas de défauts de fabrication ou
de matériau, l’appareil sera, en fonction de notre décision, réparé ou remplacé. Si un
défaut a été constaté, l’appareil doit être retourné à l’adresse indiquée avec l’indication de
l’objet de la réclamation et suffisamment affranchi. Nous déclinons toute responsabilité
pour les appareils non assurés ou ayant subi des dommages de transport. Un recours réd-
hibitoire ou de prétention à une diminution est possible uniquement s’il nous est impossi-
ble de réparer le défaut constaté. Les dommages indirects sont exclus de la garantie. Les
prestations de garantie sont annulées en cas de manipulation abusive ou non conforme,
d’emploi de la force et dans le cadre de l’usure normale, de même qu’en cas d’interven-
tion étrangère ou de modification de l’état d’origine. Votre bon d’achat sert de carte de
garantie et tient lieu de certificat. Toute fausse indication sur la date d’achat ainsi que la
modification volontaire des données inscrites nous délivrent de tout devoir de garantie. Le
lieu d’exécution de la prestation et le lieu juridique se trouvent à Offenbach am Main.
Date d’achat Cachet du revendeur
Nous vous souhaitons de grandes satisfactions avec les dispensateurs d’eau Aquarius.
Pour toute demande de renseignements veuillez vous adresser à :
BETEC · Bernd Eitel Technologies · Herzogstrasse 55, 63263 Neu-Isenburg, Allemagne
Tél. : 49 (0) 6102-31067 Fax : 49 (0) 6102-320859 · www.BETEC-Ideen.de
F
Problèmes
Pas d'eau
sortant du
robinet
Causes possibles
1. Réservoir(s) d'eau vide(s)
2. Réservoir de chauffage ou
de refroidissement bloqué
par de l'air
1. Remplir d'eau.
2. Presser le(s) bouton(s) d'eau pour laisser
le robinet ouvert et secouer légèrement
l'appareil jusqu'à ce que l'eau coule.
Remède
L'eau n'est
pas assez
chaude ou
pas assez
froide
1. Utilisation d'eau trop
importante dans un trop
bref délai de temps
2. Panne de courant
3. Temps de refroidisse-
ment trop court
1. Attendre un certain temps pour
permettre un chauffage ou un
refroidissement suffisant.
2. Vérifier que le commutateur de la
fonction de chauffage soit en position
«ON», que le cordon secteur soit branché
correctement de même que l'alimenta-
tion de courant alternatif.
3. attendre un délai de 2 heures avant de
boire la première fois de l'eau froide.
Fuite d'eau 1. Bouteille brisée
2. Le réservoir transparent
et ses joints ne sont pas
remontés correctement
et assez serrés depuis le
dernier démontage
1. Remonter une nouvelle bouteille
2. Démonter et remonter à nouveau.
Remplacer les joints usés en fonction
des nécessités.
Recherche des pannes:
Vérifier les pièces listées avant de retourner l'appareil pour réparation.
Attention :
Pour éviter les chocs électriques, ne pas
brancher la fiche secteur avec les mains
mouillées.
Ne jamais modifier la fiche du cordon secteur
ou rallonger sa longueur, afin d'éviter une sur-
chauffe ou un incendie. Veuillez racheter/rem-
placer le cordon secteur détérioré auprès de
votre distributeur ou un service après vente
agréé.
Pour éviter toute surcharge, brancher la fiche
sur une prise de courant indépendante. Ne pas laisser les enfants utiliser ou jouer avec
le distributeur d'eau sans surveillance, afin
d'éviter les accidents ou les brûlures.
Disposer le distributeur d'eau dans un emplace-
ment sec, frais et ventilé. Ne pas le placer à
proximité de meubles de valeur ou d'autres
équipements ménagers de manière à leur éviter
de possibles dégâts à cause d'éclaboussures
d'eau lors de la mise en place de la bouteille
d'eau dans l'appareil.
Il est recommandé d'attendre 3 minutes avant
de redémarrer la fonction de refroidissement,
après qu'elle ait été arrêtée, de manière à pro-
longer la durée de vie des composants de
refroidissement.
Ne pas disposer le distributeur d'eau dans une
pièce humide ou proche d'une source de
chaleur. Ne pas l'exposer à l'influence directe
du rayonnement solaire et de la pluie.
Ne jamais projeter de l'eau directement sur
l'appareil. Ne pas essuyer l'appareil avec un détergent,
un liquide organique ou un insecticide, etc.
Ne jamais laisser tomber ou bousculer
l'appareil. Nettoyer l'appareil avec un chiffon légèrement
humide et le laisser sécher naturellement.
Mesures de maintenance:
1. Débrancher le cordon secteur et attendre environ 2 heures, pour laisser l'eau chaude
refroidir et pour éviter les chocs électriques et les brûlures.
2. Démontage et nettoyage:
En premier lieu retirer la bouteille et le couvercle opaque. Ensuite dévisser l'écrou au
fond à l'intérieur du réservoir transparent, à l'aide de la clé fournie puis soulever le
réservoir transparent en introduisant les 2 plaques de serrage fournies. Ensuite retirer
les blocs d'isolation des réservoirs d'eau froide et d'eau chaude, puis vidanger prudem-
ment les restes d'eau. Troisièmement, après avoir nettoyé le réservoir d'eau chaude et
celui d'eau froide avec une eau propre, il faut remonter l'appareil dans l'ordre inverse –
placer les blocs d'isolation dans le réservoir d'eau chaude et dans le réservoir d'eau
froide – presser à nouveau de façon correcte le réservoir transparent dans le corps prin-
cipal (cette procédure requiert l'application d'une certaine force physique) – s'assurer
que les 2 joints en silicone du fond ne soient pas oubliés – revisser en place l'écrou à
l'aide de la clé fournie – s'assurer que l'écrou soit bien serré, sinon cela peut entraîner
des fuites d'eau. (illustration K – V).
AquariusPlus_Anleitung 08.09.2004 15:41 Uhr Seite 7

8
Descripción del funcionamiento y de las piezas
E
Nos complace que haya decidido adquirir nuestro dispensador de agua. Para poder obtener
el mejor rendimiento posible del producto, le recomendamos leer este manual de instruc-
ciones detenidamente antes de usarlo; Mantenga el manual de instrucciones en buenas
condiciones.
Características del producto:
Este es un producto de diseño funcional y estético avanzado que dispone de las siguientes ca-
racterísticas:
1. Depósito de agua caliente único con tubo térmico de acero inoxidable, capaz de calentar
agua hasta 92°C. Gracias a la función de recalentamiento puede calentar agua a más de
95°C, satisfaciendo así diversas necesidades tales como hacer té, café o una comida instan-
tánea etc... Este producto es adecuado para ser utilizado en el hogar, en la oficina, en hote-
les etc…
2. 3 grifos en 1 – Un tubo para agua caliente, agua fría y agua a temperatura ambiente.
Accionado simplemente los pulsadores correspondientes, situados en el panel de mando,
podrá obtener agua caliente o fría; Pulsando la barra tradicional obtendrá agua a temperatu-
ra ambiente.
3. Los 2 grandes depósitos de agua circulares pueden ser desmontados para llevar a cabo la
limpieza.
4. El producto ha sido diseñado para ser utilizado con filtros recambiables, que mejoran la
pureza del agua.
5. La función de enfriamiento dispone de un sistema termo-eléctrico avanzado (Peltier), que no
genera demasiado ruido, como es corriente en los sistemas compresores tradicionales.
6. Cubierta superior universal, que permite asir grandes botellas de agua de 2 – 5 galones o
botellas PET de 1.5 – 2 litros utilizando el adaptador suministrado.
Representación gráfica y denominación de la pieza:
Part No. 4001 Dispensador de agua Aquarius
1Adaptador de botellas PET 9Interruptor para la función de enfriamiento
2Depósito de agua primario (opaco) 10 Zócalo de conexión
3Depósito de agua secundario (transparente) 11 Interruptor para la función de calentamiento
4Barra pulsadora para el agua a
temperatura ambiente 12 Pulsador e indicador del agua caliente
53grifos en 1 13 Pulsador e indicador del recalentamiento
6Bandeja para el agua 14 Pulsador e indicador del agua fría
7Asidero (en ambos lados) 15 Indicador de encendido
8Orificio de ventilación
Llave de atornillar / destornillar
Pieza de agarre
8. Por favor
observe las
instrucciones
indicadas en la
Fig. (2) si utiliza
el grifo del
agua.
Fig. (2)
Fig. (1)
Modelo 006TD Clase de seguridad eléctrica I
Voltaje 220 - 240V Capacidad de enfriamiento ≤15°C 1L/h
Potencia nominal 475W Capacidad de calentamiento ≥90°C 1L/h
Potencia de calentamiento 400W Temperatura ambiente de servicio 10 - 32°C
Potencia de enfriamiento 75W
Importante
Si va a utilizar el aparato por primera vez o si desea utilizarlo nuevamente tras la limpieza
periódica, asegúrese por favor de que el depósito haya sido llenado con agua antes de
accionar el interruptor de calentamiento (situado en la parte posterior del aparato). Existe
la posibilidad de determinar si el depósito de agua caliente ha sido llenado con agua o no,
accionando el interruptor “Hot” situado en el panel de mando. Cuando encienda el aparato
se iluminará el indicador luminoso del panel de mando y al mismo tiempo funcionarán los
pulsadores “Hot” y “Cold”, que suministrarán agua cuando sean accionados. Mientras
tanto el agua estará sólo a temperatura ambiente. Tras haber observado que sale agua del
grifo puede utilizar las funciones de calentamiento y enfriamiento accionando los interrup-
tores situados en la parte posterior del aparato.
Este dispensador de agua ha sido dotado con un termostato de reenganche manual para
evitar que se produzcan daños causados posiblemente por el calentamiento del depósito
de agua caliente aún vacío. La función del termostato es la de desconectar el suministro
eléctrico cuando la temperatura interior del depósito vacío alcanza un nivel de alarma.
Pulse la tecla re-set, situada debajo del aparato, para reactivar la función de calentamien-
to. La tecla re-set ha sido cubierta con un etiqueta, es posible que deba retirar esta etique-
ta antes de poder pulsar la tecla.
Observaciones:
1. Es posible que sólo existan unos pocos grados de diferencia entre la temperatura del
agua caliente y la del agua fría.
2. La función de recalentamiento no calentará el agua a más de 100°C.
Especificaciones para interruptores y pulsadores:
1. Accione el pulsador para la función de calentamiento, seguidamente se encenderá el
LED rojo para indicar que la fase de calentamiento I está en curso. Si el LED se vuelve
amarillo representa el estado de mantenimiento del frio (Fig. I).
2. Accione el pulsador para la función de enfriamiento, seguidamente se encenderá el LED
verde para indicar que el proceso de enfriamiento está en curso. Si el LED se vuelve
amarillo representa el estado de mantenimiento del (Fig. I).
3. Cuando el aparato se encuentre en el modo de calentamiento o de mantenimiento del
calor, el indicador “Re-boiling” y el indicador de agua caliente se encenderán con luz
roja cuando sea activada la función “Re-Boiling”. Después de haber calentado el agua a
aprox. 97°C, el zumbador eléctrico sonará 3 veces y la función de calentamiento dejará
de mantener caliente el agua. La luz del indicador “Re-boiling” y del indicador de agua
caliente se volverá amarilla. Cuando la función de recalentamiento “Re-Boiling” esté en
curso, accione el pulsador “Re-boiling” nuevamente para volver al modo de manteni-
miento del calor (Fig. J).
4. Tras haber conectado el suministro de corriente y haberse iluminado el indicador de
encendido puede accionar el pulsador de agua caliente o de agua fría para obtener
agua, independientemente de si el interruptor de la función de calentamiento o el de la
función de enfriamiento están apagados o encendidos. Cuando los pulsadores hayan
sido accionados una vez, se abrirá la válvula de agua para dejar salir agua durante 20
segundos antes de apagarse automáticamente. El proceso de salida del agua
(independientemente de que se trate de agua caliente o fría), puede ser detenido accio-
nando el pulsador del agua nuevamente.
5. El zumbador eléctrico sonará una vez si acciona los pulsadores efectivos. Por el con-
trario el zumbador eléctrico sonará 10 veces, si existen fallos funcionales.
Instrucciones para la puesta en funcionamiento:
1. Instale el dispensador de agua sobre una superficie plana y manténgalo separado de la
pared a aprox. 15 cm con el fin de poder garantizar una ventilación suficiente (Fig. A).
2. Desinfecte el aparato antes de utilizarlo por primera vez o tras un largo período de
almacenaje utilizando para ello la pastilla desinfectante suministrada con el aparato.
Disuelva la pastilla desinfectante en aprox. 5 galones de agua e introduzca el agua en el
aparato a través del depósito primario. Deje actuar la mezcla de agua y pastilla desin-
fectante en el aparato durante aprox. 20 minutos antes de vaciarla. Añada agua destila-
da durante el vaciado de la mezcla de agua y pastilla desinfectante hasta que el agua se
vuelva inodora (Fig. B – G).
3. Primeramente lleve los interruptores para la función de enfriamiento y de calentamiento,
situados en la parte posterior del aparato, a la posición “OFF”, seguidamente conecte el
cable de red al enchufe. Accione el pulsador de agua caliente, situado en el panel de
mando, hasta que salga agua del grifo, después podrá encender la función calentamien-
to y de enfriamiento del agua.
4. Por favor desconecte el aparato si no va a utilizarlo por un periodo de tiempo prolonga-
do. Antes de almacenar el aparato desconecte el cable de red del aparato y vacíe el
agua sobrante (véase el apartado “Desmontaje y limpieza”). Si desea volver a utilizar el
aparato, asegúrese por favor de que todas sus piezas hayan sido montadas debida-
mente y se encuentran en un perfecto estado.
5. Si surge algún tipo de problema común refiérase por favor a la guía de solución de
averías. No desmonte las piezas eléctricas del dispensador de agua Usted mismo. Si es
necesario reparar el aparato, póngase por favor en contacto con la estación de servicio
autorizada.
6. No apague o encienda el aparato conectando o desconectando la clavija de enchufe.
7. Apague la función de enfriamiento durante 4 horas si el hielo bloquea la salida del agua.
E. Datos técnicos:
AquariusPlus_Anleitung 08.09.2004 15:41 Uhr Seite 8

9
Garantía (válida sólo dentro de la RFA)
El plazo de garantía para este aparato es de 24 meses. Si se justifican defectos en el
material o la fabricación, el aparato será reparado o cambiado, a nuestro criterio. Cuando
se detecte una deficiencia, el aparato debe enviarse a la dirección indicada señalando el
motivo de la reclamación y con franqueo suficiente. No asumimos ninguna responsabilidad
por los aparatos sin asegurar o dañados durante el transporte. Solamente existirá derecho
a redhibición o reducción en el precio cuando nos resulte imposible solucionar la deficien-
cia. Los daños indirectos no están cubiertos por la garantía. En caso de trato inadecuado o
incorrecto, aplicación de fuerza o de daños por el desgaste normal, no se aplicará la
garantía, igual que cuando se produzcan intervenciones ajenas y modificaciones del estado
original. Su justificante de compra sirve como tarjeta de garantía y es un documento. Los
datos incorrectos sobre la fecha de compra, así como las modificaciones por cuenta propia
de la información registrada nos liberarán de cualquier obligación de prestación de garan-
tía. El lugar de cumplimiento y la jurisdicción competente son Offenbach am Main.
Fecha de compra Sello del establecimiento
Le deseamos que disfrute de su dispensador de agua Aquarius.
Para cualquier consulta, le rogamos se dirija a:
BETEC · Bernd Eitel Technologies · Herzogstrasse 55 · 63263 Neu-Isenburg · Germany
Tel.: 49 (0) 6102-31067 · Fax: 49 (0) 6102-320859 · www.BETEC-Ideen.de
E-mail: [email protected]
E
Problema
No sale agua
del grifo
Posible causa
1. Los depósitos de agua están
vacíos
2. El depósito de agua caliente
o el de agua fría están blo-
queados por aire
1. Llene los depósitos con agua.
2. Accione los pulsadores del agua para
abrir el grifo y sacuda el aparato lige-
ramente hasta que salga agua.
Solución
El agua no
está lo
suficien-
temente
caliente o fría
1. Ha sido tomada demasiada
agua en un corto periodo de
tiempo
2. No existe suministro de
corriente
3. El tiempo de enfriamiento
no ha sido suficiente
1. Espere durante algún tiempo para per-
mitir que el agua se caliente / enfríe.
2. Asegúrese de que el interruptor de la
función de calentamiento se encuentre
en la posición “ON”, el cable de red
haya sido conectado debidamente y
exista suministro de corriente alterna.
3. El primer tiempo de enfriamiento para
beber debería ser de 2 horas.
Fuga de agua 1. La botella se ha roto
2. El depósito transparente y
sus juntas de obturación no
han sido reinstaladas firme
y correctamente tras el últi-
mo desmontaje.
1. Reponga la botella
2. Desmonte el aparato y vuelva a mon-
tarlo. Si es necesario cambie las jun-
tas de obturación gastadas.
Guía de solución de averías:
Antes de enviar el aparato a reparar compruebe la siguiente lista.
Atención:
Con el fin de evitar que se produzca una
descarga eléctrica no conecte el enchufe con
las manos mojadas.
No cambie nunca la clavija de enchufe del
cable de red ni prolongue el cable con el fin de
evitar que se produzca un sobrecalentamiento
o un incendio. Por favor compre / reponga un
cable de red dañado en un comercio especiali-
zado o en una estación de servicio autorizada.
Para evitar que se produzca una sobrecarga
realice la conexión a un enchufe independi-
ente.
No permita que los niños utilicen el dispen-
sador de agua sin vigilancia ni que jueguen
con él, con el fin de evitar que se produzcan
lesiones o escaldamiento.
Instale el dispensador de agua en un lugar
seco, fresco y ventilado. No instale el aparato
cerca de muebles valiosos ni de otros aparatos
familiares, con el fin de evitar que se produzcan
daños debidos a derrames de agua durante la
instalación de la botella de agua en el aparato.
Es recomendable esperar aprox. 3 minutos
antes de reiniciar la función de enfriamiento,
después de haberla detenido, ya que de este
modo se prolonga el tiempo de vida útil de los
componentes de enfriamiento.
No instale el dispensador de agua en recintos
húmedos o cerrados. Proteja el aparato contra
la radiación solar directa y la lluvia.
No eche nunca agua directamente en el
aparato. No limpie el aparato con detergentes, líquidos
orgánicos o insecticidas etc
No deje caer el aparato ni lo vuelque. Limpie el aparato con un paño suave húmedo
y déjelo secarse al aire.
Medidas de mantenimiento:
1. Desconecte el cable de red y espere durante aprox. 2 horas para que se enfríe el agua
caliente con el fin de evitar que se produzca una descarga eléctrica o escaldamiento.
2. Desmontaje y limpieza:
En primer lugar desinstale la botella y la cubierta opaca. En segundo lugar destornille la
tuerca situada en el fondo interior del depósito transparente utilizando para ello la llave
de atornillar / destornillar y extraiga el depósito transparente insertando las 2 piezas de
agarre suministradas. Seguidamente extraiga los bloques de aislamiento de los depósi-
tos de agua caliente y de agua fría y vacíe el agua restante con cuidado. En tercer lugar,
después de haber limpiado el depósito de agua caliente y el de agua fría con agua
limpia, puede reensamblar el aparato llevando a cabo el proceso descrito anteriormente
de forma inversa – Instale los bloques de aislamiento en los depósitos de agua caliente
y agua fría. – Vuelva a insertar el depósito transparente en la unidad principal debida-
mente (este proceso puede requerir que sea aplicada algo de fuerza) – Asegúrese de
que no se hayan perdido las dos 2 juntas obturadoras de silicona del fondo – Atornille la
tuerca con la llave de atornillar / destornillar nuevamente – Asegúrese de que la tuerca
haya sido apretada debidamente, de lo contrario podría producirse una fuga de agua.
(Fig. K - V).
AquariusPlus_Anleitung 08.09.2004 15:41 Uhr Seite 9

10
Descrizione delle funzioni e delle parti
I
Grazie per aver acquistato il distributore d'acqua. Per ottenere le migliori prestazioni del
prodotto, leggere attentamente il presente manuale di funzionamento prima di usare il
prodotto e conservare il manuale in buone condizioni.
Presentazione delle funzioni:
Questo prodotto è all'avanguardia nel proprio design funzionale ed estetico e comprende le
funzioni indicate qui sotto:
1. Serbatoio d'acqua calda unico con tubo termico in acciaio inossidabile in grado di riscal-
dare l'acqua fino a 92°C. Grazie alla funzione di ribollitura, può riscaldare l'acqua fino a
95°C, per soddisfare le diverse esigenze, quali la preparazione di tè, caffè e altre
bevande. È adatto per l'uso a casa, in ufficio, in hotel, ecc.
2. Rubinetto 3 in 1 – un beccuccio per acqua calda, acqua fredda e acqua a temperatura
ambiente. Per ottenere acqua calda e fredda è sufficiente toccare semplicemente i pul-
santi corrispondenti sul pannello di comando, mentre per ottenere acqua a temperatura
ambiente si utilizza la tradizionale barretta a pressione.
3. Per la pulizia è possibile smontare 2 serbatoi grandi circolari.
4. Progettato per essere utilizzato con filtro di ricambio per migliorare la purezza dell'ac-
qua.
5. La funzione di raffreddamento si avvale del sistema termoelettrico (Peltier) all'avan-
guardia che non genera rumore come nel caso di un sistema a compressore
tradizionale.
6. Coperchio superiore versatile in grado di contenere grandi bottiglioni d'acqua da 9 a 22
litri o bottiglie PET da 1,5 – 2 l. tramite l'adattatore fornito in dotazione.
Illustrazione della struttura e denominazione delle parti:
Codice 4001 Dispenser d’acqua Aquarius
1Adattatore per bottiglia PET 9Interruttore per la funzione di raffreddamento
2Serbatoio d'acqua principale (opaco) 10 Presa di alimentazione
3Serbatoio d'acqua secondario
(trasparente) 11 Interruttore per la funzione di riscaldamento
4Barra a pressione per acqua a
temperatura ambiente 12 Pulsante acqua calda e indicatore
5Rubinetto 3 in 1 13 Pulsante di ribollitura e indicatore
6Vaschetta dell'acqua 14 Pulsante acqua fredda e indicatore
7Impugnatura (su 2 lati) 15 Indicatore di alimentazione
8Apertura di ventilazione
Leva bloccaggio/sbloccaggio
Linguetta a pressione
8. Seguire le
istruzioni come
indicato nella
figura (2), quan-
do si usa acqua
di rubinetto.
Figura (2)
Figura (1)
Modello 006TD Classe di sicurezza elettrica I
Tensione 220 - 240 V Capacità di raffreddamento ≤15°C 1 l./h
Potenza nominale 475 W Capacità di riscaldamento ≥90°C 1 l./h
Potenza di riscaldamento 400 W Temperatura ambiente
per il funzionamento 10 - 32°C
Potenza di raffreddamento 75 W
Importante
Quando si utilizza l'unità per la prima volta o dopo una pulizia periodica, verificare che il
serbatoio dell'acqua calda sia riempito di acqua prima di inserire l'interruttore di riscalda-
mento (sul retro dell'unità). È possibile controllare se il serbatoio d'acqua calda è pieno di
acqua o meno premendo il pulsante “Hot” sul pannello di comando. Una volta che l'unità è
collegata all'alimentazione, il led corrispondente si accenderà e nello stesso tempo i pul-
santi “Hot” (Caldo) e “Cold” (Freddo) saranno pronti ad erogare l'acqua, se premuti. In
questa fase verrà erogata solo l'acqua a temperatura ambiente. Quando l'acqua fuoriesce
dal rubinetto, è possibile attivare le funzioni di riscaldamento e di raffreddamento tramite
gli interruttori situati sul retro dell'unità.
Questo distributore d'acqua è dotato di un termostato di reset manuale come dispositivo di
sicurezza che evita i rischi causati da un riscaldamento indesiderato del serbatoio dell'ac-
qua calda quando questo è vuoto. Il termostato serve per togliere l'alimentazione quando la
temperatura all'interno del serbatoio vuoto dell'acqua calda raggiunge il livello di allarme
preimpostato. È necessario premere il pulsante di reset situato nella parte inferiore dell'u-
nità per ripristinare la funzione di riscaldamento. Il pulsante di reset è coperto da
un'etichetta che può essere rimossa per la sua attivazione.
Note:
1. Vi possono essere alcuni gradi di differenza di temperatura per l'acqua calda e l'acqua
fredda.
2. La funzione di ribollitura non scalderà l'acqua fino a 100°.
Descrizione degli interruttori e dei pulsanti:
1. Attivare la funzione di riscaldamento: la spia rossa si accenderà per indicare che il
riscaldamento è in corso. Quando la spia diventa gialla, è attivo lo stato di mantenimento
dell'acqua calda (figura H).
2. Attivare la funzione di raffreddamento: la spia verde si accenderà per indicare che il raf-
freddamento è in corso. Quando la spia diventa gialla, è attivo lo stato di mantenimento
del freddo (figura I).
3. Quando l'unità è in modalità di riscaldamento o di mantenimento acqua calda, l'indica-
tore “Ribollitura” e l'indicatore dell'acqua calda si accenderanno in rosso quando si uti-
lizza la funzione “Ribollitura”. Quando l'acqua ha raggiunto una temperatura di circa
97°C, si vengono emessi tre segnali acustici e la funzione di mantenimento dell'acqua
calda viene interrotta. L'indicatore “Ribollitura” e l'indicatore dell'acqua calda diventer-
anno di color giallo. Quando è in corso la “Ribollitura” è possibile premere l'interruttore
“Re-boiling” ancora una volta per ritornare alla modalità di mantenimento dell'acqua
calda (Figura J).
4. Dopo aver inserito l'alimentazione e quando l'indicatore di alimentazione è acceso, è
possibile premere il pulsante dell'acqua calda o dell'acqua fredda per erogare l'acqua,
indipendentemente dal fatto che l'interruttore della funzione di riscaldamento e quello di
raffreddamento siano inseriti o disinseriti. Quando si preme una volta il pulsante o i pul-
santi dell'acqua, la valvola dell'acqua si aprirà per far fuoriuscire l'acqua per 20 secondi
prima di disinserirsi automaticamente. Durante la fuoriuscita dell'acqua (acqua calda o
fredda) è possibile interrompere l'erogazione premendo di nuovo il pulsante dell'acqua.
5. Alla pressione di tali pulsanti verrà emesso un segnale acustico. Diversamente, il se-
gnale acustico verrà emesso per 10 volte in caso di anomalie.
Istruzioni per il funzionamento:
1. Posizionare il distributore d'acqua su una superficie piana mantenendolo ad una distan-
za di circa 15 cm dalla parete per consentire una ventilazione adeguata (Figura A).
2. Disinfettare l'unità se la si utilizza per la prima volta oppure dopo un lungo periodo di
immagazzinamento. Con la nuova unità viene fornita una pastiglia disinfettante.
Sciogliere la pastiglia disinfettante in circa 22 litri di acqua e versarla nell'unità attraver-
so il serbatoio principale. Lasciare la miscela d'acqua nell'unità per circa 20 minuti
prima di scaricarla. Aggiungere acqua distillata durante lo scarico della miscela di acqua
fino a quando diventa inodore (Figura B - G).
3. Come prima cosa impostare su "OFF" l'interruttore per la funzione di raffreddamento e
l'interruttore per la funzione di riscaldamento (situati sul retro dell'unità), quindi inserire
il cavo di alimentazione nella relativa presa. Premere il pulsante dell'acqua calda sul
pannello di comando fino a quando l'acqua fuoriesce dal rubinetto; a questo punto è
opportuno attivare la funzione di riscaldamento e la funzione di raffreddamento
4. Togliere alimentazione se l'unità non viene utilizzata per un lungo periodo di tempo.
Scollegare il cavo di alimentazione dall'unità e scaricare l'acqua restante (vedere
Smontaggio e pulizia) prima dell'immagazzinamento. Quando si riutilizza l'unità, assicu-
rarsi che tutte le parti siano state rimontate correttamente con condizioni di tenuta
adeguate.
5. Fare riferimento alla sezione Risoluzione dei problemi per gli inconvenienti più comuni.
Non tentare di smontare il distributore d'acqua per quanto riguarda la parte elettrica. In
caso di necessità, contattare il centro di assistenza autorizzato per la riparazione.
6. Non avviare o fermare il funzionamento della macchina inserendo o disinserendo il cavo
di alimentazione dalla presa.
7. Disattivare la funzione di raffreddamento per 4 ore se l'eventuale presenza di ghiaccio
ostruisce la fuoriuscita dell'acqua.
Dati tecnici:
AquariusPlus_Anleitung 08.09.2004 15:41 Uhr Seite 10

11
Garanzia (valida solo all’interno della Repubblica Federale Tedesca)
Il periodo di garanzia per questo apparecchio è di 24 mesi. In caso di danni dimostrabili di
materiale o di fabbricazione, decideremo a nostro insindacabile giudizio se riparare oppure
sostituire l’apparecchio. Se l’utente rileva un difetto, dovrà restituire l’apparecchio all’indi-
rizzo sotto riportato indicando il motivo della contestazione e con affrancatura sufficiente.
Non ci assumiamo alcuna responsabilità per apparecchi non assicurati oppure danneggiati
durante il trasporto. Il diritto a una sostituzione o riduzione esiste solo qualora non sia
possibile eliminare il difetto. I danni indiretti non fanno parte della garanzia. Inoltre la
garanzia non è applicabile in caso di uso improprio o inadeguato, di uso della forza e in
caso di danni da usura normale nonché in caso di interventi di terzi e variazioni dello stato
originale. Il vostro scontrino d’acquisto vale come scheda di garanzia e ne diviene l’atto.
Eventuali indicazioni non corrette della data di acquisto nonché altre variazioni evidenti dei
dati in esso presenti ci assolvono da ogni obbligo di garanzia. Luogo di adempimento e
foro competente è Offenbach am Main.
Data dell'acquisto Timbro del punto vendita
Vi auguriamo di godervi a lungo il dispenser d’acqua Aquarius.
In caso di domande contattare:
BETEC · Bernd Eitel Technologies · Herzogstrasse 55 · 63263 Neu-Isenburg · Germany
Tel: 49 (0) 6102-31067 · Fax: 49 (0) 6102-320859 · www.BETEC-Ideen.de
E-mail: [email protected]
I
Problemi
No water coming
out from the
faucet
acqua dal
rubinetto
Cause possibili
1. Serbatoio(i) d'acqua
vuoto(i)
2. Serbatoio di riscalda-
mento o serbatoio di
raffreddamento ostruiti
dall'aria
1. Riempire con acqua.
2. Premere il pulsante dell'acqua per
lasciare il rubinetto aperto e agitare
leggermente l'unità finché l'acqua
fuoriesce.
Soluzione
Acqua non
abbastanza
calda o fredda
1. Eccessiva quantità di
acqua prelevata in
breve tempo
2. Alimentazione
disattivata
3. Tempo di raffreddamen-
to non sufficiente
1. Attendere per consentire un riscalda-
mento e raffreddamento adeguato
2. Verificare che l'interruttore della fun-
zione di riscaldamento sia in
posizione “ON”, che il cavo di alimen-
tazione sia collegato correttamente e
che la tensione di rete in CA sia
adeguata.
3. Il primo periodo di raffreddamento
dovrà essere di 2 ore, prima di bere
l'acqua.
Perdita d'acqua 1. Bottiglia rotta
2. Il serbatoio trasparente
e le guarnizioni non
sono state rimontate
correttamente e salda-
mente dopo l'ultimo
smontaggio
1. Sostituirla con una nuova.
2. Smontare e rimontare di nuovo.
Sostituire le guarnizioni vecchie, se
necessario.
Risoluzione dei problemi:
Controllare le voci qui elencate prima di restituire l'unità per la riparazione.
Attenzione:
Per evitare scosse elettriche, non inserire la
spina di alimentazione con le mani umide. Non sostituire la spina del cavo di alimen-
tazione né applicare una prolunga per evitare
surriscaldamenti o incendi. Acquistare/sosti-
tuire il cavo di alimentazione danneggiato
presso un rivenditore o un centro di assistenza
autorizzato.
Per evitare sovraccarichi, collegare il distribu-
tore d'acqua a una presa di alimentazione
indipendente.
Non consentire ai bambini di utilizzare o gio-
care liberamente con il distributore d'acqua al
fine di evitare lesioni o ustioni.
Posizionare il distributore d'acqua in un luogo
asciutto, fresco e ventilato. Non posizionarlo in
prossimità di mobili pregiati o di altri elet-
trodomestici per evitare di danneggiarli a causa
della fuoriuscita di acqua durante l'inserimento
del bottiglione nell'unità.
Si consiglia di attendere 3 minuti prima di
riavviare la funzione di raffreddamento dopo
averla spenta, in modo da prolungare la durata
dei componenti di raffreddamento.
Non posizionare il distributore dell'acqua in
una stanza umida o in prossimità di stufe.
Inoltre, tenerlo lontano dai raggi diretti del sole
e al riparo dalla pioggia.
Non spruzzare acqua direttamente
sull'unità. Non pulire l'unità con detergente, liquido
organico o insetticidi, ecc.
Non far cadere né urtare l'unità. Pulire l'unità con un panno leggermente umido
e lasciarla asciugare naturalmente.
Manutenzione:
1. Scollegare il cavo di alimentazione ed attendere circa 2 ore per lasciare raffreddare l'ac-
qua calda in modo da evitare scosse elettriche e ustioni.
2. Smontaggio e pulizia:
In primo luogo, estrarre la bottiglia e il coperchio opaco. Svitare quindi il dado della parte
inferiore interna del serbatoio trasparente con la leva fornita in dotazione e spingere il
serbatoio trasparente verso l'alto inserendo le 2 linguette a pressione. Ora estrarre i
blocchi di isolamento dal serbatoio dell'acqua fredda e da quello dell'acqua calda, quindi
versare con cautela l'acqua rimanente. Infine, dopo aver pulito il serbatoio dell'acqua
calda e il serbatoio dell'acqua fredda con acqua pulita, è possibile rimontare l'unità
eseguendo le procedure inverse – porre i blocchi di isolamento nel serbatoio dell'acqua
calda e nel serbatoio dell'acqua fredda – premere il serbatoio trasparente nel corpo
principale in modo adeguato (per questa procedura è necessaria una certa forza) –
accertarsi che le 2 guarnizioni di tenuta in silicone nella parte inferiore non siano andate
perse; riavvitare il dado in posizione con la leva – accertarsi che il dado sia saldamente
serrato, altrimenti può causare una perdita di acqua (Figura K - V).
AquariusPlus_Anleitung 08.09.2004 15:41 Uhr Seite 11

12
Descrição das Funções e das Componentes
P
Agradecemos a sua preferência por este produto de qualidade. Para que possa usufruir do
bom funcionamento do seu Dispensador de Água, solicitamos que leia atentamente o man-
ual que se segue e que o conserve em bom estado para futuras utilizações.
Características:
Este produto foi concebido com um avançado design funcional e ergonómico, e distingue-
se pelas seguintes características:
1. Reservatório de água quente único com tubo térmico de aço inoxidável, com capacidade
de aquecimento de água até uma temperatura de 92º C. Através da função de reaqueci-
mento é possível aquecer a água até 95º C, de forma a satisfazer as mais diversas
necessidades, tais como: fazer chá, café, cozer massa instantânea, etc.. Este aparelho
pode ser utilizado em casa, no local de trabalho, no hotel, etc.
2. Torneira 3 em 1 – uma só boca para a água quente, água fria e água à temperatura
ambiente. As águas quente e fria podem ser obtidas, premindo os respectivos botões no
painel de controlo; a patilha da torneira de pressão normal, por seu lado, é utilizada para
a água à temperatura ambiente.
3. 2 reservatórios grandes circulares, desmontáveis para limpeza.
4. Concebido para funcionar com um filtro substituível, para aumentar a pureza da água.
5. A função de refrigeração está equipada com o avançado sistema termoeléctrico (Peltier),
bastante silencioso, ao contrário do sistema compressor normal.
6. Cobertura versátil que permite a colocação de garrafões de água entre 2 galões (8 litros)
e 5 galões (20 litros) ou garrafas de água PET de 1,5 a 2 l, através da utilização do
adaptador fornecido.
Ilustração da Estrutura e Designação das Peças:
Componente N.º 4001 Dispensador de Água Aquarius
1Adaptador de garrafas PET 9Interruptor de refrigeração
2Reservatório de água principal (opaco) 10 Tomada eléctrica
3Reservatório de água secundário
(transparente) 11 Interruptor de aquecimento
4Patilha da torneira de pressão de
água à temperatura ambiente 12 Botão/indicador de água quente
5Torneira 3 em 1 13 Botão/indicador de reaquecimento
6Tabuleiro/aparador de água 14 Botão/indicador de água fria
7Pega embutida (em ambos os lados) 15 Indicador de potência
8Respiradouro
Chave para aperto/desaperto de porcas
Chapa de pressão
8. Seguir as
instruções
apresentadas
na ilustração (2)
em caso de uti-
lização de água
da torneira.
Figura (2)
Figura (1)
5 galões
Modelo 006TD Classificação de segurança
eléctrica I
Voltagem 220 - 240V Capacidade de refrigeração ≤15° C 1L/h
Potência nominal 475W Capacidade de aquecimento ≥90° C 1L/h
Potência de aquecimento 400W Temperatura ambiente
para funcionamento 10 - 32° C
Potência de refrigeração 75W
Importante
Aquando da primeira utilização da unidade, ou após proceder à limpeza periódica da
mesma, certifique-se de que o reservatório de água quente está atestado antes de ligar o
interruptor de aquecimento (no verso da unidade). Pode verificar se o reservatório de água
quente contém ou não água, premindo o botão “Água Quente” no painel de controlo. Assim
que a unidade estiver ligada à corrente, a luz de potência no painel de controlo acende e,
ao mesmo tempo, será possível libertar água através dos botões “Água Quente” e “Água
Fria”, quando premidos. Nesta altura a água estará apenas à temperatura ambiente.
Quando a água começar a sair da torneira, poderá começar a utilizar as funções de aquec-
imento e refrigeração através dos interruptores que se encontram no verso da unidade.
Este dispensador de água está equipado com um termostato regulável manualmente,
como dispositivo de segurança, para prevenir eventuais perigos causados pelo aquecimen-
to indevido do reservatório de água quente, quando o mesmo se encontra vazio. O ter-
mostato corta a potência quando a temperatura dentro do reservatório de água quente
vazio atinge o grau de alarme pré-definido. Deverá premir o botão de reinicialização que se
encontra na parte inferior da unidade para restabelecer a função de aquecimento. O botão
de reiniciali zação está coberto por uma etiqueta, devendo o mesmo ser removido para se
proceder à medida referida.
Notas importantes:
1. A diferença de graus entre a temperatura da água quente e da água fria poderá ser
muito pequena.
2. A função de reaquecimento não aquecerá a água até à temperatura de 100º C.
Especificações para Interruptores e Botões:
1. Ligar o interruptor de função de aquecimento; o indicador vermelho acenderá para
indicar que o aquecimento se encontra em curso. Caso a luz do indicador mude para
amarelo, significa que a temperatura de aquecimento se mantém (Figura H).
2. Ligar o interruptor de função de refrigeração; o indicador verde acenderá para indicar
que a refrigeração se encontra em curso. Caso a luz do indicador mude para amarelo,
significa que a temperatura de refrigeração se mantém (Figura I).
3. Quando a unidade está em modo de aquecimento ou manutenção da temperatura de
aquecimento, a luz vermelha dos indicadores de “Reaquecimento” e de água quente
acende aquando da utilização da função de “Reaquecimento”. Quando a água é aqueci-
da até aprox. 97º C, o sinal acústico é emitido 3 vezes e o aquecimento deixará de man-
ter a água quente. A luz dos indicadores de “Reaquecimento” e de água quente mudará
para amarelo. Quando o “Reaquecimento” se encontrar em curso, deverá premir-se
novamente o interruptor de “Reaquecimento” para voltar ao modo de manutenção da
temperatura da água quente (Figura J).
4. Quando a corrente eléctrica e o indicador de potência estiverem ligados, poderá premir-
se o botão de água quente ou fria para obter água, independentemente do facto do
interruptor de função de aquecimento e de função de refrigeração estar ligado ou desli-
gado. Quando o(s) botão(ões) de água for(em) premido(s) uma vez, a válvula de água
será aberta para expelir água durante 20 segundos antes de se desligar automatica-
mente. Durante a saída de água (quente ou fria) este processo poderá ser terminado,
premindo novamente o botão de água.
5. O sinal acústico será emitido uma vez ao premir os respectivos botões. Caso contrário,
será emitido durante 10 minutos, caso verifiquem falhas na(s) função(ões).
Instruções de Utilização:
1. Colocar o dispensador de água sobre uma superfície plana, a uma distância de aprox. 15
cm da parede, para permitir uma boa ventilação (Figura A).
2. Desinfectar a unidade aquando da primeira utilização ou após um longo período de
armazenagem. É fornecida uma pastilha de desinfecção juntamente com a nova unidade.
Dissolver a pastilha de desinfecção em aprox. 5 galões (20 litros) de água e encher a
unidade através do reservatório principal. Deixar a mistura de água/pastilha de desin-
fecção na unidade durante aprox. 20 minutos antes de se proceder à sua drenagem.
Adicionar água destilada ao mesmo tempo que se drena a mistura, até que a unidade não
emane qualquer odor (Figura B - G).
3. Colocar primeiro os interruptores de função de aquecimento e de refrigeração (que se
encontram no verso da unidade) na posição “OFF” e em seguida inserir o cabo de alimen-
tação na tomada eléctrica. Premir o botão de água quente no painel de controlo até que a
água comece a fluir da torneira. Seguidamente poderá ligar-se a função de aquecimento e
de refrigeração.
4. Desligar a unidade da corrente eléctrica, caso não seja utilizada durante um longo período
de tempo. Desligar o cabo de alimentação da unidade e drenar a água em excesso (con-
sultar a secção “Desmontagem e Limpeza”) antes de armazenar a mesma. Ao preparar a
unidade para ser novamente utilizada, assegurar-se de que todas as peças são montadas
de forma correcta e com uma boa condição de vedação.
5. Consultar a secção “Resolução de Problemas” para os problemas usuais. Não desmontar
o sistema eléctrico do dispensador de água por iniciativa própria. Contactar o Serviço de
Assistência Técnica para proceder à reparação, em caso de necessidade.
6. Não ligar ou desligar o aparelho, inserindo ou retirando a ficha eléctrica.
7. Desligar a função de refrigeração durante 4 horas, caso se verifique a existência de gelo a
bloquear a saída de água.
Especificações Técnicas:
AquariusPlus_Anleitung 08.09.2004 15:41 Uhr Seite 12
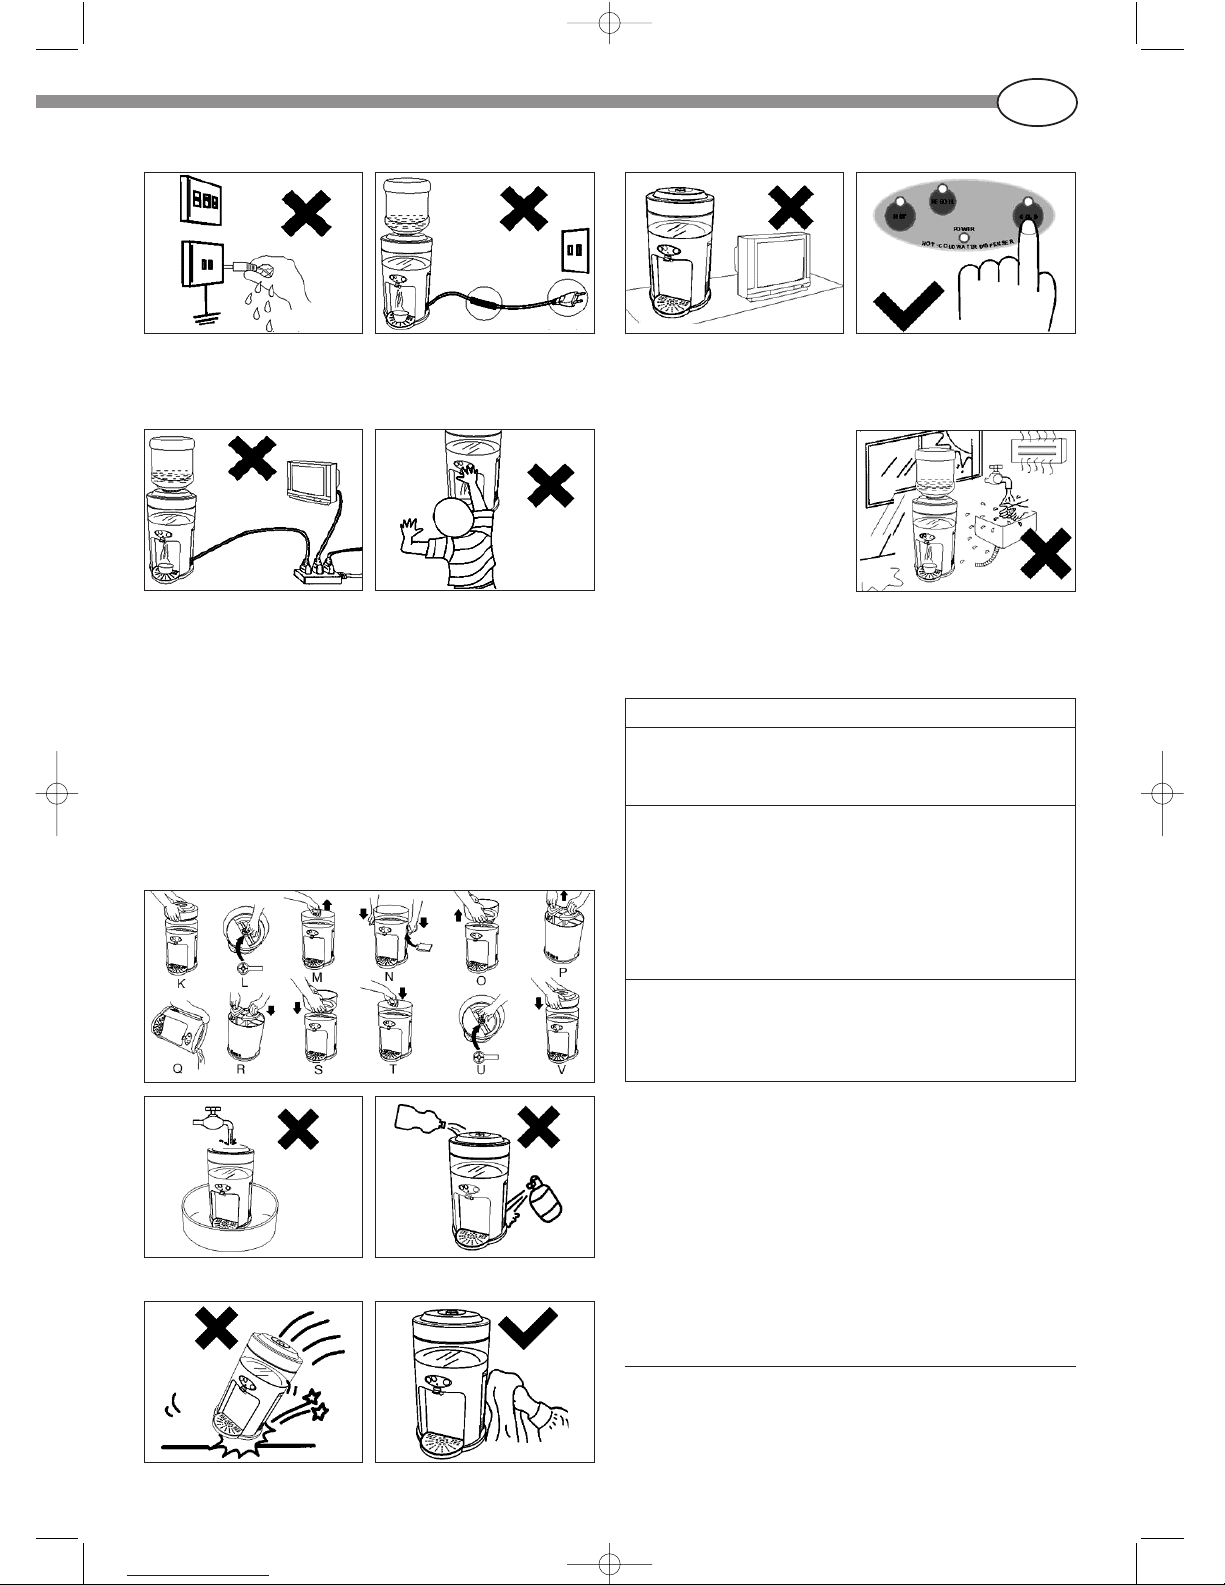
13
Garantia (válida apenas na Alemanha)
O período de garantia para este aparelho é de 24 meses. Em caso de defeitos de material
ou de fabrico comprovados, ficará ao nosso critério a reparação ou substituição do respec-
tivo aparelho. Caso seja constatado qualquer defeito, o aparelho deverá ser enviado para a
morada indicada, acompanhado do motivo da reclamação e da franquia de reenvio correc-
ta. A empresa não se responsabiliza por aparelhos não seguros ou danificados durante o
transporte. O direito de conversão ou redução é válido apenas quando não nos for possível
reparar o defeito em causa. A garantia não cobre quaisquer danos indirectos. A garantia
extingue-se em caso de manuseamento abusivo ou impróprio, utilização de violência e
danos provocados pelo desgaste normal. O mesmo aplica-se relativamente a intervenções
por terceiros e alteração das condições originais. A factura de compra é válida como
cartão de garantia e certificado. Quaisquer dados incorrectos sobre a data de aquisição,
bem como alterações arbitrárias dos dados constantes na mesma desobrigam-nos de
qualquer obrigação de garantia. O local de execução e foro competente é Offenbach am
Main.
Data da Venda Carimbo do Vendedor
Esperamos que fique satisfeito com a aquisição do Dispensador de Água Aquarius.
Para mais informações, contacte:
BETEC · Bernd Eitel Technologies · Herzogstrasse 55, 63263 Neu-Isenburg, Alemanha
Tel.: 49 (0) 6102-31067 · Fax: 49 (0) 6102-320859 · www.BETEC-Ideen.de
E-mail: [email protected]
P
Problemas
A torneira
não deita
água
Causas Possíveis
1. Reservatório(s) de água
vazio(s)
2. Reservatório de aqueci-
mento ou de refrigeração
bloqueado pelo ar
1. Atestar de água.
2. Premir o(s) botão(ões) de água para
que a torneira se mantenha aberta e
abanar levemente a unidade até que
a água comece a fluir.
Solução
A água não
está suficien-
temente
quente ou fria
1. Grande quantidade de
água retirada num curto
espaço de tempo
2. Alimentação de corrente
desligada
3. Tempo de refrigeração
insuficiente
1. Aguardar mais tempo para permitir
um aquecimento e refrigeração ade-
quados.
2. Certificar-se de que o interruptor de
função de aquecimento se encontra
na posição “ON”, que o cabo de ali-
mentação está devidamente ligado e
que a fonte de alimentação principal
CA fornece corrente.
3. O tempo de refrigeração aquando da
primeira utilização deverá ser 2 horas
antes de se poder beber.
Fuga de água 1. Garrafa(ão) rachada(o)
2. O reservatório transpar-
ente e as suas juntas não
foram montados e fixados
de forma correcta após a
última vez que foram
desmontados
1. Substituir a(o) garrafa(ão)
2. Desmontar e montar novamente.
Substituir as juntas gastas, se
necessário.
Resolução de Problemas:
Consulte a tabela que se segue antes de mandar reparar a unidade.
Atenção:
Para evitar a ocorrência de um choque
eléctrico, não introduzir a ficha eléctrica com
as mãos molhadas.
Nunca substituir a ficha do cabo de alimen-
tação ou aumentar o seu comprimento, de
modo a evitar o sobreaquecimento ou um
incêndio. Adquirir/substituir o cabo de alimen-
tação danificado através do agente autorizado
ou do Serviço de Assistência Técnica.
Para evitar uma sobrecarga, ligar a uma toma-
da independente. Não permitir que as crianças utilizem o
dispensador de água sem a presença de um
adulto ou brinquem com o mesmo, de forma a
evitar ferimentos ou queimaduras.
Colocar o dispensador de água em lugar seco,
fresco e ventilado. Não colocar a unidade perto
de mobílias de valor ou outros aparelhos
domésticos, de forma a evitar eventuais danos
devido a água entornada ao colocar o garrafão
na unidade.
É recomendável aguardar 3 minutos antes de
reiniciar a função de refrigeração, após ter sido
desligada, para prolongar o tempo de vida útil
das componentes de refrigeração.
Não colocar o dispensador de água numa
divisão húmida ou perto do fogão. Manter o
aparelho em local não exposto a raios solares
e chuva.
Nunca deitar água directamente na unidade. Não limpar a unidade com detergentes,
líquidos orgânicos ou insecticidas, entre
outros.
Não deixar a unidade cair ou embater contra
um obstáculo. Limpar a unidade com um pano levemente
húmido e deixar secar naturalmente.
Medidas de Manutenção:
1. Desligar o cabo de alimentação e aguardar aprox. 2 horas, para que a água quente
arrefeça e, deste modo, se evite a ocorrência de eventuais choques eléctricos ou
queimaduras.
2. Desmontagem e Limpeza:
Em primeiro lugar, remover o garrafão e a cobertura opaca. Em segundo lugar, desaper-
tar a porca na base interior do reservatório transparente com a chave fornecida e deslo-
car para cima o reservatório transparente, inserindo as 2 chapas de pressão fornecidas.
Seguidamente, retirar os blocos de isolamento dos reservatórios de água fria e de água
quente; e vazar a água em excesso com cuidado. Em terceiro lugar, após limpar os
reservatórios de água quente e de água fria com água limpa, a unidade deverá ser
novamente montada, seguindo os passos referidos de modo inverso – colocar os blocos
de isolamento nos reservatórios de água quente e fria – pressionar o reservatório trans-
parente e fixá-lo novamente no corpo principal da unidade (este procedimento requer a
aplicação de alguma força) – certificar-se de que as 2 juntas de vedação em silicone,
na parte inferior, não se perderam – apertar novamente a porca no mesmo sítio com a
chave – certificar-se de que a porca está bem apertada, caso contrário, poderão veri-
ficar-se fugas de água. (Figuras K - V).
AquariusPlus_Anleitung 08.09.2004 15:41 Uhr Seite 13
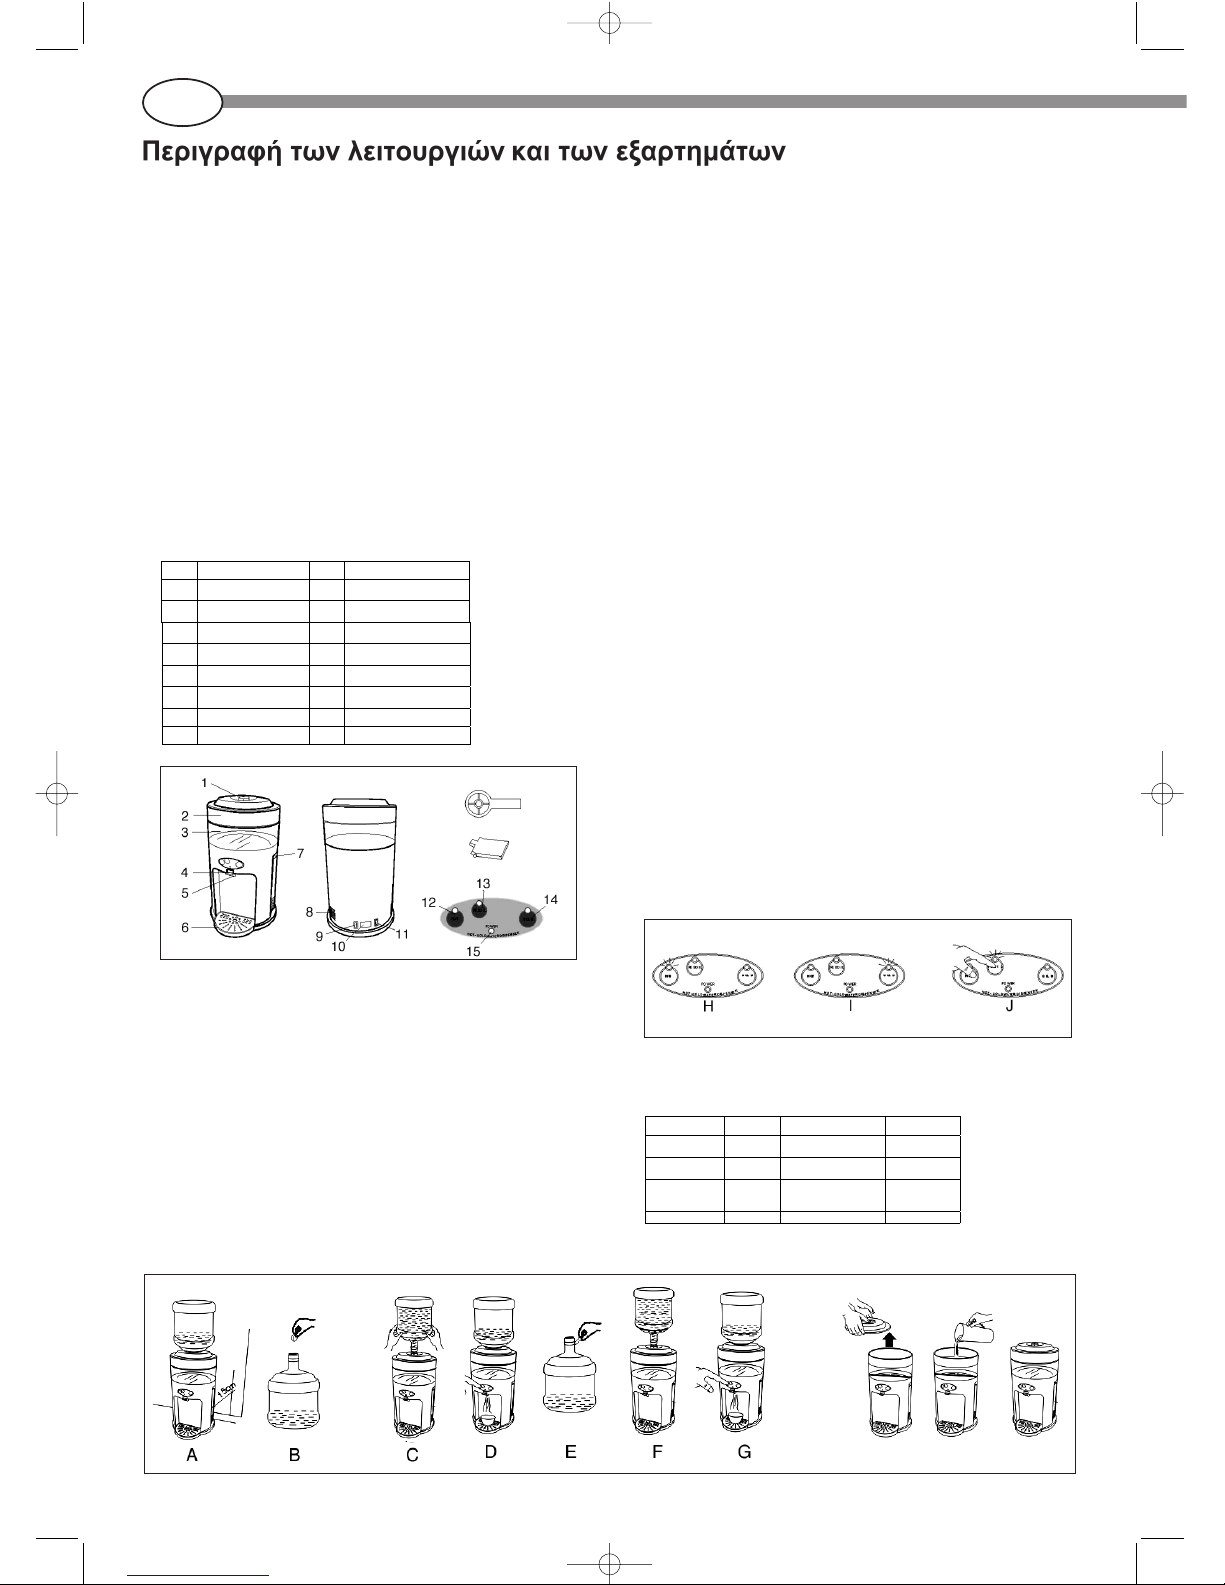
14
GR
ȈĮȢ İȣȤĮȡȚıIJȠȪµİʌȠȣ ĮʌȠțIJȒıĮIJİ IJȠȞ șİȡµȠȥȪțIJȘ ȞİȡȠȪ IJȘȢ İIJĮȚȡİȓĮȢ µĮȢ. īȚĮ ȞĮ İʌȚIJİȣȤșİȓ Ș
ȕȑȜIJȚıIJȘ ĮʌȩįȠıȘ IJȠȣ ʌȡȠȧȩȞIJȠȢ ıȣȞȚıIJȠȪµİȞĮ įȚĮȕȐıİIJİ ʌȡȠıİțIJȚțȐ ĮȣIJȩ IJȠ İȖȤİȚȡȓįȚȠ ʌȡȚȞ
ȤȡȘıȚµȠʌȠȚȒıİIJİ IJȠ ʌȡȠȧȩȞ țĮȚ ȞĮ įȚĮijȣȜȐȟİIJİ ıİ țĮȜȒ țĮIJȐıIJĮıȘ IJȠ İȖȤİȚȡȓįȚȠ.
ǹ. ȆĮȡȠȣıȓĮıȘ ȤĮȡĮțIJȘȡȚıIJȚțȫȞ:
ǹȣIJȩ IJȠ ʌȡȠȧȩȞ įȚĮșȑIJİȚ İȟİȜȚȖµȑȞȠ ȜİȚIJȠȣȡȖȚțȩ țĮȚ ĮȚıșȘIJȚțȩ ıȤİįȚĮıµȩțĮȚ
ʌİȡȚȜĮµȕȐȞİȚ IJĮ ʌĮȡĮțȐIJȦ ȤĮȡĮțIJȘȡȚıIJȚțȐ:
1. ȂȠȞĮįȚțȒ įİȟĮµİȞȒ ȗİıIJȠȪ ȞİȡȠȪ µİșİȡµȚțȩ ıȦȜȒȞĮ Įʌȩ ĮȞȠȟİȓįȦIJȠ ĮIJıȐȜȚ țĮȚ
įȣȞĮIJȩIJȘIJĮ șȑȡµĮȞıȘȢ ȞİȡȠȪ ȑȦȢ IJȠȣȢ 92ºC. Ȃİ IJȘ ȜİȚIJȠȣȡȖȓĮ İʌĮȞȐȜȘȥȘȢ ȕȡĮıµȠȪ ʌȠȣ
įȚĮșȑIJİȚ µʌȠȡİȓ ȞĮ șİȡµĮȞșİȓ Ȟİȡȩ µȑȤȡȚ IJȠȣȢ 95ºC, ȚțĮȞȠʌȠȚȫȞIJĮȢ µİĮȣIJȩȞ IJȠȞ IJȡȩʌȠ
įȚȐijȠȡİȢ ĮȞȐȖțİȢ, ȠȚ ȠʌȠȓİȢ ʌİȡȚȜĮµȕȐȞȠȣȞ IJȘȞ ʌĮȡĮıțİȣȒ IJıĮȖȚȠȪ, țĮijȑ, ȑIJȠȚµȦȞ
ȗȣµĮȡȚțȫȞ ț.Ȝ.ʌ. ǼȓȞĮȚ İȟĮȚȡİIJȚțȐ ȕȠȜȚțȩ ȖȚĮ ȤȡȒıȘ ıIJȠ ıʌȓIJȚ, ıIJȠ ȖȡĮijİȓȠ, ıİ ȟİȞȠįȠȤİȓĮ
ț.Ȝ.ʌ.
2. ǺȡȪıȘ 3 ıİ 1: ȑȞĮ ıIJȩµȚȠ ȖȚĮ ȗİıIJȩ Ȟİȡȩ, țȡȪȠ Ȟİȡȩ țĮȚ Ȟİȡȩ ıİ șİȡµȠțȡĮıȓĮ įȦµĮIJȓȠȣ. Ǿ
ʌĮȡȠȤȒ ȗİıIJȠȪ țĮȚ țȡȪȠȣ ȞİȡȠȪ ȖȓȞİIJĮȚ ʌĮIJȫȞIJĮȢ ĮʌȜȫȢ IJȠ țĮIJȐȜȜȘȜȠ țȠȣµʌȓ ıIJȠȞ ʌȓȞĮțĮ
İȜȑȖȤȠȣ, İȞȫ ȖȚĮ IJȘȞ ʌĮȡȠȤȒ ȞİȡȠȪ ıİ șİȡµȠțȡĮıȓĮ įȦµĮIJȓȠȣ ȤȡȘıȚµȠʌȠȚİȓIJĮȚ
ʌĮȡĮįȠıȚĮțȒ įȠµȒµİʌȜȒțIJȡȠ.
3. ȅȚ 2 µİȖȐȜİȢ țȣțȜȚțȑȢ įİȟĮµİȞȑȢ µʌȠȡȠȪȞ ȞĮ ĮʌȠıȣȞĮȡµȠȜȠȖȘșȠȪȞ ȖȚĮ ȜȩȖȠȣȢ
țĮșĮȡȚıµȠȪ.
4. ȈȤİįȓĮıȘ µİijȓȜIJȡȠ ĮȞIJȚțĮIJȐıIJĮıȘȢ ȫıIJİ ȞĮ ĮȣȟȐȞİIJĮȚ ȘțĮșĮȡȩIJȘIJĮ IJȠȣ ȞİȡȠȪ.
5. ǾȜİȚIJȠȣȡȖȓĮ ȥȪȟȘȢ įȚĮșȑIJİȚ İȟİȜȚȖµȑȞȠ șİȡµȠ-ȘȜİțIJȡȚțȩ ıȪıIJȘµĮ(Peltier), IJȠ ȠʌȠȓȠ įİȞ
ʌĮȡȐȖİȚ ȣȥȘȜȐ İʌȓʌİįĮ șȠȡȪȕȠȣ, ȩʌȦȢ IJĮ ʌĮȡĮįȠıȚĮțȐ ıȣıIJȒµĮIJĮ µİıȣµʌȚİıIJȒ.
6. ǼʌȐȞȦ țȐȜȣµµĮʌȠȜȜĮʌȜȫȞ ȤȡȒıİȦȞ ʌȠȣ İʌȚIJȡȑʌİȚ IJȘ ıȣȖțȡȐIJȘıȘ ijȚĮȜȫȞ ȞİȡȠȪ µİȖȑșȠȣȢ
9 – 23 ȜȓIJȡȦȞ Ȓ1,5 – 2 ȜȓIJȡȦȞ ݵijȚĮȜȦµȑȞȠȣ ȞİȡȠȪ ıİ ijȚȐȜȘ PET, ȤȡȘıȚµȠʌȠȚȫȞIJĮȢ IJȠȞ
ʌȡȠıĮȡµȠȖȑĮ ʌȠȣ ʌĮȡȑȤİIJĮȚ µĮȗȓ µİIJȠȞ șİȡµȠȥȪțIJȘ.
ȆȜȐțĮ ʌȓİıȘȢ
(2)
ī. ȅįȘȖȓİȢ ȜİȚIJȠȣȡȖȓĮȢ:
1. ȉȠʌȠșİIJȒıIJİ IJȠȞ șİȡµȠȥȪțIJȘ ıİ µȚĮ İʌȓʌİįȘ İʌȚijȐȞİȚĮ µİĮʌȩıIJĮıȘ ʌİȡȓʌȠȣ 15
İțĮIJȠıIJȫȞ Įʌȩ IJȠȞ IJȠȓȤȠ, ȫıIJİ ȞĮ İʌȚIJȡȑʌİIJĮȚ ȠțĮȜȩȢ İȟĮİȡȚıµȩȢ (İȚțȩȞĮ A).
2. ǹʌȠȜȣµȐȞİIJİ IJȘ µȠȞȐįĮ țĮIJȐ IJȘȞ ʌȡȫIJȘ ȤȡȒıȘ IJȘȢ ȒµİIJȐ Įʌȩ µĮțȡȐ ʌİȡȓȠįȠ
ĮʌȠșȒțİȣıȘȢ. Ȃİ IJȘȞ țĮȚȞȠȪȡȚĮ µȠȞȐįĮ ʌĮȡȑȤİIJĮȚ țĮȚ µȚĮ IJĮµʌȜȑIJĮ ĮʌȠȜȪµĮȞıȘȢ.
ǻȚĮȜȪıIJİ IJȘȞ IJĮµʌȜȑIJĮ ĮʌȠȜȪµĮȞıȘȢ ıİ ʌİȡȓʌȠȣ 23 ȜȓIJȡĮ ȞİȡȠȪ țĮȚ ʌȜȘȡȫıIJİ ĮȣIJȩ IJȠ
įȚȐȜȣµĮıIJȘ µȠȞȐįĮ Įʌȩ IJȘȞ țȪȡȚĮ įİȟĮµİȞȒ. ǹijȒıIJİ IJȠ µİȓȖµĮȞİȡȠȪ µȑıĮ ıIJȘ µȠȞȐįĮ
ȖȚĮ ʌİȡȓʌȠȣ 20 ȜİʌIJȐ ʌȡȚȞ IJȘȞ ĮʌȠıIJȡĮȖȖȓıİIJİ. ȀĮIJȐ IJȘȞ ĮʌȠıIJȡȐȖȖȚıȘ IJȠȣ µİȓȖµĮIJȠȢ
ȞİȡȠȪ ʌȜȘȡȫıIJİ ĮʌȠıIJĮȖµȑȞȠ Ȟİȡȩ µȑȤȡȚ ȞĮ ĮʌȠµĮțȡȣȞșȠȪȞ ȠȚ ȠıµȑȢ (İȚțȩȞİȢ B~G).
3. ĬȑıIJİ ʌȡȫIJĮ IJȠȞ įȚĮțȩʌIJȘ ȜİȚIJȠȣȡȖȓĮȢ ȥȪȟȘȢ țĮȚ IJȠȞ įȚĮțȩʌIJȘ ȜİȚIJȠȣȡȖȓĮȢ șȑȡµĮȞıȘȢ ıIJȘ
șȑıȘ «OFF» (ıIJȠ ʌȓıȦ µȑȡȠȢ IJȘȢ µȠȞȐįĮȢ) țĮȚ µİIJȐ IJȠʌȠșİIJȒıIJİ ıIJȘȞ ʌȡȓȗĮ IJȠ țĮȜȫįȚȠ
ȡİȪµĮIJȠȢ. ȆȚȑıIJİ IJȠ țȠȣµʌȓ ȗİıIJȠȪ ȞİȡȠȪ ıIJȠȞ ʌȓȞĮțĮ İȜȑȖȤȠȣ µȑȤȡȚ ȞĮ İțȡİȪıİȚ Ȟİȡȩ Įʌȩ
IJȘ ȕȡȪıȘ țĮȚ µİIJȐ µʌȠȡİȓIJİ ȞĮ İȞİȡȖȠʌȠȚȒıİIJİ IJȘ ȜİȚIJȠȣȡȖȓĮ șȑȡµĮȞıȘȢ țĮȚ ȥȪȟȘȢ.
4. ǹʌİȞİȡȖȠʌȠȚȒıIJİ IJȘȞ IJȡȠijȠįȠıȓĮ İȐȞ ȘµȠȞȐįĮ įİȞ ȤȡȘıȚµȠʌȠȚȘșİȓ ȖȚĮ µİȖȐȜȠ ȤȡȠȞȚțȩ
įȚȐıIJȘµĮ. ǹʌȠıȣȞįȑıIJİ IJȠ țĮȜȫįȚȠ ȡİȪµĮIJȠȢ Įʌȩ IJȘ µȠȞȐįĮ țĮȚ ĮʌȠıIJȡĮȖȖȓıIJİ IJȘȞ
ȣʌȠȜİȚʌȩµİȞȘ ʌȠıȩIJȘIJĮ ȞİȡȠȪ ʌȡȚȞ Įʌȩ IJȘȞ ĮʌȠșȒțİȣıȘ (ĮȞĮIJȡȑȟIJİ ıIJȘȞ İȞȩIJȘIJĮ
«ǹʌȠıȣȞĮȡµȠȜȩȖȘıȘ țĮȚ țĮșĮȡȚıµȩȢ»). ȀĮIJȐ IJȘȞ İʌĮȞĮȜİȚIJȠȣȡȖȓĮ IJȘȢ µȠȞȐįĮȢ
ȕİȕĮȚȦșİȓIJİ ȩIJȚ ȩȜĮ IJĮ İȟĮȡIJȒµĮIJĮ ȑȤȠȣȞ ıȣȞĮȡµȠȜȠȖȘșİȓ µİțĮȜȒ ıIJİȖĮȞȠʌȠȓȘıȘ.
5. ǹȞĮIJȡȑȟIJİ ıIJȘȞ İȞȩIJȘIJĮ «ǹȞIJȚµİIJȫʌȚıȘ ʌȡȠȕȜȘµȐIJȦȞ» ȖȚĮ țȠȚȞȐ ʌȡȠȕȜȒµĮIJĮ. ȂȘȞ
ĮʌȠıȣȞĮȡµȠȜȠȖİȓIJİ µȩȞȠȚ ıĮȢ IJȠȞ șİȡµȠȥȪțIJȘ ȖȚĮ IJȠ ȘȜİțIJȡȚțȩ IJµȒµĮIJȠȣ. Ȉİ ʌİȡȓʌIJȦıȘ
ĮȞȐȖțȘȢ İʌȚțȠȚȞȦȞȒıIJİ µİIJȠ İȟȠȣıȚȠįȠIJȘµȑȞȠ IJµȒµĮıȑȡȕȚȢ ȖȚĮ İʌȚıțİȣȑȢ.
ȂȠȤȜȩȢ ȕȚįȫµĮIJȠȢ/ȟİȕȚįȫµĮIJȠȢ
ǹȡ.ȅȞȠµĮıȓĮ İȟĮȡIJȒµĮIJȠȢ ǹȡ.ȅȞȠµĮıȓĮ İȟĮȡIJȒµĮIJȠȢ
1 ȆȡȠıĮȡµȠȖȑĮȢ ijȚȐȜȘȢ
PET 9 ǻȚĮțȩʌIJȘȢ ȜİȚIJȠȣȡȖȓĮȢ ȥȪȟȘȢ
2 ȀȪȡȚĮ įİȟĮµİȞȒ ȞİȡȠȪ
(ĮįȚĮijĮȞȒȢ)10 ȆȡȓȗĮ ȡİȪµĮIJȠȢ
3 ǻİȣIJİȡİȪȠȣıĮ įİȟĮµİȞȒ
ȞİȡȠȪ (įȚĮijĮȞȒȢ)11 ǻȚĮțȩʌIJȘȢ ȜİȚIJȠȣȡȖȓĮȢ
șȑȡµĮȞıȘȢ
4 ȆȜȒțIJȡȠ ʌȓİıȘȢ ȖȚĮ Ȟİȡȩ
ıİ șİȡµȠțȡĮıȓĮ įȦµĮIJȓȠȣ 12 ȀȠȣµʌȓ țĮȚ ȜȣȤȞȓĮ ȗİıIJȠȪ
ȞİȡȠȪ
5 ǺȡȪıȘ 3 ıİ 1 13 ȀȠȣµʌȓ țĮȚ ȜȣȤȞȓĮ
İʌĮȞȐȜȘȥȘȢ ȕȡĮıµȠȪ
6 ǻȓıțȠȢ ȞİȡȠȪ 14 ȀȠȣµʌȓ țĮȚ ȜȣȤȞȓĮ țȡȪȠȣ
ȞİȡȠȪ
7 ȁĮȕȒ (ıİ 2 ʌȜİȣȡȑȢ)15 ȁȣȤȞȓĮ IJȡȠijȠįȠıȓĮȢ ȡİȪµĮIJȠȢ
8 DZȞȠȚȖµĮİȟĮİȡȚıµȠȪ
Ǽ.ȉİȤȞȚ țȐ ıIJȠȚȤİȓĮ:
ȂȠȞIJȑȜȠ 006TD ȀĮIJȘȖȠȡȓĮ ȘȜİțIJȡȚțȒȢ
ĮıijȐȜİȚĮȢ
I
ȉȐı Ș
IJȡȠijȠįȠıȓĮȢ
220 – 240V ȋȦȡȘIJȚțȩIJȘIJĮ ȥȪȟȘȢ 15ºC 1L/h
ȅȞȠµĮıIJȚțȒ
ȚıȤȪȢ
475W ȋȦȡȘIJȚțȩIJȘIJĮ
șȑȡµĮȞıȘȢ
90ºC 1L/h
ĬİȡµĮȞIJȚțȒ
ȚıȤȪȢ
400W ĬİȡµȠțȡĮıȓĮ
ʌİȡȚȕȐȜȜȠȞIJȠȢ ȖȚĮ
ȜİȚIJȠȣȡȖȓĮ
10~32ºC
ȌȣțIJȚțȒ ȚıȤȪȢ 75W
ȈȘµĮȞIJȚțȩ
ȀĮIJȐ IJȘȞ ʌȡȫIJȘ ȤȡȒıȘ IJȘȢ µȠȞȐįĮȢ ȒµİIJȐ Įʌȩ ʌİȡȚȠįȚțȩ țĮșĮȡȚıµȩ, ȕİȕĮȚȦșİȓIJİ ȩIJȚ Ș
įİȟĮµİȞȒ ȗİıIJȠȪ ȞİȡȠȪ ȑȤİȚ ʌȜȘȡȦșİȓ µİȞİȡȩ ʌȡȚȞ İȞİȡȖȠʌȠȚȒıİIJİ IJȠȞ įȚĮțȩʌIJȘ șȑȡµĮȞıȘȢ (ıIJȠ
ʌȓıȦ µȑȡȠȢ IJȘȢ µȠȞȐįĮȢ). ȂʌȠȡİȓIJİ ȞĮ İȞIJȠʌȓıİIJİ İȐȞ İȓȞĮȚ ʌȜȘȡȦµȑȞȘ ȒȩȤȚ ȘįİȟĮµİȞȒ ȗİıIJȠȪ
ȞİȡȠȪ ʌȚȑȗȠȞIJĮȢ IJȠ țȠȣµʌȓ «Hot» (ǽİıIJȩ) ıIJȠȞ ʌȓȞĮțĮ İȜȑȖȤȠȣ. ȂȩȜȚȢ ıȣȞįİșİȓ ıIJȠ ȡİȪµĮȘ
µȠȞȐįĮ ĮȞȐȕİȚ ȘȜȣȤȞȓĮ IJȡȠijȠįȠıȓĮȢ ȡİȪµĮIJȠȢ ıIJȠȞ ʌȓȞĮțĮ İȜȑȖȤȠȣ țĮȚ IJĮȣIJȩȤȡȠȞĮ
İȞİȡȖȠʌȠȚİȓIJĮȚ ȘȜİȚIJȠȣȡȖȓĮ IJȦȞ țȠȣµʌȚȫȞ «Hot» (ǽİıIJȩ) țĮȚ «Cold» (ȀȡȪȠ) ʌĮȡȑȤȠȞIJĮȢ Ȟİȡȩ
ȩIJĮȞ ʌĮIJȘșȠȪȞ. Ȉİ ĮȣIJȩ IJȠ ıIJȐįȚȠ, IJȠ Ȟİȡȩ șĮ İȓȞĮȚ µȩȞȠ ıİ șİȡµȠțȡĮıȓĮ įȦµĮIJȓȠȣ. ȂİIJȐ IJȘȞ
İțȡȠȒ ȞİȡȠȪ Įʌȩ IJȘ ȕȡȪıȘ µʌȠȡİȓIJİ ȞĮ ĮȡȤȓıİIJİ ȞĮ ȤȡȘıȚµȠʌȠȚİȓIJİ IJȚȢ ȜİȚIJȠȣȡȖȓİȢ șȑȡµĮȞıȘȢ țĮȚ
ȥȪȟȘȢ İȞİȡȖȠʌȠȚȫȞIJĮȢ IJȠȣȢ įȚĮțȩʌIJİȢ ıIJȠ ʌȓıȦ µȑȡȠȢ IJȘȢ µȠȞȐįĮȢ.
ǹȣIJȩȢ ȠșİȡµȠȥȪțIJȘȢ ȞİȡȠȪ įȚĮșȑIJİȚ ȤİȚȡȠțȓȞȘIJȠ șİȡµȠıIJȐIJȘ İʌĮȞĮijȠȡȐȢ ȦȢ įȚȐIJĮȟȘ
ĮıijĮȜİȓĮȢ ȖȚĮ IJȘȞ ĮʌȠIJȡȠʌȒ țȚȞįȪȞȦȞ ʌȠȣ İȞįȑȤİIJĮȚ ȞĮ ʌȡȠțȪȥȠȣȞ Įʌȩ IJȘȞ İıijĮȜµȑȞȘ
șȑȡµĮȞıȘ IJȘȢ įİȟĮµİȞȒȢ ȗİıIJȠȪ ȞİȡȠȪ İȞȫ ĮȣIJȒ İȓȞĮȚ ȐįİȚĮ. ȅșİȡµȠıIJȐIJȘȢ įȚĮțȩʌIJİȚ IJȘȞ
IJȡȠijȠįȠıȓĮ ȡİȪµĮIJȠȢ ȩIJĮȞ ȘșİȡµȠțȡĮıȓĮ ıIJȠ İıȦIJİȡȚțȩ IJȘȢ țİȞȒȢ įİȟĮµİȞȒȢ ȗİıIJȠȪ ȞİȡȠȪ
ȣʌİȡȕİȓ IJȘȞ ʌȡȠİʌȚȜİȖµȑȞȘ IJȚµȒıȣȞĮȖİȡµȠȪ. īȚĮ IJȘȞ İʌĮȞİȞİȡȖȠʌȠȓȘıȘ IJȘȢ ȜİȚIJȠȣȡȖȓĮȢ
șȑȡµĮȞıȘȢ ʌȡȑʌİȚ ȞĮ ʌȚȑıİIJİ IJȠ țȠȣµʌȓ İʌĮȞĮijȠȡȐȢ ıIJȠ țȐIJȦ µȑȡȠȢ IJȘȢ µȠȞȐįĮȢ. ȉȠ țȠȣµʌȓ
İʌĮȞĮijȠȡȐȢ țĮȜȪʌIJİIJĮȚ Įʌȩ İIJȚțȑIJĮ țĮȚ µʌȠȡİȓIJİ ȞĮ IJȘȞ ĮʌȠµĮțȡȪȞİIJİ ȖȚĮ ȞĮ İțIJİȜȑıİIJİ ĮȣIJȒȞ
IJȘȞ İȞȑȡȖİȚĮ.
ȆĮȡĮIJȘȡȒıİȚȢ:
1. ǼȞįȑȤİIJĮȚ ȞĮ ȣʌȐȡȤİȚ įȚĮijȠȡȐ µİȡȚțȫȞ ȕĮșµȫȞ ıIJȘ șİȡµȠțȡĮıȓĮ ȖȚĮ IJȠ ȗİıIJȩ țĮȚ IJȠ țȡȪȠ Ȟİȡȩ.
2. ǾȜİȚIJȠȣȡȖȓĮ İʌĮȞȐȜȘȥȘȢ ȕȡĮıµȠȪ įİȞ șİȡµĮȓȞİȚ IJȠ Ȟİȡȩ ʌȐȞȦ Įʌȩ IJȠȣȢ 100º.
ǻ. ȆȡȠįȚĮȖȡĮijȑȢ ȖȚĮ įȚĮțȩʌIJİȢ țĮȚ țȠȣµʌȚȐ:
1. ǼȞİȡȖȠʌȠȚȫȞIJĮȢ IJȠȞ įȚĮțȩʌIJȘ ȜİȚIJȠȣȡȖȓĮȢ șȑȡµĮȞıȘȢ ʌȡȑʌİȚ ȞĮ ĮȞȐȥİȚ ȘțȩțțȚȞȘ ȜȣȤȞȓĮ
ȣʌȠįİȚțȞȪȠȞIJĮȢ ȩIJȚ İȓȞĮȚ ıİ İȟȑȜȚȟȘ ȘșȑȡµĮȞıȘ ǿ. ǼȐȞ ȘȜȣȤȞȓĮ ĮȞȐȥİȚ µİțȓIJȡȚȞȠ ȤȡȫµĮ,
ĮȣIJȩ ȣʌȠįİȚțȞȪİȚ IJȘȞ țĮIJȐıIJĮıȘ įȚĮIJȒȡȘıȘȢ șİȡµȩIJȘIJĮȢ (İȚțȩȞĮ H).
2. ǼȞİȡȖȠʌȠȚȫȞIJĮȢ IJȠȞ įȚĮțȩʌIJȘ ȜİȚIJȠȣȡȖȓĮȢ ȥȪȟȘȢ ʌȡȑʌİȚ ȞĮ ĮȞȐȥİȚ ȘʌȡȐıȚȞȘ ȜȣȤȞȓĮ
ȣʌȠįİȚțȞȪȠȞIJĮȢ ȩIJȚ İȓȞĮȚ ıİ İȟȑȜȚȟȘ ȘȜİȚIJȠȣȡȖȓĮ ȥȪȟȘȢ. ǼȐȞ ȘȜȣȤȞȓĮ ĮȞȐȥİȚ µİțȓIJȡȚȞȠ
ȤȡȫµĮ, ĮȣIJȩ ȣʌȠįİȚțȞȪİȚ IJȘȞ țĮIJȐıIJĮıȘ įȚĮIJȒȡȘıȘȢ ȥȪȟȘȢ (İȚțȩȞĮ I).
3. ǵIJĮȞ ȘµȠȞȐįĮ İȓȞĮȚ ıİ ȜİȚIJȠȣȡȖȓĮ șȑȡµĮȞıȘȢ ȒįȚĮIJȒȡȘıȘȢ șİȡµȩIJȘIJĮȢ, ȘȜȣȤȞȓĮ
«ǼʌĮȞȐȜȘȥȘ ȕȡĮıµȠȪ» țĮȚ ȘȜȣȤȞȓĮ ȗİıIJȠȪ ȞİȡȠȪ ĮȞȐȕȠȣȞ µİțȩțțȚȞȠ ȤȡȫµĮțĮIJȐ IJȘ
ȤȡȒıȘ IJȘȢ ȜİȚIJȠȣȡȖȓĮȢ «ǼʌĮȞȐȜȘȥȘ ȕȡĮıµȠȪ». ǹijȠȪ șİȡµĮȞșİȓ IJȠ Ȟİȡȩ µȑȤȡȚ IJȠȣȢ ʌİȡȓʌȠȣ
97ºC șĮ ȘȤȒıİȚ 3 ijȠȡȑȢ ȠȕȠµȕȘIJȒȢ țĮȚ șĮ ʌĮȪıİȚ ȘįȚĮIJȒȡȘıȘ șİȡµȩIJȘIJĮȢ. ǾȜȣȤȞȓĮ
«ǼʌĮȞȐȜȘȥȘ ȕȡĮıµȠȪ» țĮȚ ȘȜȣȤȞȓĮ ȗİıIJȠȪ ȞİȡȠȪ ĮȞȐȕȠȣȞ µİțȓIJȡȚȞȠ ȤȡȫµĮ. ǵIJĮȞ İȓȞĮȚ ıİ
İȟȑȜȚȟȘ ȘȜİȚIJȠȣȡȖȓĮ «ǼʌĮȞȐȜȘȥȘ ȕȡĮıµȠȪ» µʌȠȡİȓIJİ ȞĮ ʌȚȑıİIJİ ȐȜȜȘ µȓĮ ijȠȡȐ IJȠȞ
įȚĮțȩʌIJȘ «ǼʌĮȞȐȜȘȥȘ ȕȡĮıµȠȪ» ȖȚĮ ȞĮ İʌȚıIJȡȑȥİIJİ ıİ ȜİȚIJȠȣȡȖȓĮ įȚĮIJȒȡȘıȘȢ șİȡµȩIJȘIJĮȢ
(İȚțȩȞĮ J).
4. ȂİIJȐ IJȘ ıȪȞįİıȘ IJȘȢ ȘȜİțIJȡȚțȒȢ IJȡȠijȠįȠıȓĮȢ țĮȚ IJȘȞ İȞİȡȖȠʌȠȓȘıȘ IJȘȢ ȜȣȤȞȓĮȢ ȡİȪµĮIJȠȢ
µʌȠȡİȓIJİ ȞĮ ʌȚȑıİIJİ IJȠ țȠȣµʌȓ ȗİıIJȠȪ ȞİȡȠȪ ȒIJȠ țȠȣµʌȓ țȡȪȠȣ ȞİȡȠȪ ȖȚĮ IJȘȞ ʌĮȡȠȤȒ ȞİȡȠȪ,
ĮȞİȟȐȡIJȘIJĮ Įʌȩ IJȘȞ İȞİȡȖȠʌȠȓȘıȘ ȒIJȘȞ ĮʌİȞİȡȖȠʌȠȓȘıȘ IJȠȣ įȚĮțȩʌIJȘ ȜİȚIJȠȣȡȖȓĮȢ
șȑȡµĮȞıȘȢ ȒȥȪȟȘȢ. ǵIJĮȞ ʌĮIJȘșİȓ µȓĮ ijȠȡȐ IJȠ țȠȣµʌȓ (-Ȑ) ȞİȡȠȪ, ȘȕĮȜȕȓįĮ ȞİȡȠȪ ĮȞȠȓȖİ
Ț
ȖȚĮ 20 įİȣIJİȡȩȜİʌIJĮ, İʌȚIJȡȑʌȠȞIJĮȢ IJȘȞ İțȡȠȒ ȞİȡȠȪ, ʌȡȚȞ ĮʌİȞİȡȖȠʌȠȚȘșİȓ ĮȣIJȩµĮIJĮ. ȀĮIJ
IJȘ įȚȐȡțİȚĮ IJȘȢ İțȡȠȒȢ ȞİȡȠȪ (ȗİıIJȩ ȒțȡȪȠ Ȟİȡȩ), ȘİțȡȠȒ µʌȠȡİȓ ȞĮ ıIJĮµĮIJȒıİȚ ʌȚȑȗȠȞIJ
Į
ȟĮȞȐ IJȠ țȠȣµʌȓ ȞİȡȠȪ.
5. ȆȚȑȗȠȞIJĮȢ IJĮ ĮȞȐȜȠȖĮ țȠȣµʌȚȐ ȘȤİȓ µȓĮ ijȠȡȐ ȠȕȠµȕȘIJȒȢ. ǻȚĮijȠȡİIJȚțȐ șĮ ȘȤȒıİȚ 10 ijȠȡȑȢ,
İȐȞ ȣʌȐȡȤȠȣȞ ıijȐȜµĮIJĮ ȜİȚIJȠȣȡȖȓĮȢ.
ȉȘȡȒıIJİ IJȚȢ ȠįȘȖȓİȢ
ʌȠȣ ݵijĮȞȓȗȠȞIJĮȚ
ıIJȘȞ İȚțȩȞĮ (2)
ȩIJĮȞ ȤȡȘıȚµȠʌȠȚİȓIJİ
Ȟİȡȩ ȕȡȪıȘȢ.
ǼȚțȩȞĮ
(1)
ǼȚțȩȞĮ
ȀĮIJȐ
ʌȚȑȗȠȞIJĮȢ
AquariusPlus_Anleitung 08.09.2004 15:41 Uhr Seite 14
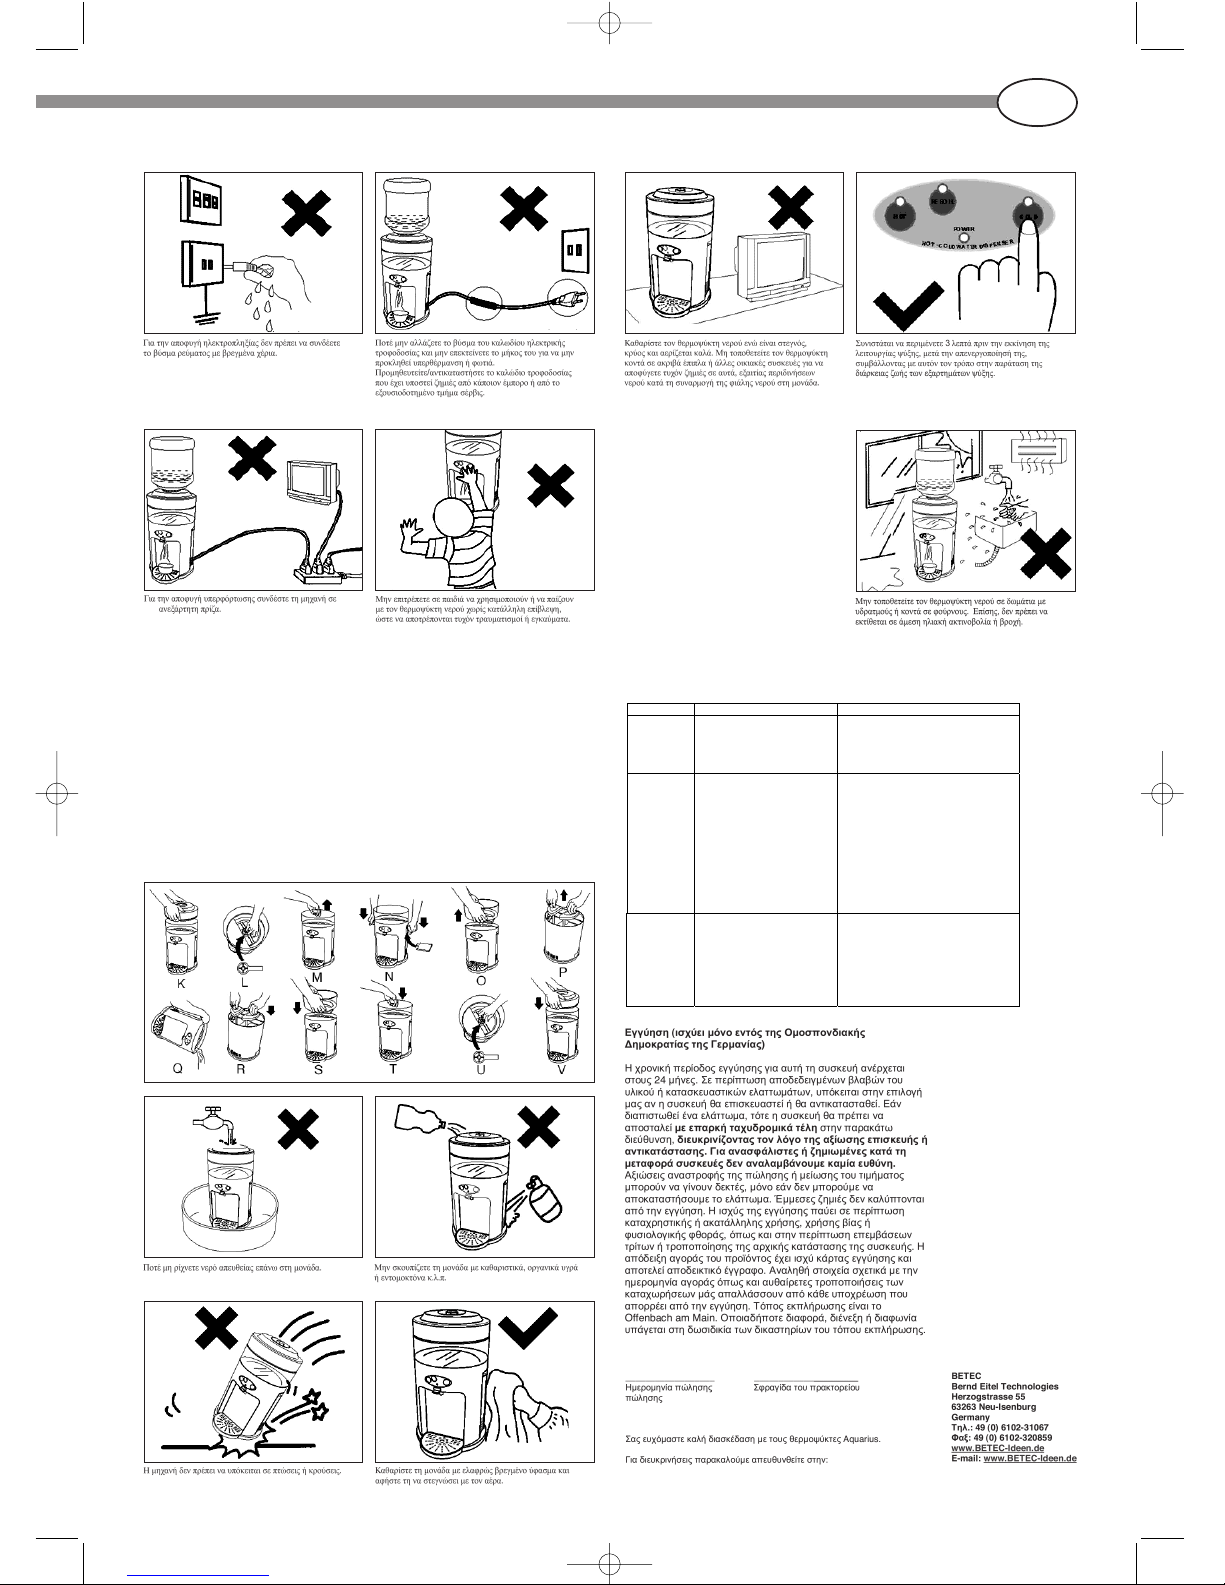
15
GR
ǽ. ȆȡȠıȠȤȒ:
Ǿ.ǼȡȖĮıȓİȢ ıȣȞIJȒȡȘıȘȢ:
1. ǹʌȠıȣȞįȑıIJİ IJȠ țĮȜȫįȚȠ ȘȜİțIJȡȚțȒȢ IJȡȠijȠįȠıȓĮȢ țĮȚ ʌİȡȚµȑȞİIJİ ʌİȡȓʌȠȣ 2 ȫȡİȢ ȖȚĮ ȞĮ
țȡȣȫıİȚ IJȠ ȗİıIJȩ Ȟİȡȩ, țĮșȫȢ țĮȚ ȖȚĮ ȞĮ ĮʌȠIJȡĮʌȠȪȞ ȠȚ țȓȞįȣȞȠȚ ȘȜİțIJȡȠʌȜȘȟȓĮȢ Ȓ
İȖțĮȣµȐIJȦȞ.
2. ǹʌȠıȣȞĮȡµȠȜȩȖȘıȘ țĮȚ țĮșĮȡȚıµȩȢ:
ǺȖȐȜIJİ ʌȡȫIJĮ IJȘ ijȚȐȜȘ țĮȚ IJȠ ĮįȚĮijĮȞȑȢ țȐȜȣµµĮ. DzʌİȚIJĮ, ȟİȕȚįȫıIJİ IJȘ ȕȓįĮ ıIJȠȞ İıȦIJİȡȚțȩ ʌȣșµȑȞĮ
IJȘȢ įȚĮijĮȞȠȪȢ įİȟĮµİȞȒȢ ȤȡȘıȚµȠʌȠȚȫȞIJĮȢ IJȠȞ µȠȤȜȩ ʌȠȣ ʌĮȡȑȤİIJĮȚ țĮȚ ʌȚȑıIJİ ʌȡȠȢ IJĮ İʌȐȞȦ IJȘ
įȚĮijĮȞȒ įİȟĮµİȞȒ İȚıȐȖȠȞIJĮȢ IJȚȢ 2 ʌȜȐțİȢ ʌȓİıȘȢ ʌȠȣ ʌĮȡȑȤȠȞIJĮȚ. ȈIJȘ ıȣȞȑȤİȚĮ, ȕȖȐȜIJİ IJĮ įȚĮijȡȐȖµĮIJĮ
µȩȞȦıȘȢ Įʌȩ IJȚȢ įİȟĮµİȞȑȢ țȡȪȠȣ țĮȚ ȗİıIJȠȪ ȞİȡȠȪ țĮȚ ĮįİȚȐıIJİ ʌȡȠıİțIJȚțȐ IJȘȞ ȣʌȠȜİȚʌȩµİȞȘ ʌȠıȩIJȘIJĮ
ȞİȡȠȪ. ȂİIJȐ IJȠȞ țĮșĮȡȚıµȩIJȘȢ įİȟĮµİȞȒȢ ȗİıIJȠȪ ȞİȡȠȪ țĮȚ IJȘȢ įİȟĮµİȞȒȢ țȡȪȠȣ ȞİȡȠȪ µİțĮșĮȡȩ Ȟİȡȩ
µʌȠȡİȓIJİ ȞĮ ıȣȞĮȡµȠȜȠȖȒıİIJİ ȟĮȞȐ IJȘ µȠȞȐįĮ ĮȞIJȚıIJȡȑijȠȞIJĮȢ IJȘ įȚĮįȚțĮıȓĮ.-- Į) IJȠʌȠșİIJȒıIJİ IJĮ
įȚĮijȡȐȖµĮIJĮ µȩȞȦıȘȢ ıIJȘ įİȟĮµİȞȒ ȗİıIJȠȪ ȞİȡȠȪ țĮȚ ıIJȘ įİȟĮµİȞȒ țȡȪȠȣ ȞİȡȠȪ.
Ĭ. ǹȞIJȚµİIJȫʌȚıȘ ʌȡȠȕȜȘµȐIJȦȞ:
ȆȡȚȞ İʌȚıIJȡȑȥİIJİ IJȘ µȠȞȐįĮ ȖȚĮ İʌȚıțİȣȒ İȜȑȖȟIJİ IJĮ İȟĮȡIJȒµĮIJĮ ʌȠȣ ĮȞĮijȑȡȠȞIJĮȚ ıIJȠȞ ʌȓȞĮțĮ.
ȆȡȠȕȜȒµĮIJĮ ȆȚșĮȞȑȢ ĮȚIJȓİȢ ǼʌȓȜȣıȘ
ǻİȞ ʌĮȡȑȤİIJĮȚ
Ȟİȡȩ Įʌȩ IJȘ
ȕȡȪıȘ
1. DZįİȚĮ įİȟĮµİȞȒ (-ȑȢ) ȞİȡȠȪ
2. DzµijȡĮȟȘ įİȟĮµİȞȒȢ
șȑȡµĮȞıȘȢ ȒįİȟĮµİȞȒȢ
ȥȪȟȘȢ Įʌȩ ĮȑȡĮ
1. ȆȜȒȡȦıȘ ȟĮȞȐ µİȞİȡȩ.
2. ȆȚȑıIJİ IJȠ țȠȣµʌȓ (-Ȑ) ȞİȡȠȪ ȖȚĮ ȞĮ
µİȓȞİȚ ĮȞȠȚȤIJȒ ȘȕȡȪıȘ țĮȚ țȠȣȞȒıIJİ
İȜĮijȡȫȢ IJȘ µȠȞȐįĮ µȑȤȡȚ ȞĮ ȕȖİȚ
Ȟİȡȩ.
ǵȤȚ ĮȡțİIJȐ
țȡȪȠ Ȓ
ĮȡțİIJȐ ȗİıIJȩ
Ȟİȡȩ
1. ȆȠȜȪ µİȖȐȜȘ ȜȒȥȘ ȞİȡȠȪ ıİ
ıȪȞIJȠµȠȤȡȠȞȚțȩ įȚȐıIJȘµĮ
2. ǻȚĮțȠʌȒ ȘȜİțIJȡȚțȒȢ
IJȡȠijȠįȠıȓĮȢ
3. ǹȞİʌĮȡțȒȢ ȤȡȩȞȠȢ ȥȪȟȘȢ
1. ȆİȡȚµȑȞİIJİ ȖȚĮ ȜȓȖȠ įȚȐıIJȘµĮȫıIJİ ȞĮ
İʌȚIJȡĮʌİȓ ȘİʌĮȡțȒȢ șȑȡµĮȞıȘ țĮȚ
ȥȪȟȘ.
2. ǼʌȚȕİȕĮȚȫıIJİ ȩIJȚ ȠįȚĮțȩʌIJȘȢ
ȜİȚIJȠȣȡȖȓĮȢ șȑȡµĮȞıȘȢ ȕȡȓıțİIJĮȚ ıIJȘ
șȑıȘ «ȅȃ», ȩIJȚ İȓȞĮȚ ıȦıIJȐ
ıȣȞįİįݵȑȞȠ IJȠ țĮȜȫįȚȠ ȘȜİțIJȡȚțȒȢ
IJȡȠijȠįȠıȓĮȢ țĮȚ ȩIJȚ ȣʌȐȡȤİȚ IJȐıȘ
IJȡȠijȠįȠıȓĮȢ Įʌȩ IJȠ țİȞIJȡȚțȩ įȓțIJȣȠ
İȞĮȜȜĮııȩµİȞȠȣ ȡİȪµĮIJȠȢ.
3. ȉȠ ʌȡȫIJȠ ȤȡȠȞȚțȩ įȚȐıIJȘµĮȥȪȟȘȢ
ĮʌĮȚIJİȓ 2 ȫȡİȢ µȑȤȡȚ IJȘȞ ʌȩıȘ.
ǻȚĮȡȡȠȒ
ȞİȡȠȪ
1. ȈʌĮıµȑȞȘ ijȚȐȜȘ
2. ǾįȚĮijĮȞȒȢ įİȟĮµİȞȒ țĮȚ ȠȚ
ĮȞȐȜȠȖİȢ ıIJİȖĮȞȠʌȠȚȒıİȚȢ
įİȞ ȑȤȠȣȞ
İʌĮȞĮıȣȞĮȡµȠȜȠȖȘșİȓ
ıȦıIJȐ țĮȚ ıIJİȖĮȞȐ µİIJȐ IJȘȞ
IJİȜİȣIJĮȓĮ
ĮʌȠıȣȞĮȡµȠȜȩȖȘıȘ
1. ǹȞIJȚțĮIJȐıIJĮıȘ µİȞȑĮ ijȚȐȜȘ
2. ǹʌȠıȣȞĮȡµȠȜȩȖȘıȘ țĮȚ
İʌĮȞĮıȣȞĮȡµȠȜȩȖȘıȘ. ǼȐȞ
ĮʌĮȚIJİȓIJĮȚ, ĮȞIJȚțĮIJĮıIJȒıIJİ IJȚȢ ʌĮȜȚȑȢ
ıIJİȖĮȞȠʌȠȚȒıİȚȢ.
AquariusPlus_Anleitung 08.09.2004 15:42 Uhr Seite 15

16
Beschrijving van functies en onderdelen
NL
Hartelijk dank voor uw aankoop van onze waterdispenser. Om met het toestel optimale
prestaties te bereiken, raden wij aan deze bedieningshandleiding zorgvuldig te lezen en
vervolgens goed te bewaren.
Inleiding functies:
Dit toestel biedt zowel functioneel als ook cosmetisch een modern ontwerp en beschikt
over de volgende functies:
1. Unieke heetwatertank met edelstalen verwarmingsstaaf om het water tot 92°C te ver-
warmen. Met zijn herkookfunctie kan het toestel water tot 95°C verhitten en voldoet
daarmee aan verschillende behoeften zoals thee of koffie zetten, instant noedels toe-
bereiden, enz. Het is geschikt voor thuis, kantoor en hotels, enz.
2. 3 in 1 tapkraan – één schenktuit voor heet water, koud water en water op kamertem-
peratuur. Heet en koud water verkrijgt u eenvoudig via de passende drukknop van het
bedieningspaneel terwijl voor water op kamertemperatuur de conventionele drukklep
voorzien werd.
3. 2 grote ronde tanks die voor reiniging kunnen worden gedemonteerd.
4. Ontworpen voor het gebruik met vervangbare filters voor nog zuiverder water.
5. De koelfunctie baseert op het moderne thermo-elektrische (Peltier) systeem dat in
tegenstelling tot conventionele compressorsystemen aangenaam geluidloos is.
6. Veelzijdige afdekkap voor grote waterflessen met circa 6 – 15 liter inhoud of bij gebruik
van de meegeleverde adapter voor PET waterflessen met 1,5 – 2 l inhoud.
Illustratie & benaming onderdelen:
Nr. onderdeel nr. 4001 Aquarius waterdispensers
1Adapter voor PET flessen 9Schakelaar voor koelfunctie
2Primaire watertank (ondoorzichtig) 10 Contactdoos
3Secundaire watertank (transparant) 11 Schakelaar voor verwarmings functie
4Drukklep voor water met
kamertemperatuur 12 Knop & indicatie voor heet water
53in 1 tapkraan 13 Knop & indicatie voor herkookfunctie
6Waterschaal 14 Knop & indicatie voor koud water
7Greep (aan 2 kanten) 15 Stroomindicatie
8Ventilatieopening
Schroefsleutel
Drukplakje
8. Volg de instruc-
ties van illus-
tratie (2) indien
u leidingwater
gebruikt.
Illustratie (2)
Illustratie (1)
Model 006TD Elektrische beschermklasse I
Voltage 220 - 240V Koelvermogen ≤15 °C 1 l/u
Nominaal vermogen 475W Verwarmingsvermogen ≥90 °C 1 l/u
Verwarmingsvermogen 400W Omgevingstemperatuur bij gebruik 10 - 32°C
Koelvermogen 75W
Belangrijk
Bij het eerste gebruik van het toestel of na periodieke reiniging dient u er op te letten dat
de tank voor heet water gevuld is vooraleer u de verwarmingsschakelaar (achteraan het
toestel) aanzet. Druk aan het bedieningspaneel eenvoudig op de “Hot” knop om te contro-
leren of de heetwatertank water bevat of niet. Zodra het toestel aan het stroomnet is
aangesloten brandt aan het bedieningspaneel de stroomindicatie. De “Hot” en “Cold” knop-
pen functioneren nu ook en indien u er op drukt zal water uitstromen. In deze fase heeft
het water slechts kamertemperatuur. Zodra water uit de aftapkraan loopt kunt u de ver-
warmings- en koelfunctie met behulp van de schakelaars achteraan het toestel gebruiken.
Als beveiliging beschikt deze waterdispenser over een thermostaat die schade verhindert
indien de lege heetwatertank per vergissing wordt verhit. De thermostaat dient dan hand-
matig te worden gereset. De thermostaat onderbreekt de stroomtoevoer indien de tem-
peratuur in de lege heetwatertank boven de vooringestelde waarde stijgt. U dient dan de
reset knop onderaan het toestel in te drukken om de verwarmingsfunctie weer te activ-
eren. De reset knop wordt door een etiket bedekt dat u in dit geval mag verwijderen.
Opmerkingen:
1. Zowel bij heet als bij koud water kan de temperatuur enkele graden afwijken.
2. De herkookfunctie verwarmt het water niet tot 100 °C.
Specificatie voor schakelaars en drukknoppen:
1. Zet u de schakelaar voor de verwarmingsfunctie aan gaat de rode indicatie branden om
aan te duiden dat verwarming actief is. Schakelt de indicatie op geel is de functie warm
houden actief (illustratie H).
2. Zet u de schakelaar voor de koelfunctie aan gaat de groene indicatie branden om aan te
duiden dat koeling actief is. Schakelt de indicatie op geel is de functie koel houden
actief (illustratie I).
3. Is het toestel bezig met verwarmen of warm houden en is ook de herkookfunctie actief
branden de indicaties voor herkoken en heet water beide rood. Zodra het water tot circa
97 °C verhit is hoort u 3 keer de zoemer en schakelt het toestel over van verwarming
naar warm houden. De indicaties voor herkoken en warm houden worden nu geel. Is het
toestel bezig met herkoken kunt u nogmaals op de knop voor herkoken drukken om het
toestel weer naar warm houden over te schakelen (illustratie J).
4. Zodra het toestel aan het stroomnet is aangesloten (de stroomindicatie brandt) kunt u
voor water ofwel op de knop voor heet water ofwel op de knop voor koud water
drukken. Daarbij speelt het geen rol of de schakelaars voor de verwarmingsfunctie of
voor de koelfunctie aan of af staan. Drukt u één keer op de waterknop(pen) gaat de
waterkraan open en stroomt gedurende 20 seconden water uit. Daarna sluit de kraan
weer automatisch. Het uitstromen van water (zowel heet als koud water) kan worden
onderbroken door opnieuw op de waterknop te drukken.
5. De zoemer is één keer te horen wanneer de actieve knoppen worden ingedrukt. Bij
functiestoring(en) is de zoemtoon anders 10 keer te horen.
Bedieningsinstructies:
1. Plaats de waterdispenser op een vlakke ondergrond en ongeveer 15 cm van de muur
om voor een goede ventilatie te zorgen (illustratie A).
2. Reinig het toestel hygiënisch indien u het voor de eerste keer of na een langere opberg-
periode weer gebruikt. Bij het nieuwe toestel hoort een ontsmettingstablet. Los de
ontsmettingstablet in circa 15 liter water op en giet het water via de primaire tank in het
toestel. Laat het water met ontsmettingsmiddel circa 20 minuten in het toestel vooraleer
het weer af te tappen. Voeg terwijl u het water met ontsmettingsmiddel aftapt gedis-
tilleerd water toe totdat het water reukloos is (illustratie B - G).
3. Zet de schakelaars voor de koelfunctie en voor de verwarmingsfunctie (achteraan het
toestel) eerst op “OFF” en verbind dan het stroomsnoer met de contactdoos. Druk aan
het bedieningspaneel op de knop voor heet water tot water uit de tapkraan komt. Nu
kunt u de verwarmings- en koelfunctie aanzetten.
4. Onderbreek de stroomtoevoer indien u het toestel langere tijd niet gebruikt. Verwijder
het stroomsnoer en tap het overtollige water af (zie demontage en reiniging) vooraleer
het toestel op te bergen. Let er bij het weer in gebruik nemen van het toestel op dat alle
onderdelen correct gemonteerd zijn en goed afdichten.
5. Raadpleeg bij algemene problemen het hoofdstuk Foutenopsporing. Demonteer nooit zelf
de elektrische onderdelen van de waterdispenser. Neem contact op met de officiële
verdeler om het toestel indien nodig te laten herstellen.
6. Zet het toestel nooit direct met de stroomkabel aan of af.
7. Zet de koelfunctie gedurende 4 uur af indien ijsvorming het uitlopen van water verhin-
dert.
Technische specificatie:
AquariusPlus_Anleitung 08.09.2004 15:42 Uhr Seite 16

17
Garantie (enkel geldig in de BRD)
De garantieperiode voor dit toestel bedraagt 24 maanden. Indien materiaal- of fabricage-
fouten kunnen worden aangetoond, wordt het toestel door ons naar keuze ofwel gerepa-
reerd ofwel vervangen. Wordt een gebrek vastgesteld, dient het toestel met vermelding van
de redenen voor de reclamatie en voldoende gefrankeerd naar het aangegeven adres te
worden terug gestuurd. Wij zijn niet aansprakelijk voor niet verzekerde of tijdens het trans-
port beschadigde toestellen. Er bestaat enkel aanspraak op koopvernietiging of mindering
wanneer het voor ons onmogelijk is het gebrek te herstellen. Indirecte schade wordt niet
door de garantie gedekt. De garantie vervalt ook bij verkeerd of ondeskundig gebruik, bij
geweldaanwending, bij schade als gevolg van normale slijtage en bij interventie door der-
den of veranderingen aan de originele toestand. Uw kassabon geldt als garantiebewijs en
is een wettig stuk. Onjuiste aangifte van de koopdatum evenals eigenmachtige wijzigingen
van de gegevens ontbinden ons van iedere garantieverbintenis. Uitvoeringsplaats en
bevoegde rechter is die te Offenbach am Main.
Datum van verkoop Stempel van de verkooppunt
Wij wensen u veel plezier met Aquarius waterdispensers.
Hebt u vragen, wendt u dan tot:
BETEC · Bernd Eitel Technologies · Herzogstrasse 55 · 63263 Neu-Isenburg · Duitsland
Tel.: 49 (0) 6102-31067 · Fax: 49 (0) 6102-320859 · www.BETEC-Ideen.de
E-mail: [email protected]
NL
Problemen
Er komt geen
water uit de
aftapkraan.
Mogelijke oorzaken
1. Lege watertank(s)
2. Verwarmings- of
koeltank door lucht
geblokkeerd
1. Opnieuw met water vullen.
2. Druk de waterknop(pen) om de
aftapkraan te openen en schud
het toestel voorzichtig tot water
uitloopt.
Oplossing
Water niet heet of
koud genoeg 1. Te veel water in te
korte tijd ontnomen
2. Stroomvoorziening
onderbroken
3. Koeltijd te kort
1. Wacht even om voldoende ver-
warming of koeling toe te laten.
2. Controleer of de schakelaar voor
de verwarmingsfunctie op “ON”
staat, of het stroomsnoer correct
aangesloten is en of de wissel-
stroomvoorziening in orde is.
3. De eerste koeling duurt 2 uur
vooraleer het water genietbaar
is.
Waterlekkage 1. Fles gebroken
2. De transparante tank
en de pakkingen zijn
na de laatste demon-
tage niet goed en vast
gemonteerd.
1. Zet een nieuwe fles in.
2. Demonteer en monteer het toestel
opnieuw. Vervang oude
pakkingringen indien nodig.
Foutenopsporing:
Controleer de volgende punten vooraleer u het toestel in herstelling geeft.
Opgelet:
Vermijd elektrische schokken – steek nooit de
stekker met natte handen in de contactdoos. Vermijd oververhitting of brand – vervang nooit
de stekker van het stroomsnoer of verleng het
snoer. Koop of vervang het beschadigde
stroomsnoer steeds bij de officiële verdeler of
servicepunt.
Vermijd overbelasting – sluit het toestel aan
een eigen contactdoos aan. Vermijd letsels of brandwonden – laat kinderen
de waterdispenser enkel onder toezicht
gebruiken; het toestel is geen speelgoed.
Plaats de waterdispenser op een droge, koele
en luchtige plaats. Plaats het toestel niet direct
naast waardevolle meubels of andere
huishoudelijke apparaten en vermijd zo
mogelijke waterschade tijdens het vervangen
van de waterfles.
Na het uischakelen van de koelfunctie is het
raadzaam 3 minuten te wachten vooraleer
deze weer aan te zetten. Zo verlengt u de
levensduur van de koelelementen.
Plaats de waterdispenser niet in een vochtige
kamer of dicht bij een verwarming. Bescherm
het toestel ook tegen directe zonnestraling of
regen.
Giet nooit water direct op het toestel. Wis het toestel niet af met reinigingsmiddelen,
organische vloeistoffen of insecticide enz.
Laat het toestel niet vallen en vermijd
schokken. Reinig het toestel met een licht vochtig doek
en laat het gewoon drogen.
Onderhoud:
1. Vermijd elektrische schokken en brandwonden – verwijder het stroomsnoer en laat heet
water eerst circa 2 uur afkoelen.
2. Demontage en reiniging:
Ten eerste: Verwijder de fles en de ondoorzichtige kap. Ten tweede: Draai de moer bin-
nen aan de onderkant van de transparante tank met de meegeleverde sleutel los en
druk de transparante tank omhoog door de 2 meegeleverde drukplakjes in te voeren.
Verwijder vervolgens de isolatieblokken zowel uit de koudwatertank als uit de heetwa-
tertank en giet het resterende water voorzichtig af. Ten derde: Na het reinigen van de
watertanks voor heet en koud water met behulp van zuiver water kunt u het toestel in
omgekeerde volgorde weer in elkaar zetten – Plaats de isolatieblokken in de watertanks
voor heet en koud water – Druk de transparante tank weer correct in het basiselement
(hiervoor is een beetje kracht nodig) – en vergeet in geen geval de 2 silicon pakkingrin-
gen onderaan. – Draai de moer met behulp van de sleutel weer vast – draai de moer
voldoende vast aan om eventuele waterlekkage te vermijden. (illustratie K - V).
AquariusPlus_Anleitung 08.09.2004 15:42 Uhr Seite 17

www.BETEC-Ideen.de
AquariusPlus_Anleitung 08.09.2004 15:42 Uhr Seite 18
Other manuals for Aquarius Plus
1
Table of contents
Languages:
Other Betec Water Dispenser manuals

Popular Water Dispenser manuals by other brands

IBC Water
IBC Water AST0715MP-960 Installation & operating instructions

Lancaster Water Treatment
Lancaster Water Treatment X FACTOR LX15 Series Installation, operating and service manual

Elkay
Elkay EMABF8 Series Installation & use manual

Oasis
Oasis Osmosis Home installation manual

Monarch Water
Monarch Water ULTIMATE MINI AQUA HE install guide

Haier
Haier HLM-109B instruction manual


