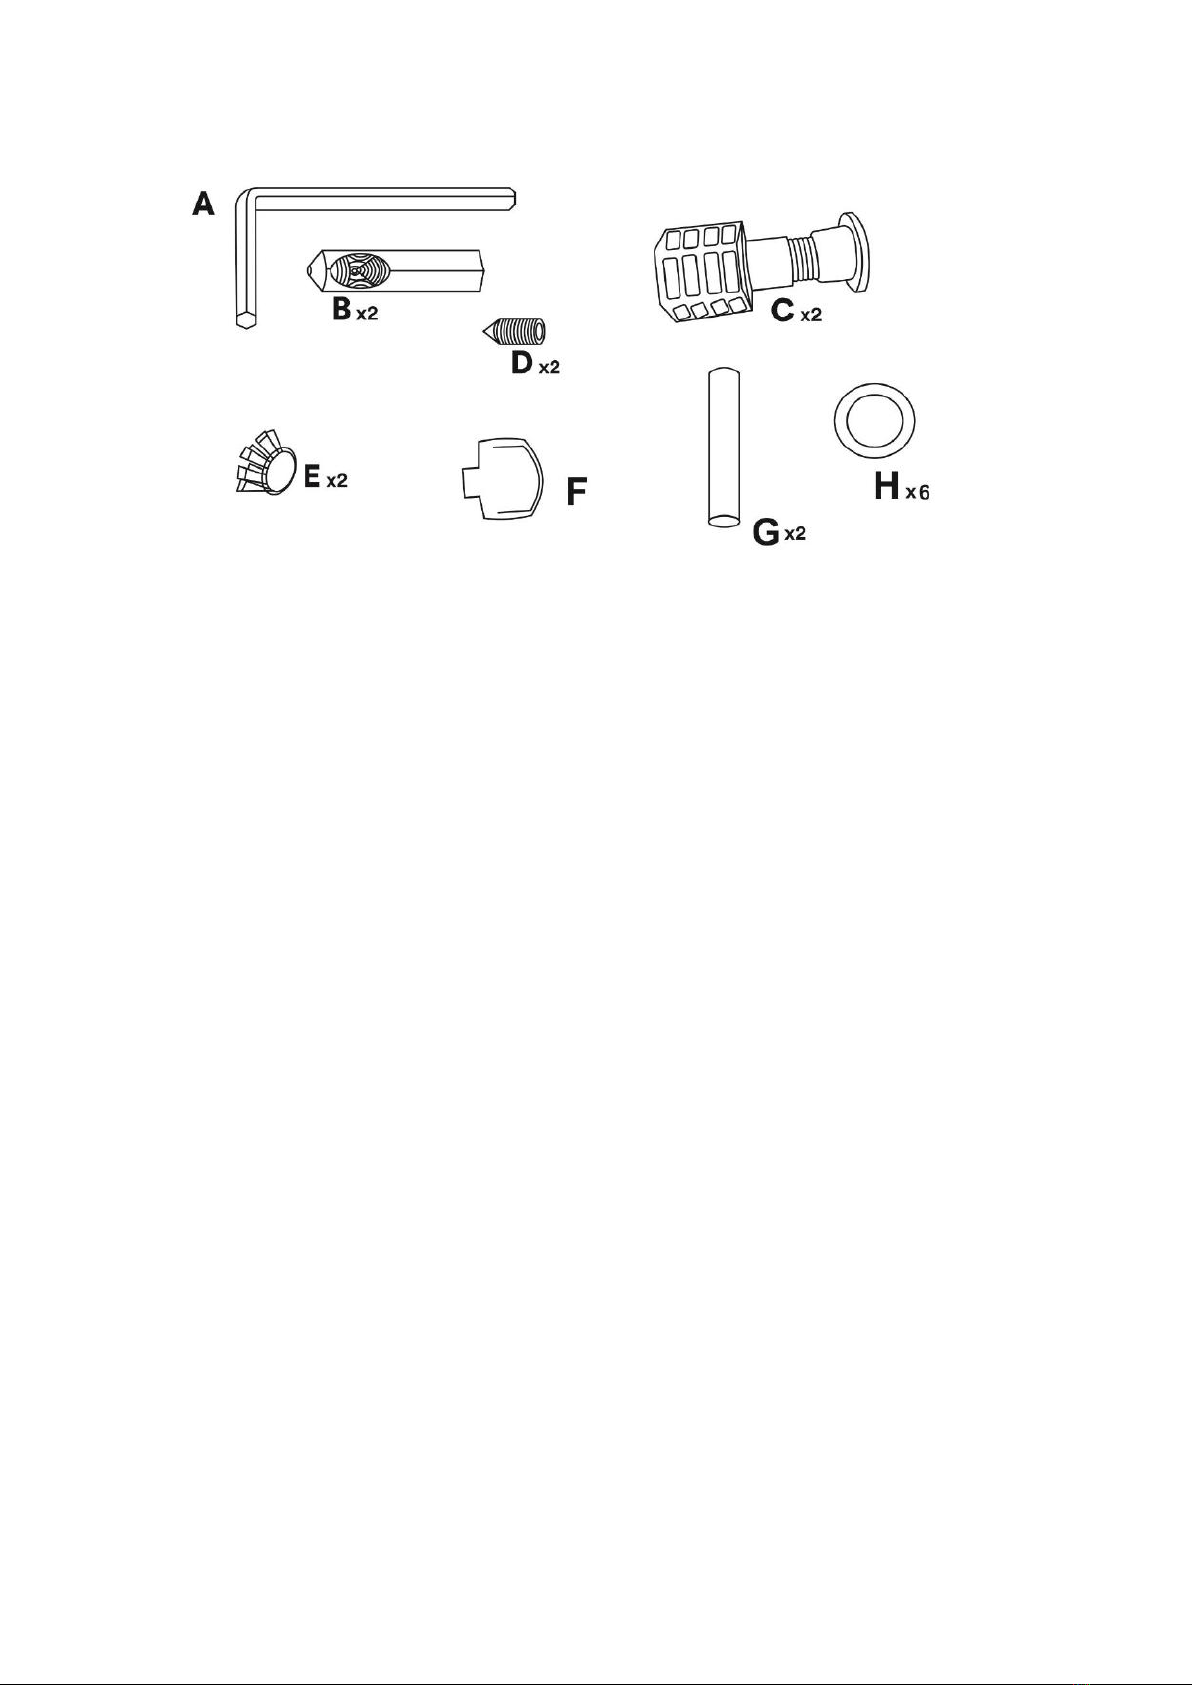
Better Bathrooms BeBa 27556 User manual

Wall Hung Toilet
BeBa_27556 Boston Wall Hung Pan
BeBa_25895 Ashford Rimless Wall Hung Toilet
BeBa_25901 Santiago Rimless Wall Hung Toilet
BeBa_25899 Valencia Rimless Wall Hung Toilet
BeBa_28418 Newport Rimless Wall Hung Toilet
Toilet seat and Wall Frame/cistern sold separately
•Waste pipe sold separately if a new installation
Please note: Image is for illustrative purposes only and may differ slightly to the
actual product.
•Single-person assembly
•Tools required
•We always recommend using professional
tradespeople to install your product V4 11.1.22

2
Congratulations on your purchase
And welcome to our growing gang of savvy shoppers
We're on a mission to bring you extraordinary bathroom products, for less. From modern
to traditional style ceramics, plus the gorgeous fixtures, fittings and furniture to match. So,
you can fall in love with your space every single day.
As one of the UK's largest independent bathroom stores, we've received countless
awards; including the National Business Awards UK, the Digital Entrepreneur Awards and
being placed on The Sunday Times Fast Track 100.
We hope your new product goes beyond and above your expectations. However, should any
problems occur, please:
•Log in to your account and contact our customer services team via your self-serve portal –
betterbathrooms.com/CustomerAccount/Login
•Contact us via betterbathrooms.com/content/contact-us
Important information
•Please read these instructions thoroughly and retain for future reference.
•Manufactured to BS EN997 WC pans and WC suites with integral trap.
•All installation work must be carried out to comply with the Water Bylaw
Regulations.
•The installation should be designed to allow access for maintenance.
•This manual covers installation of the toilet pan only - wall frame/cistern and seat
are NOT supplied.

3
Contents
•Parts 4
•Tools required 4
•Installation
oPreparing for a Wall Hung Toilet Pan Fitting 5
oWall Hung Toilet Pan Fitting 6-7
•Troubleshooting 8
•Maintenance 8
•Cleaning 8

4
Parts
Toilet Pan
Fixing kit (below components)
Please note not all the parts included are required for all installations, example top fixing
pans do not require Part E
A. Allen key
B. 2 x Threaded connector (fixing bolts)
C. 2 x Plastic wall mounting housing
D. 2 x Grub screw
E. 2 x Cover cap (Side fitting only)
F. 1 x Tightening tool for Part C
G. 2 x Clear plastic tubes
H. 6 x Space washers
Tools required
•Allen key (supplied)
•Silicone

5
Installation
Please note: Whenever possible and when safe to do so, it is recommended to carry out
leak tests during the installation process.
Preparing for a Wall Hung Toilet Pan Fitting
A –Flush pipe is supplied with the Wall Frame/cistern assembly, (Wall Frame/cistern sold
separately).
B –Pan connector (waste pipe) supplied with Wall Frame/cistern assembly.
Please note: Pipes are not included.
Once you have received your toilet pan, this will allow you to prepare and install the Wall
Frame/cistern (both sold separately). To install the Wall Frame/cistern, please use the
instruction guides supplied with them.
This guide advises on installation of the wall hung toilet pan only.

6
Wall Hung Toilet Pan Fitting
After the wall frame has been set in the wall and the wall has been finished, the
installation of the toilet pan to the frame can begin.
1. Prepare the pipes as advised (cutting of the flush pipe and pan connector may be
required).
2. The threaded bars should be exposed from the frame through the wall, as shown
below.
3. It is advisable to apply a small amount of lubricant (washing up liquid) to the flush
pipe and pan connector to assist with fitting the toilet pan.
4. Connect the flush pipe and pan connector to the frame ready for connection to the
toilet pan as shown, then screw the female threaded connectors (fixing bolts) onto
the threaded bars so that the cut out aligns with the fixing hole in the toilet pan.

7
5. Insert the plastic wall mounting housing into the holes in the rear of the toilet pan
and align the hole with the fixing hole on the top face of the toilet pan.
Please note: this next section will require two people.
6. Push the toilet pan onto the wall frame ensuring that the flush pipe and pan
connector fully engage with the toilet. (Image below shows the plastic housings
fitted inside the toilet pan).
7. If the plastic housing Part C does not align with the hole in the pan, due to length,
you will need to fit the plastic spacers Part H
Please note: The cut out on the connector and the hole in the housing should be aligned.
Please note: On this version, the fixing hole is located on the top face, not in the side of
the toilet pan.
8. Using the Allen key secure the grub screw into the plastic housing and into the cut
out on the connector to secure the toilet pan onto the frame.
9. The clear plastic tube Part G, can be used to assist in the installation of the screw,
insert the grub screw into the end of the tube and then insert the tube into the hole
in the toilet and insert the screw into the plastic housing and tighten

8
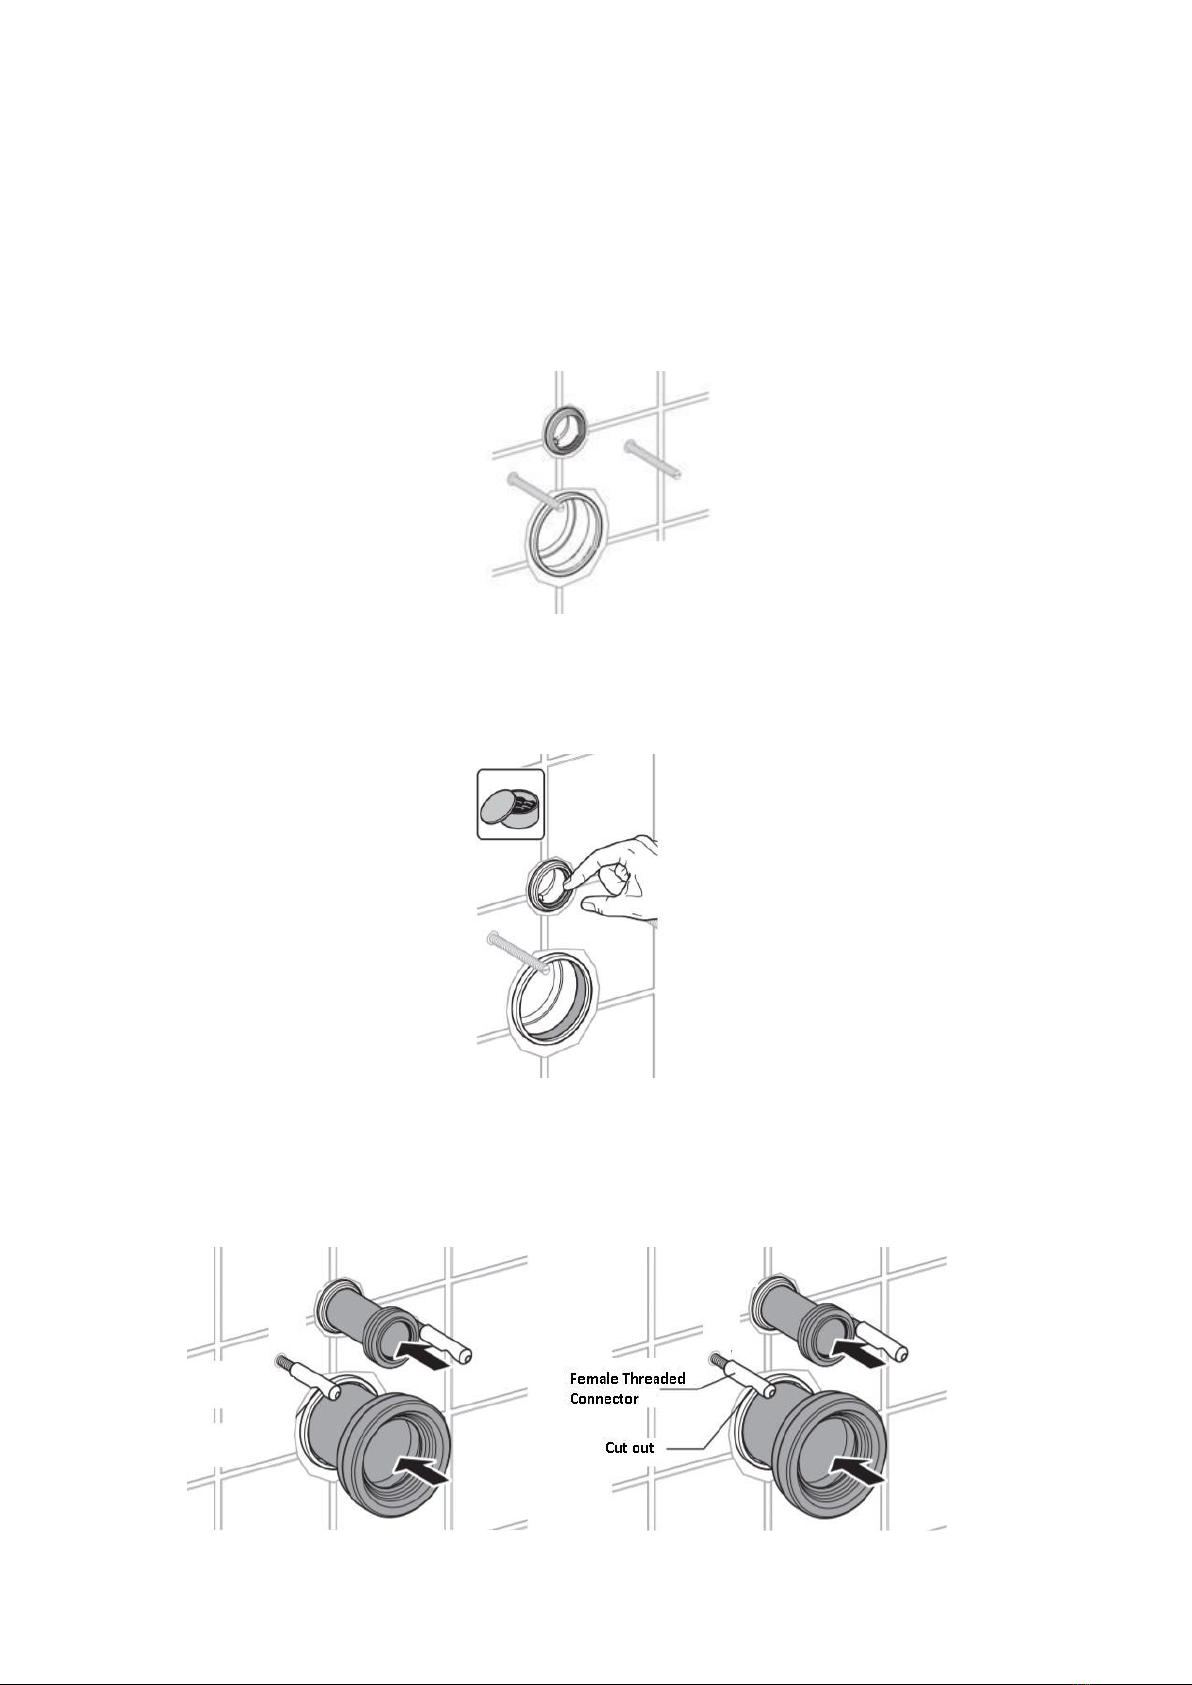
10.Once the installation is completed, a flush and leak test should be carried out and
once it has been commissioned, the toilet can be sealed around the edge to finish.
Troubleshooting
Flush volume into the pan, not sufficient
1. Adjust the flush volume level on the syphon.
2. Check that the syphon is opening correctly.
3. If none of these resolve the issue replace the syphon.
Water running into the pan continually after flushing
1. Establish if the water level in the cistern is reaching the overflow on the syphon, if it
does reach the overflow adjust the inlet valve.
2. If this continues, replace the inlet valve.
3. If the water level does not reach the overflow on the syphon, remove the top
section of the syphon and check the washer for damage.
4. If the washer is damaged then replace.
Maintenance
All of the maintenance measures resulting from troubleshooting above requires you to
access the internals of the cistern tank and for the water supply to be turned off. Please
refer to the instruction guide supplied with your cistern for further guidance.
Cleaning
To maintain the surface finish of your product, wipe clean after every use, using a clean
damp cloth, a mild detergent mixture can be used. Do not use abrasive cleaning agents or
materials which can strip and scratch the surface; the use of these agents or materials can
invalidate your guarantee.

Top Fix Soft Close Toilet Seat
Please note: Image is for illustrative purposes only and may differ slightly to the
actual product
•Single-person assembly
•Tools required
•We always recommend using professional
tradespeople to install your product V1_21.5.20

2
Congratulations on your purchase
And welcome to our growing gang of savvy shoppers
We're on a mission to bring you extraordinary bathroom products, for less. From modern
to traditional style ceramics, plus the gorgeous fixtures, fittings and furniture to match. So,
you can fall in love with your space every single day.
As one of the UK's largest independent bathroom stores, we've received countless
awards; including the National Business Awards UK, the Digital Entrepreneur Awards and
being placed on The Sunday Times Fast Track 100.
We hope your new product exceeds your highest expectations. However, if you
experience any problems, please:
•call our friendly UK call centre on 0871 244 0935 (9am-7pm Monday to Friday, or
10am-4pm Saturday and Sunday), or
•send us a message via [email protected]
Important information
•Please read these instructions thoroughly and retain for future reference
•Manufactured to BS EN 1254 –Specification for WC seats (plastics)

3
Parts
Please note that Parts are for illustrative purposes only and may differ slightly to
the actual product
1. Expanding Plug
2. Gasket
3. Fitting Peg
4. Fixing Screw
5. Fitting Cover
4. Seat/Lid Assembly
Tools required
Screwdriver

4
Installation
1. Push the expanding plugs (part 1) into the holes on the toilet pan then place the
gaskets (part 2) between fitting pegs (part 3) and toilet pan. Next, place the long
screws (part 4) through the fitting pegs and gaskets and screw into the expanding
plug (part 1).
Please note: Fit the screws loosely and do not fully tighten at this stage
2. Turn the fittings on the toilet so that they align with the holes on the seat, then push
the seat onto the pegs until it clicks into place. Gently move the seat so that it
aligns on the toilet pan.
3. Once the seat is aligned, tighten the screws into the fittings (as below) then once
the seat is secured, remove it by pressing both buttons and lifting away.

5
4. Place the fitting covers over the fixed fittings then push the seat onto the fitting
pegs and click into position
Using
During use do not force the seat closed as this will damage the soft close mechanism.
Pull the seat and/or lid towards you slightly until it reaches the point at which it will fall
under its own weight, then release.
Do not stand on the toilet seat.
Cleaning
To maintain the surface of your product, wipe with a clean damp cloth and wipe dry, do
not use any abrasive cleaning agents or materials.
It is recommended to wipe the seat and fittings on a regular basis.

6
Troubleshooting
Seat becomes loose after a period of use
Remove the seat and re-tighten the fittings.
Soft close mechanism stops working
The mechanism cannot be replaced, replace the seat and lid, however, the fittings can
remain fitted. Removal of seat/lid is advised in Maintenance (below).
Seat is short or overhangs the toilet pan
Align the seat lid with the front edge of the toilet pan, the fittings are adjustable.
Maintenance
•To remove the seat/lid, press the two buttons at the rear of the seat and pull the
seat/lid away from the fitting pegs. When replacing ensure it clicks into place.
•To access the fixing screws, remove the lid/seat as above, then pull off the covers.

Wall Frame and Cistern
BeBa_25877
xFor installation with Flush Plates - BeBa_26132 / BeBa_25874 /
BeBa_25876 (sold separately)
xToilet pan sold separately
Please note: Image is for illustrative purposes only and may differ slightly to the
actual product
xMulti-person assembly
xTools required
xWe always recommend using professional
tradespeople to install your product
V2 8.7.21
Ϯ
Congratulations on your purchase
And welcome to our growing gang of savvy shoppers
We're on a mission to bring you extraordinary bathroom products, for less. From modern
to traditional style ceramics, plus the gorgeous fixtures, fittings and furniture to match. So,
you can fall in love with your space every single day.
As one of the UK's largest independent bathroom stores, we've received countless
awards; including the National Business Awards UK, the Digital Entrepreneur Awards and
being placed on The Sunday Times Fast Track 100.
We hope your new product goes above and beyond your expectations. However, should
any problems occur, please:
x
log in to your account and contact our customer services team via your self-serve
portal –betterbathrooms.com/CustomerAccount/Login
x
contact us via betterbathrooms.com/content/contact-us
Important information
xPlease read these instructions thoroughly and retain for future reference.
xManufactured to BS EN14055 WC and urinal cisterns.
xAll installation work must be carried out to comply with the Water Bylaw
Regulations.
xThe installation should be designed to allow access for maintenance.
ϯ
Contents
xDimensions 4
xParts 5-6
xTools required 6
xInstallation
RFitting Pan connector 7
RAdjusting Frame Height 8
RSecuring the Frame 9
RFitting Protective Covers 10
RWater Connection 11
RInstallation once wall is constructed 12-15
RConnecting and Hanging the Toilet 16
xTroubleshooting 17
xMaintenance 18-19
ϰ
Dimensions
ϱ
Parts
1. Square inlet fixing plate –Pre-fitted
2. Tank
3. Frame
4. Wall fixing brackets and screws
5. Flush pipe and bung
6. Pan connector and seals
7. Adjustable foot
8. Adjustable floor foot fixing screw and plug
9. Toilet fixings
10. Flush pipe protector, use during installation
11.Pan connector protector, use during installation
12. Fixing bar sleeves, use during installation 1
13. Pan connector clip
14. Stop Valve –Pre-fitted
ϲ
15. Inlet flexi-pipe –Pre-fitted
16. Inlet valve
17. Flush plate bracket
18. Flush pipe vertical
19. Syphon
20. Flush rod locating plate
21. Flush plate protective cover
22. Flush plate fixing rods
23. Flush plate housing
24. Flush plate housing/rod clips
25. Flush rods
26. Flush plate
Tools required
xScrewdriver
xSpanner
xPencil
xDrill
xSprit Level
x10mm Drill Bit
xHacksaw
ϳ
Installation
Please note: Whenever possible and when safe to do so, it is recommended to carry out
leak tests during the installation process
Fitting Pan Connector
If using a straight connector through the wall, you can position as required.
Each option below will give you the minimum dimension from the wall to the front of the
fixing foot.
Please note: The desired location should be checked before drilling, that no pipes or
wires can be damaged
Option 1: Pan connector to be installed into the floor
Position the connector into the frame clip in the position shown below left, located in the
rear recess, then close the clip.
Option 2: Pan connector to be installed to the side
Position the connector into the frame clip in the position shown below left, located in the
front recess, then close the clip.
ϴ
Below show the fixing width dimensions for the wall and floor screws, and the distance
from the centre of the pan connector.
Adjusting Frame Height
Once the pan connector is in place, the height of the frame can be adjusted as required
along with the depth of the frame from the wall.
1. To do this loosen the nuts and bolts in the fixing brackets and adjust as required.
2. Check the frame is level and then tighten the nuts and bolts.
3. Once the frame is set to the required height and depth, mark the drill holes on the
wall, and on the floor. Now you’re ready to secure the frame.
ϵ
Securing the Frame
1. Drill the holes using a 10mm drill bit; it is recommended to place tape over the drill
mark if you are drilling into tiles to prevent any slippage.
2. Once drilled, if fixing to a solid wall and floor, push the wall plug into the hole.
3. Secure the wall bracket to the wall and then position the frame into the required
location.
4. Tighten the frame to the wall bracket and tighten the nut and bolt.
5. Secure the foot into position using the screws provided.
ϭϬ
Fitting Protective Covers
Before building the wall, and tiling around the frame, the protective covers need to be
fitted to the flush plate housing, flush pipe and pan connector and the fixing bars fixed into
place.
1. Fit the flush plate fixing bracket (as below), then fit the flush plate fitting box.
Please note: The Flush Plate is sold separately
2. Push on the flush pipe and pan connector covers.
3. Screw the threaded bars into the frame, as below, ensuring these are in the correct
hole to match the holes in the toilet, then push on the sleeves.
ϭϭ
Water Connection
1. Make the connection between the water supply and the cistern tank, using a
suitable sealing method as shown below.
Please note: The cistern has its own built in stop valve
2. Once water is connected you’re ready to build the partition wall. Use the guidance
below and construct as required then tile as required.
ϭϮ
Installation once wall is constructed
1. Once the wall is constructed and tiled to the required depth, cut the flush plate box
to the finished wall surface.
2. Insert the fixing rods into the holes within the frame flush box and twist to secure.
3. Secure the flush plate bracket to the fixing rods and secure using the screws
provided.
4. Push the flush rods into the housing as shown below.
ϭϯ
5. Once the rods are fully inserted, secure into position using the clips shown below,
then push the rods to ensure free movement is achieved.
6. Attach the flush plate and click into position.
ϭϰ
7. Remove the pan connector and flush pipe protective covers.
8. Push the straight pan connector, flush pipe and remaining parts into the holes in
the frame.
9. Mark a line at the finished wall surface.
10.Remove from the frame and connect them to the flush hole and waste spigot on the
rear of the toilet pan (Apply a small amount of washing up liquid to assist).
ϭϱ
11.Once fully connected, mark the measurements and cut as shown below.
ϭϮ Prepare the flush pipe and pan connector ends removing any rough edges and
create a small chamfer.
ϭϲ
Connecting and Hanging the Toilet
1. Push the pan connector into the frame then push the flush pipe into the toilet
2. Remove the threaded bar sleeves.
3. Unscrew the threaded bars, so they extend by dimension A depth of the toilet wall
+ 25mm.
Please note: You will require two people for this section of the installation
4. Lift the toilet pan onto the threaded bars.
5. Finally, check that the toilet is level, connect the fixings in the order shown below
and tighten until the toilet pan is secured.
Please note: Once installation is completed a full commissioning of the product should be
carried out to check the installation is safe and stable, check for leaks and check function
ϭϳ
Troubleshooting
Cistern tank not filling at all or to the required level
1. Check the water supply has been turned back on and is reaching the cistern.
2. Adjust the fill level on the cistern as required.
3. The filter on the inlet valve could be blocked.
4. If none of these resolve the issue replace the inlet valve.
Flush volume into the pan, not sufficient
1. Adjust the flush volume level on the syphon.
2. Check that the syphon is opening correctly.
3. Check that the tubes are connected to the correct inlet on the flush plate.
4. If none of these resolve the issue replace the syphon.
Water running into the pan continually after flushing
1. Establish if the water level in the cistern is reaching the overflow on the syphon, if it
does, adjust the inlet valve.
2. If this continues, replace the inlet valve.
3. If the water level does not reach the overflow on the syphon, remove the top
section of the syphon and check the washer for damage.
4. If damaged replace.
ϭϴ
Maintenance
The maintenance measures below require you to gain access to the internals of the
cistern tank, and for the water supply to be turned off.
xOnce you have gained access, turn the adjustment screw in the required direction
to adjust the tank fill volume.
xIf you need to replace the inlet valve, disconnect the water supply pipe and remove
the retaining nut, which holds the inlet valve to the tank and pull the inlet valve from
the tank.
xTo clear the filter, unscrew the filter section from the inlet valve as shown and run
under warm water using a brush to clean away any blockage.
ϭϵ
xIt is recommended to remove the pneumatic tubes from the syphon to carry out
maintenance.
xTo do this, pull each tube from the inlet on the top of the syphon, do not allow these
to drop back into the tank.
xTo remove the syphon, you will only need to remove the top section, which requires
you to twist and lift.
xTo adjust the flush volume, move the slider as shown below.
xTo remove the washer, turn the syphon upside down and the washer from the
housing.
+&#
236J701-E71-01B
2021.12.08
175X260mm
20
100克双胶
料号
材质
日期 页数
表单编号
尺寸
版本 1.0
版本 1.0
This manual suits for next models
4
Table of contents
Other Better Bathrooms Toilet manuals
Popular Toilet manuals by other brands

Mirabelle
Mirabelle AMBERLEY MIRAM200WH installation instructions

Kohler
Kohler K-25839T-NSHC installation instructions

noken
noken TONO 100188372 N396990886 quick start guide

Thetford
Thetford C223-CW installation manual

Laufen
Laufen CLEANET NAVIA operating manual

Villeroy & Boch
Villeroy & Boch Omnia architectura Compact 9M66 S2 manual

Spectrum Brands
Spectrum Brands Pfister Kamato VTP-E70W Quick installation guide

FV
FV Trento E176 installation instructions

Kohler
Kohler VIA K-20630T-BW installation instructions

Sapho
Sapho VE421 VEEN CLEAN installation instructions

Hulife
Hulife HLB-4000EC Operating instructions manual

nella
nella RENI NBMU-7312 installation instructions