BetterLiving BE9002 Manual instruction

Please read these instructions before use
This accessory is designed for use with
the BetterLiving Community Bed only.
Only approved bed accessories listed in
the BetterLiving Community Bed Parts
List should be used with the bed unless
otherwise specified by Novis Healthcare.
Attach to Bed
1Ensure Hand screw knobs are loosened,
but not removed.
2Tilt the top of the Grab Bar forward over
the bed and slide the top of the securing
clip over side of the bed frame
3Straighten the Grab Bar to allow the
bottom of the clip to slide under the bed
frame
4Tighten the two Hand Screw Knobs
When attaching a Grab Bar, the gap
between Grab Bar and bed end must
be less than 60 mm or more than
318 mm to comply with entrapment
guidelines.
Ensure a risk assessment is completed
first before attaching any Grab Bar to
the bed.
Remove from Bed
Loosen the two Hand Screw Knobs and tilt
the top of Grab Bar away from the bed and
slide the securing clips o bed frame
Grab rail is designed to assist
patients getting into and
out of bed. The Grab Bar is
supplied with two Hand Screw
Knob for attaching to bed.
BetterLiving Community Bed – Grab Bar
SET-UP AND OPERATION
Pressure care and patient handling specialists
novis.com.au /1300 738 885 JAN
2018 ©
Regular maintenance
Visual inspection for obvious wear and tear of
bar and components. Ensure Bar is secure by
tightening Hand Screw Knobs.
Replace immediately if you see evidence of
tears, cracks or other general wear.
Care & cleaning
Hand clean using hand spray and wipe
methods only. Novis recommends use of
ocially recognized disinfectants and mild
cleaning solutions.
Warranty
Novis Healthcare Pty Ltd warrants this
product for a period of 12 months. Please refer
to our Warranty Statement for full details.
Please contactyourauthoriseddealeror the
manufacturerforalistof availablespareparts.
Specifications
CODE BE9002
PRODUCT WEIGHT 2.0 kg
DIMENSIONS W265 x H630 x D55 mm
CONFORMS TO ARTG176883
MADE IN VIETNAM
0 - 60 mm
or 318+ mm

Please read these instructions
before use.
This accessory is designed for use
with the BetterLiving Community
Bed only.
Only approved bed accessories
listed in the BetterLiving
Community Bed Parts List should be
used with the bed unless otherwise
specified by Novis Healthcare.
Attach to Bed
1Raise the bed to its full height and ensure bed length is not
extended.
2Loosen (but do not remove) the Hand
Screw Knobs at the bottom of Side
Rail track on the Community Bed, at
both ends of the bed.
3Position both ends of the Side Rail
with the protruding white plastic end
plate pointing upwards at entrance of
the Side Rail tracks.
Check Side Rail fixing wire is
positioned securely in the groove
of white plastic end plates before
inserting into Side Rail track.
Fixing wire will be damaged if not
correctly securely in the grooves.
Side rails are designed
to secure patients in
bed. They are easily
raised and lowered.
Full Length Side Rails
are supplied as a pair.
BetterLiving Community Bed – Side Rail, Full Length
SET-UP AND OPERATION
4Slide both ends of the Side Rail slowly vertically up in the Side Rail
track – to the very top – until an audible ‘click’ is heard at both ends.
Two people may be necessary, as rail needs to be inserted in to the
track completely vertically.
Side Rail is now securely locked in position at its full ‘in use’ height.
220 mm minimum
5Tighten two Hand Screw Knobs at
the bottom of Side Rail track on the
Community Bed – this ensures Side
Rail will be held securely when it is
dropped down to its lowest position.
6Repeat the procedure above for the other side rail.
Ensure distance form
top of uncompressed
mattress and top of the
side rail is at least
220 mm.
Check side rails are securely fitted before use.
All hand screw knobs at bottom of Side Rail track MUST be
tightened whenever a side rail is attached to the bed. NEVER
loosen hand screw knobs at bottom of side rail tracks unless
installing or removing the Side Rail.
Loose hand screw knobs at bottom of Side Rail can result in
serious injury and damage.
Product inspection
Each side rail is supplied as two components joined by a fine loop of
wire (to facilitate compacting when lowering):
Protruding
white plastic
Connecting wire

BetterLiving Community Bed – Side Rail, Full Length
SET-UP AND OPERATION
Pressure care and patient handling specialists
novis.com.au /1300 738 885 JAN
2018 ©
Regular maintenance
Daily checks are recommended for the correct and safe function of
the Side Rail, including but not limited to:
⬡Check for signs of overall damage and locking mechanisms
⬡Check hand screw knobs are fastened and secure
⬡Audible “click” is heard when raising side rails to its full “in use”
position
⬡Check side rails are correctly secured in the “in use” position
by applying moderate downward force. If there are excessive
movements when raised to its full “in use” position, DO NOT use the
side rail and report the fault immediately.
Replace immediately if you see evidence of tears, cracks or other
general wear.
Care & cleaning
Hand clean using hand spray and wipe methods only. Novis
recommends use of ocially recognized disinfectants and mild
cleaning solutions.
Warranty
Novis Healthcare Pty Ltd warrants this product for a period of
12 months. Please refer to our Warranty Statement for full details.
Please contact your authorised dealer or the manufacturer for a list of
available spare parts.
Specifications
CODE BE6004
PRODUCT WEIGHT 7 kg each
DIMENSIONS W410 x H2080 mm
CONFORMS TO ARTG176883
MADE IN VIETNAM
To Use
To lower the Side Rail, gently pull both
Hand Knob (head end and foot end) at
top of the Side Rail track.
To raise the Side Rail slowly pull up the
Side Rail until an audible ‘click’ is heard at
both ends
Side Rail Extension
Side rails have built-in length extension
feature, and will automatically extend
when the Community Bed extension is
utilised.
No manual adjustment is necessary.
To remove from bed
1Raise bed to its full height then lower Side Rail to its lowest position.
2With one hand or someone holding the Side Rail,
loosen two Hand Screw Knobs at bottom of Side Rail track.
3Slowly let the Side Rail slide vertically down out of Side Rail track.

Please read these instructions
before use.
This accessory is designed for use
with the BetterLiving Community
Bed only.
Only approved bed accessories
listed in the BetterLiving Community
Bed Parts List should be used with
the bed unless otherwise specified
by Novis Healthcare.
Attach to Bed
1Before attaching the Side Rails to bed frame, loosen the two hand
screw knobs on the Side Rail.
2Position the Side Rail over the
bed frame and tilt forward
and clip over the horizontal
support frame.
Side rails are
designed to secure
patients in bed. They
are easily raised
and lowered. Three
Quarter Length Side
Rails are supplied as
a pair.
BetterLiving Community Bed – Side Rail,
Three Quarter Length
SET-UP AND OPERATION
BetterLiving Community Bed – Side Rail,
Three Quarter Length
SET-UP AND OPERATION
To Use
To lower the Side Rail, gently pull the black round knob located near
the foot end. Push side rail towards the Foot end
To raise the Side Rail, slowly pull up the Side Rail until an audible ‘click’
is heard (of the Lowering Knob clicking into position.
To remove from bed
1To remove the Side Rail from the bed, loosen the two Hand Screw
Knobs (under the bed frame)
2Gently lift side rail and pull away from the bed
Hand Screw knobs
Lowering knob
Bed Head end Bed Foot end
Ensure distance form
top of uncompressed
mattress and top of
the side rail is at least
220 mm.
Check side rails are securely fitted before use.
All hand screw knobs at bottom of Side Rail track MUST be
tightened whenever a side rail is attached to the bed. NEVER
loosen hand screw knobs at bottom of side rails unless installing
or removing the Side Rail.
Loose hand screw knobs at bottom of Side Rail can result in
serious injury and damage.
0 - 60 mm
or 318+ mm 0 - 60 mm
or 318+ mm
220 mm minimum
3Slide the bottom fixing
under the bed platform by
straightening up the side rail
4Tighten the two Hand Screw
Knobs (to secure the Side
Rails to under the bed frame)
5Repeat the procedure for the
other side rail.
Ensure either end of the
side rail is less than 60 mm
or more than 318 mm from
the bed end to minimise
risk of entrapment.

BetterLiving Community Bed – Side Rail,
Three Quarter Length
SET-UP AND OPERATION
Pressure care and patient handling specialists
novis.com.au /1300 738 885 JAN
2018 ©
Regular maintenance
Daily checks are recommended for the correct and safe function of
the Side Rail, including but not limited to:
⬡Check for signs of overall damage and locking mechanisms
⬡Check hand screw knobs are fastened and secure
⬡Audible “click” is heard when raising side rails to its full “in use”
position
⬡Check side rails are correctly secured in the “in use” position
by applying moderate downward force. If there are excessive
movements when raised to its full “in use” position, DO NOT use the
side rail and report the fault immediately.
Replace immediately if you see evidence of tears, cracks or other
general wear.
Care & cleaning
Hand clean using hand spray and wipe methods only. Novis
recommends use of ocially recognized disinfectants and mild
cleaning solutions.
Warranty
Novis Healthcare Pty Ltd warrants this product for a period of
12 months. Please refer to our Warranty Statement for full details.
Please contact your authorised dealer or the manufacturer for a list of
available spare parts.
Specifications
CODE BE6003
PRODUCT WEIGHT 8 kg each
DIMENSIONS (INSTALLED, IN THE ‘UP’ POSITION) 434 x 1235 mm
CONFORMS TO ARTG176883
MADE IN VIETNAM
Please read these instructions before use.
Safe Working Load of 75 kg
This accessory is designed for use with the
BetterLiving Community Bed only.
Only approved bed accessories listed in
the BetterLiving Community Bed Parts
List should be used with the bed unless
otherwise specified by Novis Healthcare.
Assemble Product
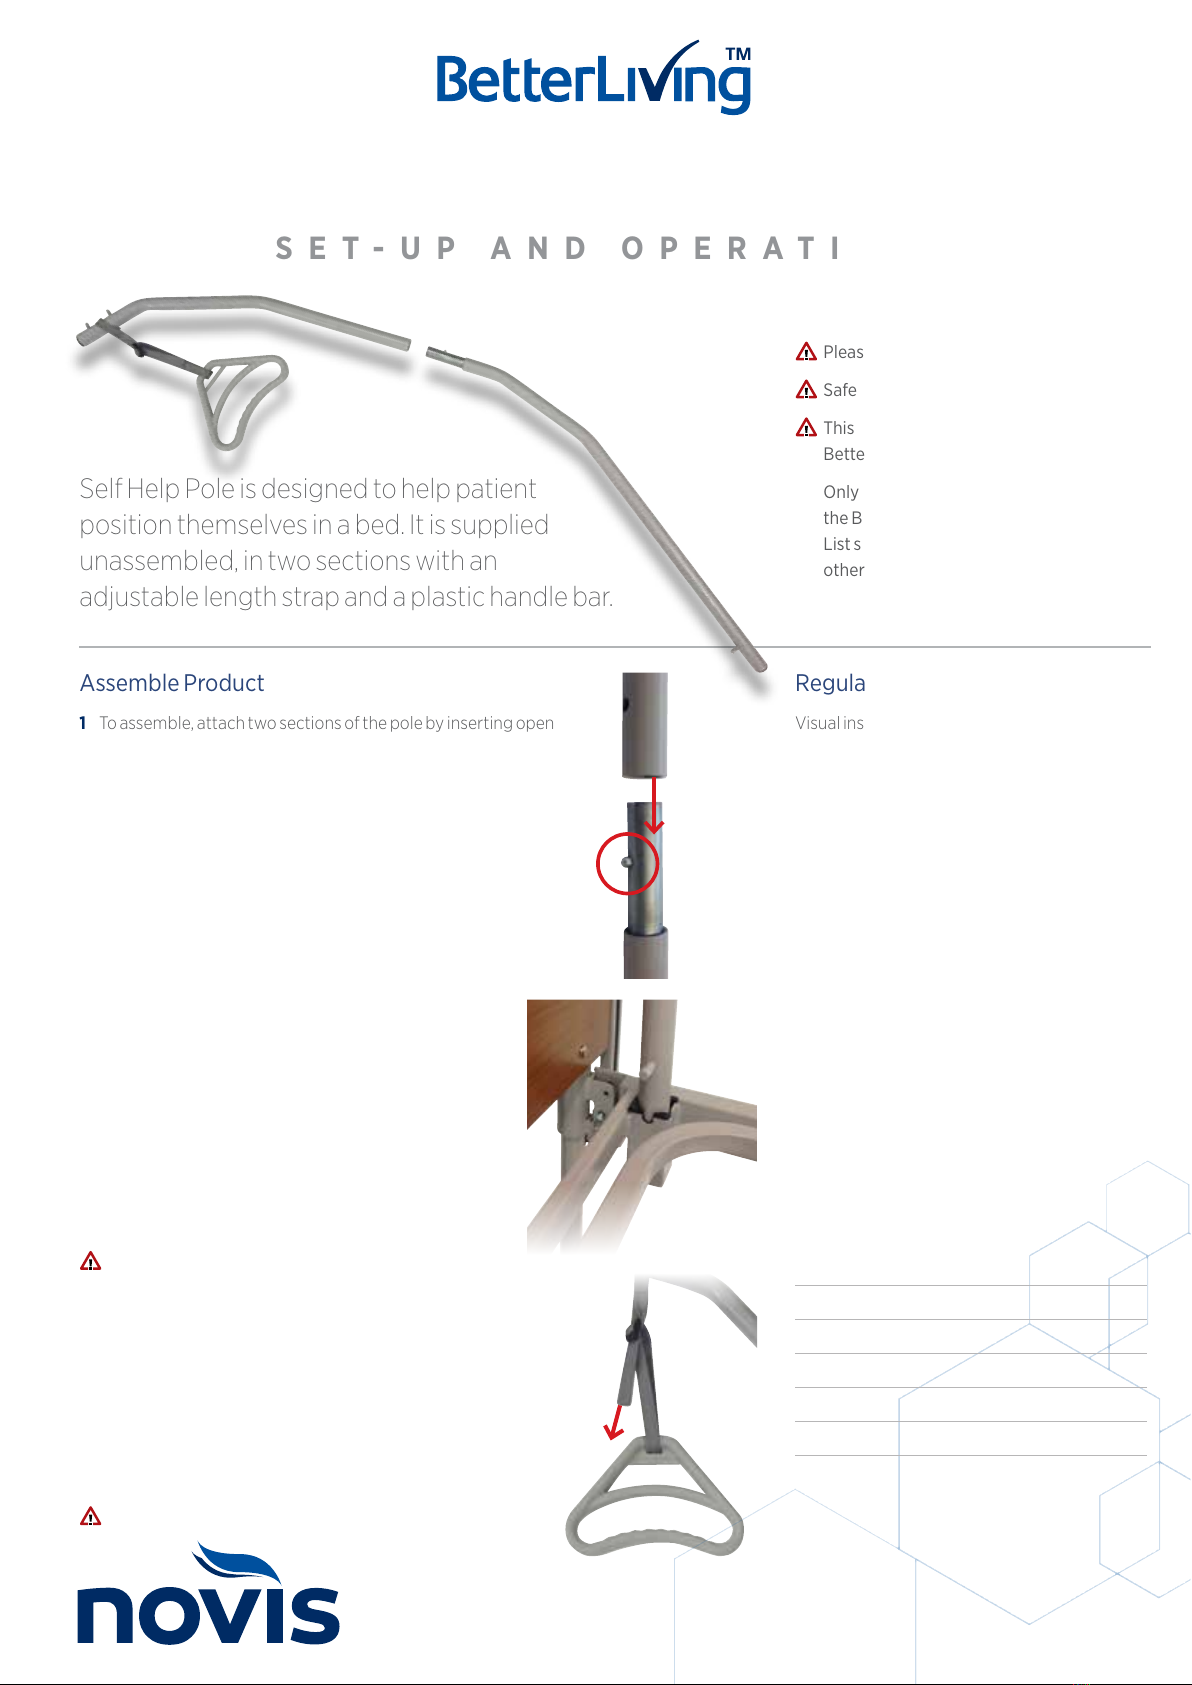
1To assemble, attach two sections of the pole by inserting open
ends of each section together.
2Align the locking button with the corresponding hole and push
in the locking button in as two ends are pushed together
3An audible click can be heard and the locking button head is
visible through the hole.
To disassemble, depress the locking button while pulling two
sections of the pole away from each other.
BetterLiving Community Bed – Self Help Pole
SET-UP AND OPERATION
Pressure care and patient handling specialists
novis.com.au /1300 738 885 JAN
2018 ©
Regular maintenance
Visual inspection for obvious wear and tear of
bar and components.
Replace immediately if you see evidence of
tears, cracks or other general wear.
Care & cleaning
Hand clean using hand spray and wipe
methods only. Novis recommends use of
ocially recognized disinfectants and mild
cleaning solutions.
Warranty
Novis Healthcare Pty Ltd warrants this product
for a period of 12 months. Please refer to our
Warranty Statement for full details.
Please contact your authorised dealer or the
manufacturer for a list of available spare parts.
Specifications
CODE BE7003
MAXIMUM USER WEIGHT 75 kg
PRODUCT WEIGHT 4.5 kg
HEIGHT 1400 mm
CONFORMS TO ARTG176883
MADE IN VIETNAM
Attach to Bed
Remove or move mattress to locate Self Help Pole bracket
1 To attach the pole to the bed, align the notch at base
section of the pole to groove in the black plastic sleeve
at head end of the bed.
2With the notch and groove aligned, insert the pole with
a direct downward vertical force. Check the notch is in
contact with the bottom of the groove.
Note, there are two notches on bed frame, depending
on where the pole needs to be positioned for patient
usage. Once in a notch, pole will not ‘rotate’.
Strap may be adjusted to suit patient comfort
To Remove
To remove Self Help Pole, pull vertically upwards out of the the
black plastic sleeve in the bed frame.
Do not pull at an angle or rotate the pole.
Self Help Pole is designed to help patient
position themselves in a bed. It is supplied
unassembled, in two sections with an
adjustable length strap and a plastic handle bar.
Please read these instructions before use.
This accessory is designed for use with
the BetterLiving Community Bed only.
Only approved bed accessories listed in
the BetterLiving Community Bed Parts
List should be used with the bed unless
otherwise specified by Novis Healthcare.
1Unassemble bed, as described in the Community Bed User Guide
2Lock the bed end castors
The Transport Bracket is designed for the
practical, compact and secure transportation
and storage the bed and accessories
Bracket is supplied as a non-identical pair.
Bracket can be attached under Community
Bed frame for storage when not in use.
Two people will be required to utilise transport brackets
BetterLiving Community Bed – Transport Bracket
SET-UP AND OPERATION
BetterLiving Community Bed – Transport Bracket
SET-UP AND OPERATION
4Slide all 4 locking pins fully
through Transport Bracket
hole to hold Bed Ends
securely in position.
Ensure all 4 castors
are locked to prevent
accidental movement
and all 4 locking pins
are fully inserted before
continuing to next step.
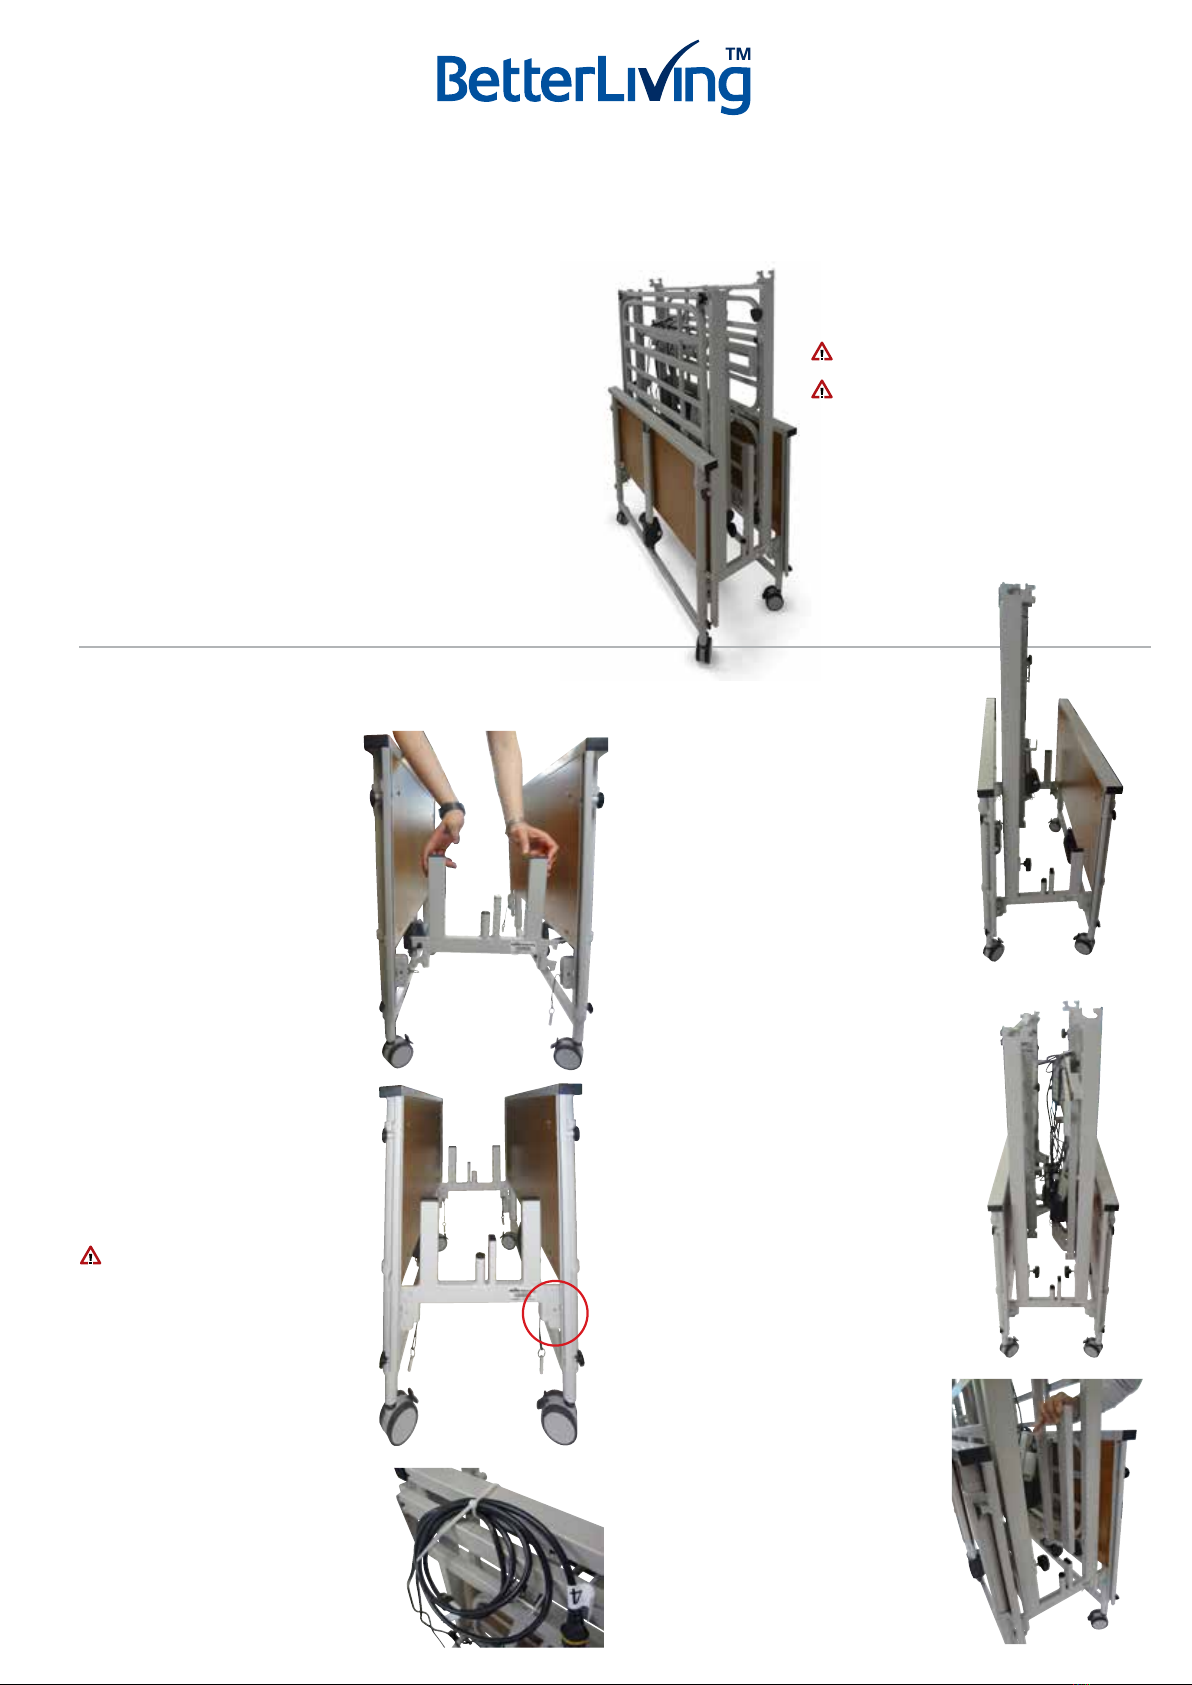
6 Place Upper Frame Section into
position on the Transport Bracket
(inserting the Bracket into Joining
locations).
When correctly positioned, control
box and knee bend actuator should
face inwards, and Foot symbol label
should be facing up.
7Place Lower Frame Sectioninto
position on the Transport Bracket.
When correctly positioned, backrest
actuator should face inwards, and the
Head symbol label should be facing up.
3Position the brackets
between upright Bed
Ends.
Hooks the Transport
Bracket onto both Bed
Ends to hold them
together.
Ensure the labels on the
transport Brackets are
facing out
5Secure all loose cables
with cable ties or
equivalent.
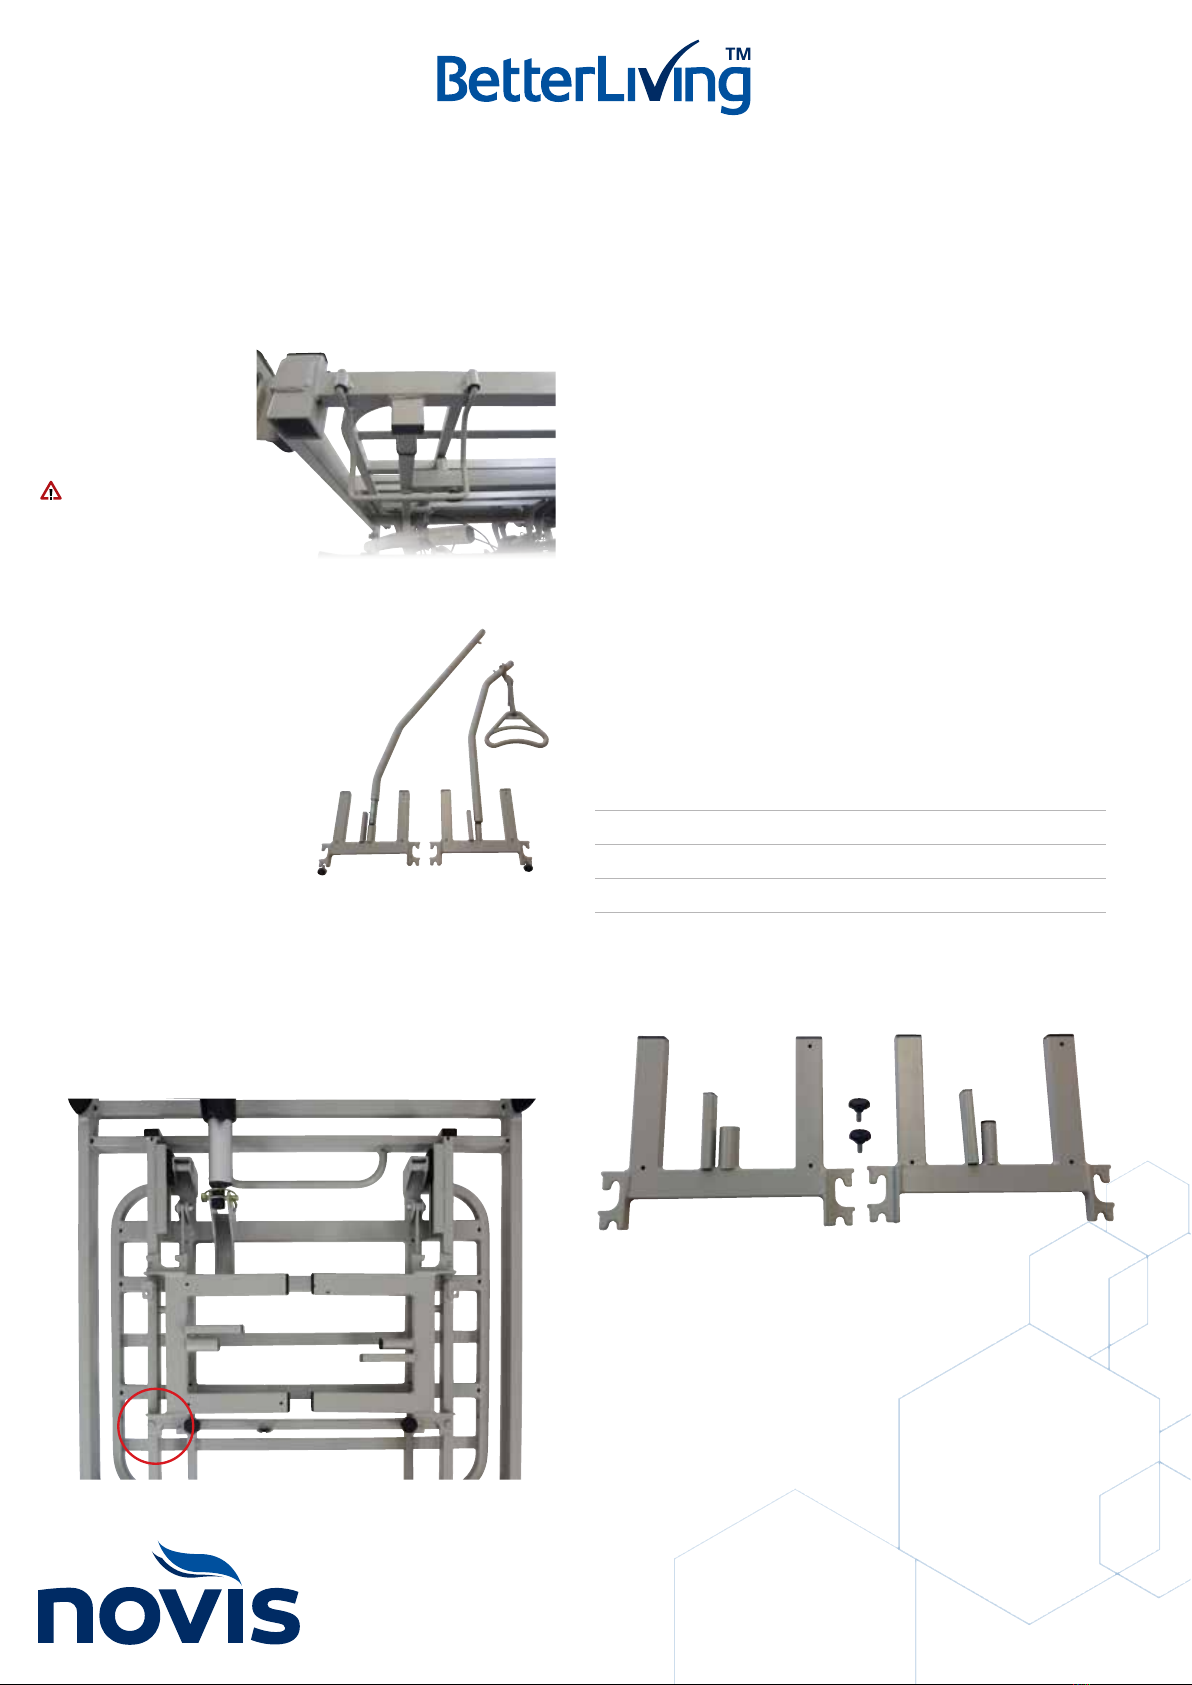
8Slide two Connection Rods onto
allocated space on the Transport
Bracket
BetterLiving Community Bed – Transport Bracket
SET-UP AND OPERATION
Pressure care and patient handling specialists
novis.com.au /1300 738 885 JAN
2018 ©
Regular maintenance
Visual inspection for obvious wear and tear of bracket. Replace
immediately if you see evidence of tears, cracks or other general wear.
Care & cleaning
Hand clean the bracket using hand spray and wipe methods only.
Novis recommends use of ocially recognized disinfectants and mild
cleaning solutions.
Warranty
Novis Healthcare Pty Ltd warrants this product for a period of
12 months. Please refer to our Warranty Statement for full details.
Please contact your authorised dealer or the manufacturer for a list of
available spare parts.
Specifications
CODE BE4017
PRODUCT WEIGHT 2.4 kg per pair
CONFORMS TO ARTG176883
MADE IN VIETNAM
Self help pole can be
disassembled transported in
two pieces, on each side of the
Transport Bracket.
Slot onto bracket with
components ‘sandwiched’
between Bed Frames
Transport Bracket Storage
When Transport Bracket is not in use, it can be stored under the
Backrest in the upper section of mattress platform.
Slot the upper hook into knob in the bed frame.
Securing it with Hand Screw Knob supplied
Accessory Storage
9Place Mattress retainers
in slots that are now
at the top of the Bed
Frames
Disengage castors
before attempting to
move
Please read these instructions before
use.
This accessory is designed for use with
the BetterLiving Community Bed only.
Only approved bed accessories listed
in the BetterLiving Community Bed
Parts List should be used with the bed
unless otherwise specified by Novis
Healthcare.
Attach bracket to the bed
Remove or move mattress to create space
at the head of the bed frame.
1 Select either the left-hand or right-hand fixing
bracket as needed to attach to the bed frame.
2 Loosen the screws with a Hexagonal Allen Key
so the fixing plate can fit over the Bed frame.
Bracket is recommended to be placed on the inside of the bed
frame (between the frame and the platform)
3Position the bottom of the fixing bracket to the bed frame and
tighten the two screws with a Hexagonal Allen Key.
Novis recommends installing both brackets
(so as not to separate the accessories)
Insert the Pole
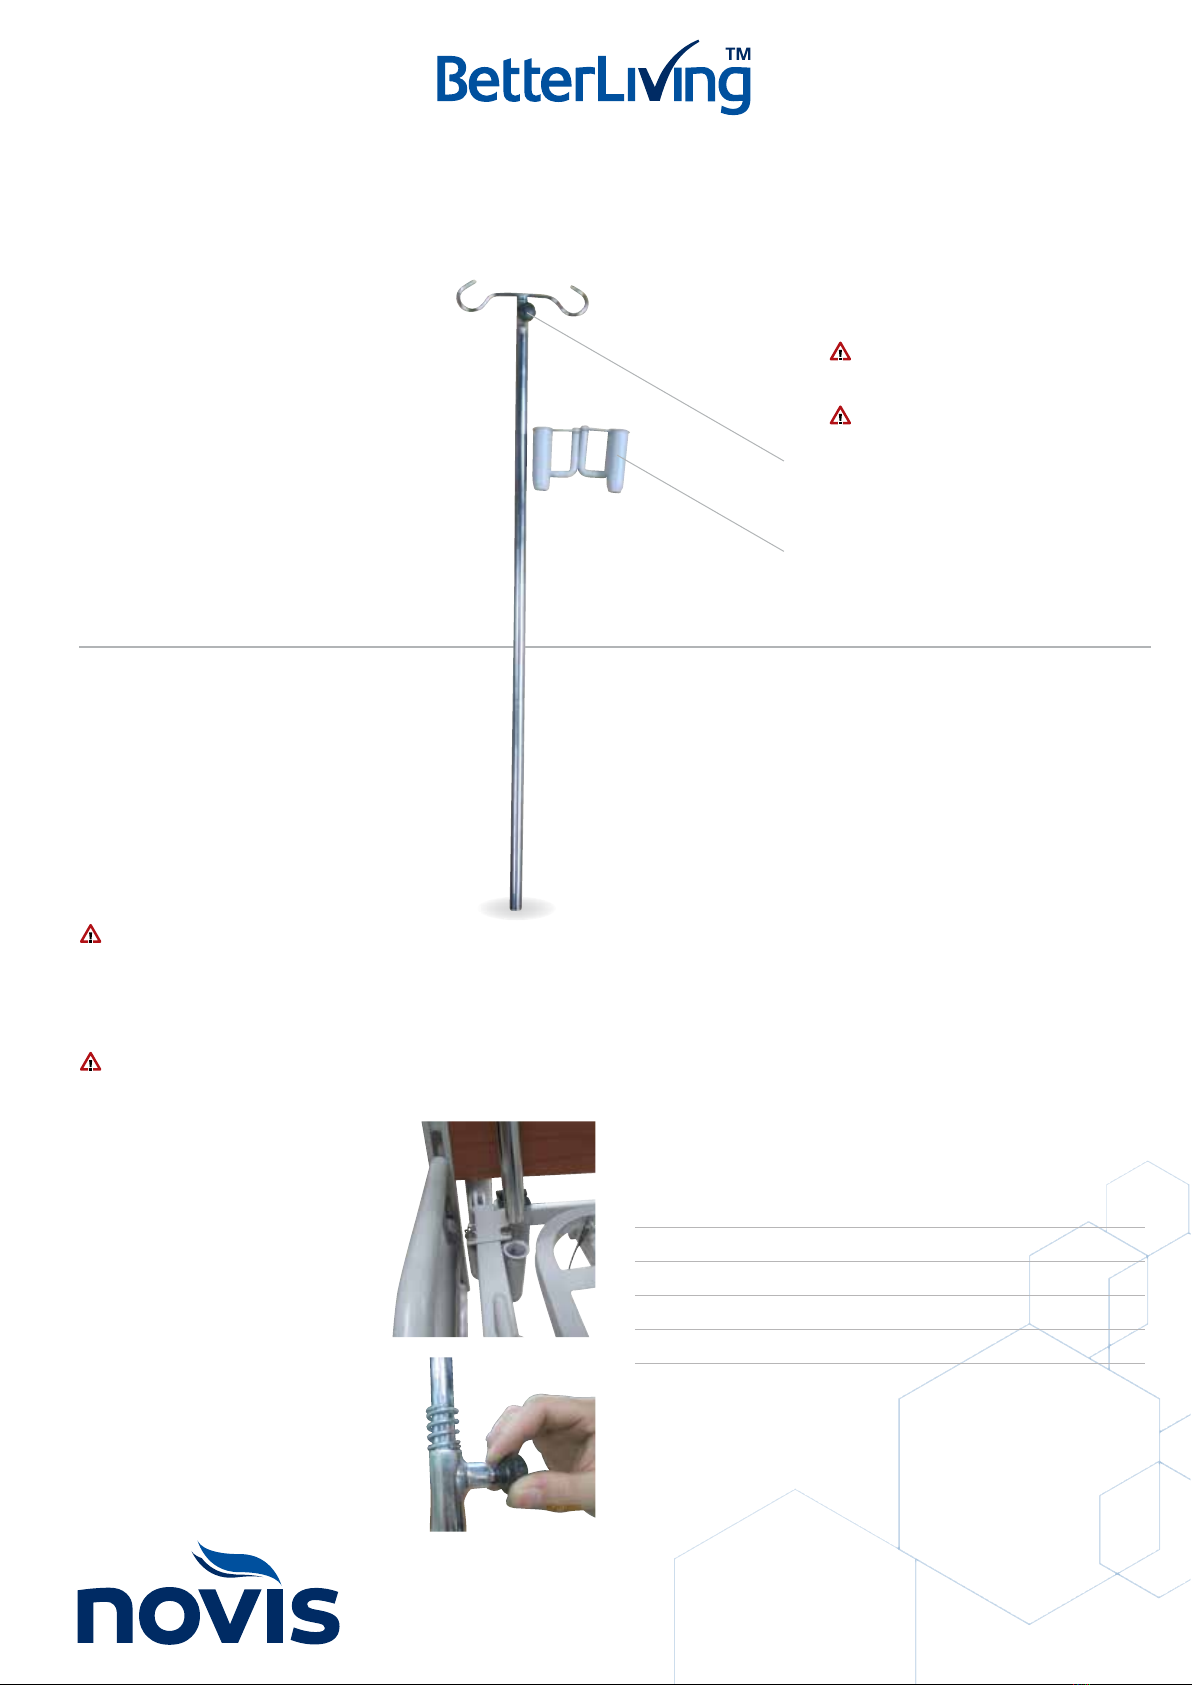
4Insert IV the pole into the fixing
bracket. Check the pole is securely
held by the fixing bracket.
To remove the IV Pole,
pull vertically upwards.
To adjust height
Pull the black height adjustable knob
to release the locking mechanism to
raise or lower the height of of pole as
needed.
The IV pole is designed
to hold IV bags only. It is
supplied assembled, with
a left-hand and a right-
hand fixing bracket (to
attach to the bed).
BetterLiving Community Bed – IV Pole
SET-UP AND OPERATION
Pressure care and patient handling specialists
novis.com.au /1300 738 885 JAN
2018 ©
Regular maintenance
Visual inspection for obvious wear and tear of pole and components.
Replace immediately if you see evidence of tears, cracks or other
general wear.
Care & cleaning
Hand clean using hand spray and wipe methods only. Novis
recommends use of ocially recognized disinfectants and mild
cleaning solutions.
Warranty
Novis Healthcare Pty Ltd warrants this product for a period of
12 months. Please refer to our Warranty Statement for full details.
Please contact your authorised dealer or the manufacturer for a list of
available spare parts.
Specifications
CODE BE8003
PRODUCT WEIGHT 1 kg
HEIGHT 786 - 1430 mm
CONFORMS TO ARTG176883
MADE IN VIETNAM
Height adjustment knob
Fixing brackets
This manual suits for next models
5
Table of contents


