Bevi Standup v1.0 User manual

Bevi v1.0 Installation Guide
Last Revision: January 2019

Safety Notice
●CAUTION : No user servicing/serviceable parts.
●This appliance must be properly installed on a GFCI protected circuit
●Maximum water inlet supply pressure: 87PSI (0.9 MPa)
●This appliance is not intended for use by persons (including children)
with reduced physical, sensory or mental capabilities, or lack of
experience and knowledge, unless they have been given supervision or
instruction concerning use of the appliance by a person responsible for
their safety.
●Children should be supervised to ensure that they do not play with the
appliance.
●Appliance is only to be installed in locations where it can be overseen by
trained personnel.
●The appliance must not be cleaned by a water jet.
●For indoor use only. 10-32°C (50-90°F)
●Appliance shall not be installed in an area where a water jet could be
used
●Do not load the shelves with more than 30 lbs (13.6 kg) each.
●Do not store explosive substances such as aerosol cans with a
flammable propellant inside the appliance.
●This appliance is climatic class 0: 20°C (68°F), 50% RH, 9.3°C dew point,
7.3 g/kg water vapor mass in dry air.
●Water pipe connections and fixtures directly connected to a potable
water supply shall be sized, installed, and maintained in accordance
with federal, state, and local codes.
●Product package is single use and must be discarded and product not
reused upon removal from the equipment.
© 2018 Bevi. All rights reserved. [email protected]

Table of Contents
Introduction
Bevi Components
Before Installation
Site Requirements
Tools
Installing Bevi
Preparing the Chassis
Preparing the Carbonator
Filling the Ice Bank
Installing the Carbonator
Attaching Water Lines
Installing the CO2 Tank
Installing Flavors
Checking the Lines
Initializing the Service Panel
Connecting to the Internet
Initial Stocking
Creating the Machine Page
Final Steps
Purging the Carbonator
Flushing the Filter
Testing Water
Enter Incubation
Bevi Support
© 2018 Bevi. All rights reserved. [email protected]

Introduction
This guide is intended to detail the installation procedures for the Bevi
Standup v1.0. For information on installing other Bevi models, as well as
additional technical documents mentioned here, please visit the Partner
Resource site at partners.bevi.co .
Bevi Components
Bevi ships on a pallet that contains the internal components for the machine,
as well as the chassis. For detailed information on each component, please
refer to the Bevi Hardware Maintenance Guide. In addition to the full chassis
and its mounted components, each Bevi pallet includes:
Carbonator with Outflow Lines
© 2018 Bevi. All rights reserved. [email protected]

Flow Compensator and Line Filter Outflow Line with Pressure Regulator
Pentek OR 3M Filter
CO
2
RegulatorDrip Tray
© 2018 Bevi. All rights reserved. [email protected]
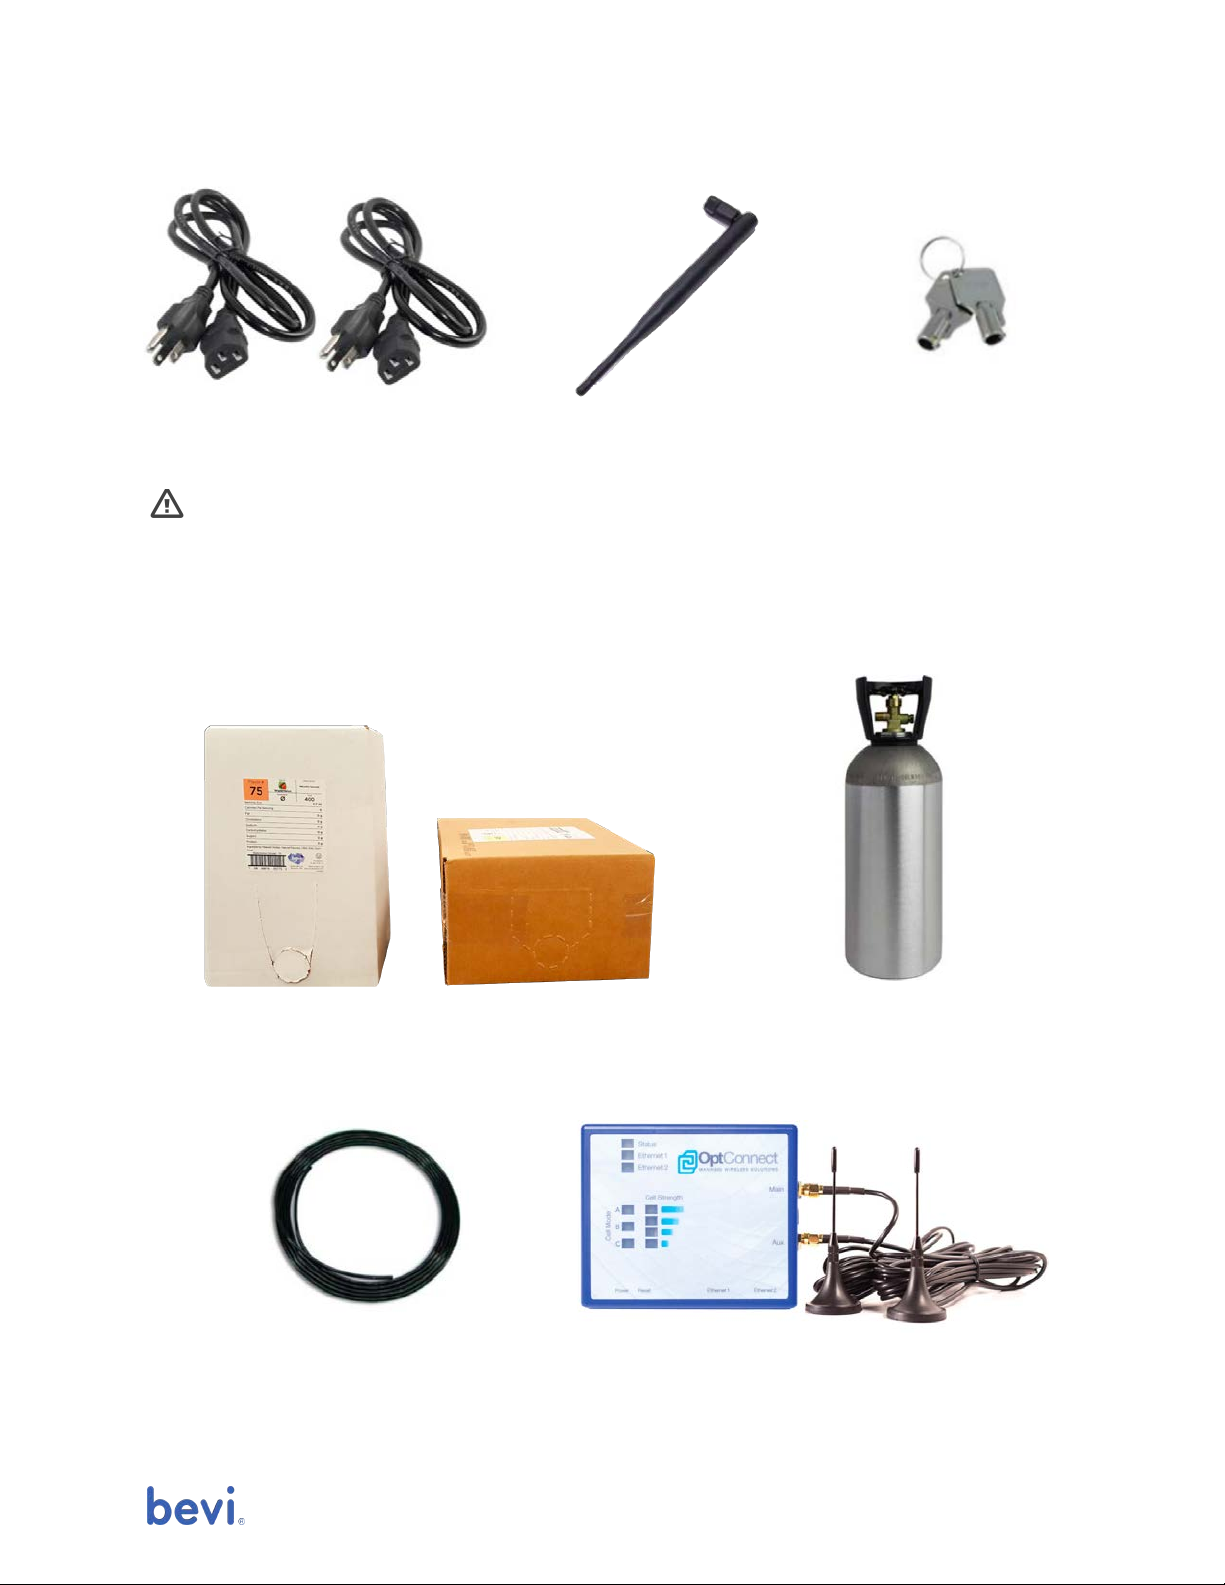
AC Power Cords (2) WiFi Antenna Bevi Door Keys (2)
IMPORTANT NOTE: Only use ⅜” polyethylene tubing on the Bevi.
Do not use ¼” or smaller ; it will cause flow problems and machine damage.
Additionally, the following components are not included with the unit by
default but are necessary for install:
Flavor Concentrate Boxes (4) 10 lb Aluminum CO
2
Tank
⅜” Polyethylene Tubing OptConnect
TM
(optional)
© 2018 Bevi. All rights reserved. [email protected]

Note: Flavors and OptConnect
TM
devices must be ordered in advance from
the Bevi ordering platform ( bevi.handshake.com ). CO
2
and tubing may be
purchased from your preferred retailer. For help with ordering these
components, please email orders@bevi.co .
Before Installation
Site Requirements
Before installing a Bevi unit, it is necessary to conduct a site inspection ensure
that the space, plumbing, and electrical requirements are meant.
Specifications for a standup Bevi include:
●Plumbing
○Minimum inflow rate of 1.3 gal/min (5 L/min) at 50 psi (3.5 Bar)
○3/8” outer diameter water line within 50 ft of the unit
●Electrical
○110-120 VAC, 60 Hz, 9A max current draw
○GFCI protected, 3-prong outlet
●Space
○At least 3” ventilation room behind the machine (the Bevi is 22”
deep)
Measuring Water Pressure
In order to confirm that the main water line will have sufficient pressure:
1. Measure the static water pressure, which should be no less than 50 psi.
2. Fully open the main water line valve and dispense 1 L of water,
recording the time it takes to fill. If the container fills in 10 seconds or
less, then the water supply should be adequate.
For more information, refer to the Bevi Standup Requirements Guide .
Tools
When installing Bevi, the following tools will be of use:
●10” adjustable wrench
●Flat head screwdriver
●Utility knife
●Tube cutter
© 2018 Bevi. All rights reserved. [email protected]

●Ratchet wrench with 3/8” and 9/16” socket
●Double sided or foam mounting tape
●Adjustable pliers
●Pitcher or bucket with clear 1L markings
●Paper towels
●Internet-connected mobile device or computer
Installing Bevi
Preparing the Chassis
1. Unlock the door of Bevi and remove the metal brace. Put aside.
2. Place the drip tray on the bottom of refill station and slide into place.
3. Plug the Bevi power adapter into back of Bevi, then into power outlet
(do not turn on power switch yet).
4. Screw the WiFi antenna into the top left corner on the back of the
chassis.
5. Insert the source water line into back of Bevi, making sure that the
water inlet valve is turned off (perpendicular to the line).
Rear view with water line, power cord, and antenna
© 2018 Bevi. All rights reserved. [email protected]

6. If you are installing an OptConnect
TM
, use double sided or foam
mounting tape to attach the main unit to the topmost shelf inside the
Bevi (above flavor shelf 1), plug in using the internal power outlet, and
mount the two antennae 6-8” apart on the back side of the Bevi near
the top of the machine.
7. Unscrew the filter housing from the filter head and insert the filter
cartridge. Ensure that the black rubber rings are in place on both ends
of the cartridge.
8. Screw the filter housing back onto the head. Hand tighten only; do not
overtighten.
9. Attach the short length of the filter outflow line and pressure regulator
to the outlet of the filter housing.
10. Turn the power button on the back of the machine on to ensure power
is working. The tablet should turn on and the lights above the the
dispense area should illuminate.
11. Turn the power back off.
Preparing the Carbonator
Filling the Ice Bank
1. Insert the filter outflow line to the Ice Bank Fill fitting on back of the
carbonator.
2. Insert the included CO
2
tubing into the In CO
2
fitting.
3. Cut a 4’ length of ⅜” polyethylene tubing and insert into the In Water
fitting.
4. On the front of the machine, confirm that the thermostat is set to 6. If
not, use a flathead screwdriver to turn the dial clockwise to 7, then dial
back so that slotted screw is pointing towards 6.
© 2018 Bevi. All rights reserved. [email protected]

Carbonator thermostat set to 6
5. Open the source water valve to fill the ice bank until water trickles into
the overflow tube. Immediately close the water valve.
6. Remove the long length of the filter outlet line from the pressure
reducer and secure the end in the top of the overflow tube for future
use, if needed.
7. Insert the free end of the In Water line into the pressure regulator
outflow.
IMPORTANT NOTE: Do not operate Bevi with a thermostat setting above
6 . Doing so will cause the carbonator to freeze and can damage the unit.
Installing the Carbonator
1. Lock the wheels of the Bevi so they do not roll and lift the carbonator
into the unit, with the overflow tube facing towards the door. This step
may be done before filling the ice bank for an easier lift.
2. Attach the AC power cord into the port to the back of the carbonator
and plug it into the outlet inside the unit.
Attaching Water Lines
1. Insert the Out Soda line into the white flow compensator.
2. Insert the Out Water line from the carbonator into still water line,
which runs up the side of the Bevi.
© 2018 Bevi. All rights reserved. [email protected]

3. Ensure that any other lines - an ambient tube and two connected and
insulated recirculation lines - are capped. They will not be used.
Installing the CO
2
Tank
1. Insert the free end of the In CO
2
line into the bottom fitting of the CO
2
regulator.
2. Remove the safety cap from a new CO
2
tank.
3. Screw the CO
2
regulator onto the tank, ensuring that the small nylon
washer in the fitting is in place. Tighten the connector nut with an
adjustable wrench.
4. Open the valve on the CO
2
tank so gas begins to flow and ensure that
the valve on the regulator is open (pointing downwards).
5. Ensure that the pressure on the top gauge (the one closer to the CO
2
tank) reads 87 psi/6 bar. If not, use a flathead screwdriver to adjust the
dial.
6. Place the CO
2
tank into the left hand side of the Bevi and set it squarely
on top of the metal plate with the regulator facing outwards.
7. Strap the CO
2
tank in by buckling the nylon strap around the tank.
Ensure that it is not tightened so much that that the tank tips, or it will
not properly record weight.
The CO
2
regulator set to a pressure of 6 bar
© 2018 Bevi. All rights reserved. [email protected]
Installing Flavors
1. Locate the appropriately labeled box and line (we recommend labelling
your lines if they are not already marked).
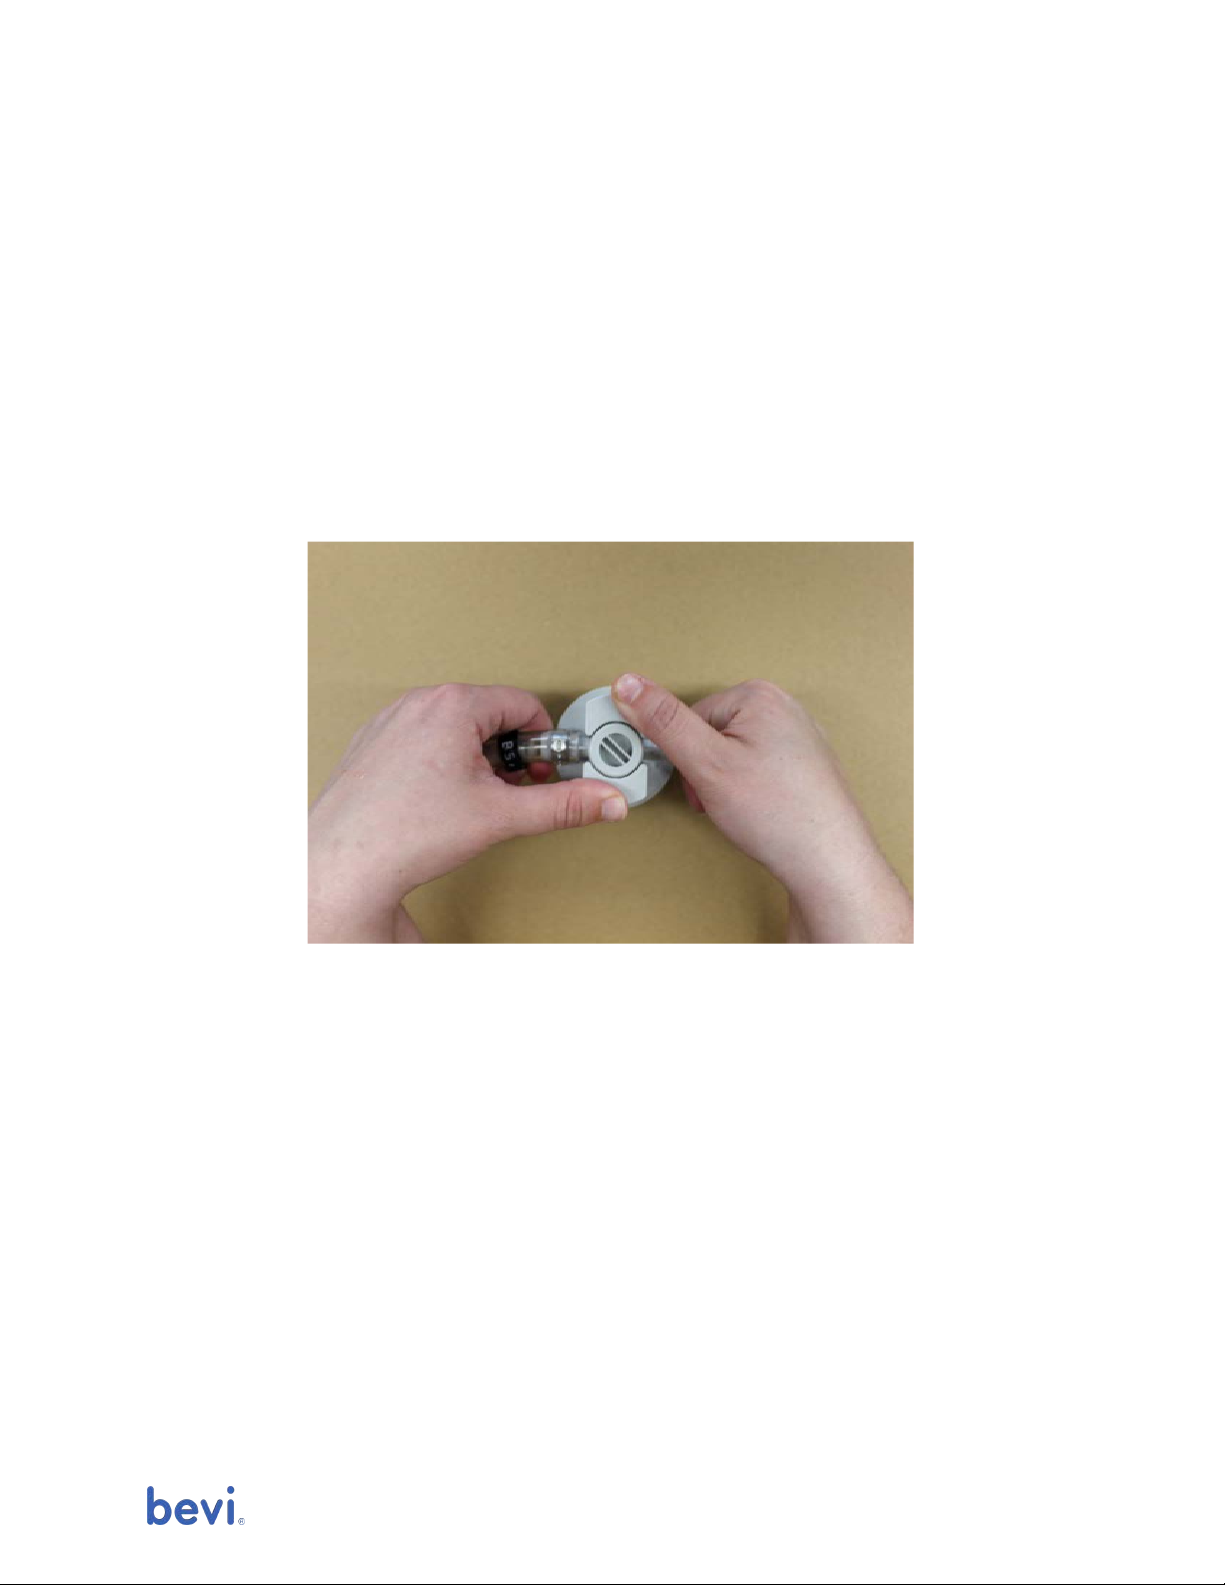
2. Hold the QDC by placing the index finger of your left hand under the
flavor line and the index finger of your right hand under the capped
flavor peg on the other side of the QDC.
3. Place your thumbs on the side tabs on top of the QDC and press them
outwards, sliding the center back until it fully disengages and clicks
twice.
Proper holding technique for a QDC
4. Slide the connector sideways and off the spout of the bag. The old box
can now be removed and discarded.
5. Open a new box of flavor concentrate by pressing in on the perforated
area. The label should be inspected to confirm flavor number and
ensure it is not expired.
6. Pull the spout out of the opening and ensure that the bag is not
bunched up and that concentrate can freely get to the spout.
7. Remove the cap from the spout. This can be discarded or kept with the
box to recap the bag upon removal. Ensure that the spout faces
upwards when doing this to avoid spills.
8. Place the new box in the appropriate area, checking that the spout is
facing outwards and hangs down slightly so concentrate can freely flow
© 2018 Bevi. All rights reserved. [email protected]

without creating air bubbles. For countertop models where the
concentrate may not have dedicated shelves, also ensure that the boxes
and lines are not interfering with or crushing each other.
9. Slide the QDC over the spout and, holding it in the same manner as in
Step 2, press the center in with your thumbs until it clicks twice.
Checking the Lines
1. Open all water valves, including the main line from the wall.
2. Turn on the carbonator and Bevi by flipping the power switches.
3. Check that water is flowing properly without leaking and that the lights
and tablet power are on. It should only take 30 seconds or so for the
touchscreen to boot up.
Initializing the Service Panel
The service panel can be accessed from the main tablet touchscreen. To enter
the panel:
1. Press the Ingredients button on the bottom of the touchscreen.
2. Select any flavor to bring up the ingredients list view.
3. Either press and hold the X in the top right corner for approximately 5-6
seconds, or tap the bottom of the ingredients list window repeatedly
until the panel appears.
When you enter the service panel, it is important to navigate to the
Advanced tab to copy down the Machine ID and Touchscreen ID (the
Machine ID can also be found on a sticker on the back of the Bevi). You will
need this when Creating the Machine Page .
© 2018 Bevi. All rights reserved. [email protected]
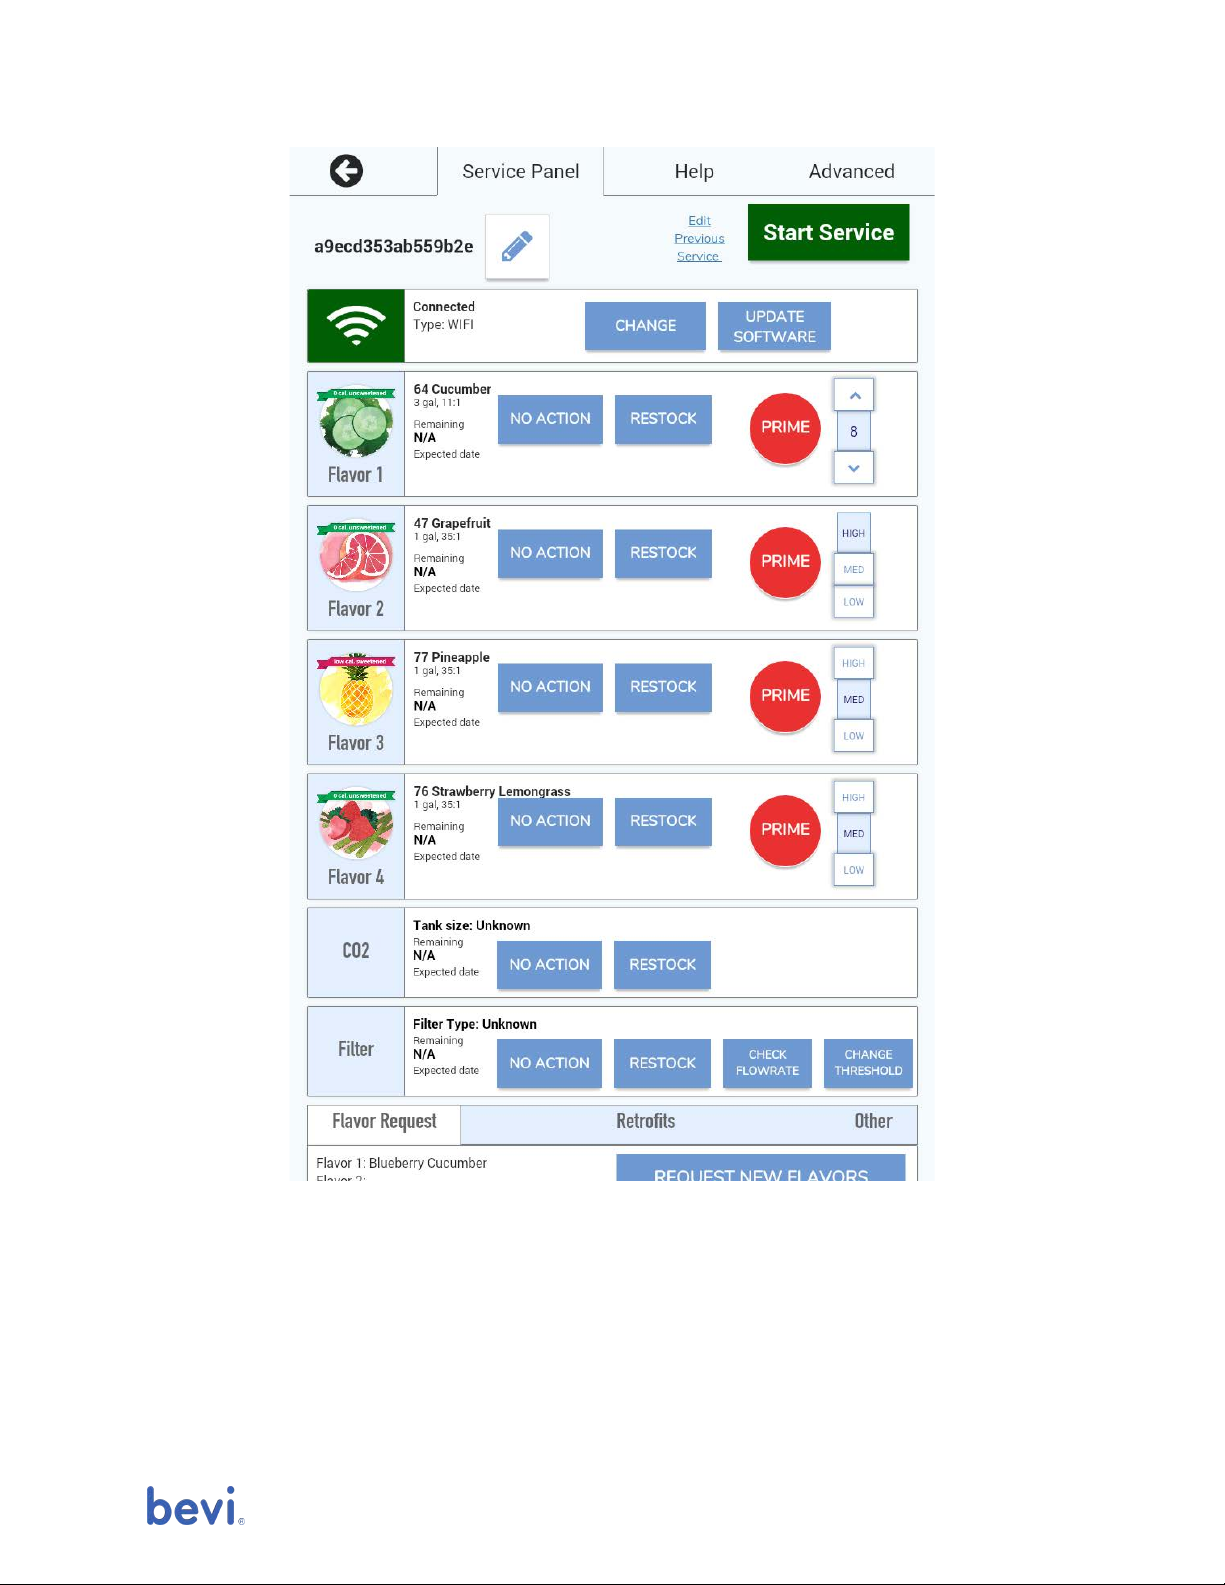
The Bevi Service Panel
Connecting to the Internet
To connect to a network:
1. Press the Change button on the top of the service panel.
2. Select the appropriate connection type from the three options.
© 2018 Bevi. All rights reserved. [email protected]

a. Connect Wirelessly: Turn on the WiFi with the slider at top right
of the screen. Select the appropriate network and enter the
password if necessary.
b. Connect via Ethernet: The ethernet port on the standup is
located beneath the power button on the back of the machine.
Simply plug the cable into the port and it should connect
automatically. In newer countertop models, the ethernet cable
hangs from the bottom of the head unit and will thread down
through the 4” hole in the countertop. And extension cable can
be used if it does not reach the ethernet jack.
c. Connect via OptConnect
TM
: After installing and initializing the
OptConnect
TM
, enter the Serial Number in the box and press
Done .
3. Return to the Service Panel main page and check that the internet is
properly connected. The icon on the left of the network field should be
green, with a “Connected” tag and the connection type listed.
Initial Stocking
Flavors
For each flavor, perform the following steps to initialize:
1. Press the Restock button to bring up the flavor list.
2. Type in the two digit ID number found on the flavor box, and select the
appropriate flavor for the new concentrate.
Note: Make sure to go by the number on the box, not just the flavor
name. Differently numbered flavors can have differing concentration
dispense ratios.
3. Place a bucket or large container under the nozzle and prime the line
for at least 15 seconds, or until concentrate freely flows. You can press
and hold the Prime button, or double tap it to let it auto pour. Tap it
again to stop the flow.
CO
2
To initialize the CO
2
, press Restock and select 5lb or 10lb (we recommend 10lb
tanks).
© 2018 Bevi. All rights reserved. [email protected]

Creating the Machine Page
The last step to registering the machine is to create a new unit on the
dashboard. To create a new machine page, you will need a smartphone or
computer (recommended).
1. Navigate to well.bevi.co and log in with your registered Google account
(please contact Bevi Support if you do not have an account).
2. On the Inventory page, press the + New Unit button.
3. Fill in the client’s company and the desired unit name and click Create
Unit .
4. On the new page, fill in the following details:
a. Company and client contact information
b. Machine, Tablet, and optional OptConnect
TM
IDs
5. If the machine has been properly connected to the internet, the page
should update itself within a few minutes with the current inventory.
Final Steps
Purging the Carbonator
To ensure that the CO
2
and water mix properly, perform an initial carbonator
purge.
1. Turn off the carbonator then stop the main water flow.
2. Dispense sparkling water until the reservoir is empty and only CO
2
dispenses.
3. Turn the water and carbonator back on to refill reservoir. Ensure that
the water is turned on first.
4. Test the sparkling water and check the pressure gauge.
Flushing the Filter
It is important whenever a filter is changed to flush it first. To flush the filter:
1. Remove the water line from the outlet of the filter head.
2. Attach a small length of tube to the outlet, and let the free end hang
down into a bucket.
© 2018 Bevi. All rights reserved. [email protected]

3. Dispense at least 3L of plain, still water into the bucket, discarding it
periodically until the water flows clear.
4. Remove the length of tube, reattach the outlet line, and dispense
another liter or so of water through the machine to ensure a clean flow
throughout.
Testing Water
Test each type of water - still, sparkling, and each flavor - testing for the
following:
●Cool temperature (it will not be fully chilled yet)
●Correct, noticeable, and enjoyable flavor
●Sufficient CO
2
concentration
●Consistent flow
If any of these seem off, consult the Bevi Hardware Guide or contact Bevi
Support at suppor[email protected]o .
Enter Incubation
IMPORTANT NOTE: Incubation is a mandatory part of the installation
process. Without it, the Bevi temperature will be too high to properly
operate. Do not skip this step.
1. Once all components are properly connected and water is flowing
properly, close and lock the door of the Bevi.
2. In the service panel, press the Start Incubation button on the Other tab
at the bottom of the page.
3. Select the incubation time. We recommend 3 hours, but it can be set
lower if the carbonator has already been running for some time.
4. A screensaver with a countdown will appear. If you need to exit the
screensaver and return to the control panel, tap repeatedly between
the hours and minutes on the screen.
Bevi Support
Online: partners.bevi.co
Phone: 866-704-2384
© 2018 Bevi. All rights reserved. [email protected]

Table of contents
Popular Water Dispenser manuals by other brands

Kinetico
Kinetico PREMIER XP Series owner's manual

WAMGROUP
WAMGROUP WAM WAMECO FIL.168 M.4L Series Installation operation & maintenance

Water Control
Water Control BrassMaster Series product manual

Clean Water
Clean Water 7500-REV4 installation guide

Petwa
Petwa 75V owner's manual

PREMIER WATER SYSTEMS
PREMIER WATER SYSTEMS NSS-744R Installation, operation and maintenance manual


Hamilton Beach
Hamilton Beach D50042 owner's manual

MasterChef
MasterChef 043-2336-8 owner's manual

Eco Pure
Eco Pure EPW2VC installation instructions

RED-RING
RED-RING Professional SB Installation & operating instructions

New Air
New Air WCD-100W owner's manual

water source
water source Water Softener operating manual