BGU WK 700 Z CLASSIC User manual

USER‘S MANUAL
Carefully read these instructions before starting
and using your saw!
LOG-CUTTING SAW
WK 700 Z CLASSIC
Südharzer Maschinenbau GmbH
Helmestraße 94 ∙ 99734 Nordhausen/Harz
Receptionist: 03631/6297-0 ∙ -111
Internet: www.bgu-maschinen.de
e-mail: [email protected]
Made in
Germany
Set-up
Use
Maintenance
Accessories

2
CONTENT
1. General information 3
1.1 About the manual 3
1.2 Delivery and transport claims 3
2. Product overview 5
2.1 PTO Log cutting saw 5
3. Safety pictograms and warning labels 6
4. Safety 8
4.1 Safety rule about the saw blade 9
4.2 Mandatory application field 9
5. Operating instructions 10
5.1 About use of the PTO version 10
6. Connection and disconnection to PTO drive 12
6.1 Safety rules 12
7. Repairs and maintenance 13
7.1 Regular maintenance 13
7.2 Yearly maintenance (or after each 50 operation hours) 13
7.3 Cleaning at the end of work 13
7.4 Tensioning and replacing the V-belt 13
7.5 Lubricating the blade shaft bearings 14
7.6 Replacing the saw blade 14
8. Transport 15
8.1 Transporting a PTO version on a three-points hitch 15
9. Dismounting and discarding an obsolete machine 16
10. Technical specifications
10.1 Noise emissions 17
11. Trouble shooting chart 18
12. Other area of possible hazard 19
12.1 Mechanical dangers 19
12.2 Environmental dangers 19
13. Warranty 19
14. EC-Statement of compliance 20

3
Dear customer,
thank you very much for your trust and preference in choosing our
equipment and joining the number of our best customers in the world.
We are confident that our equipment will be up to all your expectati-
ons and assure you a long lasting quality and performance.
1.1 About the manual
Please take time to read this manual and learn to how operate and
maintain the saw safely. For your easier reading this manual is laid
out in several sections progressively numbered 1 through 14 and lis-
ted on the “content” page.
The information, pictures and technical data in this document reflect
current or planned product features, functions, and characteristics as
of the publication date. Because of on-going product improvements
and feature additions, information in this document is subject to
change without notice.
If you are experiencing a problem or functional trouble on your machi-
ne, please read the “trouble-shooting” section to identify possible cau-
ses and remedies. If the problem or functional trouble is not listed in
the troubleshooting chart contained in this manual, ask your Authori-
zed Service Centre for service. When you have checked all the possib-
le causes listed and you are still experiencing the problem, ask your
Authorized Service Centre for help.
When you order parts maintenance or repair services, your Authorized
Service Centre, your dealer or eventually the manufacturer need your
machine serial number and engine serial number. These are the num-
bers that you have recorded on the product identification label of the
manufacturer on the machine.
1.2 Delivery and transport claims
Upon delivery of the machine please check for visual machine dama-
ges such as damaged packing or scratched buckled parts. If so, make
a remark on all copies of the delivery bill before signing for accep-
tance.
Also have the truck driver sign al copies of the delivery bill.
Should your shipper or the truck driver refuse to accept your claim,
fully reject delivery and make sure to inform us (the manufacturer)
immediately. No claims shall be taken into account by the shipper or
by the insurance company, if a reservation note is not made on the
delivery bill.
1. GENERAL INFORMATION

4
All transport damages including hidden ones must be notified within
latest 2 days from delivery. Therefore delivery must be collected and
inspected within this term. Later claims shall be disregarded. In ca-
se of assumed but not visually clear transport damages make sure to
mark the following sentence on the delivery bill: „Reserved delivery
due to assumed transportation damages.“
Insurance and shipping companies act with extreme caution in case of
transport damages and sometimes refuse to accept responsibility.
Please make sure to provide clear and exhaustive evidence (photos)
of the claimed damages.
Thank you in advance for your help and understanding in this matter.
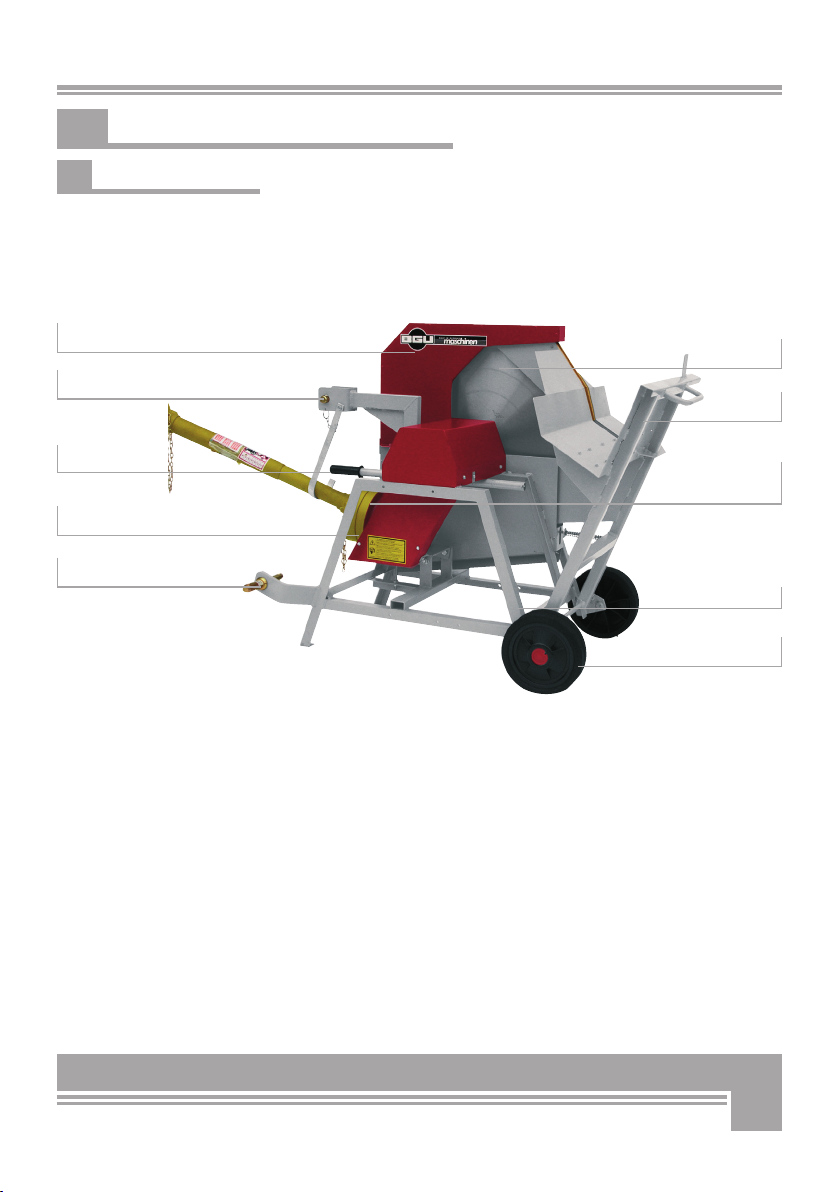
5
Upper hood
Wheels
Log carriage
Saw blade
Lower hitch pins
2. PRODUCT OVERVIEW
Grip handle
2.1 PTO Log-cutting saw
Steel stand
Top hitch point
PTO with gear
Driveline bearing
bracket
6
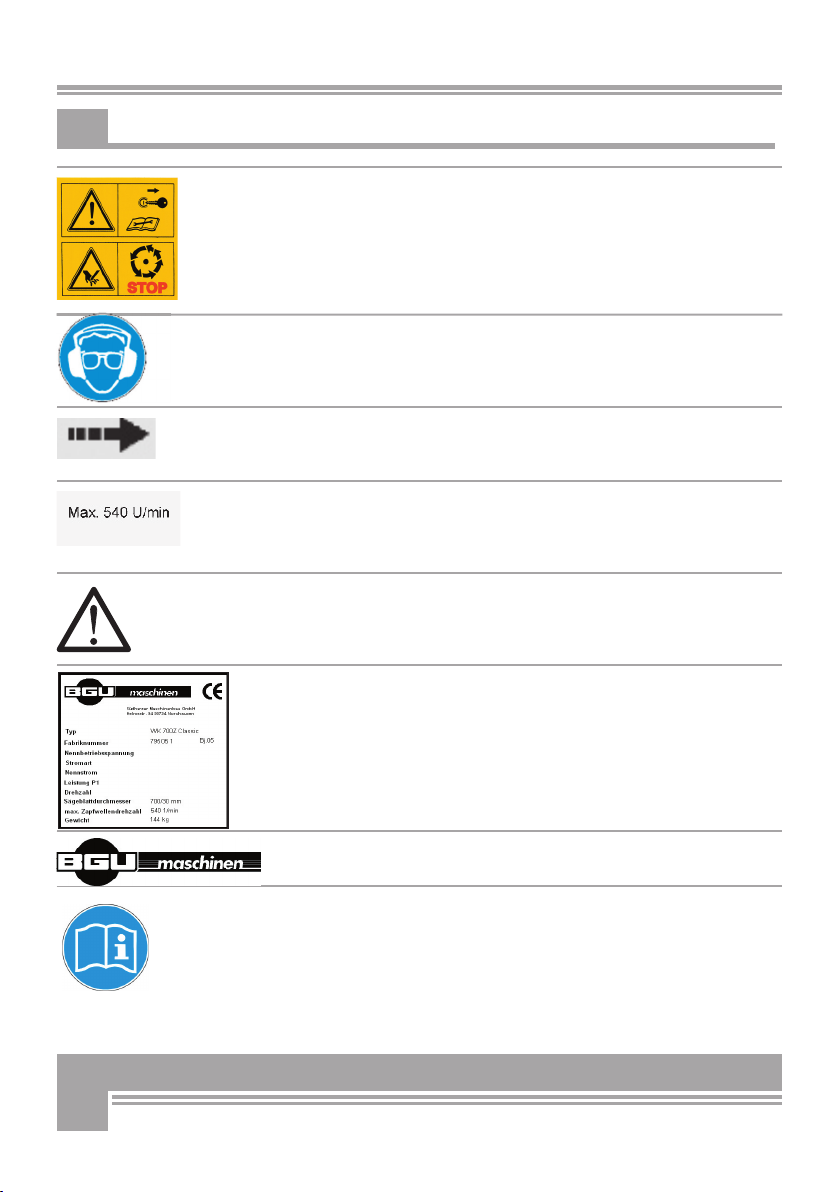
1. Machine safety label
Before setting-up, servicing, maintaining and cleaning the machine,
disengage power and stop the engine. Lock the tool and secure
against accidental start.“
Keep your hands away from all moving parts!
Pinched hands danger!!
2. Safety pictogram„Wear ear plugs and goggles!“
Loud noise can cause impairment or loss of hearing, wear a suitable
protective device such as ear plugs and safety goggles.
3. Safety pictogram „Direction arrow“
Motor, PTO shaft and driveline must be turning in the same direction
as shown by this arrow.
4. Warning label (only on PTO powered versions)
„Max. 540 RPM“
This label shows the max admissible number of PTO shaft revolutions.
5. Safety-alert symbol
Read and recognize safety information. Be alert to the potential for
personal injury when you see this safety-alert symbol.
6. Identification label „Product identification““
This label shows the company details of the manufacturer and the
main machine technical data.
7. “BGU-maschinen” Manufacturer’s logo
8. Personal protection sign
Mind these instructions for safe operation!
3. SAFETY PICTOGRAMS AND WARNING LABELS

7
9. Personal protection sign “Wear suitable protecti-
ve boots!”
This label shows that you must wear safety boots when working with
the saw.
10. Machine safety label
„Before operating the machine read this manual
and mind all safety instructions“
To avoid personal injury or death, carefully read and understand all
instructions pertaining to the saw including the engine manufacturer’s
operating and maintenace instruction manual.
11. Personal protecion sign “Wear suitable protec-
tive gloves!”
This label shows that you must wear safety gloves when working with
the saw.
12. Warning label „Do not operate the machine in-
doors!“
Never run the machine inside a closed area.
Exhaust fumes are toxic!

8
Strictly perform installation, set-up, maintenance, cleaning
and transportation with the motor switched off and the blade
firmly secured against accidental operation. Immediately dis-
connect power off the machine in case of any eventual fault or
trouble.
The user shall strictly comply with these operation, set-up, mainte-
nance, repair and trouble-shooting instructions in order to assure safe
operation and no damages to the equipment. Moreover we recom-
mend to let the machine be run only and strictly by trained and skilled
staff who must be familiar with the applicable occupational safety
and health administration rules as well as applicable transportation
and traffic rules. Incorrect use of the saw can cause serious injury or
death.
No person under school leaving age of 18 should operate a circular
saw. However, young people in age of 16 or slightly more may work
on the machine providing that they received adequate training, that
they carry all due personal protection safeties and that an adult su-
pervisor keeps standing nearby.Machine instability can result in injury
or severe damages. To ensure stability during operation make sure to
choose a flat, dry floor free from any tall grass, brush or other inter-
ferences.
The working area around the machine must be kept as clear as pos-
sible from surrounding tripping obstacles and slippery foundation
floors should be duly treated (do not use saw dust or wood ash for
this purpose).
Make sure that the equipment stands on a safe stable foundation.
Do not allow within the hazardous zone any unauthorized third or per-
sons who are not familiar with the dangers related to use and opera-
tion of the machine. Allow no bystanders, especially children and pets
in the working area.
The maximum number of drive shaft revolutions is 540 rev/min. PTO
and drive shaft rotate at 540 rpm when at full recommended speed.
For your own safety, make sure that this speed is never exceeded.
● Due and proper illumination of the working site must be provided at all times.
● The saw blade must be duly sharpened for maximum performance
and no recoil danger. Flash and chips must be removed off the
crown wheel.
● Damaged or buckled blades (very likely to break during operation)
should not be used.
4. SAFETY

9
● Always wear suitable hearing (ear plugs or muffs) and eye protec-
tion (goggles or safety glasses) while operating the machine.
● Set up the machine on a firm surface which is free from stumps,
boulders and other obstructions.
● Operators must wear steel toe safety shoes and snug-fitting, tear-
resistant work cloths.
● No additional customised protections or tools are provided on board
of the machine, other than the ones designed and supplied by the manufacturer.
● The cardan shaft keeps turning (PTO models) till the blade comes to
a complete stop after switching the machine off.
● Do not apply pressure (for instance by means of the wood stock)
against the blade to make it come to a quicker stop.
● The machine is not designed for indoor use (dust release).
● Make sure that the cardan shaft is not coupled when you start the
engine of your tractor.
● NEVER leave the machine unattended with the running motor.
● Before leaving the operator‘s station for any reason, stop the ma-
chine motor, disconnect power and secure the machine against acci-
dental operation.
● Logging and woodworking involve a lot of operator’s care and atten-
tion. Make sure to feel perfectly fit and comfortable when you work-
with a saw. Stop and take a rest at first occurrence of any stressful-
condition or sign of fatigue.
4.1 Safety rules about saw blade
The unit is strictly designed for use with a 700mm (outer diameter)
blade. The blade (Cr) is capable to withstand a maximum number of
revolutions of 3000 rev. per minute. Strictly use blades as per EN Standard 847-1.
Do not ever use worn out blades in need of sharpening.
Make sure that the blade shows good conditions, no damages, no
cracks, no buckling and no missing/broken teeth/bits.
Hard metal blades require special care and handling. Make sure that
the blade bits do not ever hit against hard surfaces (for example con-
crete floors), which might cause invisible bits damage. Hard metal
blades must be suitable to operate at 2700 revolutions per minute.
4.2 Mandatory application field
These log-cutting saws are strictly designed for cutting firewood
chunks loaded on the special log carriage. All other applications are
forbidden and considered as “misuse”.
The manufacturer is not liable for any damage or injury resulting from
misuse! The machine is capable to handle wood stocks in diameter of
8 - 26 cm. Shrubs and tiny branches bundles must be loaded on the
trough and securely hold on both sides of the blade.
The machine is strictly conceived for ONE-MAN OPERATION ONLY.

10
This PTO-powered version „WK 700 Z Classic“ is an excellent machine with
inbuilt hydraulic system and PTO drive for firewood preparation directly in
the forest/wood by simply powering it off your tractor via a cardan shaft.
A rugged all-steel construction assures longest machine life at any
operative condition.
This machine is specially designed to work with a 700 mm blade approved
and manufactured to EN 847-1.
This model is PTO-powered by the tractor by means of cardan shaft.
When you switch the machine on make sure to check that the blade is
mounted to rotate in the proper direction before cutting any material. The
blade must rotate against the operator that is upward toward the operator.
Load the log in the carriage and smoothly push it to the blade.
If you working with twisted or crooked logs make sure to load
the log on the carriage, so that the bolged side of the log is
turned to the blade in order to avoid the log from tipping over
or jamming during cutting and consequent possible even major
damages to the blade.
Now fasten the grip on the log carriage and push to smoothly tilt it over to-
wards and through the blade.
NOTE: avoid excessive pressure on the carriage through the blade while cut-
ting. Excessive hold-down pressure may slow the blade down and cause dan-
gerous jamming!
When feeding the log to the blade avoid all jerky, bumpy movements that could
lead to risky and dangerous situations. Timber in maximum length of 1.1 m must
lay on the carriage by the entire length with no projecting end. After the first log is
cut off the timber, let the carriage swing down to start-position (wide opened) be-
fore advancing the remaining timber to the blade and starting a new sawing cycle.
If you try to feed the stock forward and cut before the trough reaches back to start
position, you may run the risk of hitting the stock against the blade guard conse-
quently causing severe personal injuries and machine damages for which the man-
ufacturer carries no liability.
On all PTO-powered models the tool (blade) keeps turning for a while before it co-
mes to a complete stop after the PTO-drive has been disconnected.
5.1 About use if the PTO version
This PTO-powered version WK 700 Z Classic is an excellent machine
with inbuilt hydraulic system and PTO drive for firewood preparation
directly in the forest/wood by simply powering it off your tractor via a
cardan shaft. Benefits: sawdust, bark rests and wood chips can be
left in the forest saving extra disposal work and costs.
5. OPERATING INSTRUCTIONS

11
If the maximum 16 mm spacing between clearance inserts
(wood strips) is reduced because of excessive wear, provide
for immediate replacement of the wooden inserts!
(see fig. A1)!
Figure 1
„Maximum size of the
clearance inserts““
12
The PTO-driven WK 700 Z Classic is equipped with a three-point linka-
ge to fit on the one available on your tractor. The drive shaft is going
to act as linkage and driving element between the tractor and the saw
and should be therefore duly mounted and secured by the special pins
available on the machine.
Make sure to perform accurate connection of your PTO drive shaft both on
saw and power input side. A pictogram on the drive shaft showing a little
tractor tells you which side must be connected to tractor power output.
Press the detent lock inwards as you slide the machine shaft onto the
tractor PTO stub shaft. Slide the machine shaft forward far enough to
make sure the detent lock has snapped into the lock position.
Secure the drive shaft with the special restraining chain to avoid dangerous
twisting.
For increased safety make sure that a minimum wrapping of 1/3 of
the total useful length is achieved. (see Figure 2).
Do not perform any repair, adjustment, cleaning or maintenance work
whatsoever while the machine is running (disconnect PTO-drive or
switch the motor off)!
Strictly use certified and approved drive shafts.
Always connect and secure the driveline in compliance with shaft ma-
nufacturer instructions.
Never use a PTO driveline without safety shield or with a da-
maged guard. Never use a PTO driveline without safety shield
or with a damaged guard and make sure that the shield is of
the correct size and length for the drive shaft.
PTO-versions are stationary machines to be strictly operated on
ground.
6.1 Safety rules
Never let another person stand between the tractor and the
implement during hitching and during operation.
Keep all components of the PTO system shielded and guard-
ed. Never let a helper or unauthorized thirds stand between
the tractor and 3-point hitch implement. Crushing injuries and
death can result.
6. CONNECTION AND DISCONNECTION
TO PTO DRIVE
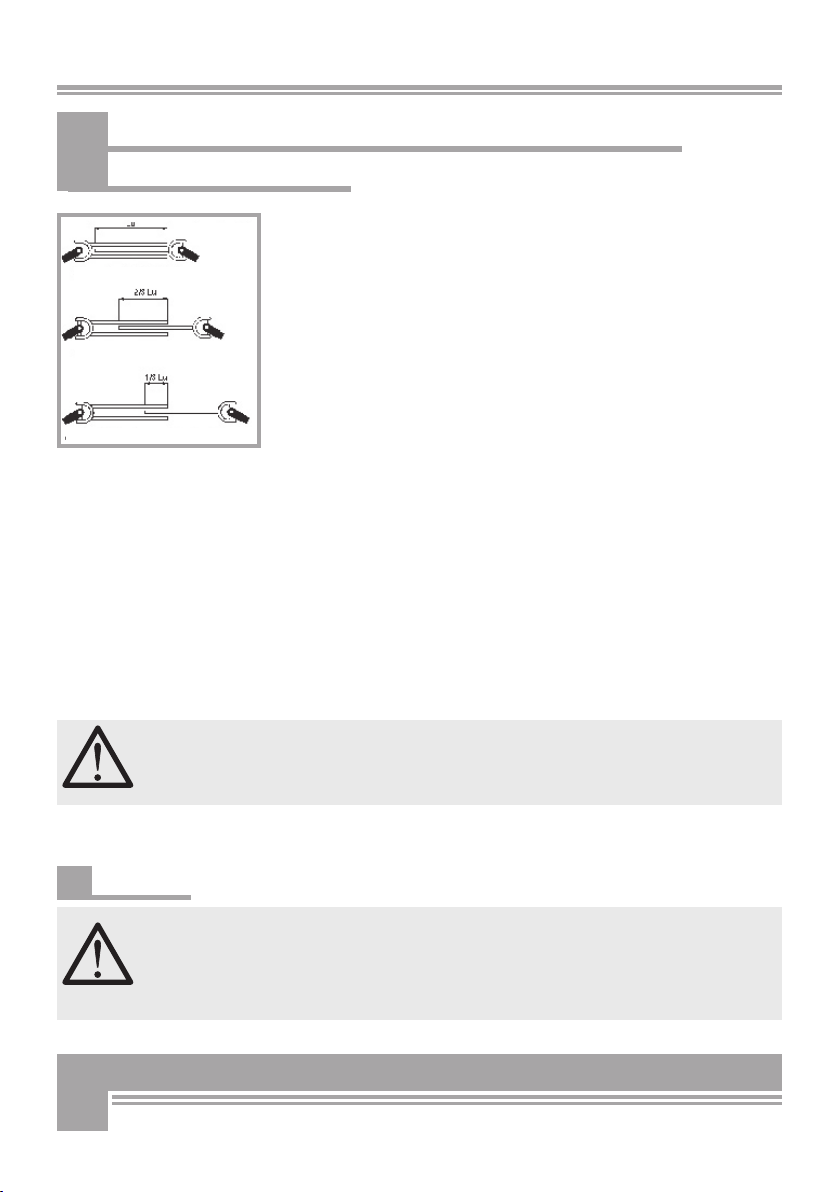
Fig. 2 Driveline coupling
scheme
Closed length = longest telescopic half fully
overlapping shortest one
Operating length = joint overlap by approx 2/3 Lu
Longest (fully extended) length = joint overlap by at
least 1/3 Lu)
Lu= useful length
13
Make sure that the machine is fully disconnected and all mo-
ving parts are secured before performing any maintenance/re-
pair work on the machine. In the event of any malfunctioning,
switch the machine off before trouble-shooting.
7.1 Regular maintenance
The following tasks belong to ordinary maintenance works:
● Clean the machine from eventual residual wood, chips or dirt.
● Lubricate all moving parts.
● Lubricate the bearings beneath the blade arbour
Additional ordinary maintenance for PTO powered versions:
● Check-up and eventually stretch the V-belts, if required.
● Lubricate the bearings beneath the blade arbour
7.2 Yearly maintenance (or every 50 operation hours)
Hydraulic oil change: Oil capacity approx. 0.4 l
Oil viscosity: Class CLP/CC 150 (ISO 150) SAE 90G
7.3 Cleaning after use
Remove wood chips and saw dust produced and left on the machine
during work.
Clean the log carriage assembly removing all wood rests.
7.4 Tensioning and replacing the V-belt
If you are operating a WK 700Z Classic (PTO) model, proper mainte-
nance requires re-tensioning of the belt after a certain number of ope-
ration hours.
To perform stretching of the V-belt between the angular gearbox and
the blade arbour, you need adjusting the clamping bolts located bene-
ath the angular gearbox.
Adjust the V-belt so that you can still provoke an approx. 10 mm of
deflection by applying one finger tip pressure in the middle (see figure
3 - Stretching a V-belt) of the distance between sheaves middle axis.
BEWARE: failure to provide due re-tensioning will result into a less ef-
ficient V-belt drive that slips and may be wear out faster.
To replace the belt, release the clamp-screws and remove the safety
guard from the V-belt drive area.
Release and remove the old belts from the sheaves and fit the new
ones on.
7. REPAIRS AND MAINTENANCE
Figure 3
„Stretching a V-belt“
Sheaves centre distance
approx. 10 mm deflection
14
Make sure to refi t the V-belt casing back in place before operating the
machine again.
7.5 Lubricating the blade shaft bearings
If you are using a „WK 700Z Classic“ model, make sure to provide peri-
odical lubrication of the blade shaft after each 100 hours of operation.
Remove both cover plates on the safety guard over the blade shaft
and use a regular greasing gun to perform bearings lubrication. Provi-
de lubrication by means of a greasing nipple. Make sure to refi t both
cover plates before working again.
7.6 Replacing the saw blade
Safety note ! Wear safety gloves - pinched hands danger.
Before replacing the blade make sure to disconnect the machi-
ne from power (unplug the electric motor or turn the tractor
off).
To replace the blade, following precautions must be taken at all times:
● Disconnect power off the machine (unplug power cord or stop the
motor of the tractor) and wait for the blade to come to a complete stop.
● Tipp the upper blade hood over by releasing and removing the 4
hex-screws with hex-nuts.
● Release and undo the fi xation bolt on the blade clamping fl ange
using a spanner and hold the blade using another spanner to
secure the blade fl ange on the motor side as you undo the nut.
● Remove the clamping fl ange.
● Pull the old blade off the shaft (make sure to wear tear-resistant
gloves. DANGER!)
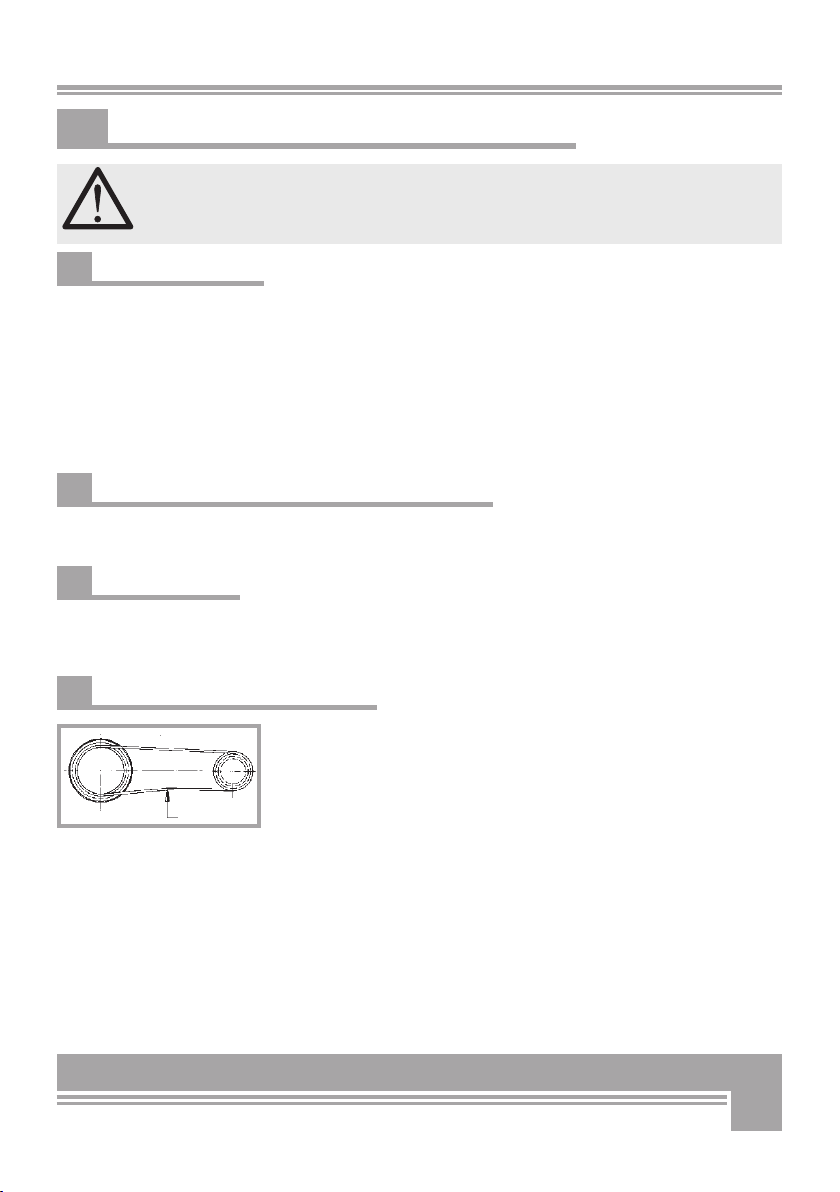
● Fit the new blade on the shaft. Note direction of rotation. All
tools must always work against the feed direction that is
revolutions must occur towards the operator’s station. (see Figure 4)
● Mount the locking fl ange back on the blade shaft minding the right
position of the feather-key in the fl ange.
● Tighten fi xation bolt with nut on the fl ange.
● Refi t the blade hood in the original position duly set and clamped.
● Now the saw is ready to operate again.
WARNING: Do not regrind worn out blades if the tips do not
show above bench level when the blade is in the resting positi-
on. In this case old blades must be replaced.
Fig. 4
„Direction of blade
rotation“
Saw blade
Log
carriage

15
Log & timber cutting saws are light equipment that can be easily mo-
ved on shortdistance by means of two caster wheels and an ergono-
mic, comfortable grip handle located on the chassis on the rear side of
the machine.
Simply fasten the grip and lift the saw for safe and rapid hauling of
the machine.
For safety reasons the grip handle is retractable and should remain
retracted during work to avoid risk of tripping or entanglement.
8.1 Transporting the machine on a three-points hitch
Transporting requires attachment to a three-point hitch on a tractor (or
other equivalent vehicles). Make sure to comply with the provisions set
forth by this paragraph.
Should the dimensions of the machine hide any of the travel signs and
illumination systems on board of your tractor (rear/head lights, rear
travel lights, stop lights, turn indicators etc...), you must provide for
the same signs and lights on the machine is order to travel on public
roads.
The same applies for eventual other tools and ancillary equipment in-
fringing the tractor profile by 1 meter in the back and by 40 cm on the
sides. In this latter case side lights must be provided in the front.
Make sure to apply suitable warning sings (white/red) as per DIN
Standards 11300 to warn about protruding obstacles likely to endan-
ger the nearby traffic.
Up-to-date rules and road traffic provisions as per your local State vehicle codes.
If transporting by attachment to a three-point hitch on a tractor, make
sure to provide suitable front ballast for increased steering perfor-
mance. The maximum speed of the vehicle while transporting the saw
should not exceed 30 km/h.
8. TRANSPORT

16
When the machine is fully obsolete and cannot be of any longer use,
it should be duly dismounted ahead of discarding. Certain components
need deactivation and dismantling in order to assure that no further
use is made by other parties and that no worn out parts are recycled
for other applications.
During dismantle be alert for possible recyclable materials and com-
ponents that belong to differentiated waste collection procedures ap-
plicable in your country.
The manufacturer is not liable and undertakes no responsibility for
personal injuries or damages that may result from the recycling of
worn out machine parts and eventual re-use in other applications dif-
ferent than originally stated in this manual.
Dismantling procedure:
Take good note please: each and every dismantling task must be per-
formed by authorized service centres or trained skilled staff only!
· Pull the machine down into single components
· Lock and clamp all moving machine parts
· Deliver each single component only to authorized waste manage-
ment facilities
· Drain oil and fuel out of respective tanks and lines before disposal of
the machine
· Remove rubber and plastic parts from the machine that must be se
parately disposed of
Deactivated, clamped moving/driving parts and components are of no
further risk and danger.
9. DISMOUNTING AND DISCARDING AN
OBSOLETE MACHINE

17
9. DISMOUNTING AND DISCARDING AN
OBSOLETE MACHINE Technical data Unit of
measurement
WK 700 Z
Classic
Max. log diameter mm approx. 240
Blade diameter mm 700/30
Weight kg 144
Max. number of PTO
shaft revolutions
RPM 540
Size and dimensions (with opened
log carriage)
Length mm 1220
Width mm 865
Height mm 1100
10. TECHICAL DATA
10.1 Noise emissions
The noise level was measured in compliance with the general rules for
establishment of noise and acoustic pollution of garden and agricultu-
ral equipment on work sites as well as with other national standards
for noise measurement. The applicable measuring parameters were:
Measurement on the machine front edge at 1600 mm height
and 400mm away from the blade on the right hand side, while proces-
sing round beech wood in the size of 80+/-5% of the admissible tim-
ber diameter as per this instruction book.
Detected noise levels:
No load 91 db(A)
Max load 105 db(A)
Hearing protection is mandatory!
The above mentioned values are emission measurements and may not be
therefore assumed as for a safe work environment. Although there is a relati-
onship between noise emission and immission levels, this is no sufficient basis
to determine the extent of on-site required protection. There are a lot of other
factors that can influence site work and risk of injuries and namely: the actual si-
te/buildings configuration, the concomitant presence of other noise sources (for
instance other machines performing other works in the neighbourhood) etc...
The factors applied for determining safety of a workplace may al-
so very from one country to the other. We are reporting here the noi-
se values detected in the facility of the manufacturer on order to allow
the user performing a better evaluation of the possible risk/disturbance.

18
11. TROUBLE-SHOOTING CHART
The following section will detail procedures for checking your saw,
should you encounter a malfunction. Before setting, operating, clea-
ning, maintaining or repairing the processor, read the manufacturer’s
operating and maintenance instruction manual.
Type of trouble Possible causes Remedies
The machine starts but
the blade does not run.
- Locking flange of the blade
shaft is not tight
- V-belt slips
- Tighten both the screw and
- Tension the V-belt
Blade runs but in the
wrong direction
- The tractor driveline runs re-
volving in the wrong direction
- Set the driveline to run in the
right direction
Blade chops - Stump blade - Sharpen or replace the blade
Loud noise out of the
gearbox
- Low or no oil in the gearbox
- Faulty gearbox
- Fill new oil in the gearbox
- Replace gearbox

19
12. OTHER AREAS OF POSSIBLE HAZARD
12.1 Mechanical dangers
Possible dangers related to machine moving parts (saw blade) are
minimized by means of suitable safeties and protections that cannot
be dismounted unless special tools and equipment is used. Do not
attempt to remove or by-pass any of the machine inbuilt safeties.
DANGER: removing or by-passing inbuilt machine safeties may result
into serious operator’s personal injuries.
12.2 Environmental dangers
The machine is strictly designed for outdoor applications.
DANGER: do not operate the machine indoors to avoid risk of inha-
ling wood dust.
13. WARRANTY
All BGU machines are covered with warranty terms in accordance with
the law. Customers should promptly notify the manufacturer eventual
material or production claims on their detection. While asking for war-
ranty service, customer should show copy of their purchase invoice or
receipt. The warranty does not cover for faults due to natural wear,
temperature or weather agents as well as misuse, faulty installation
or set-up, improper operation and lubrication or acts of vandalism.
No warranty will be given on parts damaged by improper handling,
use and application. The manufacturer is further not responsible for
warranty service on machines used for other applications than menti-
oned in this manual, altered or modified by the customer or other
thirds, or overloaded. Never attempt to use an incomplete machine or
one fitted with unauthorized modification. Any modifications to your
machine can cause personal injuries, and will void your warranty.
Consumable parts with a prescribed life (i.e. pulleys, tools, blades and
various auxiliary materials) are excluded from the warranty as well as
adjustment, optimization and fine-setting or retrofitting works.

20
We hereby declare that the equipment described in this manual responds in full to the actual version
brought on the market. We, the manufacturer further declare that this equipment was duly designed
and manufactured in accordance with the actual European Safety and Health Standards settled by the
relevant EEC directives as well as the latest electromagnetic standards issued by the European Council
of 3.5.89 and later enforced by all member states.
This statement of compliance does not apply to customer modifications of the equipment without
manufacturer’s written approval.
Date
Official language in the country of use :
01.07.2016
Machine type: Log cutting saws
Model: WK 700 Z Classic
Machine type: see model label
Applicable
European Standards: EC Machine Directive No. 42/2006
EMV (Low Voltage) Directive 108/2004
Other harmonised Standards
especially: In order to assure full compliance to these European
Standards, the following national codes , standard practices,
and Technical Specifications have been implemented:
EN 1870-6, EN 61000-3-2, EN 61000-3-3, EN 55014-1,
EN 55014-2, EN 294, EN 847-1, EN-60204-1
Official inspection Institute who performed EEC specimen approval as per Annexure IV of the Machine
Directive:
Deutsche Prüfstelle für Land- und Forsttechnik DPLF
34114 Kassel
Postfach 410356
Registration number: 0363
to the EC Machines Directive No. 42/2006 and EMV (Low Voltage) Directive 108/2004
14. CE – STATEMENT OF COMPLIANCE
René Pareis (Managing Director)
English (Copy for customer’s use)
Table of contents
Other BGU Saw manuals


Popular Saw manuals by other brands


 Spare parts list")


Evolution
Evolution EVOSAW2301 instructions

Makita
Makita 5704R instruction manual

Clarke
Clarke Metalworker CBS45MD Operation & maintenance instructions

Bosch
Bosch CRS180 Operating/safety instructions

Storch
Storch 570350 Translation of the original instruction

Scheppach
Scheppach PL75 Translation of original instruction manual