BHOOP BH0514 User manual
Isofix base for MUHO BH0514
Base isofix per MUHO
Isofix Basis für Muho
Base isofix pour Muho
User manual
Manuale utente
Benutzerhandbuch
Manuel utilisateur


3
UK- Instructions for use
Contents
Contents 3
Important 4-5
Know your car seat 6-8
Suitability 9
Use in the vehicle 10-11
Installation in the vehicle 12-17
Securing your baby 18-22
Checklist 23
Cleaning 23

4
WARNING
Read this instruction manual carefully.
The correct fitting of the ISOFIX and support leg anchoring systems is of vital
importancefor the safety of your child.
For the future use of the seat, it is important the you keep the instruction
manual carefully. Never leave your child unattended in the car.
Do not use a child safety seat if the vehicle seat is equipped with a front air-
bags. This can be dangerous. This does not apply to so-called side airbags.
• Before use our product, please read the instruction manual carefully, the
product is a safety product and is only safe when used in accordance with
the instruction manual.
• The product can be used on a forward facing or rearward facing seat that is
fitted with the ISOFIX and support leg anchoring system.
• The product may be used on either the front or the back seat. However, we
recommend that it is fitted on the back seat.
• The product has been approved according to the strictest European safety
standards(ECE R44) and is suitable for Group 0+(0-13kg)with the ISOFIX and
support leg anchoring systems.
• Aer an accident the seat may become unsafe due to damage that is not
be noticeable immediately. It should therefore be replaced. The safety of
the seat can only be guaranteed by the manufacturer if it issued by the
original owner.
• We advise you strongly that not to use a second-hand product, because you
are not sure what has happened to it. The harness pads are important for the
safety of your child, therefore use them at al the time.
• Ensure that all luggage and objects likely to cause injury in the event of an
accident are properly secured.

5
• It is recommended that the car seats should not be used more than 5 years
from the date of date of production.
The properties of the products may deteriorate due to, for example, ageing
of the plastic and this may not be visible.
• The moving parts of the car seat should not be lubricated in anyway.
• The baby car seat must not be used without the cover. Please use an original
cover, as the cover contributes to the safety of the seat.
• The seat must be secured with ISOFIX and support leg , even when it not on
use. An unsecured seat may injure other passengers in the car in an urgent
stop.
• The rigid items and plastic parts of a child restraint must be so located and
installed that they are not liable, during everyday use of the vehicle, to be-
come trapped by a movable seat or in a door of the vehicle.
• Ensure that the seat is not damaged by the webbing between or undernea-
th heavy luggage, adjustable seats or slamming the car door etc.
• No alterations may be made to the product as this could aect part or the
overall safety of the seat.
• In hot weather the plastic and metal parts of the product will be hot. You
should cover the seat when the car parked under the sun.
• In order to prevent damage to the cover, do not remove the product’s logo.
• Use the seat even in a short journey, as this is when most accidents occur.
• Before the purchase, please check that the seat is properly in your car.
• Take a short break in long journey. So that your child has some time for the
relaxation.
• Set a good example yourself and always wear your seat belt.
• Tell your child that he/she should be never play with the harness buckle.

6
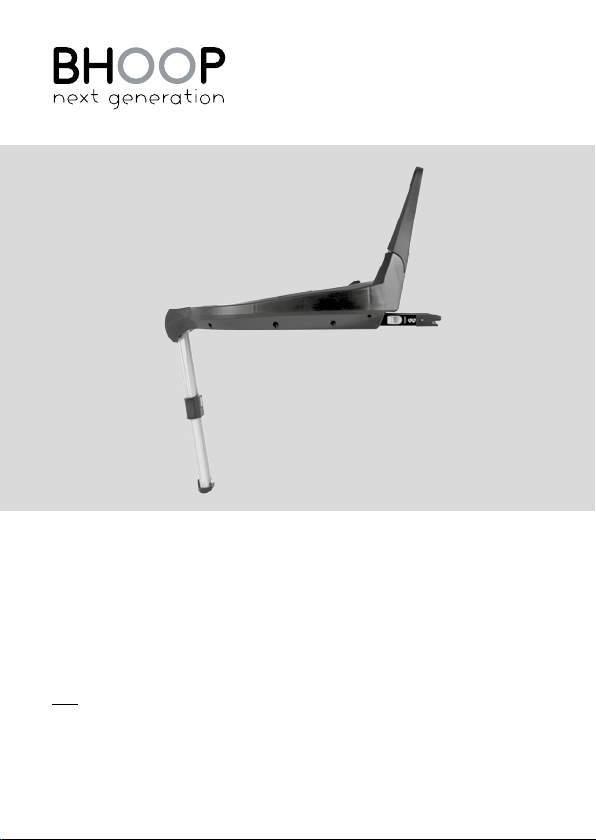
1. Base back adjustor handle
2. ISOFIX connector release button
3. ISOFIX Connector
4. ISOFIX lock&release button
5. Infant installation key groove
6. Baby seat installation key groove
7. Seat lock&release handle
8. Seat light indicator
9. Support leg angle indicator
10. Support leg height indicator
11. Support leg height adjustor button
Base
7
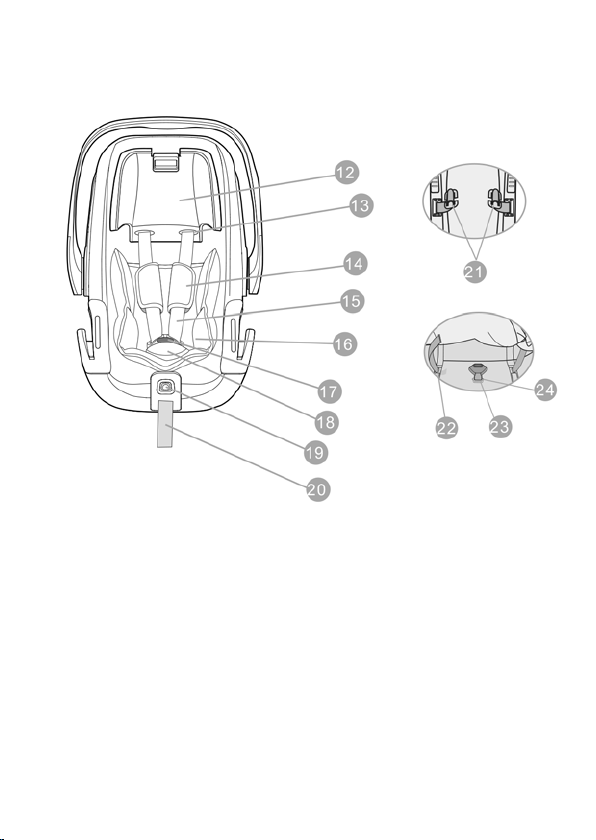
Shell
12. Handrest
13. Shoulder Straps hole
14. Shoulder pad
15. Shoulder Straps
16. Cuddle me
17. Buckle
18. Buckle pad
19. Center Adjuster
20. Adjuster strap
21. Crotch straps sun-piece(X2)
22. Crotch straps holes
23. Lap straps sun-piece
24. Lap straps hole

8
Shell
25. Handle
26. Handle adjustor
27. Seat shell
28. Handle adjuster
29. Decorate borad
30. Diagonal belt guide

9
Certification
... as a child safety seat installed in a
vehicle
*ECE = European Standard for Safety Equipment
The child safety seat has ben designed, tested and certified according to
the requirements of the European Standard for Child Safety Equipment (ECE
R44/04).
The seal of approval E (in a circle) and the approval number are located on
the approval label (sticker on the child safety seat).
This approval will be invalidated if you make any modifications to the child
safety seat. Only the manufacturer is permitted to make modifications to the
child safety seat.
Child Safety Seat
IG02-T
Tested and certified
according to ECE R44
Group Weight
0+ 0-13KG
10
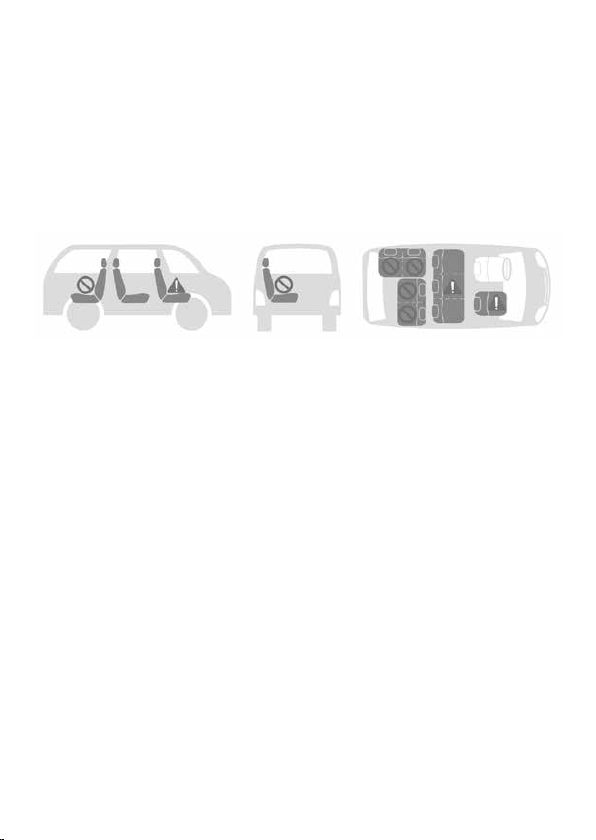
Use in vehicle
You can use your child car seat as follows:

11
For the protection of your baby
CAUTION
Please use the baby insert attached to this car
seat whenyou r baby’s weight is less than 9kg.
The baby insert is used to provide extra comfort
for very small babies, and it gives your baby the
necessary support while he orshe isstill small.
• Always secure your baby in the car seat using the harness.
• Never leave your baby unattended in the car seat when placing it on eleva-
ted surfaces (e.g. a table, nappy changing unit, etc.).
• Never allow the strap end to become caught in moving parts (e.g. automa-
tic doors, escalators, etc.).
• Caution! The plastic parts of the car seat heat up in the sun, so that your baby
may get burnt. Protect your baby and the car seat against intensive solar
radiation (e.g. by putting alight cloth over the seat).
• Take your baby out of the car seat as oen as possible to relieve its spine. We
recommend frequent breaks during longjourneys. Even outside of the car,
please avoid leaving your baby in the car seat for too long.
Baby lnsert
12
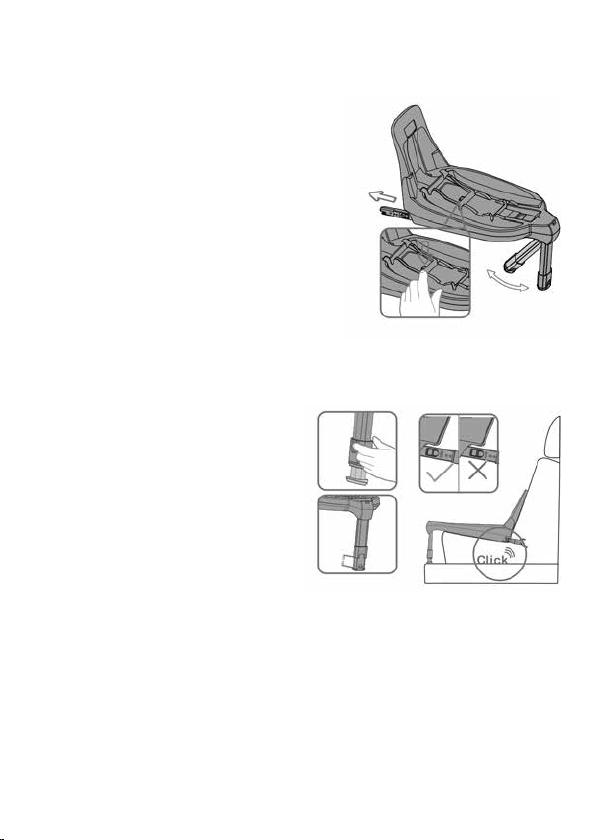
Installation in the vehicle (Use the base)
1. Prepare the base
Place the child car seat base
on to the vehicle seat.
Press the ISOFIX connector
release button in the
middle of the base.
2. Install the base
Squeeze the front support leg adjuster
button and raise or lower the front sup-
port leg so that it makes firm contact
with the vehicle floor.
Release the adjuster button when the
front support leg is in the correct posi-
tion.
WARNING: Do not place the front
support leg on a floor storage com-
partment lid.
The front support leg MUST make full
and firm contact with the veh: Make
sure that the front s WARNING up-
port leg does not raise the the surface
of the vehicle seat

13
3 .1 Rearward facing-from the birth to13KG
IMPORTANT
DO NOT USE FORWARD FAGING BEFORE THE GH1LD’ S WEI-
GHT EXCEEDS 9KG.
Do not use a child safety seat if the
vehicle seat is equipped with a front airbags.
Position the seat in the rearward
facing on the base.
Pull the locker and click, you can hear”Beep Beep”sounds and the light indica-
tor in front of the base will have turned to green.o~
The isofix base works with 2 AAA 1.5 V batteries. Replace the batteries regularly
at least once every 6 months. Use a screwdriver to open the door under the
base and replace the batteries.

14
4 .Detach the child car seat from the base
The seat can be taken o by pulling the seat release handle at the front of
the base.
5. Take o the base
Push the ISOFIX arm buttons to disengage the ISOFIX arms from the ISOFIX
anchor points and squeeze the ISOFIX release button, pull the base from the
vehicle seat.

15
Installation in the vehicle
(Use the vehicle seat belt)
• Place the infant carrier rearward-fa-
cing on the vehicle seat (baby is fa-
cing backwards).
Tip! In certain cases it is possible that
the infant carrier dose not rest secu-
rely or is inclined too steeply on the
vehicle seat.
• Ensure that the handle is in its upper
position A.
• Pull out the vehicle seat belt and pla-
ce it across the infant carrier.
• Engage the buckle tongue in the
vehicle seat buckle.
• Place the lap belt section in the blue
belt guides on both sides of the infant
carrier.
Caution! Do not twist the belt.
• Tighten the lap belt section by pulling
the diagonal belt section.
Caution! The buckle of the vehi-
cle seat belt must not be positioned
in or front of the blue shell (in the di-
rection of travel).
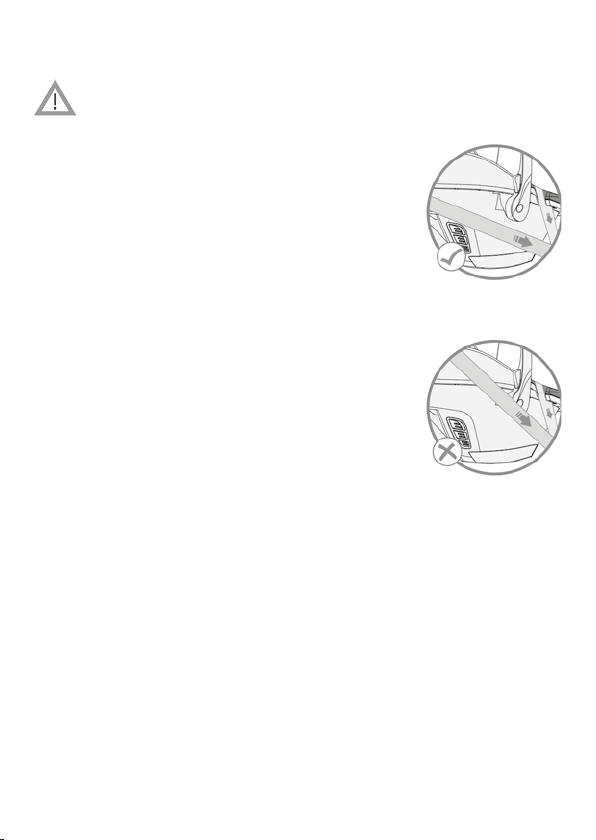
• Pull the diagonal seat belt section
behind the top end of the infant car-
rier.
• Push the diagonal belt section
between the blue shell and the in-
fant carrier until the belt engages.
Caution! Do not twist the belt.
16
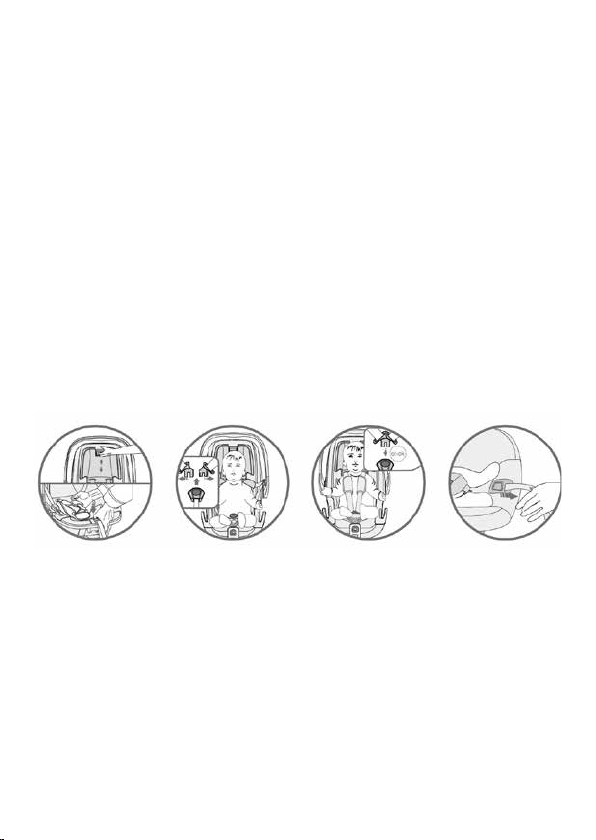
Checklist for the correct installation of the infant
carrier in your car
For the safety of your baby ,please check that...
• The infant carrier is installed rearward-facing.
• The infant carrier is only installed on the front
passenger seat if no front airbag can strike
the infant carrier.
• The infant carrier is only secured using a 3-point belt.
• The lap belt section runs through both light blue belt
guides on the infant carrier.
• The diagonal belt section runs through the blue belt
holder and the infant carrier.
• The vehicle seat buckle is not positioned in or
in front of the light blue belt guide.
• The vehicle seat belt is tightened up and not twisted.

17
Fitting the sunshade
• Hook the elastic loops of the sunshade from
underneath into the hooks on the handle.
• Pull the elastic seam over the upper edge
of the infant carrier.
• Hang the elastic loops in the hooks under the edge
of the infant carrier.
• Tighten the sunshade by pulling the edge of the
sunshade over the handle.
18
Securing your baby
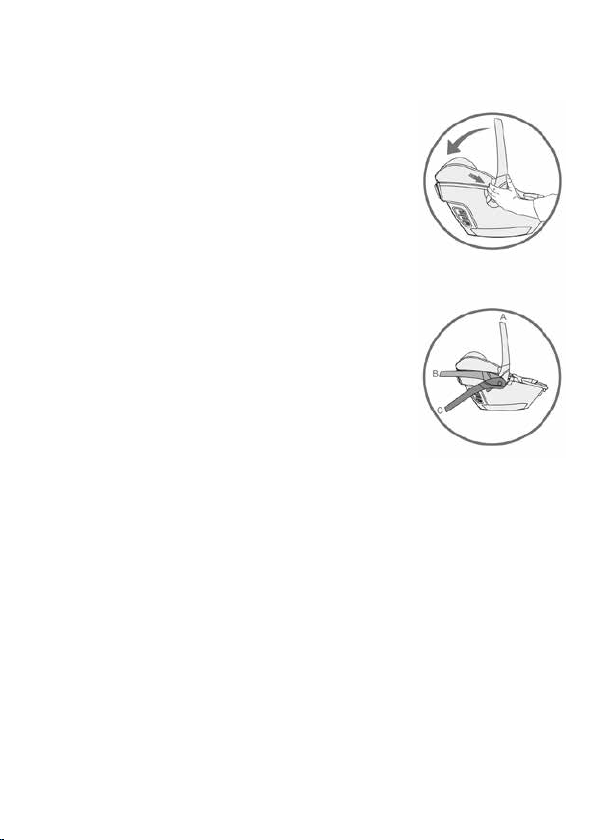
1. Adjusting the handle
You can engage the adjustor in three positions:
simultaneously press both buttons on the handle.
Then whilst holding the adjustor pressed turn the handle
backwards until it engages in the desired pos ition.
A: For carrying and for transport in the car.
Caution! Ensure that the handle is securely
engaged before
you pick up the infant carrier.
B: For placing your baby into the infant carrier.
Tip! You can swivel the handle from position to position
without pressing the buttons.
C: For setting the infant carrier down safety
outside the car.
19
2. Securing your baby using the harness
• Loosening the shoulder straps.
• Open the harness buckle (press the red release button).
• Place your baby into the infant carrier.
• Put the shoulder straps over the shoulders of your baby, then put the buckle
tongues together and engage in the harness buckle with an audible “click”.
Caution! Do not twist or interchange the shoulder straps.

20
3. Removing the harness
• Open the harness buckle (press the red release button).
• Unhook the shoulder straps from the harness yoke.
• Pull the shoulder straps out of the belt slots of the baby shell, and unthread
the shoulder pads.
• Pull out the metal part which is used to fasten the strap to the bottom of the
baby shell.
• Push the metal plate, with which the harness buckle is fixed to the seat shell,
on its side upwards through the belt slot.
Table of contents
Languages:


