BIDZ WD-512-SS-BIDZ User manual

BIDZ
User Manual
Model Number
Wet / Dry vacuum system
WD-512-SS-BIDZ
WD-814-SS-BIDZ
BIDZ
BIDZ ©

TABLE OF CONTENTS
1. IMPORTANT SAFETY INSTRUCTIONS ............................................................... P.3-4
2. GROUNDING INSTRUCTIONS .............................................................................. P.4
3. VACUUM SPECIFICATION ..................................................................................... P.5
4. INCLUDED ACCESSORIES ..................................................................................... P.5
6. VACUUM ASSEMBLY .............................................................................................. P.7
5. EXPLODED VIEW - PART LIST .............................................................................. P.6
7. DRY PICKUP SYSTEM OPERATION INSTRUCTION ........................................ P8
8. WET PICKUP SYSTEM OPERATION INSTRUCTION ........................................P.9
9. BLOWER PORT INSTRUCTION ............................................................................. P.10
10. DUST SHAKING INSTRUCTION ......................................................................... P.10
13. FILTER MAINTENANCE ....................................................................................... P.11
14. LUBRICATION ........................................................................................................ P.11
11. EMPTYING LIQUID WASTE FROM THE TANK DRAIN ............................... P.11
15. TROUBLE SHOOTING .......................................................................................... P.12
16. STORAGE ................................................................................................................. P.12
17. SERVICE .................................................................................................................... P.12
18. SAFETY NOTE ......................................................................................................... P.12
19. WARRANTY ......................................................................................................... P.13
12. AUTOMATIC SUCTION SHUT OFF .................................................................. P.11

1. IMPORTANT SAFETY INSTRUCTIONS
Carefully read all of these instructions before using this vacuum system
WHEN USING AN ELECTRIC APPLIANCE, BASIC PRECAUTIONS SHOULD ALWAYS BE FOLLOWED, INCLUDING THE FOLLOWING:
- TO REDUCE THE RISK OF FIRE, ELECTRIC SHOCK OR INJURY:
1. Do not leave appliance when plugged in. Unplug from outlet when not in use and before servicing. Connect to a properly
grounded outlet only. See Grounding Instructions.
2. Do not expose to rain – store indoors only.
3. Do not allow to be used as a toy. Close attention is necessary when used by or near children.
4. Use only as described in this manual. Use only manufacturer’s recommended attachments.
5. Do not use with damaged cord or plug. If appliance is not working as it should, has been dropped, damaged, left outdoors or
dropped into water, contact Bidz Vacuum customer service for assistance.
6. Do not pull or carry by cord, use cord as a handle, close a door on cord or pull cord around sharp edges or corners. Do not run
appliance over cord. Keep cord away from heated surfaces.
7. Do not unplug by pulling on cord. To unplug, grab the plug not the cord.
8. Do not handle plug or appliance with wet hands.
9. Do not put any object into openings. Do not use with any openings blocked; keep free of dust, lint, hair and anything that may
reduce air flow.
10. Keep hair, loose clothing, fingers and all parts of body away from openings and moving parts.
11. Do not pick up anything that is burning or smoking, such as cigarettes, matches or hot ashes.
12. Do not use without dust bag and/or filters in place.
13. Turn off all controls before unplugging.
14. Use extra care when cleaning on stairs.
15. Do not use to pick up flammable or combustible liquids such as gasoline or use in areas where they may be present.
16. Do not use your vacuum cleaner as a sprayer of flammable liquids such as oil base paints, lacquers, household cleaners, etc.
17. Do not vacuum toxic, carcinogenic, combustible or other hazardous materials such as asbestos, arsenic, barium, beryllium,
lead, pesticides or other health endangering materials. Specially designed units are available for these purposes.
18. Do not pick up soot, cement, plaster or drywall dust without cartridge filter and collection filter bag in place. These are very
fine particles that may pass through the foam and affect the performance of the motor or be exhausted back into the air.
Additional collection filter bags are available.
19. Do not leave the cord lying on the floor once you have finished the cleaning job. It can become a tripping hazard.
20. Use special care when emptying heavily loaded tanks.
21. To avoid spontaneous combustion, empty tank after each use.
22. The operation of the blower can result in foreign objects being blown into eyes, which can result in eye damage. Always wear
safety goggles when operating.
23. STAY ALERT. Watch what you are doing and use common sense. Do not use vacuum cleaner when you are tired, distracted or
under the influence of drugs, alcohol or medication causing diminished control.
24. WARNING! Do NOT use this vacuum cleaner to vacuum lead paint debris as this may disperse fine lead particles into the air.
This vacuum cleaner is not intended for use under EPA Regulation 40 CFR Part 745 for lead paint material cleanup.
KEEP THESE INSTRUCTIONS IN A SAFE PLACE P.3
WARNING
DO NOT LEAVE VACUUM UNATTENDED WHEN IT IS PLUGGED IN AND/OR OPERATING.
UNPLUG UNIT WHEN NOT IN USE.
WARNING

1. IMPORTANT SAFETY INSTRUCTIONS (Cont.)
2. GROUNDING INSTRUCTIONS
This appliance must be grounded. If it should malfunction or breakdown, grounding provides a path of least
resistance for electric current in order to reduce the risk of electric shock. This appliance is equipped with a
cord having an equipment-grounding conductor and grounding plug. The plug must be inserted into an
appropriate outlet that is properly installed and grounded in accordance with all local codes and ordinances.
Volts Total length of cord in feet
120V
Ampere Rating
More
Than No more
Than
0 -
-
6
6 - 10
10 - 12
12 - 16
25 50 100 150
AWG
18
18
16
14
16
16
16
12
16
14
14
14
12
12
Not recommended
TABLE A
IMPORTANT
The manufacturer shall not be held responsible for damages
caused by the inappropriate use of this system. The warranty
does not cover damages caused by improper use of this
system or problems resulting from an installation that does
not meet specifications, or any structural or functional
alterations made to the vacuum. An inappropriate use of the
system made without respecting the instructionsin this
document will also be considered misuse. All conditions and
restrictions are laid out in the limited warranty and the user
manual. To optimize the performance and life of your BIDZ
Vacuum, itis important to perform regular maintenance and
clean the filter according to the guidelines listed in this user
manual.
WARNING
Improper connection of the power unit grounding wire can
result in a risk of electric shock. If you are unsure whether the
unit is properly grounded, contact a professional electrician. Do
not modify the power cord supplied with this power unit. If this
power cord connector does not fit your electrical outlet, have
the proper electrical outlet installed by a professional electrician.
This power unit is designed to be used on a nominal electrical
circuit 110-120 VAC in 60 Hz. This appliance should be used
without an adapter. In Canada, the use of a temporary adapter is
not permitted BY THE CANADIAN ELECTRICAL CODE.
Extension cords
When using the appliance at a distance where an extension cord becomes necessary, a 3-conductor grounding cord of adequate size must be
used for safety and to prevent loss of power and overheating. Use Table A to determine A.W.G. wire size required. To determine the ampere
rating of your vacuum, refer to nameplate located on motor housing. Before using appliance, inspect power cord for loose or exposed wires and
damaged insulation. Make any needed repairs or replacements before using your appliance. Use only three-wire outdoor extension cords which
have three-prong grounding-type plugs and three-pole receptacles which accept the extension cord’s plug. When vacuuming liquids, make
sure the extension cord connection does not come in contact with the liquid.
NOTE: STATIC SHOCKS ARE COMMON IN DRY AREAS OR WHEN THE RELATIVE HUMIDITY OF THE AIR IS LOW. THIS IS ONLY TEMPORARY AND
DOES NOT AFFECT THE USE OF THE SYSTEM. TO REDUCE THE FREQUENCY OF STATIC SHOCKS IN YOUR HOME, THE BEST REMEDY IS TO ADD
MOISTURE TO THE AIR WITH A CONSOLE OR INSTALLED HUMIDIFIER.
P.4
General Guidelines to be Respected at All Times
- Do not use the machine in combustible and explosive places in case the motor spark causes fire
- Do not jam the air inlet mouth, in case temperature rises and damages
the motor
- Do not collect combustible and explosive objects such as glowing cigarettes, gasoline, etc
- Do not collect sharp objects
- Do not collect objects which can easily attach on the filter such as limestone powder, gypsum and graphite powder, as there
those will block the ventilation and damage the motor
- Turn off the vacuum and unplug it every time after using or when being repaired
- Keep the vacuum away from strong sunlight and high temperature places.

BIDZ ©
3. VACUUM SPECIFICATION
4. INCLUDED ACCESSORIES
BLOWER PORT
HOSE STORAGE
FILTER AUTO CLEAN
ON BOARD STORAGE
DIRT RECEPTACLE LOCK HANDLES
ON / OFF SWITCH
HOSE PORT
STAINLESS STEEL TANK
TANK DRAIN
Powerful
pulsation with air
current to blow
debris out of the
filter into the
canister
Push and clean
CORD WRAP TABS
FP-FM FP-HP FP-WD FD-8G-BZ - For Bidz 8 Gal (WD-814-SS-BIDZ)
FD-5G-BZ - For Bidz 5 Gal (WD-512-SS-BIDZ)
ACCHO-8BK ACC-416-BK
Wet/Dry vacuum 12’’ utility brush
Foam filter for wet pickup Hepa Cartridge filter for dry pickup
Necessary for gypsum and fire debris pickup Necessary for gypsum and fire debris pickup
Dirt collector for dry pickup Disposable filtration bag
ACC-217
With Squeegee
7’ Crushproof hose Plastic wand 10’’ crevice tool
P.5
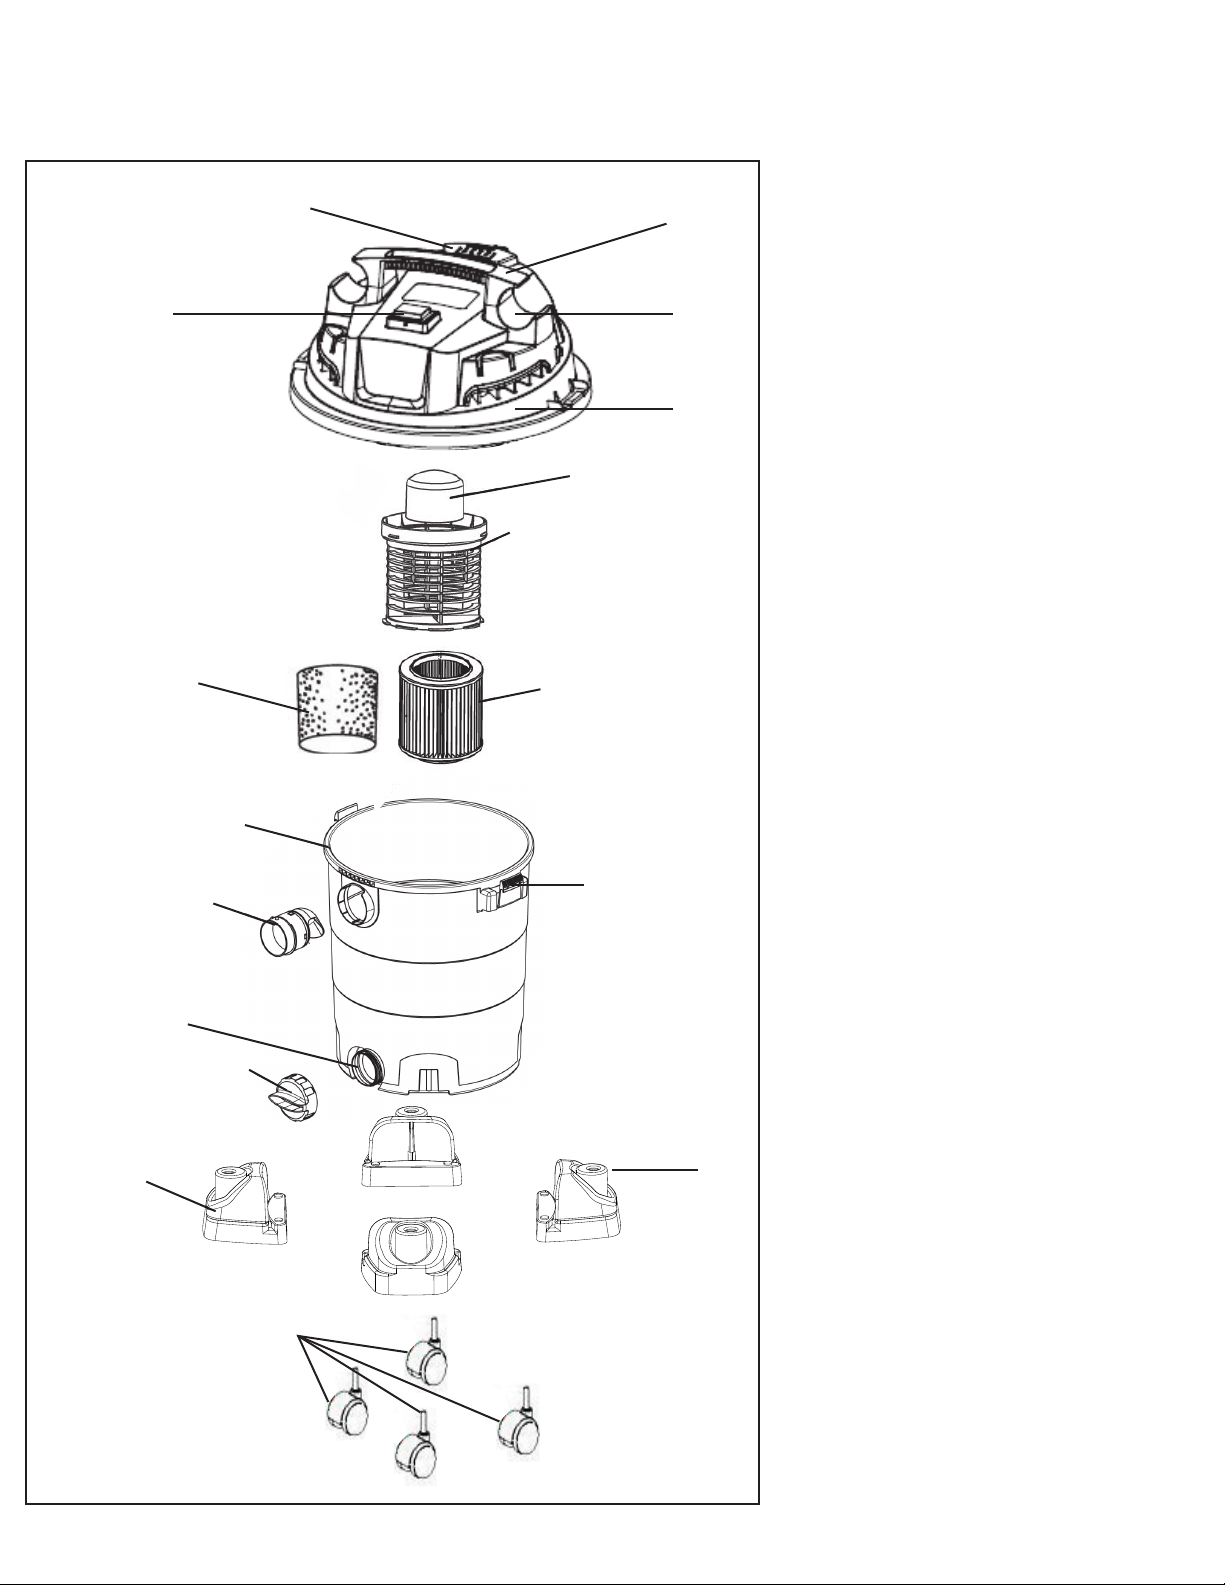
5. EXPLODED VIEW - PART LIST
1. Handle
2. Hose storage
3. Top cover assembly
4. Dust shacking button
5. On-Off switch
6. Float
7. Filter cage
8. Foam filter x 1
9. Cartridge filter x 1
10. Debris receptacle
11. Latch assemble
12. Hose port
13. Tank drain port
14. Tank drain cap
15. Wheel base
16. Accessory storage
17. Wheels x 4
P.6
1
2
3
6
7
89
10
11
12
13
14
15 16
17
4
5
Align
Align
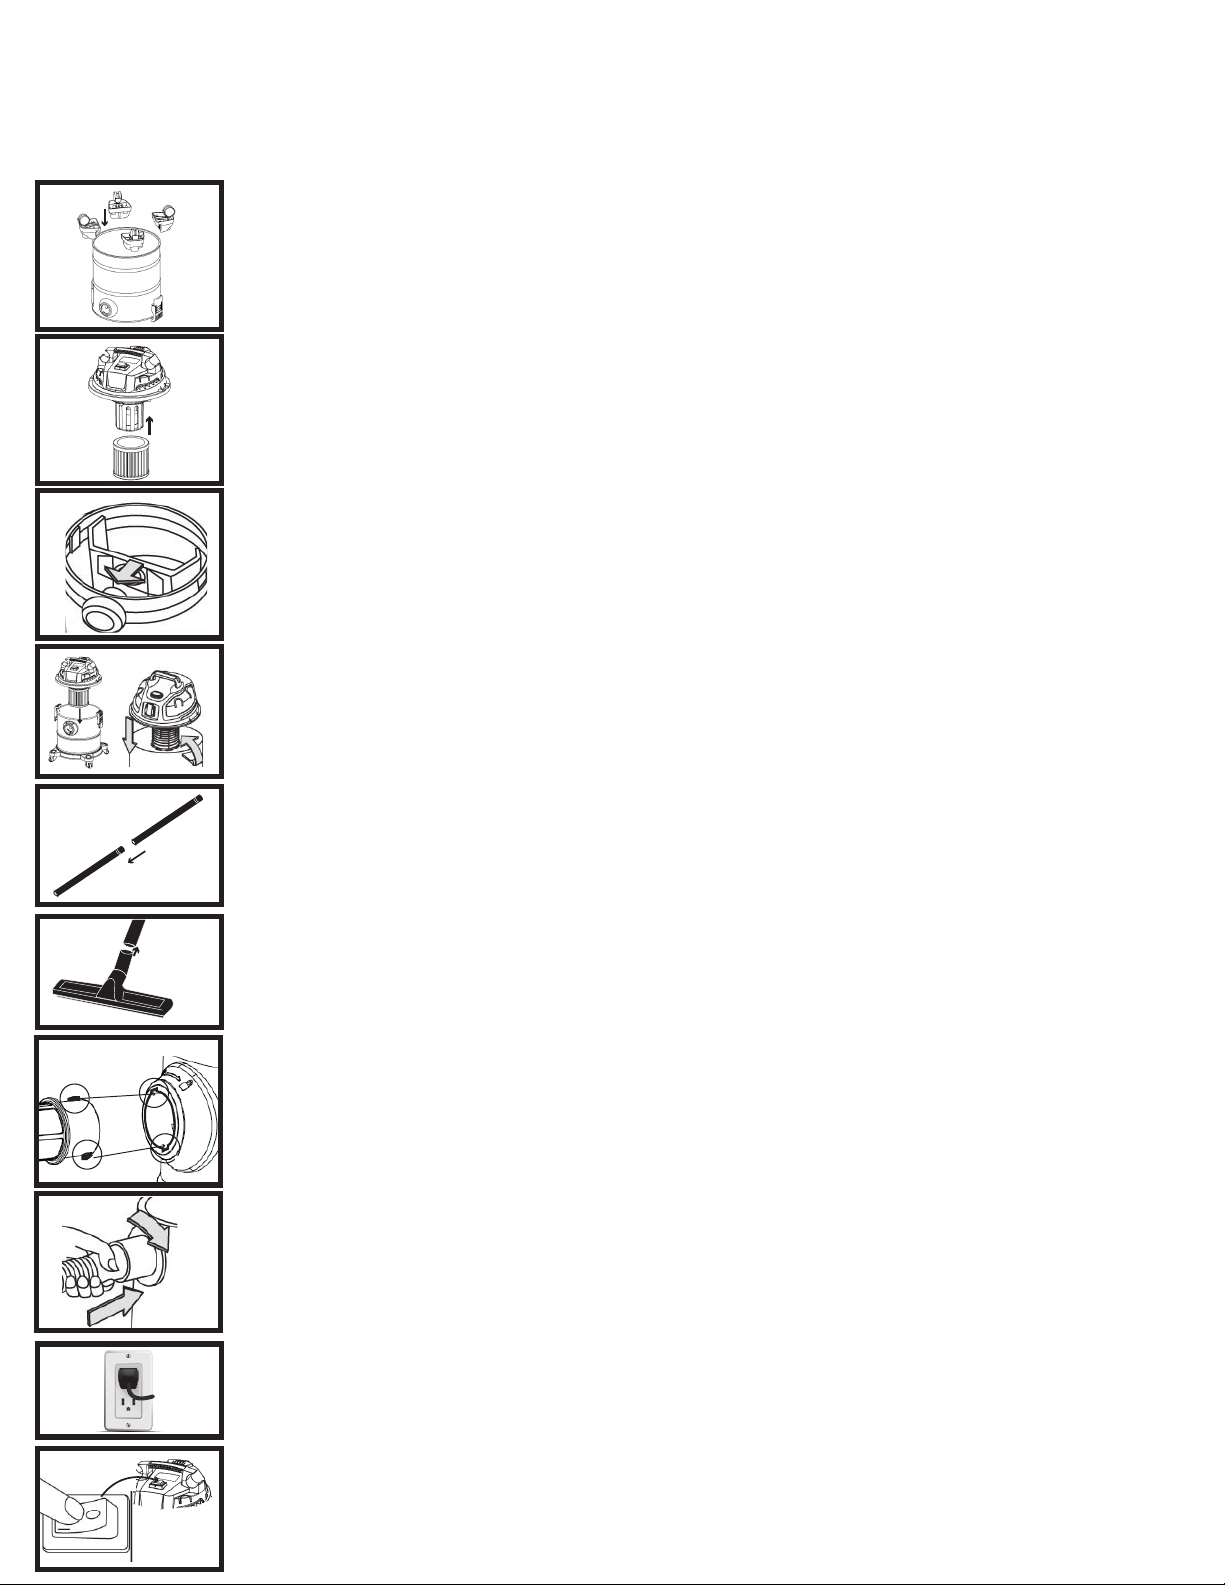
6. VACUUM ASSEMBLY
IMPORTANT: Remove the vacuum from the box. Open the dirt receptacle and make sure all the
accessories are in good condition.
To install the cartridge / Foam filter, simply slide it on the filter cage as illustrated (HEPA
cartridge filter is for dry pickup only)
To install the the bag, first open the bag so it fits all around the inside canister and insert the
hole on the intake pipe as illustrated. ( Bag is for dry pickup only).
Once filter /bags are in place, reinsert the top of the vacuum and lock it in place using the handle
on each side of the vacuum as illustrated.
To assemble the wand, simply slide the 2 part in each other and push them in so they lock in
place.
Align the pins on the hose with the gap on the suction or blower port of the vacuum as illustrated
in image 1.
Insert the hose in the suction or blower port and turn it clock wise until you hear a click to lock
the hose in place as illustrated in image 2
Plug the vacuum in a regulare 110v-120v electrical outlet
Start the vacuum by using the switch on top as illustrated.
WHEELS:
Filter
Close vacuum
Bag
Wand:
To connect the accessories to the wand, Using friction fit, simply slide the 2 part in each other
and push them in so they lock in place.
Accessories to wand:
Hose
Plug in:
Start the vacuum
To install the wheels, turn the vacuum upside down. Screw the wheels in place using the pre-drill
hole on the vacuum
P.7
1
2

7. DRY PICKUP SYSTEM OPERATION INSTRUCTION
WARNING: BE SURE TO READ, UNDERSTAND AND APPLY INFORMATION, UNDER
IMPORTANT SAFETY INSTRUCTION. DO NOT VACUUM AREAS WITH FLAMMABLE
GASES, VAPORS OR EXPLOSIVE DUST IN THE AIR. TO REDUCE RISK OF HEALTH HAZARDS
FROM VAPORS OR DUST, DO NOT VACUUM TOXIC MATERIALS
CAUTION:
FOR DRY PICKUP - Cartridge filter, disposable bag OR dust collector must be in place.
AT ALL TIMES WHEN PICKINGUP FINE DUST ( GYPSUM) FILTER AND BAG MUST BE IN PLACE
To install the cartridge filter, simply slide it on the filter cage as illustrated in section (A)
To install the bag, first open the bag so it fits all around the inside canister
and insert the hole on the intake pipe as illustrated in section (B1).
If using dust collector, install it laying flat on the edge of the vacuum as illustrated in section (B2)
Put the top of the vacuum back in place and lock it in place using the handle on each side of the
vacuum as illustrated in section (C)
Plug in the vacuum and turn it on using the switch on the vacuum as illustrated in section (E)
WARNING
: DO NOT PLUG IN POWER CORD TO POWER OUTLET. MAKE SURE PLUG IS DISCONNECTED
BEFORE CHANGING AND CLEANING FILTERS.
A
B1
B2
C
E
P.8
•Do not vacuum drywall dust or fireplace soot or ash with standard Wet/Dry filter. This is a very fine dust which will not be
captured by the filter and may cause damage to motor. When vacuuming fine dust use the Collector filter (1 included).
• Keep filter clean
Align the pins on the hose with the gap on the suction port of the vacuum as illustrated in image
D1.
Insert the hose in the suction port and turn it clock wise until you hear a click to lock the hose in
place as illustrated in image D2
Hose
Turn vacuum on
Cartridge filter
Bag / Dust Collector
Close the vacuum
Align
Align
D1
D2
Align
Align
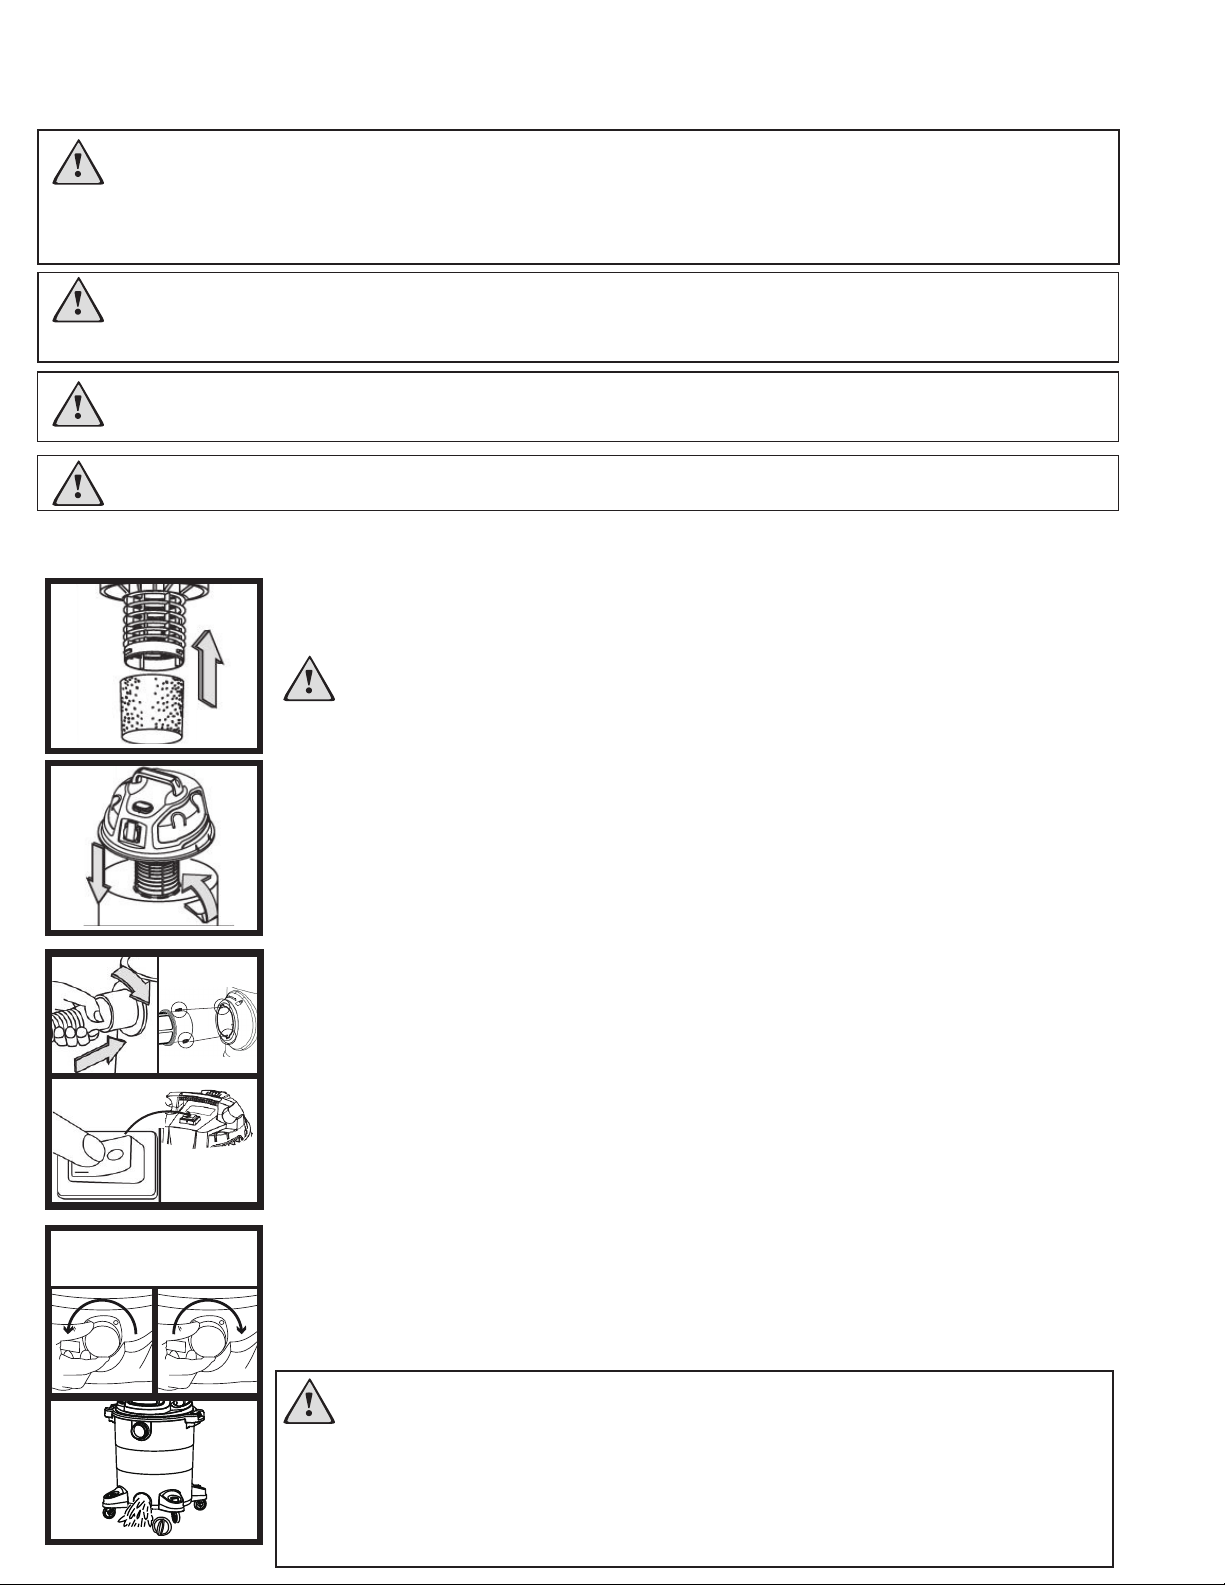
8. WET PICKUP SYSTEM OPERATION INSTRUCTION
WARNING: BE SURE TO READ, UNDERSTAND AND APPLY INFORMATION, UNDER
IMPORTANT SAFETY INSTRUCTION. DO NOT VACUUM AREAS WITH FLAMMABLE
GASES, VAPORS OR EXPLOSIVE DUST IN THE AIR. TO REDUCE RISK OF HEALTH HAZARDS
FROM VAPORS OR DUST, DO NOT VACUUM TOXIC MATERIALS
CAUTION:
•Do not vacuum drywall dust or fireplace soot or ash with standard Wet/Dry filter. This is a very fine
dust which will not be captured by the filter and may cause damage to motor. When vacuuming fine dust use the
Collector filter (1 included).
FOR WET PICKUP - Only use the foam filter. DO NOT USE Cartridge filter, disposable paper bag OR
dust collector
To install the foam filter, simply slide it on the filter cage as illustrated in
section (G)
“GRILLED” SECTION MUST BE COVERED
Put the top of the vacuumback in place and lock it using the latches on each
side of the vacuum as illustrated in section (H)
Plug in the vacuum and turn it on using the switch on the vacuum as illustrat-
ed in section (J)
After vacuuming is done, use the tank drain to empty water from canister as
illustrated in section (K2)
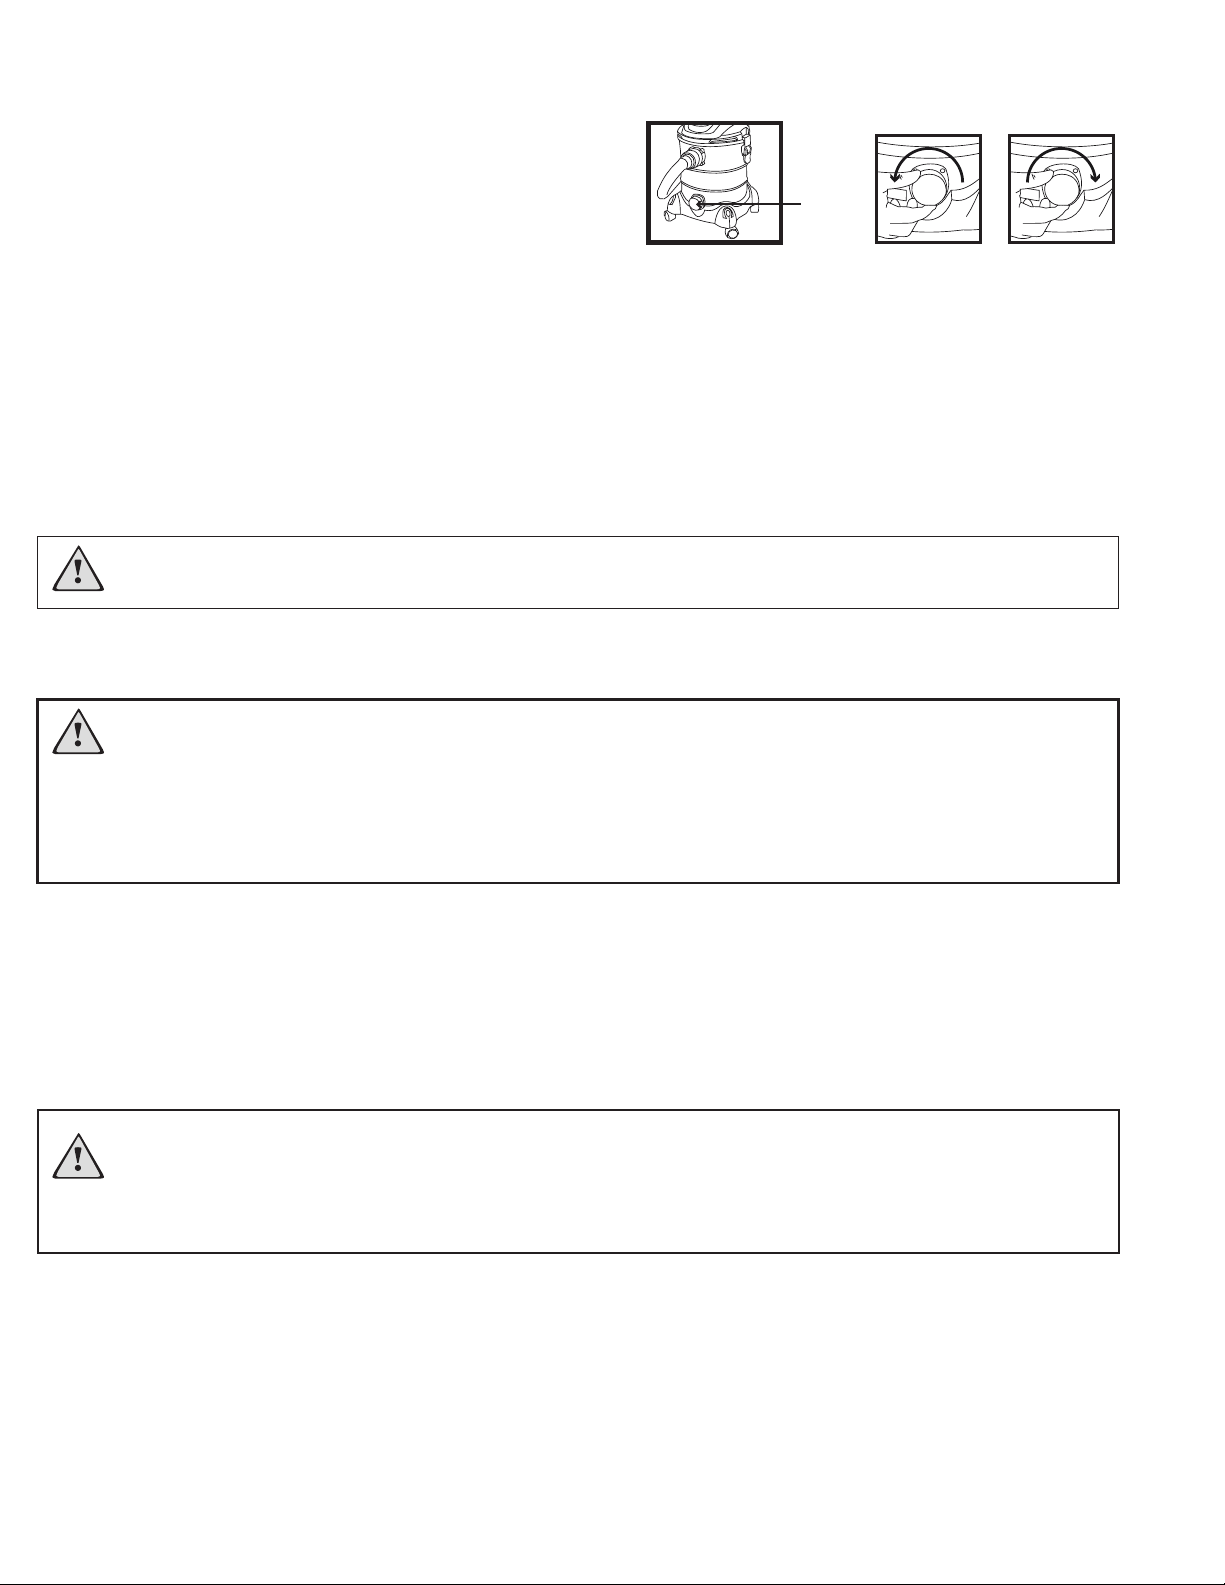
To remove the cap, turn it counter clockwise. To put the cap back on, turn it
clock wise as illustrated in section (K1)
WARNING:
When emptying the canister, be careful not to over-tilt the vacuum to
prevent the water float from sticking to the motor.
Before re-starting the vacuum, it is important to position it vertically at
90 degrees in order for the water float to be back at the bottom of the
filter cage.
WARNING
: DO NOT PLUG IN POWER CORD TO POWER OUTLET. MAKE SURE PLUG IS DISCONNECTED
BEFORE CHANGING AND CLEANING FILTERS.
CAUTION: KEEP FILTER CLEAN
H
K2
K1
G
III
J
P.9
Clockwise
Close cap
Open cap
Counter clockwise
Align the pins on the hose with the gap on the suction or blower port of the
vacuum as illustrated in image II.
Insert the hose in the suction port and turn it clock wise until you hear a click
to lock the hose in place as illustrated in image I
Align
Align
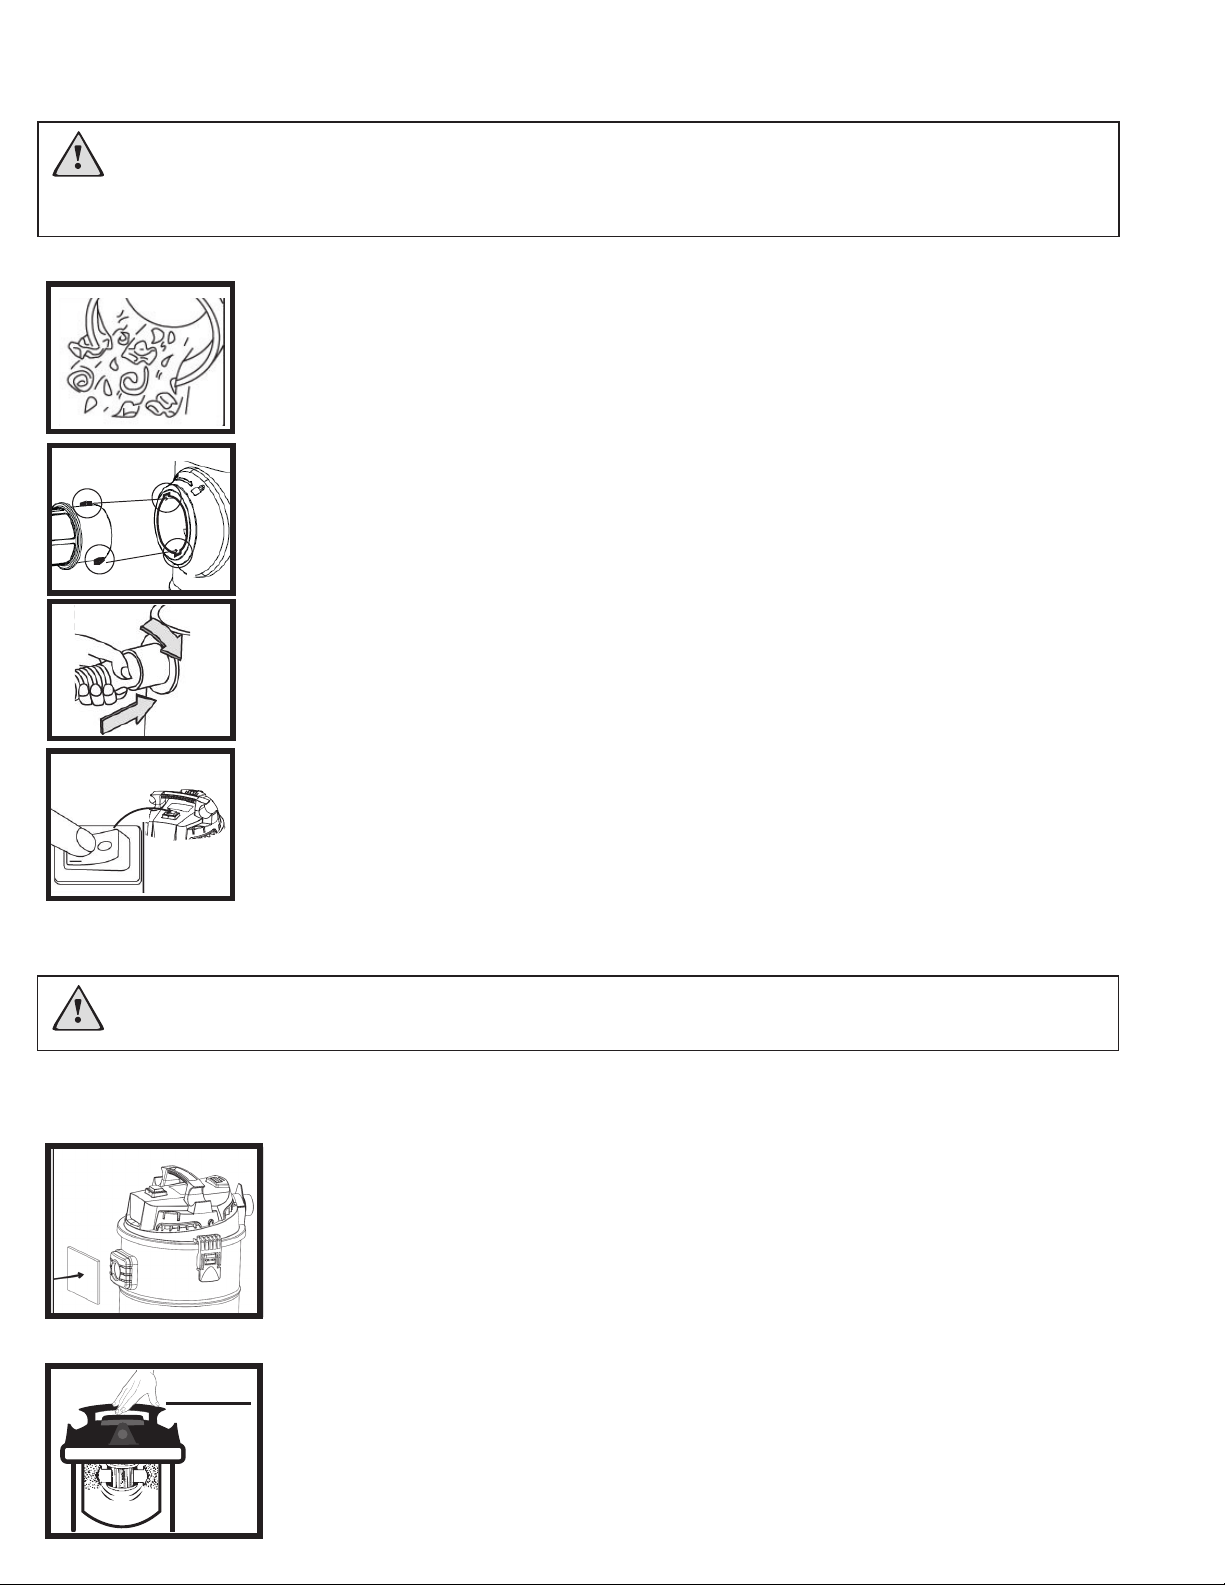
9. BLOWER PORT INSTRUCTION
10. DUST SHAKING INSTRUCTION
WARNING:
ALWAYS WEAR SAFETY GOGGLES BEFORE USING THE BLOWER
WEAR A DUST MASK IF BLOWING CREATES DUST THAT MIGHT BE INHALED
Make sure the debris container is empty before using the blower function,
otherwise debris will blow out which may be harmful and cause severe
injuries or death.
Keep vacuum running
Step 1: Block the suction port as illustrated in section (O)
Step 2: Block the suction port as illustrated in section (O) and press the
shake button for 1 second, then release. Repeat this process a minimum
of 10 times.
Turn on the vacuum using the switch as illustrated in section (N)
WARNING: VACUUM MUST BE USED AT LEAST 1-2 MINUTES IN ORDER FOR THE DUST
SHAKING TO WORK
L
N
O
P
Push and clean
P.10
Align the pins on the hose with the gap on the blower port of the vacuum as
illustrated in image M1.
Insert the hose in the suction port and turn it clock wise until you hear a click
to lock the hose in place as illustrated in image M2
M1
M2
13. FILTER MAINTENANCE
14. LUBRICATION
11. EMPTYING LIQUID WASTE FROM THE TANK DRAIN
Cartridge filter maintenance
Foam filter maintenance
WARNING: Turn o the power switch rst and pull out the power plug of the cleaning lter before maintenance. Take out the
lter and ush with water. It is recommended to ush the lter under tap water. Flush the dust on the lter. Put the lter in a
well-ventilated place and dry it naturally for storage and future use.
1- Shake o moisture and dry lter completely in order to prevent peculiar smell or blockage.
2- Do not dry lter with air blower and other hot winds in order to prevent deformation and cracks..
3- Do not use detergent, bleaching agents, diluents, alcohol, etc. in order to avoid cracks, color changes, etc.
NOTE: If accidently tipped over, the vacuum could lose suction. If this occurs, turn the unit o and place the vacuum in the upright
position. This will allow the oat to return to its normal position and you will be able to continue operating the system.
WARNING: This lter is made of high quality paper designed to stop small particles of dust. A dry lter is necessary to pick up
dry material. If you use your vacuum to pick up dust when the lter is wet, the lter will clog quickly and be very dicult to clean.
The lter may become saturated when picking up large quantities of liquid causing misting to appear in the exhaust air. At that
time, your should dry or change lter to eliminate this occurrence. Check lter for tears or small holes. Even a small hole can cause
dust to be exhausted. Do not use a lter with holes or tears. Replace it immediately.
12. AUTOMATIC SUCTION SHUT OFF
To empty liquid waste from the tank drain, turn the vacuum o and remove
the plug from the wall outlet.
Remove the tank drain cap and dispose of the liquid waste in a suitable
drain. Use side carry handles to lift the vacuum when emptying the tank into
drains that are located above floor level.
After the tank is empty, put the drain cap back in place.
The vacuum is equipped with an automatic suction shut-o that operates when picking up liquids.
As the level of the liquid rises in the tank, an internal float rises until it seats itself against a seal at the intake of the motor, shutting o suction.
When this happens, the motor will develop a higher than normal pitch noise and the suction is drastically reduced or the vacuum will automatically
shut o.
If this occurs, turn unit o immediately. Failure to turn unit o after float rises and shuts o suction will result in extensive damage to the motor.
Afterwards, empty the liquid waste from the tank as outlined in the previous section.
1. Unlock and remove the cover of the vacuum
2. Carefully hold and pull the cartridge lter up for removal.
3. Clean the cartridge lter by gently tapping or brushing dirt o. Cleaning should not be done indoors in living areas. For optimal performance a
new lter is recommended.
4. Install cleaned or new lter into place as instructed at page 8 of this manual.
5. Wet lters should be removed and allowed to air dry for 24 hours before installing onto the lter cage.
1. Unlock and remove the cover of the vacuum
2. Carefully hold and pull the foam lter up for removal.
3. Use a mild soap and water solution to wash foam sleeve lter and rinse with clean water.
4. Install cleaned or new lter into place as instructed in page 9 of this manual.
5. Wet lters should be removed and allowed to air dry for 24 hours before installing onto the lter cage.
No lubrication is necessary as the motor is equipped with lifetime lubrication bearing
P.11
Clockwise
Close cap
Open cap
Tank Drain
Cap
Counter clockwise

15. TROUBLE SHOOTING
16. STORAGE
17. SERVICE
18. SAFETY NOTE
PROBLEM POSSIBLE CAUSES SOLUTION
Before storing your vacuum the tank should be emptied and cleaned. Never allow liquids to sit in the tank for any
extended period of time. The vacuum should be stored indoors.
Parts/accessories
missing
1. Packed in tank
1. No power at receptacle
2. Defective switch or cefective motor
1. Filter not installed/not installed
properly
2. Filter damaged
3. Filter clogged or dust is too ne
4. Filter not functional
1. Loose hose connection
2. Filter clogged
3. Full tank
4. Hole in hose
1. Dry environment
2. Relative humidity of air is low
1. Add moisture to air (if practical, use
a console or installed humidier).
2. This situation is temporary and
does not aect the use of the vacuum
cleaner.
1. Tighten hose connection
2. Clean or replace lter
3. Empty tank
4. Replace hose
1. Properly install lter
2. Replace lter
3. Use more ecient lter
4. Clean or replace lter
1. Check for power
2. Contact BIDZ customer service
1. Check in tank
2. If not there, contact BIDZ customer
service
Vacuum cleaner
will not start
Static shock
Loss of suction
Dust discharging
from exhaust
Do not attempt to service your Bidz wet/dry vacuum cleaner beyond what is described in this manual. Refer all other
servicing to a qualified service center or contact us directly at 1-800-776-7891 to speak with a technician
WARNING – IF ANY OF THE MOTOR HOUSING PARTS SHOULD BECOME DETACHED OR BROKEN,
EXPOSING THE MOTOR OR ANY OTHER ELECTRICAL COMPONENTS, OPERATION SHOULD BE
DISCONTINUED IMMEDIATELY TO AVOID PERSONAL INJURY OR FURTHER DAMAGE TO THE VACUUM.
REPAIRS SHOULD BE MADE BEFORE REUSING THE VACUUM.
P.12

19. THREE (3) YEAR WARRANTY
20. One (1) YEAR INDUSTRIAL / COMMERCIAL WARRANTY
The BIDZ Warranty on the vacuum system is only valid for the original owner and is non-transferable. The warranty only
covers 1-year labour warranty. The use of electrical power other than prescribed on the unit and/or any repair(s) made
by other than authorized service person will render this warranty null & void. The manufacturer is not responsible to any
transportation/freight. Should this product be used for rental service, a 90 day limited warranty will apply. (Parts not included)
The BIDZ Vacuum Body - Three (3) years: Bidz will, for Three (3) years, replace any defective parts of the vacuum body,
housing & dust bin as long as you own it, if used in normal conditions and properly maintained as stated in this instruction
manual.
The Bidz Vacuum Unit’s Parts - Three (3) years: BIDZ will replace any defective parts of the vacuum power unit for Three
(3) years following the purchase date, if used in normal conditions and properly maintained as stated in the power unit
instruction manual.
The BIDZ Warranty on the vacuum system is only valid for the original owner and is non-transferable. The warranty only
covers 1-year on parts and labour warranty. The use of electrical power other than prescribed on the unit and/or any
repair(s) made by other than authorized service person will render this warranty null & void. The manufacturer is not
responsible to any transportation/freight. Should this product be used for rental service, a 90 day limited warranty will apply. (Parts
not included)
The BIDZ Vacuum Body - One (1) year: Bidz will, for One (1) year, replace any defective parts of the vacuum body, housing
& dust bin as long as you own it, if used in normal conditions and properly maintained as stated in this instruction manual.
The Bidz Vacuum Unit’s Parts - One (1) year: BIDZ will replace any defective parts of the vacuum power unit for One (1)
year following the purchase date if, used in normal conditions and properly maintained as stated in the power unit instruc-
tion manual.
THOSE WARRANTIES DO NOT COVER ACCESSORIES. Bidz assumes no responsibility for damage or faulty performance caused
by misuse or careless handling, or where repairs or modications have been made or attempted by others.
Use of non-recommended lters and/or accessories may void the manufacturer’s warranty
Do not attempt to service your vacuum beyond that described in the User Manual.
THOSE WARRANTIES DO NOT COVER :
- Any part that has become inoperative due to misuse, negligence, direct/indirect abuse, accidents, improper maintenance, repairs or
alterations;
- Consumables such as cartridge lters, cloth lters, dust collection bags, foam lter sleeves, and cloth lters;
- Normal wear and tear of parts and attachments, such as hose, nozzles, or casters;
- Normal deterioration of the exterior nish due to use or exposure;
- Any product where serial number/data label is tampered with or removed;
- Any product purchased from an unauthorized retailer.
This warranty gives you specic legal rights, and you may also have other rights which vary by jurisdiction.
If you consider the product is affected by a defect, it should be returned at the end point of of purchase or send an email at
[email protected]. If the you decide to send an email to [email protected], a description of the alleged problem, picture
showing the issue and proof of purchase must be included in the email. Return of the product is at your own expenses.
Customer support in North America: For technical surpport or service contact Bidz Corporation at
P.13

2044 Autoroute 440 Ouest, Laval, QC, H7S 2M9
TO REGISTER YOUR WARRANTY:
www.bidzvac.com
3-Year Warranty
1-Year Commercial Warranty
www.bidzvac.com
1-800-776-7891
TOOL-FREE: 1-800-776-7891
BIDZ
This manual suits for next models
1
Table of contents


