Big Daishowa MGR-TL/P User manual

デジタル
メガトルクレンチ
Digital MEGA Torque Wrench
MGR-TL/P
取扱説明書
OPERATION MANUAL
Read the operation manual before use.
ご使用前には必ず本書をお読みください
CAUTION
ご注意
このマークは、製品を正しくお使いいただけなかった場合に、
製品の使用者等が傷害を負う危険および物的損害の発生が
想定されることを示します。
Should this equipment be incorrectly operated injury is possible to the
operator, or other personnel in the area. Equipment may also be
damaged.
安全に関する表示について
SAFETY/ CAUTION INDICATOR
OPERATION MANUAL FOR DIGITAL MEGA TORQUE WRENCH
この取扱説明書では、この製品を安全に使用していただくために、次のような表示を
しています。内容をよくお読みいただき、正しくお使いください。
The following indicator is used in this operation manual to signify points relating to
safe operation. Please ensure these points are fully understood and followed correctly.
デジタルメガトルクレンチ取扱説明書
この度はデジタルメガトルクレンチをお買い求めいただき
誠にありがとうございます。
ご使用前には必ず本書をお読みいただき、ご使用される方がい
つでも見ることができる場所に必ず保管してくださいますよう
お願いいたします。
Thank you for purchasing the Digital MEGA Torque Wrench.
Please read these instructions before use and keep them where the
operator may refer to them whenever necessary.
1

●INDEX●
1. 安全上のご注意…………………………………………………
●警告……………………………………………………………
●ご注意 …………………………………………………………
2. 各部の名称………………………………………………………
●本体名称………………………………………………………
●表示パネル……………………………………………………
●操作ボタン……………………………………………………
3. 操作モードの概要………………………………………………
●作業モード……………………………………………………
●設定モード……………………………………………………
4. 操作説明…………………………………………………………
●アダプタの取り付け……………………………………………
●電池のON/OFF………………………………………………
●締め付けトルクの設定 ………………………………………
●ピークホールドの設定 ………………………………………
●締め付け作業 …………………………………………………
5. 電池交換…………………………………………………………
6. 仕様………………………………………………………………
P3
P3
P4
P5
P5
P5
P6
P6
P6
P6
P7
P7
P7
P8
P9
P10
P11
P12
1. SAFETY NOTES………………………………………………
●Warning …………………………………………………………
●Caution…………………………………………………………
2. PARTS DESCRIPTION ………………………………………
●Names…………………………………………………………
●Display panel …………………………………………………
●Operation buttons ……………………………………………
3. OUTLINE OF THE OPERATION MODES ………………
●Working mode …………………………………………………
●Setting mode …………………………………………………
4. OPERATION DESCRIPTION ………………………………
●Installation of the adapter ……………………………………
●Turning ON/OFF the power …………………………………
●Setting of the tightening torque ……………………………
●PEAK hold setting ……………………………………………
●Tightening operation …………………………………………
5. BATTERY REPLACEMENT ………………………………
6. SPECIFICATIONS ……………………………………………
P13
P13
P14
P15
P15
P15
P16
P16
P16
P16
P17
P17
P17
P18
P19
P20
P21
P22
2

●本製品の取り扱いについて
本製品を分解または改造しないでください。
・安全性を損なったり、機能や寿命低下、故障の
原 因となりま す。
この取扱説明書に記載されている指定の
乾電池、またはオプション品以外は使用しないで
ください 。
・事故や怪我の原因となります。
本製品を火中に投入しないでください。
・破裂または有害物質の出る恐れがあります。
① ③
②
本体は雨中で使用したり、湿気の多い場所や
濡れた場所では使用しないでください。
・感電や発煙・故障の恐れがあります。
本体は振り回さないでください。
・事故や怪我、本体の破損や精度異常の原因と
なります。
①
作業は充分に明るい場所で行ってください。
・暗い場所での作業は、事故の原因となる場合
があります。
②
可燃性の液体や引火性ガスのある場所で使用
しないでください。
・爆発や火災の恐れがあります。
③
アダプタは確実に取り付けてください。
・事故や怪我、本体の破損や精度異常の原因と
なります。
④
⑤
パイプなどを用いてグリップ部を延長して使用
しないでください。
・事故や怪我、本体の破損や精度異常の原因と
なります。
⑥
高所での使用の際には落下防止策を行って
ください 。
・本体やアダプタを落下させると、事故や怪我、
故障の原因となります。
⑦
●作業について
ここに示した注意事項は、製品を安全に正しくお使いいただき、使用される方や他の方への危害や損害を未
然に防止するためのものです。
これらの事項は危害や損害の大きさと、切迫の程度を明示するために「注意」「警告」の二つに区分されます。
いずれも安全に関する重要な内容ですので、必ずお守りください。
警告
1. 安全上のご注意
ご注意: 取り扱いを誤ったときに、人が傷害を負うまたは物的損害の発生が
想定されるもの。
警 告: 取り扱いを誤ったときに、人が死亡や重傷を負う人身的な障害
または物的損害の可能性が想定されるもの。
3

●本製品の取り扱いについて
●ご使用になる前に始業点検を行い、
設定を確認してください。
●本製品をハンマーやテコ代わりにしないで
ください。
●本製品を強い磁気のある場所で使用すると、
故障の原因となりますのでご注意ください。
●本製品を落としたりぶつけたりしますと、
破損または故障の原因となりますのでご注意
ください。
●締め付けを行う際は、グリップ部の有効長線
(力点)を確実に握り、トルクレンチに対し上下
左右とも直角に力をかけてください。
●定期的なトルク検査をお奨めします。
検査は で承りますので、お買い上げの
ルートを通じてご用命ください。
●作業について
以下の場所での使用や保管はしないでください。
叩きつけたり、投げつけたりしないでください。
・故障や破損の原因となります。
①
この取扱説明書に記載されている用途以外では
使用しないでください。
・事故や怪我の原因となります。
①
製品の能力以上の作業は行わないでください。
・事故または破損の原因となります。
②
乱雑な場所や作業台で、作業は行わないで
ください 。
・事故や怪我の原因となります。
③
作業中は作業者以外の者を近づけないで
ください 。
・事故や怪我の原因となります。
④
無理な姿勢や体勢で作業を行わないでください。
常に足元を安定させ、バランスを保つようにして
ください 。
・事故や怪我の原因となります。
⑤
グリップ部は常にきれいで乾燥した状態を保ち、
油類
やグリースなどが付着しないようにしてください。
・事故や怪我の原因となります。
⑥
使用前に各部に損傷がないか十分点検し、
正常に作動するか、所定の機能を発揮するかを
確認してください。
・事故や怪我の原因となります。
⑦
使用しないときは、適切な場所に保管してくだ
さ い 。 子供の手の届かないところ、または鍵の
かかるところに保管してください。
・事故や怪我の原因となります。
②
開口部から内部に、金属類や燃えやすい物などを
差し込んだり落とし込んだりしないでください。
・故障や破損の原因となります。
③
④
本体は環境温度50℃以上の場所で保管しない
でください。
・乾電池等の劣化の原因となり、発煙、発火の
恐 れが ありま す。
⑤
ご注意
正しく安全にご使用いただくために
●使用上のご注意
・高温多湿の場所 ・ほこりの多い場所
・激しい振動がある場所 ・不安定な場所
・水や油が機器の中に入る恐れのある場所
・強い磁気のある場所
・故障や破損の原因となります。
4
万一、ご使用中に異常を発見された場合は直ちに使用を中止し、電源を切ったのち、 へご連絡ください。
操作ボタン
各種操作は2つのボタンで行います。
メガレンチアダプタ
一方クラッチを組み込んだ、メガチャックシリーズ
専用アダプタです。メガレンチアダプタは交換式
ですので、ご使用になるコレットチャックのサイズ
に合わせてお選びください。
①
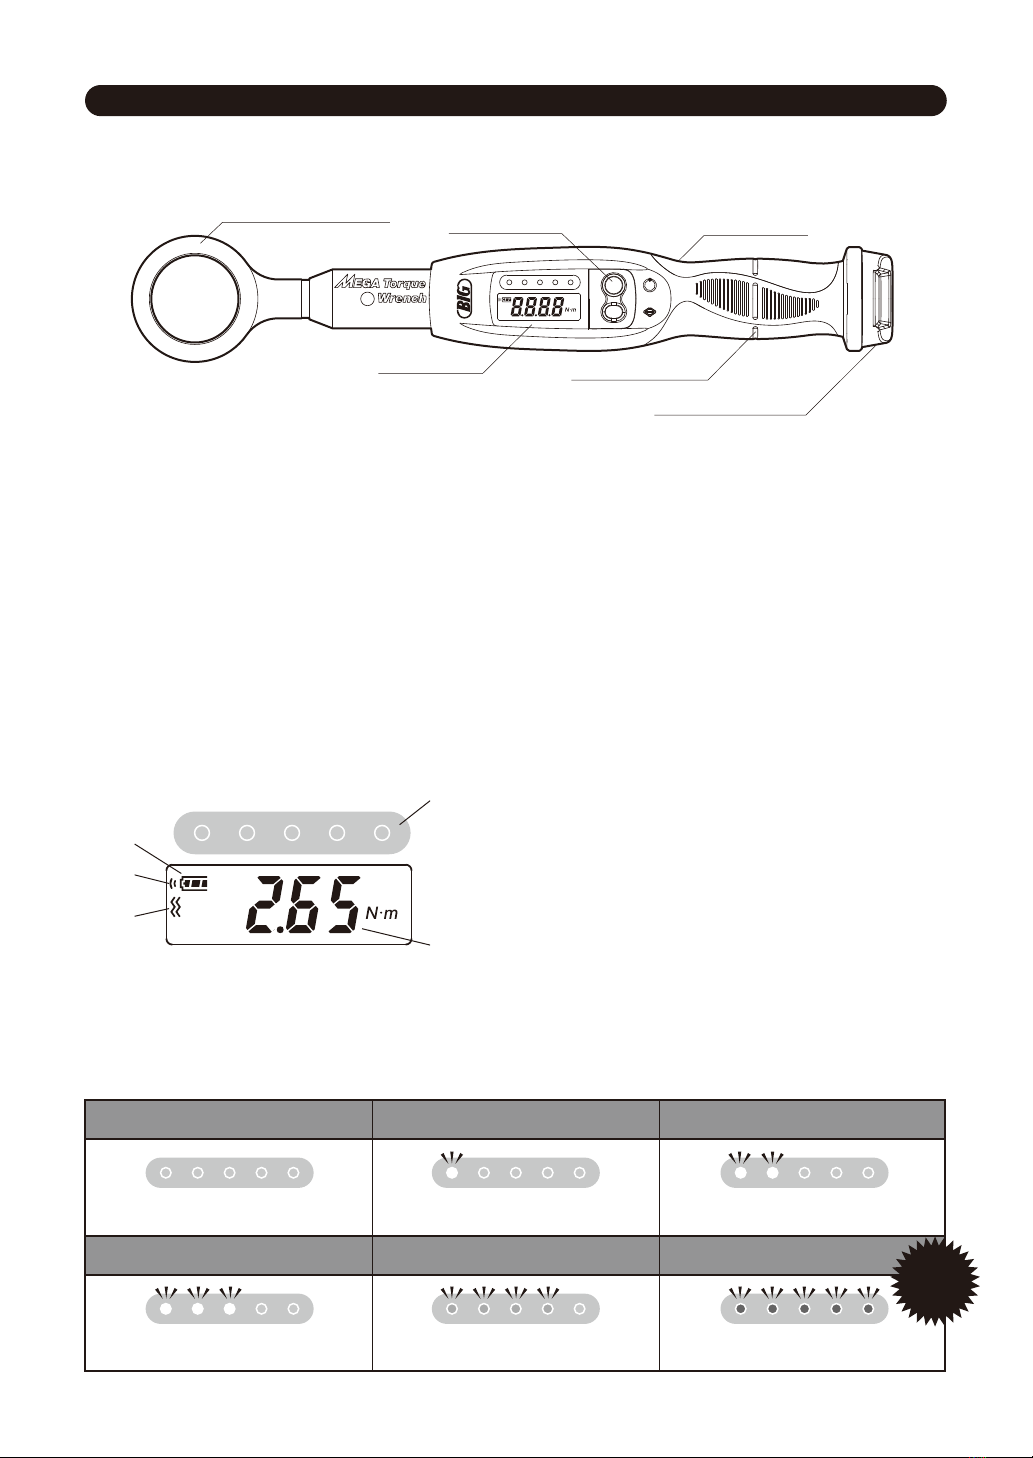
電池残量
3段階で電池残量を示します。3個表示で満充電〜50%、
2個表示で50%〜10%、1個表示になった際には電池
交換の準備をお願いします。
①
ブザー
ブザー音が有効であることを示します。
②
振動
グリップ部の振動が有効であることを示します。
③
表示パネル
締め付けトルク値やLEDインジケータ、設定内容
などを表示します。
②
③
グリップ部
目標トルクに達したとき、ブザー音とともに
グリップ部が振動してお知らせします。
④
数値
締め付けトルク値または設定値を表示します。
④
LEDインジケータ
設定トルクに対する割合を、リアルタイムにLEDの点灯
で表示しますので、アナログ感覚で作業が行えます。
⑤
2. 各部の名称
●表示パネル
●本体名称
メガレンチアダプタ 操作ボタン
表示パネル 有効長線(力点)
①③
②⑤
グリップ部
④
専用ゴムキャップ
⑥
MGR-TL/P
⑤
④
②
①
③
設定トルクの20%未満
LED全消灯 LED1個白色点滅 LED2個白色点滅
LED3個白色点滅 LED4個緑色点滅 LED5個青色点滅
設定トルクの20%に到達 設定トルクの40%に到達
設定トルクの60%に到達 設定トルクの80%に到達 設定トルクに到達
⑥専用ゴムキャップ
電池部の防水、防塵のため取り付けます。
電池交換時に取り外します。
⑤有効長線(力点)
締め付け時に、力を加える位置の目安になります。
ブザーと
振動で
お知らせ
5

電源ボタン
電源OFF時と作業モード中に長押しすることで、
電源をON/OFFにするボタンです。設定モード
中では設定値を選択するために使用します。
①
ピークホールドボタン
ピークホールド機能をON/OFFにするボタンで
す 。 長押しすることで、作業モードと設定モード
を切り替えることができます。設定モード中で
は設定値の選択に使用します。
②
●作業モード
●設定モード
●操作ボタン
実際に締め付け作業を行うためのモードで、電源をONにするとこの作業モードで起動します。
表示パネルには現在の締め付けトルクがリアルタイムに表示され、LEDインジケータも連動して動きます。
設定トルクに達するとブザー音とグリップ部の振動でお知らせします。
ピークホールド機能を有効にすることで、設定トルク到達後の最大値を保持することができます。
デジタルメガトルクレンチには、あらかじめ各
コレットチャックの推奨締め付けトルクがプリ
セットされており、設定モードで選択すること
ができます。
設定モードにすると、適合するコレットチャック
をイメージする設定名が表示されます。
設定を確定し作業モードに戻る際に設定された
設定トルクが表示されます。
右記にサイズ別プリセット内容一覧を示します。
3. 操作モードの概要
MEGA6N
MEGA8N
MEGA10N
MEGA13N
MEGA16N
MEGA20N
MEGA 6E
MEGA8E
MEGA10E
MEGA13E
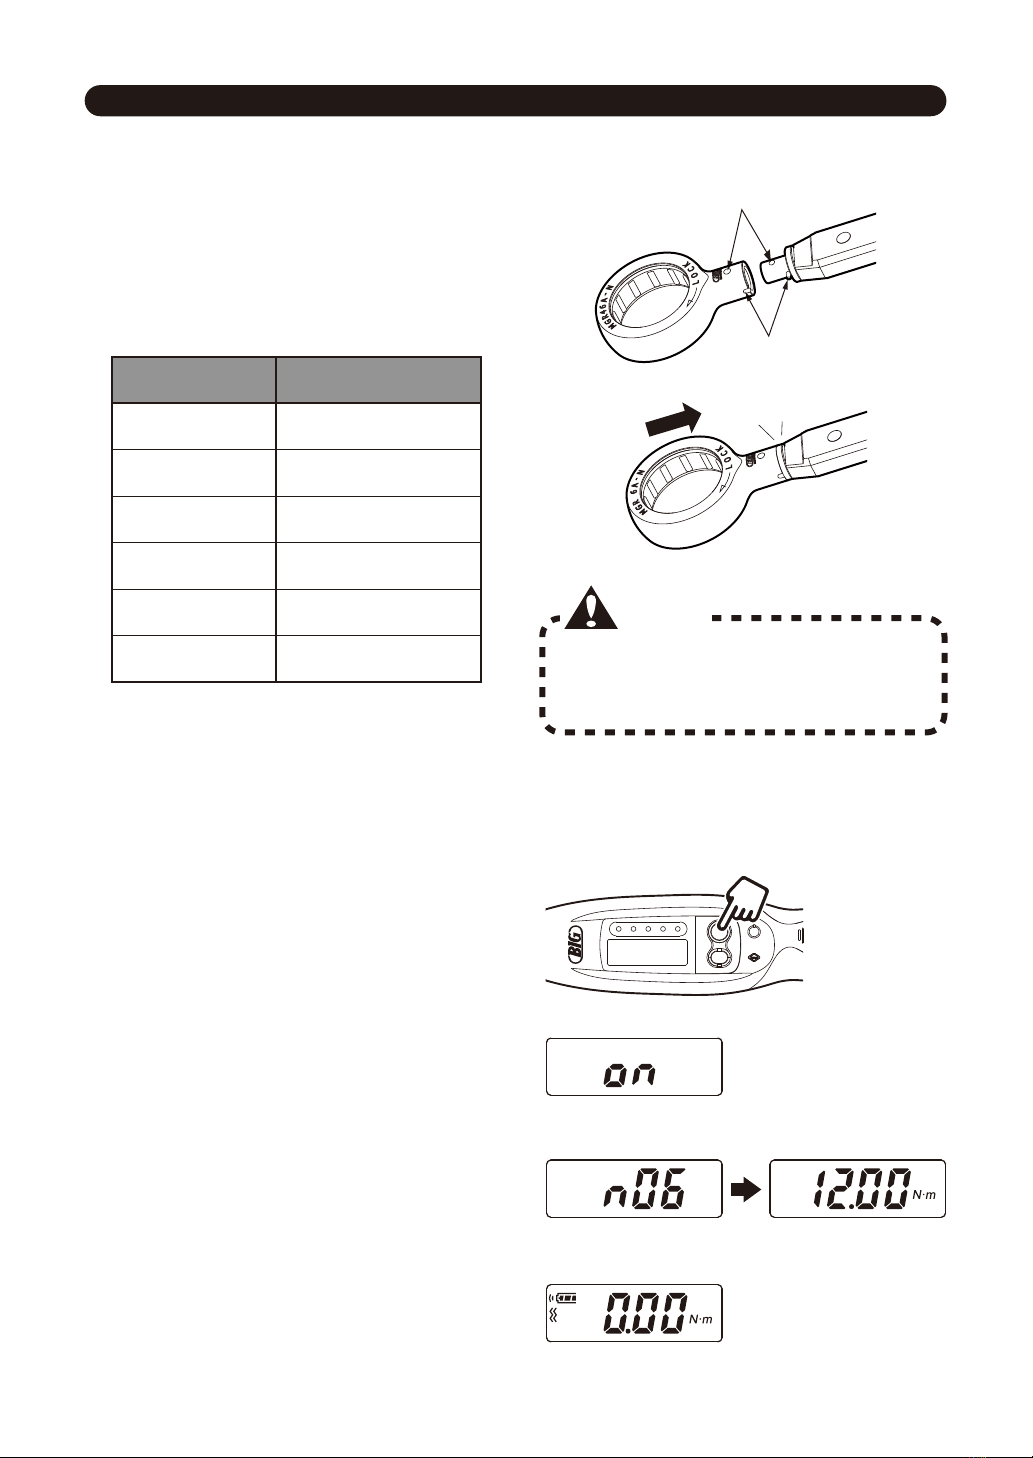
適合
コレットチャック パネル表示名 推奨トルク
( N・m )
12
19
35
40
45
50
20
35
40
50
MGR-TL/P
①
②
6
※アダプタは付属しておりません。
別途ご注文ください。
メガレンチアダプタ コレットチャック
MEGA 6N
MEGA 8N
MEGA10N
MEGA13N
MEGA16N
MEGA20N
MEGA20A-N
MEGA25A-N
MEGA30A-N
MEGA35A-N
MEGA42A-N
MEGA46A-N
MEGA 6E
MEGA 8E
MEGA10E
MEGA13E
位置を合わせる
位置を合わせる
カチッと音がするまで
押し込みます
アダプタは確実に取り付けてください。
警告
カチッ
PEAK
DC IN
PEAK
DC IN
トルクレンチ先端部のボール、ピンの位置と、
メガレンチアダプタのボール穴、切欠き位置を合
わせ、カチッと音がするまで真っすぐ押し込みます。
メガレンチアダプタはご使用するコレットチャックに
合わせて下記表より選定ください。
※購入時、乾電池は付属していますが本体には取り付いておりません。取り付け方法は5.電池交換を参照してください。
4. 操作説明
●アダプタの取り付け
①操作ボタンの電源ボタンを長押しします。
②表示パネルにONが表示されたら、ボタンから
指を離してください。
③現在の設定名と設定トルクがそれぞれ表示
されます。
④その後、表示パネルは作業モード画面に変わ
り、締め付け作業を行うことができる状態とな
ります。
●電源のON/OFF
1)電源ON
作業中にアダプタが外れると、事故や怪我の
原因となります。
MGR-TL/P
7
1)操作モードの変更
締め付け作業を行う前には必ず設定を確認し、正しい設定で作業を行ってください。
誤った設定で作業を行うと適正な締め付けが行えず、コレットチャックやトルクレンチが
破損する原因となります。
ご注意
サイズの異なるコレットチャックの締め付け作業を行う際には、アダプタを交換するとともに、
レンチ本体の設定を変更してください。
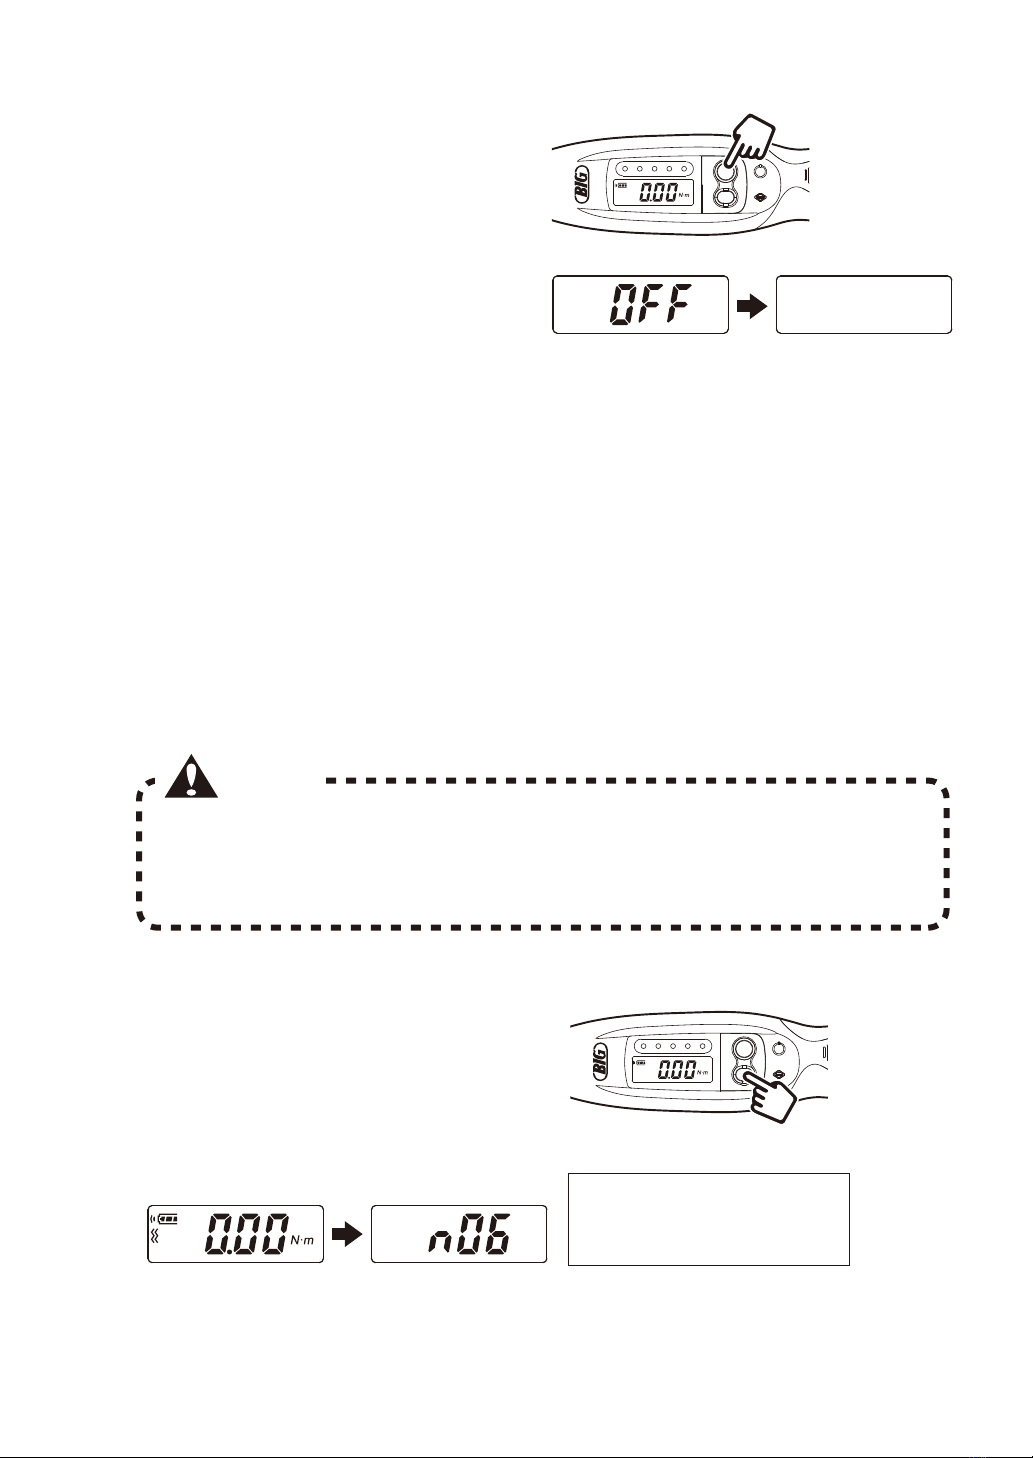
※電源のOFFは作業モード中のみ行うことができます。設定モード中やピークホールド機能が作動中は
電源のOFFはできませんのでご注意ください。
・1時間締め付け作業やボタン操作を行わなかった場合には、自動的に電源がOFFになります。
(オートパワーオフ機能)
・電源をOFFにしても、この時選択していた設定は記憶され、次に電源をONした時にもそのままの設定で
ご使用いただくことができます。
●締め付けトルクの設定
①操作ボタンの電源ボタンを長押しします。
②表示パネルにOFFが表示されたのち全表示が
消え、電源が切断されます。
2)電源OFF
MGR-TL/P
MGR-TL/P
操作ボタンのピークホールドボタンを長押しする
ことで、設定モードに切り替えます。
表示部が作業モード画面から設定モード画面に
変わります。
設定モード画面では、適合する
コレットチャックをイメージする
設定名が表示されます。
8

ピークホールドボタンを押すごとに、
ピークホールド機能の有効/無効が
切り替わります。
●ピークホールドの設定
1)設定の切り替え
ピークホールド機能がONの状態で
は、設定トルクに到達後にピークホ
ールド機能が作動し、最大測定値が
表示されたままになります。続けて
測定を行う場合、電源ボタンを押し
て測定結果をクリアしてください。
※クリア操作を行わないと、パネル表示には最大測定値しか表示されず、設定トルクに達してもブザー音が
鳴らず、グリップ部も振動しなくなりますのでご注意ください。
2)測定結果のクリア
MGR-TL/P
2)設定の変更
3)設定の確定
各操作ボタンを押すことで、前後の設定に表示が
変わります。
目的の設定を画面に表示させたまま、ピークホールドボタンを長押しすると設定が確定します。
その後、設定トルクが表示され、作業モードに戻ります。
ピークホールドボタンを押し、次に進めた際のパネル表示の順序を下に示します。
(電源ボタンでは逆の順序となります。)
MGR-TL/P
前
次
MGR-TL/P
MGR-TL/P
MGR-TL/P
ピークホールド有効 ピークホールド無効
ピークホールドボタン長押し
設定トルクの表示 作業モードに戻る
9

1.レンチはナットの根元までしっかりと入れ、完全にナットにかかるようにしてください。
ご注意
2.締め付け作業を行なう前に、必ずナット外径をウエス等できれいに拭い、
ナットとレンチのスベリを防いでください。
メガチャックと締め付けナットにはメガ
レンチの取り付け位置を示す段差を設け
ています。段差とアダプタとの間に隙間が
できないように取り付けてください。 スキマ
1.
デジタルメガトルクレンチは締め付け専用です。
ナットを緩める際は通常のメガレンチをご使用
ください。
2.
締め付け作業を行う前には必ず表示パネルの数
値が0になっていることを確認して作業を行っ
てください。
4.
グリップを握る際は、有効長線を中心に軽く手を
添え、勢いを付けず徐々に力を加えてください。
5.
力をかける方向は上下左右ともに、レンチに対
し直角になるようにしてください。
※レンチの能力を超えるトルク(60N・m)
が作用した場合は保護機能が働き表示が
すべて消えます。トルクレンチにかかる
負荷をなくすと復帰します。
ご注意
ナットの締め付け作業の際には安全のため、ツールクランプ装置( ツーリングメイト等)にホルダを固定し、
作業を行ってください。
表 示 パネ ルが 上 になるようにして 、レンチを締 め付 けナット
に取り付けます。
刃具に当たらないように注意し、アダプタの中心と締め付
けナットの中心を合わせて真直ぐに取り付けてください。
①グリップを握って、ナットを締め付けます。
グリップ部の有効長線に力がかかるように
して、ゆっくり力を加えてください。
③締め付けトルクが設定トルクに達すると、
ブザー音とともにグリップ部が振動し、締め付け完了をお知らせします。
②締め付けトルクがかかると、表示パネルのトルク値と
LEDインジケータの点灯がリアルタイムに変動していきます。
MGR-TL/P
●締め付け作業
2)締め付け
1)レンチの取り付け
有効長線
3.必ず設定範囲内でご使用ください。
90゜90゜
10

④爪を矢印の方向へカチッと音がするまで
引っ張り、電池の蓋を開けます。
その際、〇部分を押さえながら開けて
ください。
ご注意
専用ゴムキャップは電池部に水滴
や埃が侵入するのを防ぐ役割をし
ています。必ず取り付けて使用して
ください。
ご注意
①電源がOFFになっていることをご確認ください。
②単三電池2本をご用意ください。
5. 電池交換
ゴムキャップはトルクレンチの裏側から外します。
③トルクレンチのグリップ部の端にある
専用ゴムキャップを外し、電池の交換を
行います。
ゴ ム キ ャップ はト ル クレ ン チ の
表側から被せます。
上 から ゆっくりと
被せてください。
⑤電池はマイナスから挿入し、電池の蓋を逆
の手順で締めてください。
⑥電池取り付け後は再度専用ゴムキャップを
装着します。
押さえずに開けると、ばねの反動で、
電池が飛び出すことがあります。
ご注意
電池の蓋を確実に閉めたことを
ご確認ください。
裏側
表側(表示パネル)
裏側
表側
(表示パネル)
+−
11
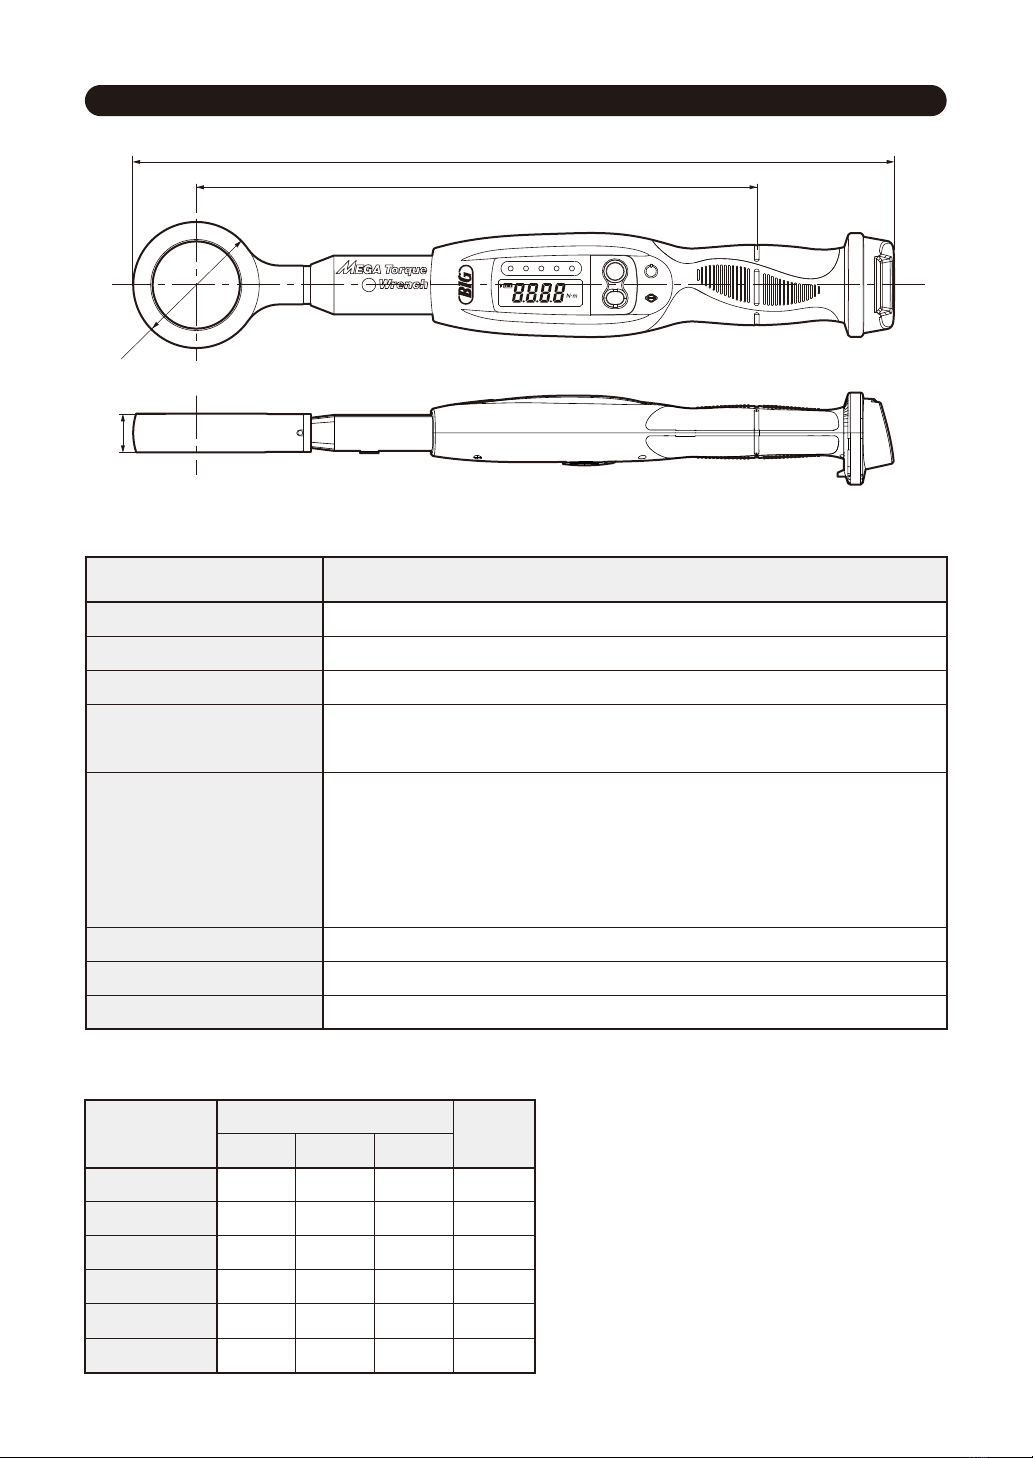
有効長289
全長L
H
φD
本体質量
トルク設定範囲
最小読取
表 示
基本機能
電 源
連続使用時間
使用温度範囲(推奨範囲)
520g(トルクレンチ本体のみ、メガレンチアダプタ、電池は除く)
5〜50N・m
0.01N・m
7セグメントLCD4桁数値表示
高精度LEDインジケータ5段階表示
電池残量表示3段階
ピークホールド機能
オートパワーオフ(1時間)
締め付け完了アラーム→ブザー音及びバイブレーション
60N・m負荷時、LCD表示部、LEDインジケータ全消灯
単3形乾電池・2本(アルカリ乾電池/ニッケル水素充電池)
約70時間(ニッケル水素充電池/締付条件:100回/h)
0℃〜40℃(15℃〜30℃)/結露不可
MGR-TL/P
型 式
●トルクレンチ本体
●メガレンチアダプタ(別売品)
MGR20A-N
MGR25A-N
MGR30A-N
MGR35A-N
MGR42A-N
MGR46A-N
377
381
384
386.5
390
392
36
44
50
55
62
66
16
20
20
20
20
20
0.13
0.18
0.22
0.23
0.25
0.27
型式 質量
(kg)
L øD H
各部寸法(mm)
MGR-TL/P
6. 仕様
12
Caution:Indicates that improper handling could result in personal injury or
property damage.
Warning:Indicates that improper handling could result in death or serious
personal injury, including property damage.
●Concerning the product
Do not disassemble or modify the product.
・
I
t may lead to damages, reduced life, functions
and safety.
Use only those batteries or optional
items that are indicated in this
operation manual.
・Failure to do so may cause injuries or
accidents.
Do not throw the product into the re.
・The product may explode or generate toxic
substances.
① ③
②
Do not use this device in the rain or in
highly humid or wet locations.
・It may result in electric shock or cause
smoking/malfunction.
Do not swing the product around.
・It may cause accidents, injuries, product
breakages or accuracy problems.
①
Use the product in a bright enough location.
・Using the product in dark locations may
lead to accidents.
②
Do not use in locations with combustible
liquids or ignitable gases.
・It may result in an explosion or re.
③
Install the adapter correctly.
・Failure to do so may cause accidents, injuries,
product breakages or accuracy problems.
④
⑤
Do not use the product with an extension
pipe or similar attached to the grip.
・It may cause accidents, injuries, product
breakages or accuracy problems.
⑥
In case of using the product in elevated
locations, take measures against
dropping the product.
・Dropping the product or the adapter may
cause accidents, injuries or breakages.
⑦
●Concerning the handling of the product
The following safety notes are arranged in order to use our product correctly and to protect the operator and
other people from possible injuries and damages. In order to distinguish the severity of the injuries or
damages, the safety notes are divided in two categories: “Caution” and “Warning”.
Please be sure to respect the safety notes since any of them contain important safety matters.
Warning
1. SAFETY NOTES
13
●Concerning this product
●Concerning the handling of the product
Do not use or store the product in the
following locations.
①
Use the product only for the applications
indicated in this manual.
・Failure to do so may cause an accident or injury.
①
Do not use the product for operations
above its specications.
・It may cause an accident or breakage.
②
Do not use the product in a cluttered
location or working table.
・It may cause an accident or injury.
③
Do not let other people come close to
the operator when using the product.
・It may cause an accident or injury.
④
Do not handle the product in an unnatural
posture.
Always stabilize your feet and maintain a
balanced position.
・Failure to do so may cause an accident or injury.
⑤
Keep the grip clean and dry at all times,
and do not allow oil, grease, etc. to come
into contact with it.
・It may cause an accident or injury.
⑥
Prior to use, carefully inspect each part
for damage, check whether the device
operates properly, and conrm that the
device functions normally.
・Failure to do so may cause an accident or injury.
⑦
Store in an appropriate place when not in
use. Store away from the reach of
children or in a location that can be
locked.
・Failure to do so may cause an accident or injury.
②
Do not let enter metallic or inammables
objects into the device.
・It may cause a malfunction or breakage.
③
Do not throw or hammer the product.
・It may cause a malfunction or breakage.
④
Do not store this device in locations with
an environmental temperature of 50°C or
higher.
・It may cause deterioration of the batteries etc
and lead to fuming or ring.
⑤
Caution
Respect the following notes for a safe and correct use of the product.
●Safety notes regarding the use of the product
・Locations with high humidity and elevated
temperature
・Locations with a lot of dust
・Locations with strong vibrations
・Unstable locations
・Locations where water or oil may invade
the product
・Locations with strong magnetic elds
If anomalies are discovered during the use of the product, stop immediately the operation and contact
after turning off the product.
●Before using the product perform a starting inspection and control the settings.
●Be aware that using the product in places with strong magnetism may damage it.
●Dropping or hitting the product may cause breakages or damages.
●Do not use the product as a hammer or a lever.
●When tightening, hold the grip rmly on the valid line (force point) and apply a
perpendicular force to the torque wrench (up and down or right and left).
●It is recommended to perform regular torque inspections. Place your inspection request
to our distributors.
・It may cause a malfunction or breakage.
14
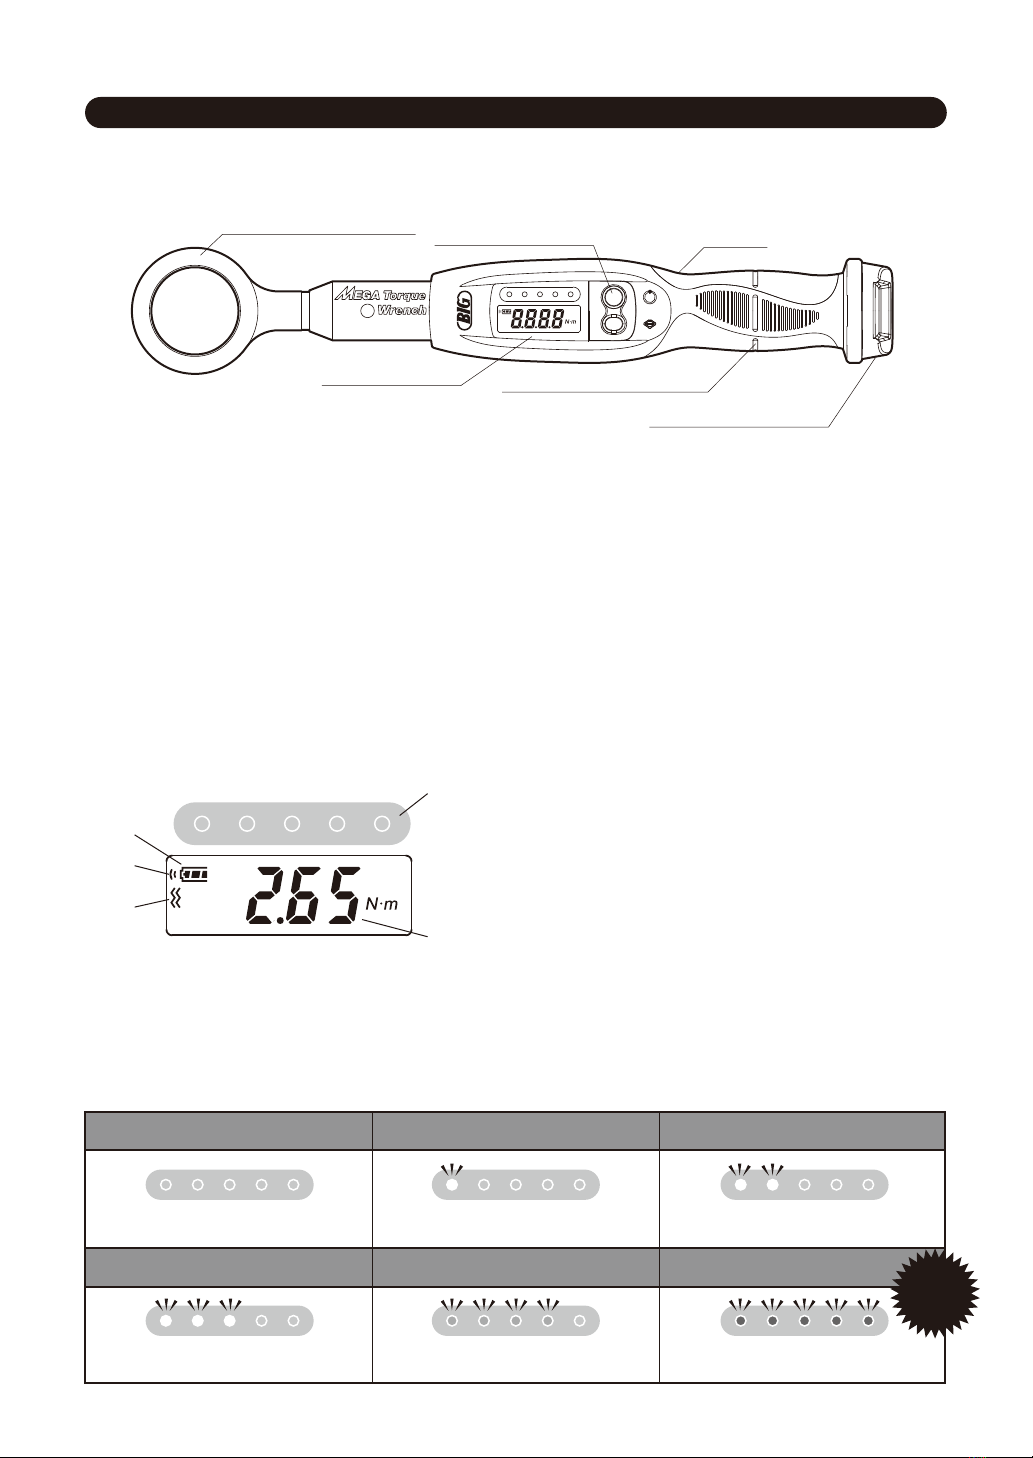
Operation buttons
Two buttons are used to perform each operation.
MEGA Wrench Adapter
MEGA chuck series exclusive adapter. The adapter
is provided with one-way clutch. Since the adapter
is interchangeable, select the adapter that
corresponds to the size of the collet chuck used.
①
Battery level
Indicates the battery level at one of three levels. When three
segments are lit it indicates a charge of 100% - 50%, when
two are lit it indicates a charge of 50% - 10%, and when one
is lit you should prepare to replace the battery.
①
Buzzer
Indicates that the buzzer sound is enabled.
②
Vibration
Indicates that vibration is enabled in the grip.
③
Display panel
The panel displays information such as tightening
torque values, LED indicators, and settings.
②
③
Grip
The grip vibrates and a sound is emitted when the
set torque is reached.
④
Numerical values
Displays the tightening torque value or setting value.
④
LED indicators
These LEDs are used to indicate the proportion of the set
torque in real time, allowing the device to be used in an
analog fashion.
⑤
2. PARTS DESCRIPTION
●Display panel
●Names
MGR-TL/P
MEGA Wrench Adapter Operation buttons
Display panel Effective length line
(Force point)
①③
②⑤
Grip
④
Dedicated rubber cap
⑥
⑤
④
②
①
③
Less than 20% of set torque
All LEDs off 1 LED ashes white 2 LEDs ashes white
3 LEDs ashes white 4 LEDs ashes green 5 LEDs ashes blue
20% of set torque 40% of set torque
60% of set torque 80% of set torque Set torque
⑥Dedicated rubber cap
This is attached to protect the battery compartment
from water and dust.
It is removed when replacing the batteries.
⑤Effective length line (Force point)
It indicates the point where to apply the force when
tightening.
Notication
provided
via buzzer and
vibration
15

MGR-TL/P
①
②
MEGA6N
MEGA8N
MEGA10N
MEGA13N
MEGA16N
MEGA20N
MEGA 6E
MEGA8E
MEGA10E
MEGA13E
Suitable
collet chuck
Panel display name
Recommended torque
(N・m)
12
19
35
40
45
50
20
35
40
50
Power button
This button turns the power ON/OFF when it is
pressed and held while either the power is OFF or
the device is in working mode. It is used to select a
setting value while in setting mode.
①
Peak hold button
This button turns the peak hold function ON/OFF. It
can be pressed and held to switch between working
mode and setting mode. It is used to select a setting
value while in setting mode.
②
●Working mode
●Setting mode
●Operation buttons
This mode is used for actual tightening work. The device starts in this mode when the power is turned
ON.
The current tightening torque is shown in real time on the display panel, together with the LED indicators.
When the set torque is reached, the device noties the user by sounding a buzzer and vibrating the grip.
The peak hold function can be enabled to maintain the maximum value after reaching the set torque.
The Digital MEGA Torque Wrench is
congured with recommended
tightening torque presets for each
collet chuck. These can be selected
in setting mode.
When switched to setting mode, the
device will display setting names
based on corresponding collet
chucks.
Once the setting is conrmed and
the device is switched back to
working mode, the set torque will be
displayed.
Presets for each size are listed to
the right.
3. OUTLINE OF THE OPERATION MODES
16

MGR-TL/P
※An adapter is not included.
Please order separately.
MEGA Wrench Adapter
Collet chuck
MEGA 6N
MEGA 8N
MEGA10N
MEGA13N
MEGA16N
MEGA20N
MEGA20A-N
MEGA25A-N
MEGA30A-N
MEGA35A-N
MEGA42A-N
MEGA46A-N
MEGA 6E
MEGA 8E
MEGA10E
MEGA13E
Align
Align
Push it until you hear a “click”
Be sure to install the adapter correctly.
Warning
Click
PEAK
DC IN
PEAK
DC IN
Align the ball and the pin of the torque wrench’s
tip to the respective holes of the MEGA Wrench
Adapter and insert it until you hear a “click”.
Select the MEGA Wrench Adapter compatible
with the collet chuck used from the below table.
※Although batteries are included with the device when purchased, they are not installed in the device.
Refer to 5. BATTERY REPLACEMENT for information how to install them.
4. OPERATION DESCRIPTION
●Installation of the adapter
①Press and hold the power operation button.
②Release your nger from the button when ON is
displayed on the display panel.
③The current setting name and set torque are
displayed.
④The display panel then changes to the working
mode screen, allowing you to begin tightening.
●Turning ON/OFF the power
1)Power ON
If the adapter comes off while using the
product it may cause accidents or injuries.
17

1)Changing the operation mode
Before tightening, always check the setting and be sure to execute the tightening operation
with the correct setting.
If the operation is performed with the wrong setting, the proper tightening torque will not be
reached and may cause damage to the collet chuck or the torque wrench.
Caution
In case of tightening a collet chuck with a different size, replace the adapter and adjust the setting of the
wrench.
※Power can only be turned off while in working mode. Note that power cannot be turned off while in
setting mode or while the peak hold function is operating.
・
The device will automatically turn off if it is not tightening anything or if the operation buttons are not
pressed for one hour.
(Auto power-off function)
・
The setting selected when the device is turned OFF is saved, so it is possible to use it immediately after
turning the device ON again.
●Setting of the tightening torque
①Press and hold the power operation button.
②OFF is displayed on the display panel, then the
display turns off and the power is shut off.
2)Power OFF
MGR-TL/P
MGR-TL/P
Press and hold the peak hold operation button to
switch to setting mode.
The display switches from the working mode screen
to the setting mode screen.
The setting mode screen displays
setting names based on
corresponding collet chucks.
18

MGR-TL/P
MGR-TL/P
Active Non-Active
Press the peak hold operation
button to enable/disable the peak
hold function.
●PEAK hold setting
1)Changing the settings
When the peak hold function is on,
the peak hold function will operate
after the device reaches the set
torque, which will leave the maximum
measurement value displayed on the
screen. To continue measuring, press
the power operation button to clear
the measurement results.
※If the results are not cleared, only the maximum measurement value will be displayed on the screen;
the buzzer will not sound even if the set torque is reached and the grip will not vibrate.
2)Clearing the measured result
MGR-TL/P
2)Changing the settings
3)Conrming the setting
Press each operation button to select the preceding
or following setting.
The panel will cycle through the following items each time the peak hold operation
button ispressed. (Pressing the power operation button will cycle in reverse order.)
MGR-TL/P
Backward
Forward
Pressing and holding the peak hold operation button will select the setting currently displayed on the
screen. The screen will then display the set torque and the device will return to working mode.
MGR-TL/P
Press and hold the peak hold operation button
Set torque displayed Returns to working mode
19
Table of contents
Other Big Daishowa Power Tools manuals


Popular Power Tools manuals by other brands


Central Machinery
Central Machinery 43353 Assembly and operating instructions

Ribimex
Ribimex PRBAT20/SECSB User and maintenance manual

Tohnichi
Tohnichi CL2Nx8D-MH operating instructions

The Handy
The Handy 10369 quick start guide

SCS
SCS 980 Installation, operation and maintenance

Gude
Gude STS 20-201-24 Translation of the original instructions


