Big Daishowa MEGA MGR-TL/P User manual

ON/OFF MODE PEAK CLEAR
DC IN
PEAK
MGR-TL/P
Digital
Torque Wrench
Operation manual
Please read this operation manual before use

Thank you for your purchase of Digital MEGA Torque Wrench.
Please be sure to read this manual before using the product and
also keep it in a location where all the operators may consult it in
case of necessity.
Regarding the safety
1
■SAFETY NOTES
Warning
Caution
■
SAFETY NOTES REGARDING
THE USE OF THE PRODUCT
■NAMES OF THE PART
1. Names
2. Details of the LCD Display
3.
Details of the operation panel
■OUTLINE OF
THE OPERATION MODES
1. Working mode
2. Setting mode
3. Concerning the preset
P 2
P 2
P 3
P 3
P 4
P 4
P 4
P 4
P 5
P 5
P 5
P 5
■OPERATION PROCEDURES
1. Installation of the adapter
2. Turning ON/OFF the power
3. Tightening operation
4.
Setting of the tightening torque
5. PEAK hold setting
6. Recharging procedures
■SPECIFICATIONS
P 6
P 6
P 6
P 7
P 8
P 9
P 9
P10
Digital MEGA Torque Wrench Operation Manual
In this manual, the following symbol is used to indicate procedures
related to the safe use of the product.
Read well the contents of the safety notes and apply correctly
those instructions.
This symbol indicates that the wrong handling of the product
may cause injuries to the operator or other people and material
damages.

2
Caution :
The following safety notes are arranged in order to use our product correctly and to protect the operator and other
people from possible injuries and damages. In order to distinguish the severity of the injuries or damages, the safety
notes are divided in two categories: “Caution” and “Warning”.
Please be sure to respect the safety notes since any of them contain important safety matters.
Warning :
Warning
SAFETY NOTES
1. Concerning the product
Do not disassemble or modify the product.
I
t may lead to damages, reduced life, functions
and safety.
Do not throw the product into the fire.
The product may explode or generate toxic
substances.
Use only accessories or optional parts
indicated in this manual.
It may cause injuries or accidents.
2. Concerning the recharge and the Battery charger
Use only the recharging device indicated
in this manual.
Do not use the recharging device outside
the indicated power specifications.
It may become extremely hot and start a fire.
Do not recharge the product with a
temperature under 0 or above 40 .
The built-in rechargeable battery
may explode or a fire may start.
Recharge the product in a well ventilated
location.
Do not recharge the product if the recharging
device or the product itself is covered by a
cloth, etc.
The built-in rechargeable battery may explode
or a fire may start.
Remove the recharging device’s plug from the
power socket when the recharge is finished.
It may start a fire or cause an electric shock.
3. Concerning the handling of the product
Do not use the product or the recharging device
under rain, etc or in places wet and humid.
The product may get damaged, emit smoke or
cause electric shocks.
Use the product in a well illuminated location.
Using the product in dark locations may
lead to accidents.
Do not use or recharge the product in
locations with inflammable gases or liquids.
Install the adapter correctly.
It may cause accidents, injuries,
product breakages or accuracy problems.
Do not swing the product around.
It may cause accidents, injuries, the product
breakages or accuracy problems.
Do not use extension pipes to tighten the
product.
It may cause accidents, injuries, the product
breakages or accuracy problems.
In case of using the product in elevated
locations, take measures against
dropping the product.
Dropping the product or the adapter may
cause accidents, injuries or breakages.
This note indicates that the wrong handling of the product may cause physical or material damages.
This note indicates that the wrong handling of the product may cause material damages.

3
1. Concerning the handling of product
Do not use or store the product in the
following locations.
Locations with high humidity and elevated
temperature
Locations with a lot of dust
Locations with strong vibrations
Unstable locations
Locations where water or oil may invade the
product
Locations with strong magnetic fields
Store the product accurately when you
do not use it.
Do not let enter metallic or inflammables
objects into the device.
Do not step on the product or place
objects on it.
Do not throw or hammer the product.
Caution
SAFETY NOTES
Do not use the cable near very hot locations
or places with oil or sharp corners.
Recharge the product in a place where the cable
does not get stuck, stepped on or does not get
damaged by receiving excessive stresses.
I
t may cause electric shocks or short-circuits.
2. Recharging and the battery charger
Do not store the product or the battery charger
in a location with a temperature above 50 .
T
he conditions of the recharging device
and of the built-in rechargeable battery may
worsen.
Do not handle the battery charger’s cable
carelessly.
Do not carry the cable around and do not remove
the cable from the power socket by pulling it.
Do not handle the product in an unnatural posture.
Always stabilize your feet and maintain a
balanced position.
Always maintain the grip clean and dry.
Do not let oil, grease adhere to the grip.
Always inspect the wrench before using it.
Before the use, inspect each part to check if
they present dents or not and also check if the
product and its functions work correctly.
3. Concerning the handling of the product
Use the product only for the applications
indicated in this manual.
Do not use the product for operations
above its specifications.
Do not use the product in a cluttered
location or working table.
Do not let other people come close to the
operator when using the product.
SAFETY NOTES REGARDING THE USE OF THE PRODUCT
Respect the following notes for a safe and correct use of the product.
If anomalies are discovered during the use of the product, stop immediately the operation and contact after
turning off the product.
Before using the product perform a starting inspection and control the settings.
Be aware that using the product in places with strong magnetism may damage it.
Be aware that if the product comes in contact with water or oil, it may get damaged or start a fire.
Dropping or hitting the product may cause breakages or damages.
Do not use the product as a hammer or a lever.
When tightening, hold the grip firmly on the valid line (force point) and apply a perpendicular force to the torque
wrench (up and down or right and left).
It is recommended to perform regular torque inspections. Place your inspection request to using our
distributors.
・
・
・
・
・
・
●
●
●
●
●
●
●

1. Names
2. Details of the LCD Display
3. Details of the operation panel
NAME OF THE PART
4
MEGA Wrench Adapter
MEGA chuck series exclusive adapter. The adapter
is provided with one-way clutch. Since the adapter
is interchangeable, select the adapter that
corresponds to the size of the collet chuck used.
Recharging jack
It is the jack used to connect the included recharging
device (AC adapter) and recharge the wrench.
LCD -Display
It displays the bar graph, the value of the tightening
torque and the setting details.
Handling panel
Each operation is executed using the panel’s buttons.
Grip
The grip vibrates and a sound is emitted when the set
torque is reached.
Effective length line (Force point)
It indicates the point where apply the force when
tightening.
MEGA Wrench Adapter
Recharging jack LCD Display
Grip
Operation panel
Effective length line
(Force point)
Numerical display
It indicates the value of the tightening torque or the setting values.
Bar graph
It indicates, in real time, the ratio in relation to the set
torque on the bar graph. And since the scale is divided in
different colours it is also possible to obtain a midway value.
Low battery indicator
It is displayed when the battery’s energy is low and it is
necessary to recharge it. At the same time the buzzer
will emit a sound for 30 seconds and after, the device
will automatically power off.
Buzzer
It indicates that the buzzer is active. (It is always displayed.)
Recharge indicator
The red LED turns on when recharging the product.
DC IN
It indicates the location of the recharging jack.
PEAK hold indicator
The symbol is displayed when the PEAK hold
function is worked.
ON/OFF button
It is used to turn ON or OFF the power.
MODE button
It is used to switch between the “Working mode” and
the “Setting mode”.
▲button
If pushed in the “Setting mode”, it displays the previous setting.
▼button
If pushed in the “Setting mode”, it displays the successive setting.
PEAK button
It is used for the PEAK hold function.
CLEAR button
Using this button while the PEAK hold function is
worked will reset the measurement value.
Red scale
Orange scale
Green scale
20
-
80%
80
-
100%
100
-
120%
・
・
・
The and buttons can only be used in the “Setting mode”.
ON/OFF MODE PEAK CLEAR
DC IN
PEAK
MGR-TL/P
▲
▲

OUTLINE OF THE OPERATION MODES
5
No. Display code
Suitable
collet chuck
Recommended
torque (N・m)
The Digital MEGA Torque Wrench is provided with two modes: the “Working mode” to perform the actual
tightening operation and the “Setting mode” to select the recommended torque suitable for the collet chuck.
The outline of each operation is explained in this section.
1. Working mode The bar graph is linked to the torque.
The value of current tightening
torque is displayed in real time.
2. Setting mode
This mode is used for executing the tightening operation.
It is active when the power is turned ON.
In the LCD, the current tightening torque is displayed in
real time and the bar graph is linked to it.
If the PEAK hold function is active, it is possible to keep
the highest value of the tightening torque.
In the Digital MEGA Torque Wrench, the recommended
tightening torque for each collet chuck is preset in
advance. In the “Setting mode” it is possible to display
the preset values and to select the suitable setting.
When the “Setting mode” is selected, a code indicating
the name of the suitable collet chuck is displayed for 2
seconds and then its recommended tightening value is
also displayed.
The recommended tightening torque for each size of
Mega New Baby Chuck and Mega E Chuck is preset in
the Digital MEGA Torque Wrench.
The details of the preset settings are indicated in the
table below.
Each setting can be displayed on the LCD by pushing the
buttons on the operation panel.
If the button is pushed, the settings will be displayed on
the LCD following the order below.
(Pushing the button will display the settings in the
opposite order.)
Code of the collet chuck (2 seconds)
Recommended tightening torque
Example of the setting mode
3. Concerning the preset
1
2
3
4
5
6
7
8
9
10
12
19
35
40
45
50
20
35
40
50
MEGA 6N
MEGA 8N
MEGA10N
MEGA13N
MEGA16N
MEGA20N
MEGA 6E
MEGA 8E
MEGA10E
MEGA13E
n06 →n08 →n10 →n13 →n16
↑ ↓
↓
E13 ←E10 ←E08 ←E06 ←n20
▲
▲
▲
▲

OPERATION PROCEDURES
6
The MEGA Wrench Adapter is not included.
Please place a separate order for it.
Align the ball and the pin of the torque wrench’s tip to
the respective holes of the MEGA Wrench Adapter and
insert it until you hear a “click”.
Select the MEGA Wrench Adapter compatible with the
collet chuck used from the below table.
The currently code
set and the value of
the recommended
torque are displayed
respectively for 2
seconds.
Then the LCD
switches to the
“Working mode”. It is
now possible to
execute the
tightening operation.
Release the
button as soon as
“On” is displayed
on the LCD.
Push the ON/OFF
button of the
operation panel for
more than 1 second.
1. Installation of the adapter
MEGA Wrench Adapter Collet chuck
MEGA 6N
MEGA 8N
MEGA10N
MEGA13N
MEGA16N
MEGA20N
MEGA20A-N
MEGA25A-N
MEGA30A-N
MEGA35A-N
MEGA42A-N
MEGA46A-N
MEGA 6E
MEGA 8E
MEGA10E
MEGA13E
Align
Align
Push it until you hear a “click”
Be sure to install the adapter correctly.
If the adapter comes off while using the
product it may cause accidents or injuries.
Warning
2. Turning ON/OFF the power
1)Power ON
All the indicators
on the LCD
disappear and the
power is turned off.
Release the
button as soon as
“OFF” is displayed
on the LCD.
Push the ON/OFF
button of the
operation panel for
more than 1 second.
2)Power OFF
The device automatically turns OFF if the operation
panel is not used or the tightening operation is not
performed within 5 minutes. (Power save function)
The setting selected when the device is turned OFF is
saved, so it is possible to use it immediately after
turning ON again the device.
Click
MGR-TL/P
PEAK
DC IN
MGR-TL/P
PEAK
DC IN
※
●
●

OPERATION PROCEDURES
7
The Digital MEGA Torque Wrench is exclusively a tightening
wrench. To remove the nut, use the normal MEGA Wrench.
Always use the product within the setting range.
When holding the grip, hold it lightly using as center the valid
line and apply the force smoothly and gradually.
When tightening, apply
a perpendicular force to
the wrench (up and
down or right and left).
3. Tightening operation
1.
Insert the adapter firmly to the base of the nut and make it adhere completely to the nut.
Caution
For safety reasons, when tightening the nut, secure
the holder to a tool clamping device (BIG Tooling
Mate, etc.) and proceed with the operation.
1)Positioning the wrench
Insert the wrench into the nut with the LCD facing up.
Align the adapter to the center of the nut and insert the
wrench vertically being careful to not hit the cutting
edge with the adapter.
Grasp the gripper and tighten the nut.
Hold the gripper in order to apply the tightening force
on the effective line and tighten slowly.
As soon as the tightening torque is applied, the value
of the torque and the bar graph are displayed on the
LCD. They both change in real time.
When the tightening torque set is reached, the grip
vibrates and the buzzer emits a sound notifying that the
tightening operation is finished.
The wrench will enter smoothly if it
is inserted rotating it in the opposite
direction of the arrow on the adapter.
2.
Before tightening, always clean the external surface of the nut with a cloth and take
measures to prevent the nut and the adapter from slipping.
If the tightening operation is executed when the adapter adheres only partially to the nut, it will not be
possible to reach the appropriate torque and also this may worsen the accuracy or damage the adapter.
If a torque that exceeds the wrench’s capacity is used,
the safety function will activate and it will not be possible
to operate. In this situation, turn off the power and
resume the operation after restarting.
Caution
The tightening nut of the Mega Chuck is provided with
a gap that indicates the installation position of the
MEGA Wrench. Install the adapter in a way to have
no clearance between the gap and the adapter itself.
Clearance
2)Tightening
Beep
Effective line
Vibration
90゜
N
-
A
6
4
R
G
M
90゜
●
●
※
1. 3.
4.
2.●

8
4. Setting of the tightening torque
In case of tightening a collet chuck with a different size, replace the adapter or modify the wrench’s settings.
Before tightening, always check the setting and be sure to execute the tightening operation
with the correct setting.
If the operation is performed with the wrong setting, the proper tightening torque will not be reached becoming
cause of damages for the collet chuck or the torque wrench.
Caution
1)Changing the operation mode
Working mode’s screen Setting mode’s screen
The LCD will change from the “Working mode” display to the “Setting mode” dis-
play. In the "Setting mode" display, the code of the collet chuck is displayed for
2 seconds and then its recommended tightening value is also displayed.
2)Changing the settings
The LCD switches to the “Working mode”. It is now possible to use the new
setting for the tightening operation.
3)Confirming the setting
If the MODE button is not pushed within 5 seconds, the LCD
switches automatically to the “Working mode”.
In this case, the operation executed on the “Setting mode” is
cancelled and the device switches back to the previous setting.
Push the MODE button on the operation
panel to switch to the “Setting mode”.
Push the buttons on the operation
panel to modify the settings.
If the button is pushed, the settings will be displayed on the LCD
following the order below.
(Pushing the button will display the settings in the opposite order.)
Push 1 time the button to display
the successive setting.
Push 1 time the button to display
the previous setting.
While the intended setting is displayed
on the screen, push again the MODE
button to confirm it. The displayed
contents become the current setting.
n06 →n08 →n10 →n13 →n16
↑ ↓
↓
E13 ←E10 ←E08 ←E06 ←n20
DC IN
DC IN
PEAK
PEAK
OPERATION PROCEDURES
9
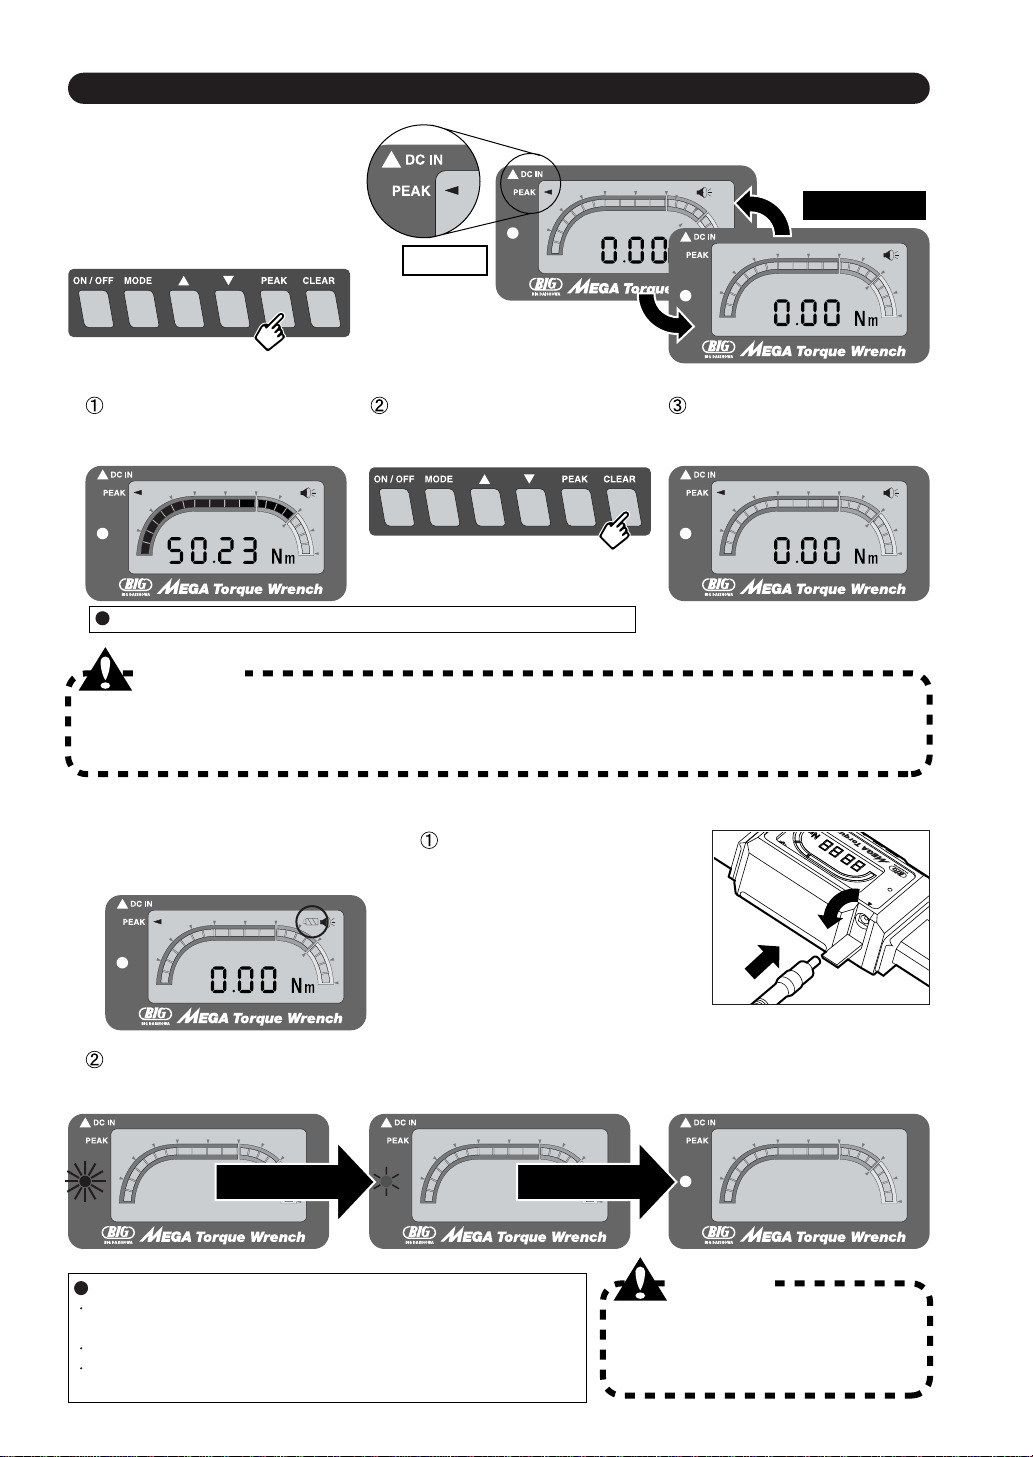
5. PEAK hold setting
Be sure to clear every time the measured result before using the device.
If it is not cleared, the LCD displays only the maximum measured value. Be aware that under this situation,
even if the intended torque is reached, the buzzer does not sound and the grip does not vibrate.
Caution
Caution
It is possible the PEAK hold function
used by pushing the PEAK button on
the operation panel.
When the battery’s energy is low, the low-
battery indicator is displayed. Use the
included AC adapter and recharge the device.
When recharging, the LED of the recharge indicator on the LCD turns on (red). The recharge’s duration is
approximately 3 hours. The LED dims when the recharge is finished normally. Remove the AC adapter promptly
when the recharge is terminated. The LED turns off when the AC adapter is removed.
Use only the recharging device indicated
in this manual. Do not use the recharging
device outside the indicated power
specifications.
When the PEAK hold function is
worked, the previously measured
result is displayed on the LCD.
The digits on the LCD are reset
(0.00).
Before executing a new work,
push the CLEAR button to clear
the measured result.
The Torque Wrench has a built-in lithium battery.
Depending on the operation conditions, it may be recharged
for about 500 times.
With 1 recharge it is possible to perform about 4,000 tightening operations.
The substitution of the built-in battery can not be performed by the
customer. Please contact BIG usingour distributors.
2)Clearing the measured result
Under this condition proceed with the
next work.
1)Changing the settings
Active
Non-Active
6. Recharging procedures
Power off the device, open the
recharging jack’s access and
connect the AC adapter’s plug to
the power socket inside it.
Check that the outlet of the AC
adapter is connected correctly to the
power outlet.
The LED dims when
the recharge is finished. The LED turns off the
AC adapter is removed.
The measured result will be saved only if it exceeds the recommended torque.

SPECIFICATIONS
10
Effective length 268
Total length L
82 118
55
35
H
øD
ON/OFF MODE PEAK CLEAR
ON/OFF MODE PEAK CLEAR
ON/OFF MODE PEAK CLEAR
DC IN
DC IN
PEAK
PEAK
MGR-TL/P
Torque setting range
Minimum read (digit)
Display
Basic functions
Power supply
Operation's quantity
Recharging time
Operating temperature
Weight
10
-
50N m
0.01N m
7 LCD segments 4 digits, numerical display
20 LCD segments bar graph
PEAK hold
Tighteningcompletionalarmsoundemissionandvibrations
AutoPowerOFF(5minutes)
Built-inlithiumbattery(Rechargeableabout500times)
About 4,000 tightening operations possible with 1 recharge
About3hours(Usingtheexclusiveadapter)
0 〜
40(Withoutdewcondensing)
290g (Only the Torque Wrench body, Mega Wrench Adapter and AC Adapter excluded)
MGR-TL/P
Torque Wrench body
Power supply
Output
specifications
Operating
temperature
External
dimensions
Weight
Cable length
AC100
-
240V, 50/60Hz
DC5V, 1A
0
-
40
34 22 44mm
75g
1.5m
MGR20A-N
MGR25A-N
MGR30A-N
MGR35A-N
MGR42A-N
MGR46A-N
355
359
362
364.5
368
370
36
44
50
55
62
66
16
20
20
20
20
20
0.13
0.18
0.22
0.23
0.25
0.27
Model Weight
(kg)
LøDH
Dimensions (mm)
AC Adapter Mega Wrench Adapter

Table of contents
Other Big Daishowa Power Tools manuals


Popular Power Tools manuals by other brands

EINHELL
EINHELL TE-HA 2000 E Original operating instructions

Greenlee
Greenlee GATOR CK06AT instruction manual

Ingersoll-Rand
Ingersoll-Rand 500P Maintenance information

Makita
Makita JS3200 instruction manual

insize
insize IST-2WM Series Operation manual

Robust
Robust RB-HA 2000/1 Original operating instructions


