Biim Ultrasound System User manual
Biim Ultrasound User Guide 1
Biim Ultrasound System
User Guide
Biim Ultrasound
P001092-07

Biim Ultrasound User Guide 2
1. WARNINGS AND CAUTIONS............................................................................................................ 6
1.1. BIIM ULTRASOUND SYSTEM WARNINGS ................................................................................................. 6
1.2. BIIM ULTRASOUND SYSTEM CAUTIONS................................................................................................... 6
1.3. FDA MEDICAL ALERT ON LATEX ............................................................................................................ 7
1.4. RESIDUAL RISK ................................................................................................................................... 7
2. OVERVIEW ..................................................................................................................................... 8
2.1. BIIM ULTRASOUND SYSTEM DEVICE DESCRIPTION .................................................................................. 8
2.2. BIIM ULTRASOUND SYSTEM INDICATION FOR USE ................................................................................... 8
2.3. BIIM ULTRASOUND SYSTEM COMPATIBLE ACCESSORIES,SPARE PARTS,AND THIRD PARTY ITEMS ............... 8
3. BIIM ULTRASOUND PROBE ........................................................................................................... 10
3.1. BIIM ULTRASOUND PROBE OVERVIEW.................................................................................................. 10
3.2. CONTROL BUTTONS ON THE BIIM ULTRASOUND PROBE.......................................................................... 11
3.3. INDICATOR LIGHT............................................................................................................................... 12
3.3.1. Battery Status of the Probe ................................................................................................. 12
3.3.2. Connection Status of the Probe .......................................................................................... 12
3.4. INSERT OR REPLACE THE PROBE BATTERY............................................................................................ 13
3.5. CHARGE THE PROBE BATTERY............................................................................................................. 14
4. APP INSTALLATION AND PROBE CONFIGURATION ........................................................................ 15
4.1. TABLET OR PHONE SETUP................................................................................................................... 15
4.1.1. Download of the App from App Store or Google Play ........................................................ 15
4.1.2. Display Device Configuration............................................................................................... 15
4.2. TOUCH SCREEN CONTROLS................................................................................................................. 16
4.3. STARTUP MENU AND FIRST TIME INSTALLATION .................................................................................... 16
5. THE HOME SCREEN ..................................................................................................................... 19
5.1. CONNECT TO PROBE/GO TO SCAN ICON ....................................................................................... 19
5.2. GO TO PATIENT ICON....................................................................................................................... 20
5.2.1. PATIENT Tab.......................................................................................................................... 20
5.2.2. EXAM TYPE Tab .................................................................................................................... 21
5.2.3. PREVIEW Tab ........................................................................................................................ 22
5.3. LOG IN/OUT ICON............................................................................................................................ 24
5.4. CONFIGURATION ICON.................................................................................................................... 25
5.4.1. General Settings................................................................................................................... 25
5.4.2. Usability Settings.................................................................................................................. 26
5.4.3. Color Settings......................................................................................................................... 27
5.4.4. Patient Settings .................................................................................................................... 27
5.4.5. DICOM Settings .................................................................................................................... 28
5.4.6. Probe Settings ...................................................................................................................... 29
5.4.7. License Info .......................................................................................................................... 29
5.4.8. Language Settings ............................................................................................................... 30
5.4.9. About Screen ........................................................................................................................ 30
5.5. HELP ICON....................................................................................................................................... 31
6. OPERATING THE BIIM ULTRASOUND SYSTEM .............................................................................. 32
6.1. SET UP THE DISPLAY DEVICE AND PROBE............................................................................................. 32
6.2. SET UP FOR STERILE PROCEDURES ..................................................................................................... 32
6.3. SCAN................................................................................................................................................ 33
6.4. FREEZE,SAVE,RECORD ..................................................................................................................... 34
6.5. ZOOM AND PAN ................................................................................................................................. 37
6.6. MEASURE ......................................................................................................................................... 37
6.7. ANNOTATE,DRAW.............................................................................................................................. 39
6.8. END,CLEAN UP................................................................................................................................. 39

Biim Ultrasound User Guide 3
7. CLEANING AND DISINFECTING..................................................................................................... 40
7.1. CLEANING THE BIIM ULTRASOUND PROBE ............................................................................................ 41
7.2. DISINFECTING THE BIIM ULTRASOUND PROBE ...................................................................................... 42
7.2.1. Low-level disinfection........................................................................................................... 42
7.2.2. High-level disinfection.......................................................................................................... 42
8. TROUBLESHOOTING .................................................................................................................... 45
9. SERVICE AND REPAIR .................................................................................................................. 47
10. UPDATING THE SYSTEM........................................................................................................... 48
10.1. UPDATE THE BIIM ULTRASOUND APP ................................................................................................... 48
10.2. UPDATE THE BIIM ULTRASOUND PROBE ............................................................................................... 48
11. DISPOSAL INFORMATION......................................................................................................... 49
12. TRAINING................................................................................................................................. 50
13. ACOUSTIC OUTPUT................................................................................................................... 51
13.1. ALARA PRINCIPLE............................................................................................................................. 51
13.2. APPLYING THE ALARA PRINCIPLE........................................................................................................ 51
13.3. DIRECT,INDIRECT,AND RECEIVER CONTROLS....................................................................................... 51
13.3.1. Direct Controls...................................................................................................................... 51
13.3.2. Indirect Controls ................................................................................................................... 51
13.3.3. Receiver Controls ................................................................................................................. 52
13.4. TRANSDUCER SURFACE TEMPERATURE RISE ........................................................................................ 52
13.5. ACOUSTIC OUTPUT MEASUREMENTS .................................................................................................... 53
14. TECHNICAL SPECIFICATIONS.................................................................................................... 56
14.1. PHYSICAL DIMENSIONS AND WEIGHT................................................................................................... 56
14.2. ENVIRONMENTAL LIMITS..................................................................................................................... 56
14.3. BATTERY CHARGER ELECTRICAL .......................................................................................................... 56
14.4. BATTERY SPECIFICATION..................................................................................................................... 56
14.5. ELECTRICAL SAFETY ........................................................................................................................... 56
14.6. MEASUREMENT ACCURACY ................................................................................................................. 56
14.7. BIOCOMPATIBILITY ............................................................................................................................. 57
14.8. FLUID INGRESS RATING...................................................................................................................... 57
14.9. WIRELESS TRANSMISSION .................................................................................................................. 57
14.10. ELECTROMAGNETIC CONFORMITY.................................................................................................... 58
14.10.1. Radiated Emissions.............................................................................................................. 58
14.10.2. Electromagnetic Immunity................................................................................................... 58
14.11. SEPARATION DISTANCE .................................................................................................................. 59
14.12. REGULATORY COMPLIANCE............................................................................................................. 60
Biim Ultrasound User Guide 4
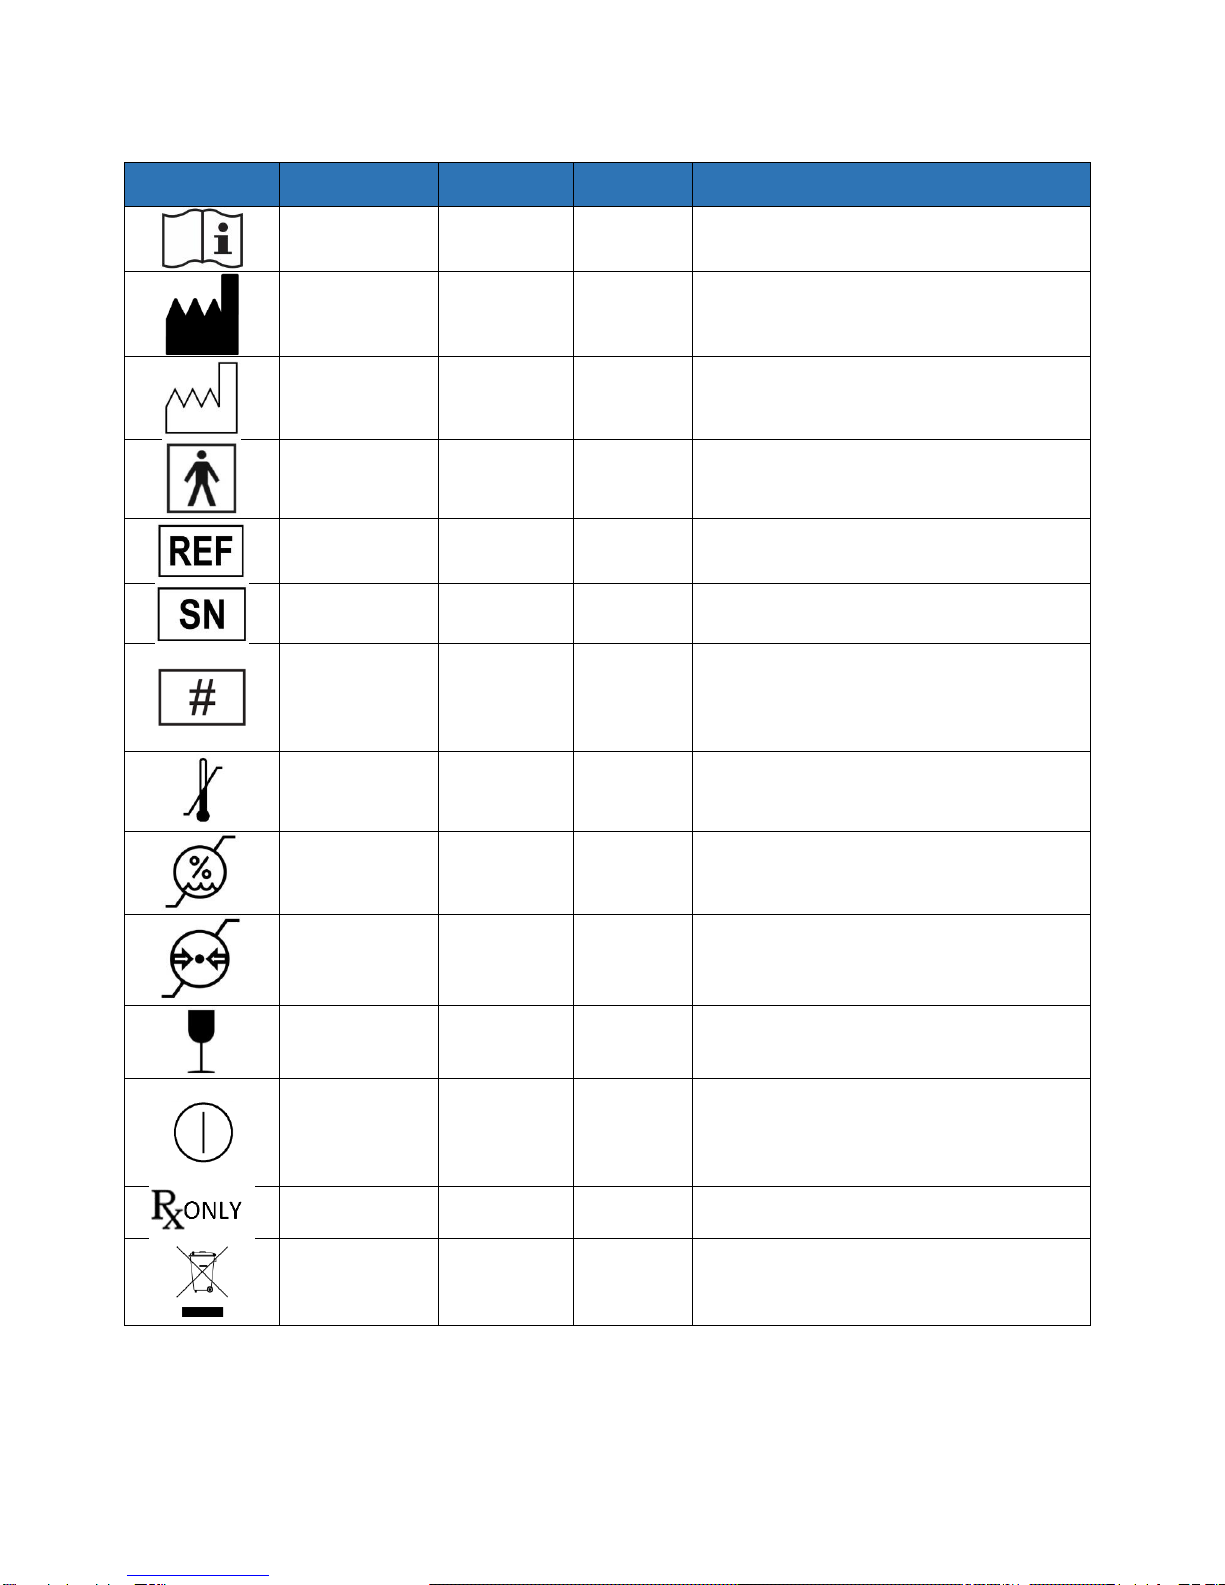
Symbol Glossary
Symbol
Title
Standard
Reference
Number
Description
Consult
instructions for
use
ISO 15223-1
(Note 1)
5.4.3
Indicates the need for the user to consult the
instructions for use.
Manufacturer
ISO 15223-1
(Note 1)
5.1.1
Indicates the medical device manufacturer, as
defined in EU Directives 90/385/EEC,
93/42/EEC, and 98/79/EC.
Date of
manufacture
ISO 15223-1
(Note 1)
5.1.3
Indicates the date when the medical device
was manufactured.
Type BF applied
part
IEC 60417
(Note 2)
5333
To identify a type BF applied part complying
with IEC 60601-1.
Catalogue
number
ISO 15223-1
(Note 1)
5.1.6
Indicates the manufacturer’s catalogue
number so that the medical device can be
identified.
Serial number
ISO 15223-1
(Note 1)
5.1.7
Indicates the manufacturer’s serial number so
that a specific medical device can be identified.
Model number
IEC 60417
(Note 2)
6050
To identify the model number or type number
of a product. In the application of this symbol,
the model number or type number of the
product should be accompanied with this
symbol.
Temperature
limit
ISO 15223-1
(Note 1)
5.3.7
Indicates the temperature limits to which the
medical device can be safely exposed.
Humidity
limitation
ISO 15223-1
(Note 1)
5.3.8
Indicates the range of humidity to which the
medical device can be safely exposed.
Atmospheric
pressure
limitation
ISO 15223-1
(Note 1)
5.3.9
Indicates the range of atmospheric pressure to
which the medical device can be safely
exposed.
Fragile, handle
with care
ISO 15223-1
(Note 1)
5.3.1
Indicates a medical device that can be broken
or damaged if not handled carefully.
“ON”/”OFF”
(push-push)
IEC 60417
(Note 2)
5010
To indicate connection to or disconnection from
the mains, at least for mains switches or their
positions, and all those cases where safety is
involved. Each position, “ON” or “OFF,”is a
stable position.
Prescription use
only
N/A
N/A
Caution: Federal (USA) law restricts this device
to sale by or on the order of a physician.
Crossed out
Wheelie-Bin
EN 50419
(Note 3)
N/A
Identifies a product that is subject to the
European Union’s Waste Electrical and
Electronic Equipment (WEEE) 2012/19/EU
Directive for recycling of electronic equipment.
1ISO 15223-1:2016, Medical Devices –Symbols to be used with Medical Device Labels, Labeling, and
Information to be Supplied –Part 1: General Requirements
2IEC 60417:2002 DB, Graphical Symbols for use on Equipment
3EN 50419:2006, Marking of electrical and electronic equipment in accordance with Article 11(2) of Directive
2002/96/EC (WEEE)
Biim Ultrasound User Guide 5
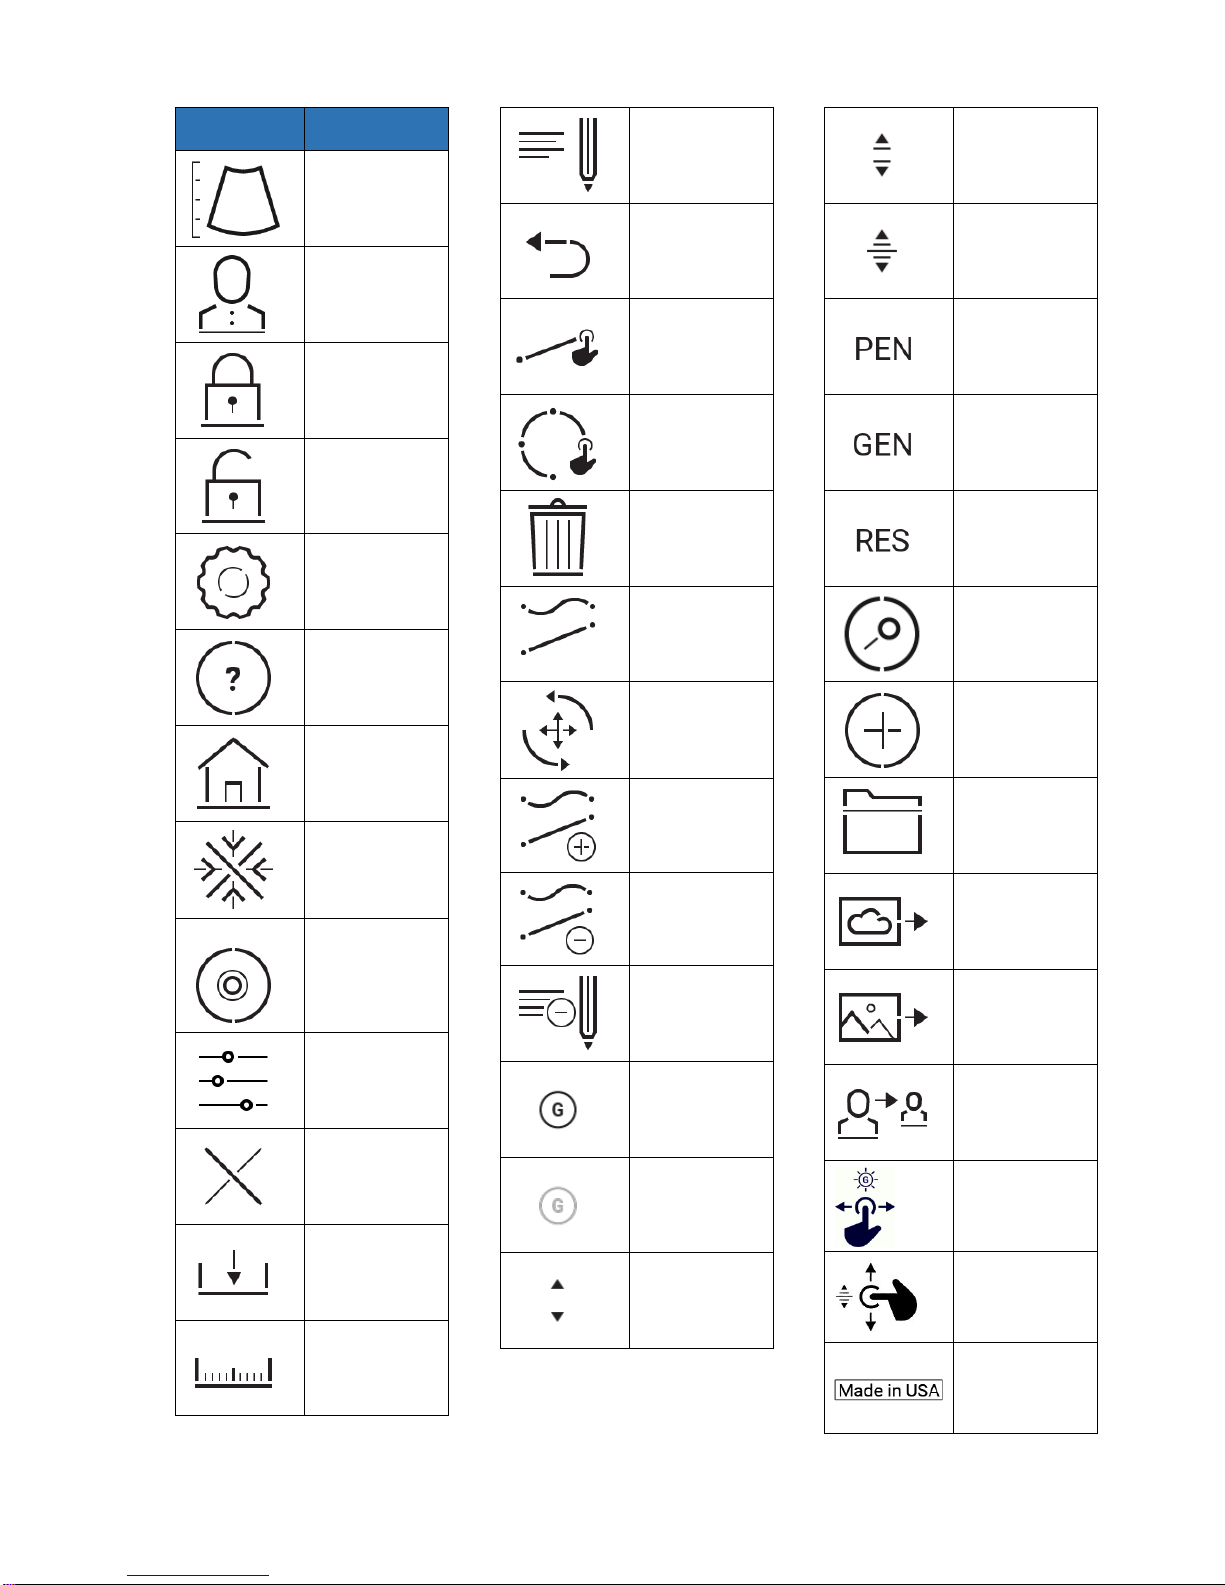
Proprietary
Symbol
Description
Go To Scan
Go To Patient
Log In
Log Out
Configuration
Help
Home
Freeze/
Unfreeze
Record
Settings
End Exam
Save
Measure
Annotate
Back
Line
Circle
Delete
Draw Menu
Zoom
Draw
Erase
Delete
Annotation
More Gain
Less Gain
Near
Medium
Deep
Best
Penetration
General
Imaging
Best
Resolution
Search
Add
Patient Folder
DICOM
Copy To
Move
Adjust gain
Adjust depth
Country of
Origin –USA

Biim Ultrasound User Guide 6
1. WARNINGS AND CAUTIONS
1.1. Biim Ultrasound System Warnings
WARNING:
•Do not use the system for purposes other than those intended and expressly stated by Biim Ultrasound.
Operation of the system for unintended purposes or with incompatible devices may lead to harm or serious
injury.
•Do not attempt to modify, remove, override, or otherwise disable any safety devices or features of the Biim
Ultrasound Probe or the Biim Ultrasound Application. Interfering with the safety features could lead to harm
or serious injury.
•Users are not allowed to modify this equipment. Changes, modifications, and/or additions to the system
should be made only by Biim Ultrasound or by third parties expressly authorized by Biim Ultrasound to do so.
Such changes and additions must comply with all applicable laws and regulations that have the force of law
within the jurisdictions concerned, and best engineering practices.
•Do not use the system on products that are not recognized by the Biim Ultrasound Application.
•Use the Biim Ultrasound System only if you understand its safe and appropriate use.
•Do not use this device unless you have received appropriate training and understand its operation and
capabilities.
•Only use this device for applications for which you have been trained for safe and effective operation. Do not
use this device if you do not know how or doubt your ability to operate the system safely and effectively.
•Use a legally marketed sterile Probe sheath and sterile gel for clinical applications which contact mucous
membranes, non-intact skin, or normally sterile tissue (e.g., biopsy procedures, needle guidance, etc.).
•Probe sheaths may contain natural rubber latex. Those covers may cause allergic reactions in some
individuals. See Section 1.3, “FDA Medical Alert on Latex,” for more information.
•Use a sterile sheath on the display device or use another means to maintain sterility during all interactions
with the display device for clinical applications which contact mucous membranes, non-intact skin, or normally
sterile tissue (e.g., biopsy procedures, needle guidance, etc.).
•This device is intended to be used by appropriately trained healthcare professionals.
•Inspect the Probe, battery and battery charger, and display device prior to use. Do not use if either device has
cracks, chips, or has other visible damage.
•Do not use the Probe or associated display device or accessories if any are known to be or suspected of being
defective or improperly set up.
•To prevent injuries or potentially hazardous situations, only use accessories approved or supplied by Biim
Ultrasound.
•Do not use this system in the presence of flammable gases or anesthetics. There are no claims that Biim
System is compatible with AP/APG environments as described in IEC 60601-1.
•Users are responsible for image quality and diagnosis.
•To avoid the risk of a burn hazard, do not use the transducer with high-frequency surgical equipment. Such a
hazard may occur in the event of a defect in the high-frequency surgical neutral electrode connection.
•Install and use the Biim System according to the electromagnetic compatibility (EMC) guidelines.
•Users are responsible for following their institutions’ security policies regarding use of wireless devices and
interfacing with local networks.
•The use of portable and mobile radio frequency communications equipment can affect the operation of
medical equipment.
•Do not use if either the Probe or the associated display device malfunctions.
•To ensure proper display device operation, keep the display device secure.
•If the Probe or the display device or any accessories appear to be malfunctioning, stop use immediately.
•It is recommended to adhere to the ALARA (As Low As Reasonably Achievable) principle to minimize acoustic
exposure.
1.2. Biim Ultrasound System Cautions
CAUTIONS:
•To prevent damage, use care when handling and avoid dropping the Biim Ultrasound Probe or display
device. If either device is dropped, discontinue use until proper operation of the device can be verified.
•Avoid bumping the Probe on hard surfaces.

Biim Ultrasound User Guide 7
1.3. FDA Medical Alert on Latex
March 29, 1991, Allergic Reactions to Latex-Containing Medical Devices
Because of reports of severe allergic reactions to medical devices containing latex (natural rubber), the FDA is
advising health care professionals to identify their latex-sensitive patients and be prepared to treat allergic
reactions promptly. Patient reactions to latex have ranged from contact urticaria to systemic anaphylaxis. Latex is
a component of many medical devices, including surgical and examination gloves, catheters, intubation tubes,
anesthesia masks, and dental dams.
Reports to the FDA of allergic reactions to latex-containing medical devices have increased lately. One brand of
latex-cuffed enema tips was recently recalled after several patients died as a result of anaphylactoid reactions
during barium enema procedures. More reports of latex sensitivity have also been found in the medical literature.
Repeated exposure to latex both in medical devices and in other consumer products may be part of the reason
that the prevalence of latex sensitivity appears to be increasing. For example, it has been reported that 6% to 7%
of surgical personnel and 18% to 40% of spina bifida patients are latex-sensitive.
Proteins in the latex itself appear to be the primary source of the allergic reactions. Although it is not now known
how much protein is likely to cause severe reactions, the FDA is working with manufacturers of latex-containing
medical devices to make protein levels in their products as low as possible.
The FDA’s recommendations to health professionals in regard to this problem are as follows:
•When taking general histories of patients, include questions about latex sensitivity. For surgical and
radiology patients, spina bifida patients and health care workers, this recommendation is especially
important. Questions about itching, rash, or wheezing after wearing latex gloves or inflating a toy balloon
may be useful. Patients with positive histories should have their charts flagged.
•If latex sensitivity is suspected, consider using devices made with alternative materials, such as plastic.
For example, a health professional could wear a non-latex glove over the latex glove if the patient is
sensitive. If both the health professional and the patient are sensitive, a latex middle glove could be
used. (Latex gloves labeled “Hypoallergenic” may not always prevent adverse reactions.)
•Whenever latex-containing medical devices are used, especially when the latex comes in contact with
mucous membranes, be alert to the possibility of an allergic reaction.
•If an allergic reaction does occur and latex is suspected, advise the patient of a possible latex sensitivity
and consider an immunologic evaluation.
•Advise the patient to tell health professionals and emergency personnel about any known latex sensitivity
before undergoing medical procedures. Consider advising patients with severe latex sensitivity to wear a
medical identification bracelet.
The FDA is asking health professionals to report incidents of adverse reactions to latex or other materials used in
medical devices (see the October 1990 FDA Drug Bulletin). To report an incident, contact the FDA Problem
Reporting Program, MedWatch, at 1-800-332-1088, or on the Internet:
www.fda.gov/Safety/MedWatch/
For a single copy of a reference list on latex sensitivity, write to: LATEX, FDA, HFZ-220, Rockville, MD 20857.
1.4. Residual Risk
To control risks associated with the use of the Biim Ultrasound System, the user must follow the instructions for
use. In particular instructions to control cross contamination risks; when and how to clean and disinfect the probe,
and the proper use and disposal of sheaths must be followed. Please reference the following sections of this
guide for these specific instructions:
•6.2 Set Up for Sterile Procedures
•6.8 End, Clean Up
•7 CLEANING AND DISINFECTING

Biim Ultrasound User Guide 8
2. OVERVIEW
2.1. Biim Ultrasound System Device Description
The Biim Ultrasound System is a portable device that features real-time 2D ultrasound imaging. It is customized
for vascular access applications. The Biim Ultrasound Probe communicates with a display device (compatible
Tablet or Phone). Imaging is obtained after downloading the Biim Ultrasound App and connecting the display
device via Wi-Fi to the Probe. The App is customized to ensure efficient work flow, procedure documentation, and
vessel measurement tools.
2.2. Biim Ultrasound System Indication for Use
The Biim Ultrasound System is intended for diagnostic ultrasound imaging of the human body. Specific clinical
applications include:
•Musculo-skeletal (conventional and superficial)
•Needle guidance
•Pediatric
•Peripheral Vessel
•Small Organ (breast, thyroid, parathyroid, testicles)
2.3. Biim Ultrasound System Compatible Accessories, Spare Parts, and
Third Party Items
Warning:
•To prevent injuries or potentially hazardous situations, only use accessories approved or supplied by Biim
Ultrasound.
The Biim Ultrasound System is compatible with the following accessories:
•Probe holder, Biim Ultrasound P001154
•Probe holder cart bracket, Biim Ultrasound P001171. For use with Biim Ultrasound probe holder and
GCX Solutions clamp.
The following spare parts are available for the Biim Ultrasound System:
•Battery charger (USA), Biim Ultrasound P001129
•Battery charger (UK), Biim Ultrasound P001197
•Battery charger (EU), Biim Ultrasound P001198
•Two extra batteries, Biim Ultrasound P001127
The following third party items are available for the Biim Ultrasound System:
Note: The following items are not manufactured by Biim Ultrasound. For information on how to order Biim
compatible third party items, visit the Biim Ultrasound website, biimultrasound.com.
•For permanently mounting the P001154 probe holder to the cart listed below, also purchase:
oClamp, GCX Solutions SL-0007-04
•Tablet, all of the following tablets are supported:
oApple iPad Air 2, iPad 5th, and iPad 6th generation
oSamsung Galaxy Tab S2, and Galaxy Tab S3
•Cart and tablet holder GCX Solutions BIM-0001-60 stand with one of the following tablet enclosures:
oFor Apple iPad Air 2, iPad 5th, and iPad 6th generation: ArmorActive Evolve
oFor Samsung Galaxy Tab S2 or S3: PadHoldr FIT GT 9.7
•Phone, all of the following phones are supported:
oApple iPhone 7 Plus, iPhone 8 Plus, and iPhone X
oSamsung Galaxy S8+ (US/Canada versions)
•Sterile sheath for tablet, Preferred Medical Products IP-1409-S

Biim Ultrasound User Guide 9
•Sterile sheath for Biim Ultrasound Probe, CIVCO 610-1212 Transducer Cover
•Ultrasound gel, Parker Laboratories Aquasonic® 100, Aquasonic Clear®, or SCAN® Ultrasound Gel
Biim Ultrasound User Guide 10
3. Biim ULTRASOUND PROBE
3.1. Biim Ultrasound Probe Overview
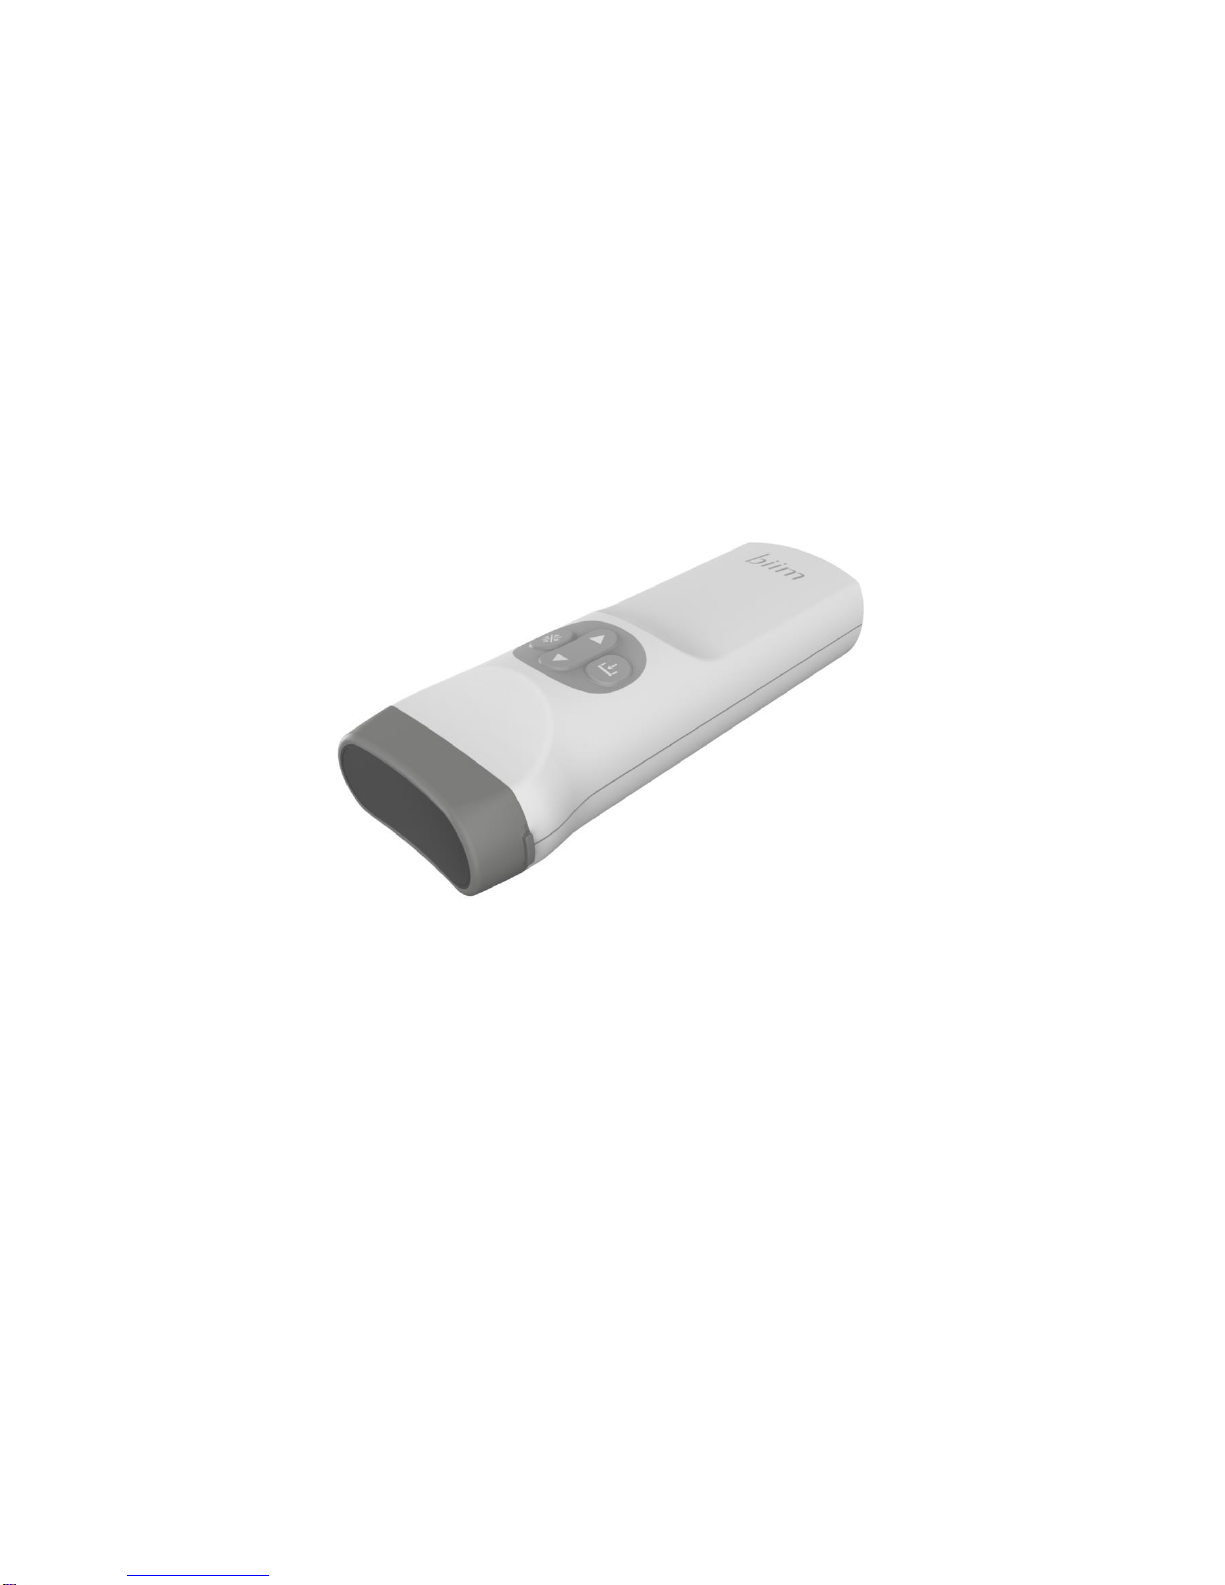
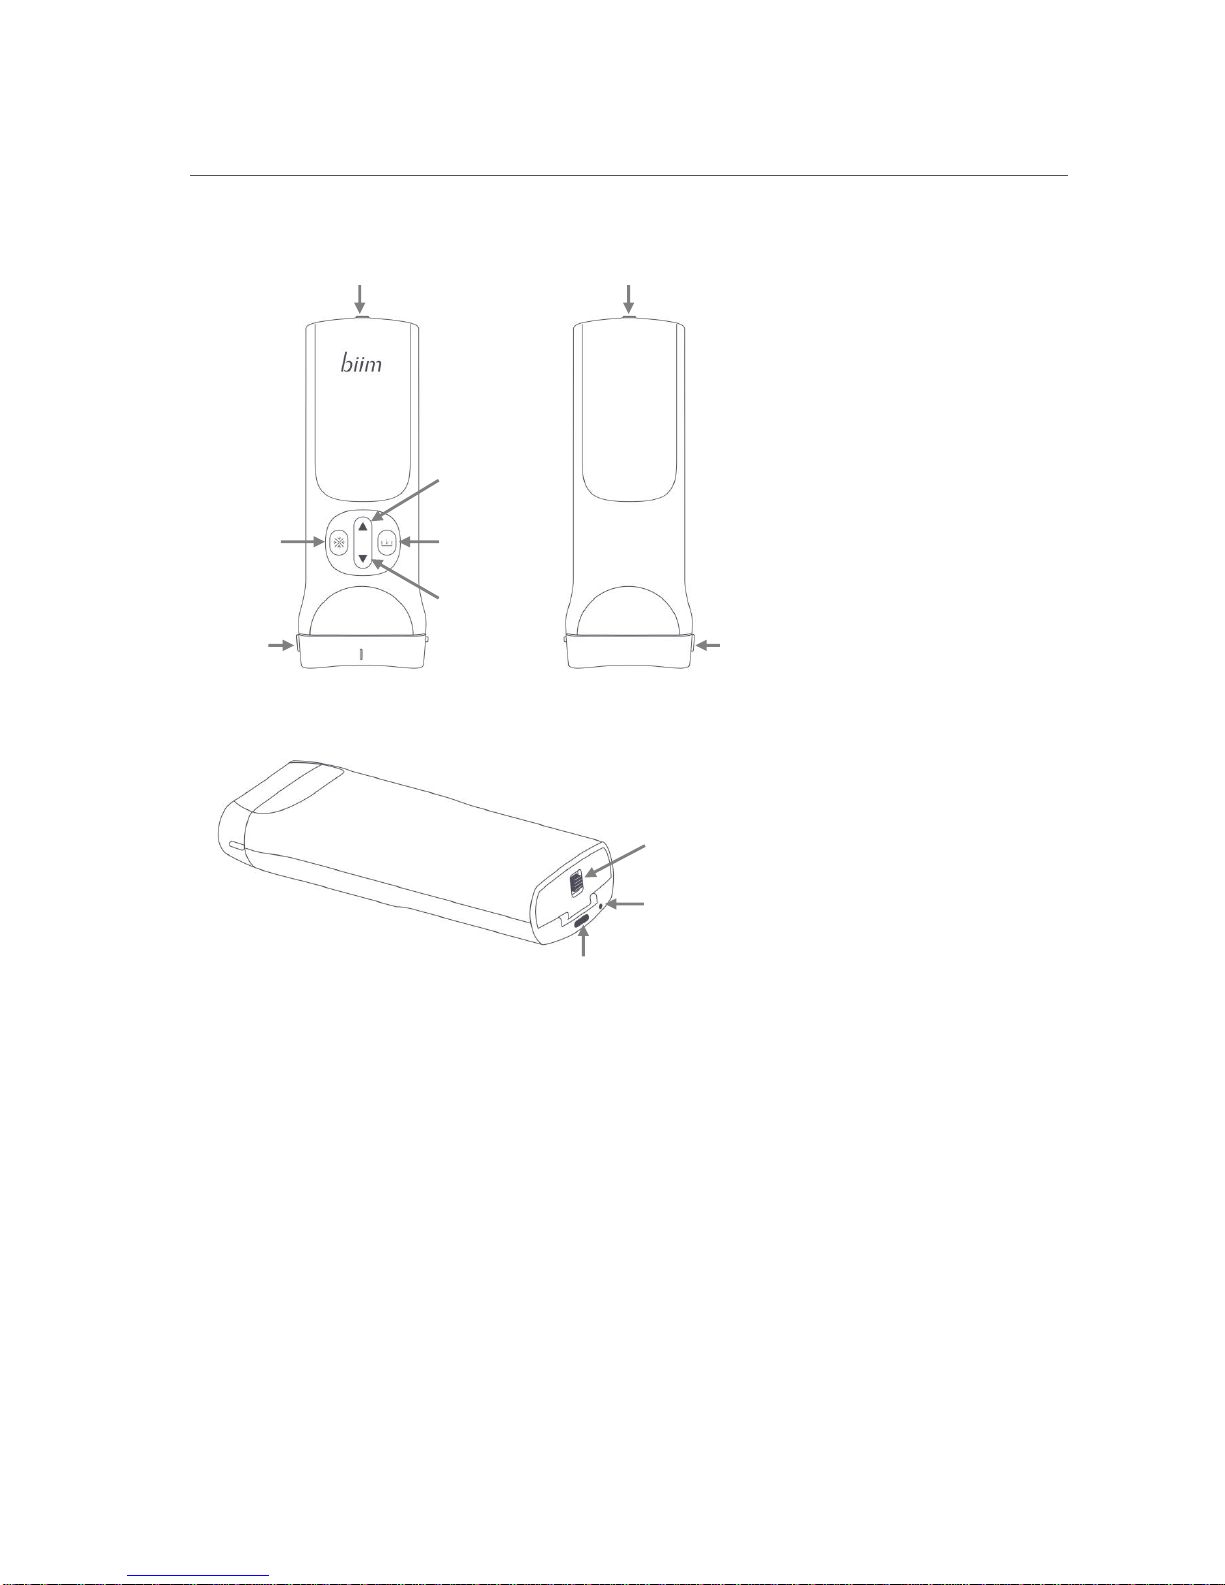
The figure below shows the main features of the Biim Ultrasound Probe.
Battery Compartment Door
Battery Compartment Door
Decreases
image depth
Saves a
frozen image
Increases
image depth
Freezes
the image
Orientation
marker
Orientation
marker
Front
Back
Battery
Compartment
Door Latch
Power
Indicator
Light
Power
Button

Biim Ultrasound User Guide 11
3.2. Control Buttons on the Biim Ultrasound Probe
The Probe has four control buttons as shown on the figure below. The buttons allow you to perform the following
functions without using the touch screen on the display device:
In addition to the primary functions shown in the figure, there are some secondary functions available from the
control buttons. These include:
•The freeze button may also be used to acknowledge messages and to go to the scanning screen from the
home screen.
•The up and down arrows may be used to adjust the gain, when enabled as described in section 5.4.2.
•The up and down arrows may be used to move through the cineloop, when enabled as described in
section 5.4.2
Decreases
image depth
Saves a
frozen image
Increases
image depth
Freezes
the image
Front
Biim Ultrasound User Guide 12
3.3. Indicator Light
The Indicator Light shows the battery charge and the connection status between the Probe and the display device.
The Indicator Light is found next to the Power Button, as shown in the figure below. The battery charge status is
indicated when the Probe first powers on. Once the Probe is powered on, the battery status is replaced by the
connection status.
3.3.1. Battery Status of the Probe
The initial color of the Power Indicator Light indicates the status of the battery. If the Probe is turned off and you
just want to see the battery charge status, give the Power Button a short tap. The Indicator Light will show one of
the following:
Solid Green
Battery has a nearly full charge (>70%)
Solid Yellow
Battery is partially charged (>30% and <70%)
Solid Red
Battery charge is low (<30%)
Flashing Red
Battery charge is critical (<10%)
The same information is displayed when the Probe is powering on.
3.3.2. Connection Status of the Probe
After the Probe has finished powering on, the Indicator Light shows the connection status between the Probe and
the display device as follows:
Solid Green
Probe is connected and the display device is on the imaging screen, live or
frozen.
Flashing Green
Probe is connected to the display device, but not imaging. If the Probe is not
used for 10 minutes, it will automatically freeze and change from solid green to
flashing green. If it is not used for another 20 minutes, it will turn off.
Flashing Yellow
Probe has not yet established a Wi-Fi connection with the display device.
Solid Yellow
Probe is finding best channel, per user request or during start up if automatic
Wi-Fi scan is configured. See section 5.4.6.
Solid Red
Probe is not working and should be restarted.
Power
Indicator
Light
Power
Button
Biim Ultrasound User Guide 13
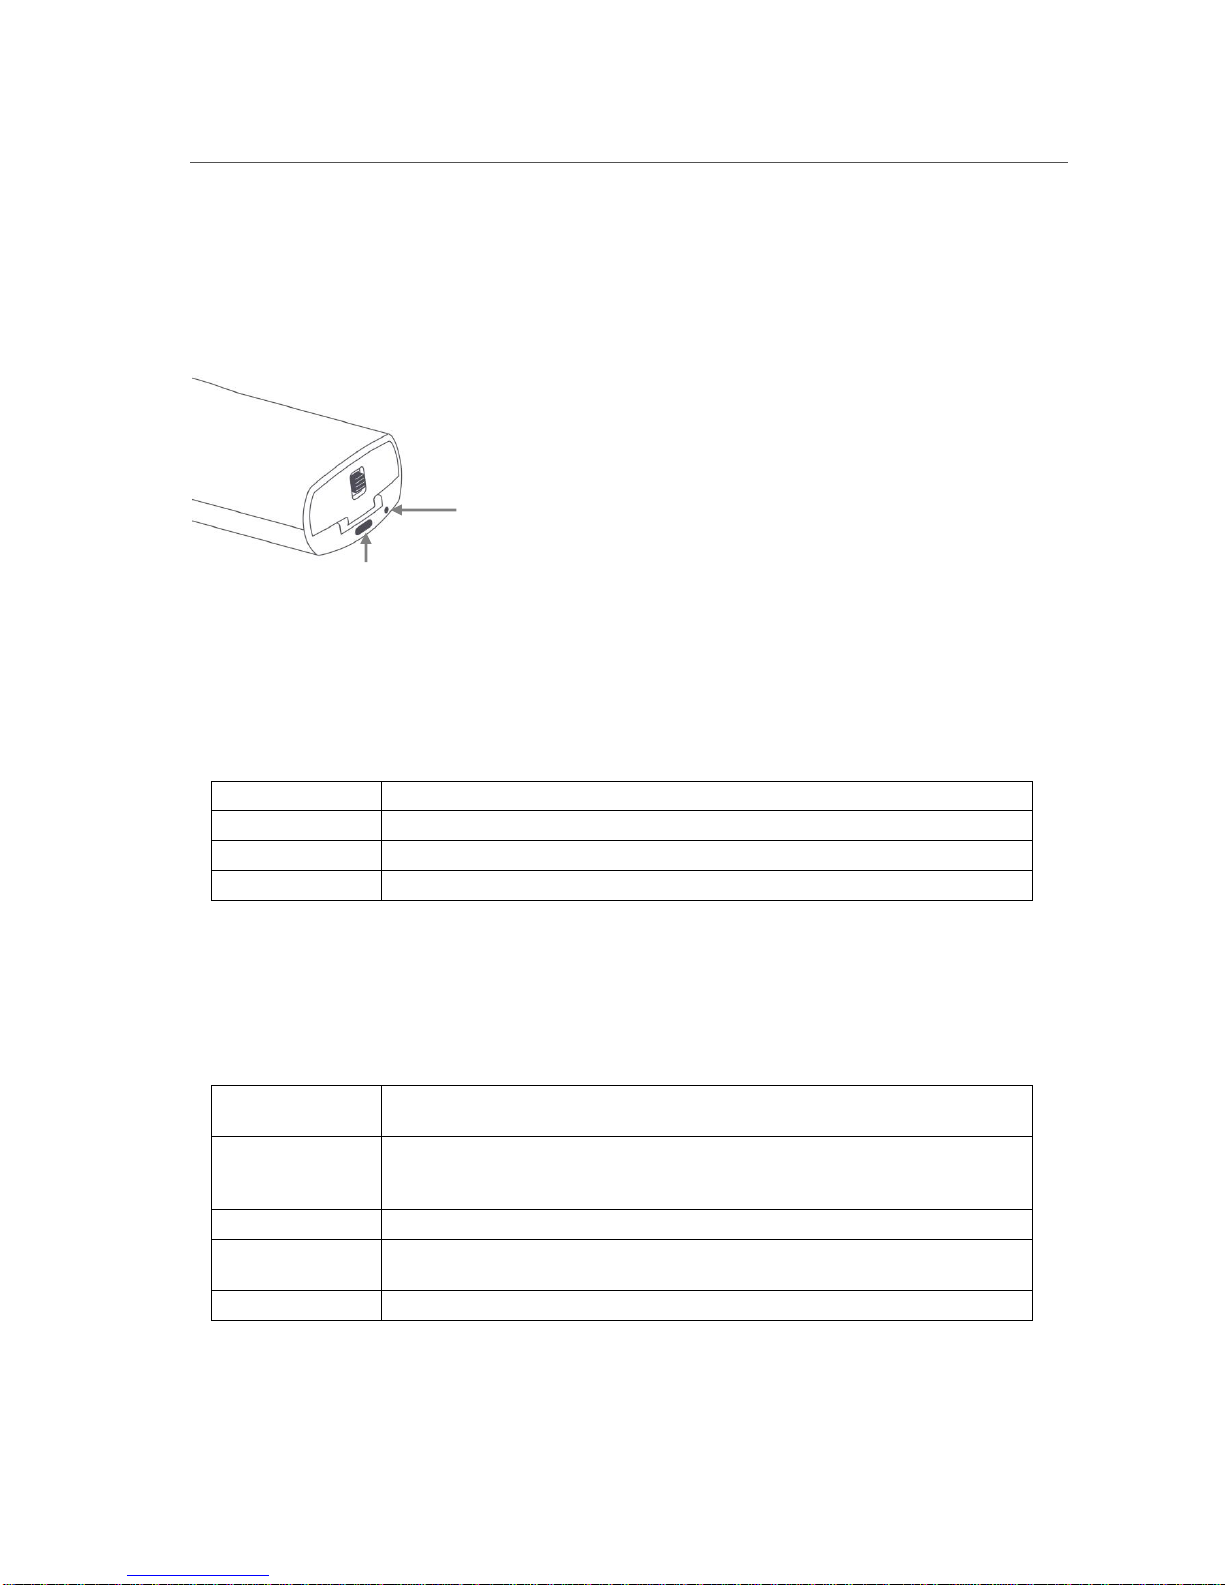
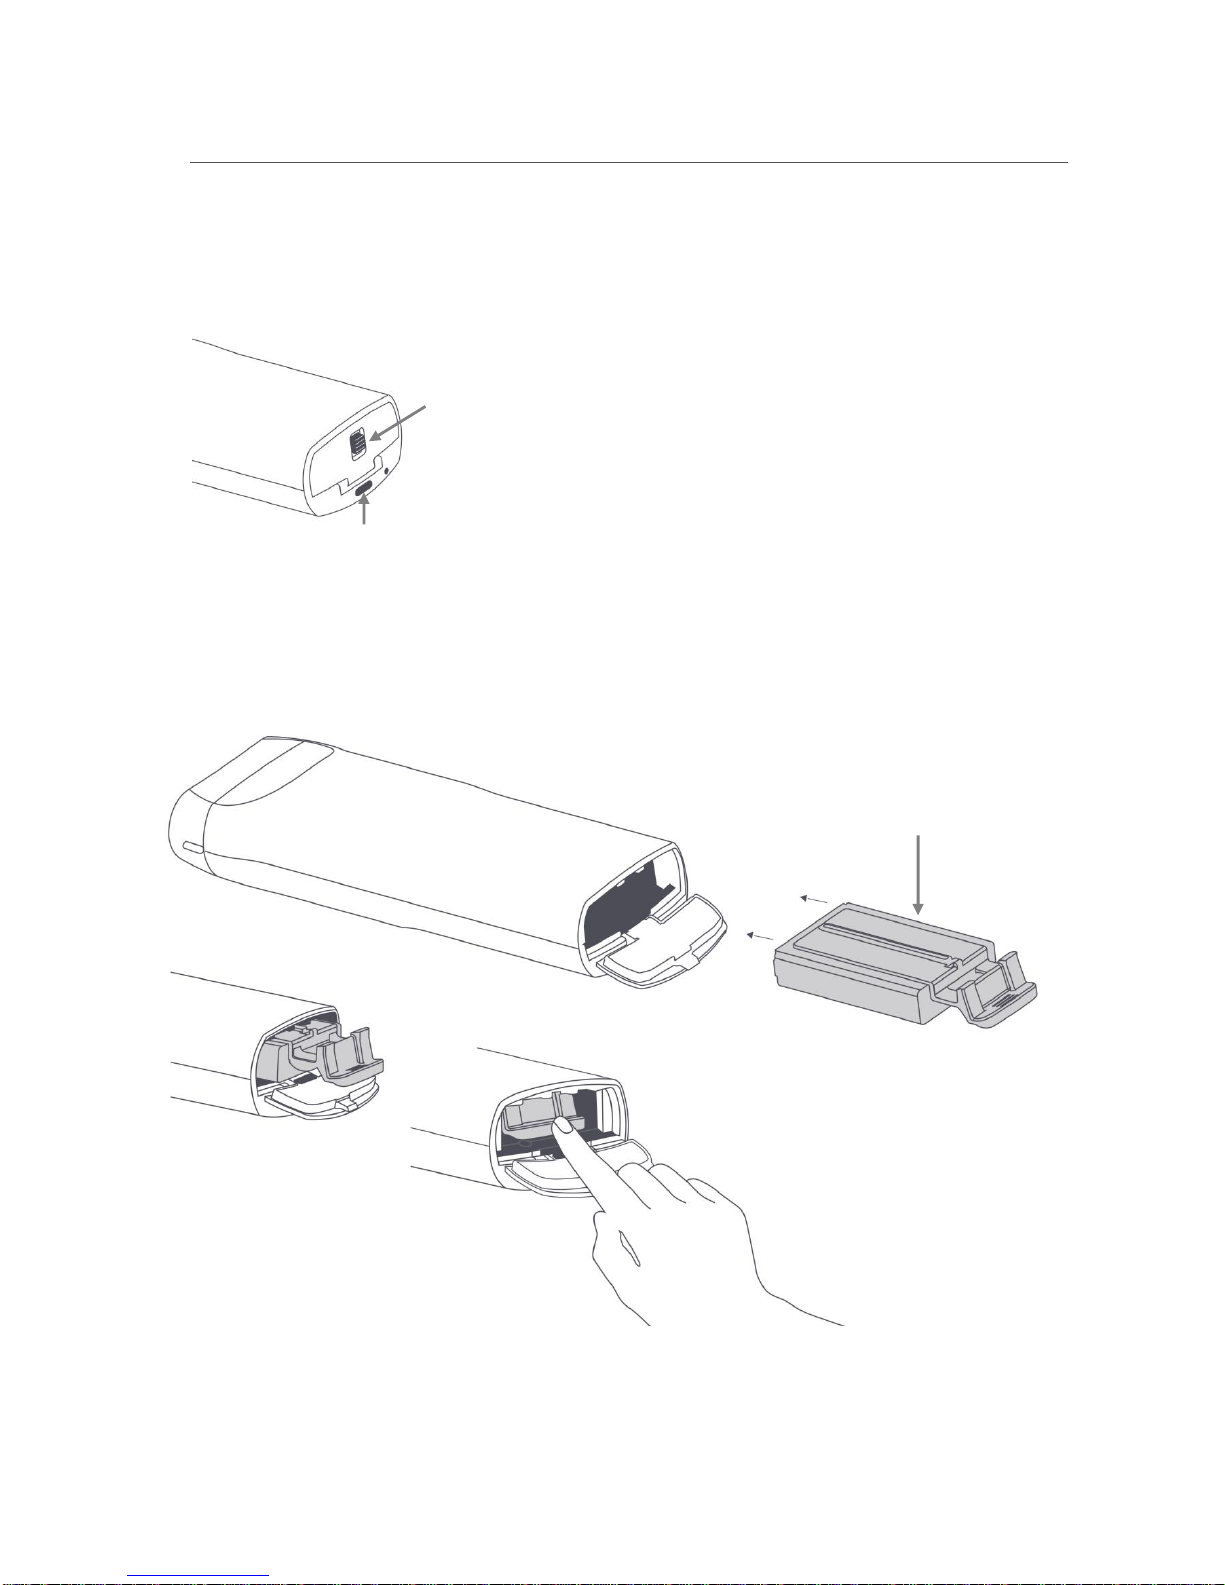
3.4. Insert or Replace the Probe Battery
The figures below show the Latch to open the Battery Compartment Door. Slide the Latch toward the Power
Button to unlock and open the Battery Compartment Door.
To insert the battery, slide the battery carefully and completely into the battery compartment and press up to seat
the battery. Secure the Battery Compartment Door by sliding the Latch away from the Power Button.
The battery is spring-loaded, and it can be removed from the battery compartment by pushing the battery tab
down to release.
Latch
Power
Button
Battery
Biim Ultrasound User Guide 14
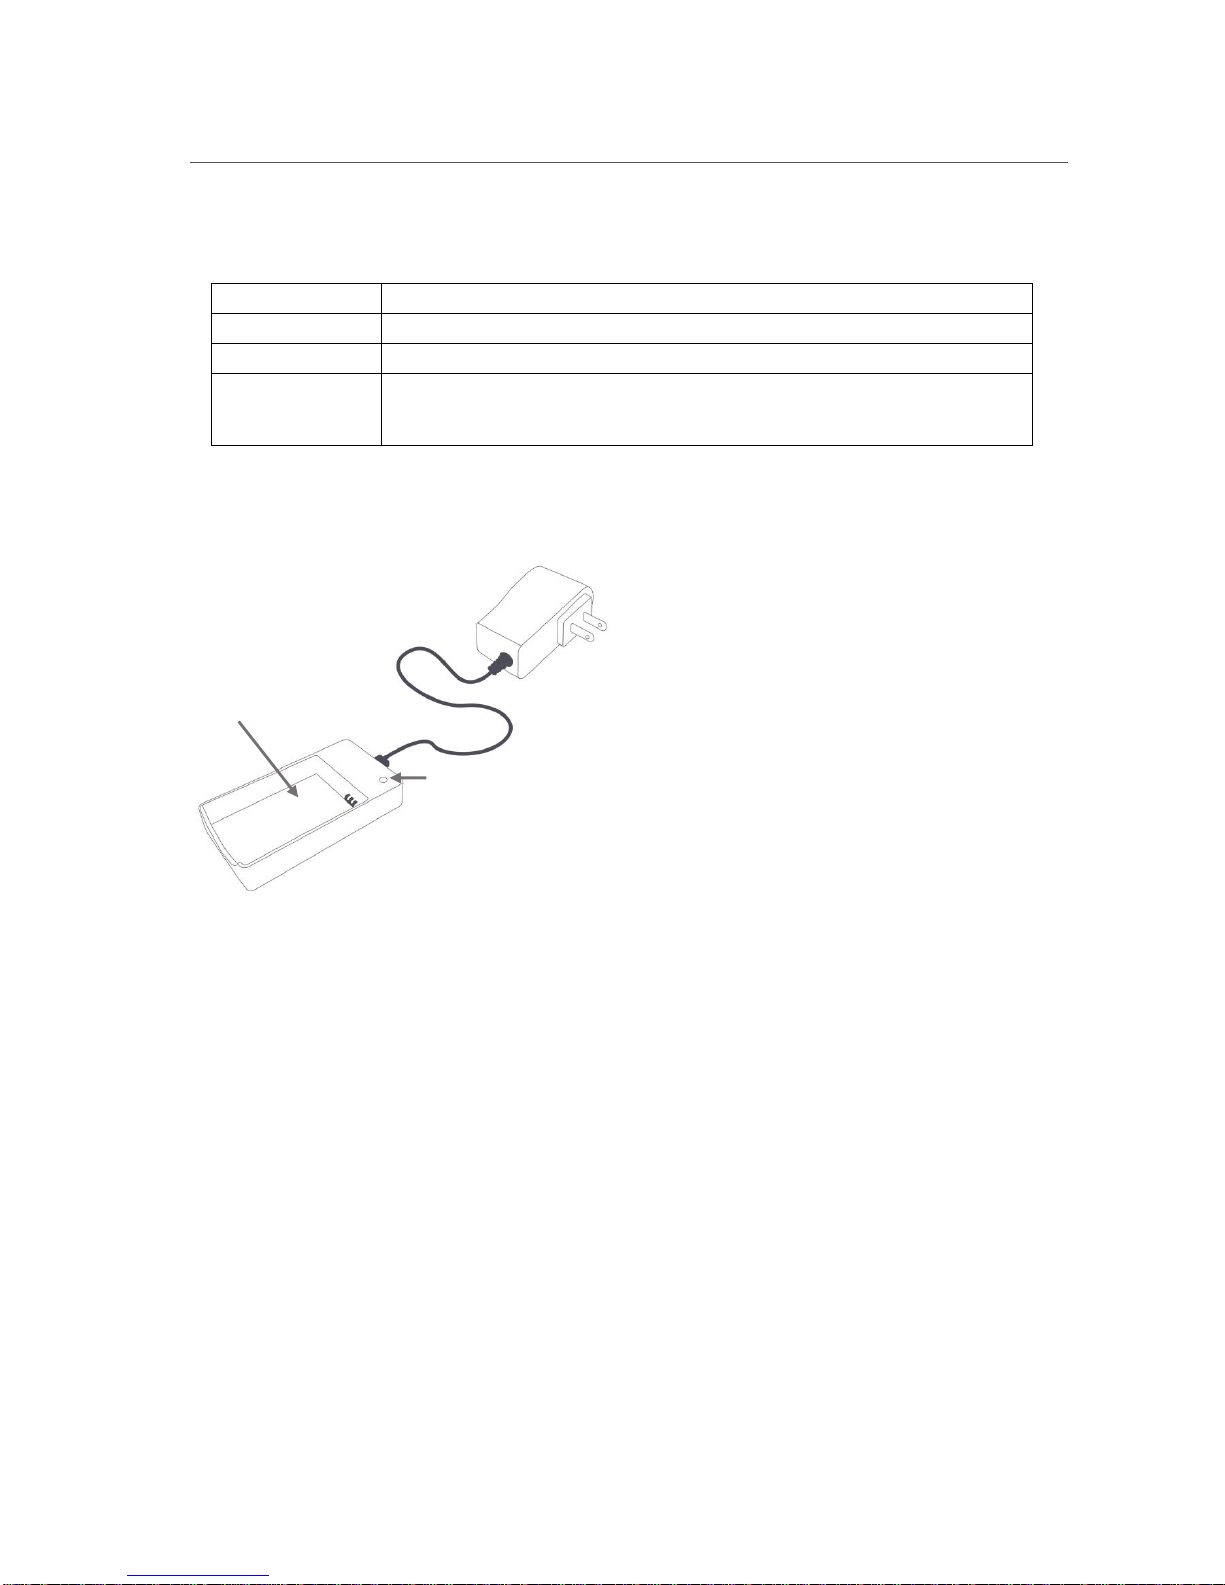
3.5. Charge the Probe Battery
The figure below shows the battery charger. The indicator light on the charger gives the following information
when the charger is powered on or when the battery is inserted into the charger:
Solid Green
Battery is fully charged and can be removed for use.
Solid Orange
Correct battery is inserted and charging.
Flashing Red
Battery detection phase.
Solid Red
No battery inserted, battery over/under temperature, charger over temperature,
battery over voltage, battery charger timer time-out error, or input voltage too
low.
CAUTION: Use only Biim Ultrasound authorized batteries and chargers. Failure to do so may result in system
inoperability and damage, and may void the warranty.
For general battery safety, adhere to the following:
•Do not disassemble or open the battery.
•Keep the battery away from heat or fire and do not store in direct sunlight.
•Do not short-circuit a battery.
•Do not store the battery in a manner that may lead to short-circuiting.
•Keep the battery in its original packaging until ready to use it.
•Avoid dropping or hitting the battery.
•If the battery leaks, do not allow the fluid to contact skin. If battery fluid does come into contact with skin
or mucous membranes, flush with water immediately. Follow the advice of the battery manufacturer on
appropriate steps.
•Only use the Biim-provided charger to charge Biim batteries.
•Be sure to insert the battery into the Biim Ultrasound Probe or charger in its correct orientation.
•Do not use any battery or charger that is not approved by Biim.
•Keep the battery away from children.
•Ensure the battery is dry and clean.
•Be sure to charge batteries prior to use.
•Do not use the Biim battery for other devices or applications.
•Remove the battery from the equipment when not in use.
•To prolong battery life, do not store the Biim battery for more than one month fully discharged, and do not
store for more than one year without recharging.
•Follow all local laws and requirements regarding proper battery disposal or recycling.
Battery charger LED
Battery compartment

Biim Ultrasound User Guide 15
4. APP INSTALLATION AND PROBE CONFIGURATION
The Biim Ultrasound Probe is operated using a compatible tablet or phone (display device) listed in Section 2.3.
Before the Biim Ultrasound System can be used, the Biim Ultrasound App must be downloaded to the display
device.
4.1. Tablet or Phone Setup
IMPORTANT: To keep your data secure, always use strong passwords and passcodes and change them frequently.
This is important when you lock your device (see Sections 4.1.1 and 4.1.2), when you set up a patient database
(see Section 4.3), and when you set up a Wi-Fi connection to the Probe (see Section 5.4.6).
For the best experience, Biim recommends that you use your display device only for imaging and remove all non-
essential apps.
4.1.1. Download of the App from App Store or Google Play
The Biim Ultrasound App is available from Apple’s App Store or Google Play. Please refer to the App Store or
Google Play for instructions on how to download an app. Search either site for the App. Once installed on your
display device, the Biim Ultrasound App icon will appear on the display device screen.
When you install or update the App, you will also get the latest firmware for the Probe.
IMPORTANT: To ensure ongoing security, you should periodically connect to the Internet and update both the App
and the display device’s operating system software (when updates are available).
4.1.2. Display Device Configuration
Biim recommends the following display device settings.
For Apple iPad display devices:
1. From Settings, Connections, enable Wi-Fi.
2. From the Settings, General, Keyboards selections:
a. Enable Auto-Capitalization
b. Disable Auto-Correction
c. Enable Shortcuts
d. Disable Predictive
e. Enable Split Keyboard
3. Disable or uninstall all applications that may automatically start up during an examination and obscure
the ultrasound image. Typical applications include incoming calls, Skype, and FaceTime.
4. From Settings, iTunes & App Store, Automatic Downloads, enable Updates.
5. Make the device more secure.
a. From Settings, Touch ID & Passcode, select Turn Passcode On, select Passcode Options, select
Custom Alphanumeric Code, and enter a strong passcode.
Biim Ultrasound User Guide 16
For Samsung Galaxy display devices:
1. From Settings, Wi-Fi, ensure Wi-Fi is enabled.
2. Install the Adobe Acrobat Reader application for best viewing of the User Guide.
3. Disable or uninstall all applications that may automatically start up during an examination and obscure
the ultrasound image. Typical applications include incoming calls and Skype.
4. Select Settings, Apps, Biim Ultrasound, Permissions, and enable Storage if you want to be able to copy
ultrasound images to your Pictures gallery.
5. Make the device more secure. Select Lock screen and security.
a. Select Screen lock type, and set a strong password.
b. Turn off Unknown sources.
c. Select Secure startup and set to require password at startup.
d. Select Other security settings and enable Knox active protection.
4.2. Touch Screen Controls
All features and controls can be selected by touching the corresponding icon on the display device’s touchscreen.
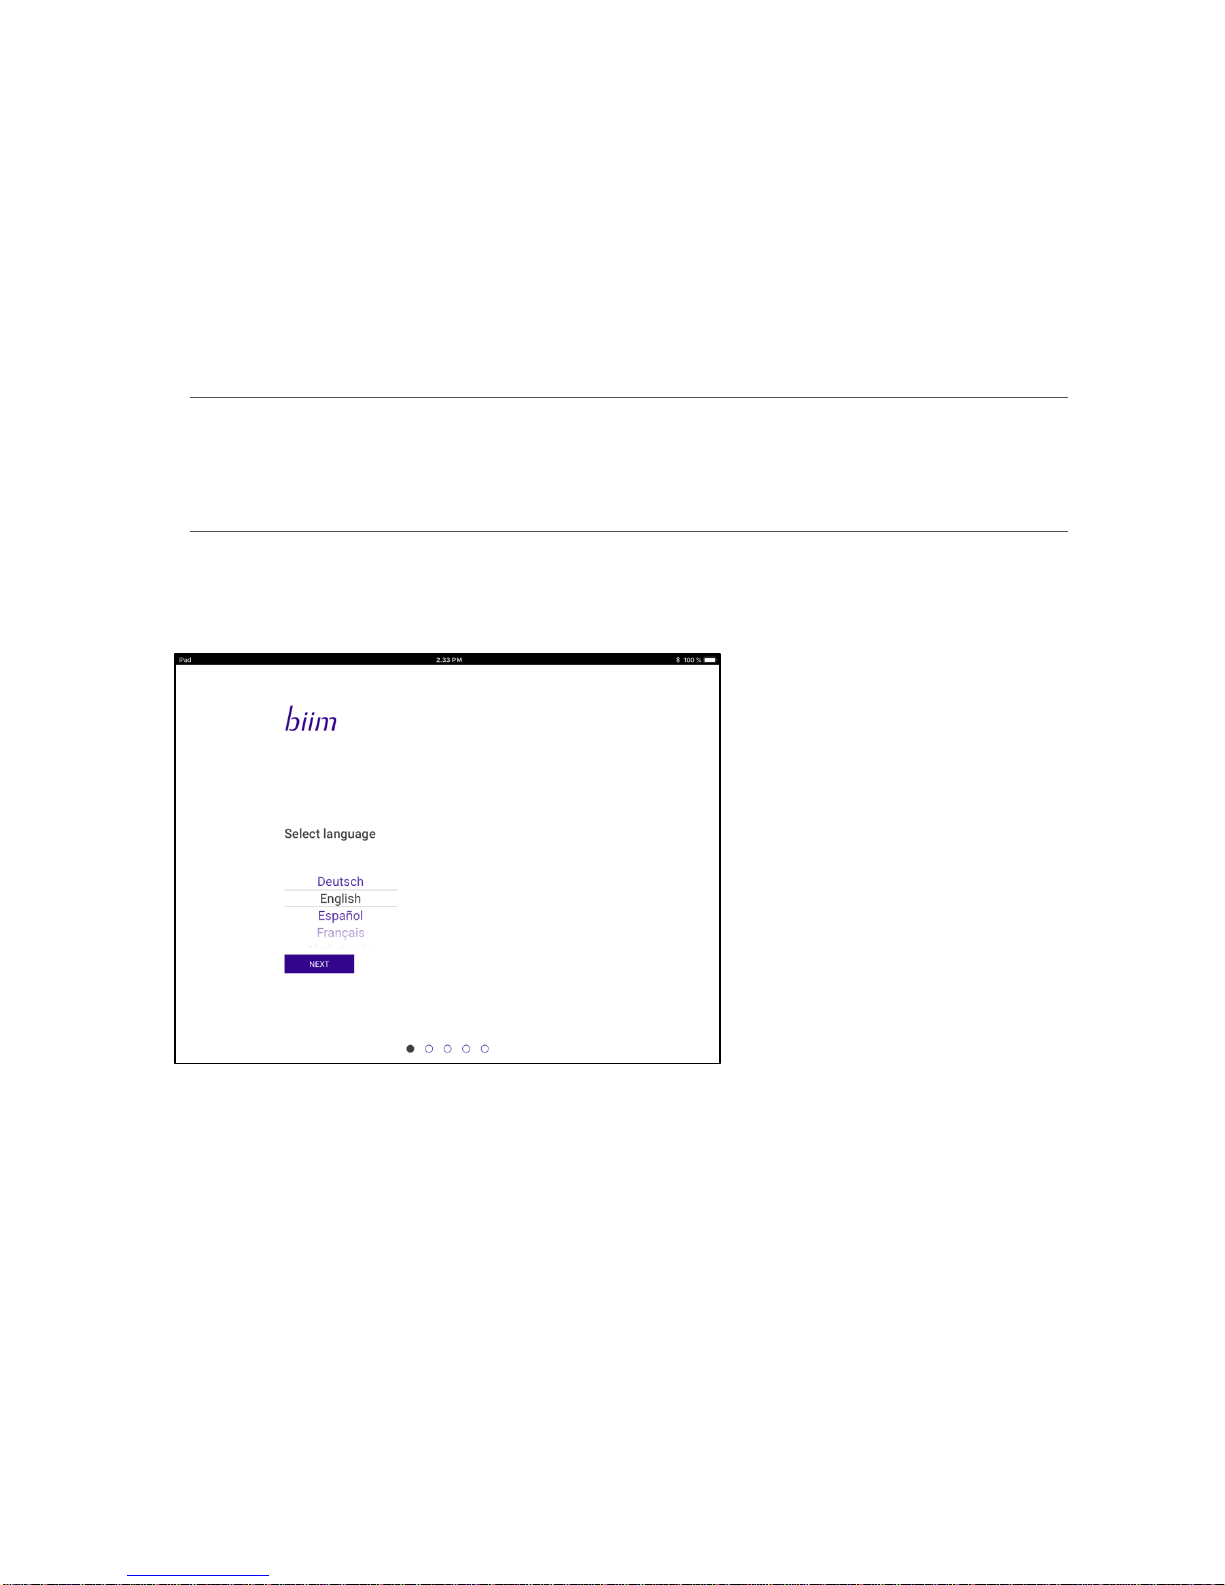
4.3. Startup Menu and First Time Installation
The first time the Biim Ultrasound App is started, the “Startup Wizard”displays a language selection as displayed
below:
.
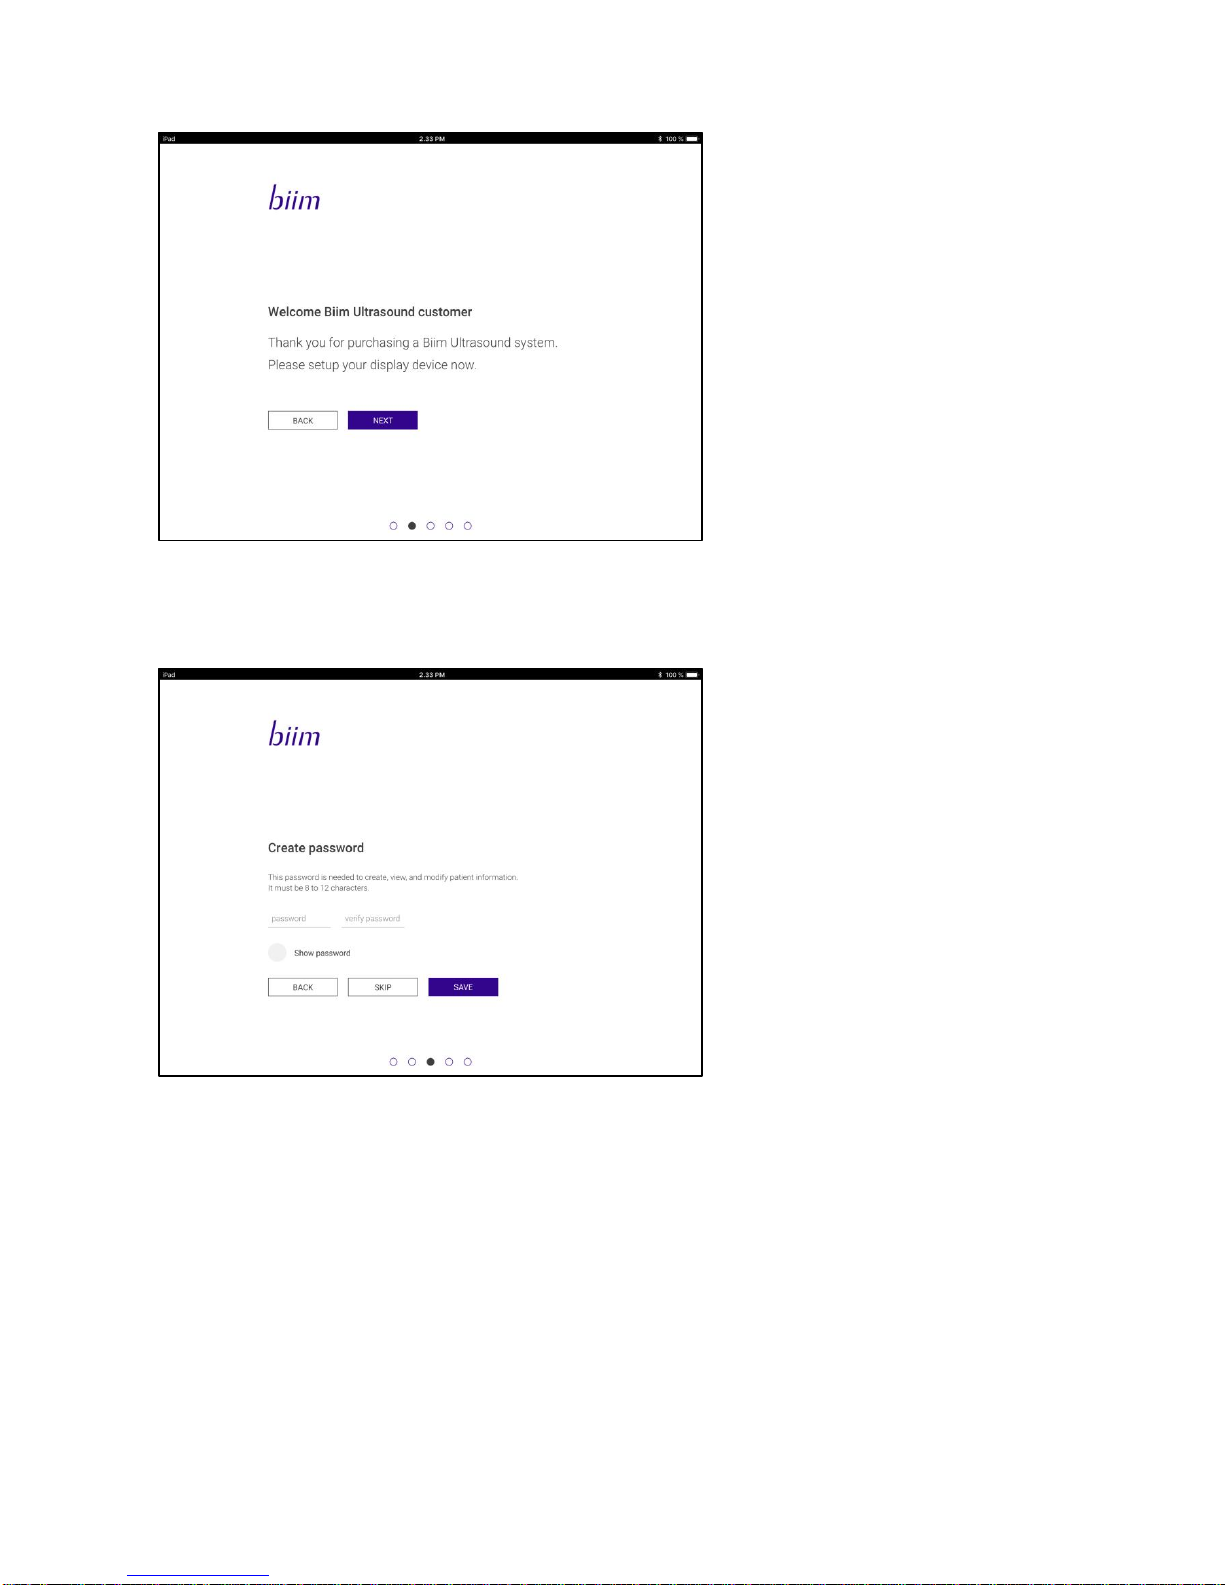
Biim Ultrasound User Guide 17
After language selection the following Welcome message is shown:
The Startup Wizard allows you to do the following:
1. Select a patient data password. Selection of a password protects patient information so that any patient
information stored on the display device can only be viewed with use of the correct password.
Biim Ultrasound User Guide 18
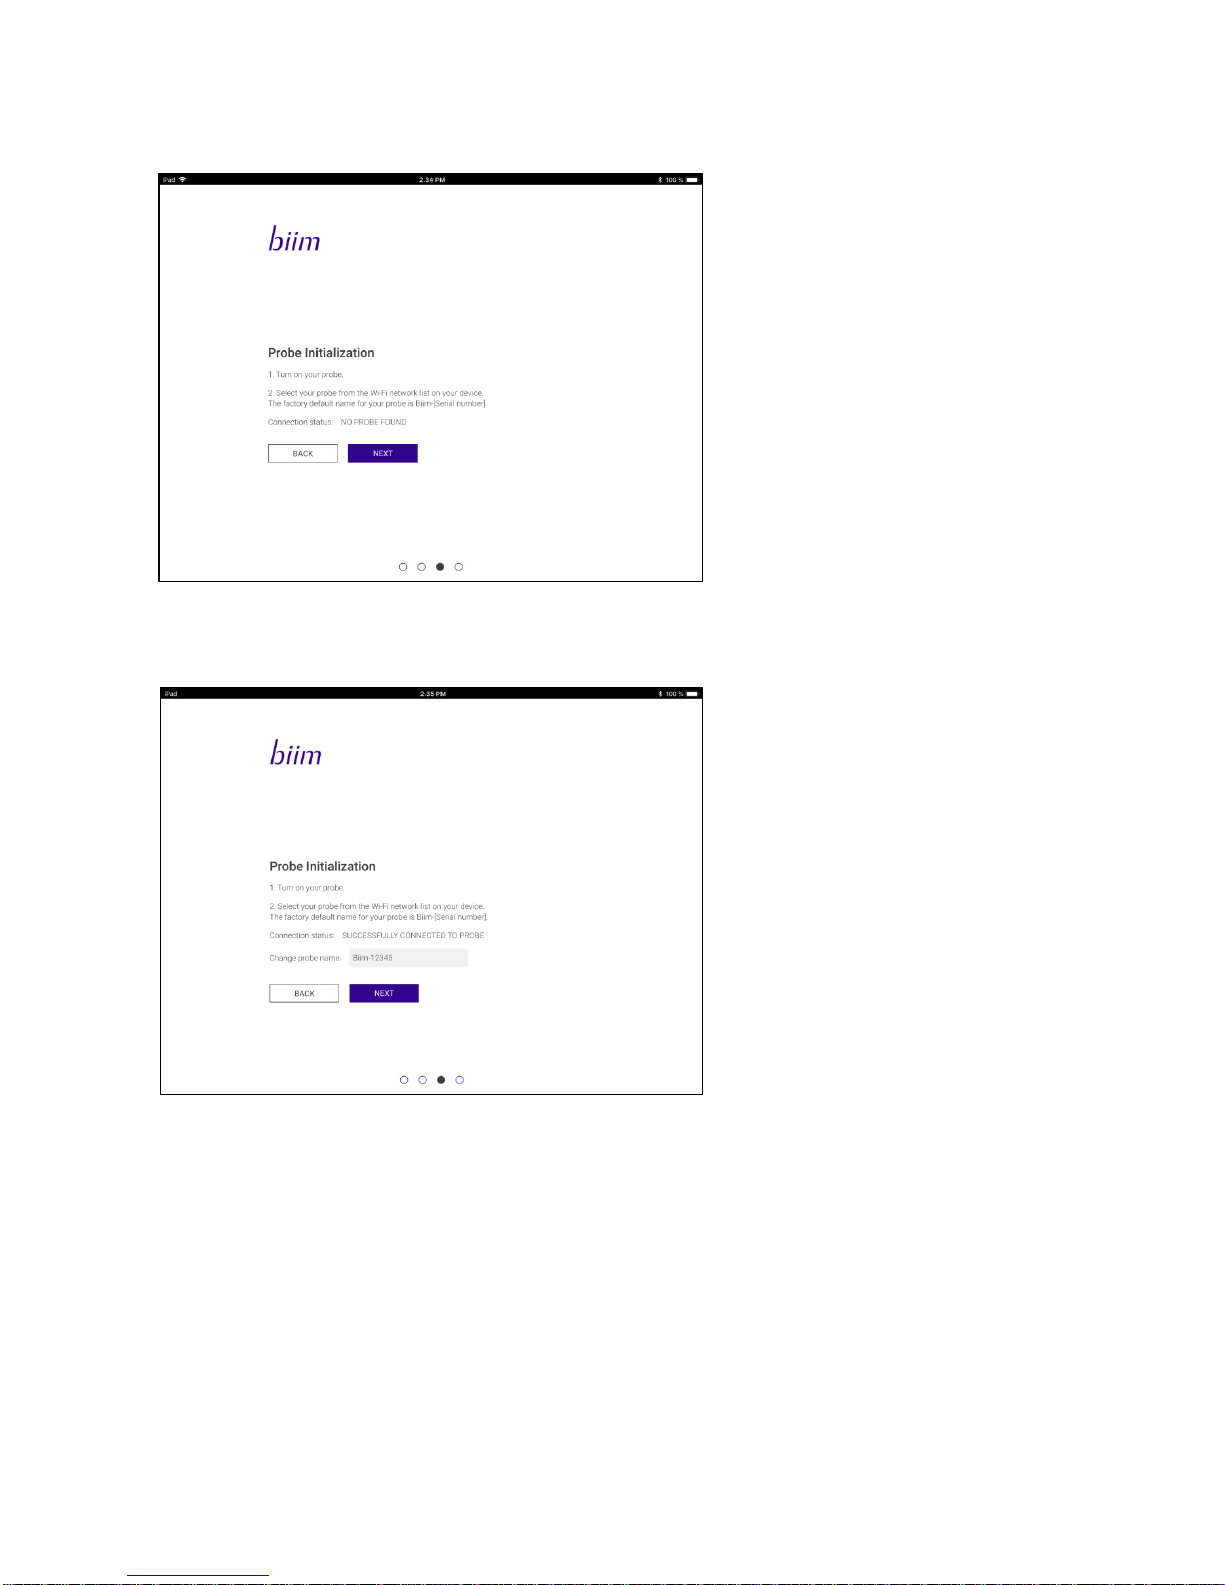
2. Verify that the Probe is connected to the display device via Wi-Fi.The Wi-Fi password will be ‘biimeasy’ until
it is changed as described in section 5.4.6
3. Change the Probe name.
The Probe name can use letters and numbers.
Biim Ultrasound User Guide 19
5. THE HOME SCREEN
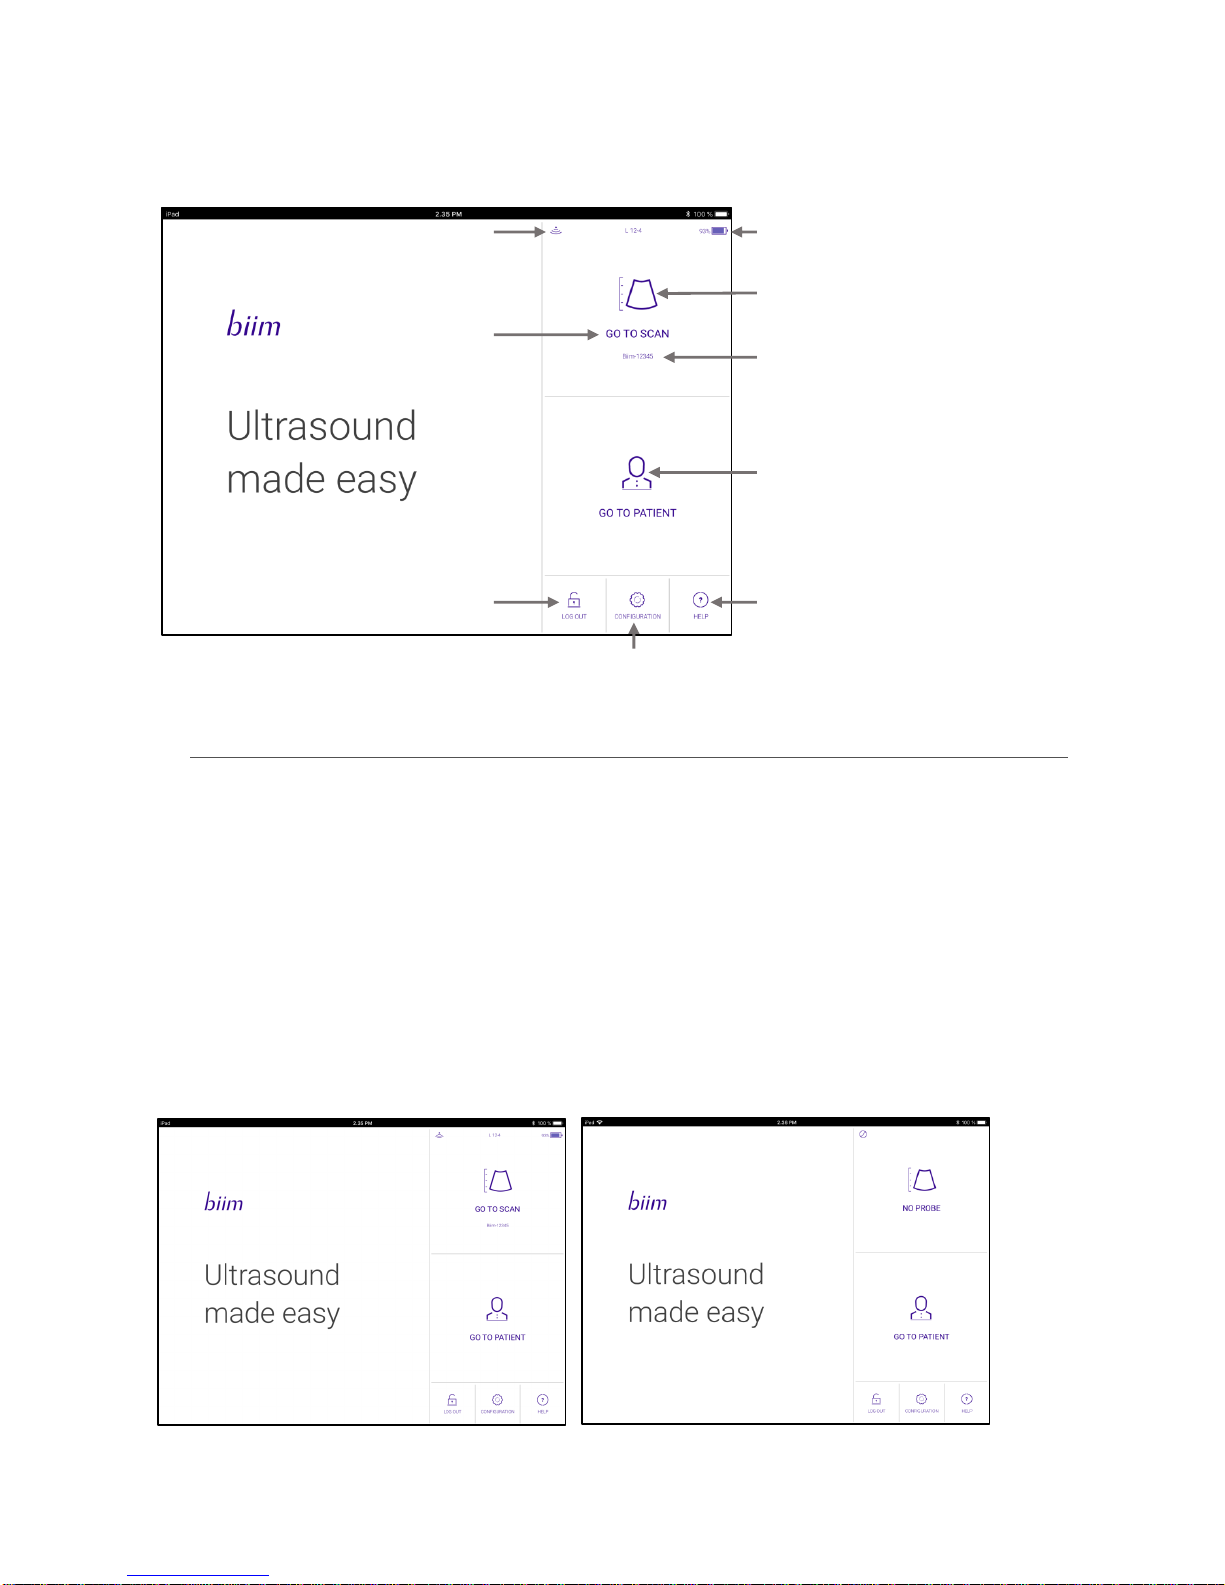
After you complete the Startup Wizard for the first time, the following HOME screen appears:
5.1. CONNECT TO PROBE/GO TO SCAN Icon
This icon may have any of three different messages depending on the connection to the probe.
GO TO SCAN indicates that the Biim probe has been connected to the display device and an ultrasound scan can
be started by clicking the icon. Selecting the GO TO SCAN icon opens the ultrasound scanning screen and allows
you to scan. The name of the Biim Ultrasound Probe attached by the Wi-Fi connection is shown below the GO TO
SCAN icon. NOTE: Pressing the Freeze button on the probe will also open the scanning screen.
If no Probe is connected by Wi-Fi to the display device, NO PROBE or CONNECT TO PROBE is displayed on the
HOME screen rather than GO TO SCAN. If the Biim Ultrasound App has previously been used with a Biim probe
CONNECT TO PROBE will be shown above the name of the most recently connected probe. The application will
attempt to connect to that probe when the icon is clicked. NO PROBE will be shown if the App has not previously
been connected. In this case the Wi-Fi connection can be established using Wi-Fi settings of the display device.
See Section 6, “OPERATING THE Biim ULTRASOUND SYSTEM,”for details on the ultrasound scanning screen.
Shows Wi-Fi connection status
Displays “NO PROBE” if
no probe is connected
Shows charge of Biim battery
Goes to scanning screen
Name of connected Biim Probe
Goes to screen for entering
and reviewing patient data
Patient Database Log In/Log Out
Brings up the Biim User Guide
Shows more controls to
configure the Biim System
Biim Ultrasound User Guide 20
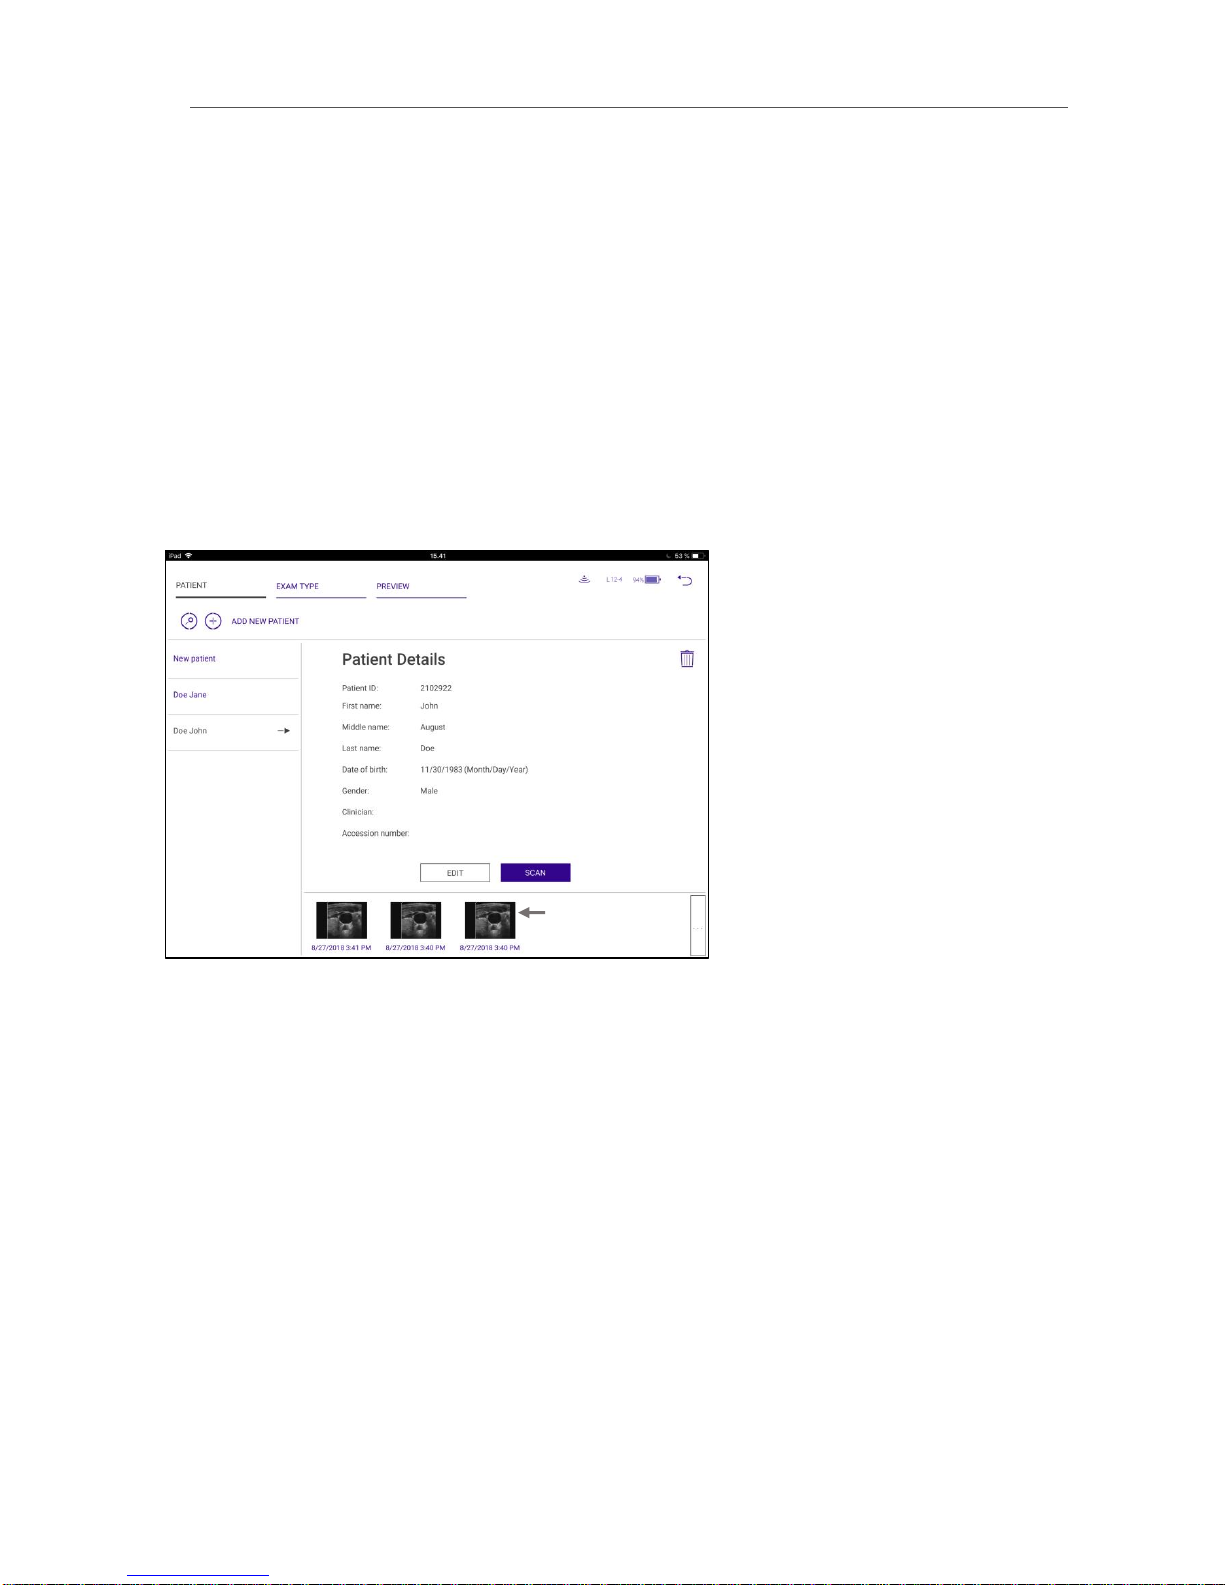
5.2. GO TO PATIENT Icon
Selecting the GO TO PATIENT icon allows you to enter, edit, or delete patient information; select the exam type;
and recall stored images.
5.2.1. PATIENT Tab
The PATIENT tab is the default display when you select the GO TO PATIENT icon. Selecting New patient allows you
to enter patient identifying information. Select SAVE to save the information or CLEAR to clear all of the patient
information fields. When you select SAVE, that patient’s name appears on the work list on the left side of the
screen.
Selecting a patient from the work list displays the patient’s information. Selecting SCAN takes you to the scanning
screen, and the patient’s name is displayed in the Information Bar at the top of the image. The data can be edited
by selecting EDIT.The patient’s information can be deleted by selecting the DELETE icon.
If images have already been stored for that patient, thumbnail images of the stored data are shown at the bottom
of the screen.
Thumbnail images
Other manuals for Ultrasound System
1
Table of contents
Other Biim Medical Equipment manuals


