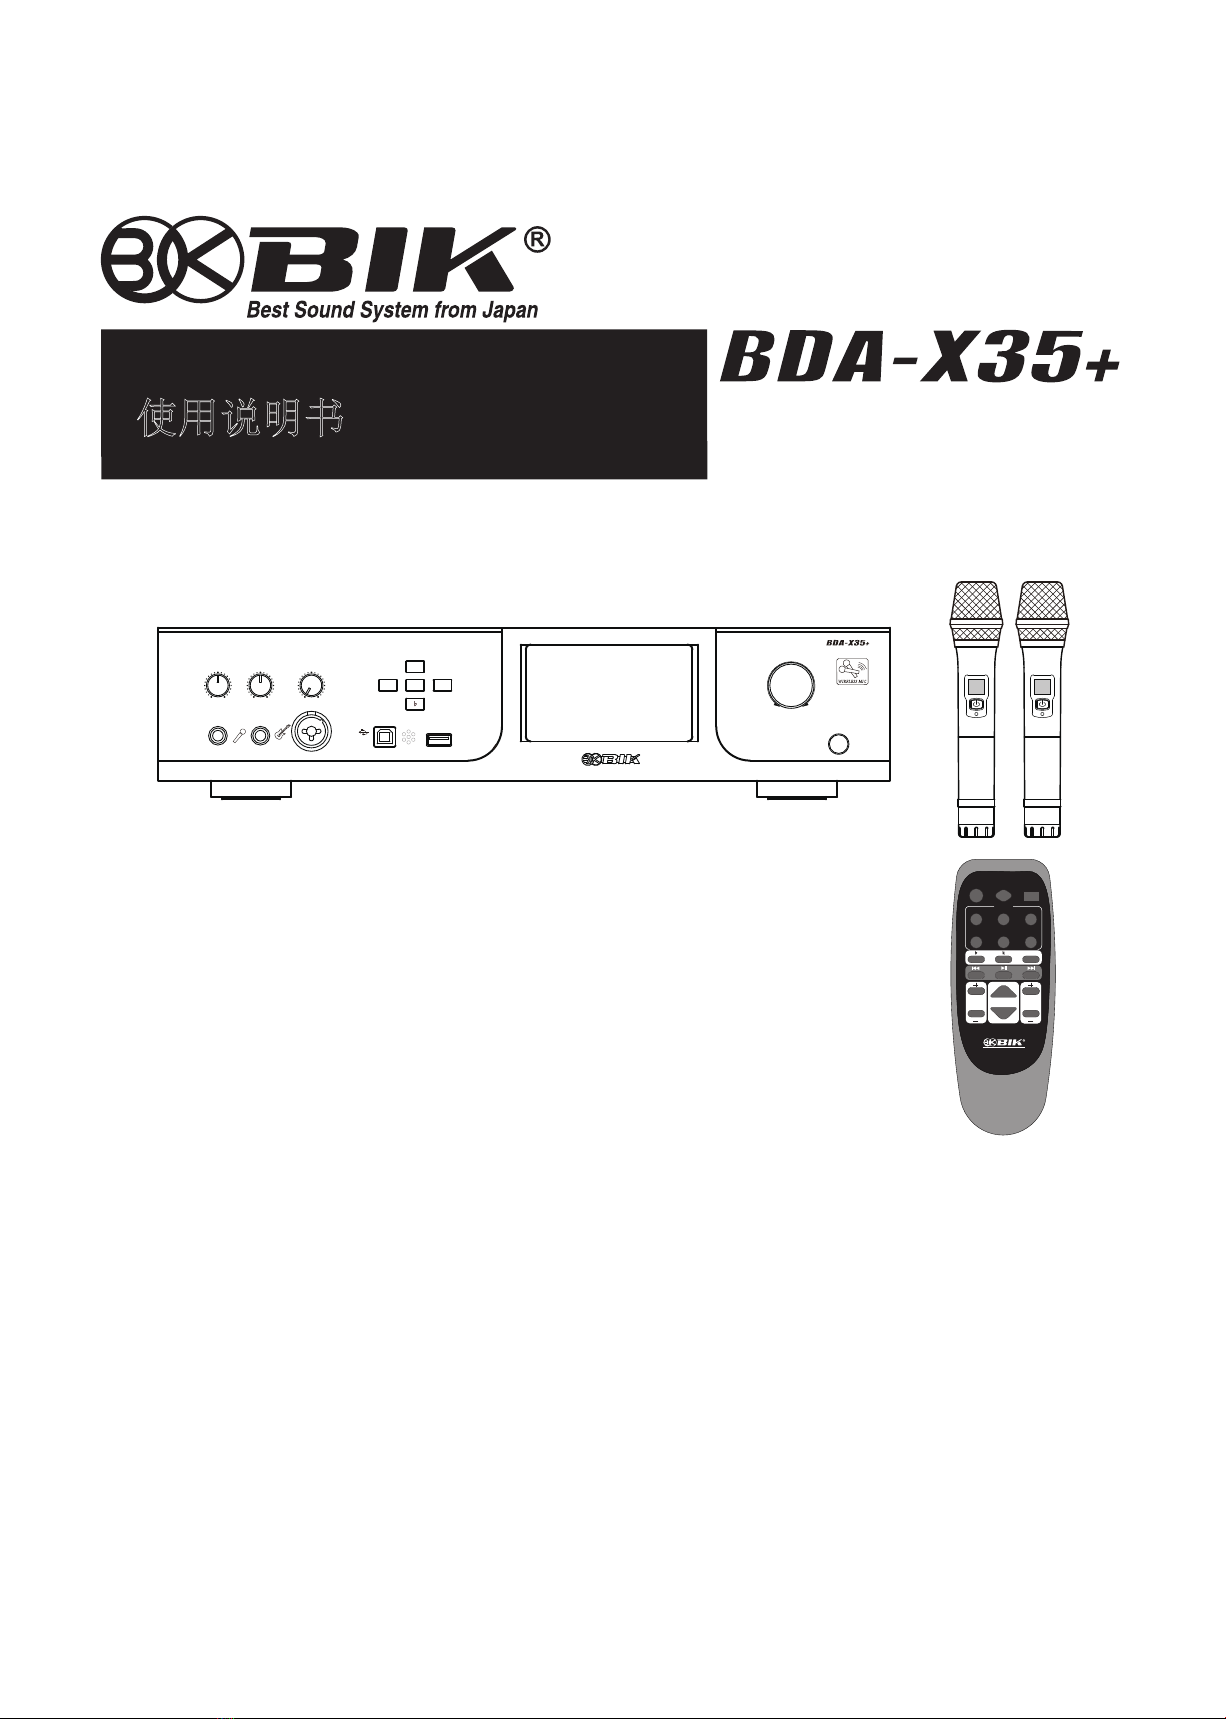
BIK BDA-X35+ User manual
使用说明书
OWNER'S MANUAL
Thank you for purchasing our ProffessionalKaraoke AV Amplifier.
Please read the owner's manual thoroughly prior to use.
Please keep the manual for future reference.
感谢您购买本公司的数码立体声二合一
卡拉OK功率放大器
。
为了尽快的熟悉掌握本产品的各项功能,使用前请仔细阅读本说明书。
阅读后,请注意妥善保管。
数码立体声二合一
卡拉OK功率放大器
Professional Karaoke AV Amplifier
Min Max
Min Max
MICROPHONE
VOL 1 VOL 2 Min Max
VOL
INSTRUMENT
MP 3
Professional Karaoke AV Amplifier
USB
KEY CONT
12
POWER
Push Enter
Min Max
MASTER VOL
INPUT
FBX
♯
♮
♭
♮
♭
♯
DVD OPTICAL ARC
MP3/BT HDMI
VOD
INPUT
MODE MUTE
MUSIC VOL
REMOTE CONTROLLER
FBX
EFF VOL MIC VOL
2
●
When this product is not used for a longer period, power supply plug should be taken out of outlet.
●
In case the thunder is generated near-by, take power supply plug out of outlet right away, or it may cause a fire or an electric shock.
●
If this product needs to be moved, switch off first, and then take power supply plug out, or it may damage cord, and may cause
a fire or an electric shock.
●
Do not put this product near cooking counter or damp supply outlet, or it may cause a fire or an electric shock.
●
Do not put this product on unstable desk, it may damage or injury when dropped.
●
Do not leave this product for a longer period such as in the cars where all windows are shut, or place where direct sunshine hits,
or it may damage each part of this product, and may cause a fire.
FRONT PANEL
HARDWARE OPERATION
MOBILE PHONE OPERATION
PC SOFTWARE OPERATION
11
12
4
7
8
2
2
4
CAUTION FOR SAFETY
FUNCTION AND NAME
HOW TO CONNECT
ANY TROUBLES ?
SPECIFICATIONS
CONTENTS
This "Caution for safety" shows various kinds of pictures in order to be used safely and correctly and to prevent from damaging
other people, and their property. Please read with full understanding, and carefulness.
WARNING
This shows: Using this product with disregarding cautions might call for death or injury.
This shows: Using this product with disregarding cautions might call for people to be
harmed and goods to be damaged.
CAUTION
CAUTION FOR SAFETY
WARNING
●
Making use of this product under the circumstances that a smoke, an abnormal smell, an irregular sound coming out, it may cause
a fire and an electric shock. In this case, switch off the product, and take AC plug out of the outlet right away. Bring it to the shop for
repair.
●
In case when water or foreign substances get into product, switch off right away, and take AC plug out of outlet, and consult with the repair shop,
otherwise, it may cause a fire or an electric shock.
●
Re-assembling this product is highly prohibited, otherwise, it may cause a fire or an electric shock.
●
Do not take the cover out, otherwise, it may cause an electric shock. Inspection, repair should be done in the repair shop.
●
This product can no way be used in the bathroom, otherwise, it may cause a fire, or an electric shock.
●
Pay attention not for water to go into or get wet, or it may cause a fire or get an electric shock.
●
This product can be used only with AC220V-240V, otherwise it may cause a fire or get an electric shock.
●
This product is not designed for built-in installation : do not place the product in an enclosed place such as a bookcase or rack.
●
Be careful for AC plug, or outlet not to get dust or to get wet, or it may cause a fire.
CAUTION
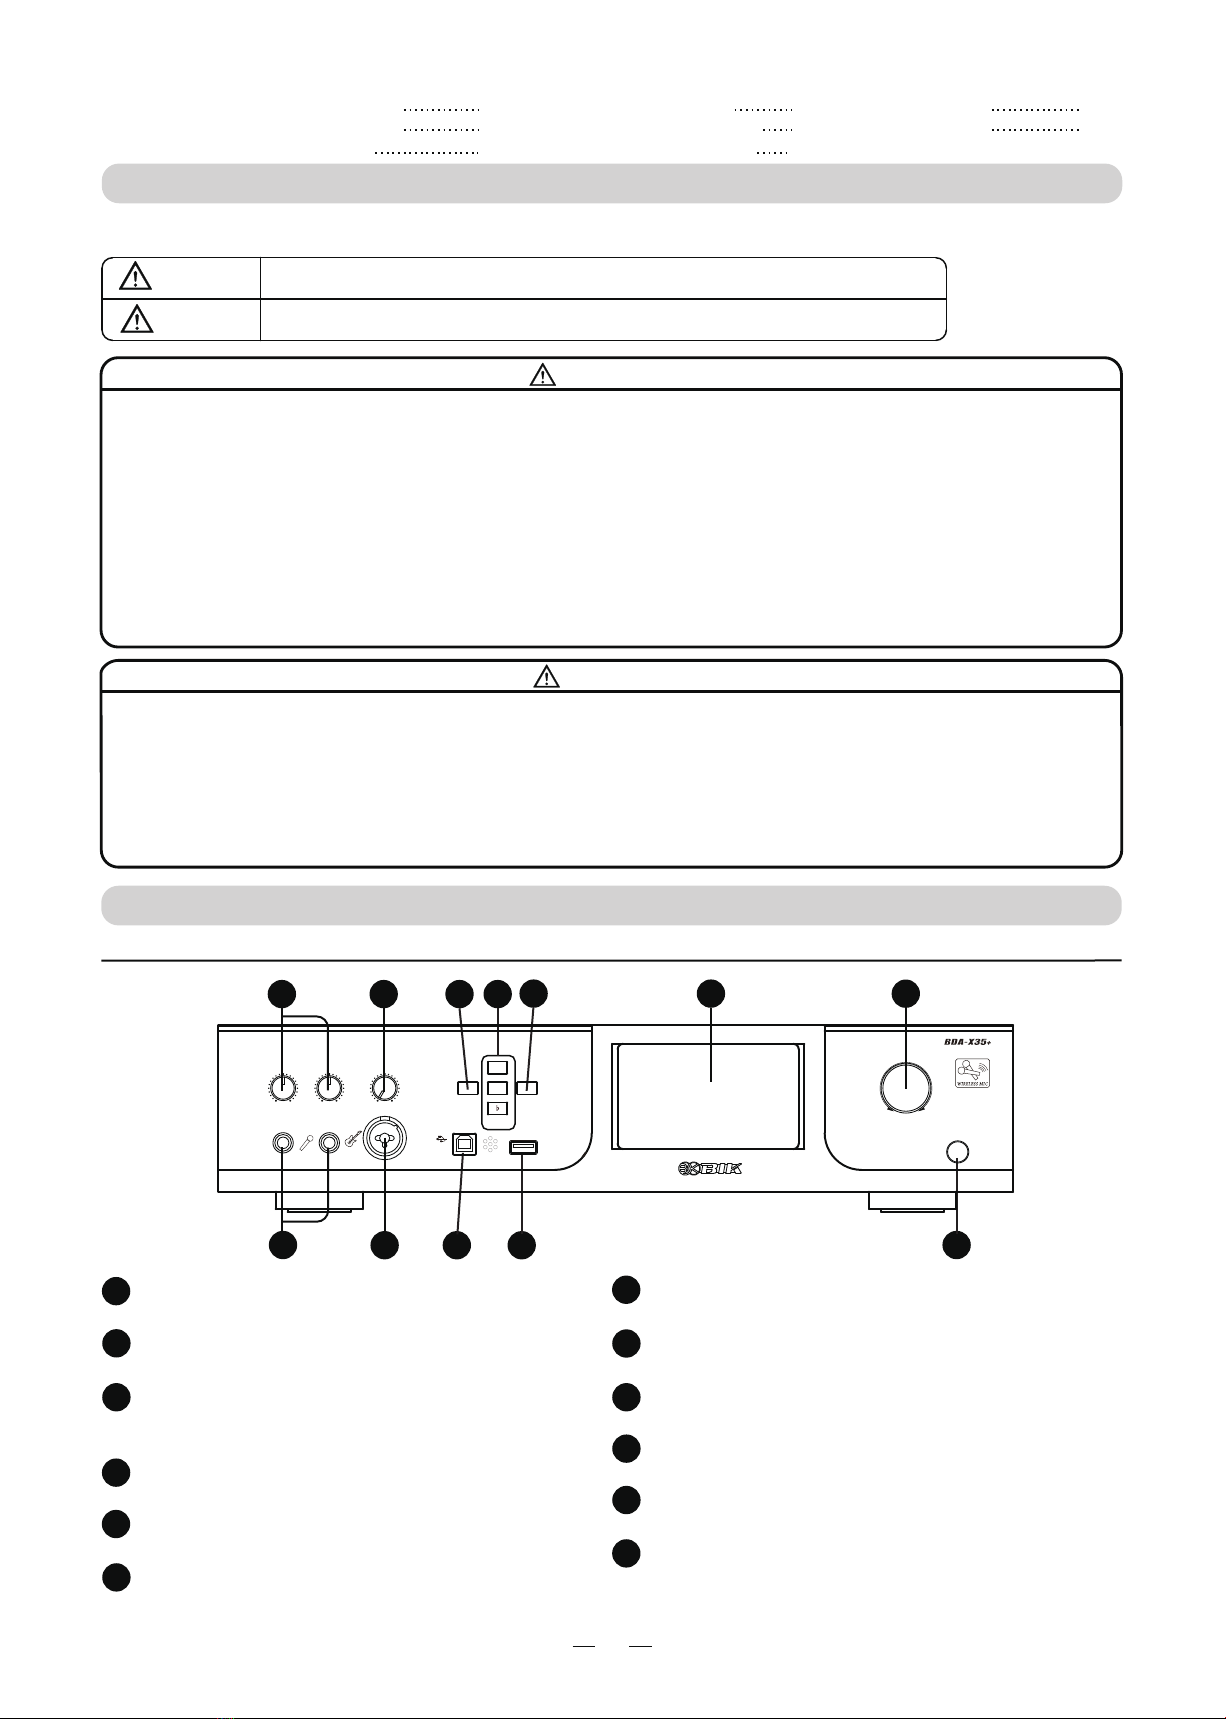
FUNCTION AND NAME
1
2
3
4
8
10
11
9
Master Volume
USB Port
Instrument Input (6.3mm PHONE and XLR)
Microphone Volume
Microphone Input
Push switch button-"On", and Re-push it and then "Off".
To adjust Music, MIC and EFFECT Volume.
Change the item to be adjusted by pressing.
Connected to a PC to adjust various settings .
To adjust keycontrol of Music.
To select of music input souce.
To adjust Feed Back Canceller of MIC.
To insert USB with MP3 audio.
To input Instrument.
To adjust sound volume of MIC 1, MIC 2.
To Input 2 microphones (MIC 1, MIC 2).
To adjust Instrument volume.
Power Switch
Key Control Button
Display
Input Select Button
5
6FBX Button
Instrument Volume
12
MP3 USB Port
7
Various settings can be adjusted on the touch panel.
23
1
11
12
8 7
10
9
65
4
Min Max
Min Max
MICROPHONE
VOL 1 VOL 2
Min Max
VOL
INSTRUMENT
MP 3
Professional Karaoke AV Amplifier
USB
KEY CONT
12
POWER
Push Enter
Min Max
MASTER VOL
INPUT
FBX
♯
♮
♭

3
1
3
4
5
2
REAR PANEL
VOD, DVD and Optical input.
AudioInput
REC, Center and Sub-woofer output. Center and
Sub-woofer output is only HDMI input.
AudioOutput
To insert MIC A and B.
MIC Input
To adjust GAIN of MIC A and MIC B.
MIC GAIN Control
6
Connect with HDMI device. (HDMI 1, HDMI 2, HDMI 3)
HDMIInput
8
Connect with HDMI ARC device.
HDMI ARCOutput
9
7
10
11
Connect with speaker. (4 Ohms - 8 Ohms)
SpeakerOutput
Connect with Bluetooth antenna.
Bluetooth ANT
Power Cord Socket.
Power input AC 220 - 240V /50Hz.
Connect with MIC antenna.
Wireless MIC ANT
FUSE Box
WIRELESS MICROPHONE
5
12
6
4
3
Channel indication
Battery level indication
Front
Rear
Battery(UM-3) X2
Display
1
2
3
4
5
6“HI”, “LO” Setting switch.
Adjustment of RF output power.
B
A
Grip
CHANNEL
B
A
Microphone head case
Switch / Channel setting
Battery case for UM-3 x 2
●How to set Channel (Frequency)
1. Put a microphone to near the front panel of amplifier.
2.
Set a channel with pushing microphone switch button at 2 times
.
3. Channel is set automatically.
LO: Use to near distance.
HI: Use to far distance.
MIC A: 00 - 18 CH
MIC B: 21 - 39 CH
CHANNEL CHANNEL
2
1
9
10
345 6
11 78
MIC INPUT
MIC A
GAIN GAIN
MIC B
HDMI INPUT HDMI ARC
OUTPUT
HDMI 1 HDMI 3
HDMI 2
AUDIO OUTPUT
AUDIO INPUT
L
R
L
R
OPTICAL
REC CENTER
SUB W
R L
SPEAKER
FUSE 5A 250V AC
AC IN
AC 220V-240V / 50Hz
SERIAL NO.
WIRELESS MIC
ANT
Bluetooth
ANT
JAPAN
TO REDUCE THE RISK OF FIRE OR ELECTRIC
SHOCK. DO NOT EXPOSE THIS APPLIANCE TO
RAIN OR MOISTURE
WARNING
RISK OF ELECTRIC SHOCK
DO NOT OPEN
CAUTION
VOD DVD
QR CODE
PROFESSIONAL KARAOKE AV AMPLIFIER
BDA-X35
AC240V/50Hz 800W

♮
♭
♯
DVD OPTICAL ARC
MP3/BT HDMI
VOD
INPUT
MODE MUTE
MUSIC VOL
REMOTE CONTROLLER
FBX
EFF VOL MIC VOL
4
HOW TO CONNECT
MIC Antenna TV
DVD
OPTICAL
Recorder
Powered Sub woofer
Right Speaker Left Speaker
Bluetooth
Antenna
HDMI
Powered Speaker
HARDWARE OPERATION
MAIN SCREEN INSTRUCTION
1
2
3
4
5
6
1
3
4
5
2
Can be Mute Music, MIC and Effect.
MUTE Setting
To The SYSTEM SETUP SCREEN
To adjust Music, MIC and Effect volume.
Volume Settings
Lights green when connected
to a wireless microphone.
Wireless MIC Indicator
6
To The INPUT SELECTION SCREEN
To The MODE SELECTION SCREEN
: unmute : mute
: volume up
: volume down
Microphone
MIC INPUT
MIC A
GAIN GAIN
MIC B
HDMI INPUT HDMI ARC
OUTPUT
HDMI 1 HDMI 3
HDMI 2
AUDIO OUTPUT
AUDIO INPUT
L
R
L
R
OPTICAL
REC CENTER
SUB W
R L
SPEAKER
FUSE 5A 250V AC
AC IN
AC 220V-240V / 50Hz
SERIAL NO.
WIRELESS MIC
ANT
Bluetooth
ANT
JAPAN
TO REDUCE THE RISK OF FIRE OR ELECTRIC
SHOCK. DO NOT EXPOSE THIS APPLIANCE TO
RAIN OR MOISTURE
WARNING
RISK OF ELECTRIC SHOCK
DO NOT OPEN
CAUTION
VOD DVD
QR CODE
PROFESSIONAL KARAOKE AV AMPLIFIER
BDA-X35
AC240V/50Hz 800W
REMOTE CONTROLLER
4FBX Button
To adjust Feed Back Canceller
of MIC.
1
MODE
9Playback button
: Reverse.
: Playback
: Fast forwarding.
2
Mute Button
3
Input Button
6MUSIC Volume
To adjust Music volume.
8To adjust Music Interval tone Level.
♭: To slow interval tone.
# : To fast interval tone.
♮: Back to original.
Key Control Button
Can be change the MODE.
Can be select the Input signals.
MP3/BT, HDMI, VOD, DVD,
OPTICAL, ARC.
5EFFECT Volume
To adjust Effect volume.
2
4
3
8
9
5
6
1
7
7To adjust MIC volume.
MIC Volume
VOD

5
MODE SELECTION SCREEN INSTRUCTION
1
3
2
MODE Selection And Setting
To The INPUT SELECTION SCREEN
Can be choose the MODE. The selected input
is displayed in a green frame.
Press and hold each mode button to display
the MODE MENU SCREEN.
To The MAIN SCREEN
1
2
3
MODE MENU SCREEN INSTRUCTION
1
4
3
MUSIC Equalizer Setting
To The EFFECT SETTING SCREEN
Return
4
1
2
3
2MIC Equalizer Setting
USB INPUT SCREEN INSTRUCTION
1
2
Music Title List
The folder name and song name are
displayed. Can be select the song to play
with the up and down buttons.
Timeline of the song
1
2
Can be set Play and Pause,
Next and Previous.
INPUT SELECTION SCREEN INSTRUCTION.
2
1
4
1
3
2
Spectrum analyzer can be turned on and off.
Spectrum Analyzer
Input Selection
To The MODE SELECTION SCREEN
Can be choose the input. The selected input
is displayed in a green frame.
34
To The MAIN SCREEN

6
SYSTEM SETUP SCREEN INSTRUCTION.
1
1MAX AND INITIAL VOLUME SETTING
Can be set max volume and initial volume.
Select the Item you want to set first.
Adjust the value with the “+” and “−” buttons.
Mus Max Vol : 0 - 100
Mic Max Vol : 0 - 100
Efx Max Vol : 0 - 100
Mus Init Vol : 0 - 100
Mic Init Vol : 0 - 100
Efx Init Vol : 0 - 100
2 3
2Language switching
3
Can be choose English or Chinese.
Factory Reset
Return to shipping settings.
MIC EQUALIZER SCREEN INSTRUCTION
MIC EQUALIZER SETTING
Select the frequency band number you
want to set first.
Adjust the gain with the up and down buttons.
EFFECT SCREEN INSTRUCTION
EFFECT SETTING METHOD
Select the Item you want to set first.
Adjust the value with the “+” and “−” buttons.
Frequency Band : 1 - 7
EQ GAIN : -20dB - +12dB
Echo Vol : 0 - 100
Direct Vol : 0 - 100
Echo PreDelay : 0 - 50
Echo Delay : 0 - 500
Echo Repeat : 0 - 90
Reverb Vol : 0 - 100
Reverb Direct Vol : 0 - 100
Reverb PreDelay : 0 - 50
Reverb Delay : 0 - 5000
Pitch : 10b - 10#
MUSIC EQUALIZER SCREEN INSTRUCTION
MUSIC EQUALIZER SETTING
Select the frequency band number you
want to set first.
Adjust the gain with the up and down buttons.
Frequency Band : 1 - 7
EQ GAIN : -20dB - +12dB
7
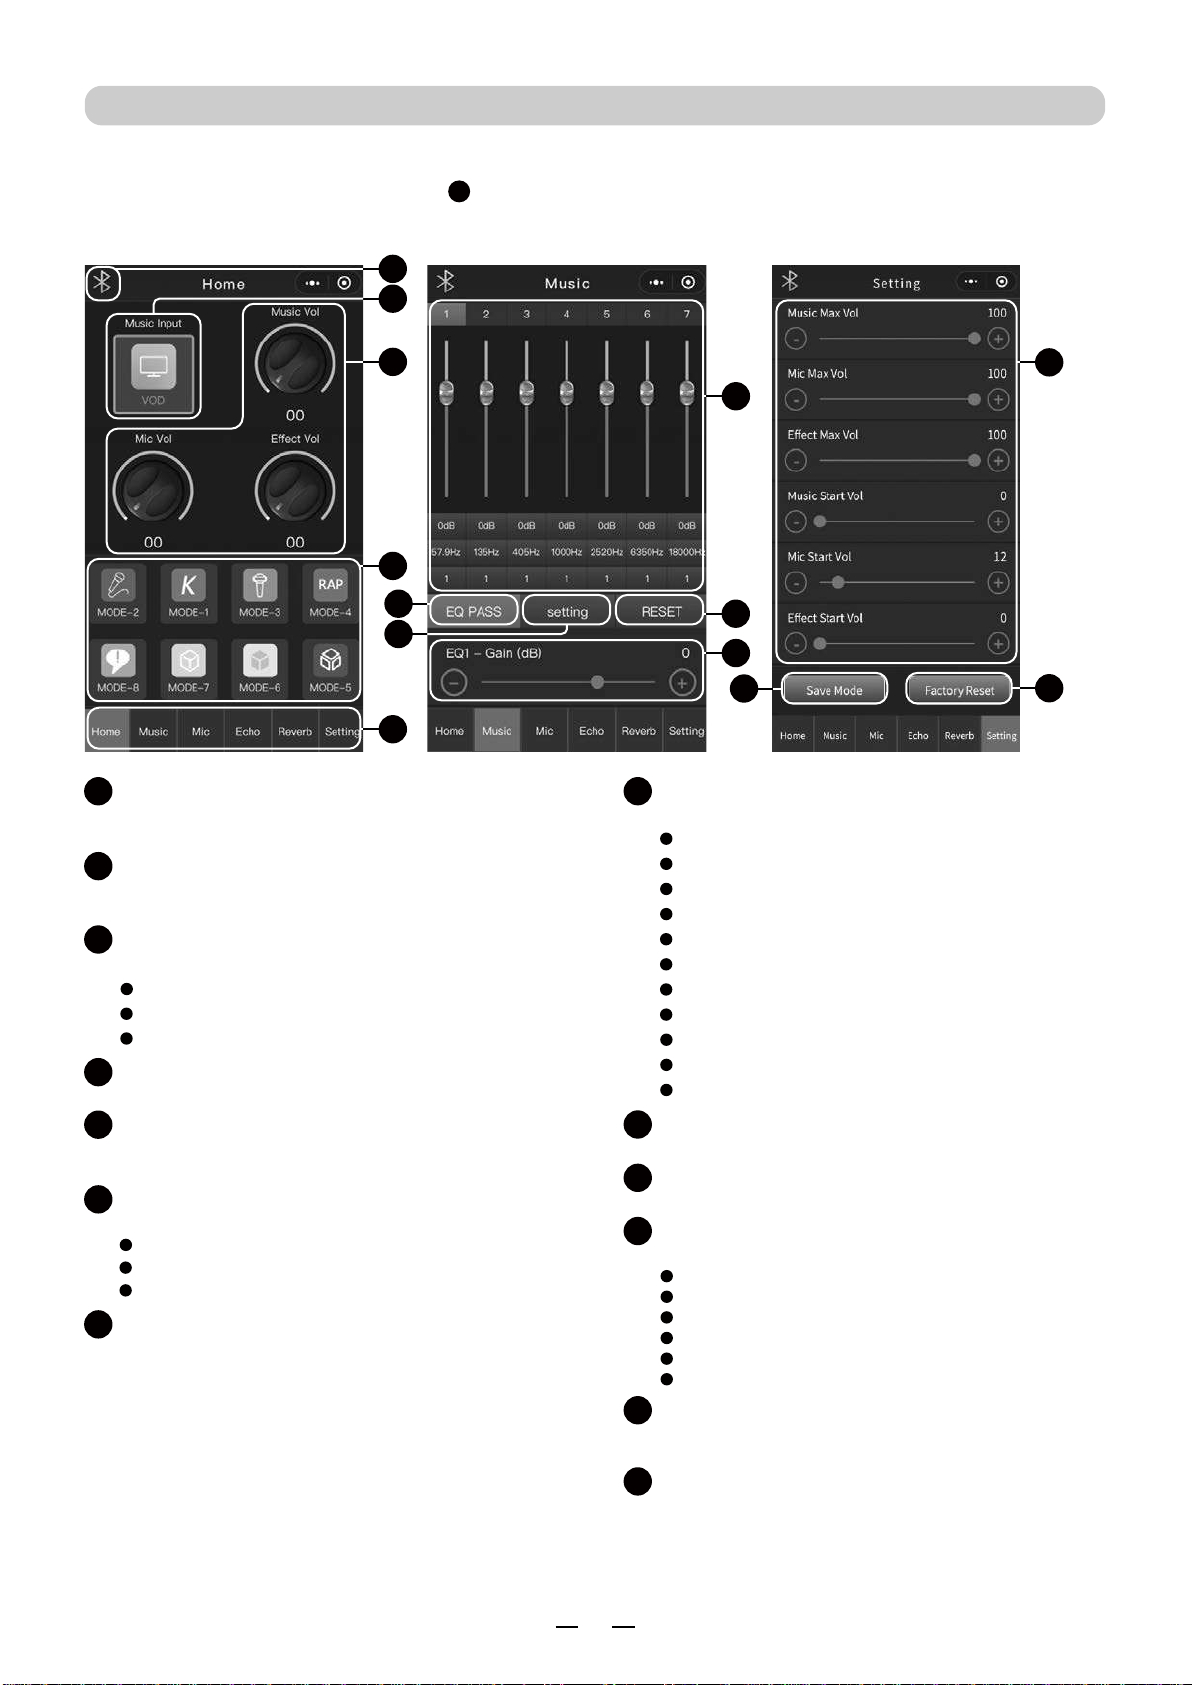
MOBILE PHONE OPERATION
1. Please Use WeChat application. Download “BDA-X35Plus” from BIK home page.
2. Please connect from the bluetooth on the main screen.
3. Can be operate it intuitively with this software.
1
2
3
4
5
6
9
10
7
8
11
13
12
1BLUETOOTH CONNECT INDICATOR
Can be connect the mobile phone with BDA-X35+.
When connected, it will be displayed in green.
2Music Input Select
3Music, Mic and Effect Volume
4MODE Select
Can be adjust various values for each MODE.
5MODE MENU Select
6Graphic Equalizer
Can be adjust GAIN, frequency and “Q” of 7 band EQ.
7Equalizer PASS
Can be PASS 7 band EQ.
8Filter and Effect Setting
Can be adjust HP filter, LP filter and Effect.
9Equalizer Value Reset
Can be reset equalizer value.
10 Fine Adjustment
Can be fine adjust GAIN, frequency and “Q”.
11 Max and Initial Volume Setting
Can be set max volumes and initial volumes.
12 Save Mode
Can be save the setting value.
There are 8 memories.
13 Factory Reset
1
Can be select the music sorce from BT, USB, HDMI,
VOD, DVD, OPT and ARC.
Can be set volume by turning the display volume.
Can be adjust Music, Mic, Echo, Reverb and System
setting. Tap the button to switch the screen
GAIN : -24dB - +12dB
Frequency : 10.5Hz - 20060Hz
Q : 0.4 - 128 Music Start : 0 - 100
Mic Start : 0 - 100
Effect Start : 0 - 100
Music Max : 0 - 100
Mic Max: 0 - 100
Effect Max : 0 - 100
Echo Vol and Polarity : 0 - 100%, “+” or “-”
Echo DelayTime : 0 - 500ms
Echo RepeatRatio : 0 - 90%
Reverb Vol : 0 - 100
Reverb Direct Vol : 0 - 100
Reverb PreDelay : 0 - 50
Reverb Time : 0 - 5000
Pitch : 10b - 10#
Dir Vol and Polarity : 0 - 100%, “+” or “-”
Echo PreDelay : 0ms - 50ms
Echo RDelay : 0.0ms - 40.0ms
Music : 0 - 100
Mic : 0 - 100
Effect : 0 - 100
8
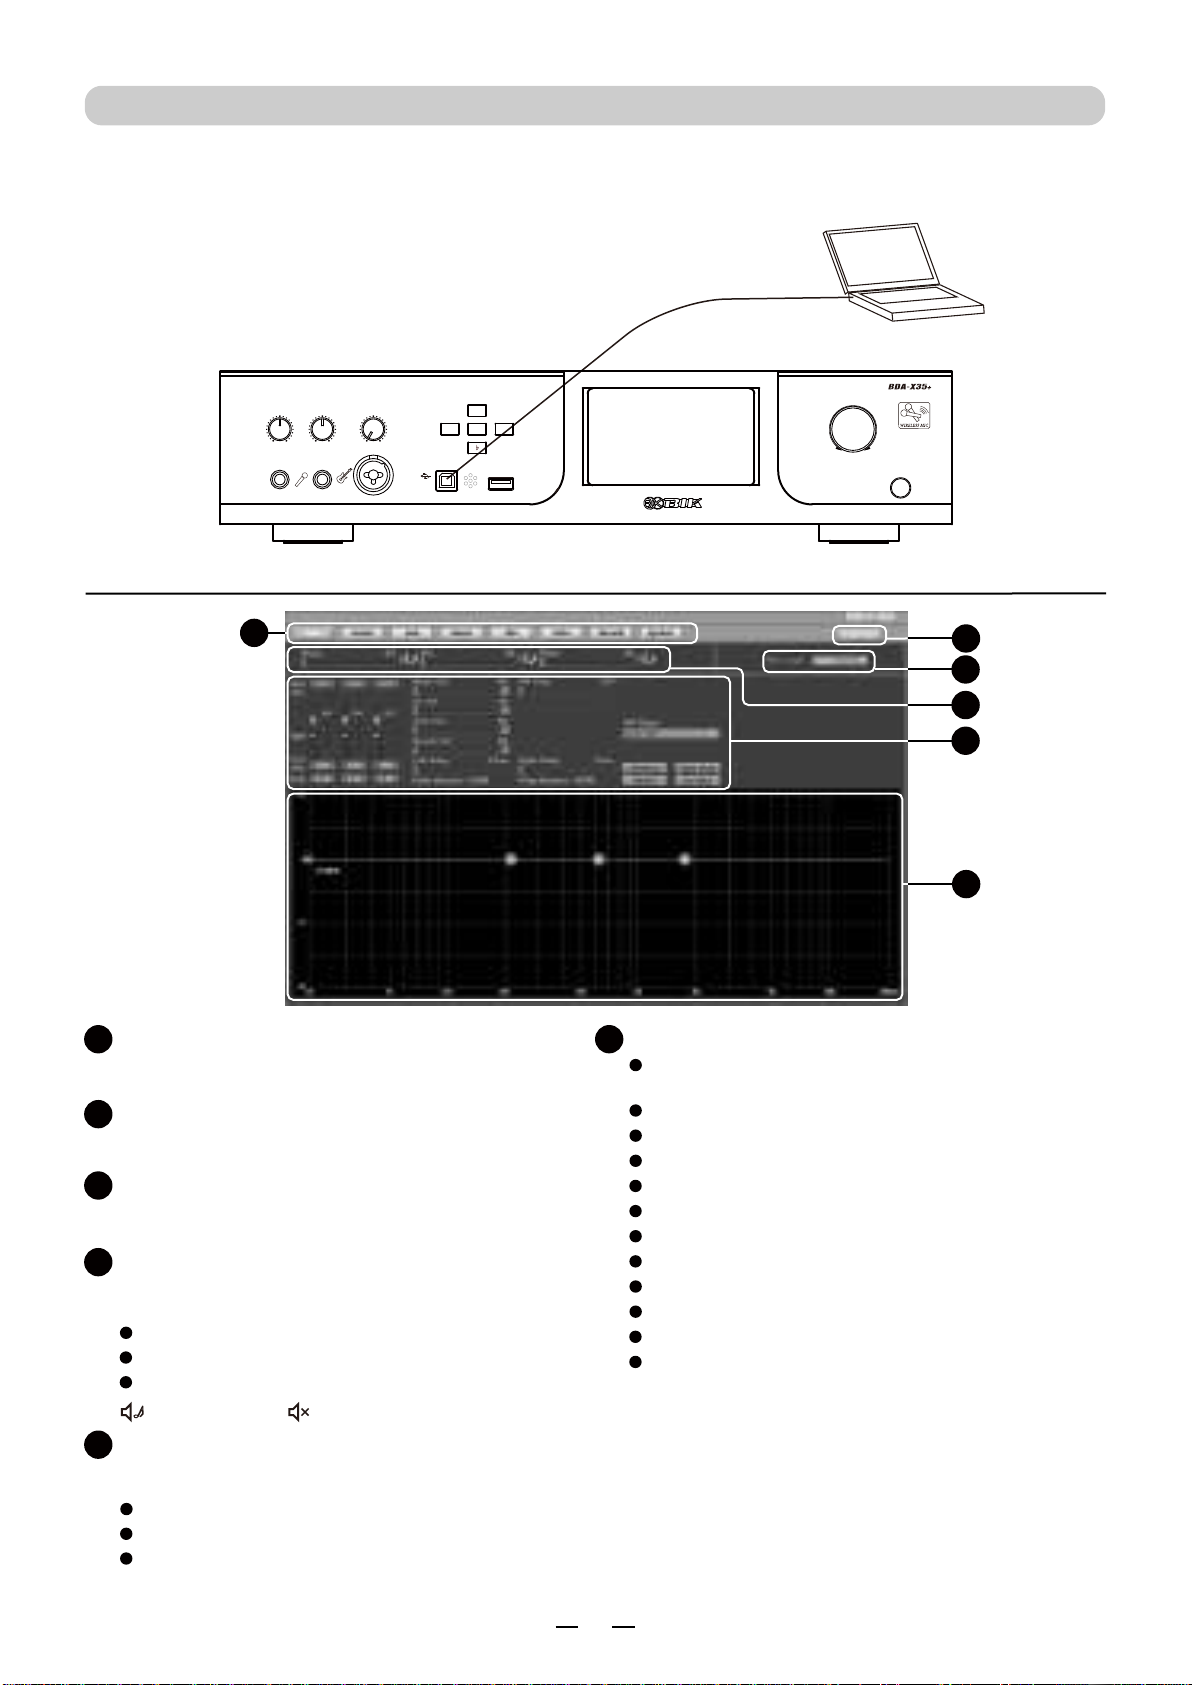
PC SOFTWARW OPERATION
1. Please download “BDA-X35+ PC SOFTWARE” from BIK home page.
2. Connect computer and the BDA-X35+ with USB cable.
PC and BDA-X35+ connect automatically.
1PC Connect Indicator
Can be connect the PC with BDA-X35+.
When connected, it will be displayed in green.
2MODE MENU Select
3
Music, Mic and Effect Volume
4
Input Select
Can be adjust Music, Mic and Effect volumes.
Can be muteby pressing the “speaker button”.
5Graphic Equalizer
Can be adjust visually HPF and GAIN, frequency
and “Q” of 3 band EQ.
6Equalizer and
various values Setting
※URL: https://www.bik-audio.com/product/bda-x35plus/
Computer
USB Cable
3. When connected, the screen of the PC software becomes “successful”.
Can be disconnect by pressing “successful”.
1
3
2
4
6
5
Can be adjust various settings of
the selected MODE MENU.
Select input from VOD, DVD, OPT, BT, HDMI 1, HDMI 2,
HDMI 3, ARC and MP3.
: unmute : mute
♪
Equalizer : 3 band
Music Vol and Polarity : 0 - 100%, “+” or “-”
Dir Vol and Polarity : 0 - 100%, “+” or “-”
Echo Vol and Polarity : 0 - 100%, “+” or “-”
Reverb Vol and Polarity : 0 - 100%, “+” or “-”
Left Delay : 0.0 - 20.0ms
Can be fine adjust GAIN, Frequency and “Q”.
Right Delay : 0.0 - 20.0ms
HPF Freq : OFF - 20060Hz
HPF Slope : Bessele, Butterworth, Link Riley
Left Right Mute : Mute or Unmute
RESET : Reset all EQ
EQ PASS : Pass all EQ
MAIN SCREEN INSTRUCTION
GAIN : -24dB - +12dB
Frequency : 19.7Hz - 20060Hz
Q : 0.4 - 128
Min Max
Min Max
MICROPHONE
VOL 1 VOL 2 Min Max
VOL
INSTRUMENT
MP 3
Professional Karaoke AV Amplifier
USB
KEY CONT
12
POWER
Push Enter
Min Max
MASTER VOL
INPUT
FBX
♯
♮
♭
Music : 0 - 100
Mic : 0 - 100
Effect : 0 - 100

9
2Graphic Equalizer
Can be adjust visually GAIN, frequency and “Q” of 3 band EQ.
1Equalizer and
various values Setting
Equalizer : 3 band
Music Vol and Polarity : 0 - 100%, “+” or “-”
Dir Vol and Polarity : 0 - 100%, “+” or “-”
Echo Vol and Polarity : 0 - 100%, “+” or “-”
Reverb Vol and Polarity : 0 - 100%, “+” or “-”
Phase0° : 0° - 180°
Can be fine adjust GAIN, Frequency and “Q”.
CEN : “CEN” or “SW/C”
Mute : Mute or Unmute
RESET : Reset all EQ
EQ PASS : Pass all EQ
CENTER SCREEN INSTRUCTION
When you touch “CEN”, it becomes “SW/C”,
and the sound of the subwoofer is also
mixed and output from the center output.
GAIN : -24dB - +12dB
Frequency : 19.7Hz - 20060Hz
Q : 0.4 - 128
1
2
2Graphic Equalizer
Can be adjust visually HPF, LPF and GAIN, frequency
and “Q” of 3 band EQ.
1Equalizer and
various values Setting
Equalizer : 3 band
Music Vol and Polarity : 0 - 100%, “+” or “-”
Dir Vol and Polarity : 0 - 100%, “+” or “-”
Echo Vol and Polarity : 0 - 100%, “+” or “-”
Reverb Vol and Polarity : 0 - 100%, “+” or “-”
Can be fine adjust GAIN, Frequency and “Q”.
CloseMicToSUB : “Close” or “OPEN”
Mute : Mute or Unmute
RESET : Reset all EQ
EQ PASS : Pass all EQ
SUBWOOFER SCREEN INSTRUCTION
Can be select whether to output the
microphone sound source from the
subwoofer output.
GAIN : -24dB - +12dB
Frequency : 19.7Hz - 20060Hz
Q : 0.4 - 128
1
2
HPF Freq : OFF - 20060Hz
HPF Slope : Bessele, Butterworth, Link Riley
LPF Freq : 19.7Hz - 20060Hz
LPF Slope : Bessele, Butterworth, Link Riley
2Graphic Equalizer
Can be adjust visually HPF and GAIN, frequency
and “Q” of 7 band EQ.
1Equalizer and
various values Setting
Equalizer : 7 band
Can be fine adjust GAIN, Frequency and “Q”.
RESET : Reset all EQ
EQ PASS : Pass all EQ
MUSIC SCREEN INSTRUCTION
GAIN : -24dB - +12dB
Frequency : 19.7Hz - 20060Hz
Q : 0.4 - 128
1
2
HPF Freq : OFF - 20060Hz
HPF Slope : Bessele, Butterworth, Link Riley
Shift : 10b - 0 - 10#

10
2Graphic Equalizer
1Equalizer and
various values Setting
MIC SCREEN INSTRUCTION
1
2
2Graphic Equalizer
Can be adjust visually HPF, LPF and GAIN, frequency
and “Q” of 3 band EQ.
1Equalizer and
various values Setting
Equalizer : 3 band
Echo Vol and Polarity : 0 - 100%, “+” or “-”
Dir Vol and Polarity : 0 - 100%, “+” or “-”
Echo PreDelay : 0ms - 50ms
Echo RDelay : 0.0ms - 40.0ms
Can be fine adjust GAIN, Frequency and “Q”.
Echo + Rev : “+ Rev” or “+Echo”
Echo A Repeat : 0% - 90%
RESET : Reset all EQ
EQ PASS : Pass all EQ
ECHO SCREEN INSTRUCTION
Can be choose with or without reverb.
“+ Rev” : with Reverb, “+ Echo” : without Reverb
GAIN : -24dB - +12dB
Frequency : 19.7Hz - 20060Hz
Q : 0.4 - 128
1
2
HPF Freq : OFF - 20060Hz
HPF Slope : Bessele, Butterworth, Link Riley
LPF Freq : 19.7Hz - 20060Hz
LPF Slope : Bessele, Butterworth, Link Riley
2Graphic Equalizer
Can be adjust visually HPF and GAIN, frequency
and “Q” of 3 band EQ.
REVERB SCREEN INSTRUCTION
1
2
Can be adjust visually HPF and GAIN,
frequency and “Q” of 7 band EQ.
Equalizer : 7 band
Can be fine adjust GAIN, Frequency and “Q”.
RESET : Reset all EQ
EQ PASS : Pass all EQ
GAIN : -24dB - +12dB
Frequency : 19.7Hz - 20060Hz
Q : 0.4 - 128
HPF Freq : OFF - 20060Hz
HPF Slope : Bessele, Butterworth, Link Riley
MIC_FBX : OFF - 3
Echo A Delay : 0ms - 500ms
Echo B Repeat : 0% - 90%
Echo B Delay : 0ms - 390ms
1Equalizer and
various values Setting
Equalizer : 3 band
Reverb Vol and Polarity : 0 - 100%, “+” or “-”
Dir Vol and Polarity : 0 - 100%, “+” or “-”
Reverb PreDelay : 0ms - 100ms
Reverb Time : 0ms - 5000ms
Can be fine adjust GAIN, Frequency and “Q”.
RESET : Reset all EQ
EQ PASS : Pass all EQ
GAIN : -24dB - +12dB
Frequency : 19.7Hz - 20060Hz
Q : 0.4 - 128
HPF Freq : OFF - 20060Hz
HPF Slope : Bessele, Butterworth, Link Riley
LPF Freq : 19.7Hz - 20060Hz
LPF Slope : Bessele, Butterworth, Link Riley

11
2Sys PassWord
1
SYSTEM SCREEN INSTRUCTION
4
Can be enter the password and log in with
administrator privileges. The administrator can
lock each setting value so that
it cannot be changed.
Music Start : 0 - 100%
12 3
6 5
7
MAX AND INITIAL VOLUME SETTING
Can be set max volume and initial volume.
Mic Start : 0 - 100%
Effect Start : 0 - 100%
Music Max : 0 - 100%
Mic Max: 0 - 100%
Effect Max : 0 - 100%
3Language
Can be choose English or Chinese.
4Hardware Memory
Each setting can be saved in hardware memory
and the saved value can be recalled.
Can be change the name freely.
5Change Password
Can be set a new password. Enter current password first,
then enter new password.
7PC Memory
Each setting can be saved in PC memory
and the saved value can be recalled.
Can be change the name freely and save it in
any folder. The filename extension is “.jib”.
Save Mode Local : Save to PC with the Original name.
Del In Local : Delete the file with that name from PC.
Update To Equip : Copy the settings saved on PC
Memory to hardware Memory.
6Noise Gate
Can be adjust Noise Gate of Music and MIC.
Turn on by checking the check box.
Music Noise Gate Threshold : 0 - 20.
Mic Noise Gate Threshold : 0 - 20.
● Echo volume is minimum.
Without echo. ●Adjust the Echo volume.
Any troubles? please check the followings. Your careless mistakes may cause troubles.
Consult with your dealers in case any troubles can not be solved after checking the followings.
Can not power ON .
●
The power cord is not connected.
●
Connect the power cord to AC outlet.
Power ON, but no sound.
No sound at beginning of the
music when switched ON.
●
Music volume control or Mic. volume control
may be set to minimum position.
● Music signal choice is incorrect.
● The output cords is not connected correctly.
● The power amplifier switch is not ON.
● Output level of audio component is set to
minimum.
● Microphone switch is to "OFF".
● The microphone cord broken.
● Microphone plug is not connected.
No microphone sound but
playback the music sound. ● Set it to "ON".
● Repair or replace it.
● Connect it correctly.
● Adjust it to suitable position.
● Adjust for proper sound position.
● Choose correct music signal input.
● Connect the output cord correctly.
● Turn ON the power amplifier.
Trouble Cause Remedy
ANY TROUBLES?
Wireless microphone can
not switch ON.
●
Receiver volume is set “ Minimum ” position?
●
Obstacle wave is disturbing?
●
Turn up Receiver volume.
●
Set another channel.
● Connect it correctly once again.
● Change HDMI cord to new ones.
● Is a battery included?
● Batteries ran down. ● Please put a battery in.
● Change batteries to new ones.
Noize out of microphone
No sound and no video
at a HDMI connection. ● A connection of a HDMI cord is loose.
● The HDMI cord broken.
SPECIFICATIONS
Wireless Microphone
Modulation Mode
Signal Reception
RF Frequency Range
Switching Bandwidth
Available Channels
Max Working Distance
RF Output Power
Frequency Stability
S/N Ratio
Total Harmonic Distortion
AF Freqency Response
MIC Sensitivity
Receiver Sensitivity
Power supply, Others
Power Voltage
Power consumption
Dimensions (W X H X D)
Weight
Accessories
Owner's manual
Power Cable
Wireless Microphone
Wireless Antena
Bluetooth Antena
Remote Controller
pi/4 DQPSK, digitally modulating
pi/4 DQPSK, digitally receiving
635-695MHz
300 KHz
38 CH (MIC-A: 0 -18 CH,
MIC-B: 21 - 38CH)
30m
10mW
±20ppm
96dB
0.5% (max)
30Hz - 18KHz, ±2dB
-51dBV
-95dBm
AC220V - 240V / 50Hz
800W
430 X 101X 301 mm
10.2 Kg
1
1
(MIC-A, MIC-B) 2
1
1
1
● Design and specifications subject to change without notice.
12
Max output power
Total Harmonic Distortion
S/N Ratio
Speaker Impedance
Audio Input
VOD, DVD
Optical, Bluetooth
MIC Input
MIC-1, MIC-2
MIC-A, MIC-B
Instrument Input
REC Output
Center Output
Sub woofer Output
Frequency response
Microphone
Music
Equalizer
Music
MIC
Center
Subwoofer
Echo
Reverb
Key Control
HDMI Input (HDMI-1, HDMI-2, HDMI-3 )
HDMI ARC
USB Input
350W + 350W /8Ω
500W + 500W /4Ω
0.09% (max)
87dB
4 - 8Ω
320mV
10mV
15mV
190mV
1.6V
1.6V
1.6V
20Hz - 20KHz±3dB
20Hz - 20KHz±3dB
7 band
7 band
3 band
3 band
3 band
3 band
±10 pitch
3 port
1 port
1 port
Min Max
Min Max
MICROPHONE
VOL 1 VOL 2 Min Max
VOL
INSTRUMENT
MP 3
Professional Karaoke AV Amplifier
USB
KEY CONT
12
POWER
Push Enter
Min Max
MASTER VOL
INPUT
FBX
♯
♮
♭
430
301
90
101

● 在使用时
、
如果有冒烟、异味、异音等异常现象发生
、
为避免发生火灾
、
触
电现象等
、
请立即切断本机电源
、
然后拔下AC电源插头。
确认没有再冒烟后
、
到贩卖店进行修理。
●
在使用时如有水或异物等混入机体内
、
首先切断机体电源
、
然后拔下电源插头。请尽快与
经销商
联系
、
进行修理。
●
在未进行维修的状态下使用
、
会引起火灾
、
触
电现象等问题。
●
请勿分解、改装本机器、会引起火灾、
触
电、故障等现象。绝对不可以打开本机器的外壳、会引起
触
电
事故
。内部的检查、
修理等请委托
经销商
。
●
请勿在浴室内使用
、
会引起火灾、
触
电等现象。
●
请防止机器进水或使机器
受潮
、
会引起火灾、
触
电等现象。
●
电源插头不要插入电压(AC220V - AC240V)以外的电源上。有造成火灾、触电的危险。
●
请不要用带有灰尘
、
或带有湿气的插头和插座
、
会引起火灾等现象。
13
22
23
注意
15
18
19
13
13
15
●
旅行等长时间不使用时
、
为了安全请务必拔下
插头
。
●
如近距离内有雷电现象时
、
请拔下电源插头,由于雷电原因,会引起火灾、
触
电、故障等现象。
●
移动时首先
关闭电源开关
、
然后务必拔下电源插头。
●
请勿放置在灶台、加湿器及有油烟、雾气的地方。会引起火灾、
触
电等现象。
●
请勿放置在不安稳的桌上、或倾斜的地方。会容易掉落、翻倒而造成损坏、损伤等现象。
●
请勿放置在紧闭车窗的汽车内、或阳光直射及高温的地方。以免造成零部件的损坏、而引起火灾。
各部分的功能及名称
硬件操作
手机操作
软件操作
安全注意事项
安全注意事项是为了安全正确使用本商品
、
防止给
自己
及他人带来财产损害。
以下用图标的形式加以注明。
请仔细阅读本文。
安全注意事项
各部分的功能及名称
连接方法
目录
故障分析处理
产品规格
警告
无视或误用会有造成人身事故的可能性。
注意 注意
无视或误用会有造成人身伤残
、
或对财产损坏的可能性。
警告
警告
前面板
23
1
11
12
8 7
10
9
65
4
Min Max
Min Max
MICROPHONE
VOL 1 VOL 2 Min Max
VOL
INSTRUMENT
MP 3
Professional Karaoke AV Amplifier
USB
KEY CONT
12
POWER
Push Enter
Min Max
MASTER VOL
INPUT
FBX
♯
♮
♭
1
2
3
4
8
10
11
9
音量调节旋钮
USB
端子
乐器输入端子
单只麦克风音量旋钮
麦克风输入端子
电源开关
升降调
按钮
显示屏
输入切换按键
5
6啸叫抑制按键
乐器音量旋钮
12
USB
输入端子(MP3)
7
音乐、
麦克风、
效果的音量调节。
按一下ON、再按即为OFF
♭
: 降调、
#
: 升调、
♮
: 复原
按此按键的时候会依据BT,USB,HDMI-1,HDMI-2,
HDMI-3, VOD, DVD, OPT, ARC
的顺序切换信号。
电脑连接口。
乐器总音量的调节。
可以插入2支麦克风(MIC 1、MIC 2)
MIC 1、MIC 2、麦克风的音量可以分别调节。

14
1
3
4
5
2
VOD, DVD,
数字光纤
音频信号
输入
端子
录音,中置,超低输出。
只有高清HDMI信号输入时才有中置和超低音输出。
音频信号
输出端子
连接
MIC-A, MIC-B
麦克风输入端子
输入
音量的调节旋钮
麦克风
音量旋钮
6
连接
HDMI-1, HDMI-2, HDMI-3
HDMI 输入
端子
8
HDMI ARC
输出端子
9
7
10
11
4 - 8Ω
音箱端子
连接附属蓝牙天线
蓝牙天线端子
电源线插座
电源电压
AC 220 - 240V / 50Hz
连接附属天线
麦克风天线端子
保险丝
5
12
6
4
3
B
A
CHANNEL
B
A
●
频道的设定方法
1. 将话筒靠近前面板
2.
按动话筒的电源开关,设定频道。
3.
频道将会自动设定。
MIC A: 00 - 18 CH
MIC B: 21 - 39 CH
CHANNEL CHANNEL
4
1
2
3
5
6
显示频道
显示电池电量
LO: 近距离使用
HI: 远距离使用
2节 (UM-3)电池
网头及音头模组
麦克风管体
电池窗
2节 (UM-3)电池
显示屏
电源开关 / 频道设定按键
“HI ”、“LO” 开关
调整电波的强度。
无线麦克风
后背
前面
2
1
9
10
345 6
11 78
MIC INPUT
MIC A
GAIN GAIN
MIC B
HDMI INPUT HDMI ARC
OUTPUT
HDMI 1 HDMI 3
HDMI 2
AUDIO OUTPUT
AUDIO INPUT
L
R
L
R
OPTICAL
REC CENTER
SUB W
R L
SPEAKER
FUSE 5A 250V AC
AC IN
AC 220V-240V / 50Hz
SERIAL NO.
WIRELESS MIC
ANT
Bluetooth
ANT
JAPAN
TO REDUCE THE RISK OF FIRE OR ELECTRIC
SHOCK. DO NOT EXPOSE THIS APPLIANCE TO
RAIN OR MOISTURE
WARNING
RISK OF ELECTRIC SHOCK
DO NOT OPEN
CAUTION
VOD DVD
QR CODE
PROFESSIONAL KARAOKE AV AMPLIFIER
BDA-X35
AC240V/50Hz 800W
后背板

15
连接方法
硬件操作
主界面
1
2
3
4
5
6
1
3
4
5
2
静音设置
到
系統
界面
音量设置
当无线麦克风连接成功时,灯亮。
无线麦克风指示灯
6
到
输入选择
界面
到效果
选择
界面
: 无静音 : 静音
音乐,话筒音量大小调节,音效大小调节。
♮
♭
♯
DVD OPTICAL ARC
MP3/BT HDMI
VOD
INPUT
MODE MUTE
MUSIC VOL
REMOTE CONTROLLER
FBX
EFF VOL MIC VOL
4啸叫抑制
1音效模式
9
播放控制
:
上一曲
:
播放/暂停
:
下一曲
2静音
3
切换音源输入
6
音乐音量调节
8♭:
降调
# :
升调
♮:
复原
声调调节
MP3/BT、HDMI、VOD、DVD
OPTICAL、ARC。
5
效果
音量调节
2
4
3
8
9
5
6
1
7
7
麦克风音量调节
TVHDMI
MIC INPUT
MIC A
GAIN GAIN
MIC B
HDMI INPUT HDMI ARC
OUTPUT
HDMI 1 HDMI 3
HDMI 2
AUDIO OUTPUT
AUDIO INPUT
L
R
L
R
OPTICAL
REC CENTER
SUB W
R L
SPEAKER
FUSE 5A 250V AC
AC IN
AC 220V-240V / 50Hz
SERIAL NO.
WIRELESS MIC
ANT
Bluetooth
ANT
JAPAN
TO REDUCE THE RISK OF FIRE OR ELECTRIC
SHOCK. DO NOT EXPOSE THIS APPLIANCE TO
RAIN OR MOISTURE
WARNING
RISK OF ELECTRIC SHOCK
DO NOT OPEN
CAUTION
VOD DVD
QR CODE
PROFESSIONAL KARAOKE AV AMPLIFIER
BDA-X35
AC240V/50Hz 800W
麦克风
麦克风天线 蓝牙天线
DVD
VOD
右音箱 左音箱
录音机
超低音
音箱
数字输出播放器
(光纤)
中置音箱
遥控器

16
模式
选择界面
1
3
2
选择模式
到
输入选择屏幕
被选择的模式显示绿色边框。
长按各模式进入其相应的详细模式菜单。
到主屏幕
1
2
3
模式菜单
1
4
3
到
音乐图形均衡器
到
效果菜单
返回
4
1
2
3
2
到
麦克风图形均衡器
USB(MP3)输入界面
1
2
播放列表
显示文件与歌曲的名称,
通过上下按键选择要播放的歌曲。
歌曲的播放时间
1
2
可以操作播放,停止,下一首,上一首歌曲。
输入选择界面
2
1
4
1
3
2
当设定ON时,当音量达到设定数值
主屏幕会切换显示频谱图。
频谱设定开关
输入选择
到效果
选择
界面
选定的输入窗口变为绿色。
34
到主界面
17
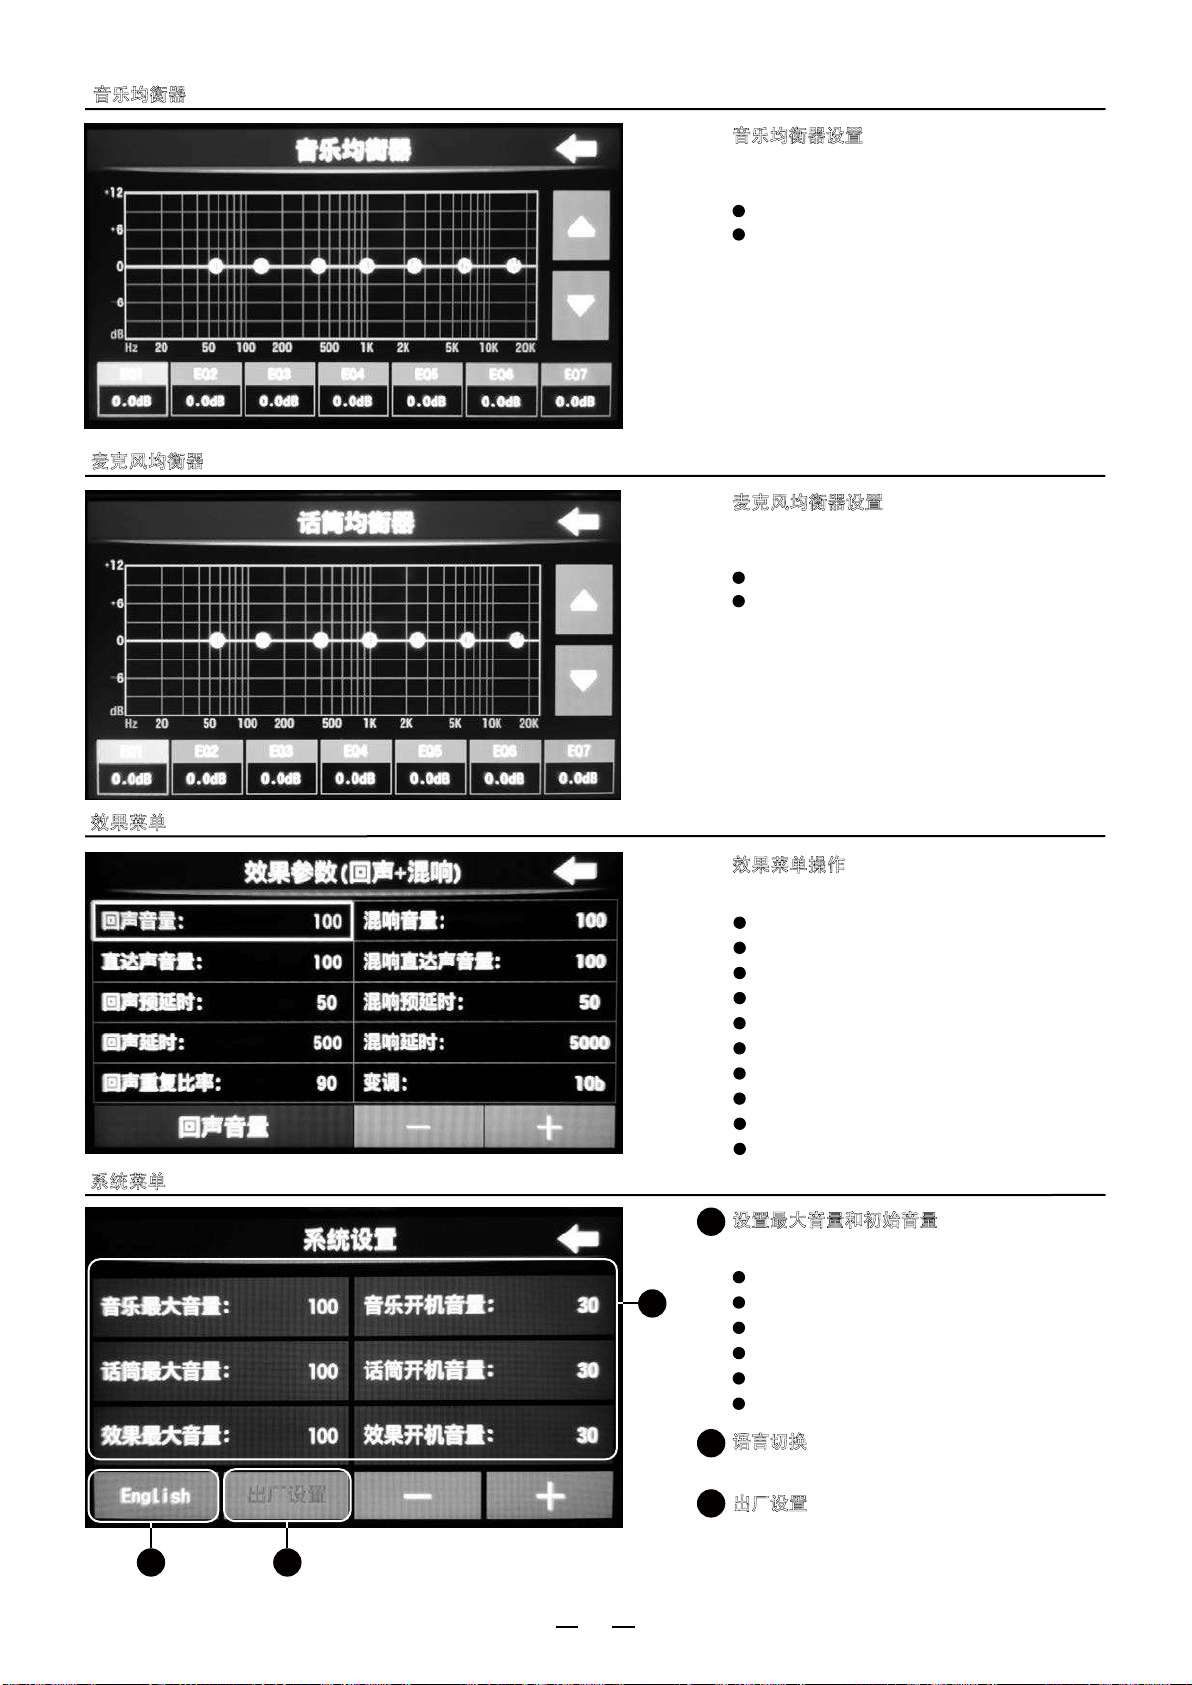
系统菜单
1
1设置最大音量和初始音量
选择要设定的项目,用+和-按钮调整。
音乐最大音量
: 0 - 100
话筒最大音量
: 0 - 100
效果最大音量
: 0 - 100
音乐开机音量
: 0 - 100
话筒开机音量
: 0 - 100
效果开机音量
: 0 - 100
2 3
2语言切换
3
可以切换英文和中文。
出厂设置
恢复到出厂设置。
麦克风均衡器
麦克风均衡器
设置
选择要设定的频带。
用上下按钮调整增益。
效果菜单
效果菜单操作
选择要设定的项目,用+和-按钮调整。
频段
: 1 - 7
增益
: -20dB - +12dB
回声音量 : 0 - 100
直达声音量
: 0 - 100
回声预延时
: 0 - 50
回声延时
: 0 - 500
回声重复比率
: 0 - 90
混响音量
: 0 - 100
混响直达声音量
: 0 - 100
混响预延时
: 0 - 50
混响延时
: 0 - 5000
変调
: 10b - 10#
音乐均衡器
音乐均衡器
设置
选择要设定的频带。
用上下按钮调整增益。
频段
: 1 - 7
增益
: -20dB - +12dB

18
手机操作
1. 请使用微信应用小程序。软件请从BIK的主页下载。
2. 请按主界面的 连接蓝牙。
3. 各种设置功能都可以使用此软件直接进行。
1
2
3
4
5
6
9
10
7
8
11
13
12
1蓝牙连接显示
连接手机和BDA-X35+。连接成功时显示绿色。
2输入选择
3
音量设置
4选择模式
可以在各模式下调整各种设置。
5选择模式菜单
6均衡器
可以调整7波段EQ的增益、频率和Q值。
7EQ 复位 ( 直通 )
8过滤器和效果设置
可以调整HPF和LPF的效果。
9重置均衡器设置值
10 微调
可以
微
调整7波段EQ的增益、频率和Q值。
11 设置最大音量和初始音量
12 硬件存储器
保存设置的效果。可以保存8种效果。
13 出厂设置
1
从VOD,DVD,OPT,BT,HDMI 1,HDMI 2,HDMI 3,
ARC和MP3中选择输入信号。
通过转动屏幕的音量旋钮可以调整音量。
可以调整音乐、麦克风、回声、混响、系统设置。
点击按钮后显示各个画面。
GAIN : -24dB - +12dB
Frequency : 10.5Hz - 20060Hz
Q : 0.4 - 128
Music Start : 0 - 100
Mic Start : 0 - 100
Effect Start : 0 - 100
Music Max : 0 - 100
Mic Max: 0 - 100
Effect Max : 0 - 100
Echo Vol and Polarity : 0 - 100%, “+” or “-”
Echo DelayTime : 0 - 500ms
Echo RepeatRatio : 0 - 90%
Reverb Vol : 0 - 100
Reverb Direct Vol : 0 - 100
Reverb PreDelay : 0 - 50
Reverb Time : 0 - 5000
Pitch : 10b - 10#
Dir Vol : 0 - 100%, “+” or “-”
Echo PreDelay : 0ms - 50ms
Echo RDelay : 0.0ms - 40.0ms
Music : 0 - 100
Mic : 0 - 100
Effect : 0 - 100

19
软件操作
1. BDA-X35+ 的调试软件请在BIK官方网站下载。
2. 用USB连接线连接。电脑和BDA-X35+自动连接。
1电脑连接显示
连接电脑和BDA-X35+。连接成功时显示绿色。
2系統菜单
3
音量设置
4
输入选择
音乐、
麦克风、
效果的音量调节。
按扬声器图标即变为静音。
5图形均衡器
三个带均衡器的HPF和GAIN、频率和Q值可以调节。
6调整配置均衡器和各种项目
※URL: https://www.bik-audio.com/product/bda-x35plus/
电脑
USB电缆
3. 连接后电脑软件画面显示“连接成功”。点击“连接成功”后解除连接。
1
3
2
4
6
5
可调整所选模式菜单的各种数值。
从VOD,DVD,OPT,BT,HDMI 1,HDMI 2,HDMI 3,
ARC和MP3中选择输入信号。
: 无静音 : 静音
♪
频段
: 3
音乐音量
,极性 : 0 - 100%, “+” or “-”
直达声音量
,极性 : 0 - 100%, “+” or “-”
回声效果音量,极性 : 0 - 100%, “+” or “-”
混响效果音量
,极性 : 0 - 100%, “+” or “-”
左声道延时
: 0.0 - 20.0ms
可以调整3波段EQ的增益、频率和Q值。
右声道延时
: 0.0 - 20.0ms
高通 : OFF - 20060Hz
高通濾波器斜率 : Bessele, Butterworth, Link Riley
左, 右声道
: 无静音 - 静音
RESET : Reset all EQ
EQ PASS : Pass all EQ
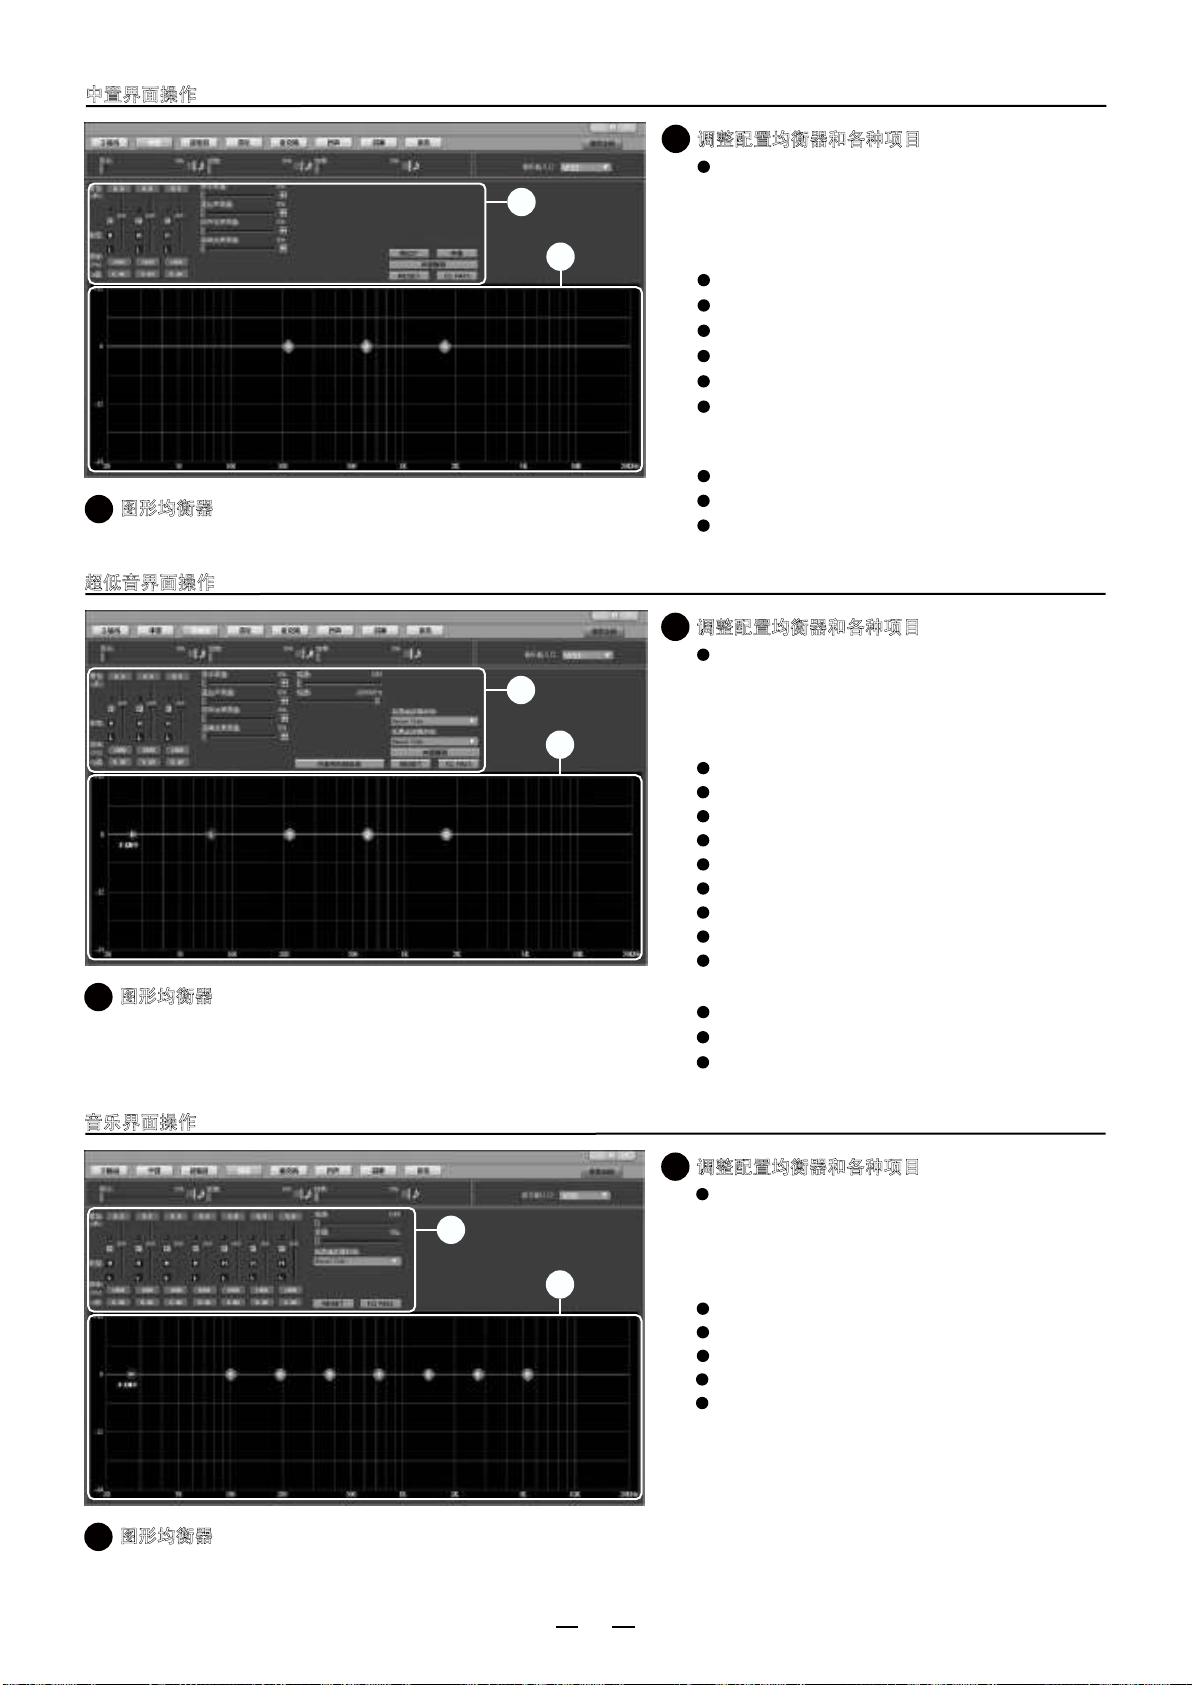
主界面操作
增益
: -24dB - +12dB
频率 : 19.7Hz - 20060Hz
Q : 0.4 - 128
Min Max
Min Max
MICROPHONE
VOL 1 VOL 2 Min Max
VOL
INSTRUMENT
MP 3
Professional Karaoke AV Amplifier
USB
KEY CONT
12
POWER
Push Enter
Min Max
MASTER VOL
INPUT
FBX
♯
♮
♭
音乐
: 0 - 100
话筒
: 0 - 100
效果
: 0 - 100
20
2图形均衡器
三个带均衡器的HPF和GAIN、频率和Q值可以调节。
1调整配置均衡器和各种项目
频段
: 3
音乐音量
,极性 : 0 - 100%, “+” or “-”
直达声音量
,极性 : 0 - 100%, “+” or “-”
回声效果音量 : 0 - 100%, “+” or “-”
混响效果音量
: 0 - 100%, “+” or “-”
相位0° : 0° - 180°
可以调整3波段EQ的增益、频率和Q值。
中置 : “中置” or “低音中置”
声道静音 : 无静音 - 静音
RESET : Reset all EQ
EQ PASS : Pass all EQ
中置界面操作
按“中置”按钮时,即设置为“低音中置”,
低音输出和中置输出混合在一起输出。
增益
: -24dB - +12dB
频率 : 19.7Hz - 20060Hz
Q : 0.4 - 128
1
2
2图形均衡器
三个带均衡器的HPF和GAIN、频率和Q值可以调节。
1调整配置均衡器和各种项目
频段
: 3
音乐音量
,极性 : 0 - 100%, “+” or “-”
直达声音量
,极性 : 0 - 100%, “+” or “-”
回声效果音量 : 0 - 100%, “+” or “-”
混响效果音量
: 0 - 100%, “+” or “-”
可以调整3波段EQ的增益、频率和Q值。
无麦克风
到低音 : “
无
” or “开”
声道静音 : 无静音 - 静音
RESET : Reset all EQ
EQ PASS : Pass all EQ
超低音界面操作
从低音输出中选择是否输出麦克风声音。
增益
: -24dB - +12dB
频率 : 19.7Hz - 20060Hz
Q : 0.4 - 128
1
2
高通 : OFF - 20060Hz
高通濾波器斜率 : Bessele, Butterworth, Link Riley
低通 : 19.7Hz - 20060Hz
低通濾波器斜率 : Bessele, Butterworth, Link Riley
2图形均衡器
七个带均衡器的HPF和GAIN、频率和Q值可以调节。
1调整配置均衡器和各种项目
频段
: 7
可以调整7波段EQ的增益、频率和Q值。
RESET : Reset all EQ
EQ PASS : Pass all EQ
音乐界面操作
增益
: -24dB - +12dB
频率 : 19.7Hz - 20060Hz
Q : 0.4 - 128
1
2
高通 : OFF - 20060Hz
高通濾波器斜率 : Bessele, Butterworth, Link Riley
変调
: 10b - 0 - 10#
This manual suits for next models
1
Table of contents


