Bikefit BiSaddle ShapeShifter EXT User manual

Install the BiSaddle and lightly tighten your seatpost bolts,
while still allowing for some movement and adjustments (do
NOT sit on the saddle or ride the bike yet).
6.
STEP
Installing the Fully Adjusted BiSaddle onYour Bike
www.BikeFit.com
Instructions for Use
BiSaddle ShapeShifter EXT - BikeFit Edition
Part# 8050201-5
Form# 0050201
Toll Free 855-813-3233
Kirkland, WA 98034 • USA
You can adjust the shape of BiSaddle to custom fit your body and riding style. And, if your riding style or body
shape change, you can simply re-adjust for ultimate comfort.
BiSaddle Shapeshifter is the world’s only adjustable shape saddle. (PATENTED)
All components are replaceable making it the last saddle you’ll ever need to buy.
The split-saddle design can change it’s width, angle and profile (flatness) to fit your unique body shape, riding
position and riding style.
The perfect BiSaddle shape eliminates pain, numbness, discomfort and genital injury!
FEATURES:
• Adjustable Width 130 - 185mm
• Saddle weight varies from 275 g to 340 g based upon your frame selection
• UCI compliant race length (243mm long)
• Ultra sleek stealth black
• Takes pressure off your unmentionables
• Helps you ride faster, further
To set the fore-aft adjustment, replicate your old
measurement from the widest point of the saddle to the
center of the stem clamp:
To set the height, simply replicate the height you measured on your old saddle.You may also want to adjust the tilt
of the saddle top. We suggest starting with the top of the saddle flat, or slightly tilted downwards.
DOUBLE CHECK THAT ALL BOLTS ARE TIGHTENED PROPERLY BEFORE RIDING YOUR BIKE!
Bring the necessary wrenches on your first few rides, as some small tweaks may be necessary to get the position
100% dialed in. Often times a small adjustment in height, tilt, or fore-aft can make a big difference in comfort.
Also feel free to experiment with the saddle width, always making sure to carefully adjust it and properly tighten
the bolts before riding again.
Always let comfort be your guide!
Installing
Profile Wedges
5.
STEP
To install the wedges, remove the four
bolts from the bottom of the saddle.
NOTE:The REAR bolts are slightly longer
than the front bolts.
Place the wedge on the saddle frame,
ensuring that it is properly aligned.
Press down so alignment knobs can
engage frame.
Press down on rear of wedge to snap into
frame.
The tabs will align to the groove in the cut
out of the saddle frame.
Replace the bolts and washers. Use the
longest set in the back and the mid length set
on the front.Your shortest set will be left over
when using wedges. Adjust as needed.
MAX torque 25 in/lbs or 2.8 NM
Please consider your local
BikeFit Pro for help with finding
your saddle settings.
US Patent # 10,118,658, 6,209,954.
Additional patents pending
Made in the USA
There are no absolute rules that dictate who should use wedges. In general, people with good flexibility and forward hip rotation
tend to prefer a flatter saddle. People who aren’t as flexible and/or to struggle with saddle sores tend to prefer a more rounded
saddle. We suggest you start with no wedges, and add them if you run in to a specific problem.
Register your saddle online at:
bisaddle.com/register
FIND INSTRUCTIONS ONLINE:
https://blog.bikefit.com/instructions
Setting Up Saddle Width
Every BiSaddle ShapeShifter leaves our factory with a neutral position
that works well for a variety of people (approximately 53mm front width,
145mm rear width). If you’re new to BiSaddle and not sure what you want or need,
try this setting first. If you have experience with another saddle and know of specific
measurements that you’d like, feel free to adjust to those settings.
In general, most people prefer a rear width of the saddle that’s equal or
slightly greater (1cm –4cm) than their sit bones for comfort and support.
Rear width adjustment range: 130 – 185mm.
The front width of your BiSaddle is largely up to personal preference. A wider
front typically results in better blood flow and/or reduction of genital numbness.
If it’s too wide, however, it can cause rubbing or chafing of your inner thighs. We
suggest that you set the front of the seat as wide as possible without chafing.
You can check the width of your saddle using a tape measure or Vernier caliper.
Front width adjustment range: 40 – 75mm.
Please consider your local BikeFit Pro for help with finding your saddle settings.
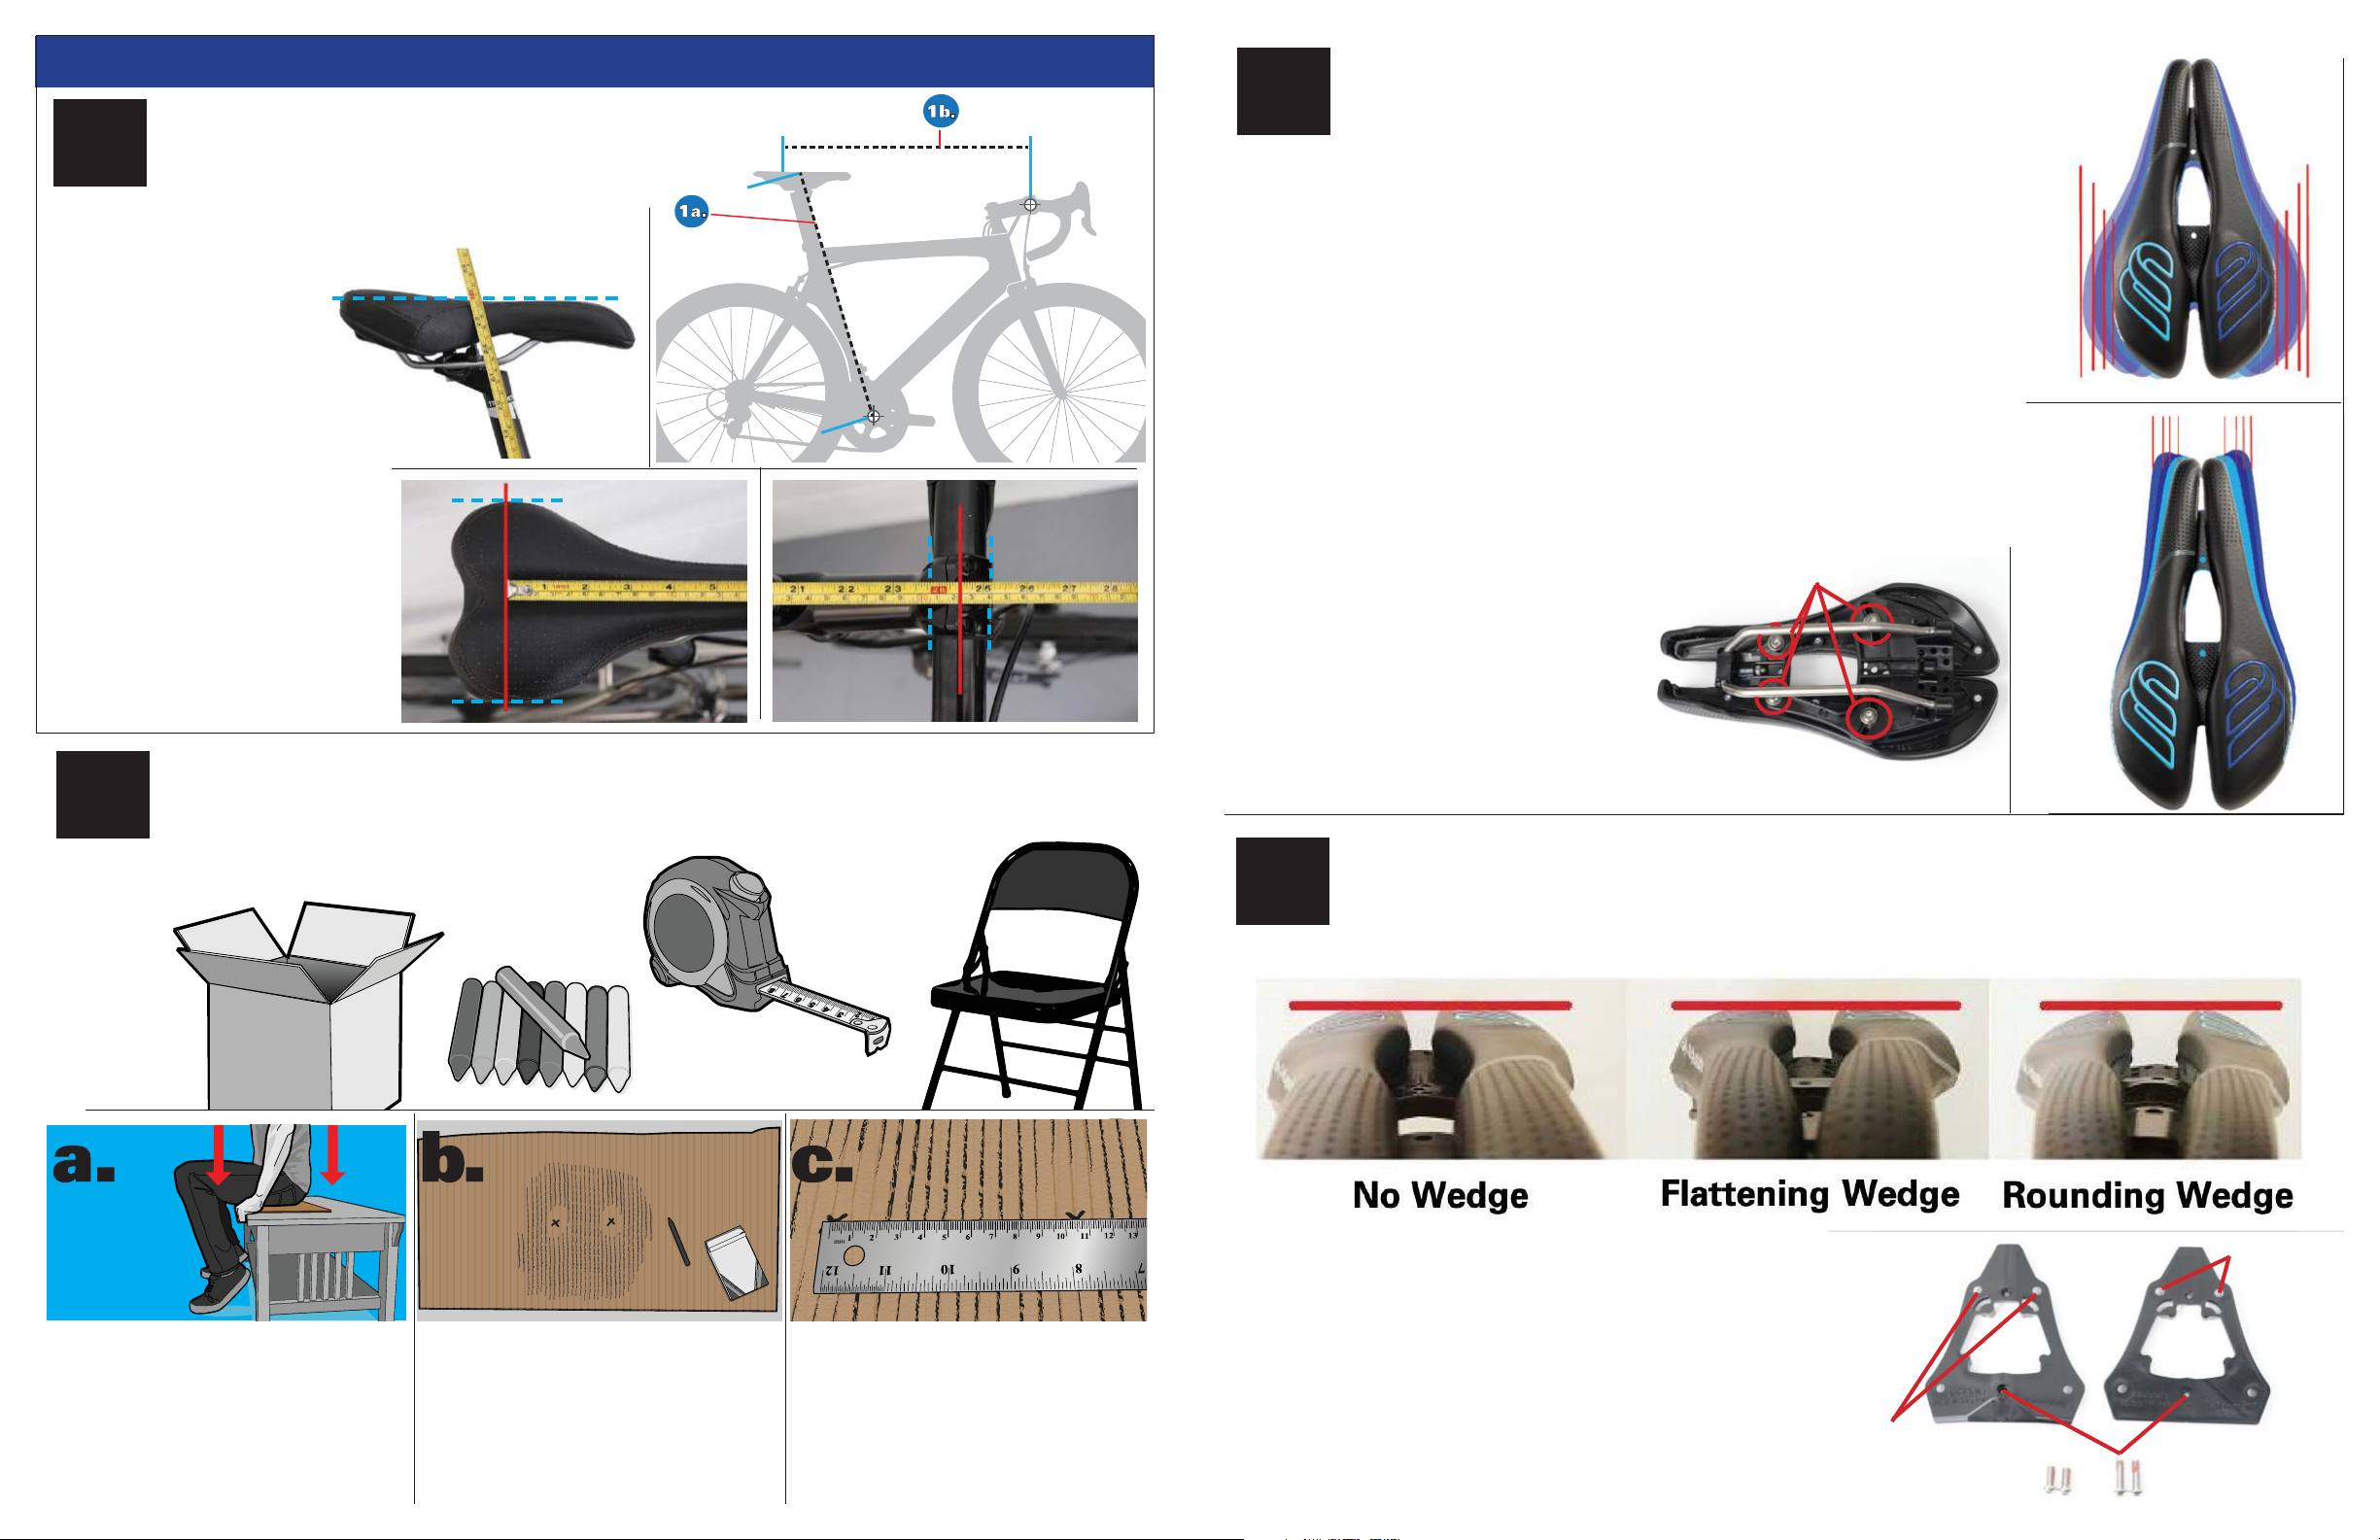
1.
STEP
Installing BiSaddle toYour Bike
Before removing your old saddle, be sure to record two measurements:
1a.) saddle height
(from the top of the saddle to the
center of the bottom bracket):
2.
STEP
Using Profile Wedges
Your BiSaddle ShapeShifter includes two sets of angled proflie wedges.These can be installed between the
base of the saddle and the two seating pads, to change the shape across the saddle top – making it either
more flat, or more rounded.
1b.) saddle (widest portion)
to the handlebars (center):
Record these two measure-
ments and remove your old
saddle. These points will be
used for installing the BiSaddle.
Before installation ensure
that your seat post is in good,
safe condition, and is free of
any grease on the clamp area
that contacts the saddle rails.
Follow all seat post manufac-
turers’ instructions and bolt
torque specifications.
Rear width
adjustment
Front width
adjustment
saddle
height
close-up
view
saddle width
close-up view
center of
handlebar
close-up
view
MeasureYour Sit Bones
Obtaining a width measurement for your sit bones (ischial tuberosities) can be useful for establishing a rear saddle
width. Most bicycle shops have tools to measure your sit bones, but you can also get a measurement at home using
very simple tools and just a few minutes of your time.
Tools
Needed:
cardboard
crayons
or chalk
ruler or
tape measure
hard, flat
sitting
surface
Place a piece of clean cardboard on
to a hard surface. While sitting pull
yourself firmly down on to it. This
will leave impressions of your sit
bones in the cardboard.
Be sure to sit upright and do not wear
thick padded clothing.
Use a dark colored crayon to rub across
the surface of the cardboard (using the
side of the crayon with paper sleeve
removed) – this will reveal your sit bone
indentations.
Mark the center of each indentation.
Use a ruler or tape measure to determine
the distance (in millimeters) between
the center of the sit bones.
Most people add 1 to 4 cm (10 – 40mm)
to this width to set the rear saddle width.
To adjust the BiSaddle width, simply
loosen (but don’t remove) the bottom bolts
using the supplied Allen wrench. Adjust
the seating pads to your desired width,
and begin to tighten the bolts slowly.
We encourage you to double check that
both sides are adjusted correctly several
times before fully tightening the bolts.
MAX bolt torque is 25 inch/lb or 2.8NM.
TORQUE SPECS: Carbon Rails: 6-10 Nm,
6-8 for 2-bolt, 9-10 for single bolt
Bottom bolt
locations
3.
STEP
4.
STEP
Rounding
Wedge
Flattening
Wedge
Longer screws are required for the wedges and are included in
the wedge kit.
The Flattening and Rounding Wedge will require (2) 20mm rear screws. The
Flattening Wedge will use (2) 16mm screws (original rear screws) for front
and the Rounding wedge will use (2) 14mm screws for the front.
*Wedges will slightly reduce the amount of front adjustability.
See the next step for Wedge Installation. (2) 20mm Screws for
Rear (Round & Flat)
(2) 16mm for
Front Flat
(2) 14mm Screws
for Front Rounding
Wedge Only
Other Bikefit Bicycle Accessories manuals

Popular Bicycle Accessories manuals by other brands


Specialized
Specialized Elite CylcoComputer user manual

Sigma
Sigma BC 16.16 manual

Playcore
Playcore Dero Setbacks installation instructions

VDO Cyclecomputing
VDO Cyclecomputing x3dw instruction manual

Cateye
Cateye RAPID X2 manual

buratti meccanica
buratti meccanica Clorofilla Trail Use and maintenance manual


