Bild CellarPro 800 WINE ROOM User manual

BILD 800 WINE ROOM
Owner’s Manual

B I L D W I N E C A B I N E T S
-2-
T A B L E O F C O N T E N T S
I. Important Notes……………..……………………………………. 3
II. Delivery and Inspection …………………………………………. 4
III. Wine Room Assembly Instructions……………………………. 5
IV. Placement of Your Wine Room…………..……………………. 28
V. Wine Room Set-Up Instructions…………………………………. 29
VI. Cooling Unit Operating Instructions… ………………………... 30
VII. Bottle Storage Tips……………………………………...…………. 37
VIII. Maintenance Instructions……………………………………….. 38
IX. Troubleshooting Guide………………………..…………………. 39
X. Limited Warranty………………………………..…………………. 41
XI. Contact Information……………………………………………… 42
DON’T FORGET TO REGISTER YOUR WARRANTY AT:
www.lecache.com/register-lc
To register, you’ll need your 7-digit serial number, which you can find on
the white label that is located on the left side of the cooling unit.

B I L D W I N E C A B I N E T S
-3-
I. I M P O R T A N T N O T E S
•WHEN TAKING DELIVERY OF YOUR WINE ROOM, FOLLOW THE INSPECTION
PROCEDURES DESCRIBED IN CHAPTER II.
•YOU MAY PLUG IN THE COOLING UNIT AT TIME OF DELIVERY TO TEST THAT IT
WORKS. ONCE TESTED, WE RECOMMEND SWITCHNG “OFF” THE COOLING
UNIT AND WAITING FOR 24 HOURS BEFORE NORMAL OPERATION.
•THE COOLING UNIT SHOULD BE PLUGGED INTO AN OUTLET CONNECTED TO A
DEDICATED 15-AMP CIRCUIT
•IF THE WALL OUTLET IS DIRECTLY BEHIND THE WINE CABINET, USE AN EXTENSION
CORD (GROUNDED; 14 GAUGE OR THICKER) AND COIL THE EXCESS AT THE
TOP OF THE CABINET SO THAT YOU WON’T NEED TO MOVE THE WINE CABINET
IN THE EVENT THAT THE COOLING UNIT NEEDS TO BE REPLACED.
•WE RECOMMEND PLUGGING THE COOLING UNIT INTO A SURGE PROTECTOR
(MINIMUM OF 15-AMPS) TO PROTECT THE ELECTRICAL COMPONENTS FROM
POWER SURGES OR SPIKES.
•THE COOLING UNIT SHOULD BE “OFF” WHEN LOADING LARGE QUANTITIES OF
BOTTLES. IF THE COOLING UNIT RUNS WHILE THE DOOR IS OPEN, IT WILL CAUSE
EXCESS CONDENSATION, LEAKING AND A REDUCTION IN COOLING POWER.
P L E A S E N O T E!
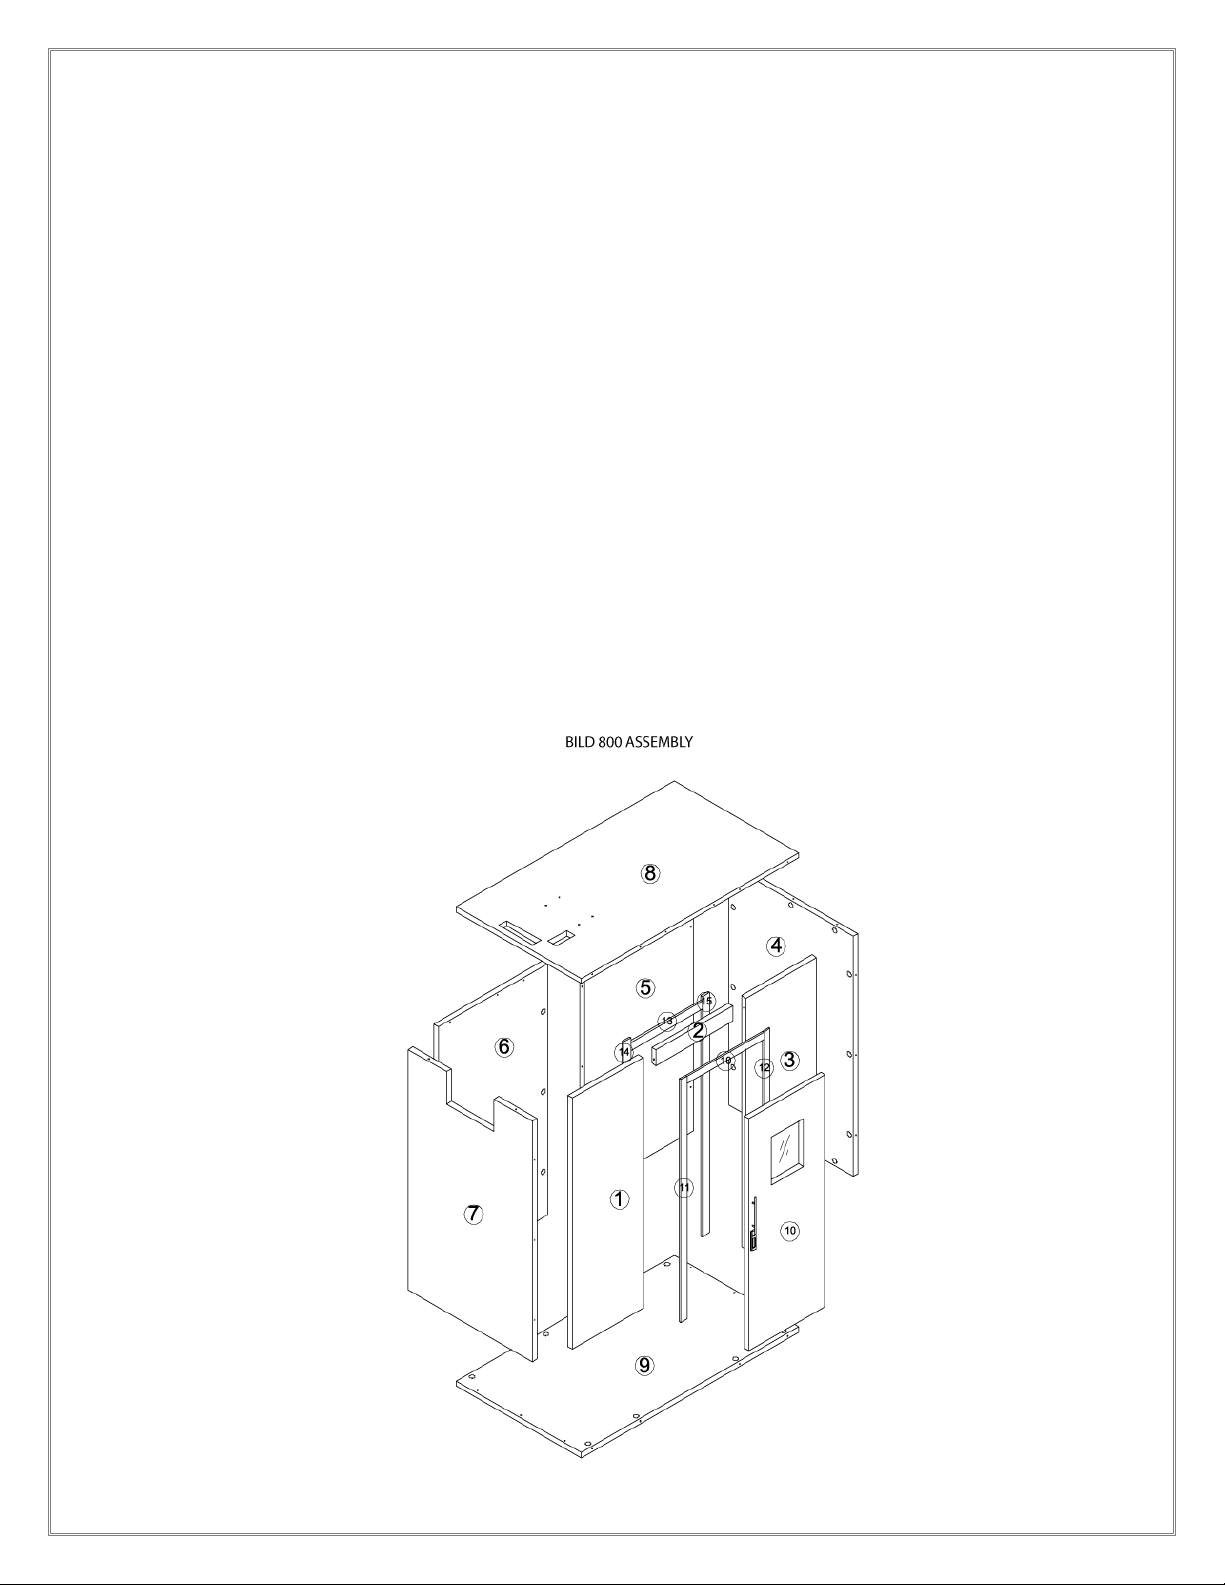
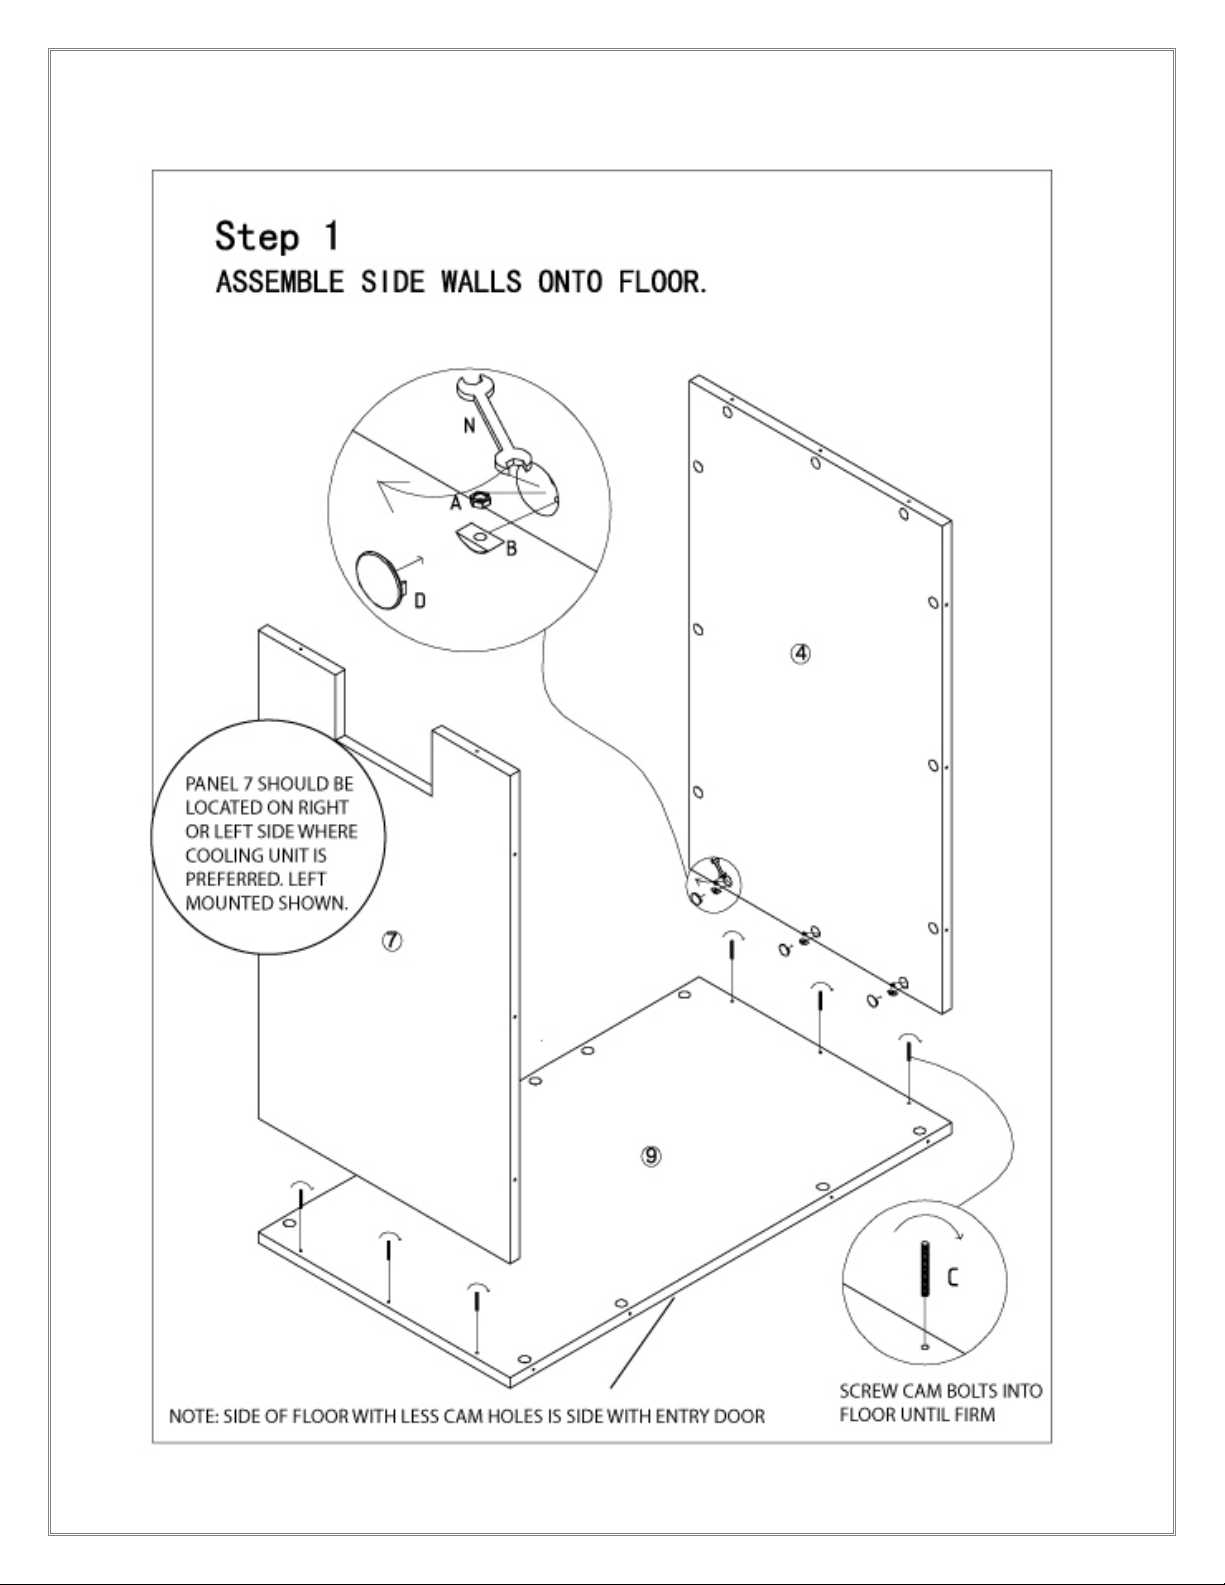
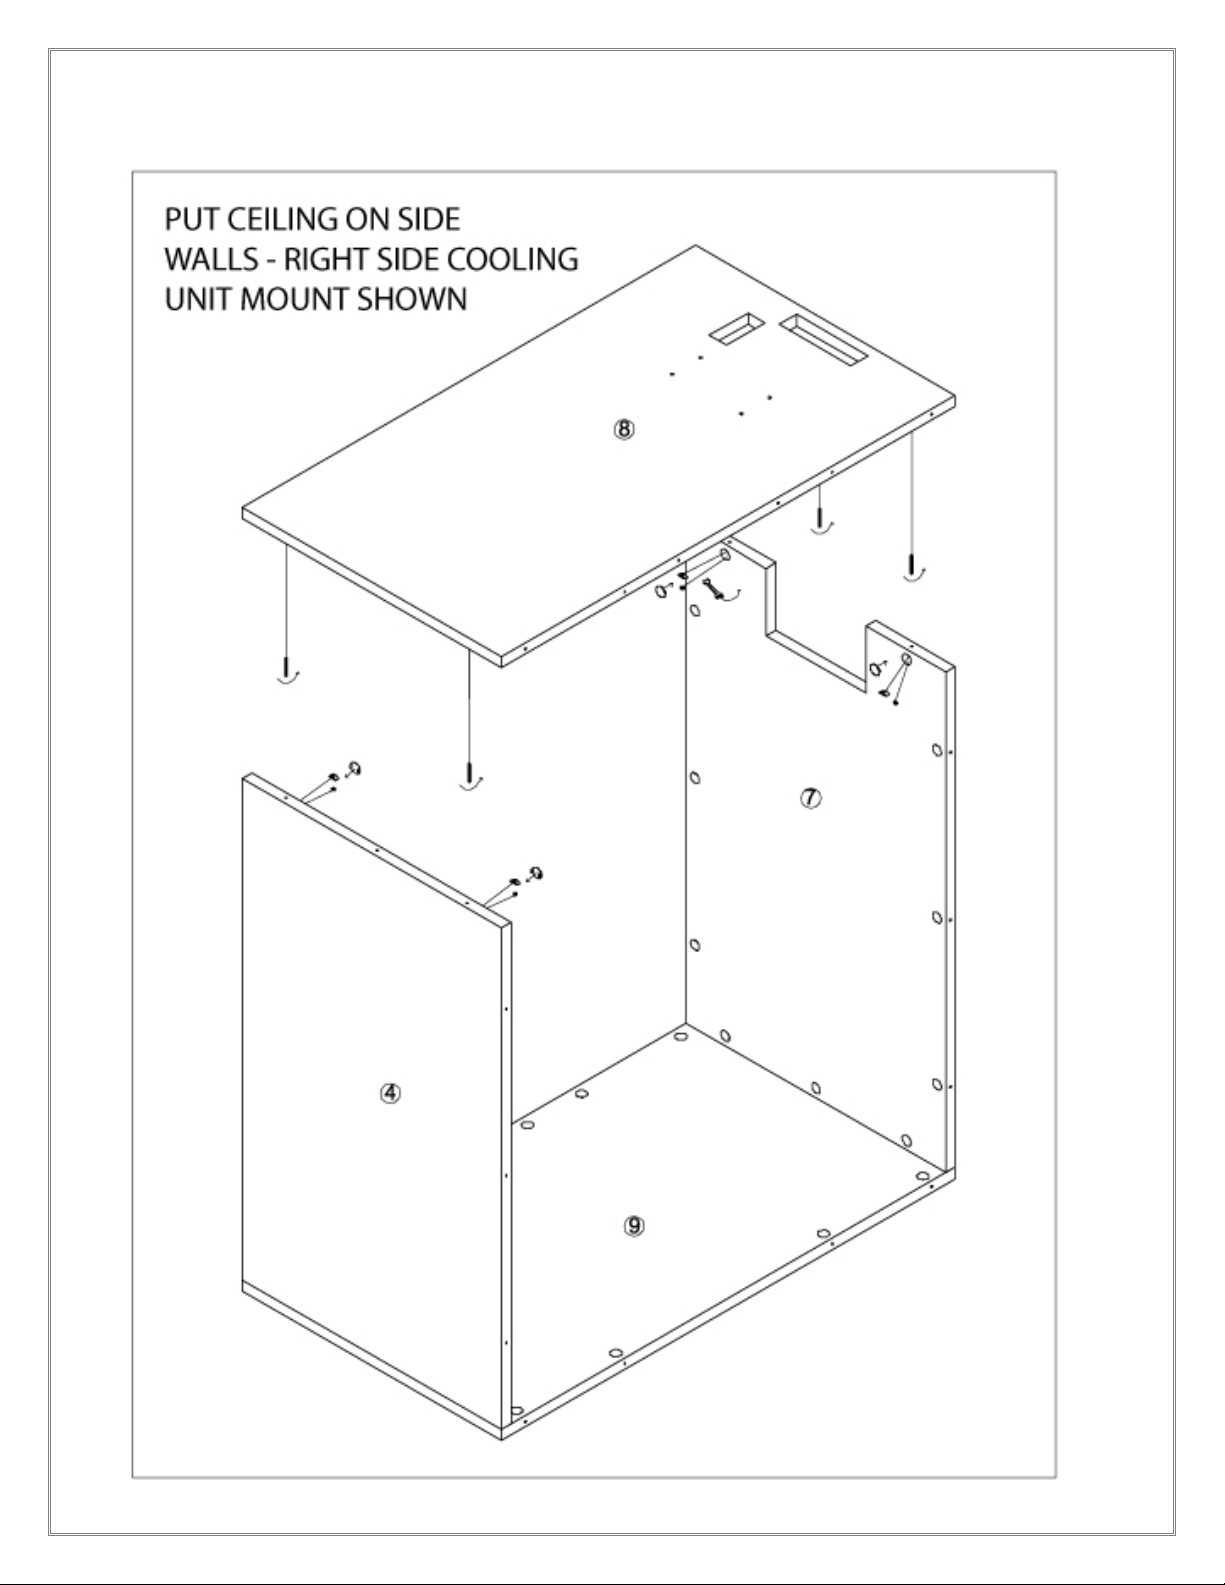
When assembling this unit the components are large and difficult to handle due
to the size and weight. BE CAREFUL WHEN HANDLING AND POSITIONING THE
COMPONENTS.

B I L D W I N E C A B I N E T S
-4-
II. D E L I V E R Y A N D I N S P E C T I O N
The BILD line is a ready to assemble unit that is shipped with multiple boxes enclosed
in an outer layer of packaging for the cabinet and a separate box for the cooling
unit. The boxes are strapped to a wooden pallet and shipped by LTL carrier with
curbside delivery.
In the event of freight damage, it is critically important that you follow each and
every one of the following procedures in the sequence described below.
1. INSPECT THE PACKAGING BEFORE UNPACKING THE BOXES
•The boxes should arrive stacked on a pallet and be strapped together.
•The packaging shouldn’t have any tears, holes, marks or other damage.
2. IF YOU FIND DAMAGE TO THE BOXES:
a. Describe the damage on the bill of lading.Be detailed and descriptive.
b. Call Le Cache at 1.877.532.2243 before the delivery men leave
c. Save a copy of all freight documents, including the bill of lading with your
comment, making sure that everything is legible on your copy
FAILURE TO FOLLOW THESE INSTRUCTIONS MAY RESULT IN A DENIED INSURANCE
CLAIM AND/OR BILLING(S) FOR REPAIRS OR RETURNED MERCHANDISE.

B I L D W I N E C A B I N E T S
-5-
III. A S S E M B L Y I N S T R U C T I O N S
The following diagrams provide a step-by-step procedure to assemble the wine
room. When undertaking this process the following tips should be employed:
-A set of basic hand tools – screwdrivers and a small set of wrenches – will be
helpful, as well as a rubber mallet.
-A second and possibly a third helper will be important when moving the
panels, as they are quite heavy
-A large clean, padded area for laying out the pieces and raising assembled
pieces
-Make sure the unit can be moved into its final location from the assembly
area
-Ensure the door seals well before moving on to next steps as this is a critical
point

B I L D W I N E C A B I N E T S
-6-

B I L D W I N E C A B I N E T S
-7-

B I L D W I N E C A B I N E T S
-8-
THIS TASK REQUIRES AT LEAST
TWO PEOPLE AND IDEALLY
THREE TO STEADY THE PANEL
AND ONE TO LOCATE THE
HOLES WHILE ON A STEP
LADDER
NOTE: LEFT SIDE COOLING UNIT SHOWN ABOVE

B I L D W I N E C A B I N E T S
-9-

B I L D W I N E C A B I N E T S
-10-

B I L D W I N E C A B I N E T S
-11-

B I L D W I N E C A B I N E T S
-12-

B I L D W I N E C A B I N E T S
-13-

B I L D W I N E C A B I N E T S
-14-

B I L D W I N E C A B I N E T S
-15-

B I L D W I N E C A B I N E T S
-16-
LIGHT CAN BE PLACED WHERE
DESIRED. IT PLUGS INTO
RECEPTACLE ON COOLING
UNIT.

B I L D W I N E C A B I N E T S
-17-
TOP VENTED INSTALLATION
REAR VENTED INSTALLATION– SIDE VIEW OF UNIT
TIPS:
-MOUNTING CLIPS FOR COOLING UNIT CAN BE
PLACED IN HOUSING BY REMOVING GRILL. BOLTS
SCREW INTO CEILING INSERTS.
-COOLING UNIT CAN BE TOP VENTED - USE 1ST ROW
OF HOLES IN CEILING. FOR REAR VENTING USE
SECOND ROW OF HOLES.
-TOP VENTING ALLOWS WINE ROOM WALL WITH
COOLING UNIT BE 2-3 INCHES AWAY FROM AN
ADJACENT WALL.
-USE THE CAULK PROVIDED TO SEAL ANY JOINTS
ON THE INSIDE OF THE CELLAR THAT MIGHT NOT
BE AIR TIGHT.
-USE SADDLE PROVIDED IF COOLING UNIT TOP-
VENTED.
-SADDLE NEEDS TO LINE UP WITH OPENING IN WALL
– REGARDLESS OF PILOT HOLES.
-REAR VENTING OF COOLING UNIT REQUIRES 4
INCHES CLEARANCE ON SIDE.
-PLACE SUPPLIED FOAM IN SADDLE WHEN
TOP-VENTED.
-USE BUTYL TAPE TO SEAL ALL CONTACT POINTS
AROUND THE COOLING UNIT.

B I L D W I N E C A B I N E T S
-18-

B I L D W I N E C A B I N E T S
-19-

B I L D W I N E C A B I N E T S
-20-
Table of contents
Other Bild Wine Cooler manuals