Billet Specialties Tru Trac 13225 User manual

SMALL BLOCK CHEVROLET
Installation Manual
For Systems without A/C
#13225 / #13125
Billet Specialties, Inc.
500 Shawmut Ave. • La Grange, IL 60526
Tech (708) 588-0505 • Fax (708) 588-7181

www.billetspecialties.com • Tech Line 708.588.0505
2
Small Block Chevrolet Tru Trac - 13225 / 13125 3
Required Tools & Materials
PLEASE READ ALL INSTRUCTIONS BEFORE INSTALLING ANY
COMPONENTS OF THE TRU TRAC SERPENTINE SYSTEM
Anti-seize Compound
LocTite 272 Thread Locker
RTV Silicone
Gasket Scraper
Scotch-Brite® Pad
3/8-16 Thread Chaser* & Holder
*Thread chasers are available at your local parts
store and are different from a thread cutting tap.
9/16” Combination Wrench
5/8” Combination Wrench
11/16” Combination Wrench
3/4” Combination Wrench
Socket Wrench & Extension
10mm 12pt. Socket
12mm 12pt. Socket
Tech Line: 708.588.0505
Fax: 708.588.7181
www.billetspecialties.com
TECH TIP:
Billet Specialties recommends the use of Anti-Seize on all fasteners
to prevent thread lock-up.
1/4” Hex Key
3/16” Hex Key
5/16” Hex Key
6mm Hex Key
Preparing The Engine Block
• Disconnect the battery.
• Remove existing alternator, air conditioning compressor and associated brackets.
• Remove all pulleys and water pump.
• Remove all traces of gasket and sealer with gasket scraper and Scotch Brite® pad.
• Clean threads in block by chasing with a 3/8-16 thread chaser.
Included Serpentine Belt
With P/S Goodyear 6-Rib Poly-V Serpentine Length: 50.5" #4060505
Without P/S Goodyear 6-Rib Poly-V Serpentine Length: 48.5" #4060485
Packaged With Power Steering Pump Packaged With Water Pump
5/16-24 x 3" Socket Head Cap Screw
(Power Steering Pump)
x2
3/8-16 x 2" Socket Head Cap Screw
(Power Steering Bracket)
x2
x2
5/16"
Lock Washer
3/8-16 x 3" Block Mounting Stud
x3
3/8-16 x 4" Block Mounting Stud
x1
Spacer Nut - 1-3/4" Spacer Nut - 2-11/16"
x3x1
x2
3/8-16 Zinc Coated
Hex Nuts
(Discard After Use)

www.billetspecialties.com • Tech Line 708.588.0505
4
Small Block Chevrolet Tru Trac - 13225 / 13125 5
Packaged In Main Box
8mm-1.25 x 25mm 12pt. Cap Screw
(Bridge Bracket)
3/8-16 x 3/4" 12pt. Cap Screw
(Tensioner Pulley)
10mm-1.25 x 80mm 12pt. Cap Screw
(Alternator)
8mm-1.25 x 25mm Socket Head Cap Screw
(Tensioner)
5/16-24 x 1/2" Socket Head Cap Screw
(Water Pump Pulley)
x4 x1
x1
x1
x4
x2
x2
10mm x .5mm
Shim Washer
10mm x 1mm
Shim Washer
x2
O-Ring Set
x4
O-Ring Set
8mm-1.25 x 25mm Flat Head Cap Screw
(Bridge Bracket To Tensioner)
x2
3/8-24 x 1" Socket Head Cap Screw
(Crankshaft Pulley)
x3
x2
3/8-16 x 2" Socket Head Cap Screw
(Tensioner Bracket)
x2
3/8-16 x 1-1/4" Socket Head Cap Screw
(Alternator Bracket)
3/8" Belleville Washer
x3

www.billetspecialties.com • Tech Line 708.588.0505
6
Small Block Chevrolet Tru Trac - 13225 / 13125 7
Figure 1: Install The Block Mounting Studs
Locate and apply RTV silicone sealant to one end of each of the four (4) block mounting
studs and install into the water pump mounting locations. Thread into the block until the
threads are completely seated into the block.
The longer 3/8-16 x 4" block mounting stud is to be installed in the lower passenger side water
pump mounting location.
Tech Tip: Use the two (2) 3/8-16 hex nuts provided as a drive nut by tightening them against
each other, see illustration below.
Figure 2: Install Water Pump Spacer & Alternator Bracket
Note: The water pump spacer & alternator bracket incorporate o-rings for sealing. Make sure
to install the four (4) large o-rings for the water pump and the two (2) small o-rings for the
bypass before installing.
A] Install the water pump spacer by sliding the spacer over the block mounting studs.
B] Install the alternator bracket as shown by sliding the bracket over the block mounting
studs on the driver side of the engine.
A B
3/8-16 x 4" Block Mounting Stud
Use the two 3/8-16 hex nuts as a drive nut to set the studs

www.billetspecialties.com • Tech Line 708.588.0505
8
Small Block Chevrolet Tru Trac - 13225 / 13125 9
Figure 3: Install Power Steering Bracket
Kits Without Power Steering:
For kits without power steering apply anti-seize to the two (2) 3/8-16 x 1-1/4" socket head cap
screws and install through lower end of the alternator bracket and into the block. Tighten
firmly.
Kits With Power Steering:
A] For kits with power steering apply anti-seize to the two (2) 3/8-16 x 2" socket head cap
screws and install by threading through the power steering bracket as shown above, through
the alternator bracket and into the block. Tighten firmly.
Figure 5: Install Water Pump
A] Install the included water pump by sliding the unit over the exposed ends of the block
mounting studs previously installed.
Figure 6: Install Stainless Stand-offs
A] Apply anti-seize to the exposed threads
of the block mounting studs and attach the
stainless standoffs as shown with hex end
out. Only hand tighten at this time.
B] Make sure to install the shorter (1-3/4")
stainless stand-off on the lower passenger
side block mounting stud as shown. Hand
tighten at this time.
Figure 4: Install Lower Tensioner
Bracket
Apply anti-seize to two (2) 3/8-16 x 2"
socket head cap screws.
A] Locate and install the lower
tensioner bracket by threading the
two 3/8-16 x 2" socket head screws
through the bracket and into the lower
mounting bosses on the passenger
side of the block. Tighten firmly.
A A
A
B
A

www.billetspecialties.com • Tech Line 708.588.0505
10
Small Block Chevrolet Tru Trac - 13225 / 13125 11
Figure 7: Install Tensioner
Install the tensioner by first applying anti-seize to one (1) 8mm-1.25 x 25mm socket head cap
screw and one (1) 8mm-1.25 x 25mm flat head cap screw.
A] Align the tensioner and install the socket head screw through the tensioner and into the
tensioner support bracket, install the flat head cap screw through the tensioner and into the
lower water pump stainless stand-off. Tighten firmly.
Figure 8: Install Power Steering Pump
Without Power Steering: Continue To Next Step.
With Power Steering:
Align the power steering pump with pre-installed pulley to the power steering bracket.
Apply anti-seize to the two (2) 5/16-24 x 3" socket head cap screws.
A] Using the two (2) 5/16-24 x 3" socket head screws with 5/16" lock washers, attach the
power steering pump by threading the socket head cap screws through the pump and into
the power steering bracket. Tighten firmly.
A A

www.billetspecialties.com • Tech Line 708.588.0505
12
Small Block Chevrolet Tru Trac - 13225 / 13125 13
Figure 9: Install Bridge Bracket
Apply anti-seize to:
• Three (3) 8mm-1.25 x 25mm 12-point cap screws
• One (1) 8mm-1.25 x 25mm flat head cap screw
A] Align and install the bridge bracket using the three 8mm-1.25 x 25mm 12-point cap screws,
threading into the stainless stand-offs. Install the 8mm-1.25 x 25mm flat head cap screw
through the bridge bracket and into the boss on the tensioner housing. Finger tighten.
Figure 11: Install Alternator
Apply anti-seize to:
• One (1) 8mm-1.25 x 25mm 12-point cap screw
• One (1) 10mm-1.50 x 80mm 12-point cap screw
Align the alternator with the two mounting locations on the bridge bracket.
A] Install the 10mm-1.50 x 80mm 12-point cap screw through the lower mounting location on
the alternator and finger tighten. Install the 8mm-1.25 x 25mm 12-point cap screw through
the alternator and into the bridge bracket.
At this time tighten both fasteners firmly.
Note: Due to the polishing process the width of the mounting bosses may vary, 10mm shim
washers are provided if needed for the lower mounting location.
Figure 10: Tighten All Stand-offs & Bridge Bracket Hardware
• Firmly tighten the four (4) stainless stand-offs previously installed.
• After the stand-offs have been tightened, now tighten the 12-point caps screws and flat
head cap screw that attach the bridge bracket.
• Re-check remaining hardware, all hardware should be tightened firmly at this time.
A A
www.billetspecialties.com • Tech Line 708.588.0505
14
Small Block Chevrolet Tru Trac - 13225 / 13125 15
Figure 14: Install Tensioner Pulley
Apply anti-seize to:
• (1) 3/8-16 x 3/4" 12-point Cap Screw
A] Align the tensioner pulley onto the tensioner's mounting boss. Install the 3/8-16 x 3/4"
12-point cap screw with aluminum load washer as shown. Tighten firmly.
Figure 15: Install Serpentine Belt
With a 5/8" 6-point socket or wrench, turn the belt tensioner release nut clockwise to unload
the spring tension and install the serpentine belt (routing shown below). Slowly return the
tensioner to its starting position to apply tension to the belt.
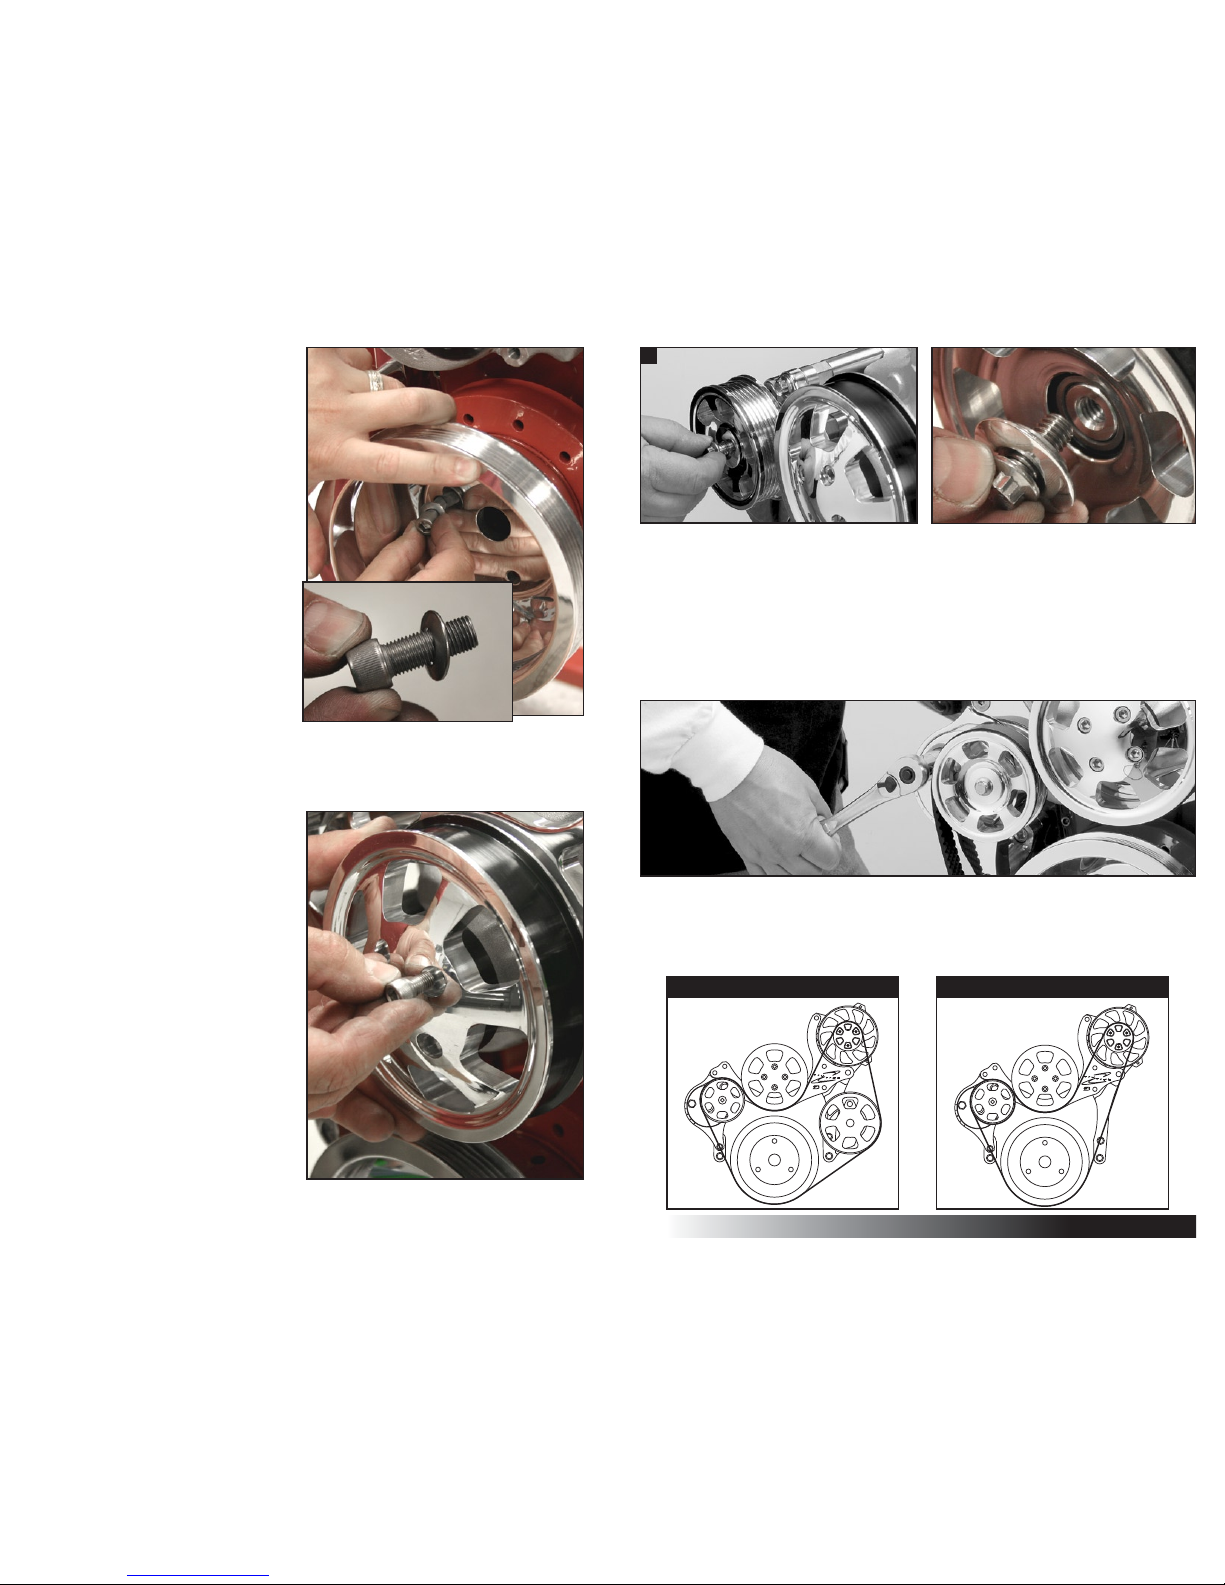
Figure 12: Install Crank Pulley
Apply anti-seize to:
• (3) 3/8-24 x 1" Socket Head Cap Screws
Using three (3) 3/8-24 x 1" socket head cap
screws with 3/8" Belleville washers align and
install the crankshaft pulley. Cup on washer
should go towards pulley. Torque to 35ft.lbs.
Note: Some crate engines will have a large
center bolt and washer on the damper that
will need to be removed before the pulley
can be installed. This bolt should be replaced
and installed after the pulley with a
7/16-20 x 2-3/4" bolt.
Figure 13: Install Water Pump Pulley
Apply anti-seize to:
• (4) 5/16-24 x 1/2" Socket Head Cap Screws
Align and install the water pump pulley using
four 5/16-24 x 1/2" socket head cap screws.
Tighten firmly.
A
With Power Steering Without Power Steering

#13225 / #13125
Billet Specialties, Inc.
500 Shawmut Ave. • La Grange, IL 60526
Tech (708) 588-0505 • Fax (708) 588-7181
www.billetspecialties.com
06/10
This manual suits for next models
1
Other Billet Specialties Engine manuals


