Bimmer Jakes FRONT HEADLIGHT LENS COVER Operating and safety instructions


+420 608 411 090
REPLACEMENT MANUAL
www.BimmerJakes.com
1 Covers replacement
It is necessary to be very careful during the covers replace-
ment. Being careful prevents from unnecessary damage
of covers parts, as the process is prone to it. It is also neces-
sary to keep your work place clean. Clean work place prevents
the nal product from unnecessary pollution and devaluation.
Covers replacement is productive process, which due to price
of the new covers, brings a high value added. The process
is made by hand completely, so there is an option of some
cosmetic changes on the headlight. It is guaranteed,
that these changes will not have any influence on function-
ality and quality of the nal product. The work of the ad-
vanced technician takes 1-3 hours for one light in average.
However the nal time of the process depends on the light
type.
This is a recommended process, by which is possible to re-
placed covers with the best result.
2 Removing the old covers
First step of the process is to remove the original damaged
covers – there are 2 ways to get that done. For cleaning
the headlamp (which should be your rst step) use a wet
napkin. There is the risk that the running water would flowed
inside the light.
Removing the screws and buckles
The process continues with removing the screws, buckles
and possible nail buckle, wich hold the cover and back corpus
together.
Removing the old cover
Manufacturers are using 2 types of sealant to mount the
cover.
Removal by heating
The rst type of sealant is possible to dismount by using
a heat gun, eventually in hot air drying oven - than the cover
begins to separate gradually and the light is disassembled.
Choose this way for following models:
- Vehicles made until the year 2012
- Headlights made by Automotive lighting
- For example vehicles BMW e39, BMW e83, BMW e63/4, BMW
e92/3
Removal by grinder
The second type of sealant has better thermal resistence
and it is not possible to dismount it by heating. Due to that,
the grinder is used to dismount it. The cover is cut as close
as possible to the back of the light. For operating with grinder
is required extreme caution in the inside part of light to avoid
damage. Caution is required also to avoid injury. It is recom-
mended to use a proper protective equipment such as gloves
or glasses.
Choose this way for following models:
- Vehicles made since the year 2008
- Headlight made by Hella or Automotive lighting
- For example vehicles BMW e60, BMW e70, BMW F25
+420 608 411 090
REPLACEMENT MANUAL
www.BimmerJakes.com
3 Removing the old cover
Do this step carefully and check twice to avoid damage
of lights.
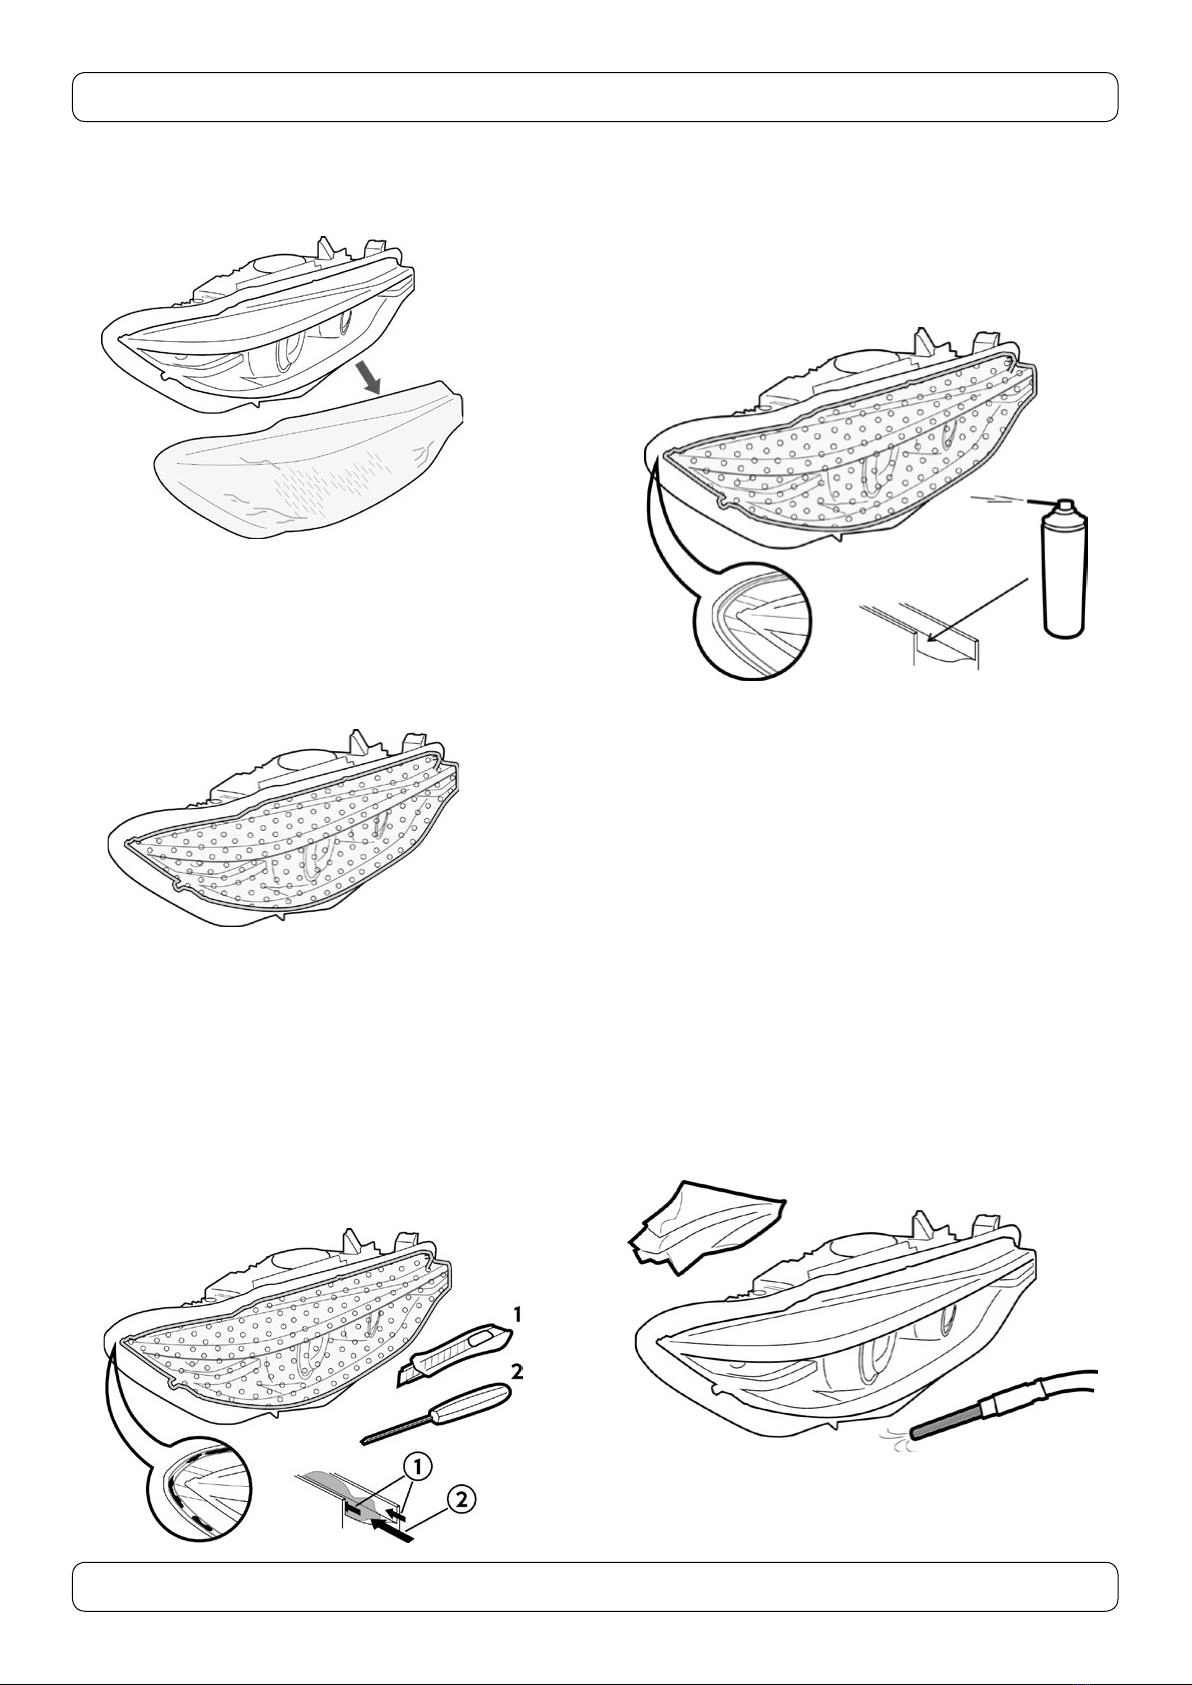
4 Parabolas protection
The process continues with dismounting the parabolas
or covering them, to avoid the damage during further oper-
ations. The best way to cover parabolas is by using bubble
foil and adhesive tape. It might be a problem to dismount
the parabolas for some types of lights, so covering them
is often the better option
5 Cleaning the gripping grove
Next step is to clean the gripping grove. The rst type of seal-
ant is relatively easy to clean, but it is quite difcult to clean
the second type. The best way how to remove the second type
is to cut it on the sides by using knife blade and the undercut
the gripping edge by using chisel (6 mm). Dishwasher deter-
gent also might be useful. Dishwasher detergent decrease ad-
hesion of materials and unlike others chemical agents is not
detrimental to health. The gripping grove has to be cleaned
carefully so it ts to the bottom properly (same like the origi-
nal one). This is the most difcult part of the process.
6 Removing grease
Following step is to degrease clean gripping grove by using al-
cohol cleaner. Alcohol cleaner unlike others aggressive clean-
ers will not damage the plastic parts.
7 Cleaning the new cover
The space around the headlight is often full of dirt and re-
mains of materials after the process of dismounting.
The best way how to clean this space throughly is to use the
vacuum cleaner. The suitable vacuum cleaner is available
on www.bimmerjakes.com. The use of wet napkins is also
an option, but it is necessary to avoid the chrome parts,
wich could be damaged by napkins. It is also required to turn
the light up side down and shake it to spill out remaining dirt.
Do not forget to clean also the back side of every part. The
perfect cleaning process is necessary for succesful result.
Subsequently control the new cover if it is clean. The protec-
tive foil must cover the whole area of the cover until whole
process is done, to avoid damage.

+420 608 411 090
REPLACEMENT MANUAL
@bimmerjakes
www.BimmerJakes.com
8 Installation of the new cover
It is necessary to test if the new cover ts in the groove as
the original one before pasting it. Otherwise try to clean the
groove again until the cover ts well. It is possible, that the
area of new cover contains redundant bulges. In case of that,
grind the redundant materials of.
9 Pasting the new cover
We attach the cover slowly and keep controlling the right di-
rection of attaching. We have to make sure, that the cover will
t properly before it touches the sealant.
Subsequently the new cover of sealant is applied in the groove.
Ideal type is the sealant for pasting car glasses. The sealant
must be applied evenly and the groove must be at least ¾ full.
Insufcient amount of sealant could cause insufcient ability
to seal and decrease ability to be water resistant.
You must press the cover fully to the groove and make sure,
that the cover is surrounded by sealant sufciently.
10 Fixation
The nal step of the process is to x the headlight to avoid
undesirable movement of the cover during solidication.
The best way how to x the headlight is by using clamps
and tapes. Protect the cover by using foil to avoid dirt from
sealant during manipulation. It is necessary protect the cover
from any movement during solidication.
11 Conclusion
The time of whole process depends on the technicians expe-
rience and the type of headlight. By respecting all recommen-
dation is the chance of good result very high.
12 Sent it to us
We will be more than happy if you share your before/after
photos with us, we will post them at our social media pages
where we can tag you if you want. You can even write a review
for specic product at our eshop.
Follow us


