Binatone FP-705 User manual

Food Processor
Instruction Manual
FP705

Food Processor FP705

33
33
3
ÐÓÑÑÊÈÉ
ENGLISH ........................................ 44
44
4
ÐÓÑÑÊÈÉ.....................................14
ÓÊÐÀ¯ÍÑÜÊÀ ................................ 24
ENGLISH
ÓÊÐÀ¯ÍÑÜÊÀ
АЗААЗА
АЗААЗА
АЗА ......................................... 34
АЗА

44
44
4
OPERATING INSTRUCTIONS
Processor Use
1. Make sure the appliance is switched off and
the speed selector (a)(a)
(a)(a)
(a) is in “0” position. Put
the adaptor (6)(6)
(6)(6)
(6) on the rod inside the cup (5).(5).
(5).(5).
(5).
2. Place the required attachment (7, 10, 9)(7, 10, 9)
(7, 10, 9)(7, 10, 9)
(7, 10, 9) on
the adapter (6).(6).
(6).(6).
(6).
3. Put the lid (4)(4)
(4)(4)
(4) on the bowl (5).(5).
(5).(5).
(5). Fix the lid
(4)(4)
(4)(4)
(4) by turning it clockwise until the click. If you install the bowl
(5)(5)
(5)(5)
(5) or the lid (4)(4)
(4)(4)
(4) improperly, the appliance won’t work.
Food Processor FP-705
Please read the safety instructions carefully before using this
appliance. Please retain the instructions for future reference.
APPLIANCE COMPONENTS
DESCRIPTION
Figure A:
1. Control panel::
::
:
a — speed selector
b — release button
c — Turbo mode knob
2. Casing with the motor
3. Pusher
4. Lid with an opening for food loading
5. Bowl with a rod
6. Adapter
7. Chopper
8. Chopper holder
9. Emulsifier
10.Cover for attachments
11.Thick slicer
12.Thin slicer
13.Thick shredder
14.Thin shredder
15.Beating whisks
16.Dough kneading attachments
17.Washer
18.Small aperture to fix attachments
19.Large aperture to fix attachments
BEFORE THE FIRST USE
Before the first use of the appliance, thor-
oughly wash all components which will contact
with food products. Wipe with a soft damp cloth
the casing (2)(2)
(2)(2)
(2) of the appliance.

55
55
5
ENGLISH
4. Press the release (b)(b)
(b)(b)
(b) button and attach the casing (2)(2)
(2)(2)
(2) to the
lid (4)(4)
(4)(4)
(4) by inserting its rear end into the handle of the bowl
(5)(5)
(5)(5)
(5) first. Then lower the front part of the casing (2)(2)
(2)(2)
(2) onto the
lid until the click. Place the pusher (3)(3)
(3)(3)
(3) in the feeding tube of
the lid (4).(4).
(4).(4).
(4).
5. Use the pusher (3)(3)
(3)(3)
(3) for pushing products through the loading
opening. During the operation, you may use the pusher (3)(3)
(3)(3)
(3) to
cover the loading opening to prevent the splash-out of liquid or
food product chips.
Attention: if the kitchen machine suddenly stops operating,
switch the speed to «0» to switch off the appliance,
unplug the appliance from the power grid and allow it
cool down within 15 minutes. After that switch it on
again.
6. Use the speed selector (a)(a)
(a)(a)
(a) to choose the required mode of opera-
tion or pulse «Turbo» mode (c).(c).
(c).(c).
(c). After completion of the work,
switch to «0» to switch the appliance off, and unplug the power
cord from the power grid.
7. The appliance mills the products very quickly. To avoid exces-
sive milling of ingredients, each time switch on the appliance
for a short period of time.
8. Use mode «1–5» either for grating soft vegetables and fruit, or
slicing solid products. Use the pulse mode («Turbo») for milling
softer products.
9. When you have finished processing, the casing with the motor
(2)(2)
(2)(2)
(2) can only be removed from the lid (4)(4)
(4)(4)
(4) after the appliance is
switched off. The release button (b)(b)
(b)(b)
(b) cannot be pressed when the
appliance is switched on. To remove the casing (2),(2),
(2),(2),
(2), press the
release button (b)(b)
(b)(b)
(b) and lift the casing off the lid (4).(4).
(4).(4).
(4).
Attachments Use
Chopper (7)
1. The chopper (7)(7)
(7)(7)
(7) can be used for chopping (meat, vegetables).
2. Remove the chopper holder (8)(8)
(8)(8)
(8) off the chopper (7).(7).
(7).(7).
(7).
3. Place the adapter (6)(6)
(6)(6)
(6) into the bowl on the rod (5)(5)
(5)(5)
(5) and fix the
chopper (7)(7)
(7)(7)
(7) in the adapter (6).(6).
(6).(6).
(6).
4. Make sure that all components of the appliance are properly
installed.
5. Load the food products into the bowl (5)(5)
(5)(5)
(5). Pre-cut large pieces
into3x3x3x cm pieces.
6. Put the lid (4)(4)
(4)(4)
(4) on the bowl (5).(5).
(5).(5).
(5). Fix the lid (4)(4)
(4)(4)
(4) by turning it
clockwise until the click. If you install the bowl (5)(5)
(5)(5)
(5) or the lid (4)(4)
(4)(4)
(4)
improperly, the appliance won’t work.
7. Press the release (b)(b)
(b)(b)
(b) button and attach the casing (2)(2)
(2)(2)
(2) to the lid
(4)(4)
(4)(4)
(4) by inserting its rear end into the handle of the bowl (5)(5)
(5)(5)
(5) first.
Then lower the front part of the casing (2)(2)
(2)(2)
(2) onto the lid until the
click. Place the pusher (3)(3)
(3)(3)
(3) in the feeding tube of the lid (4).(4).
(4).(4).
(4).
8. Turn on the appliance by switching the speed control (a)(a)
(a)(a)
(a) to
“1–5” position. Processing takes about 10-30 sec.
Note: do not chop very hard ingredients like coffee beans,
nutmeg and ice cubes as the blades can get blunt.

66
66
6
Shredders and slicers (11,12,13,14)
1. Double-sided tip for thick slicing (11)(11)
(11)(11)
(11) is applied for slicing
products in thick circles and for thick shredding (13)(13)
(13)(13)
(13) - for
coarse shredding as well as for grating products in thick strips.
2. Double-sided tip for thin slicing (12)(12)
(12)(12)
(12) is applied for slicing
products in thin circles, for thin shredding - for fine shredding as
well as for grating products in thin strips.
3. Place the adapter (6)(6)
(6)(6)
(6) into the bowl on the rod (5).(5).
(5).(5).
(5). Select one
of the available replaceable tips (11-14)(11-14)
(11-14)(11-14)
(11-14) which you would
like to use, and put it into the cover for attachments (10)(10)
(10)(10)
(10) by
pressing the side section of the tip. Place the cover (10)(10)
(10)(10)
(10) in the
adaptor (6)(6)
(6)(6)
(6) in the bowl (5).(5).
(5).(5).
(5).
Note: put the selected tip (11–14) with the cutting part
upward.
4. Put the lid (4)(4)
(4)(4)
(4) on the bowl (5).(5).
(5).(5).
(5). Fix the lid (4)(4)
(4)(4)
(4) by turning it
clockwise until the click. If you install the bowl (5)(5)
(5)(5)
(5) or the lid (4)(4)
(4)(4)
(4)
improperly, the appliance won’t work.
5. Press the release (b)(b)
(b)(b)
(b) button and attach the casing (2)(2)
(2)(2)
(2) to the
lid (4)(4)
(4)(4)
(4) by inserting its rear end into the handle of the bowl
(5)(5)
(5)(5)
(5) first. Then lower the front part of the casing (2)(2)
(2)(2)
(2) onto the
lid until the click. Place the pusher (3)(3)
(3)(3)
(3) in the feeding tube of
the lid (4).(4).
(4).(4).
(4).
6. Load products through a special opening. Use the pusher (3)(3)
(3)(3)
(3) to
push ingredients slowly and steadily.
7. After completion of the work, switch to «0» to switch the appli-
ance off, and unplug the power cord from the power grid.
8. Use mode «1–5» for grating and slicing solid product. Use
mode «Turbo» for soft products.
9. Large products should preliminary be cut into smaller pieces, so
that they could easily pass through the food loading opening.
Attention: be extremely careful while inserting the cover
with the attachments (10) and chopper (7) in the
adapter (6). The knife blades are very sharp! Be
extremely careful while removing the attachments.
Emulsifier (9)
1. This attachment is used for making mayonnaise, to whip light
cream and whisk egg whites.
2. Place the adapter (6)(6)
(6)(6)
(6) into the bowl on the rod (5)(5)
(5)(5)
(5) and fix the
emulsifier (9)(9)
(9)(9)
(9) in the adapter (6).(6).
(6).(6).
(6).
3. Make sure the attachment (9)(9)
(9)(9)
(9) is installed properly.
4. Load the necessary ingredients into the bowl (5).(5).
(5).(5).
(5).
5. Put the lid (4)(4)
(4)(4)
(4) on the bowl (5).(5).
(5).(5).
(5). Fix the lid (4)(4)
(4)(4)
(4) by turning it
clockwise until the click. If you install the bowl (5)(5)
(5)(5)
(5) or the lid (4)(4)
(4)(4)
(4)
improperly, the appliance won’t work.
6. Press the release (b)(b)
(b)(b)
(b) button and attach the casing (2)(2)
(2)(2)
(2) to the
lid (4)(4)
(4)(4)
(4) by inserting its rear end into the handle of the bowl
(5)(5)
(5)(5)
(5) first. Then lower the front part of the casing (2)(2)
(2)(2)
(2) onto the
lid until the click. Place the pusher (3)(3)
(3)(3)
(3) in the feeding tube of
the lid (4).(4).
(4).(4).
(4).
7. Switch on the appliance by switching to mode “1-5” (a).(a).
(a).(a).
(a).

77
77
7
ENGLISH
Mixer Use
1. Make sure the appliance is switched off and the speed selector
(a)(a)
(a)(a)
(a) is in “0” position and the cord is disconnected from the
mains before the use of the mixer. Remove the casing (2)(2)
(2)(2)
(2) from
the lid (4).(4).
(4).(4).
(4).
2. Beating whisks (15)(15)
(15)(15)
(15) can be fixed in random order. Fix them
into apertures for attachments (18 and 19)(18 and 19)
(18 and 19)(18 and 19)
(18 and 19) till a click is heard.
3. Dough kneading attachments (16)(16)
(16)(16)
(16) can be installed only ac-
cording to the following procedure: attachment with washer
(17)(17)
(17)(17)
(17) has to be fixed into the large aperture for attachments
(19)(19)
(19)(19)
(19), and the second attachment (without a washer) should be
fixed into the small aperture (18)(18)
(18)(18)
(18). Both attachments should be
fixed until a click is heard.
4. Before switching the appliance on, make sure that both attach-
ments are fixed properly!
5. Load the ingredients into the bowl (5).(5).
(5).(5).
(5). Lower the beaters (15,(15,
(15,(15,
(15,
16)16)
16)16)
16) into the ingredients.
6. Switch on the appliance by selecting the speed mode “1–5”
(a).(a).
(a).(a).
(a). Always start operating the machine at the lowest speed
gradually increasing the speed. Time of continuous operation of
the appliance must not exceed 5 minutes.
7. After finishing work stop the mixer by switching the speed regu-
lator (a)(a)
(a)(a)
(a) to “0” position.
8. Press the release button (b)(b)
(b)(b)
(b) to remove the beaters (15, 16).(15, 16).
(15, 16).(15, 16).
(15, 16).
Tip application
!Use beating whisks (15)(15)
(15)(15)
(15) to prepare puddings, puree, mobile
dough (for example, pancake dough), to beat cream and egg
whites Selection of the speed regime:
SpeedSpeed
SpeedSpeed
Speed FunctionFunction
FunctionFunction
Function UtilizationUtilization
UtilizationUtilization
Utilization
1 low To combine To prepare sauces, puddings,
components dough for rolls and pancakes.
2 low–middle To mix To mix liquid and dry
ingredients, to beat up eggs
3 middle To shake To prepare mobile dough and mixes
4 middle–high To beat To mix butter with sugar, to pre-
pare dough for cookies, mixes for
patisserie and glace icing
5 high To froth To prepare light foamy mixes,
to beat cream, whites, etc.
!Attachments to knead dough (16)(16)
(16)(16)
(16) should be used for average
texture dough. Tough dough should be kneaded manually. Speed
regimes 1 and 2 are considered to be optimal for kneading dough.
!You can change the speed in the course of its operation.
!The turbo button (c)(c)
(c)(c)
(c) provides an additional possibility to in-
crease operation speed in the course of several short time peri-
ods. This function can be activated at any of 5 speed ranges. To
achieve that press the button (c)(c)
(c)(c)
(c) and keep it pressed. Time of
continuous operation of the appliance in the turbo regime shall
not exceed 1 minute.
!Always start pureeing hard and tough ingredients, then add
soft ones. Fruits and vegetables can be pureed without adding

88
88
8
any liquid. However for better result you can add a small amount
of liquid.
!Use shredders (13, 14)(13, 14)
(13, 14)(13, 14)
(13, 14) to shred cheese: hard cheese should
be at room temperature, softer cheese should be at refrigerator
temperature.
MAINTENANCE AND
CLEANING
1. Always switch off the appliance before
cleaning.
2. Do not use rigid abrasive tools for cleaning
the appliance.
3. After each use, wipe the casing (2)(2)
(2)(2)
(2) with a
damp cloth. Do not submerge the casing (2)(2)
(2)(2)
(2)
and the cord in water or any other liquid.
4. Wash all attachments, lid (4)(4)
(4)(4)
(4), bowl (5)(5)
(5)(5)
(5) and pusher (3)(3)
(3)(3)
(3) in a
soapy water, rinse and dry thoroughly.
5. Clean the kitchen machine each time immediately after use!
USEFUL TIPS
Sponge cake
Eggs – 3 pcs
Water (35°C) – 30ml
Sault – on the tip of a knife
Vanilla sugar – 1 bag
Sugar – 150g
Breadstuff – 150g
Baking powder – 3g
For dough kneading, use the beating whisks (15)(15)
(15)(15)
(15). Beat eggs
with water within about 2 minutes. Gradually add sugar, vanilla
sugar and salt. Mix the ingredients within about 1 minute. The
mixture should flow down from a spoon, but be sufficiently thick at
the same time. Carefully add breadstuff
and baking powder in the
mixture, and mix the ingredients once again. Cook the sponge
cake in an oven at a temperature of 180°C within 30 minutes.
Mayonnaise sauce
Yolks – 6 pcs
Dining mustard – 25g
Lemon – 1 piece
Vinegar – 20g
Vegetable oil – 800g
Salt, pepper – on taste
Using the emulsifier (9),(9),
(9),(9),
(9), mix uncooked yolks with mustard,
salt and lemon juice. Stir the mixture fair enough and then, with-
out interrupting the beating process, pour oil to obtain a thick
sauce. Add vinegar and lemon juice of the lemon second half to the
cooked sauce and then beat the mixture again. Serve with black
pepper.

99
99
9
ENGLISH
Italian tomato sauce
Tomato – 4–6 pcs.
Bulb onion – 40g
Garlic – 2 cloves
Celery – 40g
Parsley greens
Basil – a few leaves
Vegetable oil – 2-4 tablespoons
Salt, pepper – on taste
Cut all ingredients by the chopper (7)(7)
(7)(7)
(7), add salt and pepper.
Place the mixture in a pot and smother with oil on a slow fire over
several minutes, continuously stirring the mixture.
Pancakes
Breadstuff – 2–3 glasses
Yolks – 2–3 pcs
Milk – 1 liter
Vegetable oil – 2 tablespoons
Leaven
Vanilla sugar
Salt, pepper – on taste
Use the dough kneading tip (16)(16)
(16)(16)
(16). Mix uncooked yolks with
sugar, salt, vanilla sugar. Add breadstuff, leaven and 0.5 l of milk.
Mix the ingredients. The consistence of the mixture should recon
thick sour cream. Then add vegetable oil and mix again. Add
remaining preliminary-heated (not until boiling) milk. Stir the
mixture to receive a homogenous state. Bake pancakes on a heated
oiled frying pan. Pancakes are served hot with oil, sour cream or
plain condensed milk. It’s delicious if you roll a piece of salmon in
a pancake.
Farci peppers
Chicken stuffing – 500g
Rice – 150g
Carrot – 200g
Sweet pepper – 1kg
Salt, tomato paste – on taste
Use the chopper (7)(7)
(7)(7)
(7) to cook chicken stuffing. Decoct rice, but not
until it is ready, then mix it with stuffing, add salt. Remove the core
from peppers and fill the peppers with stuffing (not until the end),
add grated carrot from atop. Lay peppers in a big pot, pour hot
water and add tomato paste. Cook over 30–40 minutes, then add
salt on taste.
SAFETY MEASURES
When using your appliance, the following basic
safety precautions should always be followed:
!Before using for the first time, check that the ap-
pliance voltage is the same as your local supply.
!Only use the appliance for the purposes stipu-
lated by the instructions.

1010
1010
10
!Only use attachments supplied with the equipment.
!To avoid electric shocks, do not immerse the appliance,do not immerse the appliance,
do not immerse the appliance,do not immerse the appliance,
do not immerse the appliance,
plug or power cord in water or any other liquids.plug or power cord in water or any other liquids.
plug or power cord in water or any other liquids. Do
not
place the appliance where it could come into contact with
water or other liquids..
..
. If the appliance comes in contact with
water, immediately disconnect it from the mains. Do not use the
machine again until it has been serviced by an authorizedan authorized
an authorizedan authorized
an authorized
service center.service center.
service center.
!Do not let children use the appliance without supervision.
!If the power cord plug does not fit to your wall socket,If the power cord plug does not fit to your wall socket,
If the power cord plug does not fit to your wall socket,If the power cord plug does not fit to your wall socket,
If the power cord plug does not fit to your wall socket,
consult a qualified electrician.consult a qualified electrician.
consult a qualified electrician.
!Use of various adapters may result in damage to theUse of various adapters may result in damage to the
Use of various adapters may result in damage to theUse of various adapters may result in damage to the
Use of various adapters may result in damage to the
appliance and termination of warranty.appliance and termination of warranty.
appliance and termination of warranty.
!Always supervise the equipment while in use.
!To avoid a circuit overload, do not operate any other high volt-
age equipment on the same circuit.
!Always unplug before moving the appliance fromAlways unplug before moving the appliance from
Always unplug before moving the appliance fromAlways unplug before moving the appliance from
Always unplug before moving the appliance from
one place to another, cleaning and storing.one place to another, cleaning and storing.
one place to another, cleaning and storing.
!Never pull the cord to disconnect the appliance, instead grasp
the plug and pull it to disconnect.
!Do not allow the cord or the machine itself to come in contact
with hot surfaces.
!Position the appliance and the cord so that nobody can acciden-
tally overturn it.
!Do not use the appliance if it has been dropped, or it has a
damaged power cord or plug. Do not modify or repair the
machine yourself.
!Do not dismantle the appliance as improper assembly might
result in an electric shock during the subsequent use of the
equipment. Repairs should only be done by authorizedRepairs should only be done by authorized
Repairs should only be done by authorizedRepairs should only be done by authorized
Repairs should only be done by authorized
service centersservice centers
service centers.
!Do not use the device in areas where combustible gas mixtures
or inflammable liquid vapors could present in the air, or in
areas with inflammable air-borne dust or fibers
!This equipment is intended for household use only, not for com-
mercial or industrial use.
!Please follow all the requirements of this guide
!Do not use the appliance if it has mechanical defects (dents,
cracks etc.), get it checked by the nearest authorized service
center.
SPECIAL SAFETY MEASURES
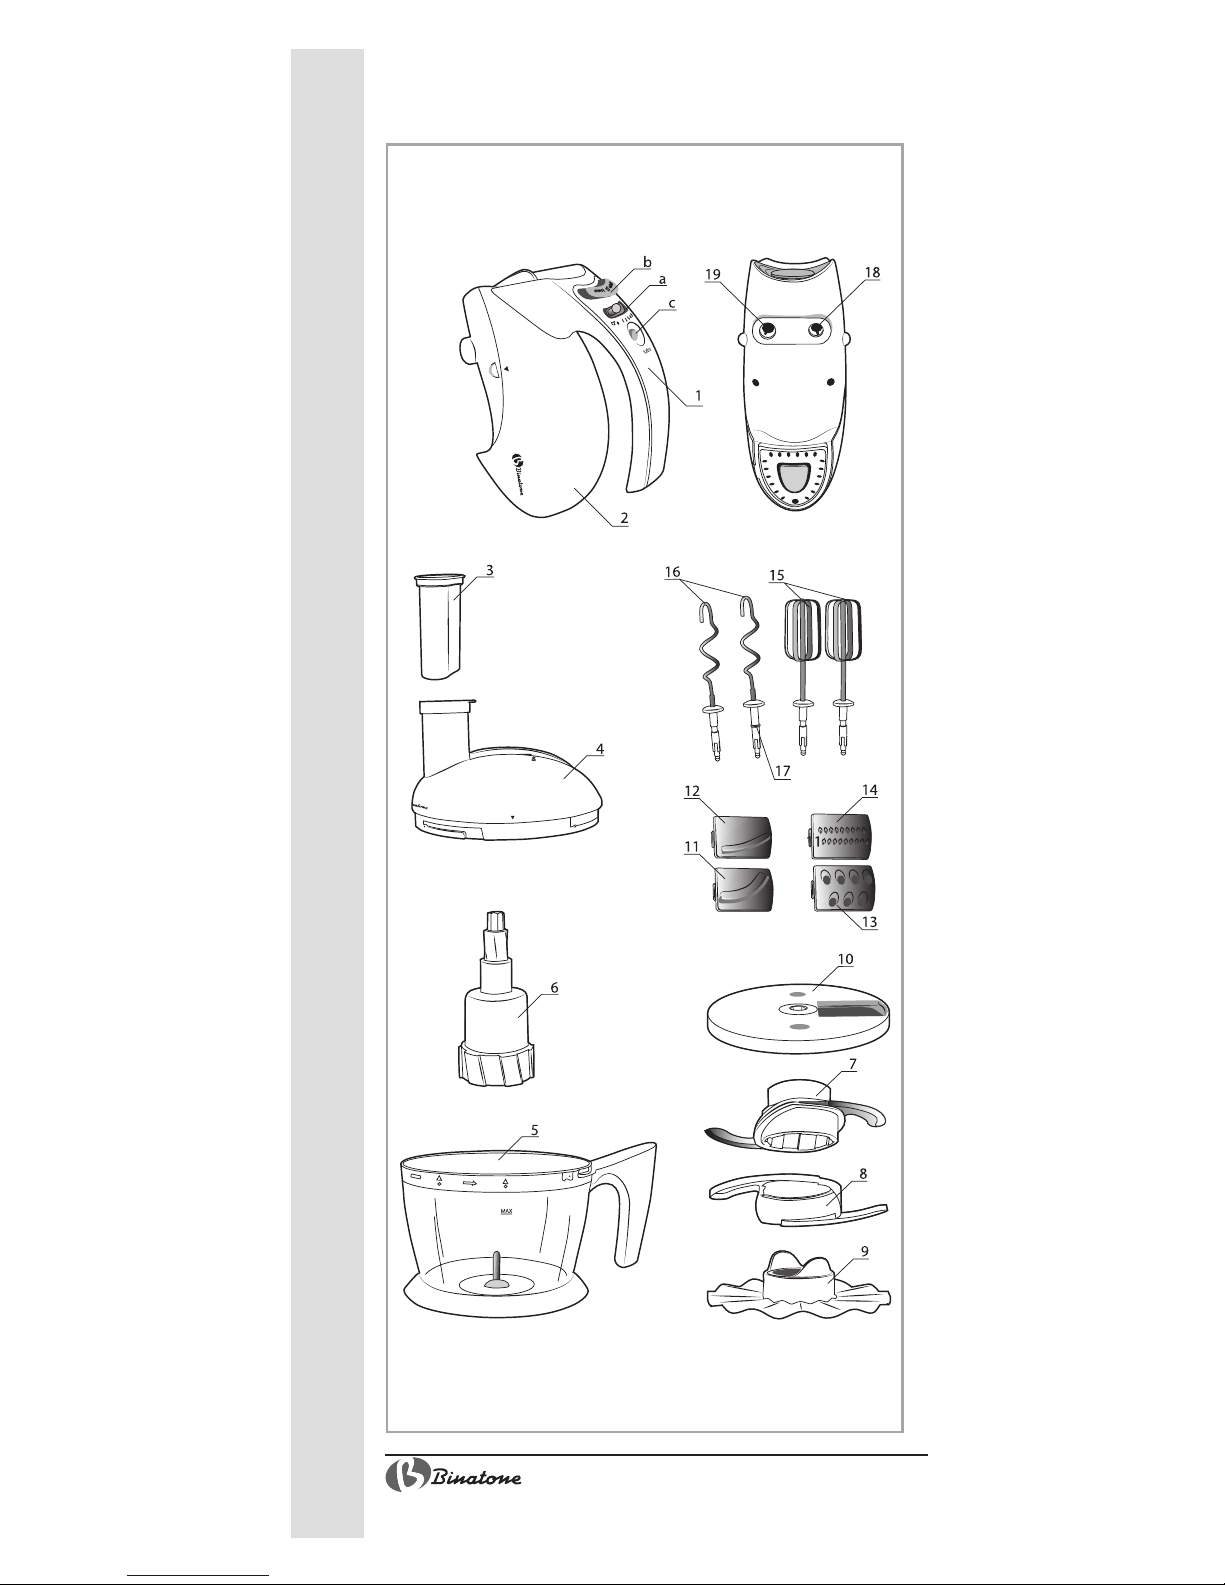
!Put the kitchen machine on a plain horizontal
dry surface.
!Before the first use, make sure all components
of the kitchen machine are properly mounted.
!While fitting the tips, do not apply excessive
force since this could cause to a failure of the
appliance and termination of warranty obliga-
tions.
!Do not fill the cup above the maximum level markDo not fill the cup above the maximum level mark
Do not fill the cup above the maximum level markDo not fill the cup above the maximum level mark
Do not fill the cup above the maximum level mark
(calibration upper mark).
!During the operation of the electrical appliance, it’s not allowed
to push in products, using fingers or any other foreign objects.

1111
1111
11
ENGLISH
Use only special pushrod for this purpose (3)(3)
(3)(3)
(3).
!If food products are hot, let them cool down (maximum tem-
perature is 80°C) before processing.
!Do not use abrasive detergents for washing the appliance compo-
nents.
!If abnormal smoke smell, sounds or capacity reduction are ob-
served during the operation, switch off and unplug the appli-
ance immediately and clean it. If normal operation has not
resumed after the cleaning, get in touch with an authorized
service center.
!It’s recommended to use the manufacturer’s package to prevent
damage of the kitchen machine during transportation.
!Never touch the moving parts of the appliance during opera-
tion.
!Always insert beaters into the appropriate slots.
!During the operation, the cup of the kitchen machine must
always be closed with the lid.
!When the work is finished or before the removal of the tip from
the appliance, always move the mode selector to position «0»
and unplug the appliance from the power grid.
DISPOSAL
The appliance should be disposed of in accor-
dance with waste disposal regulations in your coun-
try and with the least damage to the environment.
Only ecologically safe materials are used in the
packaging of our products and the cardboard and
paper can be disposed of with normal paper waste.

1212
1212
12
AFTERSALES SERVICE
If your appliance does not operate or does
not operate properly, contact an authorized
service center for consultancy or repair.
The warrantee does not cover:
– product packing, consumables and acces-
sories (knives, tips, etc.);
– mechanical damages and natural wear of the product;
– failures due to overloading, improper or careless maintenance,
penetration of liquids, dust, insects and other foreign matters
inside the product, exposure of plastic and other not thermal-
resistant components to high temperatures, force-majeure cir-
cumstances (accidents, fire, flooding, power grid failure, light-
ning stroke, etc.);
– damages caused by:
!Non-fulfillment of the above-mentioned precautions and oper-
ating manuals.
!Application in commercial purposes (application of the product
beyond personal daily living needs).
!Connection to a grid with a voltage which differs from that
indicated on the appliance.
!Unauthorized repair or replacement of the components of the
appliance, performed by an unauthorized person or service
center.

1313
1313
13
ENGLISH
Features may be changed by Binatone without any notice.
Warranty details are set out in the warranty card provided with
the product.
Exploitation periodExploitation period
Exploitation period: 3 years after the day of purchase.
ManufactureManufacture
Manufacture: Binatone Industries Ltd, Great Britain,
Vitabiotics House,1 Apsley Way, Staples Corner, London, NW2
7HF, UK.

1414
1414
14
ИСПОЛЬЗОВАНИЕ ПРИБОРА
Комбайн
1. Óáåäèòåñü, ÷òî ïðèáîð îòêëþ÷åí, è ïåðåêëþ-
÷àòåëü ñêîðîñòåé (à) íàõîäèòñÿ â ïîçèöèè
«0». Óñòàíîâèòå ïåðåõîäíèê (6) íà ñòåðæåíü
âíóòðè ÷àøè (5).
Êóõîííûé êîìáàéí FP-705
Âíèìàòåëüíî ïðî÷òèòå èíñòðóêöèþ ïåðåä ïåðâûì èñïîëüçîâà-
íèåì, ÷òîáû îçíàêîìèòüñÿ ñ ðàáîòîé íîâîãî ïðèáîðà. Ïîæàëóéñòà,
ñîõðàíèòå èíñòðóêöèþ äëÿ äàëüíåéøèõ ñïðàâîê.
ОПИСАНИЕ ДЕТАЛЕЙ
ПРИБОРА
Рисунок А:
1. Ïàíåëü óïðàâëåíèÿ
a – ïåðåêëþ÷àòåëü ñêîðîñòåé
b – êíîïêà àâòîìàòè÷åñêîãî âûáðîñà íàñàäîê
c – êíîïêà òóðáî ðåæèìà
2. Êîðïóñ ïðèáîðà ñ äâèãàòåëåì
3. Òîëêàòåëü
4. Êðûøêà ñ îòâåðñòèåì äëÿ çàãðóçêè ïðîäóêòîâ
5. ×àøà ñî ñòåðæíåì
6. Ïåðåõîäíèê
7. Èçìåëü÷èòåëü
8. ×åõîë äëÿ íîæà èçìåëü÷èòåëÿ
9. Íàñàäêà äëÿ ñîóñîâ/êðåìîâ
10.Äèñê äëÿ íàñàäîê
11.Íàñàäêà äëÿ êðóïíîé øèíêîâêè
12.Íàñàäêà äëÿ ìåëêîé øèíêîâêè
13.Êðóïíàÿ òåðêà
14.Ìåëêàÿ òåðêà
15.Âåí÷èêè äëÿ âçáèâàíèÿ
16.Âåí÷èêè äëÿ çàìåøèâàíèÿ òåñòà
17.Øàéáà
18.Ìàëåíüêîå îòâåðñòèå äëÿ ôèêñàöèè íàñàäîê
19.Áîëüøîå îòâåðñòèå äëÿ ôèêñàöèè íàñàäîê
ПЕРЕД ПЕРВЫМ
ИСПОЛЬЗОВАНИЕМ
Ïåðåä ïåðâûì èñïîëüçîâàíèåì ïðèáîðà
òùàòåëüíî ïðîìîéòå âñå äåòàëè, êîòîðûå áóäóò
êîíòàêòèðîâàòü ñ ïèùåâûìè ïðîäóêòàìè,
êîðïóñ ïðèáîðà (2) ïðîòðèòå ìÿãêîé âëàæíîé
òêàíüþ.

1515
1515
15
ÐÓÑÑÊÈÉ
2. Çàôèêñèðóéòå íà ïåðåõîäíèê íåîáõîäèìóþ äëÿ ïðèãîòîâ-
ëåíèÿ íàñàäêó: èçìåëü÷èòåëü (7), äèñê ñ íàñàäêàìè (10)
èëè íàñàäêó äëÿ ñîóñîâ/êðåìîâ (9).
3. Íàêðîéòå ÷àøó (5) êðûøêîé (4). Ïîâåðíèòå êðûøêó ïðîòèâ
÷àñîâîé ñòðåëêè äî óïîðà. Óáåäèòåñü, ÷òî âñå ÷àñòè ïðèáîðà
óñòàíîâëåíû ïðàâèëüíî. Åñëè Âû íåïðàâèëüíî óñòàíîâèëè
÷àøó (5) èëè êðûøêó (4), ïðèáîð íå âêëþ÷èòñÿ.
4. Ïðèñîåäèíèòå ê ÷àøå (5) êîðïóñ ïðèáîðà (2). Äëÿ ýòîãî
íàæìèòå êíîïêó àâòîìàòè÷åñêîãî âûáðîñà íàñàäîê (b) è
ïîñòàâüòå çàäíþþ ÷àñòü êîðïóñà (2) íà ðó÷êó ÷àøè. Çàòåì
îïóñòèòå ïåðåäíþþ ÷àñòü êîðïóñà (2) íà êðûøêó (4) äî
ùåë÷êà. Îòïóñòèòå êíîïêó àâòîìàòè÷åñêîãî âûáðîñà íàñàäîê
(b). Âñòàâüòå òîëêàòåëü (3) â îòâåðñòèå äëÿ çàãðóçêè.
5. Çàãðóæàéòå ïðîäóêòû ÷åðåç ñïåöèàëüíîå îòâåðñòèå äëÿ
çàãðóçêè íà êðûøêå (4). Èñïîëüçóéòå òîëêàòåëü (3) äëÿ
ïðîòàëêèâàíèÿ ïðîäóêòîâ ÷åðåç îòâåðñòèå äëÿ çàãðóçêè. Âû
ìîæåòå âîñïîëüçîâàòüñÿ òîëêàòåëåì (3), ÷òîáû çàêðûòü
îòâåðñòèå äëÿ çàãðóçêè âî âðåìÿ ðàáîòû êîìáàéíà, ýòî
ïðåäîòâðàòèò âûïë¸ñêèâàíèå æèäêîñòè è êóñî÷êîâ ïðîäóêòîâ.
Внимание: в случае, если комбайн прекратил
работать, выключите прибор
переключением скорости в позицию «0»,
отключите прибор от сети и дайте ему
остыть в течение 15 минут. По истечении
этого времени попробуйте включить его
вновь.
6. Ñ ïîìîùüþ ïåðåêëþ÷àòåëÿ ñêîðîñòåé (à) âûáåðèòå íåîáõî-
äèìûé ðåæèì ðàáîòû èëè òóðáî ðåæèì (ñ). Ïîñëå èñïîëüçî-
âàíèÿ âûêëþ÷èòå ïðèáîð, ïåðåêëþ÷èâ ñêîðîñòü íà «0», è
îòêëþ÷èòå ïðèáîð îò ýëåêòðè÷åñêîé ñåòè.
7. Ýëåêòðîïðèáîð èçìåëü÷àåò ïðîäóêòû î÷åíü áûñòðî. ×òîáû
èçáåæàòü ÷ðåçìåðíîãî èçìåëü÷åíèÿ èíãðåäèåíòîâ, âêëþ-
÷àéòå ïðèáîð êàæäûé ðàç íåíàäîëãî.
8. Äëÿ òîãî ÷òîáû íàòåðåòü îâîùè è ôðóêòû, òâåðäûå ïðîäóêòû
íà ò¸ðêå èëè íàðåçàòü ëîìòèêàìè, èñïîëüçóéòå ðåæèì «1–5»
â çàâèñèìîñòè îò òâåðäîñòè ïðîäóêòà. Äëÿ èçìåëü÷åíèÿ áîëåå
ìÿãêèõ ïðîäóêòîâ èñïîëüçóéòå èìïóëüñíûé «Turbo» ðåæèì
ðàáîòû.
9. Êîðïóñ ïðèáîðà ñ äâèãàòåëåì (2) ìîæíî ñíÿòü ñ êðûøêè (4)
òîëüêî ïîñëå îòêëþ÷åíèÿ ïðèáîðà. Ïîêà ïðèáîð âêëþ÷åí,
êíîïêó àâòîìàòè÷åñêîãî ñíÿòèÿ íàñàäîê (b) íåëüçÿ íàæàòü.
×òîáû ñíÿòü êîðïóñ ïðèáîðà (2), îòêëþ÷èòå ïðèáîð, íàæìèòå
êíîïêó àâòîìàòè÷åñêîãî ñíÿòèÿ íàñàäîê (b) è ñíèìèòå êîðïóñ
ñ êðûøêè (4).
Насадки
Измельчитель (7)
1. Ýòà íàñàäêà èñïîëüçóåòñÿ äëÿ èçìåëü÷åíèÿ ïðîäóêòîâ (ìÿñà,
îâîùåé).
2. Ñíèìèòå ÷åõîë (8) ñ èçìåëü÷èòåëÿ (7).
3. Óñòàíîâèòå ïåðåõîäíèê (6) íà ñòåðæåíü âíóòðè ÷àøè (5).
Çàêðåïèòå èçìåëü÷èòåëü (7) íà ïåðåõîäíèêå (6).

1616
1616
16
4. Ïåðåä çàãðóçêîé ïðîäóêòîâ, âíèìàòåëüíî ïðîâåðüòå, ÷òîáû
íàñàäêà áûëà óñòàíîâëåíà ïðàâèëüíî.
5. Çàãðóçèòå â ÷àøó (5) âñå íåîáõîäèìûå èíãðåäèåíòû,
ïðåäâàðèòåëüíî ïîðåçàâ èõ, åñëè íåîáõîäèìî, íà áîëåå
ìåëêèå êóñêè 3õ3õ3 ñì.
6. Çàêðîéòå ÷àøó êðûøêîé (4). Ïîâåðíèòå êðûøêó ïðîòèâ
÷àñîâîé ñòðåëêè äî óïîðà. Óáåäèòåñü, ÷òî âñå ÷àñòè ïðèáîðà
óñòàíîâëåíû ïðàâèëüíî. Åñëè Âû íåïðàâèëüíî óñòàíîâèëè
÷àøó (5) èëè êðûøêó (4), ïðèáîð íå âêëþ÷èòñÿ.
7. Ïðèñîåäèíèòå ê ÷àøå (5) êîðïóñ ïðèáîðà (2). Äëÿ ýòîãî
íàæìèòå êíîïêó àâòîìàòè÷åñêîãî âûáðîñà íàñàäîê (b) è
ïîñòàâüòå çàäíþþ ÷àñòü êîðïóñà (2) íà ðó÷êó ÷àøè. Çàòåì
îïóñòèòå ïåðåäíþþ ÷àñòü êîðïóñà (2) íà êðûøêó (4) äî
ùåë÷êà. Îòïóñòèòå êíîïêó àâòîìàòè÷åñêîãî âûáðîñà íàñàäîê
(b). Âñòàâüòå òîëêàòåëü (3) â îòâåðñòèå äëÿ çàãðóçêè.
8. Âêëþ÷èòå ïðèáîð, ïåðåêëþ÷èâøèñü íà ñêîðîñòü «1–5» (à).
Ñðåäíåå âðåìÿ îáðàáîòêè ïðîäóêòîâ —10–30 ñåê.
Примечание: не измельчайте такие очень твердые
продукты, как кофейные зерна, мускатный
орех, лед, т.к. это может затупить нож.
Шинковки и терки (11, 12, 13, 14)
1. Íàñàäêà äëÿ êðóïíîé øèíêîâêè (11) èñïîëüçóåòñÿ äëÿ
íàðåçêè ïðîäóêòîâ òîëñòûìè êðóæî÷êàìè, êðóïíàÿ òåðêà
(13) – äëÿ íàòèðàíèÿ ïðîäóêòîâ òîëñòûìè ïîëîñêàìè.
2. Íàñàäêà äëÿ ìåëêîé øèíêîâêè (12) èñïîëüçóåòñÿ äëÿ íàðåçêè
ïðîäóêòîâ òîíêèìè êðóæî÷êàìè, ìåëêàÿ òåðêà (14)- äëÿ
íàòèðàíèÿ ïðîäóêòîâ òîíêèìè ïîëîñêàìè.
3. Óñòàíîâèòå ïåðåõîäíèê (6) íà ñòåðæåíü âíóòðè ÷àøè (5).
Âñòàâüòå íåîáõîäèìóþ íàñàäêó â äèñê äëÿ íàñàäîê (10),
íàäàâèâ íà áîêîâóþ ñòîðîíó íàñàäêè. Çàòåì âñòàâüòå äèñê
(10) â ïåðåõîäíèê (6).
Примечание: насадка (11–14) устанавливается
режущей стороной вверх.
4. Çàêðîéòå ÷àøó êðûøêîé (4). Ïîâåðíèòå êðûøêó ïðîòèâ
÷àñîâîé ñòðåëêè äî óïîðà. Óáåäèòåñü, ÷òî âñå ÷àñòè ïðèáîðà
óñòàíîâëåíû ïðàâèëüíî. Åñëè Âû íåïðàâèëüíî óñòàíîâèëè
÷àøó (5) èëè êðûøêó (4), ïðèáîð íå âêëþ÷èòñÿ.
5. Ïðèñîåäèíèòå ê ÷àøå (5) êîðïóñ ïðèáîðà (2). Äëÿ ýòîãî
íàæìèòå êíîïêó àâòîìàòè÷åñêîãî âûáðîñà íàñàäîê (b) è
ïîñòàâüòå çàäíþþ ÷àñòü êîðïóñà (2) íà ðó÷êó ÷àøè. Çàòåì
îïóñòèòå ïåðåäíþþ ÷àñòü êîðïóñà (2) íà êðûøêó (4) äî
ùåë÷êà. Îòïóñòèòå êíîïêó àâòîìàòè÷åñêîãî âûáðîñà íàñàäîê
(b). Âñòàâüòå òîëêàòåëü (3) â îòâåðñòèå äëÿ çàãðóçêè.
6. Ìåäëåííî è ðàâíîìåðíî ïðîäâèãàéòå èíãðåäèåíòû
òîëêàòåëåì (3).
7. Ïîñëå îêîí÷àíèÿ èñïîëüçîâàíèÿ êîìáàéíà âûêëþ÷èòå åãî è
îòêëþ÷èòå îò ñåòè.
8. Äëÿ íàòèðàíèÿ è íàðåçêè òâåðäûõ ïðîäóêòîâ èñïîëüçóéòå
ðåæèì «1–5» â çàâèñèìîñòè îò òâåðäîñòè ïðîäóêòà. Äëÿ
ìÿãêèõ ôðóêòîâ ìîæíî âîñïîëüçîâàòüñÿ ðåæèìîì «Turbo».
9. Êðóïíûå êóñêè ïðîäóêòîâ íåîáõîäèìî ïðåäâàðèòåëüíî
ðàçðåçàòü íà áîëåå ìåëêèå ÷àñòè, ÷òîáû îíè ìîãëè ëåãêî
ïðîõîäèòü ÷åðåç îòâåðñòèå äëÿ çàãðóçêè.

1717
1717
17
ÐÓÑÑÊÈÉ
Внимание: будьте предельно осторожны, когда
вставляете диск с насадками (10) или
измельчитель (7) в переходник (6). Ножи
терок очень острые! Соблюдайте особую
осторожность при извлечении насадок.
Насадка для соусов/кремов (9)
1. Ýòà íàñàäêà èñïîëüçóåòñÿ äëÿ ïðèãîòîâëåíèÿ ìàéîíåçà,
âçáèâàíèÿ ëåãêîãî êðåìà è áåëêîâ.
2. Óñòàíîâèòå ïåðåõîäíèê (6) íà ñòåðæåíü âíóòðè ÷àøè (5).
Çàêðåïèòå íàñàäêó (9) íà ïåðåõîäíèêå (6).
3. Ïåðåä çàãðóçêîé ïðîäóêòîâ, âíèìàòåëüíî ïðîâåðüòå, ÷òîáû
íàñàäêà áûëà óñòàíîâëåíà ïðàâèëüíî.
4. Çàãðóçèòå â ÷àøó (5) âñå íåîáõîäèìûå èíãðåäèåíòû.
5. Çàêðîéòå ÷àøó êðûøêîé (4). Ïîâåðíèòå êðûøêó ïðîòèâ
÷àñîâîé ñòðåëêè äî óïîðà. Óáåäèòåñü, ÷òî âñå ÷àñòè ïðèáîðà
óñòàíîâëåíû ïðàâèëüíî. Åñëè Âû íåïðàâèëüíî óñòàíîâèëè
÷àøó (5) èëè êðûøêó (4), ïðèáîð íå âêëþ÷èòñÿ.
6. Ïðèñîåäèíèòå ê ÷àøå (5) êîðïóñ ïðèáîðà (2). Äëÿ ýòîãî
íàæìèòå êíîïêó àâòîìàòè÷åñêîãî âûáðîñà íàñàäîê (b) è
ïîñòàâüòå çàäíþþ ÷àñòü êîðïóñà (2) íà ðó÷êó ÷àøè. Çàòåì
îïóñòèòå ïåðåäíþþ ÷àñòü êîðïóñà (2) íà êðûøêó (4) äî
ùåë÷êà. Îòïóñòèòå êíîïêó àâòîìàòè÷åñêîãî âûáðîñà íàñàäîê
(b). Âñòàâüòå òîëêàòåëü (3) â îòâåðñòèå äëÿ çàãðóçêè.
7. Âêëþ÷èòå ïðèáîð, ïåðåêëþ÷èâøèñü íà ñêîðîñòü «1-5» (à).
Миксер
1. Ïåðåä òåì êàê óñòàíîâèòü íàñàäêè, ïðîâåðüòå, ÷òî
ïåðåêëþ÷àòåëü ñêîðîñòè (à) óñòàíîâëåí â ïîçèöèþ «0», è
ñåòåâîé øíóð îòñîåäèíåí îò ýëåêòðè÷åñêîé ñåòè. Ñíèìèòå
êîðïóñ ïðèáîðà ñ äâèãàòåëåì (2) ñ êðûøêè (4).
2. Âåí÷èêè äëÿ âçáèâàíèÿ (15) Âû ìîæåòå óñòàíàâëèâàòü â
êîðïóñ ïðèáîðà (2) â ïðîèçâîëüíîì ïîðÿäêå. Óñòàíîâèòå èõ
â îòâåðñòèÿ äëÿ ôèêñàöèè íàñàäîê (18 è 19) äî ùåë÷êà.
3. Íàñàäêè äëÿ çàìåøèâàíèÿ òåñòà (16) ìîãóò áûòü óñòàíîâ-
ëåíû òîëüêî ñëåäóþùèì îáðàçîì: íàñàäêà ñ øàéáîé (17)
äîëæíà áûòü óñòàíîâëåíà â áîëüøîå îòâåðñòèå äëÿ ôèêñàöèè
íàñàäîê (19), à âòîðàÿ íàñàäêà (áåç øàéáû) óñòàíàâëèâàåòñÿ
â ìàëåíüêîå îòâåðñòèå (18). Íàñàäêè óñòàíàâëèâàþòñÿ äî
ùåë÷êà.
4. Ïåðåä âêëþ÷åíèåì ïðèáîðà óáåäèòåñü, ÷òî îáå íàñàäêè
óñòàíîâëåíû ïðàâèëüíî!
5. Çàãðóçèòå â ÷àøó (5) âñå íåîáõîäèìûå èíãðåäèåíòû.
Îïóñòèòå ìèêñåð ñ íàñàäêàìè â ÷àøó.
6. Âêëþ÷èòå ïðèáîð, óñòàíîâèâ ïåðåêëþ÷àòåëü ñêîðîñòåé (à)
íà ñêîðîñòü «1–5».Âñåãäà íà÷èíàéòå ðàáîòó ìèêñåðà ñ
ìèíèìàëüíîé ñêîðîñòè, ïîñòåïåííî óâåëè÷èâàÿ îáîðîòû.
Âðåìÿ íåïðåðûâíîé ðàáîòû ìèêñåðà íå äîëæíî ïðåâûøàòü
5 ìèí.
7. Ïî îêîí÷àíèè èñïîëüçîâàíèÿ ïðèáîðà óñòàíîâèòå ðåãóëÿòîð
ñêîðîñòè (à) â ïîëîæåíèå «0».
8. Íàæìèòå êíîïêó àâòîìàòè÷åñêîãî âûáðîñà íàñàäîê (b), ÷òîáû
èçâëå÷ü èõ èç êîðïóñà ïðèáîðà (2).

1818
1818
18
Полезные советы
!Âåí÷èêè äëÿ âçáèâàíèÿ (15) ðåêîìåíäóåòñÿ èñïîëüçîâàòü
äëÿ ïðèãîòîâëåíèÿ ïóäèíãîâ, ïþðå, æèäêîãî òåñòà (íàïðèìåð,
áëèííîãî), äëÿ âçáèâàíèÿ êðåìîâ è ÿè÷íûõ áåëêîâ (íàïðèìåð,
äëÿ ïðèãîòîâëåíèÿ áåçå). Âûáîð ñêîðîñòíîãî ðåæèìà:
Ñêîðîñòü Ôóíêöèÿ Èñïîëüçîâàíèå
1 íèçêàÿ Ñîåäèíÿòü Äëÿ ïðèãîòîâëåíèÿ ñîóñîâ, ïóäèí-
êîìïîíåíòû ãîâ, òåñòà äëÿ áóëî÷åê è îëàäüåâ
2 íèçêàÿ– Ñìåøèâàòü Äëÿ ñìåøèâàíèÿ æèäêèõ è ñóõèõ
ñðåäíÿÿ èíãðåäèåíòîâ, âçáèâàíèÿ ÿèö
3 ñðåäíÿÿ Âçáàëòû- Äëÿ ïðèãîòîâëåíèÿ æèäêîãî
âàòü òåñòà è ñìåñåé
4 ñðåäíÿÿ– Âçáèâàòü Äëÿ ñìåøèâàíèÿ ìàñëà ñ
âûñîêàÿ ñàõàðîì, ïðèãîòîâëåíèÿ òåñòà
äëÿ ïå÷åíüÿ, ñìåñåé äëÿ
ïèðîæíûõ è ãëàçóðåé
5 âûñîêàÿ Âçáèâàòü Äëÿ ïðèãîòîâëåíèÿ ëåãêèõ
â ïåíó ïåíèñòûõ ñìåñåé, âçáèòûõ
ñëèâîê, âçáèâàíèÿ áåëêîâ è ò.ï.
!Íàñàäêè äëÿ çàìåøèâàíèÿ òåñòà (16) ñëåäóåò ïðèìåíÿòü
äëÿ òåñòà ñðåäíåé êîíñèñòåíöèè. Î÷åíü êðóòîå òåñòî
ðåêîìåíäóåòñÿ çàìåøèâàòü âðó÷íóþ. Äëÿ çàìåñà òåñòà
îïòèìàëüíûìè ÿâëÿþòñÿ 1 è 2 ñêîðîñòíûå ðåæèìû.
!Âû ìîæåòå èçìåíÿòü ñêîðîñòü ðàáîòû ïðèáîðà â ïðîöåññå
èñïîëüçîâàíèÿ.
!Êíîïêà òóðáî–ðåæèìà (c) ïðåäîñòàâëÿåò äîïîëíèòåëüíóþ
âîçìîæíîñòü óâåëè÷åíèÿ ñêîðîñòè ðàáîòû â òå÷åíèå êîðîòêèõ
ïðîìåæóòêîâ âðåìåíè. Ýòà ôóíêöèÿ ìîæåò áûòü àêòèâèçè-
ðîâàíà íà ëþáîé èç ïÿòè ñêîðîñòåé. Äëÿ ýòîãî íóæíî íàæàòü
êíîïêó (c) è óäåðæèâàòü åå â òàêîì ïîëîæåíèè. Âðåìÿ
íåïðåðûâíîé ðàáîòû ìèêñåðà â ðåæèìå òóðáî íå äîëæíî
ïðåâûøàòü 1 ìèíóòó.
!Ïðè ïðèãîòîâëåíèè ïþðåîáðàçíîé ìàññû èç ôðóêòîâ ñíà÷àëà
ñëåäóåò îáðàáàòûâàòü áîëåå òâåðäûå ôðóêòû, à çàòåì
äîáàâëÿòü ìÿãêèå. Äëÿ ëó÷øåãî ðåçóëüòàòà ìîæíî ïðè
îáðàáîòêå äîáàâëÿòü íåìíîãî ñîêà/âîäû.
!Äëÿ ñûðà èñïîëüçóéòå íàñàäêè — òåðêè (13, 14). Ïðè
íàòèðàíèè òâåðäûé ñûð äîëæåí áûòü äîâåäåí äî êîìíàòíîé
òåìïåðàòóðû, à ìÿãêèé ñûð íàòèðàþò õîëîäíûì, ñðàçó ïîñëå
õîëîäèëüíèêà.
УХОД И ЧИСТКА
1. Ïåðåä ÷èñòêîé ïðèáîðà âñåãäà îòêëþ÷àéòå
åãî îò ñåòè.
2. Íå èñïîëüçóéòå æåñòêèå àáðàçèâíûå
ñðåäñòâà äëÿ ÷èñòêè ïðèáîðà.
3. Ïîñëå êàæäîãî èñïîëüçîâàíèÿ ïðîòèðàéòå
êîðïóñ ïðèáîðà (2). Íå ïîãðóæàéòå êîðïóñ
ïðèáîðà (2) è øíóð â âîäó èëè ëþáóþ
äðóãóþ æèäêîñòü.

1919
1919
19
ÐÓÑÑÊÈÉ
4. Âûìîéòå âñå íàñàäêè, êðûøêó (4), ÷àøó (5) è òîëêàòåëü (3)
â ìûëüíîé âîäå, îïîëîñíèòå è òùàòåëüíî âûñóøèòå.
5. ×èñòèòå êîìáàéí êàæäûé ðàç ñðàçó ïîñëå èñïîëüçîâàíèÿ!
ПОЛЕЗНЫЕ РЕЦЕПТЫ
Бисквит
ßéöà – 3 øò.
Âîäà (35°Ñ) – 30 ìë
Ñîëü – íà êîí÷èêå íîæà
Âàíèëüíûé ñàõàð – 1 ïàêåòèê
Ñàõàð – 150 ã
Ìóêà – 150 ã
Ïåêàðñêèé ïîðîøîê – 3 ã
Äëÿ çàìåñà òåñòà èñïîëüçóéòå íàñàäêó äëÿ âçáèâàíèÿ (15).
Âçáèâàéòå ÿéöà ñ âîäîé â òå÷åíèå ïðèáëèçèòåëüíî 2-õ ìèíóò.
Ïîñòåïåííî äîáàâüòå ñàõàð, âàíèëüíûé ñàõàð è ñîëü.
Ïåðåìåøàéòå âñå ïðèìåðíî â òå÷åíèå ìèíóòû. Ñìåñü äîëæíà
ñòåêàòü ñ ëîæêè, íî ïðè ýòîì äîëæíà áûòü äîñòàòî÷íî ãóñòàÿ.
Îñòîðîæíî äîáàâüòå â ñìåñü ìóêó è ïåêàðñêèé ïîðîøîê, åùå ðàç
âñå ðàçìåøàéòå. Âûïåêàéòå áèñêâèò â äóõîâêå ïðè òåìïåðàòóðå
180°Ñ â òå÷åíèå 30 ìèíóò.
Соус майонез
Æåëòêè ÿèö – 6 øò.
Ãîð÷èöà ñòîëîâàÿ – 25 ã
Ëèìîí – 1 øò.
Óêñóñ – 20 ã
Ðàñòèòåëüíîå ìàñëî – 800 ã
Ñîëü, ïåðåö – ïî âêóñó
Ïðè ïîìîùè íàñàäêè äëÿ ñîóñîâ (9) ñìåøàéòå ñûðûå ÿè÷íûå
æåëòêè ñ ãîð÷èöåé, ñîëüþ è ëèìîííûì ñîêîì. Ìàññó õîðîøî
ðàçìåøàòü, çàòåì ïðè íåïðåðûâíîì âçáèâàíèè âëèòü ìàñëî äî
ïîëó÷åíèÿ ãóñòîãî ñîóñà.  ïðèãîòîâëåííûé ñîóñ âëèòü óêñóñ è
ëèìîííûé ñîê âòîðîé ïîëîâèíû ëèìîíà è ñíîâà âçáèòü.
Çàïðàâèòü ÷åðíûì ïåðöåì.
Итальянский томатный соус
Ïîìèäîðû – 4-6 øò.
Ëóê ðåï÷àòûé – 40 ã
×åñíîê – 2 çóá÷èêà
Ñåëüäåðåé – 40 ã
Çåëåíü ïåòðóøêè
Áàçèëèê – íåñêîëüêî ëèñòèêîâ
Ðàñòèòåëüíîå ìàñëî – 2–4 ñò. ë.
Ñîëü, ïåðåö – ïî âêóñó
Ïîðåæüòå âñå èíãðåäèåíòû èçìåëü÷èòåëåì (7), ïîñîëèòå,
ïîïåð÷èòå. Ïåðåëîæèòå ïîëó÷åííóþ ìàññó â êàñòðþëþ è òóøèòå
ñ ìàñëîì íà ìåäëåííîì îãíå íåñêîëüêî ìèíóò ïîñòîÿííî
ïîìåøèâàÿ.

2020
2020
20
Блины
Ìóêà – 2–3 ñò.
ßéöà – 2–3 øò.
Ìîëîêî – 1 ë
Ðàñòèòåëüíîå ìàñëî – 2 ñò. ë.
Ðàçðûõëèòåëü
Âàíèëüíûé ñàõàð
Ñîëü, ñàõàð – ïî âêóñó
Èñïîëüçóéòå íàñàäêó äëÿ ïðèãîòîâëåíèÿ òåñòà (16).
Ñìåøàéòå ñûðûå ÿéöà ñ ñàõàðîì, ñîëüþ, âàíèëüíûì ñàõàðîì.
Äîáàâüòå ìóêó, ðàçðûõëèòåëü, è ïîë ëèòðà ìîëîêà. Ïåðåìå-
øàéòå èíãðåäèåíòû. Ïîëó÷èâøàÿñÿ ìàññà ïî êîíñèñòåíöèè
äîëæíà íàïîìèíàòü ãóñòóþ ñìåòàíó. Çàòåì äîáàâüòå ðàñòè-
òåëüíîå ìàñëî è ñíîâà ïåðåìåøàéòå. Äîáàâüòå îñòàâøååñÿ
ìîëîêî, ïðåäâàðèòåëüíî ïîäîãðåâ åãî (íî íå äî êèïåíèÿ).
Ðàçìåøàéòå ïîëó÷èâøóþñÿ ìàññó äî îäíîðîäíîãî ñîñòîÿíèÿ.
Âûïåêàòü áëèíû íà ðàçîãðåòîé ñêîâîðîäå, ñìàçàííîé ìàñëîì.
Ïîäàâàòü áëèíû ñëåäóåò ãîðÿ÷èìè ñ ìàñëîì, ñìåòàíîé, èëè
ñãóùåííûì ìîëîêîì. Î÷åíü âêóñíî, åñëè â áëèí çàâåðíóòü êóñî÷åê
êðàñíîé ðûáû (ãîðáóøè).
Фаршированные перцы
Êóðèíûé ôàðø – 500 ã
Ðèñ – 150 ã
Ìîðêîâü – 200 ã
Ñëàäêèé ïåðåö – 1 êã
Ñîëü, òîìàòíàÿ ïàñòà – ïî âêóñó
Ñ ïîìîùüþ èçìåëü÷èòåëÿ (7) ïðèãîòîâüòå êóðèíûé ôàðø.
Îòâàðèòå ðèñ, íî íå äî ãîòîâíîñòè, ñìåøàéòå åãî ñ ôàðøåì,
ïîñîëèòå. Âûíüòå èç ïåðöåâ ñåðäöåâèíó, çàïîëíèòå èõ ôàðøåì
(íî íå äî êîíöà), ñâåðõó äîáàâüòå òåðòóþ ìîðêîâü. Ïåðöû óëî-
æèòå â áîëüøóþ êàñòðþëþ, çàëåéòå êèïÿ÷åíîé âîäîé, äîáàâüòå
òîìàòíîé ïàñòû. Âàðèòå 30–40 ìèíóò, ïîñîëèòå ïî âêóñó.
МЕРЫ БЕЗОПАСНОСТИ
Âî âðåìÿ ýêñïëóàòàöèè ïðèáîðà âñåãäà
ñîáëþäàéòå ñëåäóþùèå ìåðû ïðåäîñòîðîæíîñòè:
!Ïåðåä ïåðâûì èñïîëüçîâàíèåì ïðîâåðüòå,
ñîîòâåòñòâóåò ëè íàïðÿæåíèå, óêàçàííîå íà
ïðèáîðå, íàïðÿæåíèþ ýëåêòðè÷åñêîé ñåòè â
Âàøåì äîìå.
!Èñïîëüçóéòå ïðèáîð òîëüêî â öåëÿõ, ïðåäóñìîò-
ðåííûõ èíñòðóêöèåé.
!Èñïîëüçóéòå òîëüêî ïðèñïîñîáëåíèÿ, âõîäÿùèå â êîìïëåêò
ïðèáîðà.
!Âî èçáåæàíèå ïîðàæåíèÿ ýëåêòðè÷åñêèì òîêîì íå
ïîãðóæàéòå êîðïóñ ïðèáîðà, âèëêó èëè ýëåêòðè÷åñêèé
øíóð â âîäó èëè äðóãèå æèäêîñòè. Ñòàâüòå ïðèáîð â
òàêèå ìåñòà, ãäå îí íå ìîæåò óïàñòü â âîäó èëè äðóãèå
æèäêîñòè. Ïðè ïîïàäàíèè âîäû íà ïðèáîð, íåìåäëåííî
îòêëþ÷èòå åãî îò ñåòè. Íå ïîëüçóéòåñü ïðèáîðîì, óïàâøèì
â âîäó. Îòíåñèòå åãî â óïîëíîìî÷åííûé ñåðâèñíûé öåíòð.
Table of contents
Languages:
Other Binatone Food Processor manuals
Popular Food Processor manuals by other brands

Silvercrest
Silvercrest SKM 550 A1 Operating instruction

Silvercrest
Silvercrest SMZT 500 A1 operating instructions

Silvercrest
Silvercrest SKM 550 B1 operating instructions

Silvercrest
Silvercrest 360748 2007 operating instructions

Silvercrest
Silvercrest SKMP 1200 A2 operating instructions

Silvercrest
Silvercrest SKM 550 B1 operating instructions