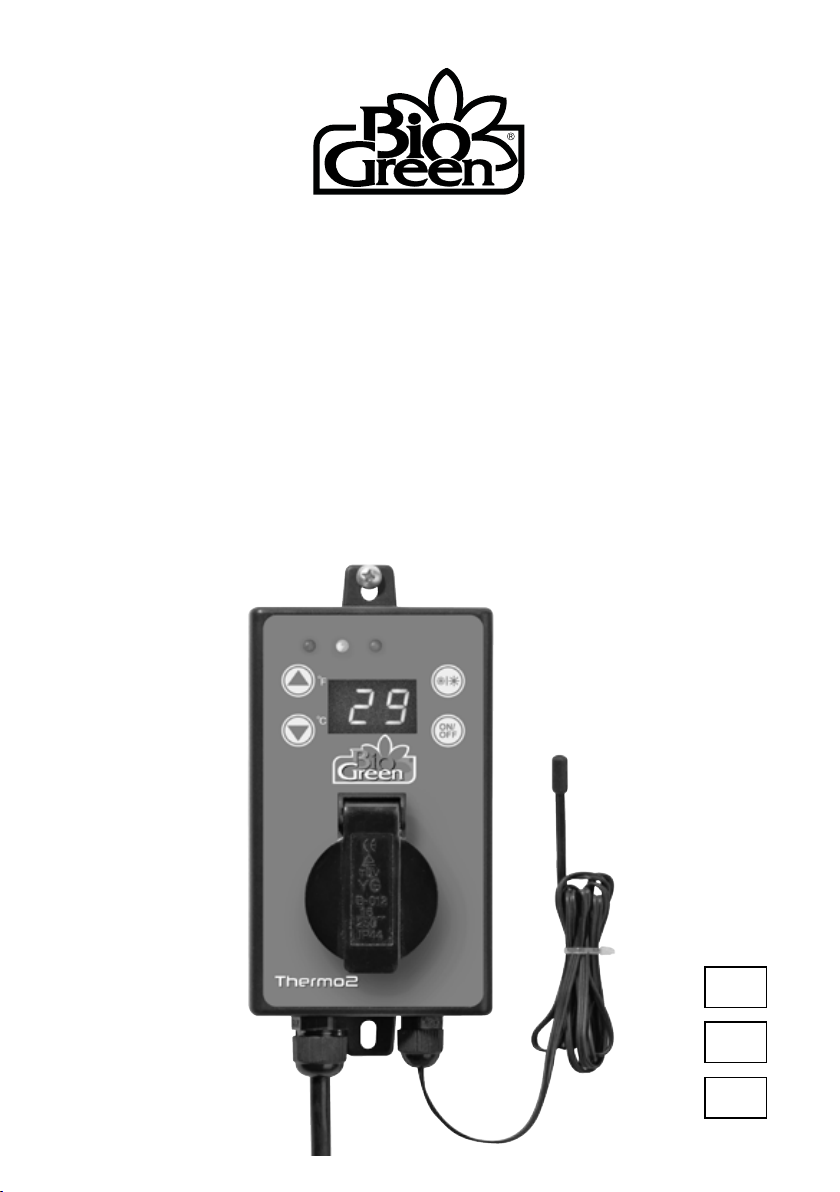
Bio Green Thermo 2 User guide
US
ES
FR
Installation and operating instruction
Digital-Thermostat
Instrucciones de instalación y funcionamiento Termostato Digital
Notice de montage et d‘utilisation du Thermostat Digital
THERMO 2

2
Operating instructions................................................................................................................................................. 2
Instrucciones de funcionamiento.......................................................................................................................... 10
Notice d‘utilisation ........................................................................................................................................................ 17
US
Index
Do not drink any alcohol or take any drugs before or during
the installation of the Thermo 2 and follow the safety
instructions carefully.
Read all instructions first before installing the
Thermo 2 Digital thermostat!
ES
No beba alcohol ni consuma drogas antes o durante la
instalación del Thermo 2 y siga cuidadosamente las
instrucciones de seguridad.
¡Lea todas las instrucciones antes de instalar el
termostato Thermo 2 Digital!
Ne buvez pas d‘alcool et ne prenez pas de drogue avant
ou pendant le montage du Thermo 2 et suivez attentivement
les conseils de sécurité.
Lisez attentivement toutes les instructions avant de monter
le thermostat digital Thermo 2 !
FR
3
1. Scope of supply
1 Digital-Thermostat Thermo 2, Incl. suspension device
2. Technical data
Type of unit: Thermo 2
Power supply: 110VAC ±10%, 50/60Hz
Max. breaking capacity: 1500 W
Output capacity: 15A/125VAC
Control range: 0 – 40 °C / ± 0 – 90 °F
Distinction rate: ± 1 °C / ± 1 °F
Measuring temperature range: -50 to 108 °F
Switching accuracy: ± 1 °C / ± 2 °F
Input: < 1,5 W
Protection class: II
Protective system: IP X4
Sensor length: approx. 40“
Note:
Measuring temperature range: -50 to 108 °F
A0--100 °F A01--101°F A02--102°F A03--103°F A04--104°F
A05--105°F A06--106°F A07--107°F A08--108°F
3. General
After unpacking and before switching on, make sure that the unit and all its accessories
are perfectly in order. If there has been any damage in transit, consult your dealer or
the manufacturer immediately. Keep the packaging materials (polythene bag, polys-ty
rene, nails etc.) out of reach of children because they represent a potential source of
danger. This also applies to small parts supplied, which can be swallowed. This electr-o
nic thermostat can be used for a wide variety of temperature control applications, for
example for heating and cooling greenhouses and winter gardens, or for monitoring
water temperatures in aquariums, the air temperature in terrariums or the soil temp-e
rature in seed beds. It is simple to operate and can be connected to any type of heating
cable, heating mat or other heating or cooling devices, provided that the maximum
heating power of 1500 W is not exceeded. This thermostat is only licensed for connecti-
on to 110VAC ±10%, 50/60Hz voltage. The unit must be protected from high degrees of
contamination and moisture. If it is used for any application other than that described
above it may be damaged and risks such as short-circuiting, fire, electric shock etc. may
ensue. The safety and installation in-structions must be strictly adhered to.
IMPORTANT:
Read carefully and follow these instructions as well as the general advice
on safety and risks before installation. Keep this leaflet in a safe place for
future reference. If you have any doubt about the safety of the unit seek
the advice of an expert. If the unit is used in a greenhouse make sure that
the electrical connections are carried out by qualified personnel.

4
4. Advice on safety and risks
• Only a 110VAC ± 10%, 50/60Hz mains socket in the public supply network may
be used as a power source. Never try to operate the unit at a different voltage.
• Consult an expert if you have any doubts about the operation, safety
or connection of the unit.
• This unit may only be used indoors.
• When opening the cover or removing parts, the unit must be disconnected
from the mains supply.
• Never switch the mains plug on or off with wet hands.
• Never pull on the mains cable itself, always pull the plug
out of the socket by the gripping surfaces.
• Do not use the unit in an easily inflammable atmosphere (e.g. in the vicinity of
fuel gas or spray bottles). Risk of explosion and fire!
• Never install the unit close to water cocks, washbasins or other water sources.
• Do not insert any objects in the openings of the unit. Risk of injury, electric
shock or damage to the unit!
• When assembling make sure that the connecting cable is not squeezed or
damaged by sharp edges. If such damage gives rise to open points on the unit
it must under no circumstances be connected to the mains supply. Danger!
• Always pull the plug out of the socket before cleaning the unit. Only clean
with a dry cloth.
• Remove the plug from the socket whenever the unit is switched off.
• If it is to be assumed that harmless operation is no longer possible, the unit
must be switched off and protected against unintentional operation, which is
the case when:
• the unit or mains cable show visible damage
• the unit no longer operates
• after being stored for a long time under unfavourable conditions
• after heavy transport loads
• Units that operate on mains voltage should not get into the hands of children.
• The unit is not suitable for use in cattle breeding areas.
• These instructions for use form part of the unit and should be
kept in a safe place. If the unit is passed on to third parties these instructions for
use should also be provided.
• In industrial installations the accident prevention regulations of the
Industrial Professional Association for Electrical Installations and Equipment
must be complied with.
• Never pour liquids over the unit as this presents the risk of a fire or‚ fatal
electric shock. If this should happen, however, pull the plug out of the socket
and consult a specialist.
• If you are uncertain about correct connection, or if you have any questions
which are not clarified in the course of the instruction,
contact the manufacturer or a specialist.
• This unit is not intended for use by persons (including children) with limited
physical, sensory or mental capacity. This also applies to persons who do not have
sufficient experience in or knowledge of handling the product, unless they are
being supervised or instructed in the use of the unit by a person responsible for
their safety.

5
5. Installation
Make sure that the mains voltage corresponds to the voltage indicated in Chapter 2
(technical data). The place of installation must be chosen so that the unit can under no c-ir
cumstances get wet (e.g. dripping condensation, open roof hatches, etc.) or fall into water.
The thermostat may be operated in a
horizontal or vertical position.
1. Connect the heating or cooling
unit to the thermostat. To do
so, insert the plug of the corres-
ponding heating or cooling unit
in the socket on the thermostat.
2. Now connect the connecting
cable of the thermostat to a
110VAC mains socket.
3. Position the end of the sensor
cable at the most suitable
point for temperature control.
Room temperature control
The sensor should be installed at half room height
and should be freely suspended. The room tempe-
rature can only be optimally controlled when the
sensor is not influenced by draughts, solar radiation
or other heat or cold sources.
Cultivation of plants and seeds
Position the sensor in the soil close to
the roots. The sensor must be entirely surrounded
by soil. In large plant pots the
sensor should be located in the middle of the pot.
Water temperature control
For water temperature control (e.g. in an aquarium), the sensor should be positioned
in the central layers of water. Here too the sensor must be completely surrounded by
water.
6
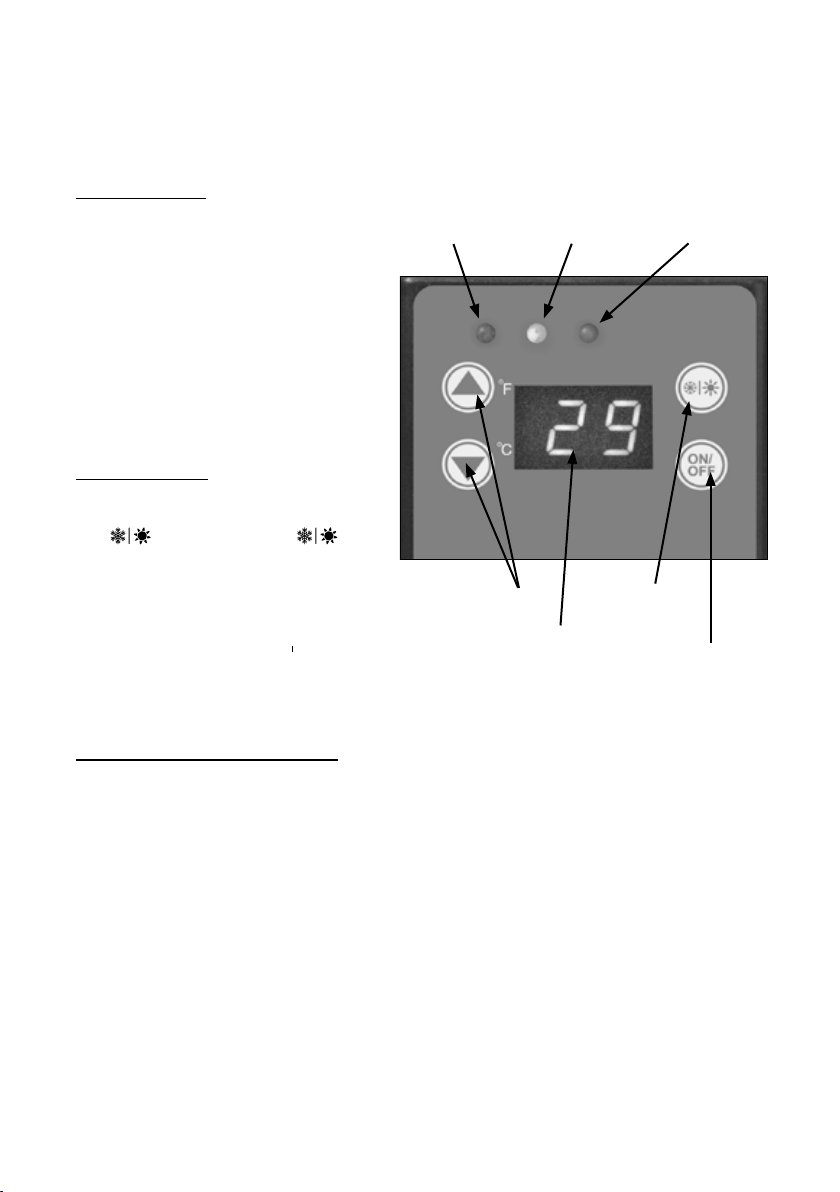
6. Operation
When installing, check that the unit or mains cable is not damaged. Also make sure
that the sensor cable has not become sharply kinked as this may impair operation.
Switching on/off
As soon as the unit has been connec-
ted to the supply voltage it can be
switched on by means of the „ON/
OFF“ button. To do this the button
must be press for 3 seconds. Imme-
diately after switching on the unit
determines the ambient tempera-
ture of the sensor and indicates it
on the display. To switch off, again
press the „ON/OFF“ button for 3 se-
conds.
Heat/Cool mode
It is possible to alternate between
the heat and cool mode by pressing
the button. Keep the
button pressed for 3 seconds to
change mode. On the display „H“ ap-
pears for 4 seconds for heating and
„C“ for cooling. At the same time you
can detect the mode that has been
set by means of the The red LED
stands for heating and the green
LED for cooling.
Setting the required temperature
Press the por qbutton briefly to switch to the setting mode. The already set tem-
perature now flashes in the display. Using the pand qbuttons you can change the
temperature in 1 °F steps. (Setting range -50 °F to +99 °F). After you have set a new
temperature, it is saved automatically and the menu closes after 3 seconds. Now the
display again shows the current ambient temperature.
Celsius/Fahrenheit unit selection:
Under normal running status, short press qkey or pkey and immediately release it, it
enters to temperature setting state, and it blinkingly displays the current set tempera-
ture. At this time, hold and press C / H key for more than 5 seconds , the system enters
Celsius and Fahrenheit setting state , LED blinkingly flashes C and F. Switch between
Celsius and Fahrenheit by pressing qkey or pkey. When finish setting, it will exit
in 3s if there is no key operation, and return to the normal running state and save the
parameters automatically. If an error occurs during saving parameter, it displays „Er“,
and 3 seconds later, it returns to normal display state.
Heat
LED
Heat and cool
mode on LED
Cool
LED
Temperature
selction buttons
Display /
Temp indication
Cool /Heat
mode
On/Off
button
7
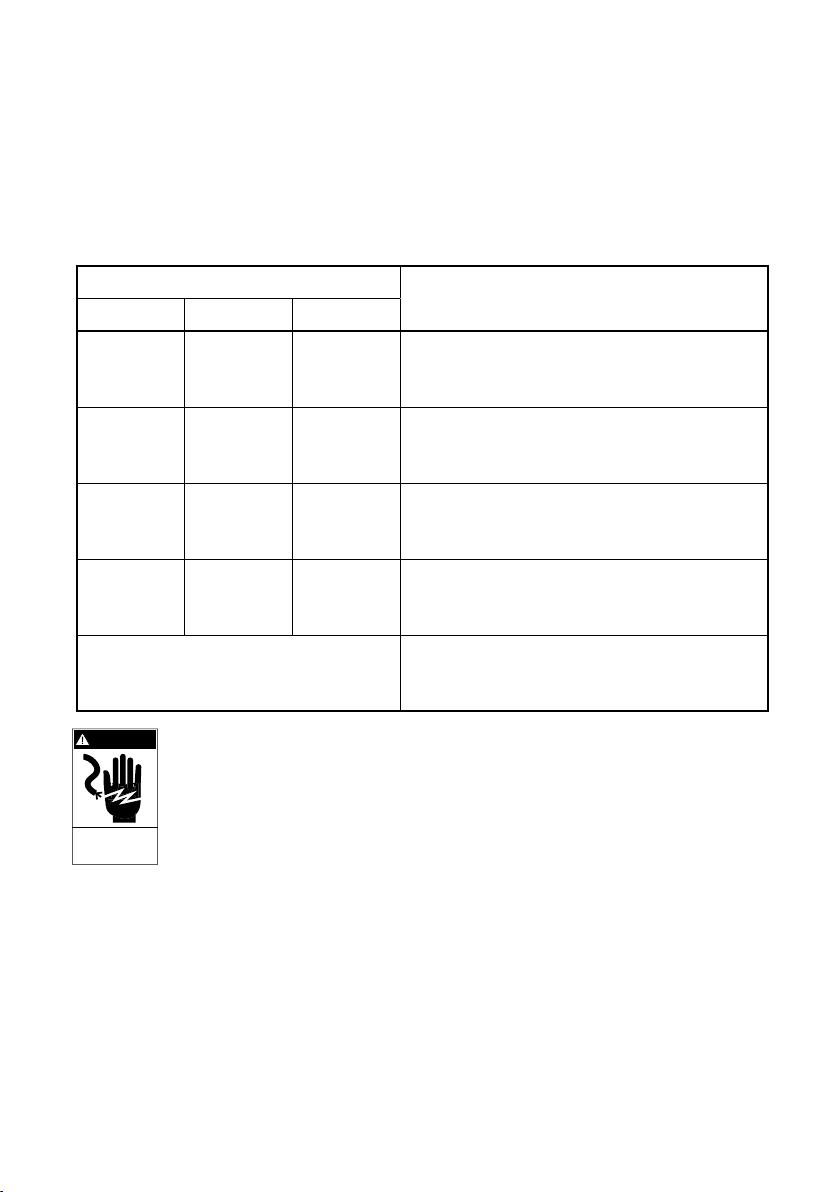
Operating modes
It is indicated by the yellow LED whether the heat or cool mode is active.
LED‘s Operating mode
red yellow green
on off off
“Heat” mode selected /
theoretical temperature reached / heat
mode off
on on off
“Heat” mode selected /
theoretical temperature not reached/
heat mode on
off off on
“Cool” mode selected /
theoretical temperature reached / cool
mode off
off on on
“Cool” mode selected /
theoretical temperature not reached /
cool mode on
Display shows “HH” with signal tone
Interrupted working circuit or shortcircuit
or temperature above 99°C (or
108 °F)/ heat mode off
8. Disposal and repair
• Take units to be disposed of to a suitable waste reception depot only.
• Repairs to the unit may only be carried out by authorised specialists.
Please therefore consult the manufacturer or dealer.
• N.B. If the unit is not correctly repaired the warranty will not be valid.
• Incorrectly carried out repairs may represent a danger to the user and other people.
7. Cleaning
• Switch off the thermostat before cleaning and remove the plug.
• Do not use any grinding, etching or cleaning agents.
• Clean the casing with a damp cloth (not wet), vacuum cleaner or
feather duster.
• Never immerse the unit in water. Danger!
• If the unit is not used for a long time it is necessary to protect it from
excessive dust and dirt.

9. MANUFACTURER’S REPESENTATIONS AND WARRANTIES
Bio Green oHG
Marburger Str. 1b
35649 Bischoffe-Oberweidbach
Phone: +49 64 44 / 93 12 0
Fax: +49 6444 / 6162
Email: [email protected]
Web: www.biogreen.de
These Representations and Warranties are applicable to all customers (the “Customers” and
each, individually, a “Customer”) purchasing products (the “Products”) manufactured by Bio
Green oHG (the “Company”).
1. Warranty and Limitations:
1.1. Company warrants solely to the original purchaser of the Products that for the Warranty
Period (as defined below), the Products will be free from defects in materials and workmans-
hip under normal use, and will conform to Company’s published specifications of the Products.
Notwithstanding the foregoing, Company retains its right to deviate from its published specifi-
cations due to the latest innovations and improvements in function and design of the Products.
1.2. The foregoing warranty is subject to the proper storage, transportation and use of the Pro-
ducts, and does not include defects due to normal wear and tear or deterioration.
1.3. Customer shall immediately, but in any event no later than eight (8) days following deli-
very of the Product, inspect the Products for conformity and visible defects. Customer shall
give Company immediate written notice of any non-conformities or visible defects regarding
the Products. In the event that Customer fails to provide the Company within eight (8) days
following delivery of the Products with notice of any non-conformities or visible defects, any
warranty claims in this regard shall be deemed waived.
1.4. Customer shall immediately notify Company in writing of any other defects of the Products
and return such defective Product. Prior to any shipment of a defective Product, Customer shall
contact Company first at the address provided in 1.9. Company’s sole obligation under the fore-
going warranty is, at Company’s option and in its sole discretion, to repair, replace or exchange
the defective Product. Any repaired, replaced or exchanged Products shall be subject to this
warranty, following their repair, replacement or exchange. If Company has received notificati-
on from Customer, and no defects of the Product could be discovered, Customer shall bear the
costs that Company incurred as a result of the notice. It shall be in Company’s sole discretion to
determine if the Product has a defect. In no event shall Company bear the costs of disassembly.
1.5. With respect to orders made to custom, any defects of the Products caused by Customer’s
specifications are excluded from the warranty set forth in 1.1.
1.6. Company also makes no warranty that the Products manufactured under an order made to
custom do not infringe the intellectual property or other proprietary rights of any third party
and Customer is solely responsible for assuring that such Products do not so infringe.

9
1.7. The “Warranty Period” begins on the date of delivery of the Product to Customer, and cont-
inues to be in effect for twenty-four (24) months. The “Warranty Period” shall be suspended for
the time of repair, replacement or exchange until the repaired, exchanged or replaced product
has been returned to Customer.
1.8. Company does not authorize any person or party to assume or create for it any other obliga-
tion or liability in connection with the Products except as set forth herein.
1.9. All requests and notices under this Warranty shall be directed to:
Bio Green USA, Inc.
350 Fifth Avenue, Suite 5220
New York, NY 10118
Phone:
1-800-941-3169
Email:
1.10. THE WARRANTY SET FORTH IN SECTION 1.1 IS MADE IN LIEU OF ALL OTHER WARRANTIES
(WHETHER EXPRESS OR IMPLIED), RIGHTS OR CONDITIONS, AND CUSTOMER ACKNOWLEDGES
THAT EXCEPT FOR SUCH LIMITED WARRANTY, THE PRODUCTS ARE PROVIDED “AS IS.” COM-
PANY SPECIFICALLY DISCLAIMS, WITHOUT LIMITATION, ALL OTHER WARRANTIES, EXPRESS
OR IMPLIED, OF ANY KIND, INCLUDING, WITHOUT LIMITATION, THE IMPLIED WARRANTIES OF
MERCHANTABILITY AND FITNESS FOR A PARTICULAR PURPOSE, NON-INFRINGEMENT, AND
THOSE WARRANTIES ARISING FROM A COURSE OF PERFORMANCE, A COURSE OF DEALING OR
TRADE USAGE.
2. Limitation of Liability:
2.1. IN NO EVENT SHALL COMPANY BE LIABLE FOR ANY INDIRECT, INCIDENTAL, PUNITIVE, SPE-
CIAL OR CONSEQUENTIAL DAMAGES, INCLUDING BUT NOT LIMITED TO, DAMAGES FOR LOSS
OF PROFITS, REVENUE, GOODWILL OR USE, INCURRED BY CUSTOMER OR ANY THIRD PARTY,
WHETHER IN AN ACTION IN CONTRACT, TORT, STRICT LIABILITY, OR IMPOSED BY STATUTE, OR
OTHERWISE, EVEN IF ADVISED OF THE POSSIBILITY OF SUCH DAMAGES. COMPANY’S LIABILITY
FOR DAMAGES ARISING OUT OF OR IN CONNECTION WITH THIS AGREEMENT SHALL IN NO
EVENT EXCEED THE PURCHASE PRICE OF THE PRODUCTS. IT IS AGREED AND ACKNOWLED-
GED THAT THE PROVISIONS OF THIS AGREEMENT ALLOCATE THE RISKS BETWEEN COMPANY
AND CUSTOMER, THAT COMPANY’S PRICING REFLECTS THIS ALLOCATION OF RISK, AND BUT
FOR THIS ALLOCATION AND LIMITATION OF LIABILITY, COMPANY WOULD NOT HAVE ENTERED
INTO THIS AGREEMENT.
2.2. IN JURISDICTIONS THAT LIMIT THE SCOPE OF OR PRECLUDE LIMITATIONS OR EXCLUSION
OF REMEDIES OR DAMAGES, OR OF LIABILITY, SUCH AS LIABILITY FOR GROSS NEGLIGENCE
OR WILLFUL MISCONDUCT OR DO NOT ALLOW IMPLIED WARRANTIES TO BE EXCLUDED, THE
LIMITATION OR EXCLUSION OF WARRANTIES, REMEDIES, DAMAGES OR LIABILITY SET FORTH
ABOVE ARE INTENDED TO APPLY TO THE MAXIMUM EXTENT PERMITTED BY APPLICABLE LAW.
CUSTOMER MAY ALSO HAVE OTHER RIGHTS THAT VARY BY STATE, COUNTRY OR OTHER JU-
RISDICTION.
10
1. Alcance de suministro
1-Termostato-Digital Termo 2, incluye dispositivo de suspensión
2. Datos técnicos
Tipo de unidad: Thermo 2
Fuente de alimentación: 110VAC ±10%, 50/60Hz
Max. Potencia de corte: 1500 W
Capacidad de salida: 15A/125VAC
R ango de control: 0 – 40 °C / ± 0 – 90 °F
Índice de distinción: ± 1 °C / ± 1 °F
Rango de medición de temperatura: -45 a 42 ºC
Precisión de conmutación: ± 1 °C / ± 2 °F
Toma: < 1,5 W
Clase de protección: II
Sistema de protección: IP X4
Longitud del sensor: aprox. 1 m.
Note:
Rango de medición de temperatura: -45 a 42 ºC
A0--37°C A01--38°C A02--38.5°C A03--39°C A04--40°C
A05--40.5°C A06--41°C A07--41.5°C A08--42°C
3. General
Tras abrir y antes de utilizar por primera vez, asegúrese de que la unidad y todos sus accesorios
están perfectamente en orden. Si se ha producido algún daño durante el transporte, consulte
a su distribuidor o al fabricante inmediatamente. Mantenga los materiales de embalaje (bolsa
de polietileno, poliestireno, clavos, etc.) fuera del alcance de los niños, ya que representan una
fuente potencial de peligro. Esto también se aplica a las pequeñas piezas suministradas que
pueden ser tragadas. Este termostato electrónico se puede utilizar para una amplia variedad
de aplicaciones de control de temperatura, por ejemplo para la calefacción y enfriamiento de
invernaderos y jardines de invierno, o para el control de la temperatura del agua en los acua-
rios, la temperatura del aire en terrarios o la temperatura del suelo en semilleros. Es fácil de
manejar y se puede conectar a cualquier tipo de cable calefactor, placa de calefacción u otros
dispositivos de calefacción o enfriamiento, siempre que no se supere la potencia máxima de
calentamiento de 1500 W. Este termostato solo se puede conectar a 110 VCA ± 10%, 50 / 60Hz
de voltaje. La unidad debe protegerse de altos grados de contaminación y humedad. Si se utiliza
para cualquier aplicación distinta de la descrita anteriormente, se podría dañar y se corren
riesgos de cortocircuitos, incendios, descargas eléctricas, etc. Las instrucciones de seguridad e
instalación deben cumplirse
de forma estricta.
IMPORTANTE:
Lea cuidadosamente y siga estas instrucciones, así como los consejos
generales sobre seguridad y riesgos antes de la instalación. Mantenga este
folleto en un lugar seguro para futuras consultas. Si usted tiene alguna
duda sobre la seguridad de la unidad, contacte con un experto. Si utiliza la
unidad en un invernadero, asegúrese de que las conexiones eléctricas sean
realizadas por personal cualificado.
ES

11
4. Indicaciones de seguridad y riesgos
• Solo se puede utilizar una toma de corriente 110VAC ± 10%, 50 / 60Hz
en la red de suministro público como fuente de energía. Nunca trate de
operar la unidad a un voltaje diferente.
• Consulte a un experto si tiene alguna duda sobre el funcionamiento, la
seguridad o la conexión de la unidad.
• Esta unidad sólo puede utilizarse en interiores.
• Al abrir la tapa o sacar partes, la unidad debe ser desconectada del
enchufe principal.
• No conecte nunca el enchufe de red, encienda o apague con las manos
mojadas.
• No tire del cable de red, siempre tire del enchufe por la toma por las
superficies de agarre.
• No utilice la unidad en un ambiente fácilmente inflamables (por ejemplo,
cerca de gas combustible o botellas de spray). ¡Existe riesgo de explosión y fuego!
• Nunca instale la unidad cerca de válvulas de agua, lavabos u otras
fuentes de agua.
• No introduzca ningún objeto en las aberturas de la unidad. ¡Existe
riesgo de lesiones, descargas eléctricas o daños en la unidad!
• Durante el montaje, asegúrese de que el cable de conexión no sea aplastado
o dañado por objetos afilados. Si esto causa daños de aislamiento, en ningú
caso debe ser conectado a la red eléctrica. ¡Peligro!
• Desenchufe siempre la toma de corriente antes de limpiar la unidad.
Sólo limpie con un paño seco.
• Retire el enchufe de la toma cuando la unidad está apagada.
• Si el aparato ya no se puede manejar de forma segura, debe ser dado de
baja y protegido contra el funcionamiento accidental. En casos como:
– el cable o unidad muestran daños visibles
– la unidad ya no funciona
–
después de haber sido almacenada durante mucho tiempo en
condiciones des favorables
–
después de un transporte accidentado
• Las unidades que operan con voltaje de red de suministro deben
mantenerse lejos del alcance de los niños.
• La unidad no es apta para su uso en las áreas de reproducción de ganado.
• Estas instrucciones de uso son parte de la unidad y deben ser guarda
das en un lugar seguro. Si la unidad se traspasa a un tercero, debe
ir acompañada de las instrucciones de uso.
• En las instalaciones industriales, se deben respetar las normas de
prevención de accidentes de la Asociación Profesional Industrial para
Instalaciones y Aparatos Eléctricos.
• Nunca derrame líquidos sobre el equipo, ya que esto representa
el riesgo de un incendio o una descarga eléctrica fatal. Si esto sucede,
saque el enchufe de la toma de corriente y consulte a un especialista.
• Si no sabe realizar la conexión de forma correcta, o si tiene alguna
pregunta que no se aclara en el curso de estas instrucciones, póngase
en contacto con el fabricante o un especialista.
ELECTRICIDAD
PELIGRO

12
• Este dispositivo no está diseñado para ser utilizado por personas (incluidos niños)
que poseen capacidades físicas, sensoriales o mentales limitadas y tampoco
por personas con experiencia o conocimiento insuficientes sobre la manipulación
de esteproducto, excepto bajo la vigilancia o instrucción de una persona responsab
le de su seguridad.
5. Instalación
Asegúrese de que la tensión de la red
corresponde al voltaje indicado en el
Capítulo 2
(datos técnicos). El lugar de instala-
ción debe ser elegido de modo que la
unidad no se
moje bajo ninguna circunstancia (por
ejemplo, condensación que gotea,
tomas de aire
abiertas, etc.), o que caiga agua.
El termostato puede funcionar en una
posición horizontal o vertical.
1. Conecte la unidad de calefacción o enfria-
miento al termostato. Para hacerlo, inserte
el enchufe del dispositivo de calefacción o
enfriamiento en la entrada del termostato.
2. A continuación, conecte el cable de conexión
del termostato a una toma de corriente de
110 VCA.
3. Coloque el extremo del cable del sensor en el
punto más adecuado para el control de la temperatura.
Control de temperatura ambiente
El sensor debe ser instalado a la mitad de la altura de la estancia y debe estar suspendido
libremente. La temperatura de la habitación sólo puede ser controlada de forma óptima
cuando el sensor no está influenciado por corrientes de aire, radiación solar u otro tipo
de fuentes de calor o frío.
Cultivo de plantas y semillas
Colocar el sensor en el suelo cerca de las raíces. El sensor debe estar completamente
rodeado de tierra. En macetas grandes, el sensor debe estar ubicado en el centro de la
maceta.
Control de temperatura del agua
Para el control de la temperatura del agua (por ejemplo, en un acuario), el sensor debe
colocarse en las capas centrales del acuario, rodeado completamente de agua.
ELECTRICIDAD
PELIGRO

13
6. Operación
Durante la instalación, compruebe que el cable de red o la unidad no estén dañados.
También asegúrese de que el cable del sensor no se haya doblado bruscamente, ya
que esto puede perjudicar el
funcionamiento.
Encendido/apagado
Cuando la unidad haya sido conec-
tada a la electricidad, se puede ac-
tivar mediante el botón „ON / OFF“.
Para ello, el botón debe pulsarse
durante 3 segundos. Inmediatamen-
te después de su encendido, la uni-
dad determina la temperatura am-
biente del sensor y la indica que en
la pantalla. Para apagar el aparato,
pulse de nuevo el botón „ON / OFF“
durante 3 segundos.
Modo Calor/Frío
Es posible alternar entre el modo
calor/frío presionando el botón
. Mantenga el botón
durante 3 segundos para cambiar
el modo. En la pantalla, aparecerá
una „H“(por ‚heat‘ que es calor en
inglés) durante 4 segundos para la
calefacción y una „C“(por ‚cold‘ que
es frío en inglés) para la refriger-
ación. Al mismo tiempo se puede
saber el modo que se ha establecido por medio del LED, rojo para la calefacción y
verde para la refrigeración.
Establecer la temperatura requerida
Presione el botón poqbrevemente para cambiar al modo de ajustes. La temperatura
ya establecida ahora parpadea en la pantalla. Usando los botones py q, se puede
cambiar la temperatura en intervalos de 1 °F. (Margen de ajuste de -50 °F to +99 °F).
Después de haber establecido una nueva temperatura, se guarda automáticamente
y el menú se cierra después de 3 segundos. Ahora la pantalla muestra de nuevo la
temperatura ambiente actual.
Celsius/Fahrenheit unit selection:
Bajo estado de funcionamiento normal, presione rápidamente el botón po qy uélte-
lo inmediatamente, entrará al menú de ajuste de temperatura, que de forma intermi-
tente el conjunto actual de temperatura. Tras esto, sostenga y presione la tecla C/H
durante más de 5 segundos, el sistema entra en grados Celsius y Fahrenheit, el LED
parpadeará C y F. Cambie entre Celsius y Fahrenheit presionando la teclapo q.
Calor
LED
Modo calor y
Frío en LED
Frío
LED
Botones de
selección de
temperatura Pantalla /
Temperatura
Modo
Calor/Frío
Botón
encendido
14
Cuando termine el ajuste, volverá a la pantalla inicial en 3s si no se pulsa ninguna
tecla, se uardarán los parámetros de forma automática. Si se produce un error durante
la grabación de parámetros, se muestra “Er”, y 3 segundos más tarde, volverá al estado
de visualización normal.
Modos de funcionamiento
Para saber el modo de funcionamiento (calor o frio), vea la indicación del
LED amarillo.
LED Modo de funcionamiento
rojo amarillo verde
enc. apa. apa.
„modo de „calor“ seleccionado /
temperatura teórica alcanzada / modo
calor apagado
enc. enc. apa.
„modo de „calor“ seleccionado /
temperatura teórica no alcanzada / modo
calor encendido
apa. apa. enc.
„modo de „frío“ seleccionado /
temperatura teórica alcanzada / modo
frío apagado
apa. enc. enc.
„modo de „frío“ seleccionado
temperatura teórica no alcanzada / modo
frío encendida
La pantalla muestra „HH“ con señal
acústica
Circuito interrumpido o cortocircuitoor o
temperatura sobre 99°C (or 108 °F) /
modo calor apagado
8. Eliminación de desechos y reparación
• Las unidades solo deben ser enviadas a un depósito de recepción de desechos
adecuado.
• Las reparaciones en el aparato sólo pueden ser realizadas por especialistas autori-
zados. Por favor, consulte con el fabricante o distribuidor.
• N. B. Si la unidad no se repara correctamente, la garantía se perderá.
• Las reparaciones llevadas a cabo incorrectamente pueden representar un peligro
para el usuario y otras personas.
7. Limpieza
• Apagar el termostato y desconectar del enchufe antes de limpiar.
• No utilice ningún productos de lijado, abrasión o limpieza.
• Limpiar la carcasa con un paño húmedo (no mojado), una aspiradora o
plumero.
• Nunca sumerja la unidad en agua. ¡Peligro!
• Si la unidad no se utiliza durante mucho tiempo, es necesario protegerla
del exceso de polvo y suciedad.
ELECTRICIDAD
PELIGRO

15
9. REPRESENTACIONES Y GARANTÍAS DEL FABRICANTE
Bio Green oHG
Marburger Str. 1b
35649 Bischoffen-Oberweidbach
Phone: +49 64 44 / 93 12 0
Fax: +49 6444 / 6162
Email: [email protected]
Web: www.biogreen.de
Estas Representaciones y Garantías son aplicables a todos los clientes (los „Clientes“ y a cada
uno de forma individual, un „Cliente“) que compren los productos (los „Productos“) fabricado
por Bio Verde oHG (la „Compañía”)
1. Garantías y limitaciones:
1.1. La Compañía garantiza únicamente al comprador original de los productos que en el Período
de Garantía (el cual se define más adelante), los productos no presentarán defectos en materiales
ni fallas de fábrica bajo condiciones normales de uso, y que cumplirán con las especificaciones de
los productos publicadas por la Compañía. No obstante lo anterior, la empresa conserva su de-
recho de apartarse de sus especificaciones publicadas debido a las últimas innovaciones y mejoras
en la función y el diseño de los productos.
1.2. La garantía precedente está sujeta al almacenamiento, transporte y uso adecuado de los pro-
ductos, y no incluye los defectos debidos al desgaste normal por el uso o deterioro.
1.3. El Cliente deberá inmediatamente, pero en ningún caso después de ocho (8) días siguientes al
envío del Producto, revisar estos Productos para conformidad y defectos visibles. El Cliente deberá
dar aviso inmediato de la empresa por escrito de todos los casos de incumplimiento o defectos vi-
sibles con respecto a los productos. En el caso de que el Cliente no proporcione a la Compañía den-
tro de los ocho (8) días siguientes a la entrega de los productos un aviso de los casos de incumpli-
miento o defectos visibles, cualquier reclamo de garantía en este sentido se considerará cancelado.
1.4. El Cliente deberá notificar inmediatamente a la empresa por escrito de cualquier otros
defecto de los productos y devolver el Producto defectuoso. Antes de cualquier envío de un
producto defectuoso, el Cliente deberá ponerse en contacto con la empresa por primera vez en
la dirección indicada en el apartado 1.9. La única obligación de la Compañía bajo la presente
garantía es, a elección de la empresa y a su sola discreción, reparar, reemplazar o sustituir el
producto defectuoso. Cualquiera de los Productos reparados, sustituidos o cambiados estarán
sujetos a esta garantía, después de su reparación, sustitución o cambio. Si la empresa ha reci-
bido notificación por parte del Cliente, y no se descubren defectos en el Producto, el cliente
correrá con los gastos de desmontaje.
1.5. Con respecto a los pedidos realizados a la medida, los defectos de los productos causados
por las especificaciones de los clientes están excluidos de la garantía mencionada en el apar-
tado 1.1.
1.6. La Compañía tampoco garantiza que los Productos fabricados en virtud de una orden de en-
cargo no infrinjan la propiedad intelectual u otros derechos de propiedad de terceros y el Clien-
te es el único responsable de asegurar que estos Productos no contravengan dichos derechos.
1.7. El „Período de Garantía“ comienza en la fecha de entrega del Producto al Cliente,

16
y permanece en vigencia durante veinticuatro (24) meses. El „Período de Garantía“ se suspen-
derá durante el tiempo de reparación, sustitución o cambio hasta que el producto reparado,
cambiado o sustituido haya sido devuelto al Cliente.
1.8. La Compañía no autoriza a ninguna persona o parte a asumir o crear para ello cualquier
otra obligación o responsabilidad en relación con los Productos, excepto como se establece en
el presente documento.
1.9. Todas las solicitudes y notificaciones bajo esta Garantía deben ser dirigidas a:
Bio Green USA, Inc.
350 Fifth Avenue, Suite 5220
New York, NY 10118
Phone:
1-800-941-3169
Email:
1.10. LA GARANTÍA PRESENTADA EN LA SECCIÓN 1.1 SE APLICARÁ EN LUGAR DE TODAS LAS
OTRAS GARANTÍAS (YA SEA EXPRESA O IMPLÍCITA), DERECHOS O CONDICIONES, Y EL CLIENTE
RECONOCE QUE EXCEPTO POR DICHA GARANTÍA LIMITADA, LOS PRODUCTOS SE PROPORCI-
ONAN „TAL CUAL“. LA COMPAÑÍA NIEGA ESPECÍFICAMENTE, SIN LIMITACIÓN, TODAS DEMÁS
GARANTÍAS, EXPRESAS O IMPLÍCITAS, DE NINGÚN TIPO, INCLUYENDO, SIN LIMITACIÓN, LAS
GARANTÍAS IMPLÍCITAS DE COMERCIALIZACIÓN Y APTITUD PARA UN PROPÓSITO PARTICU-
LAR, NO INFRACCIÓN, Y LAS GARANTÍAS DERIVADAS DEL RENDIMIENTO, TRANSACCIÓN O USO
COMERCIAL.
2. Limitación de responsabilidad:
2.1. EN NINGÚN CASO LA EMPRESA SERÁ RESPONSABLE DE CUALQUIER DAÑO INDIRECTO,
INCIDENTAL, PUNITIVO, ESPECIAL O DERIVADOS, INCLUYENDO PERO NO LIMITADO A, DAÑOS
POR PÉRDIDA DE GANANCIAS, INGRESOS, FONDO DE COMERCIO O USO, INCURRIDO POR EL
CLIENTE O UN TERCERO, YA SEA EN UNA ACCIÓN CONTRACTUAL, AGRAVIO, RESPONSABILI-
DAD OBJETIVA O IMPUESTA POR LEY, O DE OTRO MODO, INCLUSO SI SE ADVIRTIÓ DE LA PO-
SIBILIDAD DE TALES DAÑOS. LA RESPONSABILIDAD DE LA EMPRESA POR DAÑOS DERIVADOS
DE O EN RELACIÓN CON ESTE ACUERDO EN NINGÚN CASO EXCEDERÁ EL PRECIO DE COMPRA
DE LOS PRODUCTOS. SE ACEPTA Y RECONOCE QUE LAS DISPOSICIONES DE ESTE ACUERDO
ASIGNAN LOS RIESGOS ENTRE COMPAÑÍA Y EL CLIENTE, ESA FIJACIÓN DE PRECIOS POR PARTE
DE LA COMPAÑÍA REFLEJA ESTA ASIGNACIÓN DISTRIBUIDA DE RIESGO, Y SI NO FUESE POR
ESTA ASIGNACIÓN Y LIMITACIÓN DE RESPONSABILIDAD, LA EMPRESA NO HABRÍA FIRMADO
ESTE ACUERDO.
2.2. EN JURISDICCIONES QUE LIMITAN EL ALCANCE O QUE AFECTAN LAS LIMITACIONES O
EXCLUSIÓN DE COMPENSACIONES O DAÑOS, O DE RESPONSABILIDAD, COMO LA RESPONS-
ABILIDAD EN NEGLIGENCIA O POR ACCIÓN DELIBERADA NO PERMITEN QUE LAS GARANTÍAS
IMPLÍCITAS SEAN EXCLUIDAS, LA LIMITACIÓN O EXCLUSIÓN DE GARANTÍAS, COMPENSACIO-
NES, DAÑOS O RESPONSABILIDAD ESTABLECIDA ANTERIORMENTE, ESTÁ CONTEMPLADA LA
APLICACIÓN EN LA MEDIDA MÁXIMA PERMITIDA POR LA LEY. EL CLIENTE PUEDE TENER OTROS
DERECHOS QUE PUEDEN VARIAR SEGÚN EL ESTADO, PAÍS U OTRA JURISDICCIÓN.

17
1. Matériel fourni
1-Thermostat Digital Thermo 2, comprend un dispositif de suspension
2. Données techniques
Type d‘appareil : Thermo 2
A limentation électrique : 110VAC ±10%, 50/60Hz
C apacité de coupure max. : 1500 W
C apacité de production : 15A/125VAC
P lage de contrôle : 0 – 40 °C / ± 0 – 90 °F
T aux de différence : ± 1 °C / ± 1 °F
Plage de mesure des températures : -50 to 108 °F
P récision de commutation : ± 1 °C / ± 2 °F
Alimentation : < 1,5 W
Classe de protection : II
Système de protection : IP X4
Longueur du capteur : approx. 40“
Note:
L a plage de mesure de la température : -50 to 108 °F
A0--100 °F A01--101°F A02--102°F A03--103°F A04--104°F
A05--105°F A06--106°F A07--107°F A08--108°F
3. Généralités
Après le déballage et avant la mise en route, assurez-vous que l‘appareil et tous ses accessoires
sont en bon état. S‘il a eu des dégâts pendant le transport, veuillez consulter immédiatement le
marchand ou le fabriquant. Conservez l‘emballage (sac en polythène, polystyrène, clous, etc.)
hors de portée des enfants, parce qu‘il représentent un danger. Cela s‘applique aussi aux
petites pièces qui peuvent être avalées. Ce thermostat électronique peut être utilisé pour
différentes applications de contrôle de température, par exemple pour chauffer ou refroidir les
serres et les jardins d‘hiver ou pour contrôler la température de l‘eau dans les aquariums, la
température de l‘air dans les terrariums ou la température du sol des lits de semences. Il est
facile à utiliser et peut être connecté à tout type de câbles et de coussins chauffants ou d‘autres
appareils chauffants ou refroidissants en sachant que la puissance de chauffage de 1500 W ne
peut être dépassée. Le thermostat est uniquement agréé pour la connexion à un voltage de
110VAC ±10%, 50/60Hz. L‘appareil doit être protégé des risques élevés de contamination et
d‘humidité. S‘il est utilisé pour une autre application que celles décrites ci-dessus, il peut être
endommagé et créer des risques de courts-circuits, d‘incendie, de choc électrique, etc. Les
consignes de sécurité et le montage doivent être rigoureusement respectés.
IMPORTANT:
Lisez et suivez minutieusement ces instructions ainsi que les conseils
généraux sur la sécurité et les risques avant le montage. Conservez ce
manuel en lieu sûr pour des besoins futurs. Si vous avez des doutes sur la
sécurité de l‘appareil, demandez l‘avis d‘un expert. Si vous utilisez l‘appareil
dans une serre, assurez-vous que les connections électriques sont installées
par un professionnel qualifié.
FR

18
Danger
électrique
• Seule une prise de courant 110VAC ± 10%, 50/60Hz connectée au réseau public
peut être utilisée comme source de courant. Ne jamais essayer de faire
fonctionner l‘appareil avec un voltage différent.
• Consultez un expert si vous avez des doutes sur le fonctionnement, la sécurité ou
la connexion de l‘appareil.
• Cet appareil doit être utilisé à l‘intérieur uniquement.
• Lorsque vous ouvrez le couvercle ou que vous retirez des pièces,
l‘appareil doit être débranché de la prise.
• Ne manipulez pas la prise avec les mains mouillées.
• Ne tirez jamais sur le câble, débranchez la prise par la partie prévue à cet effet.
• N‘utilisez pas l‘appareil dans un endroit qui peut s‘enflammer (par ex. à
proximité de gaz ou d‘atomiseurs. Risque d‘explosion et d‘incendie !
• N‘installez jamais l‘appareil près d‘un robinet, d‘un bassin ou d‘autre source d‘eau.
• N‘insérez pas d‘objets dans les ouvertures de l‘appareil. Risque de blessure,
de choc électrique ou de dégât sur l‘appareil !
• Lors du montage, assurez-vous que le câble de connexion n‘est pas coincé ou
abimé par des bords coupants. Si vous voyez des dégâts de la sorte et que des
parties de l‘appareil sont mises à nu, ne branchez surtout pas l‘appareil sur la
prise. Danger !
• Débranchez toujours la prise avant de nettoyer l‘appareil. Nettoyez uniquement
avec un chiffon sec.
• Débranchez la prise du secteur quand l‘appareil est éteint
• Si vous pensez que l‘appareil présente un danger, vous devez l‘éteindre et éviter
qu‘il soit utilisé par mégarde, cela peut être le cas quand :
• l‘appareil ou le câble du secteur présente des dégâts visibles
• l‘appareil ne fonctionne plus
• lorsqu‘il est resté longtemps rangé dans des conditions défavorables
• lorsqu‘il a été transporté avec des charges lourdes
• Les appareils qui fonctionnent sur secteur ne devraient pas se retrouver
dans les mains des enfants .
• Cet appareil ne convient pas aux zones d‘élevage.
• Cette notice doit être conservée dans un endroit sûr. Si l‘appareil est prêté à
un tiers,cette notice doit l‘accompagner.
• Dans les structures industrielles, les règles de prévention des accidents de
l‘Association Professionnelle pour les Équipements et Installations
électriques,doivent être respectées.
• Ne versez jamais du liquide sur l‘appareil, cela présente un risque d‘incendie
ou de chocs électriques mortels. Si cela arrivait, débranchez la prise du secteur
et consultez un spécialiste.
• Si vous n‘êtes pas sûr de bien connecter l‘appareil ou si vous avez des questions
sur cette notice, consultez le fabricant ou un spécialiste.
• Cet appareil n‘est pas conçu pour être utilisé par des personnes (dont des
enfants) qui ont des capacités physiques, sensorielles ou mentales limitées.
Cela est aussi valable pour les personnes qui n‘ont pas assez d‘expérience ou de
connaissances pour utiliser cet appareil, à moins qu‘elles soient supervisées par
une personne responsable de leur sécurité.
4. Conseils sur la sécurité et les risques

19
5. Installation
Assurez-vous que le voltage du secteur correspond au voltage indiqué dans le chapitre 2
(données techniques). L‘emplacement de l‘installation doit être choisi de sorte que l‘appa-
reil ne soit jamais mouillé (écoulement du à la condensation, fenêtres de toit, etc.), ou ne
tombe jamais dans l‘eau.
Le thermostat peut fonctionner dans
une position horizontale ou verticale.
1. Connectez l‘appareil de chauf-
fage ou de refroidissement au
thermostat. Vous devez insérer la
prise de l‘appareil de chauffage/
refroidissement correspondant
dans la prise du thermostat.
2. Maintenant, connectez le câble
du thermostat dans la prise sec-
teur 110VAC.
3. Positionnez le bout du fil du senseur dans
l‘endroit le plus adapté au contrôle de
température.
Contrôle de la température d‘une pièce
Le senseur doit être installé à mi-hauteur de la
pièce et doit pendre librement. La température de
la pièce est mieux contrôlée lorsque le senseur ne
subit pas de courants d‘air, de rayons de soleil, ou
d‘autres sources de chaleur ou de froid.
Culture de plantes et de graines
Placez le senseur dans le sol près des racines. Le senseur peut être entièrement plongé
dans la terre. Si vous utilisez un grand pot, placez le senseur au milieu du pot.
Contrôle de la température de l‘eau
Pour le contrôle de la température de l‘eau (par ex. aquarium), le senseur doit être
positionné dans la couche centrale de l‘eau. Ici aussi le senseur doit être complètement
plongé dans l‘eau.
Danger
électrique
20
6. Fonctionnement
Lors de l‘installation, vérifiez que l‘appareil ou le câble de secteur n‘est pas abîmé.
Assurevous aussi que le fil du senseur ne s‘est pas emmêlé car cela peut altérer son
fonctionnement.
A llumer/Éteindre
Dès que l‘appareil est connecté au
secteur il peut être allumé à l‘aide
du bouton „ON/OFF“. Il suffit d‘ap-
puyer sur le bouton pendant 3 se-
condes. Immédiatement après avoir
allumé l‘appareil, le senseur de
température ambiante sera mis en
route et sera affiché. Pour éteindre,
appuyez encore sur le bouton „ON/
OFF“ pendant 3 secondes.
Modo Calor/Frío
Il est possible de changer le mode
chaud et froid en appuyant sur le
bouton . appuyez sur le
bouton pendant 3 secondes pour
changer le mode. Sur l‘affichage
„H“ apparaîtra pendant 4 secondes
for la chaleur et „C“ for le froid.
Vous pouvez aussi déterminer le
mode réglé grâce au voyant LED
rouge pour la chaleur et le voyant
LED vert pour le froid.
Réglage de la température désirée
Appuyez brièvement sur les boutons pouqpour changer le mode de réglage. La
température déjà réglée clignote dans l’affichage. En utilisant les boutons petq, vous
pouvez changer la température par tranche de 1 °F. (La plage de réglage va de -50 °F à +99
°F). Dès que vous réglez une nouvelle température, elle est enregistrée automatiquement
et le menu se ferme 3 secondes après. L’affichage montre alors la température ambiante.
Sélection degrés Celsius/Fahrenheit :
Pour un fonctionnement normal, appuyez brièvement sur la touche pouqet relâchez-la
immédiatement, cela vous mène à l’état de réglage de la température, et affiche en
clignotant le réglage actuel de la température. A ce stade, vous devez maintenir et appuyer
sur le bouton C / H pendant plus de 5 secondes, le système affiche l’état du réglage en
Celsius et Fahrenheit, le voyant LED affiche en clignotant C et F. Changer le réglage Celsius
et Fahrenheit en appuyant sur le boutonpouq. Lorsque vous aurez terminé le réglage, il
va se fermer. S’il n’y a pas de manipulation de bouton dans les 3 secondes, les paramètres
seront automatiquement enregistrés et l’appareil reprendra son fonctionnement normal.
S’il y a une erreur pendant l’enregistrement des paramètres, “Er” va s’afficher et l’appareil
reviendra à son état de fonctionnement normal.
LED
Chaud
Mode chaud et
froid sur LED
LED
Froid
Boutons de
sélection de
température Affichage /
Indication Temp
Mode Froid/
Chaud
bouton
On/Off
Other manuals for Thermo 2
3
Table of contents
Languages:
Other Bio Green Thermostat manuals


Popular Thermostat manuals by other brands

ClimateMaster
ClimateMaster ATC32U01 iGate installation manual

DELTA DORE
DELTA DORE Diana D20 Installation

Ecoer
Ecoer EST01 Install and User Guide

Honeywell
Honeywell Prestige THX9321R01 operating manual

Siemens
Siemens QAA2212.*W*N installation instructions

Bryant
Bryant T6-PRH-A li installation instructions


Levoit
Levoit Aura Smart user manual

Johnson Controls
Johnson Controls T26 Series Specifications

Aube Technologies
Aube Technologies TH209 owner's guide

Supco
Supco CTC PROCOMM 93257WF user manual

Carrier
Carrier TSTAT Installation, start-up, and operating instructions

ClimateMaster
ClimateMaster ATC32U01 iGate user manual