Biocare Nuancer SR-III User manual

User Manual


Table of Contents
Chapter 1. Preface .............................................................................................................................................1
Chapter 2. Introduction ..................................................................................................................................2
Introduction of Use ............................................................................................................................................................................................. 2
Rationale.................................................................................................................................................................................................................. 2
Chapter 3. Packaging and Content ...........................................................................................................3
3.1 Packaging ......................................................................................................................................................................................................... 3
3.2 Content ............................................................................................................................................................................................................. 4
Chapter 4. Preparation of Test Samples and Strips..............................................................................5
4.1 Preparation of urine samples................................................................................................................................................................... 5
4.2 Preparation of strips .................................................................................................................................................................................... 5
Chapter 5. Installation ....................................................................................................................................6
5.1 Preparation ...................................................................................................................................................................................................... 6
5.2 Loading the thermal printing paper .................................................................................................................................................... 6
Chapter 6. Operation Procedure.................................................................................................................8
6.1 Turn On/Off...................................................................................................................................................................................................... 8
6.2 Initiate Analysis ............................................................................................................................................................................................. 8
6.3 Steps................................................................................................................................................................................................................... 8
6.4 Installation of barcode reader and scanning of medical record No.....................................................................................10
6.5 Test the Instrument Function with Check Strip.............................................................................................................................10
Chapter 7. Interpretation of Test Result................................................................................................. 12
7.1 Printout test report....................................................................................................................................................................................12

7.2 Print history report from the memory drive ..................................................................................................................................13
Chapter 8. Maintenance .............................................................................................................................. 14
8.1 Maintenance .................................................................................................................................................................................................14
8.2. Procedure......................................................................................................................................................................................................14
Chapter 9. Other Settings............................................................................................................................ 15
9.1 Date setting .................................................................................................................................................................................................15
9.2 Time setting .................................................................................................................................................................................................15
9.3 Automatic data transfer setting..........................................................................................................................................................15
9.4 Display of software version...................................................................................................................................................................15
Chapter 10. Warning Message, Error Message and Troubleshooting....................................... 16
10.1 Warning Message and Troubleshooting ......................................................................................................................................16
10.2, Error message and Troubleshooting ..............................................................................................................................................17
Chapter 11. Specifications........................................................................................................................... 18
Chapter 12.Symbols Information............................................................................................................. 20
Chapter 13. Warranty Statement.............................................................................................................. 21
Exemption of Lability .......................................................................................................................................................................................21
Safety, Reliability and Performance...........................................................................................................................................................21
Chapter 14. Service/Overhaul.................................................................................................................... 22

1
Chapter 1. Preface
Please read the manual carefully to correctly operate the instrument.
Precaution
☑ The testing urine samples may be pathogenic. Please handle with care.
☑ Please wear gloves and lab coats to protect your own safety.
☑ Correctly dispose of the analyzed strips as medical waste.
☑ The instrument can only analyze urine strips provided by BioCare.
☑ Please follow the instruction to correctly operate and avoid damaging the instrument, and
to obtain accurate result.
☑ This instrument can only be used with the enclosed transformer. Do not use.
other transformers. Use of other transformers can cause damage to the instrument
and danger.
☑ If the enclosed power cord is incompatible with local requirement, please contact your
local distributor.
☑ Please place the instrument on a level surface.
☑ In case of malfunction, please do not attempt to repair the instrument. Contact the service
personnel that sell the instrument to your company if you encounter any problem, or contact
BioCare service personnel. (Contact information is listed on the last page of the Manual)
☑ Please avoid spillage of water or other liquid in the instrument.
☑ After dipping the strip in the urine sample, absorb excessive urine off the strip. Running the
test with excessive urine can leave urine residues in the instrument and cause malfunction.
☑ Do no re-test.
☑ Please keep the strip holder clean, especially the optical white calibration bar. A dirty and

2
stained instrument can affect the test result.
☑ Operating environment: temperature 15~30°C; humidity 20-80% .(No condensation)
Chapter 2. Introduction
Introduction of Use
NuAncer SR-III Urine Chemistry Analyzer is used for in-vitro diagnostic purpose by
medical professionals. It can only be used in conjunction with urine chemical strips provided by
BioCare(Self-Stick). The analysis includes the following parameters in the urine: leukocyte, nitrite,
urobilinogen, protein, pH, occult blood, specific gravity, ketone, bilirubin and glucose & ascorbic
acid.
Rationale
NuAncer SR-III Urine Chemistry Analyzer contains a
photodiode light sensor and a pair of white LED light source.
The light sensor detects the color change in the reflective
light from urine strips radiated by the LED light source. The
analyzer reads the color of the urine strips and measures
the semi-quantitative concentration of the testing substance
in the urine. The report will be automatically printed upon the
completion of analysis.
3
Chapter 3. Packaging and Content
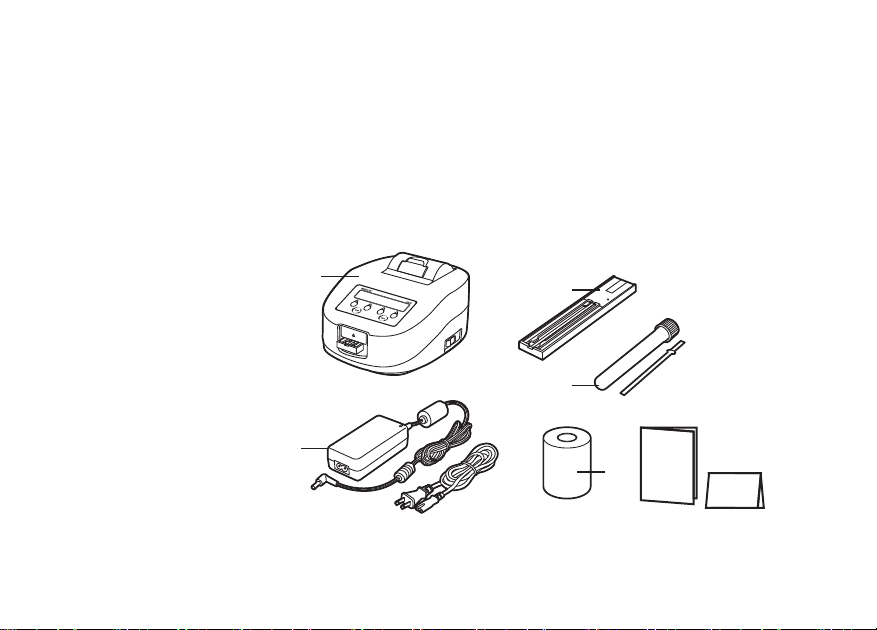
3.1 Packaging
Each Package Contains:
①NuAncer SR-III Urine Chemistry Analyzer
②Strip Holder
③DC Transformer and Power Cord
④Check Strip
⑤Thermal Printing Paper
⑥User Manual
⑦Warranty Card ①②
③
④
⑤⑥
⑦

4
3.2 Content
3.2.1 Location of Accessories
①Power port
Located at the bottom of the machine to connect power
②Strip holder
Carries urine strips for analysis
③Optical white calibration bar
Located at the front of the strip holder for optical calibration purpose
④Buttons
Use with the screen to operate the
machine and establish setting
⑤Display screen
Data display, input and output
⑥Printer
Prints out test data
⑦PS/2 barcode reader connection port
Located at the back of the machine to connect to a barcode reader
⑧RS-232 data transfer port
Located at the back of the machine to transfer data to a personal computer
⑨Power switch
Located on the side of the machine to turn on/off the power
※Barcode reader is an optional product. Please consult your local distributor for availability.

5
Chapter 4. Preparation of Test Samples and Strips
4.1 Preparation of urine samples
4.1.1 Collect midstream urine in a clean container. It is advised to test the sample immediately.
If the test cannot be performed right away, store the samples in the refrigerator at 2-8°C.
Do not store for over 24 hours. All the samples should be brought to room temperature
before testing.
4.1.2 Gently swirl the samples before testing. Do not centrifuge.
4.1.3 Do not use urine that contains preservatives.
4.1.4 Use a disposable and thoroughly cleaned container to collect urine samples.
If the container is not clean or contains detergent or antimicrobial residues, the test result
might be inaccurate.
4.2 Preparation of strips
4.2.1 For use with urine strips provided by BioCare only. Check the expiry date on the bottle.
Do not use the strips if the product has expired.

6
Chapter 5. Installation
5.1 Preparation
5.1.1 Connect the transformer power cord to the power port.
5.1.2 Connect the power cord to the power.
5.1.3 Turn on the switch to initiate the booting procedure.
Turn on the power to enter the booting procedure until the
machine is calibrated and enters the main screen.
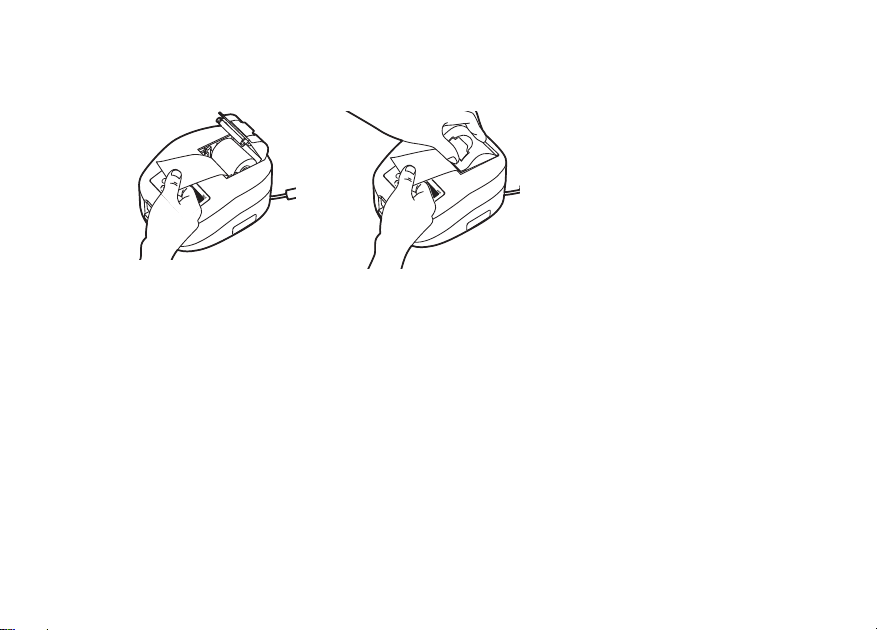
5.2 Loading the thermal printing paper
Install the thermal printing paper in the following order.
5.2.1 Lift up the cover of the printer by pulling the handle.
7
5.2.2 Install the printing paper. Pull out some paper and flatten it before closing the cover.

8
Chapter 6. Operation Procedure
6.1 Turn On/Off
Press the power switch to turn on or off the
machine. Initiate the booting procedure.
End of booting procedure, entering the main
screen.
6.2 Initiate Analysis
6.2.1 Quick button for quick initiation of analysis.
6.2.2 TEST button for analyzing with medical record No. .
Scan the medical record No. with BARCODE READER. Press CLEAR to delete erroneous scan.
Press TEST button if the scan is correct to initiate analysis. (Refer to the detail test
steps below)
6.3 Steps
6.3.1 Selection of Strip
Press Strip button on the upper left corner
to select strip. (There are 4 options on the
screen. Select the leftmost one)
Strip Reader III
System Initial...
#001, Strip Type:S-10L
Strip Feed Set Mem
#001, Strip Type:S-10L
Strip Feed Set Mem
9
6.3.2 Select the type of strip Ex: S-10L.
6.3.3 TEST button Press this button and scan the patient’s medical record No.
(Please refer to 6.2.2)
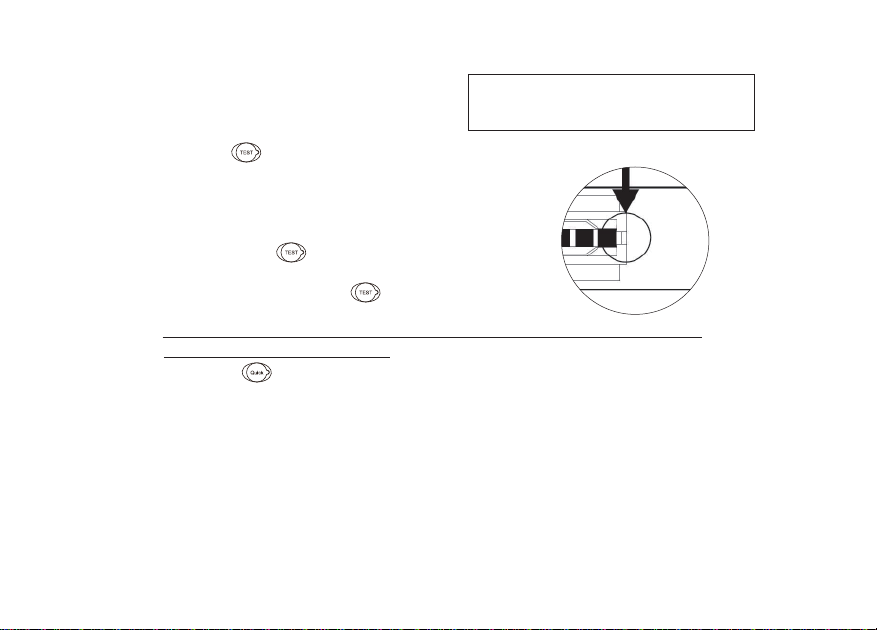
6.3.4 Immerse the strip in the urine sample for 1
second and remove excessive urine with a piece of
tissue paper. Put the strip in the strip holder and
press TEST button . Try to keep the time
between immersing the test strip in the urine sample
and pressing the Test button for 5~8 seconds in
order to obtain a more accurate result.
Notes : When loading the test strip into instrument, slide the strip along the tray until
it touches the end of the trough.
6.3.5 Quick button for quick initiation of analysis. Press the button to perform the test
immediately without entering the patient’s medical record No..
6.3.6 The strip holder will retract into the machine automatically to start analysis.
6.3.7 Upon the completion of analysis, the strip holder will eject automatically. The machine will
print out the analysis report automatically.
6.3.8 Remove and dispose of the used strip in accordance with medical waste disposal
guidelines.
6.3.9 To run the next analysis, repeat steps 6.3.3 ~ 6.3.8.
<Strip Type>
S-10L S-11 S-11VET CHECK

10
6.3.10 Refer to 8.2 Cleaning the Strip Holder.
6.4 Installation of barcode reader and scanning of medical record No.
6.4.1 Install PS/2 barcode reader (to be purchased separately) Connect the PS/2 connector to the
PS/2 port at the back of the machine.
6.4.2 Press TEST button to scan the patient’s medical record No. with the barcode reader.
Press YES to enter the scanned No. or press TEST button directly to run the analysis
immediately.
6.5 Test the Instrument Function with Check Strip
If you suspect the obtained results are inadequate, use the check strip that came with the instrument
to see if the instrument is working properly. The check strip container contains two gray strips. Use
either one for the test.
6.5.1 Wash the test strip holder.
See “Chapter 8. Maintenance” on page14.
NOTE : Unless the holder is washed before check measurement, the check strip may be contaminated
and lose its effectiveness.
6.5.2 Selection of Strip.
Press Strip button on the upper left corner.
(There are 4 options on the screen. Select
the leftmost one)
#001, Strip Type:S-10L
Strip Feed Set Mem

11
6.5.3 Select CHECK.
6.5.4 Take a check strip out of the container.
IMPORTANT : Do not touch the surface
of the check strip. A check strip contaminated
by sebum may cause incorrect results.
6.5.5 Put a Check Strip in the strip holder.
6.5.6 Press Quick button to initiate
CHECK STRIP analysis.
6.5.7 Upon the completion of analysis, the
strip holder will eject automatically. The
machine will print out the analysis
report automatically. Pass means the
machine passed the test; Fail means
the machine failed the test.
<Strip Type>
S-10L S-11 S-11VET CHECK
Date :2018/04/19 17:38
SEQ# : CHECK
ID# :Check Strip Test
MEMO
------------------
CHECK : Pass

12
6.5.8 if the obtained values fall, either the instrument or the check strip may be abnormal.
Use another check strip from the container to retry check measurement.
If the second measurement still shows Fail, the instrument may be malfunctioning. Contact
your distributor.
Chapter 7. Interpretation of Test Result
7.1 Printout test report
The test report is as shown on right diagram.
Press Feed , if desired, to add 4 blank lines after
the results.
Date :2018/04/19 17:38
SEQ# :001 S-11
ID# :
MEMO
------------------
BLD : - Ery/uL
BIL : 2+ 1 mg/dL
URO : +/- 1 mg/dL
KET : + 10 mg/dL
PRO : + 30 mg/dL
NIT : + mg/dL
GLU : - mg/dL
PH : 6
SG : 1.030
LEU : +/- 25 WBC/ul
AA : + 10 mg/dL
13
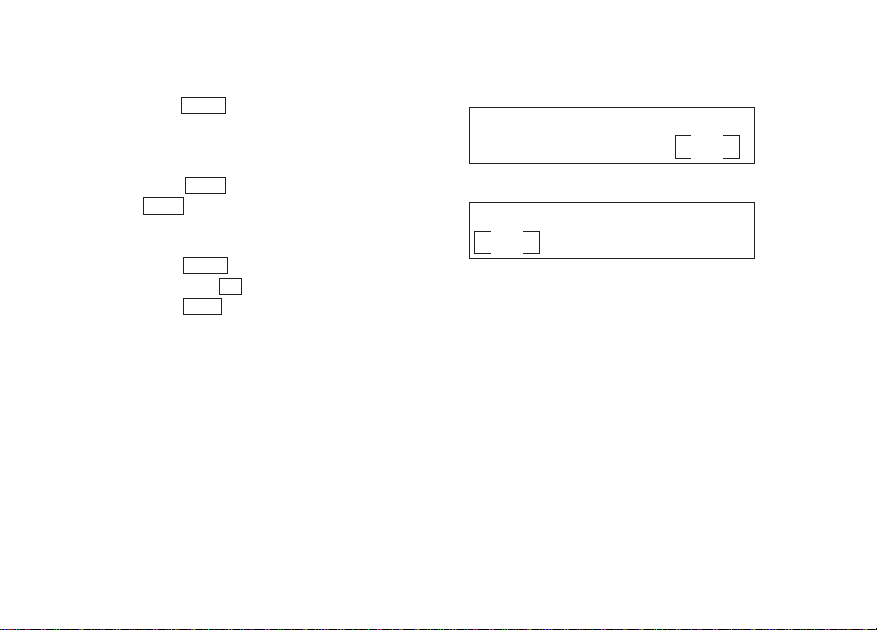
7.2 Print history report from the memory drive
7.2.1 Press Mem to access history
reports from memory drive.
7.2.2 Press Print to print the report and then
Back to return to the main screen.
7.2.3 Press Down button to access the previous
data. Press Up to access the next data.
Press Print to print the report.
#002 ID: 9789860158359
Print Up Down Back
#001, Strip Type:S-10L
Strip Feed Set Mem
14
Chapter 8. Maintenance
8.1 Maintenance
Please clean the strip holder daily after testing.
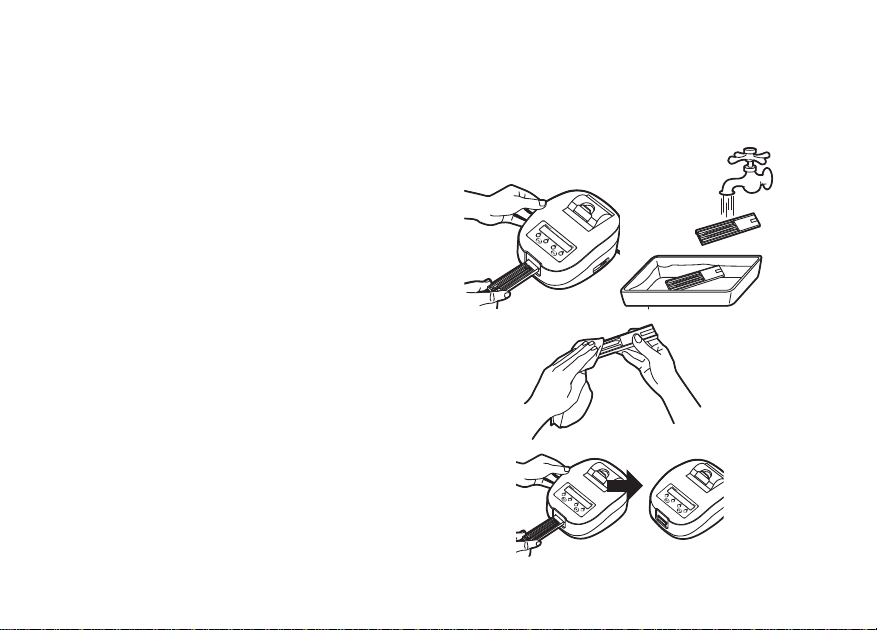
8.2. Procedure
8.2.1 Remove the strip holder. from the machine.
Wash the strip holder with detergent or
alcohol and rinse with running water.
Remove residual or inaccessible smudges
with a cotton swab. Do not touch the
white bar. As the white bar will not be in
contact with the sample, avoid rinsing it
unless necessary.
8.2.2 Hang dry or use a piece of soft cloth to
wipe clean the strip holder after rinsing. If
the white bar is dirty, gently wipe clean
with a piece of soft cloth. Avoid
scratching the white bar.
8.2.3 Re-install the holder in the machine, or if
the holder cannot be cleared, replace the
holder by contacting with the local
distributor.

15
Chapter 9. Other Settings
Press SET button to enter the other 4 settings.
9.1 Date setting
9.1.1 Press Date button to set date. Press the
button under Date to increase by a day, a
month or a year. Hold the button to
automatically enter the scrolling mode.
(Note: year Min ~ MAX 2010~2070 scrolling mode)
9.1.2 Press Back to set date.
9.2 Time setting
9.2.1 Press Time to set time. Press the button under Time to increase by an hour or a minute.
Hold the button to automatically enter scrolling mode.
9.2.2 Press Back to set time.
9.3 Automatic data transfer setting
9.3.1 Press Trans to enter setting. Press ON button to turn on transfer and OFF button to turn
off transfer.
9.3.2 Press Back to confirm.
9.4 Display of software version
Press Next, and press VER. to display software version.
<Setting>
Date Time Trans Next
<Setting>
Ver. Back

16
Chapter 10. Warning Message, Error Message
and Troubleshooting
10.1 Warning Message and Troubleshooting
Warning Message
Warning 1 :
No Strip Holder
Warning 2 :
Strip position incorrect or no Strip
Warning 3 :
Strip position incorrect
Warning 4 :
Strip holder movement not smooth
Warning 6 :
Timer cell low power
Possible Cause
Strip holder missing
Incorrect loading of strip
(the strip was not placed all the way to the end
of the strip holder) or no strip
Incorrect loading of strip
(the strip was not placed all the way to the end
of the strip holder) or no strip
Jamming of strip holder
Out of battery
Troubleshooting
Insert strip holder
Re-test a new strip
Re-test a new strip
Take care not to block
the movement of strip holder
when analyzing
Battery replacement (CR-2032)
Table of contents
Popular Measuring Instrument manuals by other brands

Oxford Technical Solutions
Oxford Technical Solutions xNAV user manual

Halma
Halma Ocean Optics DH-mini UV-Vis-NIR Installation and operation manual

Keysight
Keysight E4982A Configuration guide

Hanna Instruments
Hanna Instruments HI9812-51 instruction manual

General
General TS01 user manual

Southwire
Southwire 40120N operating instructions


Würth
Würth ORSY-Mobil 4 installation instructions

Silverline
Silverline 250582 quick start guide

Metrohm
Metrohm NIRS DS2500 manual

Emerson
Emerson Daniel Ultrasonic 100 Series INSTALLATION PROCEDURE

Extech Instruments
Extech Instruments 407123 user guide

Hanna Instruments
Hanna Instruments Checker HI 753 instruction manual