BIOCORP Mallya User manual

07-2020
IFU_MAL_SLST_US_V1.7
Instructions For Use
®
Designed for Flexpen®Novo
Nordisk
Designed for Kwikpen®Eli Lilly
Designed for Solostar®Sanofi
Helping you keep track of your insulin doses

IFU_MAL_US_V1.7_July 2020 P a g e 2 | 41
TABLE OF CONTENTS
P.
1. SYMBOLS IN THIS INSTRUCTIONS FOR USE.................................................................................................................. 4
2. WARNING & CAUTION ....................................................................................................................................................... 5
3. STORAGE............................................................................................................................................................................ 5
4. DIRECTIONS FOR USE....................................................................................................................................................... 6
4.1 FEATURES................................................................................................................................................................. 6
4.2 INTENDED USE ......................................................................................................................................................... 6
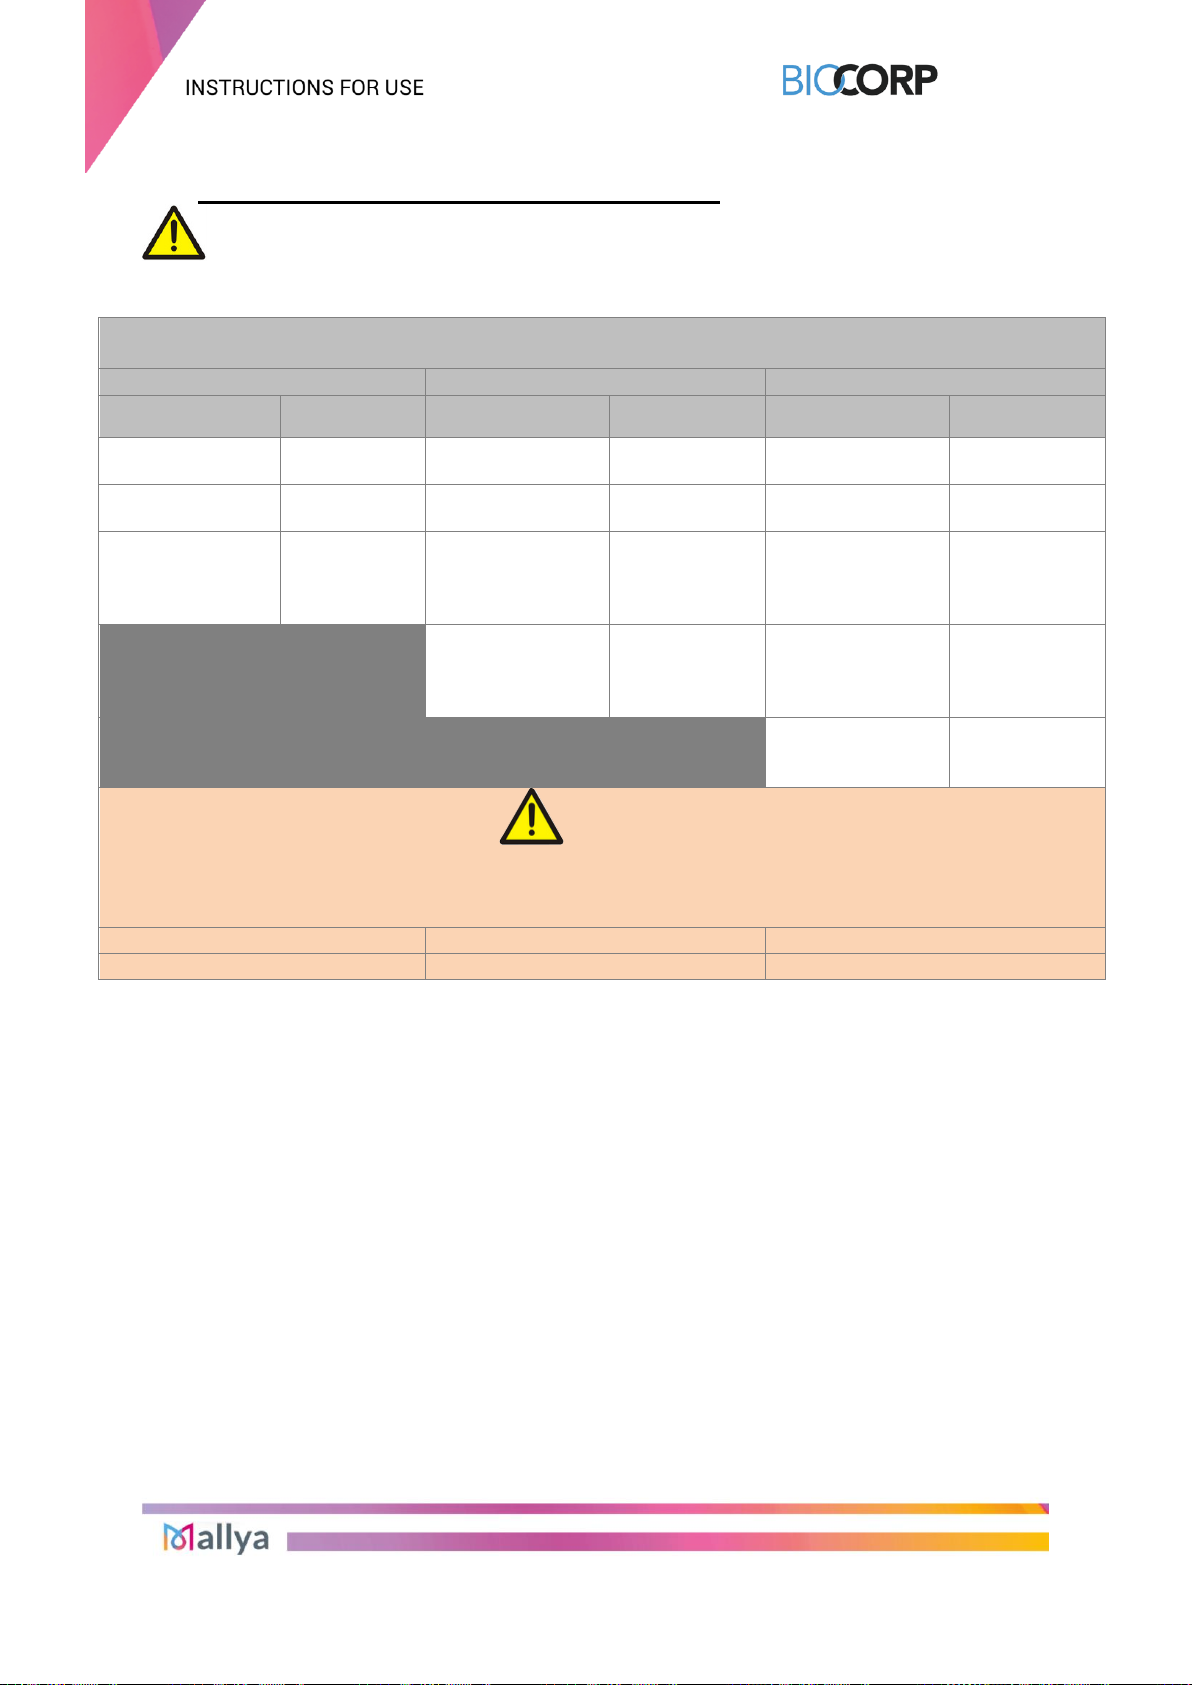
5. MALLYA COMPATIBILITIES WITH PENS.......................................................................................................................... 7
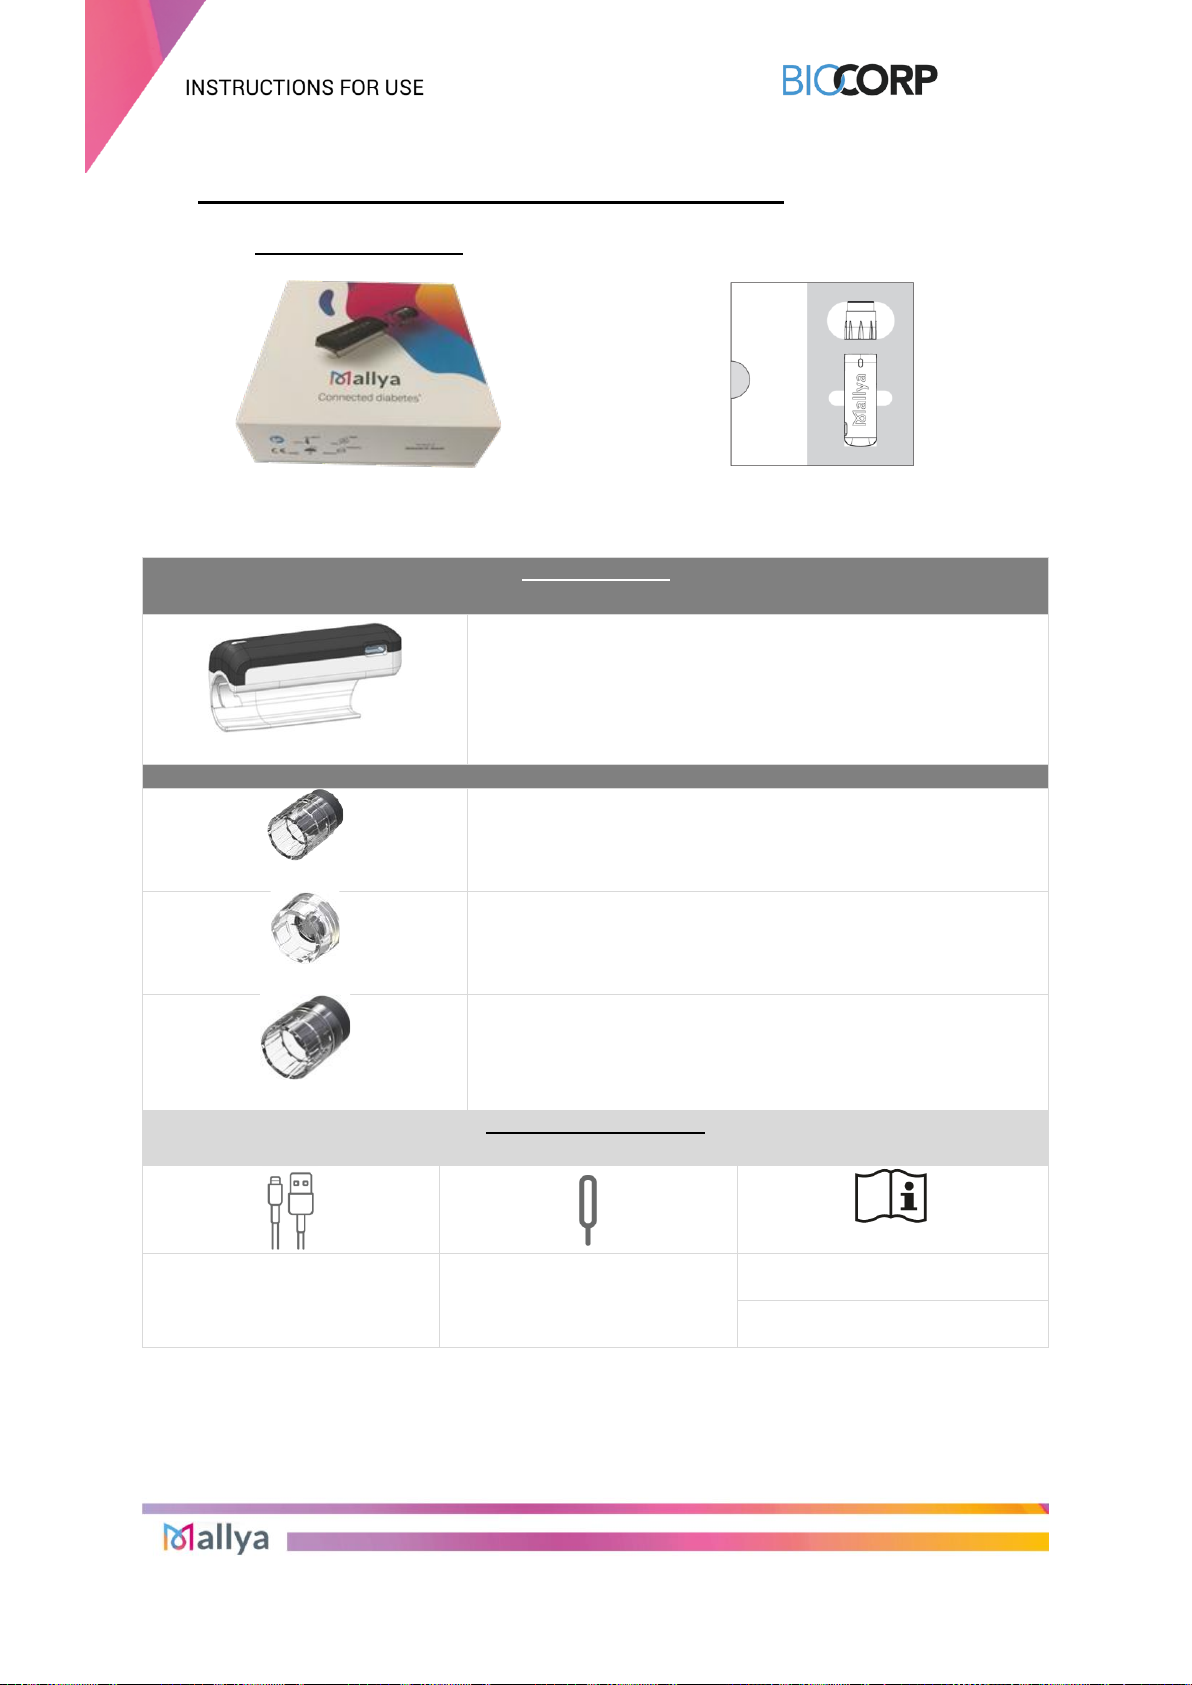
6. GETTING TO KNOW YOUR MALLYA DEVICE.................................................................................................................. 8
6.1 GETTING STARTED .................................................................................................................................................. 8
6.2 FEATURES OF YOUR MALLYA................................................................................................................................ 9
6.3 WEIGHT AND SIZE OF THE MAIN ELEMENTS ....................................................................................................... 9
6.4 STORAGE INFORMATION ........................................................................................................................................ 9
6.5 TRANSPORT AND PACKAGING ............................................................................................................................ 10
7. INSTALLING THE MALLYA APPLICATION..................................................................................................................... 10
7.1 TECHNICAL COMPATIBILITIES ............................................................................................................................. 10
7.2 DOWNLOAD THE MALLYA APPLICATION AND GET STARTED......................................................................... 11
7.2.1 Select "Get started":............................................................................................................................................... 11
7.2.2 A video will guide you through the unboxing steps. Select "Continue" to watch the Quick Start video:....... 11
8. CARING FOR YOUR MALLYA.......................................................................................................................................... 12
8.1 CHARGING YOUR MALLYA ................................................................................................................................... 12
8.1.1 Plug the powered USB cable into the Mallya micro-USB port. ........................................................................... 12
8.1.2 Check that the Mallya LED is slowly flashing green............................................................................................ 12
8.1.3 Let the battery charge for at least 10 minutes...................................................................................................... 12
8.2 CALIBRATING YOUR MALLYA .............................................................................................................................. 13
8.2.1 Unplug the Mallya smart base from the USB cable.............................................................................................. 13
8.2.2 Check that the Mallya LED is flashing orange...................................................................................................... 13
8.2.3 Slowly tilt the Mallya smart base side to side to CALIBRATE............................................................................. 13
8.2.4 Continue tilting until:.............................................................................................................................................. 13
8.3 ATTACHING YOUR MALLYA TO PEN.................................................................................................................... 14
8.3.1 ATTACHING SMART BASE TO PEN ...................................................................................................................... 14
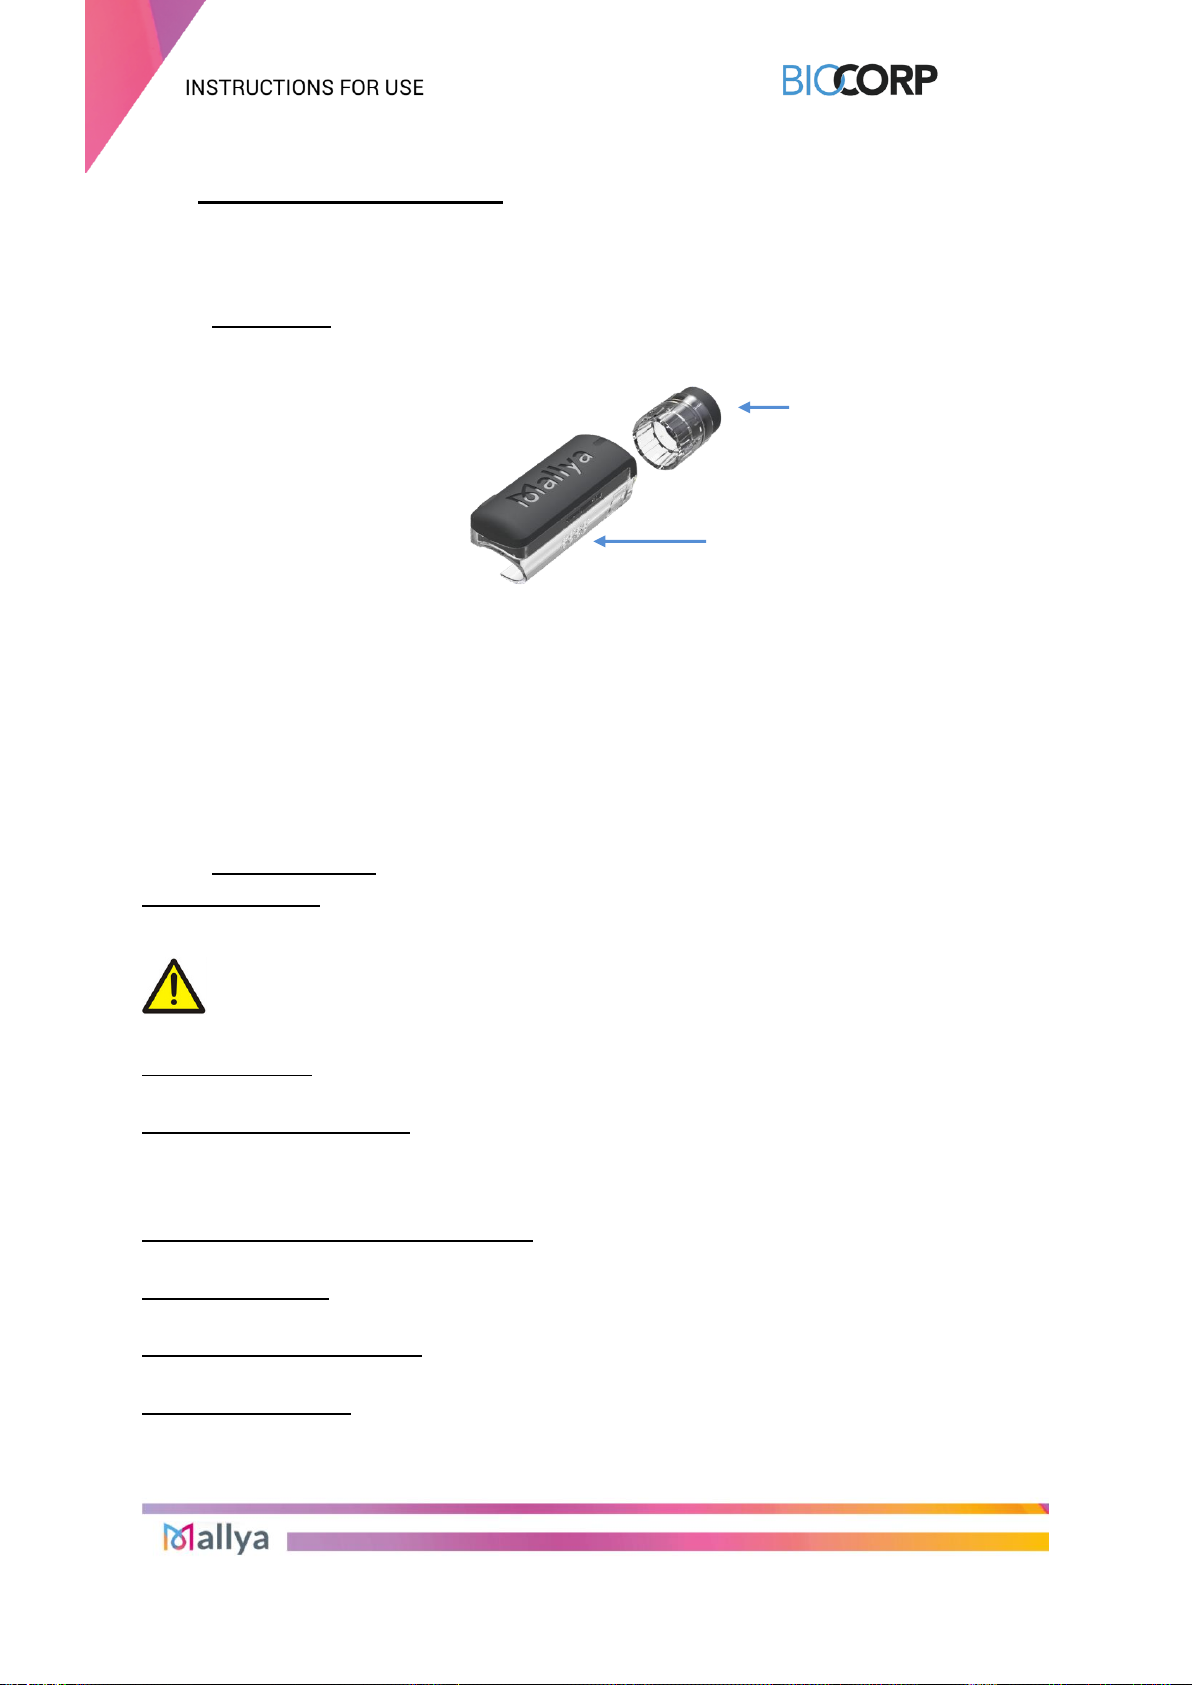
8.3.1.1 Hold the Mallya smart base so that the clear square plastic window is facing you.......................................... 14
8.3.1.2 Align the Mallya smart base clear square plastic window with the pen dose window, then snap the smart base
onto the pen........................................................................................................................................................................ 14
8.3.1.3 Make sure the Mallya smart base window is aligned with the pen dose window............................................. 14
A pen symbol is represented on the side of the Mallya smart base to help you position the pen in the correct orientation. 14
8.3.2 ATTACHING BUTTON TO PEN............................................................................................................................... 14
8.3.2.1 Place and insert the Mallya button over your pen injection button. Make sure the button is properly attached.
14
8.3.2.2 The Mallya smart base LED will flash orange and green when the button and smart base are properly mounted
onto the pen........................................................................................................................................................................ 14
8.4 PAIRING YOUR MALLYA........................................................................................................................................ 16
8.4.1 Make sure the Mallya smart base is within 12 inches of your smartphone and select “Start pairing”:.......... 16
8.4.2 Select “Pair” ............................................................................................................................................................ 16
8.4.3 Choose the insulin pen model onto which the Mallya device is assembled...................................................... 16
8.4.4 Confirm the pen model currently assembled with the Mallya device................................................................. 16
8.4.5 Well done! Your Mallya device is now paired with the Mallya application on your smartphone..................... 17
8.4.6 The injection screen is displayed.......................................................................................................................... 17
9. USING YOUR INSULIN PEN WITH MALLYA ................................................................................................................... 18
9.1 SECURITY TEST - PRIMING ................................................................................................................................... 18
9.1.1 Follow the injectable insulin pen Instructions for Use to carry out the priming step.............................................. 18
9.1.2 At the end of the priming step, keep the injection button pressed down:.............................................................. 18
-While Mallya’s green LED is flashing, ....................................................................................................................... 18
-Until Mallya emits an audible signal (BEEP) signaling the end of the priming step................................................... 18
9.1.3 You can release the pressure on the button when the green LED stops flashing and the “BEEP” signaling the end
of priming is emitted............................................................................................................................................................ 18
9.2 INJECTION............................................................................................................................................................... 19
Check the insulin dose to inject as requested by the drug manufacturer’s requirements. .................................................. 19

IFU_MAL_US_V1.7_July 2020 P a g e 3 | 41
Turn the dose knob to select the number of units to inject. The dose indicator should line up with the dose to inject........ 19
Press on the injection button with your thumb until you return to ZERO (complete dose injection).................................... 19
Keep the injection button pressed in and the needle in the skin :....................................................................................... 19
-While the Mallya’s green LED is flashing, ................................................................................................................. 19
-Until Mallya emits an audible signal (BEEP) signaling the end of the injection. ........................................................ 19
You can release the pressure on the button and then remove the needle from the skin when the green LED stops flashing
and the “BEEP” signaling the end of injection is emitted. ................................................................................................... 19
10. MANAGING RECORDED DATA.............................................................................................................................. 20
10.1 DISPLAY OF THE RECORDED DATA.................................................................................................................... 20
10.2 MANAGE YOUR RECORDED DATA....................................................................................................................... 21
10.2.1 You can change a «priming» or a «dose» quantity already recorded.............................................................. 21
10.2.2 You can change an injection recorded as a «dose» to a «priming», or a «priming» to a «dose».................... 21
10.2.3 You can delete a «dose» or a «priming»......................................................................................................... 22
10.2.4 You can add an injection that was not recorded to the history......................................................................... 22
10.2.5 You can fill in a dose that was not captured by the device .............................................................................. 23
11. OTHER FEATURES OF THE MALLYA APPLICATION.......................................................................................... 23
11.1 GENERATE A REPORT........................................................................................................................................... 23
11.2 PAIR TWO MALLYA TO YOUR MOBILE APP........................................................................................................ 24
11.3 SETTINGS................................................................................................................................................................ 25
11.4 “HELP” SCREEN ..................................................................................................................................................... 26
12. TRANSFERRING MALLYA TO A NEW PEN........................................................................................................... 27
12.1 REMOVE MALLYA FROM THE EMPTY PEN ......................................................................................................... 27
12.1.1 Remove the Mallya smart base from the insulin pen. Use your thumb to press on Mallya and to remove it
from the pen........................................................................................................................................................................... 27
12.1.2 Then, remove the Mallya knob button from the pen........................................................................................ 27
12.2 ATTACH YOUR MALLYA TO A NEW PEN............................................................................................................. 27
12.2.1 Injection screen before transferring Mallya onto a new pen:......................................................................... 28
12.2.2 Remove Mallya from the empty pen / attach Mallya onto a new pen (smart base and / or button)............. 28
12.2.3 On the next PRIMING or an INJECTION: .......................................................................................................... 28
............................................................................................................................................................................................ 28
12.3 COLLECT YOUR INJECTION DATA FROM MALLYA AFTER SMARTPHONE DISCONNECTION ..................... 30
13. TROUBLESHOOTING.............................................................................................................................................. 31
13.1 TROUBLESHOOTING MALLYA WITH SMART BASE SIGNALS .......................................................................... 31
13.2 TROUBLESHOOTING MALLYA WITH THE APPLICATION .................................................................................. 33
13.3 RESET INSTRUCTIONS .......................................................................................................................................... 35
Disassemble Mallya as indicated step 8.1.......................................................................................................................... 35
Flip Mallya over so that you can see the following indications:........................................................................................... 35
Take the Reset Key:........................................................................................................................................................... 35
Insert the Reset Key into the hole shown below and WAIT until 3 beeps are emitted before removing the key................. 35
Then follow step 4. to prepare your device for a new operation. ........................................................................................ 35
14. MAINTENANCE AND INSPECTION........................................................................................................................ 36
14.1 MALLYA DEVICE LIFETIME.................................................................................................................................... 36
14.2 MALLYA APPLICATION UPDATES........................................................................................................................ 36
14.3 CLEANING YOUR MALLYA .................................................................................................................................... 36
14.4 MAINTAIN WATER, DUST AND LIGHT RESISTANCE .......................................................................................... 36
15. TECHNICAL SPECIFICATIONS .............................................................................................................................. 37
15.1 COMPLIANCE WITH STANDARDS / REGULATION AND CLASSIFICATIONS.................................................... 37
15.2 SMART BASE LABELLING..................................................................................................................................... 37
15.3 SYMBOLS ON THE DEVICE AND ITS PACKAGING.............................................................................................. 38
15.4 ELECTRICAL RATINGS .......................................................................................................................................... 39
15.5 MATERIALS ............................................................................................................................................................. 39
15.6 ACCURACY.............................................................................................................................................................. 39
15.7 DISPOSAL................................................................................................................................................................ 40
16. GENERAL INFORMATION ...................................................................................................................................... 41
17. DISCLAIMER............................................................................................................................................................ 41

IFU_MAL_US_V1.7_July 2020 P a g e 4 | 41
1. SYMBOLS IN THIS INSTRUCTIONS FOR USE
Symbol
Meaning
Signification
WARNING
Improper operation may result in
serious injury*1or death to the user,
patient
CAUTION
Improper operation may result in
bodily injury*2 or property damage*3
CAUTION
Disconnect the device from power
supply before servicing/cleaning
NOTE
Important information for operation
CAUTION
Consult the Instructions for Use
documents
CAUTION
Do not use if the packaging is
damaged
Table 1 - Symbols used in this IFU (Instructions for Use)
*1 Serious injury means electrical shock or poisoning that causes a subsequent complication or requires
hospitalization or long-term outpatient treatment.
*2 Bodily injury means an injury, burn, electrical shock and so on that will not necessitate hospitalization or long-
term outpatient treatment.
*3 Damage to property means extensive damage to a house and/or household goods as well as a domestic animal
and pet.

IFU_MAL_US_V1.7_July 2020 P a g e 5 | 41
2. WARNING & CAUTION
NOTES:
- Mallya must only be used for the intended use described in this Instructions for Use
document.
- Read the Quick Start Guide and these Instructions for Use before you use Mallya for the
first time. Keep these instructions in a safe place.
- Warning and Caution statements are included throughout this document.
WARNING: improper operation may result in serious injury or death
-
- If you are not certain that you injected your insulin, do not start or repeat your injection.
Monitor your blood glucose as instructed by your healthcare provider.
- Disconnect the USB cable from the USB charging port and disconnect Mallya from the USB
cable before using it.
- Mallya must only be paired with a compatible mobile application.
- Mallya has been designed to work with ONE insulin pen. If you unpair your Mallya smart
base from the insulin pen, you MUST reselect your insulin pen.
- Do not disassemble, modify or repair the Mallya by yourself. All servicing should be done
by a BIOCORP PRODUCTION authorized dealer.
- Do not try to access the internal hardware of your device.
- Never install a mobile application from unofficial stores on your phone.
- Jailbreak or rooted phone exposes it to dangers and will invalidate the Mallya warranty.
CAUTION: improper operation may result in bodily injury or property damage
- The Instructions for Use should be accessible to you at all times and you should read all
instructions carefully before using the device.
- Mallya is intended for Over the Counter use and is not a prescription device.
- Mallyais supplied with a USB cable. Use the cable supplied with the device to connect it to
a USB power port. Do not use any other cable. Other cables may create problems or
interfere with other electronic devices.
- Protect your personal health data by using a password on your smartphone.
- If the device is bumped or dropped, it maymalfunction. If it is malfunctioning, pleasecontact
a BIOCORP PRODUCTION authorized dealer for technical support.
- Use only neutral cleaning agents. Do not wipe the surface of Mallya with other chemical
products or solvents (e.g. acetone) as they can lead to discoloration or deterioration.
- Before disposing of Mallya: reset the device to delete all your personal health data (see
step 9.3.)
3. Storage
Store the Mallya at room temperature between 59°F to 95°F (15°C to 35°C).
Keep Mallya away from:
•Water
•Pacemakers and defibrillators
•Metallic parts
•Small children. Your Mallya contains small parts that may cause injury or become a
choking hazard.

IFU_MAL_US_V1.7_July 2020 P a g e 6 | 41
4. DIRECTIONS FOR USE
4.1 FEATURES
Mallya is composed of a smart base and a button that can be mounted on a disposable insulin
pen.
Mallya allows you to:
- record the injected selected increment (insulin dose),
- record the day and time when each insulin dose was injected,
- transmit the dose, day/time when each insulin dose was injected to a compatible mobile
app. on a bluetooth paired mobile device (smartphone).
The compatible mobile application is then able to display the injected Insulin Selected Dose
(ISD) by day/time.
4.2 INTENDED USE
Indications for use:
Mallya can be used either for type I or type II diabetes.
The device is intended to assist patients maintain accurate records of their insulin usage.
WARNING
The device should not be used by children and women with gestational diabetes.
Contraindications:
There are no known contraindications to the use of Mallya.
Intended Patient population:
Intended users are patients and medical professionals.
Mallya can only be used by patients already familiar with the pen injectors: Kwikpen®(Eli
Lilly), Solostar®(Sanofi) or Flexpen®(Novo Nordisk).
Over the Counter (OTC) Medical Device:
Mallya is intended for Over the Counter use and is not a prescription device.
Sterility information:
Mallya is intended to be non-sterile.
Adverse reaction information:
There are no known adverse reactions to the use of Mallya.
Intended use location:
The device is intended for use in a medical office or at home.
Mallya
smart
base
Mallya
button

IFU_MAL_US_V1.7_July 2020 P a g e 7 | 41
5. MALLYA COMPATIBILITIES WITH PENS
WARNING
Make sure your Mallya is compatible with your pen.
MALLYA IS COMPATIBLE WITH THE PENS WITH THE FOLLOWING MOLECULES AND
CONCENTRATIONS:
Mallya for FLEXPEN®
Mallya for KWIKPEN®
Mallya for SOLOSTAR®
International non-
proprietary name
Concentration
International non-
proprietary names
Concentration
International non-
proprietary names
Concentration
INSULIN
DETEMIR
100 IU/mL
INSULIN
GLARGINE
100 IU/mL
INSULIN
GLARGINE
100 IU/mL
INSULIN
ASPART
100 IU/mL
INSULIN LISPRO
100 IU/mL
INSULIN
GLARGINE
300 IU/mL
INSULIN
ISOPHANE
HUMAN
BIOGENETIC
100 IU/mL
INSULIN LISPRO
200 IU/mL
INSULIN LISPRO
100 IU/mL
INSULIN
ISOPHANE
HUMAN
BIOGENETIC
100 IU/mL
INSULIN
GLULISINE
100 IU/mL
INSULIN
GLARGINE AND
LIXISENATIDE
100 IU/mL +
33 mcg/mL
WARNING
EXCLUDED VERSIONS:
(MALLYA IS NOT COMPATIBLE WITH THE FOLLOWING INSULIN PENS)
Mallya for KWIKPEN®
Mallya for SOLOSTAR®
HUMALOG®JUNIOR
TOUJEO®MAX
Table 2 - Mallya compatibilities with pens

IFU_MAL_US_V1.7_July 2020 P a g e 8 | 41
6. GETTING TO KNOW YOUR MALLYA DEVICE
6.1 GETTING STARTED
The shipment box contains the following items. The Part Numbers (PN) vary depending on
the Mallya model (Mallya designed for FLEXPEN or KWIKPEN or SOLOSTAR):
Mallya DEVICE:
1 X Mallya SMART BASE
Applied part
For the insulin pen FLEXPEN® NOVO NORDISK:
PN: 0273778
For the insulin pen KWIKPEN®ELI LILLY:
PN: 0273694
For the insulin pen SOLOSTAR® SANOFI:
PN: 0273777
2 X Mallya BUTTONS
Applied part
For the insulin pen FLEXPEN®NOVO NORDISK:
PN : 0273727
Applied part
For the insulin pen KWIKPEN®ELI LILLY:
PN : 0273698
Applied part
For the insulin pen SOLOSTAR®SANOFI:
PN: 0273710
Mallya ACCESSORIES:
1 x USB CABLE
1 x RESET KEY
1 x QUICK START GUIDE
CAUTION
Part Number: B014JOOZFS
Model: B004OQOQQ0
Manufacturer:
Bright Sea Industrial. Co
Instructions For Use
(reference: IFU_MAL_US)
Quick Start Guide
(reference: QSG_MAL_US)
Table 3 - Mallya box content
NOTE :
Before you use your Mallya for the first time, you have to charge it. Use the provided USB
cable to connect the Mallya smart base to a USB port or outlet. Let it charge for at least 10
minutes.

IFU_MAL_US_V1.7_July 2020 P a g e 9 | 41
6.2 FEATURES OF YOUR MALLYA
6.3 WEIGHT AND SIZE OF THE MAIN ELEMENTS
Element
Weight
Size
Mallyasmart base
0.016 kg
KWIKPEN® smart base:
(60.8x28.9x21.3) mm
FLEXPEN®and SOLOSTAR® smart
bases: (60.8x26.9x21.3) mm
Mallyabutton
0.006 kg
KWIKPEN® button:
(11.6 x Ø22) mm
SOLOSTAR®button:
(24.4 x Ø20) mm
FLEXPEN®button:
(26.3 x Ø19.3) mm
Mallyatotal weight
0.022 kg
Table 4 - Weight and size of the main elements
6.4 STORAGE INFORMATION
Temperature
Atmospheric
pressure
Relative humidity
Transport
–10°C to +40°C
(14°F < T° < 104°F)
500 hPa to 1060 hPa
10% to 90%
Storage
–10°C to +40°C
(14°F < T° < 104°F)
800 hPa to 1060 hPa
10% to 90%
Operating
+15°C to +35°C
(59°F < T° < 95°F)
800 hPa to 1060 hPa
30% to 70%
Table 5 - Storage information
LED
Clear square
dose window
Micro
USB port
Button

IFU_MAL_US_V1.7_July 2020 P a g e 10 | 41
6.5 TRANSPORT AND PACKAGING
-The device must be transported and stored in its original packaging. Storage and transport
conditions need to meet conditions described in the previous step 2.4.
-Keep the original packaging in case of return or transport of device.
-Check if there is any damage to the packaging. If the packaging is damaged, there is a
possibility that the device is also damaged. Please notify the carrier if any damage is found
and report it to the manufacturer.
CAUTION:
Do not use Mallya if the packaging is damaged.
-Leave the device in a room for 30 minutes before unpacking to ensure there is no
condensation.
NOTE :
Keep all original packaging forfutureuse. The system must always be transported in its original
packaging specially designed to protect it against damage.
7. INSTALLING THE MALLYA APPLICATION
Mallya connects your insulin pen to your smartphone!
Use the Mallya smartphone application to keep track of your insulin doses.
7.1 TECHNICAL COMPATIBILITIES
The list of smartphones validated by BIOCORP and compatible with the Mallya application
Version 1.7.0 is shown below:
SMARTPHONE MODEL
COMPATIBLE OPERATING SYSTEM
Samsung Galaxy S9
Android 10.0
Samsung Galaxy S8 Plus
Android 9.0
Samsung Galaxy S6
Android 7.0
Honor 10
Android 8.1
Huawei P20 Lite
Android 8.0
Huawei Mate 10 Lite
Android 8.0
LG V30
Android 8.0
iPhone SE
iPhone 6s
iPhone 6s Plus
iPhone 7
iPhone 7 Plus
iPhone 8
iPhone 8 Plus
iPhone X
iPhone XR
iPhone 11
iOS13
Table 6 - Mallya application technical compatibilities
CAUTION
This list represents the list of smartphones and associated operating systems that have been
tested and validated by BIOCORP. This list is not exhaustive.

IFU_MAL_US_V1.7_July 2020 P a g e 11 | 41
7.2 DOWNLOAD THE MALLYA APPLICATION AND GET STARTED
Download the Mallya application from:
Once installed, select the following icon to open up the application:
The first time you open the application, the Mallya application terms of service screen is
displayed. Please read the Mallya application terms of use before accepting them and
confirming your choice.
before accepting them and confirming your choice.
The privacy policy screen is then displayed: make sure you understand it before accessing the
“Get Started” screen.
7.2.1 Select "Get started":
7.2.2 A video will guide you through the
unboxing steps. Select "Continue"
to watch the Quick Start video:
The next screens will guide you through the 4 operations required to start up your Mallya:
-Switch on (as explained in step 4.1. Charging your Mallya)
-Calibrate (as explained in step 4.2. Calibrating your Mallya)
-Assemble (as explained in step 4.3. Assembling your Mallya to the insulin pen)
-Pair (as explained in the following step 4.4. Pairing your Mallya)

IFU_MAL_US_V1.7_July 2020 P a g e 12 | 41
8. CARING FOR YOUR MALLYA
8.1 CHARGING YOUR MALLYA
NOTE:
Mallya must be charged before first-time use.
CAUTION
-Mallya is supplied with a USB cable. Do not use any other cable. Use the cable supplied
with the device to connect it to a USB power port.
-You cannot use your Mallya for an injection while it is connected to a USB power port and
charging.
8.1.1 Plug the powered USB cable into the
Mallya micro-USB port.
8.1.2 Check that the Mallya LED is slowly
flashing green.
8.1.3 Let the battery charge for at least 10
minutes.
NOTES:
-Fully recharging the battery takes approximately 2 hours. When the battery is fully charged,
the green LED will turn off.
-Optimal autonomy is reached when Mallya’s battery is fully charged. You can then use
Mallya for at least 2 weeks.

IFU_MAL_US_V1.7_July 2020 P a g e 13 | 41
8.2 CALIBRATING YOUR MALLYA
8.2.1 Unplug the Mallya smart base from
the USB cable.
8.2.2 Check that the Mallya LED is flashing
orange.
8.2.3 Slowly tilt the Mallya smart base side
to side to CALIBRATE.
8.2.4 Continue tilting until:
✓The smart base beeps and the
LED light turns green.
✓Then the light will turn off.

IFU_MAL_US_V1.7_July 2020 P a g e 14 | 41
8.3 ATTACHING YOUR MALLYATO PEN
CAUTION
The Mallya smart base and button must be correctly attached onto the pen, otherwise, data
will not be transferred.
8.3.1 ATTACHING SMART BASE TO PEN
8.3.1.1 Hold the Mallya smart base so that the
clear square plastic window is facing you
8.3.1.2 Align the Mallya smart base clear square
plastic window with the pen dose
window, then snap the smart base onto
the pen.
8.3.1.3 Make sure the Mallya smart base
window is aligned with the pen dose
window.
NOTE:
A pen symbol is represented on the side of the
Mallyasmart base to help you position the pen in
the correct orientation.
8.3.2 ATTACHING BUTTON TO PEN
8.3.2.1 Place and insert the Mallya button over
your pen injection button. Make sure the
button is properly attached.
8.3.2.2 The Mallya smart base LED will flash
orange and green when the button and
smart base are properly mounted onto
the pen.

IFU_MAL_US_V1.7_July 2020 P a g e 15 | 41
CAUTION
The Mallya smart base LED remains orange if:
-the clear square plastic window of the Mallya
smart base and the dose window of the pen are
not correctly aligned,
-or, the Mallya knob is not pushed on enough.
In this case, it is necessary to:
-Re-adjust (re-align) the windows,
-or, push on the knob,
until the Mallya smart base LED flashes green and orange.

IFU_MAL_US_V1.7_July 2020 P a g e 16 | 41
8.4 PAIRING YOUR MALLYA
To pair the Mallya deviceto the BIOCORP Mallyaapplication, follow the steps indicated below:
8.4.1 Make sure the Mallya smart base is
within 12 inches of your smartphone
and select “Start pairing”:
8.4.2 Select “Pair”
NOTE:
The pairing step may take few seconds.
8.4.3 Choose the insulin pen model onto
which the Mallya device is
assembled.
8.4.4 Confirm the pen model currently
assembled with the Mallya device.
NOTE:
In case you cannot find your pen model in the
list: select “cancel pairing”. The application
will guide you to pair a new Mallya.
NOTE:
If you select “No, it does not match”, the
application will return to the previous
screen (step 4.4.3.) to let you choose
another pen model.

IFU_MAL_US_V1.7_July 2020 P a g e 17 | 41
8.4.5 Well done! Your Mallya device is
now paired with the Mallya application
on your smartphone.
Select “OK” to move on to the injection
screen.
8.4.6 The injection screen is displayed.
CAUTION
From now on, this Mallya should only be used
with this pen model, unless you make a new
adjustment.
Your insulin pen can now be used as usual and Mallya will track your insulin intake.
NOTE:
When Mallya is paired and correctly attached to the injection pen: the LED is green.

IFU_MAL_US_V1.7_July 2020 P a g e 18 | 41
9. USING YOUR INSULIN PEN WITH MALLYA
NOTE :
Once Mallya is attached to the insulin pen, the pen should be used just like a normal insulin
pen. Refer to the manufacturer’s injector pen Instructions for Use.
9.1 SECURITY TEST - PRIMING
WARNING
Always perform a priming (safety test) before each injection to ensure that:
✓Your pen and the needle are working properly,
✓The right dose of insulin will be injected.
If you do NOT perform the priming, you may receive too much or too little insulin (refer to the
manufacturer’s injector pen Instructions for Use).
9.1.1 Follow the injectable insulin pen Instructions for Use to carry out the priming step.
9.1.2 At the end of the priming step, keep the
injection button pressed down:
-While Mallya’s green LED is flashing,
-Until Mallya emits an audible signal
(BEEP) signaling the end of the priming
step.
WARNING
If the liquid does not come out of the needle tip during the safety test, do not use the pen
and refer to the manufacturer’s injector pen Instructions for Use for more information to solve
the problem.
9.1.3 You can release the pressure on the button when the green LED stops flashing
and the “BEEP” signaling the end of priming is emitted.
The Mallya application will automatically detect a “priming” if:
➢You are priming 1 or 2 unit(s), and
➢You perform your insulin injection just after the priming step (within 2 minutes)
CAUTION
If the time interval between the two consecutive injections exceeds 2 minutes, the
application will automatically detect an injection instead of a priming.
NOTE :
You can always change an injection recorded as a “dose” to a “priming”, or a “priming” to a
“dose” in case it has not been suitably categorized. Please refer to step 6.2.2.

IFU_MAL_US_V1.7_July 2020 P a g e 19 | 41
9.2 INJECTION
WARNING
If you are not certain that you injected your insulin, do not start or repeat your injection.
Monitor your blood glucose as instructed by your healthcare provider.
Check the insulin dose to inject as requested by the drug manufacturer’s requirements.
Turn the dose knob to select the number of units to inject. The dose indicator should
line up with the dose to inject.
Press on the injection button with your thumb until you return to ZERO (complete dose
injection)
Keep the injection button pressed in and the
needle in the skin :
-While the Mallya’s green LED is flashing,
-Until Mallya emits an audible signal
(BEEP) signaling the end of the injection.
You can release the pressure on the button and then remove the needle from the skin
when the green LED stops flashing and the “BEEP” signaling the end of
injection is emitted.
WARNING
If you do not see ZERO (“0”) in the pen dose window: it indicates that the full dose has not
been injected.
The Mallya application will automatically detect an injection:
The information corresponding to the injected dose is displayed: dose, day and time.

IFU_MAL_US_V1.7_July 2020 P a g e 20 | 41
10. MANAGING RECORDED DATA
Once data is transferred from a paired compatible Mallya, you can display and manage any
recorded data using the Mallya application as follows:
10.1 DISPLAY OF THE RECORDED DATA
Select the injection screen:
“Doses” or “Priming” injections are then displayed as follows:
The Insulin Dose information is displayed:
•Type of injection: “priming” or “dose”
•Injection day and time
•Insulin dialed dose (in International Unit)
•Color indicator of the injected insulin type or concentration
PRIMING
DOSES
Other manuals for Mallya
2
Table of contents
Popular Personal Care Product manuals by other brands

Otto Bock
Otto Bock Manu Junior 50P50 Instructions for use

Oregon Scientific
Oregon Scientific BL1211 user manual

Casa Lusso
Casa Lusso MVL800PR installation instructions

Arzum
Arzum REVOLUTION AR 5162 instruction manual

Somnox
Somnox Sleep Robot 2 Full manual

ComforTrac
ComforTrac Lumbar Traction instruction manual