Interacoustics Titan IMP440 Operating and safety instructions

Titan – Setup
& Installation
80655241 ver. 06/2011


Table of contents
1Introduction ............................................................................................................................... 1
1.1Intended Use ...................................................................................................................... 1
1.1.1Typical Applications........................................................................................................ 1
1.2Safety Notes ....................................................................................................................... 2
1.3Warranty ............................................................................................................................. 4
1.4General Maintenance Procedures...................................................................................... 5
1.5Unpacking and Inspection .................................................................................................. 5
1.6Reporting Damage ............................................................................................................. 6
1.7Concerning Maintenance and Repair................................................................................. 6
2System Setup ............................................................................................................................ 7
2.1System Requirements ........................................................................................................ 7
2.1.1PC minimum Requirements ........................................................................................... 7
2.1.2Supported Operating Systems ....................................................................................... 7
2.1.3Supported Noah3 Office Systems.................................................................................. 7
2.2System Installation ............................................................................................................. 8
2.2.1Hardware Installation...................................................................................................... 8
2.2.1.1Installing the Cradle................................................................................................ 8
2.2.1.2Mounting a Cradle on the wall.............................................................................. 10
2.2.1.3Cradle Indication Lights........................................................................................ 11
2.2.1.4Calibration Cavities and Issues ............................................................................ 11
2.2.1.5Installing the Thermal Printer ............................................................................... 11
2.2.1.6Installing Paper in the Thermal Printer................................................................. 12
2.2.1.7 Installing Bluetooth for direct printing with HP Officejet H470, HP Deskjet 6940
or thermal printer .................................................................................................. 12
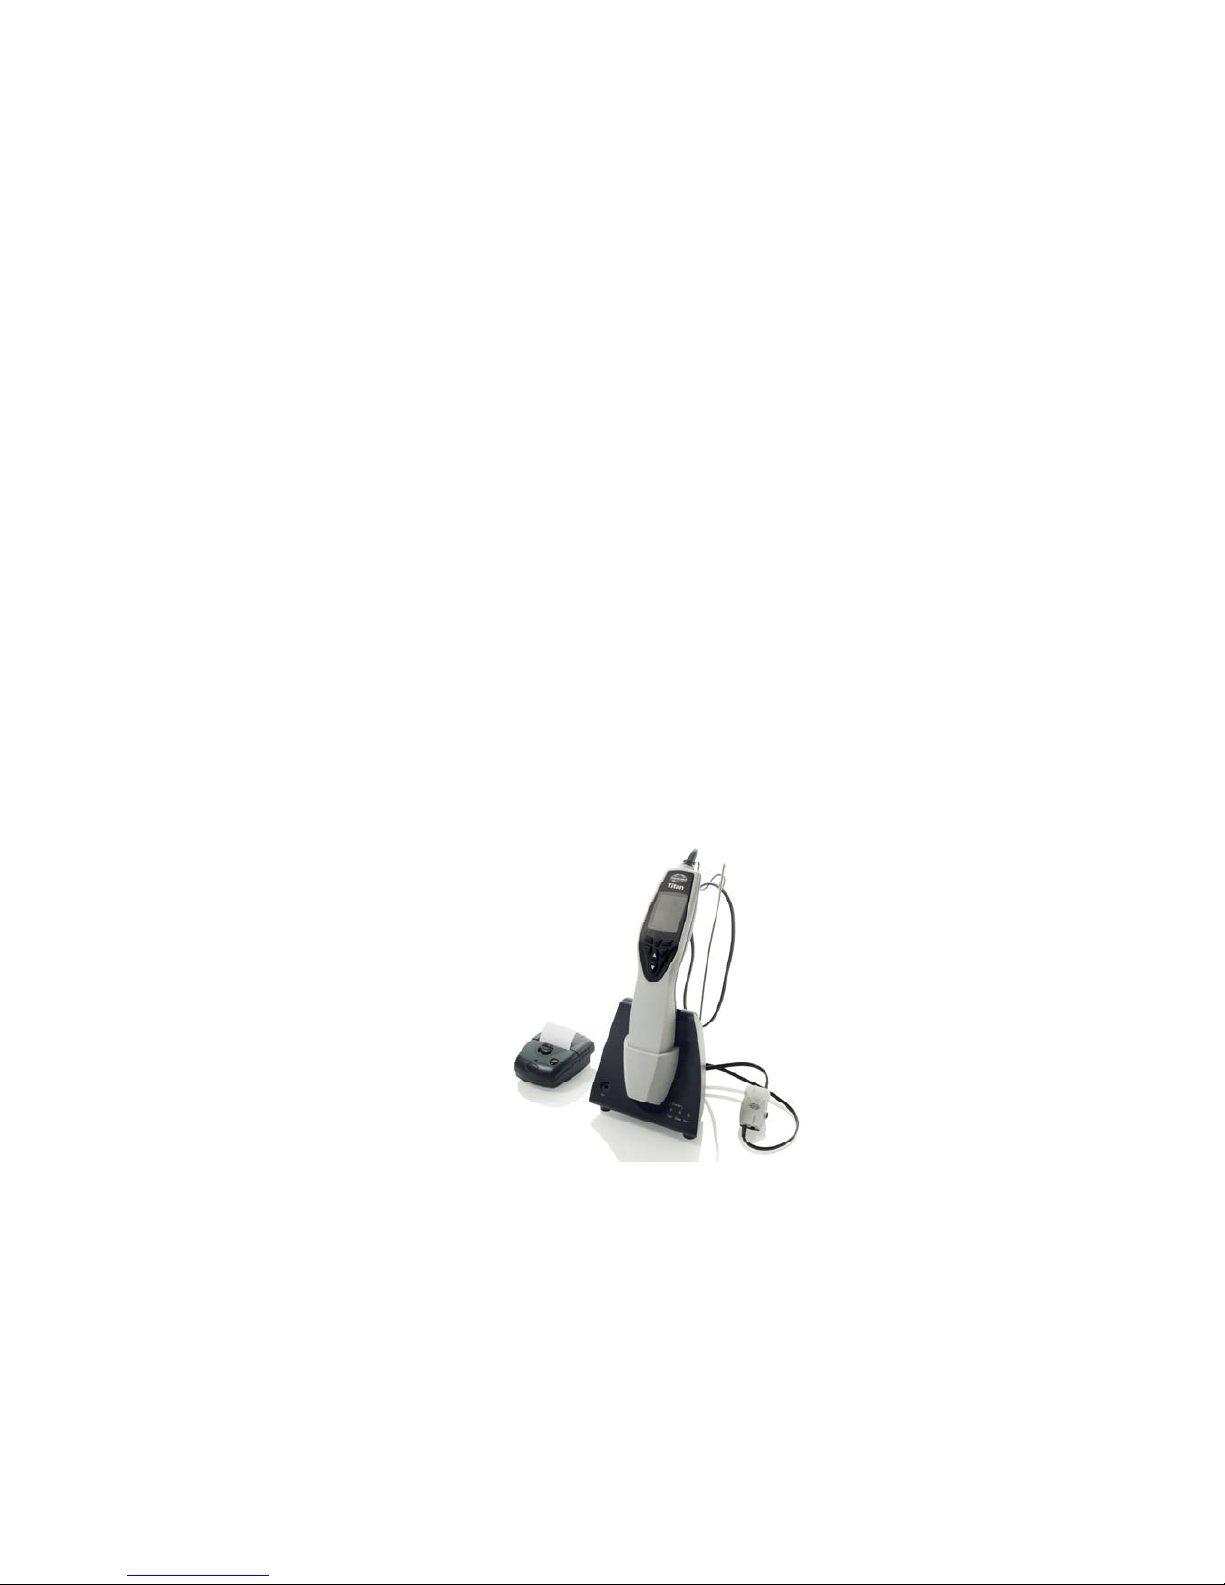
2.2.1.8Installing Titan and its Battery .............................................................................. 13
2.2.1.9Charging the Battery............................................................................................. 14
2.2.1.10Battery Lifetime and Charging Time................................................................. 14
2.2.1.11Changing Probes and Extension Cords on the Titan ....................................... 15
2.2.1.12Connecting transducers to the shoulder box and PreAmp............................... 16
2.2.2Safety Precautions to take when connecting the Titan. ............................................... 17
2.2.3Software and Driver Installation ................................................................................... 23
2.2.3.1Before you start installation .................................................................................. 23
2.2.3.2Software Installation ............................................................................................. 23
2.2.3.3Installation of the Driver........................................................................................ 25
2.2.3.4Installation of NOAH Toolbar shortcut.................................................................. 25
2.2.3.5Standalone Use of Titan Suite.............................................................................. 26
2.2.3.6License ................................................................................................................. 26
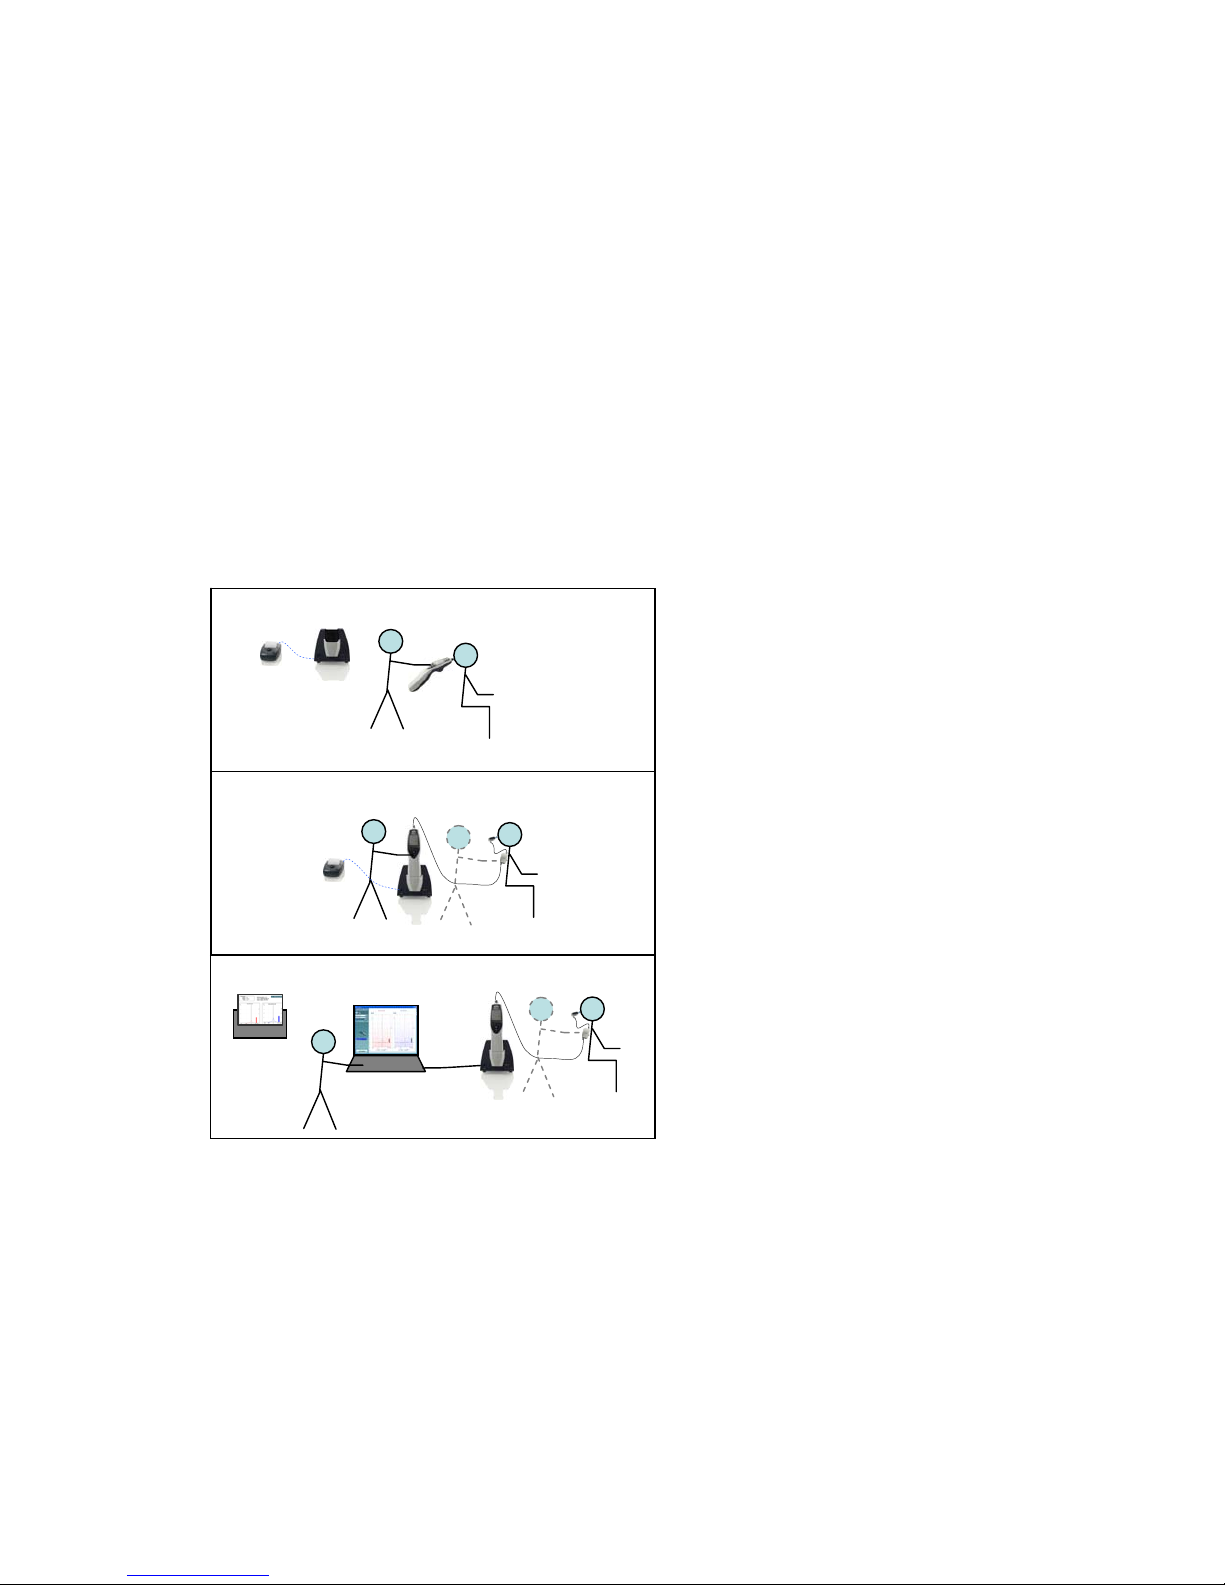
2.2.3.7PC controlled Measurements with use of Bluetooth connection .......................... 26
2.2.4Selection of transducers............................................................................................... 26
2.2.5Handling and selection of ear tips ................................................................................ 27
2.2.6Placing and using the Shoulder Box or PreAmplifier ................................................... 28
2.2.7Placing the Montage-Indication Stickers on the PreAmplifier ...................................... 29
2.3Cleaning the Probe Tip..................................................................................................... 29
3Technical Specifications........................................................................................................ 31
4Return Report – form 001....................................................................................................... 39


Titan Setup and Installation Manual Page 1
1Introduction
1.1 Intended Use
The Titan with IMP440 Impedance System is an electroacoustic test instrument that produces
controlled levels of test tones and signals intended for use in conduction diagnostic hearing
evaluations and assisting in the diagnosis of possible otologic disorders, It features tympanometry
and acoustics reflex. The target population for Titan with IMP440 includes all ages.
The Titan with DPOAE440 is intended for use in the audiologic evaluation and documentation of
ear disorders using Distortion Product Otoacoustic Emissions. The target population for Titan with
DPOAE440 includes all ages.
The Titan with ABRIS440 is intended for use in the audiologic evaluation and documentation of ear
and nerve disorders using auditory evoked potentials from the inner ear, the auditory nerve and the
brainstem. The target population for Titan with ABRIS440 is newborns.
1.1.1 Typical Applications
Titan is well suited for screening, as well as
diagnostic work. Newborn screening
programs will particularly appreciate the
Automated Auditory Brainstem Response
(AABR) test implemented under the ABRIS
module and the option to create user
defined PASS/REFER protocols for DPOAE
screening. The presence of the 1000Hz
probe tone for tympanometry also allows
more reliable tympanometry results in
infants.
Titan, as a screener, will typically be
operated as a hand held device. Results
can be printed using the (Bluetooth) thermal
printer or a Bluetooth PC printer. Optionally,
measurements can be transferred later to a
database on your PC for printing.
In combination with the cradle and shoulder
box for IMP440 and DPOAE440, the Titan
gives you more flexibility in placing the
probe. Choice of ear, start and stop of the
measurement can be controlled from the
shoulder box.
In combination with the Preamplifier (PreAmp), the Titan is capable of performing the full range of
tests from the ABRIS440, DPOAE440 and IMP440 modules.
The Titan, when licensed with a diagnostic or clinical version of the IMP440 or DPOAE440
software, is generally operated via the PC. PC operation allows access to advanced testing
parameters, for example, it permits manual pressure control within the impedance module and the
ability to add extra test points in DPOAE after testing. Testing is as quick in PC controlled mode as
when using the handheld device. Results are saved in your database and can be printed on an
external printer. Protocols can be modified with all the flexibility you need.

Titan Setup and Installation Manual Page 2
1.2 Safety Notes
It is recommended that all staff working with the Titan read this manual and thereby learn the
precautionary measures.
1. External equipment intended for connection to signal input, signal output or other
connector, shall comply with the relevant IEC standard (e.g. IEC 60950 for IT equipment
and the IEC 60601 series for medical electrical equipment). In addition, all such
combinations - systems - shall comply with the standard 60601-1-1, Safety requirements
for medical electrical systems. Equipment not complying with IEC 60601 shall be kept
outside the patient environment, as defined in the standard (at least 1.5 m from the
patient).
2. Any person who connects external equipment to signal input, signal output or other
connectors has created a system and is therefore responsible for the system complying
with the requirements of IEC 60601-1-1. If in doubt, contact your service technician or local
representative for help.
3. In order to comply with IEC 60601, use of the direct power adapter to mains for the thermal
printer when it is connected to the cradle is not permitted. The cradle connection provides
power for the thermal printer.
4. In order to maintain a high level of safety it is necessary to have the instrument and its
power supply checked according to the medical electrical safety standard IEC 60601-1 on
a yearly basis by a qualified service technician.
1. Use this device only as described in this manual.
2. Use only the disposable Interacoustics ear tips designed for use with this instrument.
3. Never insert the probe tip into the ear canal without affixing an ear tip as omission may
damage the patient’s ear canal.
4. Keep the box of ear tips outside the reach of the patient.
5. Be sure to insert the probe tip in a way which will assure an airtight fit without causing any
harm to the patient. Use of a correct and clean ear tip is mandatory.
6. Be sure to use only stimulation intensities acceptable to the patient.
WARNING indicates a hazardous situation which, if not avoided, could
result in death or serious injury.
CAUTION, used with the safety alert symbol, indicates a hazardous
situation which, if not avoided, could result in minor or moderate injury.
NOTICE is used to address practices not related to personal injury.

Titan Setup and Installation Manual Page 3
7. When presenting contralateral stimuli using the insert phones – do not insert the phones or
in any way try to conduct measurements, without a correct insert ear tip in place.
8. When presenting contralateral stimuli using headphones – do not try to conduct
measurements without the MX41 cushion in place.
9. Clean the headphone cushion regularly using a recognized disinfectant.
10. We recommend using a new ear tip for each patient.
1. Careful handling of the instrument whenever in contact with a patient should be given high
priority. Calm and stable positioning while testing is preferred for optimal accuracy.
2. The Titan should be operated in a quiet environment, so that measurements are not
influenced by outside acoustic noises. This may be determined by an appropriately skilled
person trained in acoustics. OSHA defines a quiet room for audiometric hearing testing in
its guideline OSHA 29 CFR 1910.95.
3. It is recommended that the instrument be operated within an ambient temperature range of
15°C / 59°F – 35°C / 95°F.
4. Storage in temperatures below 0°C /32°F and above 50°C /122°F may cause permanent
damage to the instrument and its accessories.
5. The headphone and insert phone are calibrated to the shoulder box of this instrument –
introducing transducers from other equipment requires a re-calibration.
6. Never clean the transducer housing with water or insert non-specified instruments into the
transducer.
7. Do not drop and avoid other undue impact to this device. If the instrument is dropped or
otherwise damaged, return it to the manufacturer for repair and/or calibration. Do not use
the instrument if any damage is suspected.
8. Although the instrument fulfils the relevant EMC requirements, precautions should be taken
to avoid unnecessary exposure to electromagnetic fields, e.g. from mobile phones etc. If
the device is used adjacent to other equipment, caution must be taken to observe that no
mutual disturbance appears.
9. The temperature of the battery pack in the thermal printer will rise if it is powered through
both the printer’s power supply and through the RJ12 cable to the cradle. Use either one or
the other power connections, but never both, as this may severely reduce the lifetime of
the battery.
10. The connectors marked with the symbol shown below should not be touched without taking
necessary ESD (electrostatic discharge) precautions.
11. The best way to protect the Titan from ESD is to avoid the build-up of electrostatic charges
through the use of conductive footwear and floor coverings. Humidification of the air is also
an effective preventive means. Failing to comply with these measures can cause the build-
up of voltage levels of several thousand volts. If the Titan is subjected to such an ESD
pulse, it may be necessary to remove the battery for a few seconds and then restart the
instrument.

Titan Setup and Installation Manual Page 4
The precautionary symbol:
Within the European Union it is illegal to dispose of electrical and electronic waste
as unsorted municipal waste. Electrical and electronic waste may contain
hazardous substances and therefore have to be disposed of separately. Such
products will be marked with the crossed-out wheelie-bin image shown to the left.
User cooperation is important in order to ensure a high level of reuse and
recycling of electrical and electronic waste. Failure to recycle such waste products
in an appropriate way may endanger the environment and consequently the
health of human beings.
1.3 Warranty
INTERACOUSTICS guarantees that:
•The Titan is free from defects in material and workmanship under normal use and
service for a period of 24 months from the date of delivery by Interacoustics to the first
purchaser.
•Accessories are free from defects in material and workmanship under normal use and
service for a period of ninety (90) days from the date of delivery by Interacoustics to the
first purchaser.
If any product requires service during the applicable warranty period, the purchaser should
communicate directly with the local Interacoustics service centre to determine the appropriate
repair facility. Repair or replacement will be carried out at Interacoustics’ expense, subject to the
terms of this warranty. The product requiring service should be returned promptly, properly
packed, and postage prepaid. Loss or damage in return shipment to Interacoustics shall be at
purchaser's risk.
In no event shall Interacoustics be liable for any incidental, indirect or consequential damages in
connection with the purchase or use of any Interacoustics product.
This shall apply solely to the original purchaser. This warranty shall not apply to any subsequent
owner or holder of the product. Furthermore, this warranty shall not apply to, and Interacoustics
shall not be responsible for, any loss arising in connection with the purchase or use of any
Interacoustics product that has been:
•repaired by anyone other than an authorized Interacoustics service representative;
•altered in any way so as, in Interacoustics opinion, to affect its stability or reliability;
•subject to misuse or negligence or accident, or that has had the serial or lot number
altered, defaced or removed; or
•improperly maintained or used in any manner other than in accordance with the
instructions provided by Interacoustics.
This warranty is in lieu of all other warranties, express or implied, and of all other obligations or
liabilities of Interacoustics. Interacoustics does not give or grant, directly or indirectly, the
authority to any representative or other person to assume on behalf of Interacoustics any other
liability in connection with the sale of Interacoustics products.
INTERACOUSTICS DISCLAIMS ALL OTHER WARRANTIES, EXPRESSED OR IMPLIED,
INCLUDING ANY WARRANTY OF MERCHANTABILITY OR FOR FUNCTION OF FITNESS
FOR A PARTICULAR PURPOSE OR APPLICATION.

Titan Setup and Installation Manual Page 5
1.4 General Maintenance Procedures
The performance and safety of the instrument will be maintained if the following recommendations
for care and maintenance are observed:
1 It is recommended that the instrument go through at least one annual service, to ensure that
the acoustical, electrical and mechanical properties are correct. This should be carried out by
an authorized repairer in order to guarantee proper service and repair.
2 Before connection to the mains network, be sure that the local mains voltage corresponds to
the voltage labeled on the instrument. Always disconnect the power cord if the instrument is to
be opened for inspection.
3 Observe that no damage is present to the insulation of the mains cable or the connectors and
that it is not exposed to any kind of mechanical load that could involve damage.
4 For maximum electrical safety, turn off the power from a mains powered instrument when it is
left unused.
5 Do not place the instrument next to a heat source of any kind, and allow sufficient space
around the instrument to ensure proper ventilation.
6 To ensure that the reliability of the instrument is maintained, we recommend that the operator
at short intervals, for instance once a day, performs a test on a person with known data. This
person could be the operator.
7 If the surface of the instrument or parts of it are contaminated, it can be cleaned using a soft
cloth moistened with a mild solution of water and detergent or similar. The use of organic
solvents and aromatic oils must be avoided. Always disconnect the mains power adaptor and
battery during the cleaning process, and be careful that no fluid enters the inside of the
instrument or accessories.
8 After each patient examination, ensure that there has been no contamination to the parts
touching the patient. General precautions must be observed in order to avoid cross-
contamination of disease from one patient to another. If ear cushions or ear tips are
contaminated, it is strongly recommended to remove them from the transducer before they are
cleaned. Water should be used for frequent cleaning, but in the case of severe contamination
it may be necessary to use a disinfectant. The use of organic solvents and aromatic oils must
be avoided.
9 Great care should be exercise when handling transducers, as rough handling, for example
dropping onto a hard surface may break or damage the parts.
1.5 Unpacking and Inspection
Check the box and its contents for damage
When the instrument is received, please check the shipping box for rough handling and damage. If
the box is damaged it should be kept until the contents of the shipment have been checked
mechanically and electrically. If the instrument is faulty, please contact your local distributor. Keep
the shipping material for the carrier’s inspection and insurance claim.
Keep the carton for future shipment
The Titan comes in its own shipping carton, which is specially designed for the Titan. Please keep
this carton. It will be needed if the instrument has to be returned for service.
If service is required please contact your local distributor.

Titan Setup and Installation Manual Page 6
1.6 Reporting Damage
Inspect before connection
Prior to connecting the product to the mains it should re-inspected for damage. The entire cabinet
and accessories should be checked visually for scratches and missing parts.
Report immediately any faults
Any missing part or malfunction should be reported immediately to the supplier of the instrument
together with the invoice, serial number, and a detailed report of the problem. In the back of this
manual you will find a "Return Report" where you can describe the problem.
Please use the "Return Report"
Completion of the Return Report is advisable so that the service engineer can easily understand
the problem being reported and correct/repair to your satisfaction. Without this relevant
information, it may be difficult to determine where the fault/problem lies.
1.7 Concerning Maintenance and Repair
Interacoustics is only considered to be responsible for the validity of the CE marking, effects on
safety, reliability and performance of the equipment if:
•assembly operations, extensions, readjustments, modifications or repairs are carried out by
authorized persons,
•a 1 year service interval is maintained
•the electrical installation of the relevant room complies with the appropriate requirements, and
•the equipment is used by authorized personnel in accordance with the documentation supplied
by Interacoustics.
It is important that the customer (agent) fills out the RETURN REPORT every time a problem
arises and sends it to Interacoustics, Drejervaenget 8, DK-5610 Assens, Denmark. This should
also be done every time an instrument is returned to Interacoustics. (This of course also applies in
the unlikely worst case scenario of death or serious injury to a patient or user).

Titan Setup and Installation Manual Page 7
2System Setup
2.1 System Requirements
2.1.1 PC minimum Requirements
•1.6 GHz Pentium IV processor or higher
•1GB RAM or more.
•Hard drive with min 10 GB space.
•Minimum display of 1024x768 pixels.
•Hardware accelerated direct3D graphic card with 128 MB RAM or higher
•One or more USB ports, version 1.1 or higher.
•CD-ROM drive
2.1.2 Supported Operating Systems
•Microsoft Windows® XP Professional (SP3 required)
•Microsoft Windows® XP Home Edition (SP3 required)
•Microsoft Windows® Vista family
•Microsoft Windows® 7 32-bit and 64-bit.
Windows is a registered trademark of Microsoft Corporation in the United States and other
countries.
Important: make sure you have the latest service packs and critical updates installed for the
version of Windows® that you are running.
2.1.3 Supported Noah3 Office Systems
•NOAH3 (from HIMSA)
•AuditBase System 4
•Mirage
•Practice Navigator
•Power Office
•AkuWin
•He@r-O
•Entendre 2

Titan Setup and Installation Manual Page 8
2.2 System Installation
2.2.1 Hardware Installation
2.2.1.1 Installing the Cradle
Slide off the back plate of the cradle.
Connect the printer cable to the rear of the cradle (1), power
supply (2) and USB cable (4) or optical USB cable (3 and 4).
Attach the other end of the USB cable to your PC.
Slide the back plate onto the cradle again.
Place the cradle upright on your desk.
1 2 3
4

Titan Setup and Installation Manual Page 9
Place the steel cable holder into the holes provided on
the back of the cradle.
Mount the spare battery inside the cradle.
Now the cradle is ready to be used with the Titan placed
in it.

Titan Setup and Installation Manual Page 10
2.2.1.2 Mounting a Cradle on the wall
In order to mount the cradle to the wall you will need the following tools: a drill and a screwdriver.
You may need to find out which plugs and screws are best to use depending on the material of the
wall.
Use the retaining plate of the cradle and a pencil to draw the
exact position of the 3 screw holes on the wall. Make sure that
the height is chosen in a way that you can still read the Titan
display when it is placed in its cradle.
Drill the holes and insert the plugs provided. Use three screws
to mount the retaining plate to the wall.
Put the power cable, printer cable and USB cable behind the
retaining plate. Attach these to the cradle before sliding the
cradle onto the retaining plate.
Now the spare battery and Titan can be placed in the cradle.

Titan Setup and Installation Manual Page 11
1 2
1 2 3
2.2.1.3 Cradle Indication Lights
The LEDs on the cradle indicate the following:
LED 1 will show a solid green light when the Titan is placed inside
the cradle and its battery is fully charged. LED 1 will flash green
while the battery is charging.
LED 2 will show a solid green light when the spare battery is placed
inside the cradle and is fully charged. LED 2 will flash green while
the battery is charging.
LED 3 will show a solid green light when the cradle is attached to the
mains power.
2.2.1.4 Calibration Cavities and Issues
The Titan cradle has a built-in 2cc cavity which can be used for a
quick validity check of the probe calibration. You can use the 0.2 ml,
0.5 ml, 2.0 ml and 5.0 ml cylinder cavities for more thorough checks.
To perform a calibration check, select a protocol that measures a
tympanogram.
Do not use an ear tip! Place the probe tip completely into the cavity.
Perform the measurement. Check the volume that was measured.
The allowed tolerance in the volume measurement is ± 0.1 ml for
cavities up to 2 ml and ± 5% for larger cavities. These tolerances are
applicable for all probe tone frequencies.
We strongly recommended calibrating each probe and contra phone
at least once a year. If a probe is handled roughly (e.g. dropped onto
a hard surface) it might need to be calibrated again. Calibration values
of the probe are stored in the probe itself. Therefore probes can be
exchanged at all times. The contra phone is, however, calibrated
together with the shoulder box. You should not exchange contra
phones from one shoulder box to another without calibrating.
2.2.1.5 Installing the Thermal Printer
To charge the printer battery, attach either the printer power adapter to the back of the printer (1), or use the
cable which connects the printer to the cradle (2). If Bluetooth is not available on your printer you should
charge by using the cable that attaches to the cradle (2).
The temperature of the battery pack in the
thermal printer will increase if it is powered
through both the printer’s power supply and
through the RJ12 cable to the cradle. Use either one power connection
or the other, but never both, as this may severely reduce the lifetime of
the battery.

Titan Setup and Installation Manual Page 12
2
1
2.2.1.6 Installing Paper in the Thermal Printer
To open the paper holder press down the button (1).
Place the paper roll in the paper holder with its unfastened end to the
front of the printer (as per the image to the left).
Close the lid of the paper holder.
After you switch on the printer with button 2, the printer is ready for
printing.
If you want to switch off or reset the printer: open the paper holder and
then press button 2 twice. The printer will automatically shut off when it
remains unused for 4 minutes.
2.2.1.7 Installing Bluetooth for direct printing with HP Officejet H470, HP Deskjet 6940 or
thermal printer
When the Titan is used as a hand held unit it can use Bluetooth to directly print to either a thermal printer or
to most Bluetooth PC printers. However, functionality with Bluetooth printers is only guaranteed for the HP
Officejet H470 and HP Deskjet 6940 with use of the HP Bt500 Bluetooth dongle.
In order to use Bluetooth for printing, the Titan print option needs to be setup for connecting to a printer (and
not to a PC). Find this setting by switching on Titan and pressing Protocol | My Titan | Titan… Item
Bluetooth Connection should be set to “printer”. Change the option by pressing the R or L key on the
handheld unit.

Titan Setup and Installation Manual Page 13
To install the printer connection you switch on the Titan and press Protocol | My Titan | Printer | Search.
When the search is completed, select the serial number and/or type of printer and press Select.
Note that most HP printers, according to their manuals, allow direct printing through a USB connection.
Connecting the Titan directly through USB will NOT allow you to print.
Note that the HP printers allow the use of a pin code for the use of Bluetooth. Titan will NOT be able to print
to your printer if this function is used.
More detailed information regarding hand held use of the Titan can be found in the Operation Manual
specific to the module you are licensed for.
2.2.1.8 Installing Titan and its Battery
The battery compartment is opened by gently pressing the
indentation and sliding the cover downwards.
Place the battery inside the compartment. Make sure the battery
contacts line up with the contacts inside the Titan.
Replace the cover on the Titan and push it upwards to close the
battery compartment.
If not in operation for long periods, it is recommended to remove the
battery from the Titan.

Titan Setup and Installation Manual Page 14
2.2.1.9 Charging the Battery
Please observe the following precautions:
Keep the battery fully charged.
Do not place the battery in a fire or apply heat to the battery.
Do not damage the battery or use a damaged battery.
Do not expose the battery water.
Do not short circuit the battery or reverse the polarity.
Use only the charger provided with the Titan
Please see the following section for estimated charging times.
2.2.1.10 Battery Lifetime and Charging Time
When fully charged, the Titan battery will last for a full day of testing under normal test conditions when the
default power save and power off is enabled.
Typically, the Titan can perform the following number of continuous tests for the various modules:
The figures below have been calculated taking into consideration an average test time of 1 minute per test
for IMP and DPOAE. A test time of 3 minutes has been used to calculate the number of tests that can be
performed in ABRIS.
Module Test (average test times explained above) Number of tests
IMP440
Tymp, + Reflexes ipsi and contra
200+
DPOAE440
DP-Gram Detailed
200+
ABRIS440
ABR infant screening
75
The Titan battery automatically starts charging when placed in the cradle if this is connected to mains power.
Keeping the spare battery in the cradle charging compartment means you will always have fully charged
spare battery.
Interacoustics provides a medically approved mains power supply (ASA30M-0301) to be used for charging
the Titan. A DC USB adaptor can be used to connect the Titan to the medically approved mains power
supply (ASA30M-0301) when the cradle is not in use. Then the battery in Titan is charged within the same
time frame as if it was placed in the cradle.
The Titan battery can also be charged via connection to a PC with a USB cable provided.
Testing can be performed while the Titan battery is charging.
The following table gives an estimate of the charging time (ct) in hours for the battery. Be aware that
negative numbers mean that the battery is discharging. Charge times for the spare battery in the cradle and
the battery in the Titan while placed in the cradle are the same.

Titan Setup and Installation Manual Page 15
2.2.1.11 Changing Probes and Extension Cords on the Titan
The Titan probe can be connected in four ways to the device:
1) directly to the Titan
2) using the short extension cord
3) using the long extension cord with the shoulder box (small – for OAE & IMP)
4) using the long extension cord with the PreAmp (large – for OAE/IMP & ABRIS)
Note that the length of the tubing influences the pump speed. When the probe is directly connected to the
Titan, pump speeds are about 60% higher than when it is connected via the long extension cable with either
the shoulder box or PreAmp. For the most accurate measurements it is recommended to use probe while
connected via the shoulder box or PreAmp.
To release the probe or the extension cable from the Titan,
press the button at the back of the Titan and pull the probe or
extension cord out while holding onto the base of the probe or
extension cable.
Do not pull directly on the cord of the extension cable as this
can damage the tubing connections! Do not pull directly on
the probe tip as this may cause it to break!
Connect the extension cord or probe to the Titan by lining up
the red triangles and pushing the probe or extension cable
into the connection plate.
The probe can be attached to the extension cable by lining it
up correctly and clicking the probe onto the end. .
ct through cradle
up to 80% ct through USB
(PC) up to 80% ct through cradle
up to 100% ct through USB
(PC) up to 100%
Off 1,5 3,8 2,3 5,7
On (not testing) 2,8 -32 4,1 -47

Titan Setup and Installation Manual Page 16
2.2.1.12 Connecting transducers to the shoulder box and PreAmp
You can only perform contralateral stimulation during impedance reflex measurements when the shoulder
box or PreAmp is connected to the Titan.
When using the shoulder box (for IMP/OAE), plug the jack of
the contralateral headphone, insert phone or CIR55 into the
shoulder box where it is labeled “Phones Contra”.
When using the PreAmp, all transducers (contra headphones,
TDH39, Insert EarTone 3A etc), except for the probe, are
connected via the Omnetics port (1) beside the probe
connection plate (2).
1 2
This manual suits for next models
2
Table of contents
Other Interacoustics Personal Care Product manuals