BioCut SterilCut S28 User manual

BandSaw UserManual
SterilCut S28
© 2019, BioCut, LLC
8219 W. Bradley Road
Milwaukee, Wisconsin 53223
Phone: 262-946-1052
Fax: 262-946-1056
www.biocutsystems.com

WI-108 SterilCut S28 Band Saw User Manual Revision August 27 2019 1
Copyright 2019 ©, BioCut, LLC. All rights Reserved. No part of this document may be
reproduced or transmitted in any form or by any means including: electronic,
photocopying, mechanical, or otherwise. This document may not be translated into other
languages without BioCut’s express written approval. The contents of this document are
strictly confidential and are subject to amendment or revision without notice.
8219 W. Bradley Road
Milwaukee, Wisconsin 53223
Phone: 262-946-1052
Fax: 262-946-1056
www.biocutsystems.com

WI-108 SterilCut S28 Band Saw User Manual Revision August 27 2019 2
Table of Contents
Statement of Intent............................................................................................................................................3
LIABILITY DISCLAIMER ...................................................................................................................................3
Warranty Statement...........................................................................................................................................3
Safety Symbols
...................................................................................................................................................4
Warnings...........................................................................................................................................................4
Safety Precautions ............................................................................................................................................5
Introduction........................................................................................................................................................6
Applications and Uses............................................................................................................................6
Component Identification .......................................................................................................................7
Operation ..........................................................................................................................................................8
Site Preparations
.....................................................................................................................................8
Unpacking..............................................................................................................................................8
Assembly Procedure..............................................................................................................................9
Installation of Optional Parts ................................................................................................................15
Band Saw Adjustments........................................................................................................................17
Production Operation...........................................................................................................................22
Maintenance....................................................................................................................................................23
Daily Cleaning......................................................................................................................................23
Decommissioning.................................................................................................................................23
Routine Maintenance...........................................................................................................................24
Troubleshooting...................................................................................................................................25
Shipping ..........................................................................................................................................................26
Physical Specifications....................................................................................................................................26
Utility Requirements ........................................................................................................................................26
Performance....................................................................................................................................................26
Safety Features
................................................................................................................................................27

WI-108 SterilCut S28 Band Saw User Manual Revision August 27 2019 3
Statement of Intent
THIS MANUAL CONTAINS THE INSTRUCTIONS NECESSARY TO OPERATE THE STERILCUT LINE
OF BAND SAWS SAFELY AND IN ACCORDANCE WITH ITS FUNCTION AND INTENDED USE. TO
AVOID POTENTIAL SERIOUS INJURY TO THE USER AND/OR DAMAGE TO THIS DEVICE, THE USER
MUST READ THIS OPERATING MANUAL THOROUGHLY AND BE FAMILIAR WITH ITS CONTENTS
PRIOR TO USING THIS EQUIPMENT. THE ILLUSTRATIONS IN THIS MANUAL ARE FOR EXAMPLE
PURPOSES AND MAY NOT REFLECT THE EXACT SETUP OF YOUR PRODUCT.
LIABILITY DISCLAIMER
Purchaser assumes all liability for unsafe operation of the SterilCut line of Band Saws. Misuse of this machine
may result in damage to the machine or cause injury or death to the operator. BioCut is not liable for death,
injuries to persons or property, or incidental, consequential, contingent or special damages arising from the
use of the product.
Warranty Statement
The Warranty for the SterilCut line of Band Saws is provided in the Master Agreement Terms and Conditions
and nothing in this document alters the stated warranty. THERE ARE NO IMPLIED WARRANTIES OF
MERCHANTABILITY AND FITNESS FOR A PARTICULAR PURPOSE. THE TERMS SHALL BE LIMITED
IN DURATION TO THE APPLICABLE PERIOD OF WARRANTY SET FORTH ON THIS PAGE. THE
PURCHASER’S ONLY REMEDIES IN CONNECTION WITH THE BREACH OR PERFORMANCE OF ANY
WARRANTY ON BIOCUT ARE THOSE SET FORTH IN THE MASTER AGREEMENT. IN NO EVENT WILL
BIOCUT, OR ANY COMPANY AFFILIATED WITH BIOCUT, BE LIABLE FOR INCIDENTAL OR
CONSEQUENTIAL DAMAGES
Please note that maintenance and cleaning of this product must be carried out by a trained and qualified
individual. The failure to do so will void the product warranty.

WI-108 SterilCut S28 Band Saw User Manual Revision August 27 2019 4
Safety Symbols
PROHIBITED: This symbol indicates an action that is strictly prohibited. The
prohibited action should never be carried out, under any circumstances.
CAUTION: This symbol indicates a warning or precaution related to safety.
Please read and understand the text and use the equipment safely.
ACTION: This symbol indicates instruction that requires an action. Please follow
the instructions carefully.
IMPORTANT: This symbol indicates that review of the following instructions is
required.
Warnings
WHEN UNIT IS RECEIVING POWER, THE BLADE CAN RUN: Never place any
body part on or near the SterilCut S28 blade while the unit is plugged in. Doing
so may result in injury or death.
PROHIBITED: Always unplug the SterilCut S28 before disassembly, changing
blades, or performing maintenance, cleaning or repair.
PROHIBITED: Never attempt to operate the SterilCut S28 if any part of the
system has been damaged.
WARNING: The SterilCut S28 may be operated by trained and experienced
personnel only. If you are not familiar with the safe operation of the SterilCut S28,
do not use until proper training has been completed.
PROHIBITED: Do not operate machine without blade guard and lower catch tray
in place.
PROHIBITED: Do not use the SterilCut S28 for any other purpose than it’s
intended use.
PROHIBITED: Do not operate the SterilCut S28 with loose or baggy clothing.
Confine long hair. Non-slip footwear or anti-skid flooring are recommended.

WI-108 SterilCut S28 Band Saw User Manual Revision August 27 2019 5
Safety Precautions
CAUTION: Read and understand all instructions before uncrating,
commissioning and operating the SterilCut S28.
CAUTION: Ensure that the Foot Pedal(s) is not depressed before plugging in the
SterilCut S28.
CAUTION: Wear ANSI or CE approved safety glasses or face shield while
operating the SterilCut S28. Always wear proper cut resistant gloves while
operating the SterilCut S28.
CAUTION: Only use GFCI circuitry with the SterilCut S28.
CAUTION: Only use BioCut approved replacement parts.
CAUTION: When operating the SterilCut S28 always maintain a balanced stance
so you do not fall into the blade. Do not use excessive force when operating. Do
not overreach into the cutting area.
CAUTION: Keep hands out of the line of the saw blade. Maintain a safe distance
from the saw blade when operating. Use a push stick when required. Do not reach
around or over the saw blade.
CAUTION: Remove loose items, tools, and unnecessary material from the work
area before operating the SterilCut S28.
Introduction

WI-108 SterilCut S28 Band Saw User Manual Revision August 27 2019 6
The SterilCut line of Band Saws has been designed to be clean room compatible. The removable and
interchangeable parts of the SterilCut line of Band Saws aid in the cleaning and assembly processes. Minimal
controls simplify the operation of the Band Saw. A foot pedal is used to start and stop the saw. Applying pressure
on the foot pedal starts the saw and releasing pressure allows for a quick stop of the saw’s rotation (via motor
assisted breaking). Additionally, an optional start/stop push button can be included, which reduces the risk of
bodily injury.
Applications and Uses
Applications include:
Medical Device PartCutting
Human or Animal Bone Cutting/Sawing
Wet or Dry Material Cutting
Introduction

WI-108 SterilCut S28 Band Saw User Manual Revision August 27 2019 7
Component Identification
ITEM NO.
PART NUMBER
DESCRIPTION
QTY.
1
S11834
PLATE, BLADE HOUSING FIXTURE, BS
1
2
S11793
HOUSING, BLADE, BS
1
3
S11794
ECCENTRIC, BS
1
4
S11829
BAR, GUIDE, BS
1
5
S11796
WHEEL, TENSION, BS
1
6
S11795
WHEEL, DRIVE, BS
1
7
S11949
CARRIER, BS
1
8
S11956
COVER, BLADE HOUSING RH, BS
1
9
S11824
MOUNT, GUIDE, BS
1
10
S12025
TRAY, CATCH, BS
1
11
S11872
GUARD, BLADE, BS
1
12
S11833
PLATE, TABLE, BS
2
13
S11823
TABLE, BS
1
14
P10973
INSERT, TABLE, BS
1
15
H10510
BEARING, BS
4
16
P10974
SCRAPER, BS
1
17
S11828
HUB, DRIVE SHAFT, BS
1

WI-108 SterilCut S28 Band Saw User Manual Revision August 27 2019 8
Site Preparations
Consideration should be given to the location where the SterilCut S28 is to be installed. Avoid uneven or
unstable locations as well as high traffic areas. Provide enough space around the Band Saw to allow
adequate access for maintenance and repair.
Unpacking
Before unpacking, examine the packing case carefully for signs of damage. If any damage is detected,
contact the carrier. If the packing case is intact, remove the shipping enclosure. The SterilCut S28 may
come in more than one packaging unit.
The following recommendations are for all units that have been shipped:
Before transporting the SterilCut S28 to the installation site, remove all shipping enclosures to gain
access to safe lifting locations. Leave all wrappings on the SterilCut S28 until it is in the final position, this
avoids scratches and damage to the external facade.
Ensure that there is a clear path to move the SterilCut S28 from the shipping dock to the final installation
site. The SterilCut S28 weighs approximately 155 pounds and will require proper lifting techniques.
Once the SterilCut S28 has been moved to its proper position, ensure the stability of the device on the
platform that it will be used on. Contact BioCut for custom table options.
Remove the wrappings covering the stainless steel base and corresponding parts.
CAUTION: Read all instructions before uncrating, commissioning and operating
the SterilCut S28.
ATTENTION Before moving or installing the SterilCut S28, those responsible must read the
Introduction and Installation sections of this manual.
Operation

WI-108 SterilCut S28 Band Saw User Manual Revision August 27 2019 9
Assembly Procedure
1. Ensure all SterilCut S28 components are accounted for and cleaned before assembly. (Per Bill of Materials,
Pg. 7)
2. Locate the Table on the Motor Housing using the Table Plate and engage by sliding forward on the screw
shoulders.
3. Place Table Insert into locating hole in table.
4. Bring the Blade Housing to its position on the Blade Housing Fixture Plate and lock it in by maneuvering up
and to the right. This allows the Blade Housing to rest on the shoulder screws of the Blade Housing Fixture
Plate.
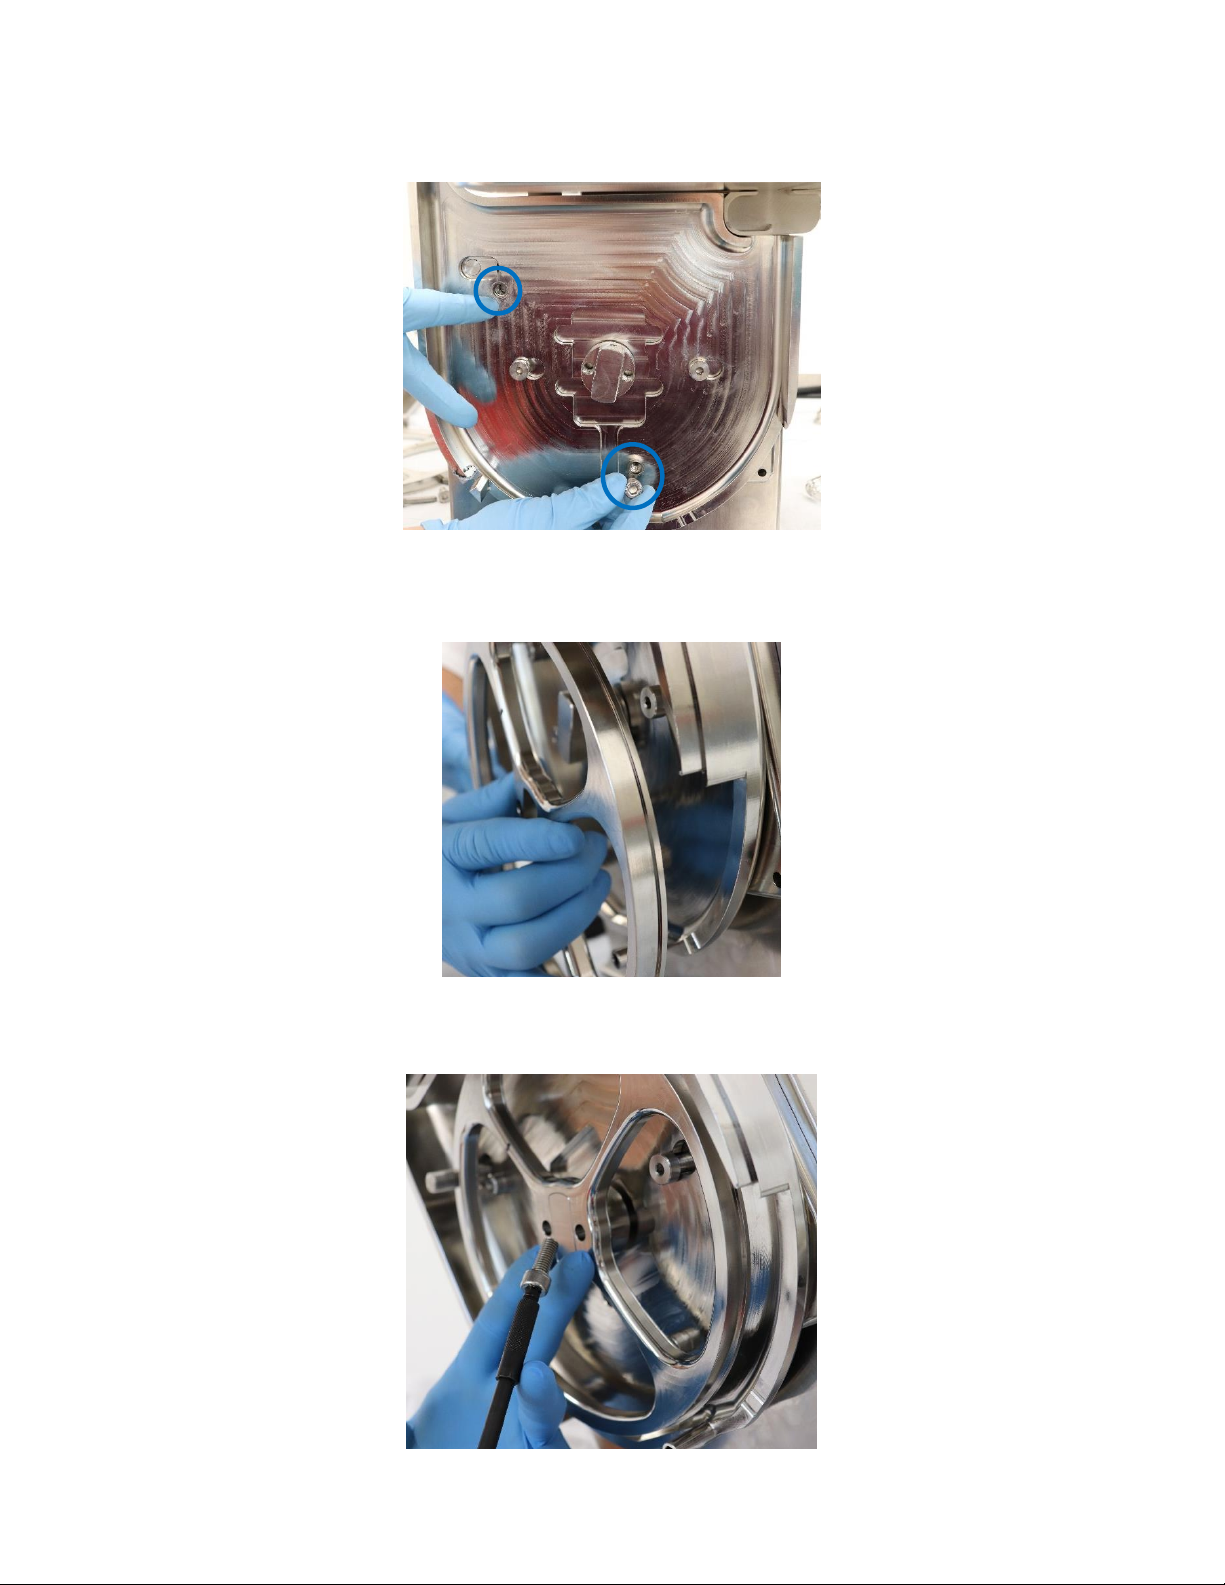
WI-108 SterilCut S28 Band Saw User Manual Revision August 27 2019 10
5. Secure the Blade Housing by using a 6mm hex wrench to tighten 2 Socket Head Cap Screws in the locations
portrayed below (torque to minimum of 130 in-lbs).
6. Place the Drive Wheel into the bottom of the Blade Housing, locking it in on the Drive Shaft Hub. Ensure Drive
Wheel flange is closest to the Motor Housing.
7. Secure the Drive Wheel using a 6mm hex wrench to tighten 2 Socket Head Cap Screws in the locations
portrayed (torque to minimum of 130 in-lbs).

WI-108 SterilCut S28 Band Saw User Manual Revision August 27 2019 11
8. Install Blade Guide by inserting the two pins into the designated holes and sliding the bottom pin down into
place. Tighten hand knob to lock Blade Guide/Guard into place. For adjusting Blade Guide/Guard see “Setting
Blade Guide/Guard Height” (Pg. 17)
9. Insert the Tension Wheel carrier into the top of the Blade Housing. Ensure threaded hole on the Carrier is
pointed to the top of the Blade Housing.
10. Add in the Tensioning Screw through the top of the Blade Housing, and slide Carrier up to threaded
component. Rotate two to three turns clockwise to hold Carrier in position.
WI-108 SterilCut S28 Band Saw User Manual Revision August 27 2019 12
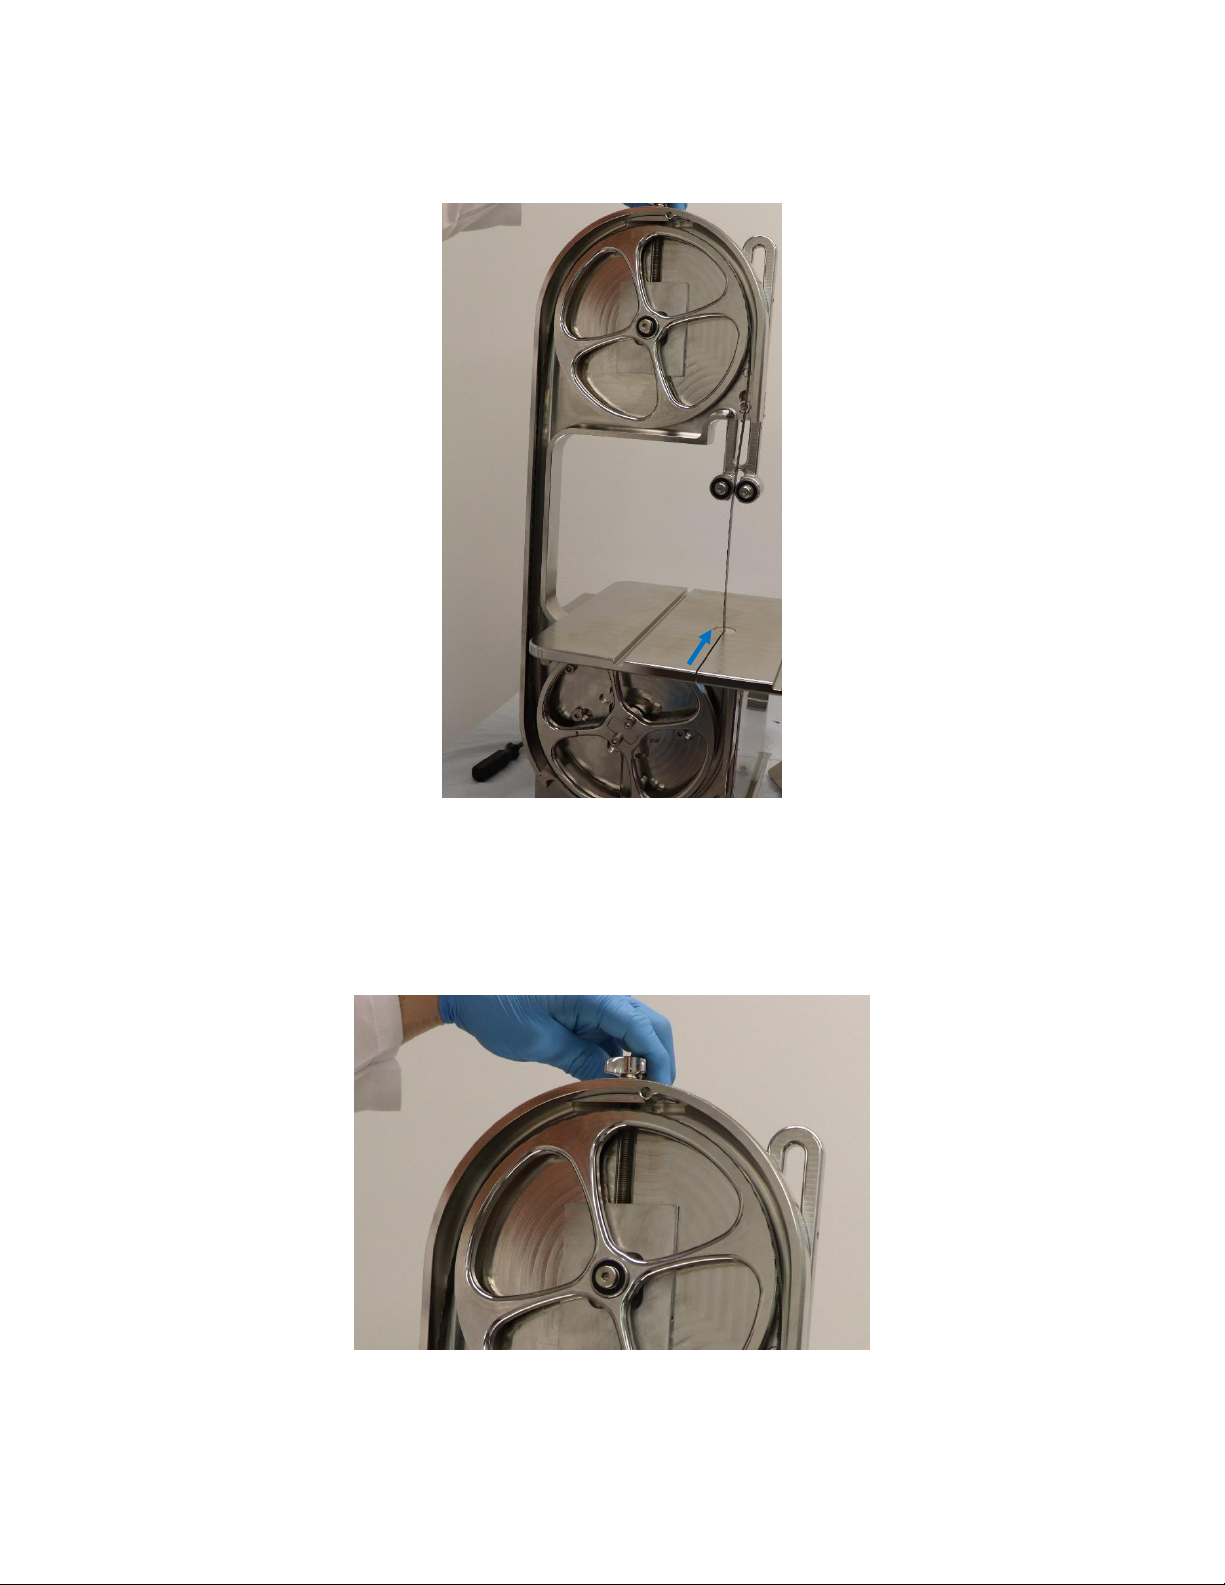
11. Insert the blade through the slot in the Table and position on top of the Tension Wheel and beneath the Drive
Wheel.
12. Rotate Tension Knob clockwise to apply a light tension on the blade. Rotate Drive Wheel by hand to test
blade tracking. If blade is not tracking properly reference “Adjusting Blade Tracking” (Pg. 18). Ensure blade
Guide Bearings are properly adjusted for blade thickness, .010” to .030” clearance between bearings and
blade. IF Blade Guide Bearings need adjustment reference “Adjusting Blade Guide Bearing Width” (Pg. 19)

WI-108 SterilCut S28 Band Saw User Manual Revision August 27 2019 13
13. Place Scraper into designated slot in lower part of the Blade Housing, ensure flanged end is inserted first.
14. Install Catch Tray using the two 2-inch quick connect fasteners (the longer fasteners). Ensure quick connect
fasteners are locked by tugging lightly on the handles.

WI-108 SterilCut S28 Band Saw User Manual Revision August 27 2019 14
15. Place the Blade Housing Cover, in its location and attach with quick connect fasteners. Rotate quick connect
fasteners until they lock into position. Ensure quick connect fasteners are locked by tugging lightly on
the handles.
16. Install Blade Guide Guard using the two Knurled Knobs
17. If not already installed, insert pneumatic tube of Foot Pedal into Push To Connect fitting on rear of the Motor
Housing.
CAUTION: Only use GFCI Circuitry with the SterilCut S28.

WI-108 SterilCut S28 Band Saw User Manual Revision August 27 2019 15
Installation of Optional Parts
Fence: To assist in making parallel cuts
Miter Gauge: To guide material perpendicular to blade

WI-108 SterilCut S28 Band Saw User Manual Revision August 27 2019 16
Miter Slot Fillers: To provide a smooth tabletop for scroll cutting
WI-108 SterilCut S28 Band Saw User Manual Revision August 27 2019 17
Band Saw Adjustments
PROHIBITED: Always unplug the SterilCut S28 before disassembly, changing
blades, or performing maintenance, cleaning or repair.
PROHIBITED: Do not operate machine without Blade Guard and Lower Catch
tray in place.
Setting Blade Guide/Guard Height
1. Adjust Blade Guide / Guard to a max of .5” above material to be cut. (this reduces the amount of exposed
blade and provides a safer operating condition).
2. Loosen back nut and vertically move the Blade Guide / Guard Height.
3. Move the Blade Guide / Guard until it is approximately .5” above the material.
4. Tighten the nut on the back of the Blade Guide / Guard.
TEST MATERIAL: Prior to operating SterilCut S28 for the first time, test a material
similar in thickness and cutting resistance to adjust cutting height.

WI-108 SterilCut S28 Band Saw User Manual Revision August 27 2019 18
Adjusting Blade Tracking
1. Ensure blade is lightly tensioned. Use the Tension Knob to adjust if necessary.
2. Using a 6mm hex wrench, loosen the lower Socket Head Cap Screw on the Carrier two to three turns.
3. While rotating Drive Wheel by hand, adjust the upper Socket Head Cap Screw in the Carrier until blade tracks
properly. Clockwise rotation of upper screw will adjust blade back. Counterclockwise rotation of upper screw
will adjust blade forward. Blade should track against flange of Tension Wheel.
4. Lock in the blade tracking adjustment by tightening the lower Socket Head Cap Screw of the Carrier to a hand
tight torque.
5. Adjust Tension Knob to achieve proper blade tension. Do not overtighten.

WI-108 SterilCut S28 Band Saw User Manual Revision August 27 2019 19
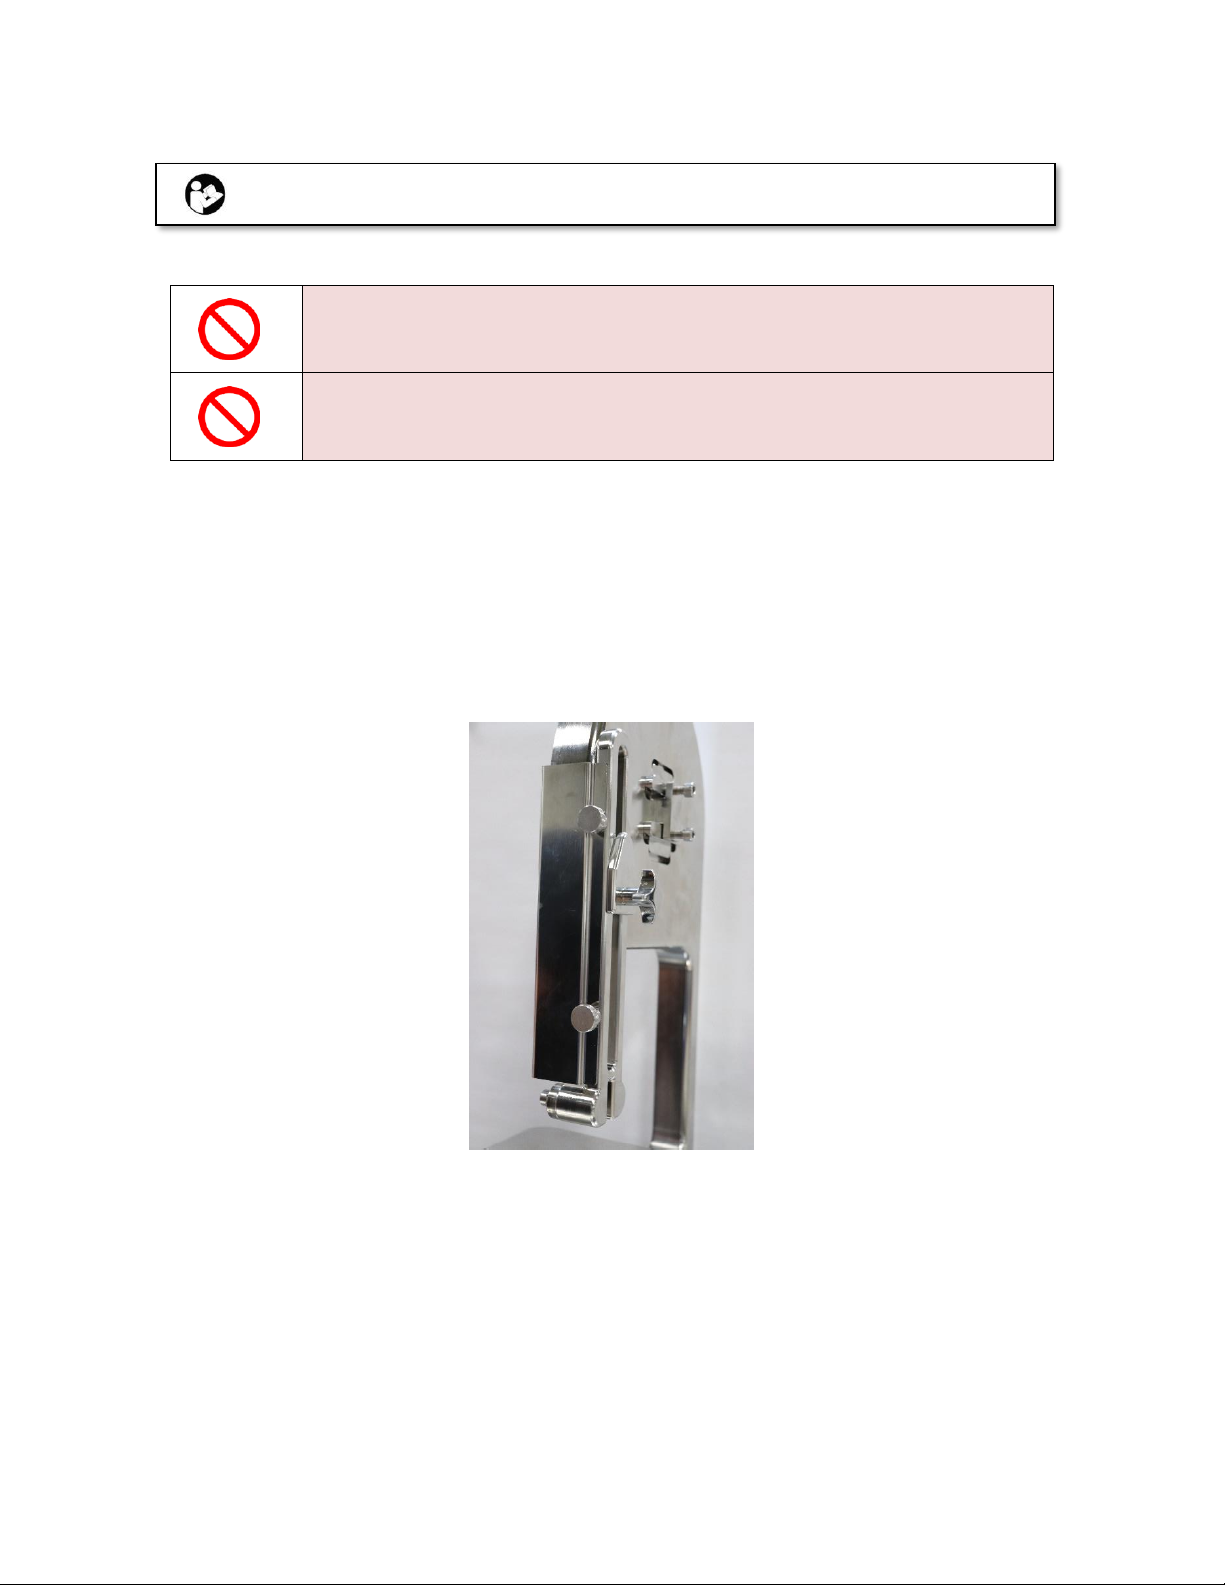
Adjusting Blade Guide Bering Width
1. Ensure blade is tensioned properly. Use the Tension Knob to adjust if necessary.
2. Loosen the Lock Shoulder Screw using a 4mm hex wrench.
3. Rotate Eccentric Nut using a 13mm open end wrench to properly adjust blade guide bearing clearance to
have .010” to .030” gap between blade. (Do not adjust bearings to be tight on the blade)
4. While holding Eccentric Nut in desired position using a 13mm wrench, tighten the Lock Shoulder Screw to set
Eccentric Nut spacing.
Table of contents


